Raspberry Pi Pico - Button - LED
This guide shows you how to control an LED using a Raspberry Pi Pico and a button. We will explore two methods to achieve this.
Application 1 - The LED matches the button's status:
Application 2 - Each time you press the button, the LED switches its state.
When the Raspberry Pi Pico notices the button is pressed (changing from HIGH to LOW), it will switch the LED on if it's off, or switch it off if it's on. The LED does not change state when the button is released.
For Application 2, it is necessary to debounce the button to ensure it functions properly. We will understand its importance by observing the behavior of the LED with and without debouncing in the Raspberry Pi Pico code.
Or you can buy the following kits:
Disclosure: Some of the links provided in this section are Amazon affiliate links. We may receive a commission for any purchases made through these links at no additional cost to you.
Additionally, some of these links are for products from our own brand,
DIYables .
Buy Note: Use the LED Module for easier wiring. It includes an integrated resistor.
If you need help understanding LED and button (including how they are arranged, how they work, and how to program them), the tutorials below may be useful:
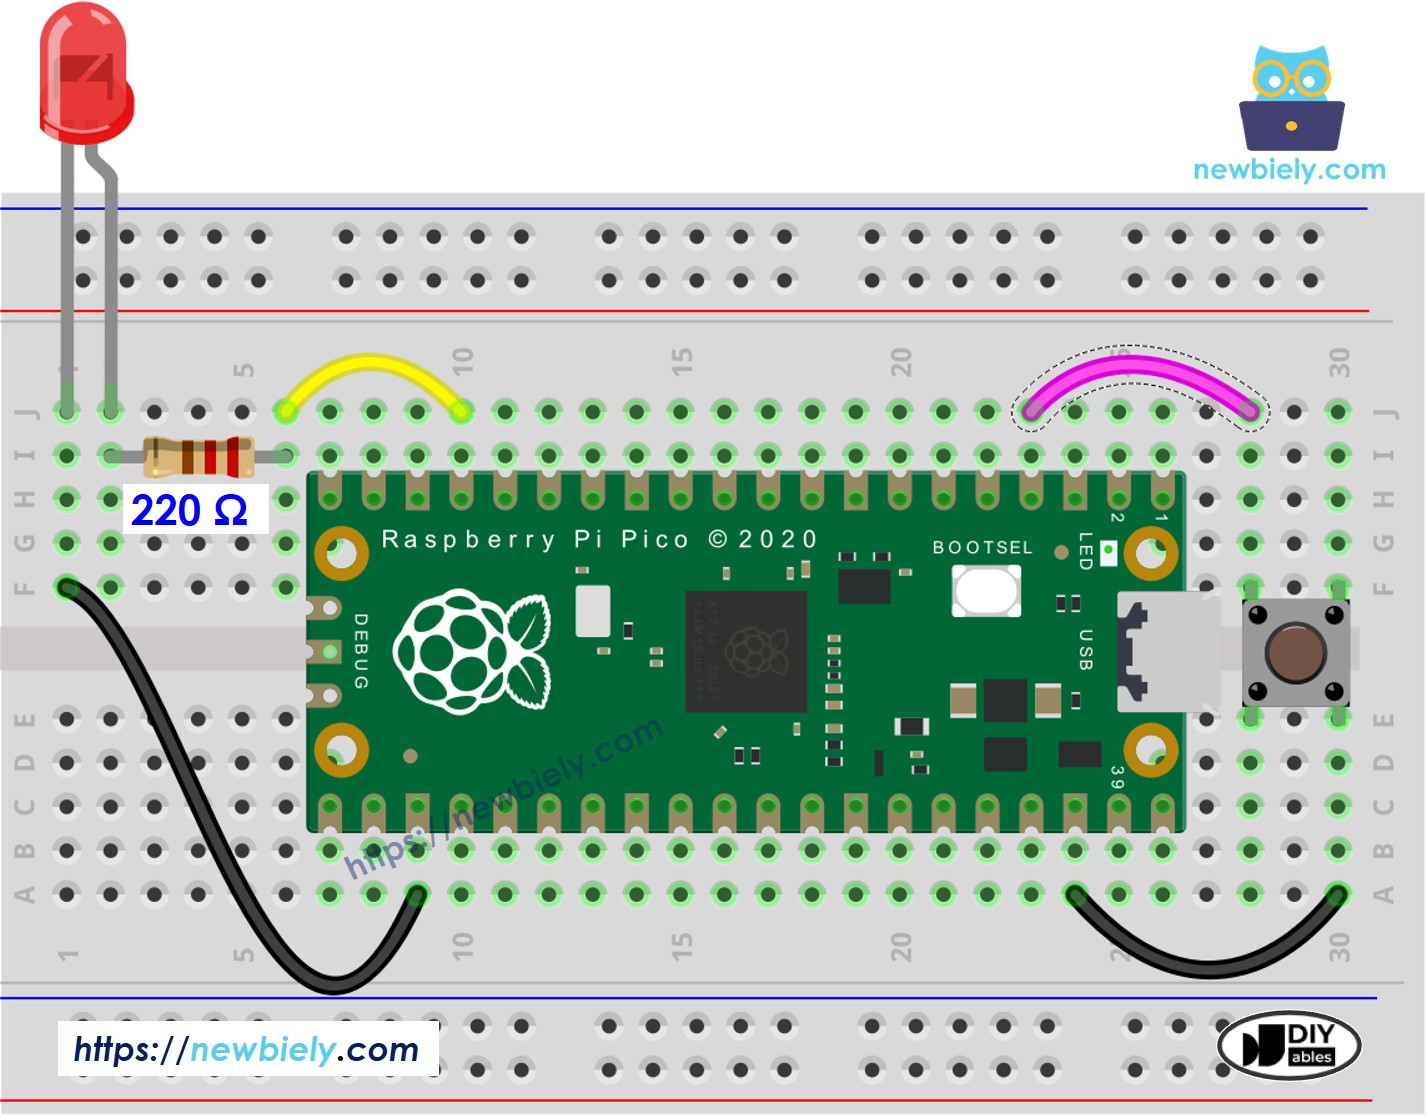
This image is created using Fritzing. Click to enlarge image
from machine import Pin
import time
BUTTON_PIN = 2
LED_PIN = 13
button = Pin(BUTTON_PIN, Pin.IN, Pin.PULL_UP)
led = Pin(LED_PIN, Pin.OUT)
while True:
button_state = button.value()
if button_state == 0:
print("The button is being pressed")
led.value(1)
else:
print("The button is unpressed")
led.value(0)
time.sleep(0.1)
Please follow these instructions step by step:
Ensure that Thonny IDE is installed on your computer.
Ensure that MicroPython firmware is installed on your Raspberry Pi Pico.
Wire the components according to the provided diagram.
Connect the Raspberry Pi Pico to your computer using a USB cable.
Launch the Thonny IDE on your computer.
On Thonny IDE, select MicroPython (Raspberry Pi Pico) Interpreter by navigating to Tools Options.
In the Interpreter tab, select MicroPython (Raspberry Pi Pico) from the drop-down menu.
Ensure the correct port is selected. Thonny IDE should automatically detect the port, but you may need to select it manually (e.g., COM3 on Windows or /dev/ttyACM0 on Linux).
Copy the above code and paste it to the Thonny IDE's editor.
Save the script to your Raspberry Pi Pico by:
Click the Save button, or use Ctrl+S keys.
In the save dialog, you will see two sections: This computer and Raspberry Pi Pico. Select Raspberry Pi Pico
Save the file as main.py
Click the green Run button (or press F5) to run the script. The script will execute.
Press the button and hold it for a few seconds.
Check out the message in the Shell at the bottom of Thonny.
Observe the change in the LED's status.
The LED status matches the button status.
If you name your script main.py and save it to the root directory of the Raspberry Pi Pico, it will automatically run each time the Pico is powered on or reset. This is useful for standalone applications that need to start running immediately upon power-up. If you name your script another name other than main.py, you will need to manually run it from Thonnys's Shell.
Read the detailed explanations in the source code's comments for each line!
from machine import Pin
import time
BUTTON_PIN = 2
LED_PIN = 13
button = Pin(BUTTON_PIN, Pin.IN, Pin.PULL_UP)
led = Pin(LED_PIN, Pin.OUT)
led_state = 0
button_state = button.value()
prev_button_state = button_state
while True:
prev_button_state = button_state
button_state = button.value()
if prev_button_state == 1 and button_state == 0:
print("The button is pressed")
led_state = not led_state
led.value(led_state)
time.sleep(0.1)
Copy the code and open it in Thonny IDE.
Upload the code to the Raspberry Pi Pico.
Press and release the button multiple times.
Observe how the LED's state changes.
Each time you press the button, the LED state changes once.
You can find the explanation in the comments of the above Raspberry Pi Pico code.
In the code, led_state = not led_state does the same thing as this code:
if led_state == 1:
led_state = 0
else:
led_state = 1
