Raspberry Pi Pico - Traffic Light
In this guide, we will show you how to manage a traffic light module with Raspberry Pi Pico. We will discuss:
- Connecting a traffic light module to Raspberry Pi Pico
- Programming a Raspberry Pi Pico to Control a traffic light module
- Programming a Raspberry Pi Pico to Control a traffic light module without using the time.sleep() function
Hardware Preparation
| 1 | × | Raspberry Pi Pico W | |
| 1 | × | Raspberry Pi Pico Alternatively, | |
| 1 | × | Micro USB Cable | |
| 1 | × | Traffic Light Module | |
| 1 | × | Jumper Wires | |
| 1 | × | Breadboard | |
| 1 | × | Recommended: Screw Terminal Expansion Board for Raspberry Pi Pico |
Or you can buy the following kits:
| 1 | × | DIYables Sensor Kit (18 sensors/displays) |
Disclosure: Some of the links provided in this section are Amazon affiliate links. We may receive a commission for any purchases made through these links at no additional cost to you.
Additionally, some of these links are for products from our own brand, DIYables .
Additionally, some of these links are for products from our own brand, DIYables .
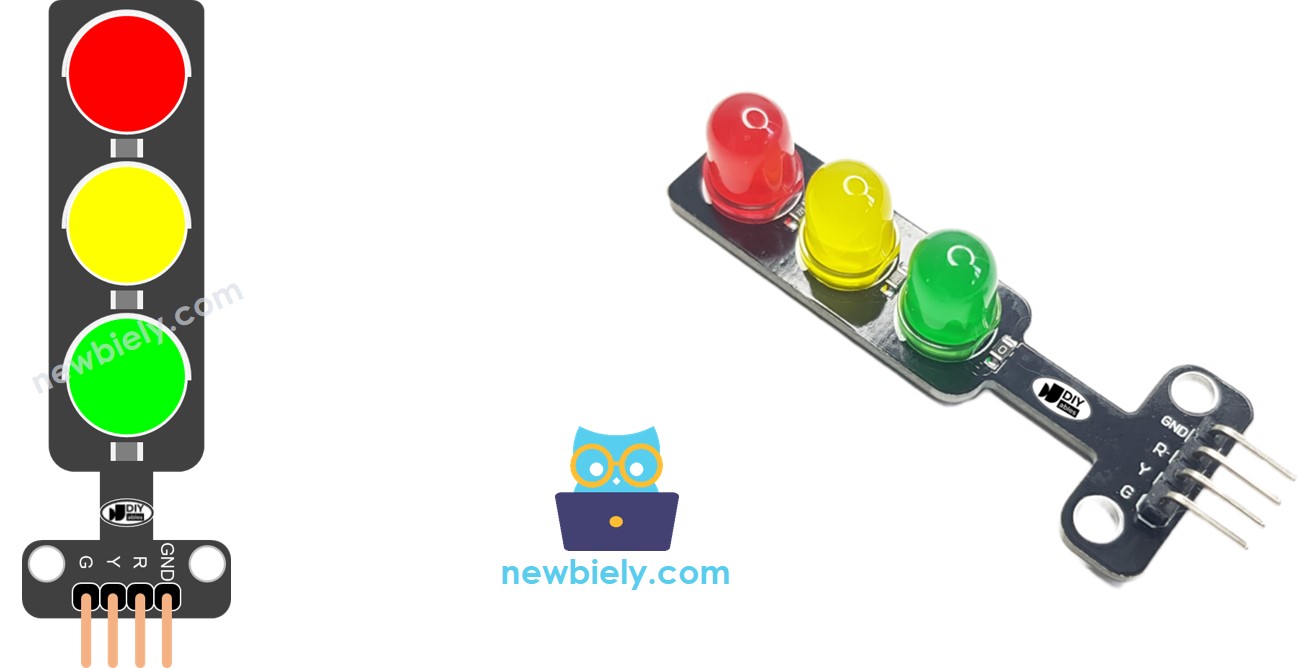
Overview of Traffic Light Module
Pinout
The traffic light module has four pins.
- GND pin: Connect this ground pin to the Raspberry Pi Pico's GND.
- R pin: This pin operates the red light. Attach it to a digital output on the Raspberry Pi Pico.
- Y pin: This pin operates the yellow light. Attach it to a digital output on the Raspberry Pi Pico.
- G pin: This pin operates the green light. Attach it to a digital output on the Raspberry Pi Pico.
How It Works
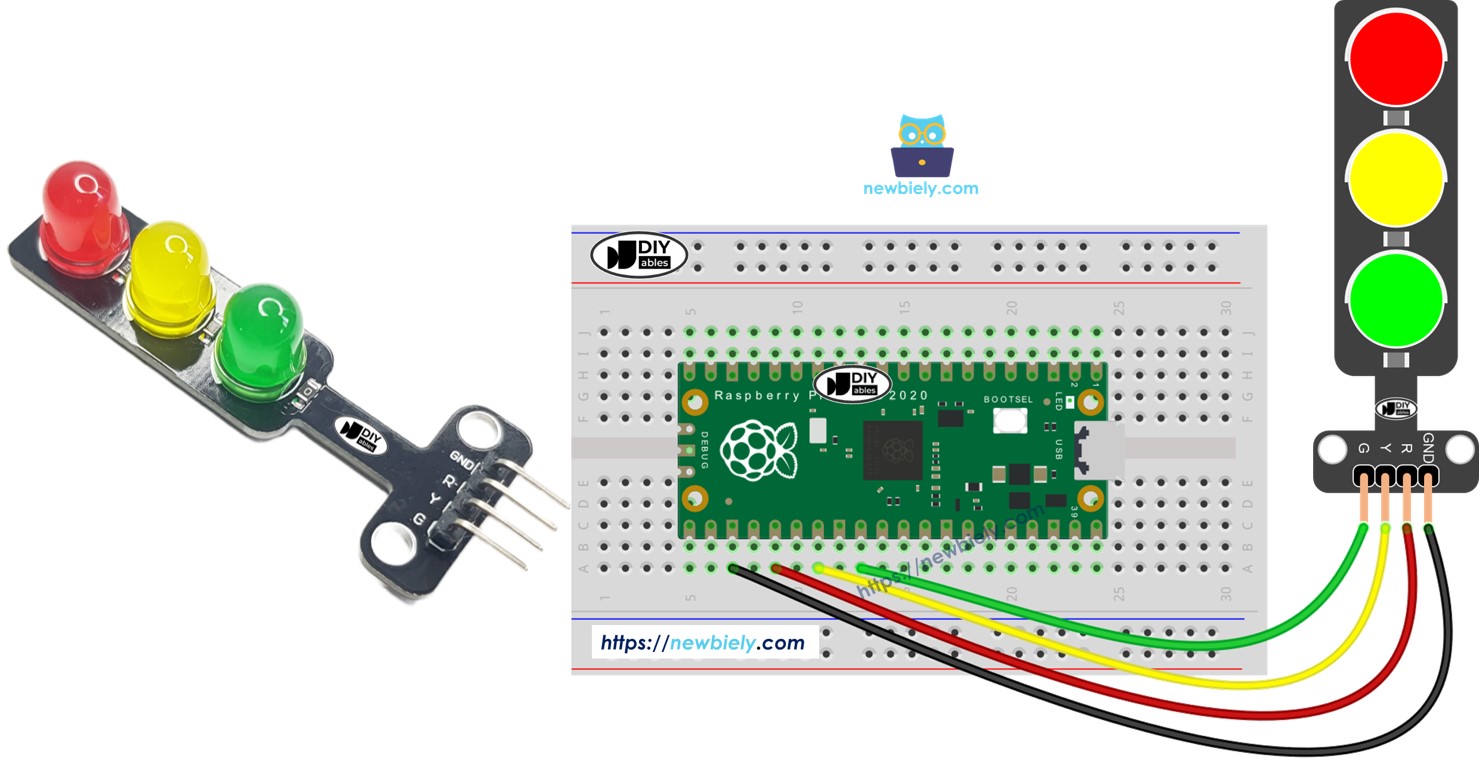
Wiring Diagram
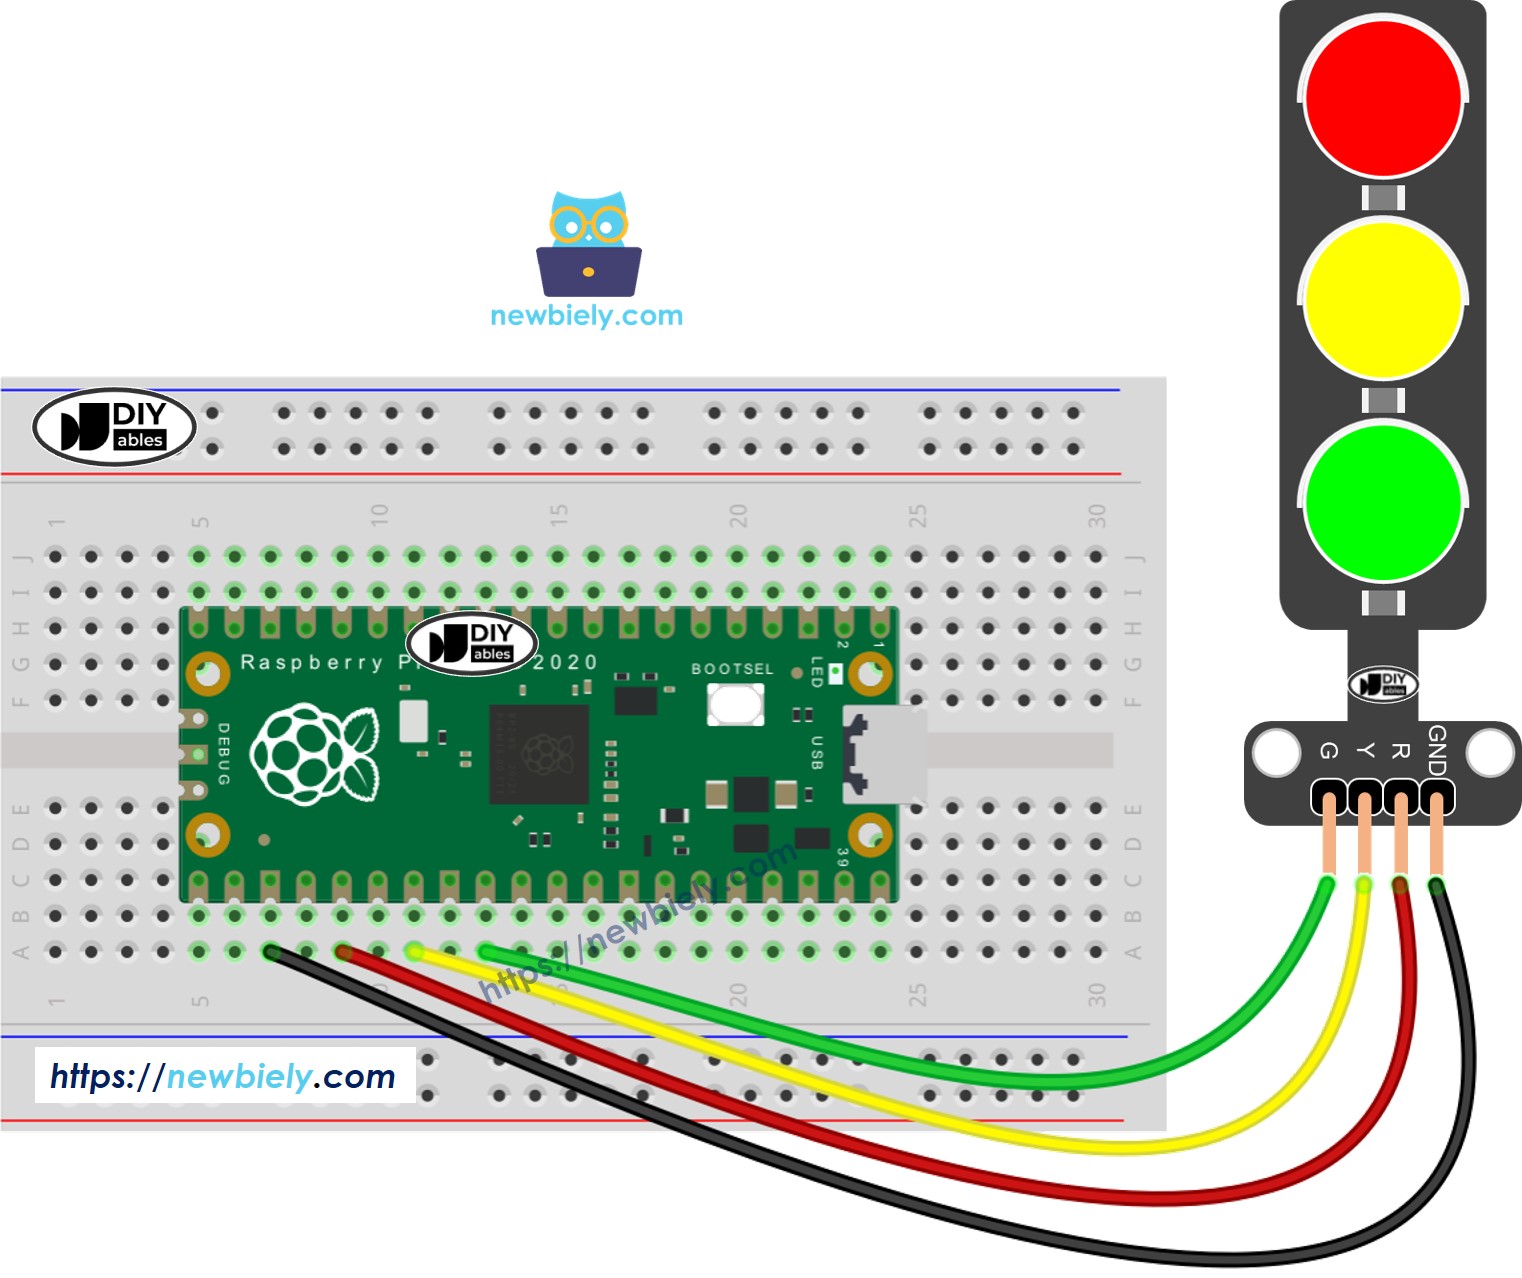
This image is created using Fritzing. Click to enlarge image
Raspberry Pi Pico Code
"""
This Raspberry Pi Pico MicroPython code was developed by newbiely.com
This Raspberry Pi Pico code is made available for public use without any restriction
For comprehensive instructions and wiring diagrams, please visit:
https://newbiely.com/tutorials/raspberry-pico/raspberry-pi-pico-traffic-light
"""
import machine
import time
# Define pin numbers (you can change these to match your wiring)
PIN_RED = 19 # GPIO19 on Raspberry Pi Pico
PIN_YELLOW = 21 # GPIO21 on Raspberry Pi Pico
PIN_GREEN = 22 # GPIO22 on Raspberry Pi Pico
# Define times in seconds (MicroPython uses seconds for time.sleep)
RED_TIME = 4 # RED time in seconds
YELLOW_TIME = 4 # YELLOW time in seconds
GREEN_TIME = 4 # GREEN time in seconds
# Setup pins as output
red = machine.Pin(PIN_RED, machine.Pin.OUT)
yellow = machine.Pin(PIN_YELLOW, machine.Pin.OUT)
green = machine.Pin(PIN_GREEN, machine.Pin.OUT)
# Main loop
while True:
# Red light on
red.value(1) # turn on red
yellow.value(0) # turn off yellow
green.value(0) # turn off green
time.sleep(RED_TIME) # keep red light on for the defined period
# Yellow light on
red.value(0) # turn off red
yellow.value(1) # turn on yellow
green.value(0) # turn off green
time.sleep(YELLOW_TIME) # keep yellow light on for the defined period
# Green light on
red.value(0) # turn off red
yellow.value(0) # turn off yellow
green.value(1) # turn on green
time.sleep(GREEN_TIME) # keep green light on for the defined period
Detailed Instructions
Please follow these instructions step by step:
- Ensure that Thonny IDE is installed on your computer.
- Ensure that MicroPython firmware is installed on your Raspberry Pi Pico.
- If this is your first time using a Raspberry Pico, refer to the Raspberry Pi Pico - Getting Started tutorial for detailed instructions.
- Connect the Raspberry Pi Pico to the traffic light module according to the provided diagram.
- Connect the Raspberry Pi Pico to your computer using a USB cable.
- Launch the Thonny IDE on your computer.
- On Thonny IDE, select MicroPython (Raspberry Pi Pico) Interpreter by navigating to Tools Options.
- In the Interpreter tab, select MicroPython (Raspberry Pi Pico) from the drop-down menu.
- Ensure the correct port is selected. Thonny IDE should automatically detect the port, but you may need to select it manually (e.g., COM3 on Windows or /dev/ttyACM0 on Linux).
- Copy the above code and paste it to the Thonny IDE's editor.
- Save the script to your Raspberry Pi Pico by:
- Click the Save button, or use Ctrl+S keys.
- In the save dialog, you will see two sections: This computer and Raspberry Pi Pico. Select Raspberry Pi Pico
- Save the file as main.py
- Click the green Run button (or press F5) to run the script. The script will execute.
- Check out the traffic light status.
Traffic lights function in various ways, depending on their design in each location. Here is a simple explanation of how traffic lights manage traffic.
The code shown above allows you to control each light individually. Now, we will enhance the code to make it works more effectively.
Raspberry Pi Pico Code Optimization
- Let's improve the code by creating a function to manage the light.
"""
This Raspberry Pi Pico MicroPython code was developed by newbiely.com
This Raspberry Pi Pico code is made available for public use without any restriction
For comprehensive instructions and wiring diagrams, please visit:
https://newbiely.com/tutorials/raspberry-pico/raspberry-pi-pico-traffic-light
"""
import machine
import time
# Define pin numbers (you can change these to match your wiring)
PIN_RED = 19 # GPIO19 on Raspberry Pi Pico
PIN_YELLOW = 21 # GPIO21 on Raspberry Pi Pico
PIN_GREEN = 22 # GPIO22 on Raspberry Pi Pico
# Define times in seconds (MicroPython uses seconds for time.sleep)
RED_TIME = 2 # RED time in seconds
YELLOW_TIME = 1 # YELLOW time in seconds
GREEN_TIME = 2 # GREEN time in seconds
# Define indexes
RED = 0
YELLOW = 1
GREEN = 2
# Setup pins as output and store them in a list
pins = [
machine.Pin(PIN_RED, machine.Pin.OUT),
machine.Pin(PIN_YELLOW, machine.Pin.OUT),
machine.Pin(PIN_GREEN, machine.Pin.OUT)
]
# Define the times array
times = [RED_TIME, YELLOW_TIME, GREEN_TIME]
def trafic_light_on(light):
for i in range(RED, GREEN + 1):
if i == light:
pins[i].value(1) # turn on
else:
pins[i].value(0) # turn off
# Main loop
while True:
# Red light on
trafic_light_on(RED)
time.sleep(times[RED]) # keep red light on during a period of time
# Yellow light on
trafic_light_on(YELLOW)
time.sleep(times[YELLOW]) # keep yellow light on during a period of time
# Green light on
trafic_light_on(GREEN)
time.sleep(times[GREEN]) # keep green light on during a period of time
- We can improve the code by using a for loop.
"""
This Raspberry Pi Pico MicroPython code was developed by newbiely.com
This Raspberry Pi Pico code is made available for public use without any restriction
For comprehensive instructions and wiring diagrams, please visit:
https://newbiely.com/tutorials/raspberry-pico/raspberry-pi-pico-traffic-light
"""
import machine
import time
# Define pin numbers (you can change these to match your wiring)
PIN_RED = 19 # GPIO19 on Raspberry Pi Pico
PIN_YELLOW = 21 # GPIO21 on Raspberry Pi Pico
PIN_GREEN = 22 # GPIO22 on Raspberry Pi Pico
# Define times in milliseconds (MicroPython can handle time in milliseconds with time.sleep_ms)
RED_TIME = 2000 # RED time in milliseconds
YELLOW_TIME = 1000 # YELLOW time in milliseconds
GREEN_TIME = 2000 # GREEN time in milliseconds
# Define indexes
RED = 0
YELLOW = 1
GREEN = 2
# Setup pins as output and store them in a list
pins = [
machine.Pin(PIN_RED, machine.Pin.OUT),
machine.Pin(PIN_YELLOW, machine.Pin.OUT),
machine.Pin(PIN_GREEN, machine.Pin.OUT)
]
# Define the times array
times = [RED_TIME, YELLOW_TIME, GREEN_TIME]
def trafic_light_on(light):
for i in range(RED, GREEN + 1):
if i == light:
pins[i].value(1) # turn on
else:
pins[i].value(0) # turn off
# Main loop
while True:
for light in range(RED, GREEN + 1):
trafic_light_on(light)
time.sleep_ms(times[light]) # keep light on during a period of time
- Let's improve the code by using the millis() function instead of time.sleep().
"""
This Raspberry Pi Pico MicroPython code was developed by newbiely.com
This Raspberry Pi Pico code is made available for public use without any restriction
For comprehensive instructions and wiring diagrams, please visit:
https://newbiely.com/tutorials/raspberry-pico/raspberry-pi-pico-traffic-light
"""
import machine
import time
# Define pin numbers (you can change these to match your wiring)
PIN_RED = 19 # GPIO19 on Raspberry Pi Pico
PIN_YELLOW = 21 # GPIO21 on Raspberry Pi Pico
PIN_GREEN = 22 # GPIO22 on Raspberry Pi Pico
# Define times in milliseconds (MicroPython can handle time in milliseconds with time.sleep_ms)
RED_TIME = 2000 # RED time in milliseconds
YELLOW_TIME = 1000 # YELLOW time in milliseconds
GREEN_TIME = 2000 # GREEN time in milliseconds
# Define indexes
RED = 0
YELLOW = 1
GREEN = 2
# Setup pins as output and store them in a list
pins = [
machine.Pin(PIN_RED, machine.Pin.OUT),
machine.Pin(PIN_YELLOW, machine.Pin.OUT),
machine.Pin(PIN_GREEN, machine.Pin.OUT)
]
# Define the times array
times = [RED_TIME, YELLOW_TIME, GREEN_TIME]
# Initialize variables
last_time = time.ticks_ms()
light = RED # start with RED light
def trafic_light_on(light):
for i in range(RED, GREEN + 1):
if i == light:
pins[i].value(1) # turn on
else:
pins[i].value(0) # turn off
# Initialize the first light
trafic_light_on(light)
# Main loop
while True:
current_time = time.ticks_ms()
if time.ticks_diff(current_time, last_time) > times[light]:
light += 1
if light >= 3:
light = RED # reset to RED for a new cycle
trafic_light_on(light)
last_time = current_time
# TO DO: your other code