Raspberry Pi Pico - Rain Sensor
This guide will show you how to use a Raspberry Pi Pico with a rain sensor to identify rain or snow. We will learn the followings:
- How to connect a rain sensor to a Raspberry Pi Pico.
- How to program the Raspberry Pi Pico detect rain using a digital signal from the rain sensor.
- How to program the Raspberry Pi Pico to measure how heavy the rain is using an analog signal from the rain sensor.

You can modify the code so that it activates a motor or an alarm when it detects rain or snow.
Hardware Preparation
| 1 | × | Raspberry Pi Pico W | |
| 1 | × | Raspberry Pi Pico Alternatively, | |
| 1 | × | Micro USB Cable | |
| 1 | × | Rain Sensor | |
| 1 | × | Jumper Wires | |
| 1 | × | Breadboard | |
| 1 | × | Recommended: Screw Terminal Expansion Board for Raspberry Pi Pico |
Or you can buy the following kits:
| 1 | × | DIYables Sensor Kit (30 sensors/displays) | |
| 1 | × | DIYables Sensor Kit (18 sensors/displays) |
Additionally, some of these links are for products from our own brand, DIYables .
Overview of Rain Sensor
The rain sensor can sense and assess how much rain or snow falls. It produces two kinds of output signals: a digital signal (LOW or HIGH) and an analog signal.
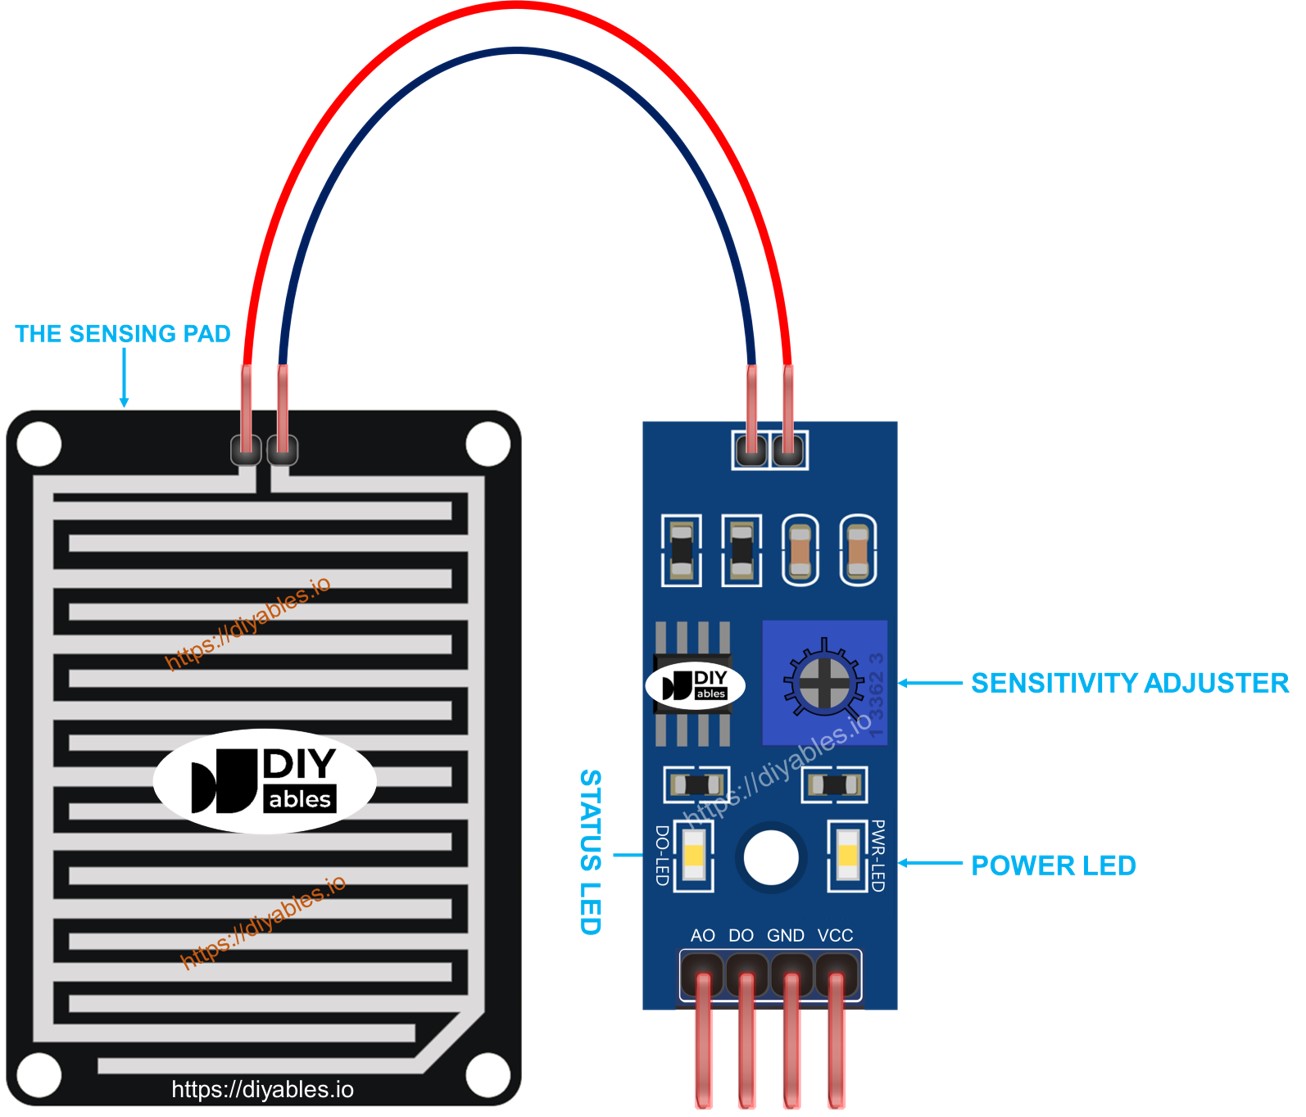
The rain sensor consists of two parts:
- The sensor pad
- The electronic device

The sensing pad
The sensing pad is put outside, where it could be exposed to rain or snow, like on a roof. It has many copper lines which are of two kinds: power lines and sensor lines. These lines are separate and only connect if water or snow touches them. Both kinds of lines work the same way, so you can pick any line as the power line and another as the sensor line.
The electronic module
The electronic module of the rain sensor transforms the signal from the sensing pad into a form (analog or digital) that the Raspberry Pi Pico can understand. It comes with four pins.
- VCC pin: Connect this to VCC (between 3.3V and 5V).
- GND pin: Connect this to GND (0V).
- DO pin: This is a digital output pin. It shows HIGH if there is no rain and LOW if there is rain. Change the rain detection sensitivity using the potentiometer.
- AO pin: This is an analog output pin. The output value decreases with more water on the sensing pad and increases with less water.
It also has two LED lights.
- One light that shows power is on (PWR-LED).
- One light that shows rain status (DO-LED) on the DO pin: it lights up when it rains.
How It Works
For the DO pin:
- The module has a potentiometer to change the sensitivity.
- When the rain level is too high, the sensor's output pin goes LOW, and the DO-LED light turns on.
- When the rain level is low, the sensor's output pin remains HIGH, and the DO-LED light stays off.
About the AO pin:
- When the sensing pad has more water, the AO pin value decreases.
- When the sensing way has less water, the AO pin value increases.
The potentiometer does not alter the value on the AO pin.
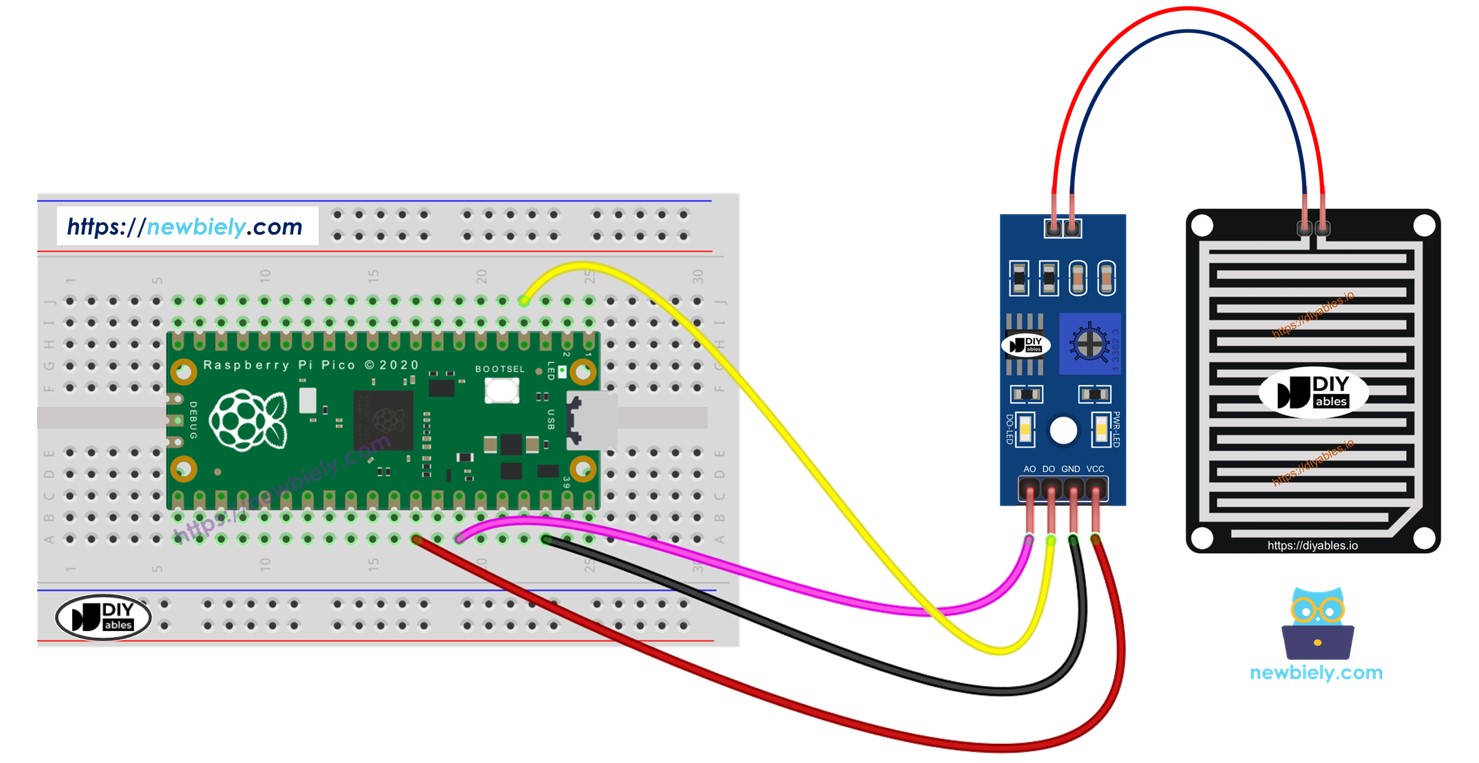
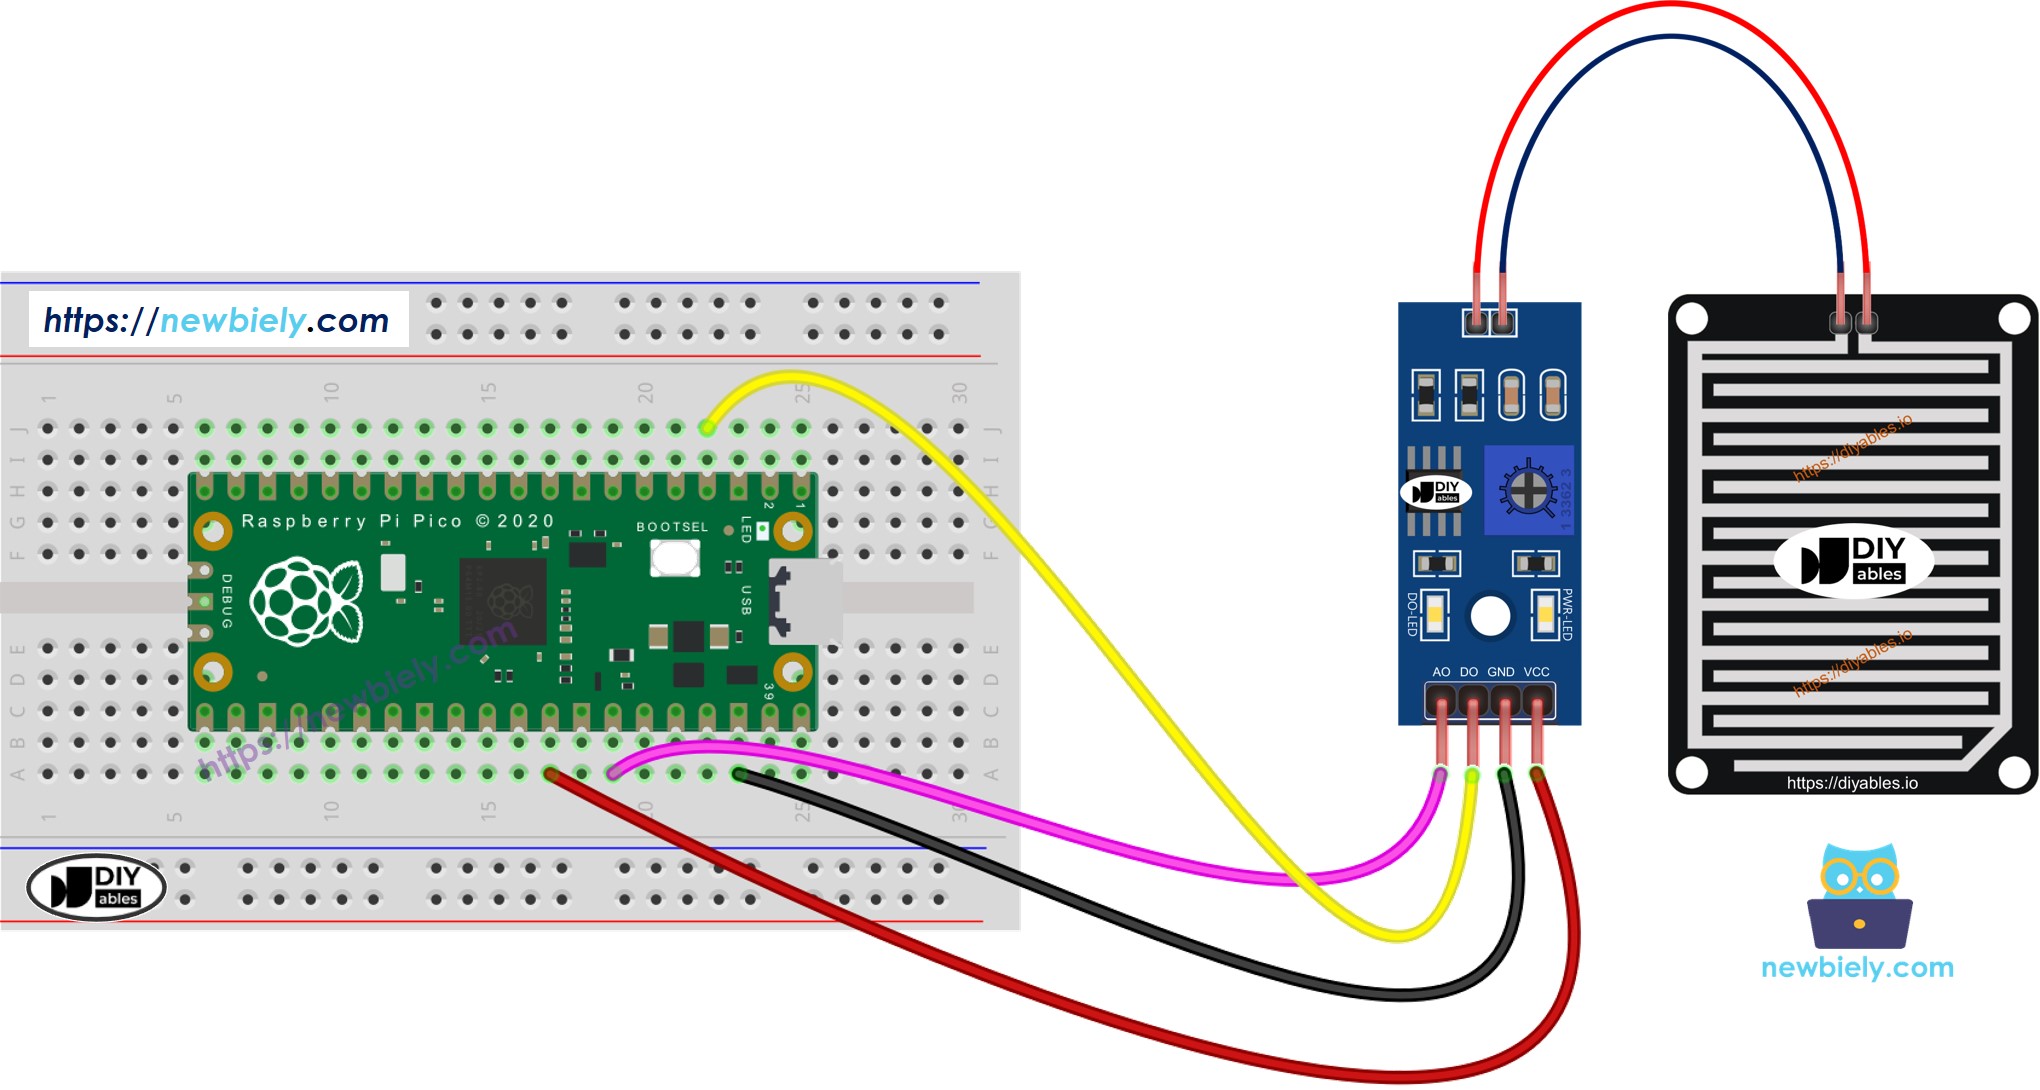
Wiring Diagram
Connect the VCC pin of the sensor to a pin on the Raspberry Pi Pico that provides either 3.3V or 5V. But, directly connecting it might shorten the sensor's life because of electrochemical corrosion. A better way is to connect the sensor's VCC pin to a programmable output pin on the Raspberry Pi Pico. Set up the pin to give power to the sensor only when you need to take readings. This approach reduces electrochemical corrosion.
The rain sensor module offers two outputs. You can use either one or both as required.

This image is created using Fritzing. Click to enlarge image
Raspberry Pi Pico Code - Read value from DO pin
Detailed Instructions
Please follow these instructions step by step:
- Ensure that Thonny IDE is installed on your computer.
- Ensure that MicroPython firmware is installed on your Raspberry Pi Pico.
- If this is your first time using a Raspberry Pico, refer to the Raspberry Pi Pico - Getting Started tutorial for detailed instructions.
- Connect the Raspberry Pi Pico to the rain sensor according to the provided diagram.
- Connect the Raspberry Pi Pico to your computer using a USB cable.
- Launch the Thonny IDE on your computer.
- On Thonny IDE, select MicroPython (Raspberry Pi Pico) Interpreter by navigating to Tools Options.
- In the Interpreter tab, select MicroPython (Raspberry Pi Pico) from the drop-down menu.
- Ensure the correct port is selected. Thonny IDE should automatically detect the port, but you may need to select it manually (e.g., COM3 on Windows or /dev/ttyACM0 on Linux).
- Copy the above code and paste it to the Thonny IDE's editor.
- Save the script to your Raspberry Pi Pico by:
- Click the Save button, or use Ctrl+S keys.
- In the save dialog, you will see two sections: This computer and Raspberry Pi Pico. Select Raspberry Pi Pico
- Save the file as main.py
- Click the green Run button (or press F5) to run the script. The script will execute.
- Place some water drops on the rain sensor. Do not use pure water.
- Check out the message in the Shell at the bottom of Thonny.
Please note, if the LED light remains constantly on or stays off even during rain, adjust the sensor's sensitivity by changing the potentiometer.
If you name your script main.py and save it to the root directory of the Raspberry Pi Pico, it will automatically run each time the Pico is powered on or reset. This is useful for standalone applications that need to start running immediately upon power-up. If you name your script another name other than main.py, you will need to manually run it from Thonnys's Shell.
Raspberry Pi Pico Code - Read value from AO pin
Detailed Instructions
- Copy the code and open it in Thonny IDE.
- Click the green Run button (or press F5) to run the script. The script will execute.
- Put some water on the rain sensor.
- Check out the message in the Shell at the bottom of Thonny.
