Raspberry Pi Pico - Ultrasonic Sensor
This guide shows you how to use the ultrasonic sensor and Raspberry Pi Pico to find out how far away an object is. We will learn about:
- Connecting an Ultrasonic Sensor to Raspberry Pi Pico
- Programming Raspberry Pi Pico to Measure Distance Using an Ultrasonic Sensor
- Reducing noise in distance measurements from an Ultrasonic Sensor on Raspberry Pi Pico
- Using Ultrasonic Sensor library to simplify the code
Hardware Preparation
| 1 | × | Raspberry Pi Pico W | |
| 1 | × | Raspberry Pi Pico Alternatively, | |
| 1 | × | Micro USB Cable | |
| 1 | × | Ultrasonic Sensor | |
| 1 | × | Jumper Wires | |
| 1 | × | Breadboard | |
| 1 | × | Recommended: Screw Terminal Expansion Board for Raspberry Pi Pico |
Or you can buy the following kits:
| 1 | × | DIYables Sensor Kit (18 sensors/displays) |
Additionally, some of these links are for products from our own brand, DIYables .
Overview of Ultrasonic Sensor
The HC-SR04 ultrasonic sensor calculates how far objects are by using sound waves. It emits a sound wave that cannot be heard by humans and waits to hear the echo that comes back after bouncing off an object. By timing how long it takes for the echo to return, the sensor figures out the distance to the object.
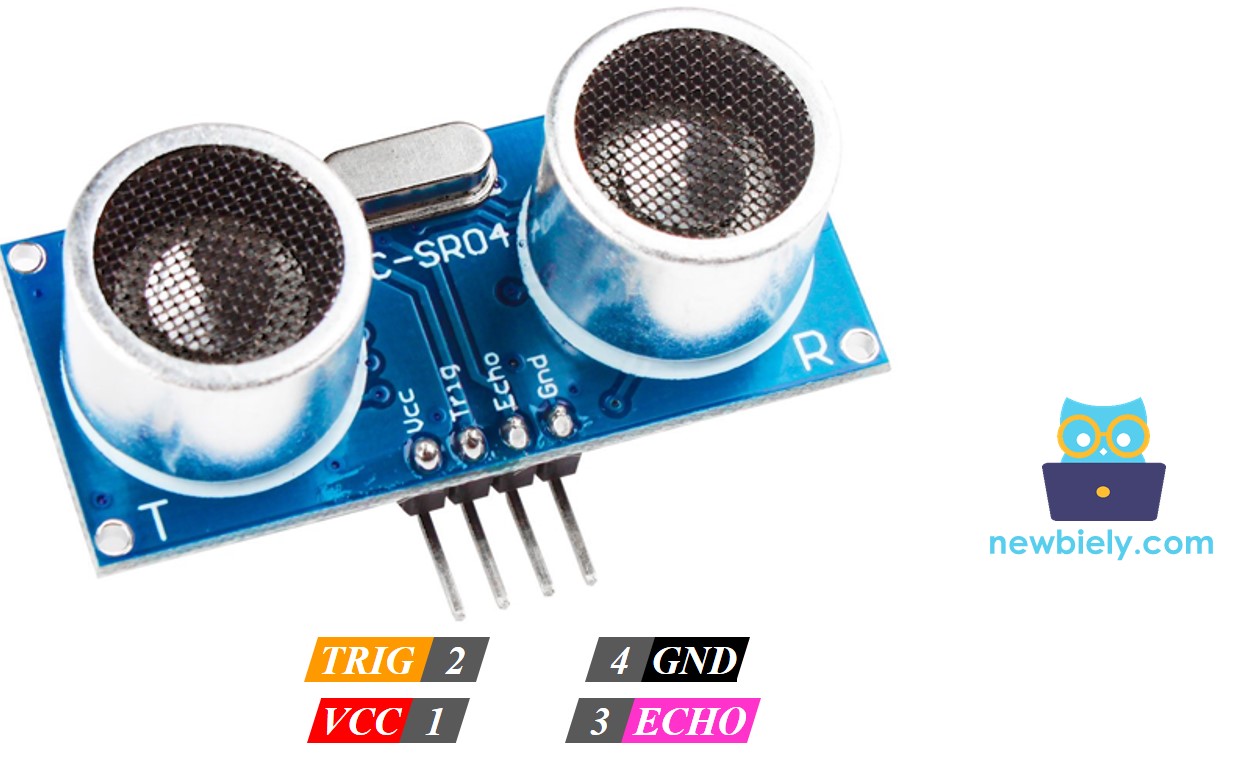
Pinout
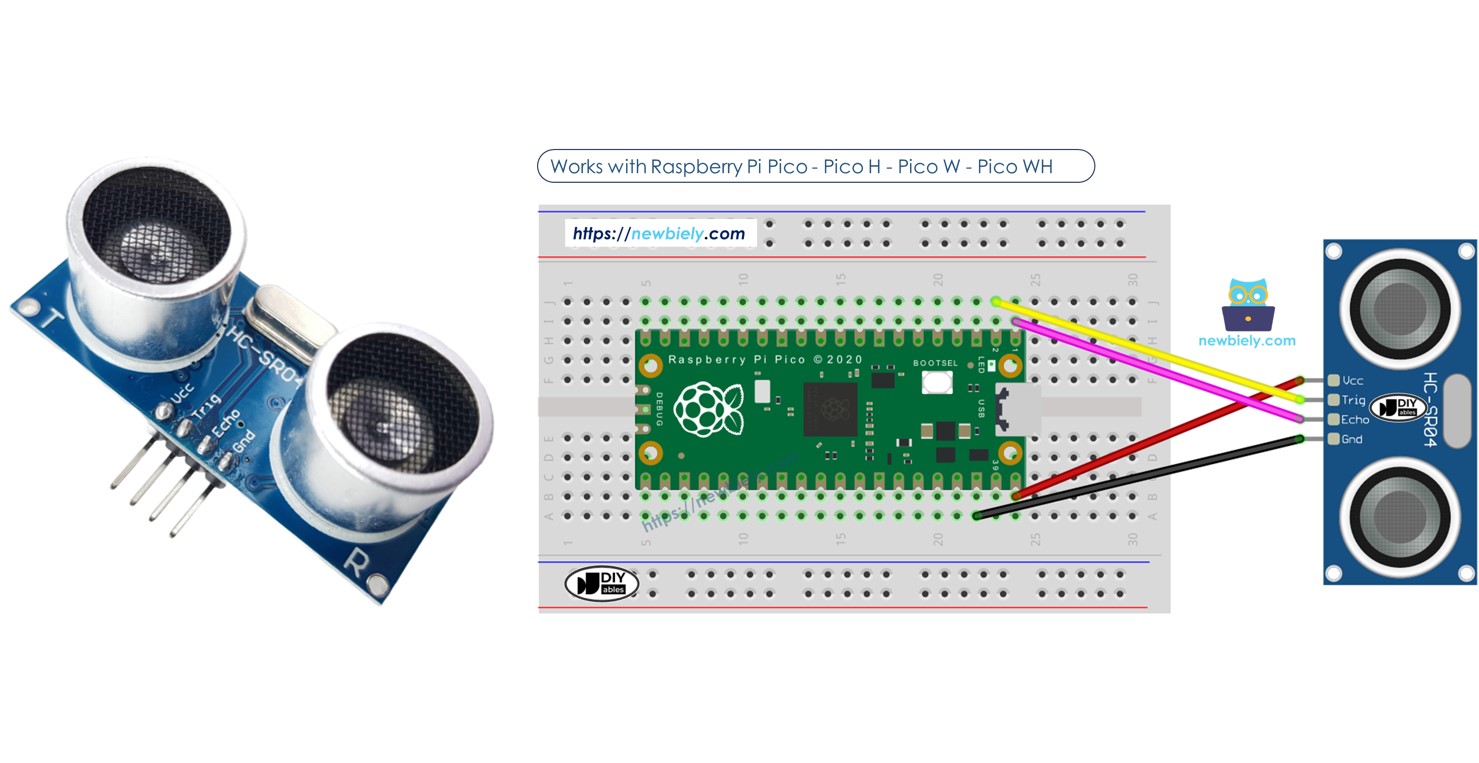
The HC-SR04 ultrasonic sensor has four pins.
- VCC pin: Connect this pin to VCC (5 volts).
- GND pin: Connect this pin to GND (0 volts).
- TRIG pin: Connect this to the Raspberry Pi Pico to send control signals.
- ECHO pin: This sends signals back to the Raspberry Pi Pico, which measures these signals to find out distance.
Wiring Diagram
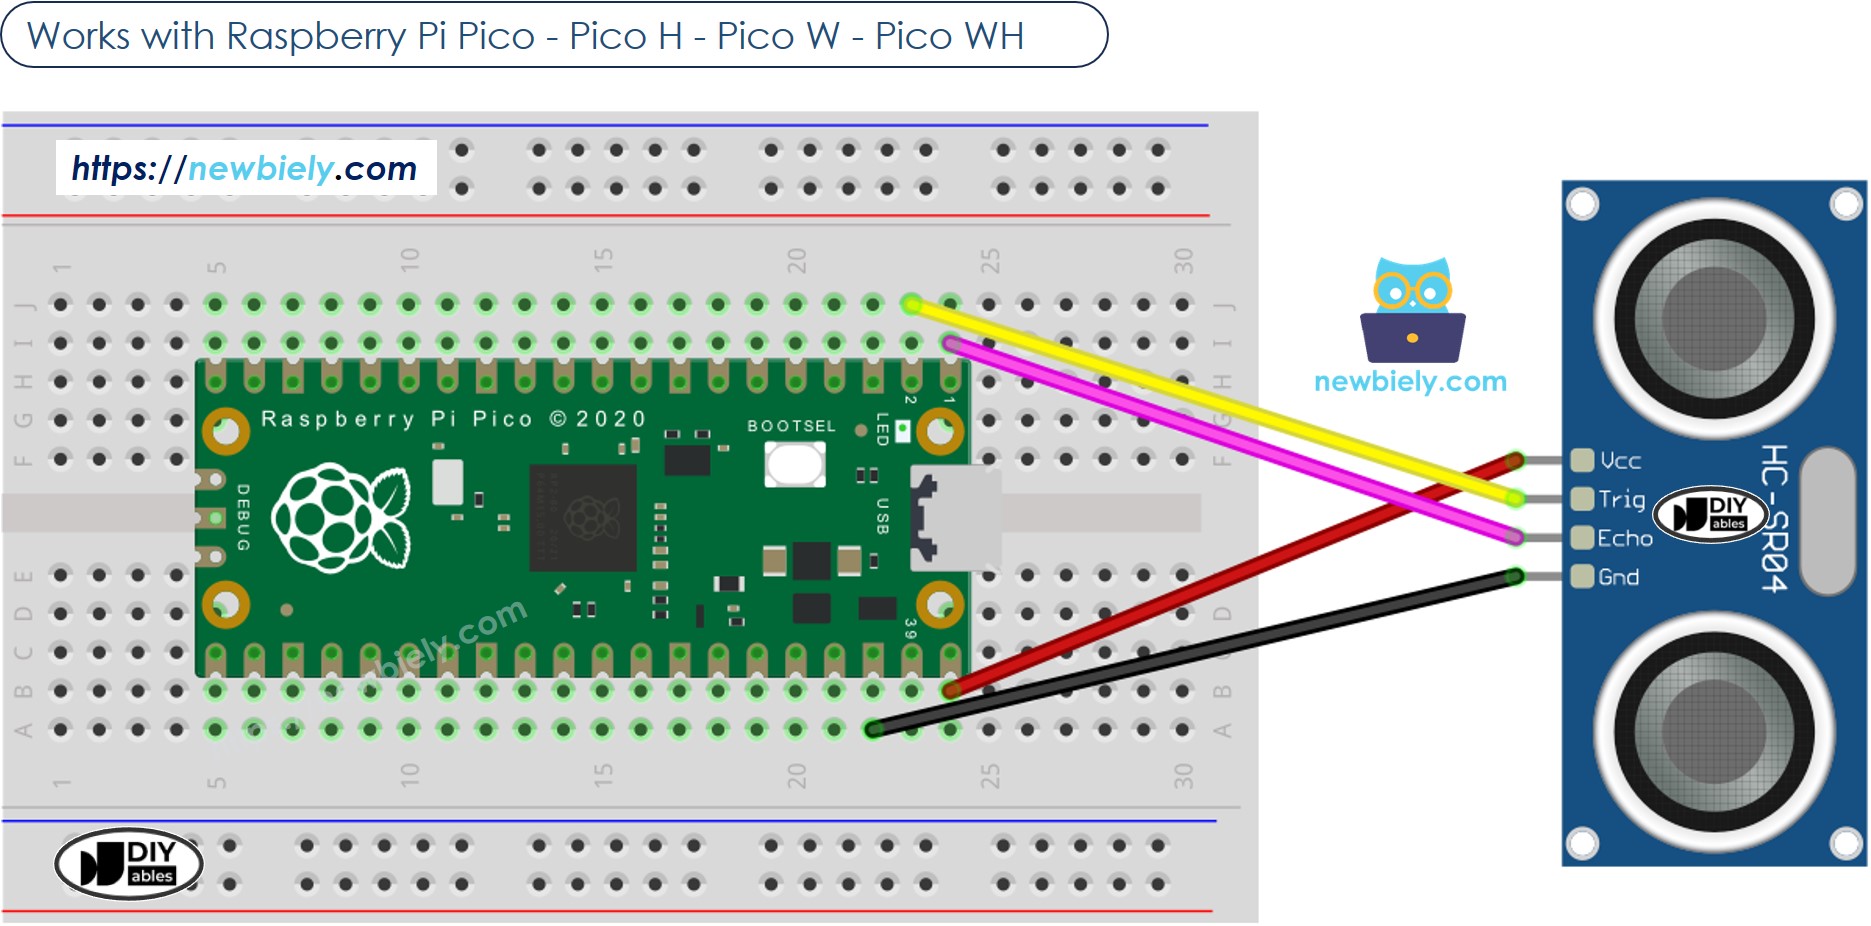
This image is created using Fritzing. Click to enlarge image
Raspberry Pi Pico Code
Before using Ultrasonic Sensor libary, we will try to program Raspberry Pi Pico without using library to understand how it works.
Detailed Instructions
Please follow these instructions step by step:
- Ensure that Thonny IDE is installed on your computer.
- Ensure that MicroPython firmware is installed on your Raspberry Pi Pico.
- If this is your first time using a Raspberry Pico, refer to the Raspberry Pi Pico - Getting Started tutorial for detailed instructions.
- Wire the Raspberry Pi Pico to the ultrasonic sensor according to the provided diagram.
- Connect the Raspberry Pi Pico to your computer using a USB cable.
- Launch the Thonny IDE on your computer.
- On Thonny IDE, select MicroPython (Raspberry Pi Pico) Interpreter by navigating to Tools Options.
- In the Interpreter tab, select MicroPython (Raspberry Pi Pico) from the drop-down menu.
- Ensure the correct port is selected. Thonny IDE should automatically detect the port, but you may need to select it manually (e.g., COM3 on Windows or /dev/ttyACM0 on Linux).
- Copy the above code and paste it to the Thonny IDE's editor.
- Save the script to your Raspberry Pi Pico by:
- Click the Save button, or use Ctrl+S keys.
- In the save dialog, you will see two sections: This computer and Raspberry Pi Pico. Select Raspberry Pi Pico
- Save the file as main.py
- Click the green Run button (or press F5) to run the script. The script will execute.
- Move your hand in front of the ultrasonic sensor.
- Check out the message in the Shell at the bottom of Thonny.
If you name your script main.py and save it to the root directory of the Raspberry Pi Pico, it will automatically run each time the Pico is powered on or reset. This is useful for standalone applications that need to start running immediately upon power-up. If you name your script another name other than main.py, you will need to manually run it from Thonnys's Shell.
Code Explanation
The explanation can be found in the comments of the above Raspberry Pi Pico code.
How to Filter Noise from Distance Measurements of Ultrasonic Sensor
The data from the ultrasonic sensor has extra, unnecessary signals, which we call noise. Sometimes this noise can cause the sensor to work wrongly. We can remove this noise by using the following method:
- Measure multiple times and store these measurements in a list.
- Arrange the list in order from the smallest to the largest value.
- Clean the data by removing noise:
- Ignore the smallest values because they are considered noise.
- Ignore the largest values because they are also considered noise.
- Find the average of the remaining values in the middle.
- Leave out the five smallest and the five largest samples because they are considered noise. Calculate the average of the ten middle samples, ranging from the 5th to the 14th.
- Copy the above code and paste it to the main.py on the Thonny IDE's editor.
- Save the script to your Raspberry Pi Pico.
- Click the green Run button (or press F5) to run the script. The script will execute.
- Move your hand in front of the ultrasonic sensor.
- Check out the message in the Shell at the bottom of Thonny.
The example code below makes 20 measurements.
The below MicroPython code implements the above algorithm:
Raspberry Pi Pico - Ultrasonic Sensor Libary
The above looks complicated, but fortunately, DIYables has develop the library to make it easy for you. You can follow the below step to use the Ultrasonic Sensor library:
- On Thonny IDE, Navigate to the Tools Manage packages on the Thonny IDE.
- Search “DIYables-MicroPython-Ultrasonic-Sensor”, then find the Ultrasonic Sensor library created by DIYables.
- Click on DIYables-MicroPython-Ultrasonic-Sensor, then click Install button to install Ultrasonic Sensor library.

- Copy the below code and paste it to the Thonny IDE's editor.
- Save the script to main.py on your Raspberry Pi Pico
- Click the green Run button (or press F5) to run the script. The script will execute.
- Move your hand in front of the ultrasonic sensor.
- Check out the message in the Shell at the bottom of Thonny.
Video Tutorial
Ultrasonic Sensor Applications
- Preventing Crashes
- Checking if Full
- Checking Height
- Sensing Nearness