Raspberry Pi Pico - Sound Sensor
This guide will teach us how to operate the Raspberry Pi Pico and a sound sensor to recognize sounds. We will discuss the following points:
- How to connect a sound sensor to a Raspberry Pi Pico
- How to program a Raspberry Pi Pico to detect sound with a sound sensor
Later, you can change the code to make an LED or a light turn on (using a relay) when it detects sound, or to make a servo motor rotate.
Hardware Preparation
Or you can buy the following kits:
| 1 | × | DIYables Sensor Kit (18 sensors/displays) |
Additionally, some of these links are for products from our own brand, DIYables .
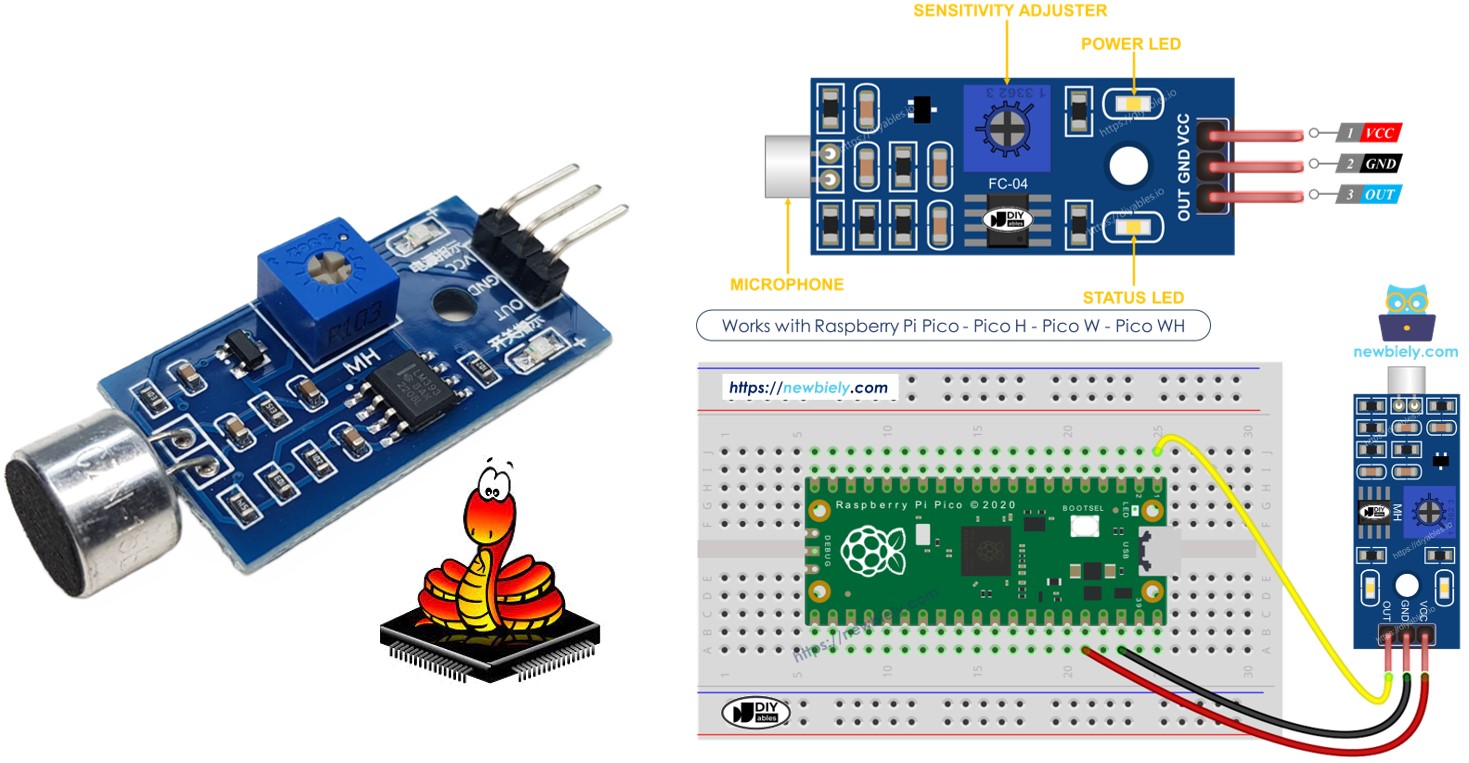
Overview of Sound Sensor
You can use a sound sensor to detect sound nearby. There are two types of sound sensor modules:
- Digital sound sensor module: provides a simple ON or OFF signal.
- Analog sound sensor module: gives continuous range values and ON/OFF signals.
You can change how sensitive the digital output is by using the potentiometer that is included.
The Digital Sound Sensor Pinout
The digital sound sensor has three pins:
- VCC pin: Connect this to VCC, between 3.3V and 5V.
- GNC pin: Connect this to GND, which is 0V.
- OUT pin: This is the output pin. It is HIGH with no noise and LOW when there is sound. Connect it to the input pin on your Raspberry Pi Pico.
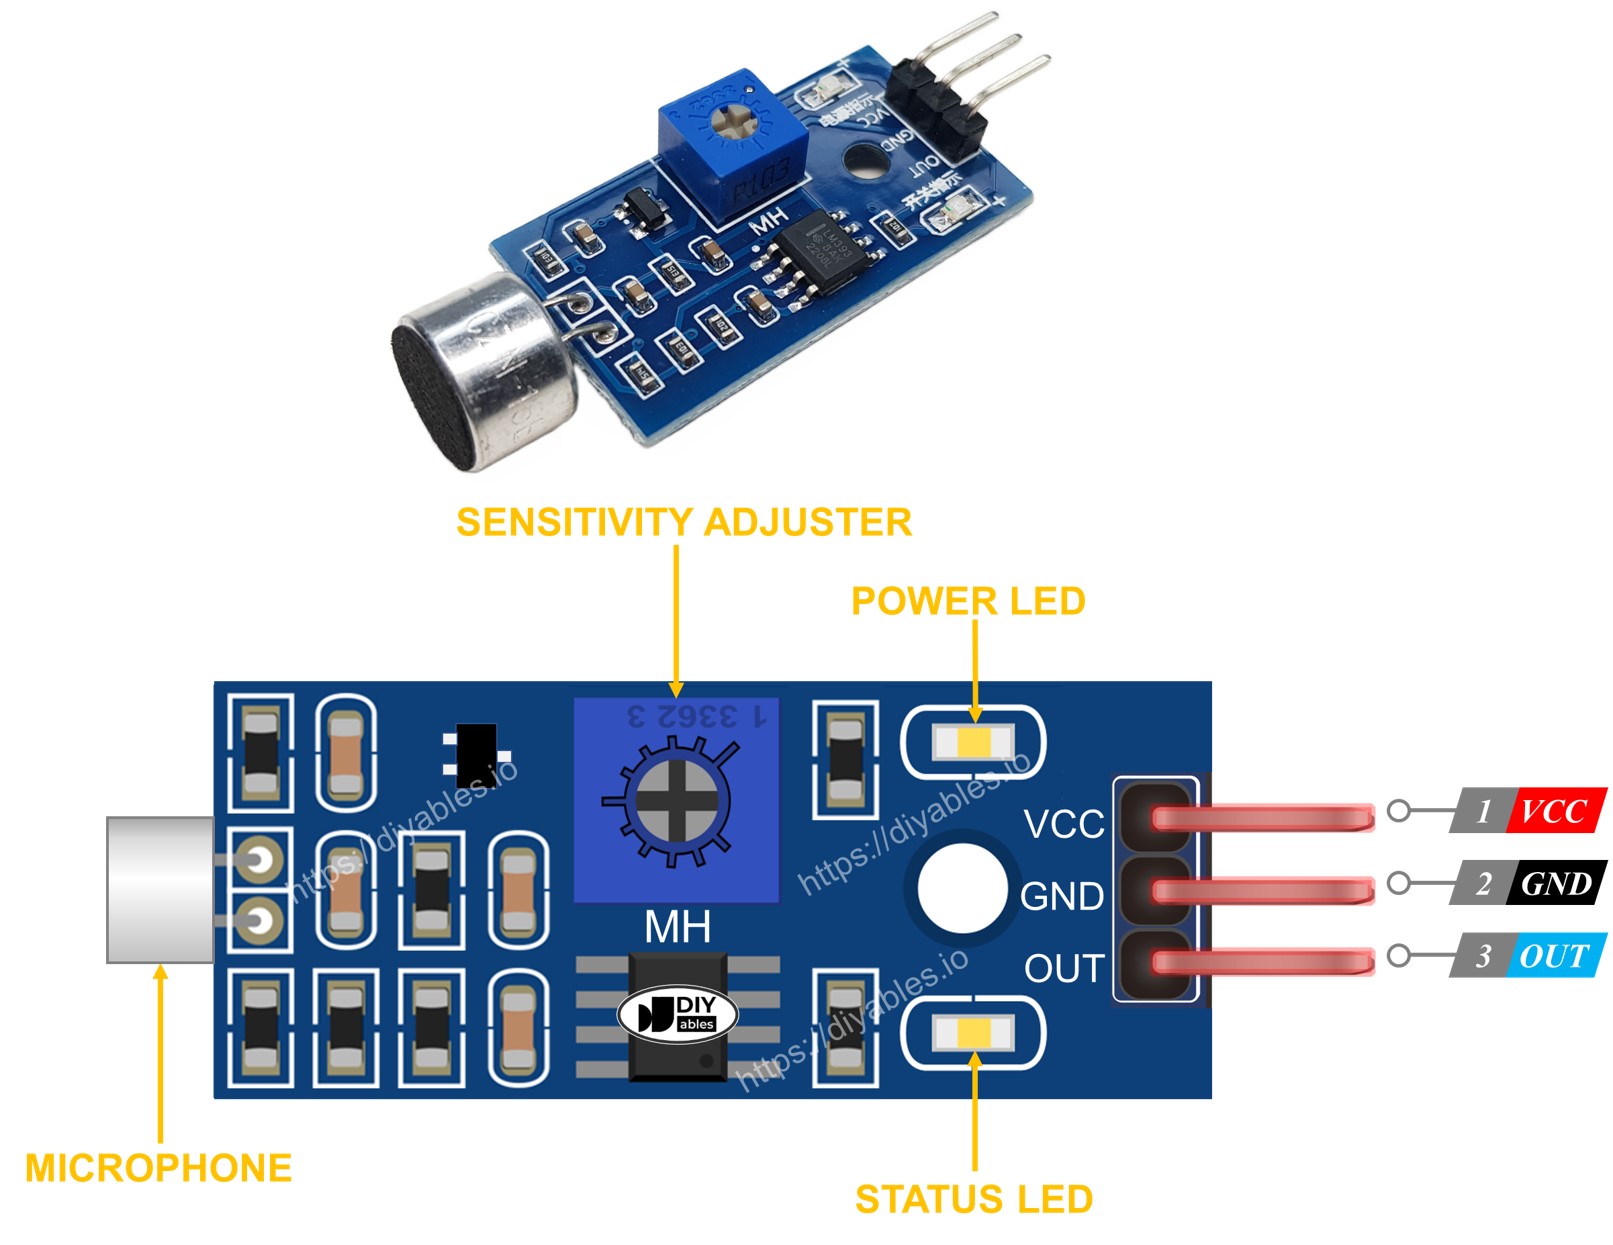
The sound sensor has a sensitivity control knob and two lights that show its status.
- One LED light shows power is on
- One LED light for sound: it lights up with sound, turns off when quiet
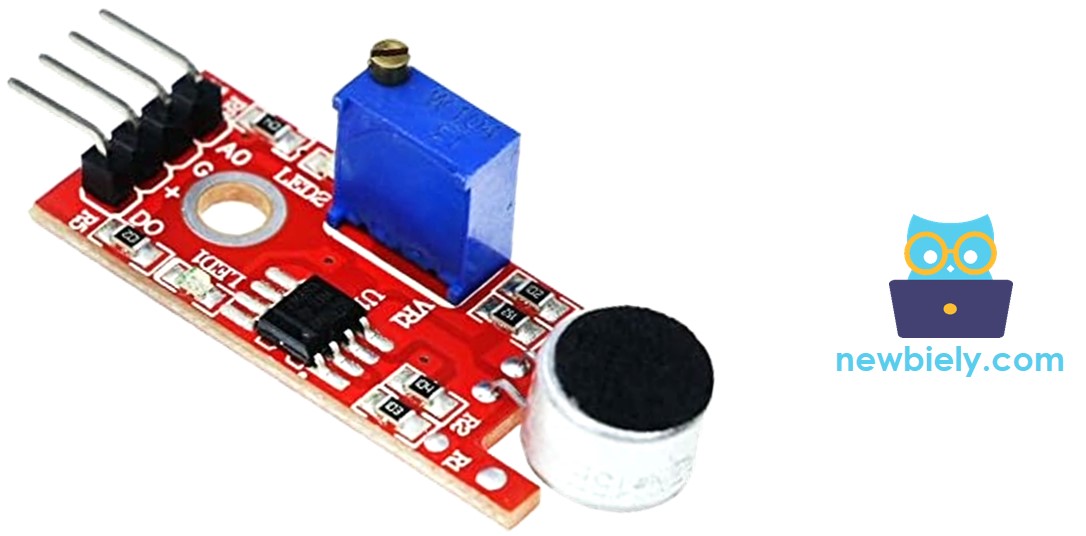
The Analog Sound Sensor Pinout
The analog sound sensor has four connectors.
- + pin: Connect to 5V.
- G pin: Connect to GND (0V).
- DO pin: This is a digital output pin. It stays HIGH when there is no sound and goes LOW when sound is detected. Connect it to a digital input pin on the Raspberry Pi Pico.
- AO Browpin: This is an analog output pin. It outputs the sound level as an analog value. Connect it to an analog input pin on the Raspberry Pi Pico.
The analog sound sensor has a built-in potentiometric device for easy adjustment of sensitivity. It also features two LED indicators.
- One LED light indicates the power is on.
- Another LED light signals the presence of sound. It turns on when there is noise and turns off when it is silent.
How It Works
The module has a potentiometer that you can adjust to change how sensitive it is to sound.
- When the sensor detects sound, its output pin is LOW. When the sensor does not detect sound, its output pin is HIGH.
Wiring Diagram
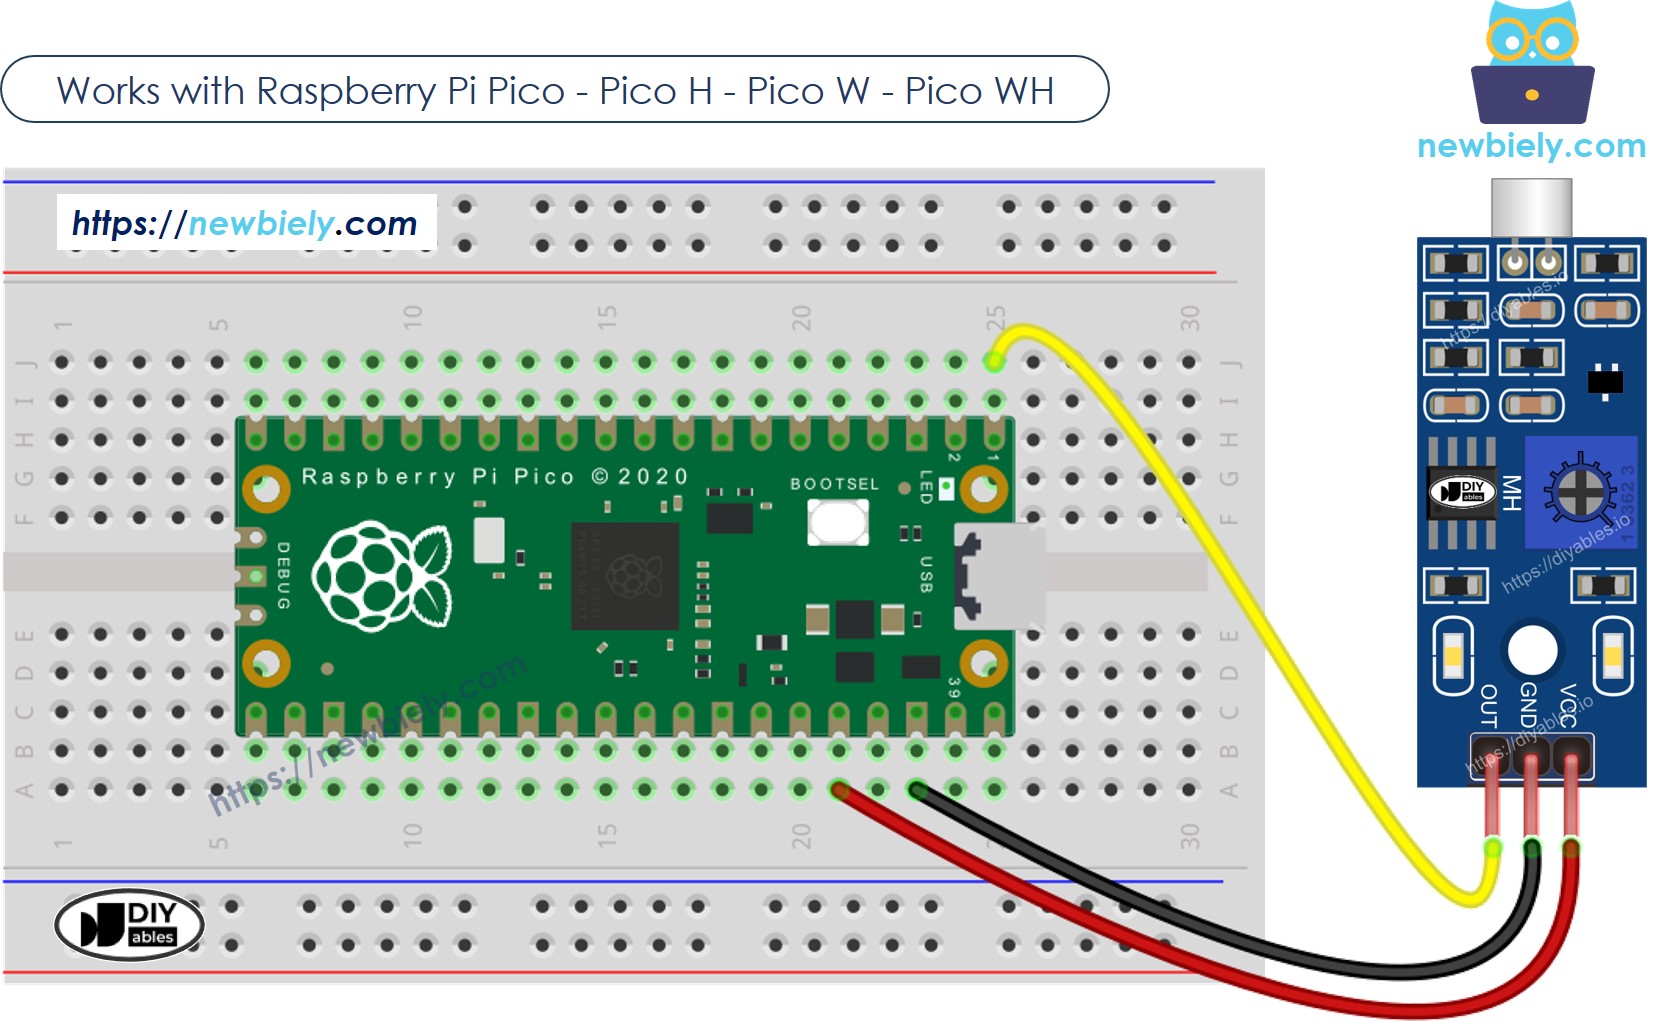
This image is created using Fritzing. Click to enlarge image
How To Program For Sound Sensor
- Sets the Raspberry Pi Pico pin 8 as a digital input.
- It checks the status of a pin on the Raspberry Pi Pico.
Raspberry Pi Pico Code - Detecting the sound
Detailed Instructions
Please follow these instructions step by step:
- Ensure that Thonny IDE is installed on your computer.
- Ensure that MicroPython firmware is installed on your Raspberry Pi Pico.
- If this is your first time using a Raspberry Pico, refer to the Raspberry Pi Pico - Getting Started tutorial for detailed instructions.
- Wire the sound sensor to the Raspberry Pi Pico according to the provided diagram.
- Connect the Raspberry Pi Pico to your computer using a USB cable.
- Launch the Thonny IDE on your computer.
- On Thonny IDE, select MicroPython (Raspberry Pi Pico) Interpreter by navigating to Tools Options.
- In the Interpreter tab, select MicroPython (Raspberry Pi Pico) from the drop-down menu.
- Ensure the correct port is selected. Thonny IDE should automatically detect the port, but you may need to select it manually (e.g., COM3 on Windows or /dev/ttyACM0 on Linux).
- Copy the above code and paste it to the Thonny IDE's editor.
- Save the script to your Raspberry Pi Pico by:
- Click the Save button, or use Ctrl+S keys.
- In the save dialog, you will see two sections: This computer and Raspberry Pi Pico. Select Raspberry Pi Pico
- Save the file as main.py
- Click the green Run button (or press F5) to run the script. The script will execute.
- Clap near the sound sensor.
- Check out the message in the Shell at the bottom of Thonny.
If the LED light is always on or always off, even when there is sound, you can adjust the potometer settings to improve how the sensor responds to sound.
If you name your script main.py and save it to the root directory of the Raspberry Pi Pico, it will automatically run each time the Pico is powered on or reset. This is useful for standalone applications that need to start running immediately upon power-up. If you name your script another name other than main.py, you will need to manually run it from Thonnys's Shell.
Troubleshooting
If the sound sensor is not functioning properly, follow these steps:
- Adjust the sensitivity: You can change how sensitive the sensor is by turning the small screw on it.
- Reduce vibrations: The sound sensor might capture vibrations and noise from the wind. To avoid this, fix it firmly to a stable surface.
- Consider the sensing range: The sound sensor can only hear sounds that are within 10 inches. To measure sound accurately, make sure to make sounds close to the sensor.
- Check the power supply: Ensure that the power supply is consistent. Fluctuations in power can disturb the functioning of this sensor, which uses analog technology.