Arduino MicroPython Joystick

This guide shows you how to use a joystick with an Arduino and MicroPython. You will learn:

Arduino MicroPython and Joystick

Hardware Preparation

1×Arduino Giga R1 WiFi
1×USB Cable Type-C
1×Joystick
1×Jumper Wires
1×(Recommended) Screw Terminal Block Shield for Arduino Uno/Mega/Giga
1×(Recommended) Breadboard Shield For Arduino Uno/Mega/Giga
1×(Recommended) Enclosure For Arduino Giga

Or you can buy the following sensor kits:

1×DIYables Sensor Kit (30 sensors/displays)
1×DIYables Sensor Kit (18 sensors/displays)
Disclosure: Some of the links provided in this section are Amazon affiliate links. We may receive a commission for any purchases made through these links at no additional cost to you.
Additionally, some of these links are for products from our own brand, DIYables.

Overview of Joystick

You may have seen a joystick used for controlling video games, toys, or even larger machines like excavators. A joystick is made up of two potentiometers arranged in a square pattern and a button. It provides three types of outputs:

  • A horizontal (left-right) position value ranging from 0 to 4095.
  • A vertical (up-down) position value ranging from 0 to 4095.
  • The button status, which is either ON (HIGH) or OFF (LOW).

The joystick combines the two analog values to generate 2-D coordinates, which are centered when the joystick is in its neutral position. You can find the actual direction of these coordinates using a test code, which we will discuss in the next section. Some applications may use all three outputs, while others may only require a few.
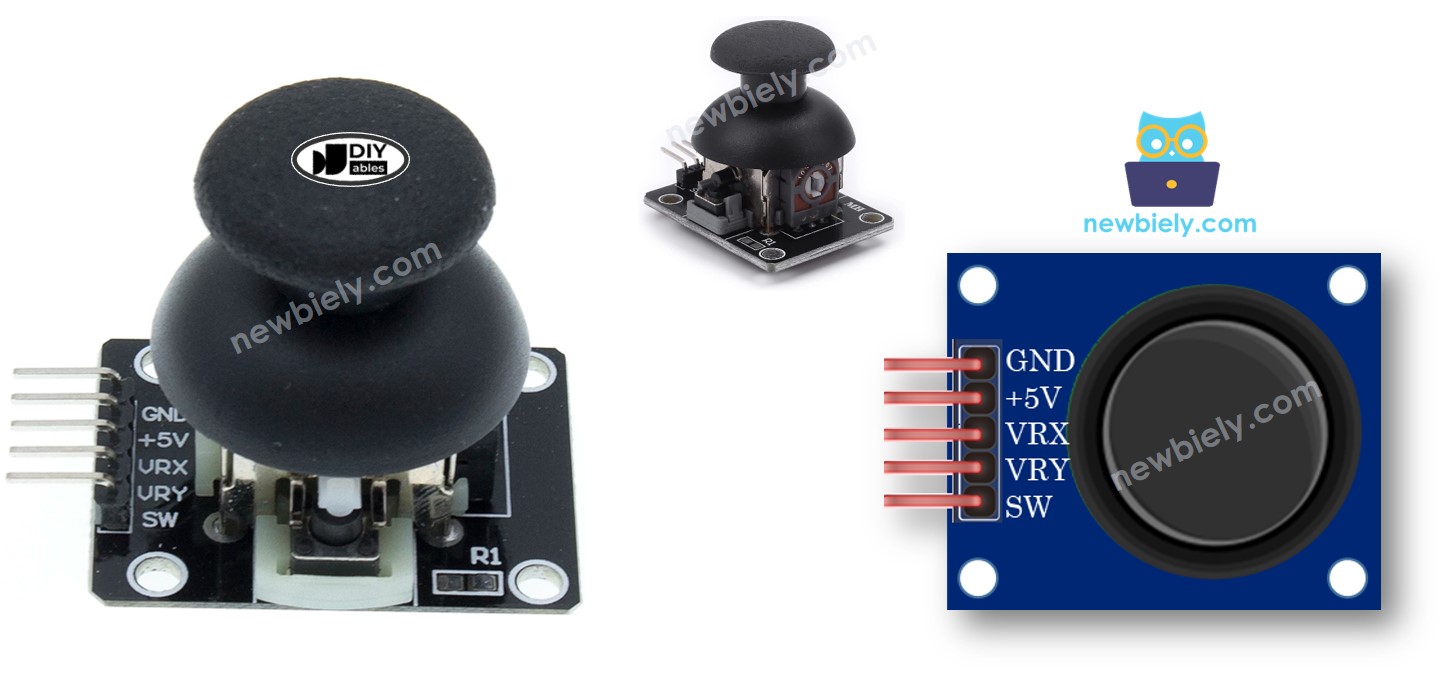
Pinout

A joystick has five pins:

  • GND pin: Connects to ground (0V).
  • VCC pin: Connects to the 3.3V supply of the Arduino.
  • VRX pin: Provides an analog value for the horizontal position (X-coordinate); connect this pin to an ADC pin on the Arduino.
  • VRY pin: Provides an analog value for the vertical position (Y-coordinate); connect this pin to an ADC pin on the Arduino.
  • SW pin: Connected to the joystick's pushbutton, which is normally open. Use a pull-up resistor to keep this pin HIGH when the button is not pressed and LOW when it is pressed.
Joystick Pinout

How It Works

  • Left/Right Movement:
    • Moving the joystick left or right changes the voltage at the VRX pin.
    • Moving it left decreases the voltage to 0 volts, while moving it right increases it to 3.3 volts.
    • The Arduino reads this voltage and converts it to a value between 0 and 4095, where 0V equals 0 and 3.3V equals 4095.
  • Up/Down Movement:
    • Moving the joystick up or down changes the voltage at the VRY pin.
    • Moving it up lowers the voltage to 0 volts, while moving it down raises it to 3.3 volts.
    • The Arduino reads this voltage and converts it to a number from 0 to 4095, just like the VRX pin.
  • Combined Movements:
    • Moving the joystick diagonally or in any other direction changes the voltage at both the VRX and VRY pins, depending on its position along each axis.
  • Pressing the Joystick:
    • Pressing down on the joystick activates an internal button.
    • A pull-up resistor connected to the SW pin causes the voltage at this pin to drop from 3.3V to 0V when the button is pressed.
    • The Arduino reads this as a digital signal, showing HIGH (3.3V) when not pressed and LOW (0V) when pressed.

    When the joystick is moved, it adjusts the voltages at the VRX and VRY pins, which the Arduino interprets as values ranging from 0 to 4095. Pressing the joystick changes the voltage at the SW pin, which the Arduino detects as either HIGH or LOW.

Wiring Diagram

The wiring diagram between Arduino MicroPython Joystick

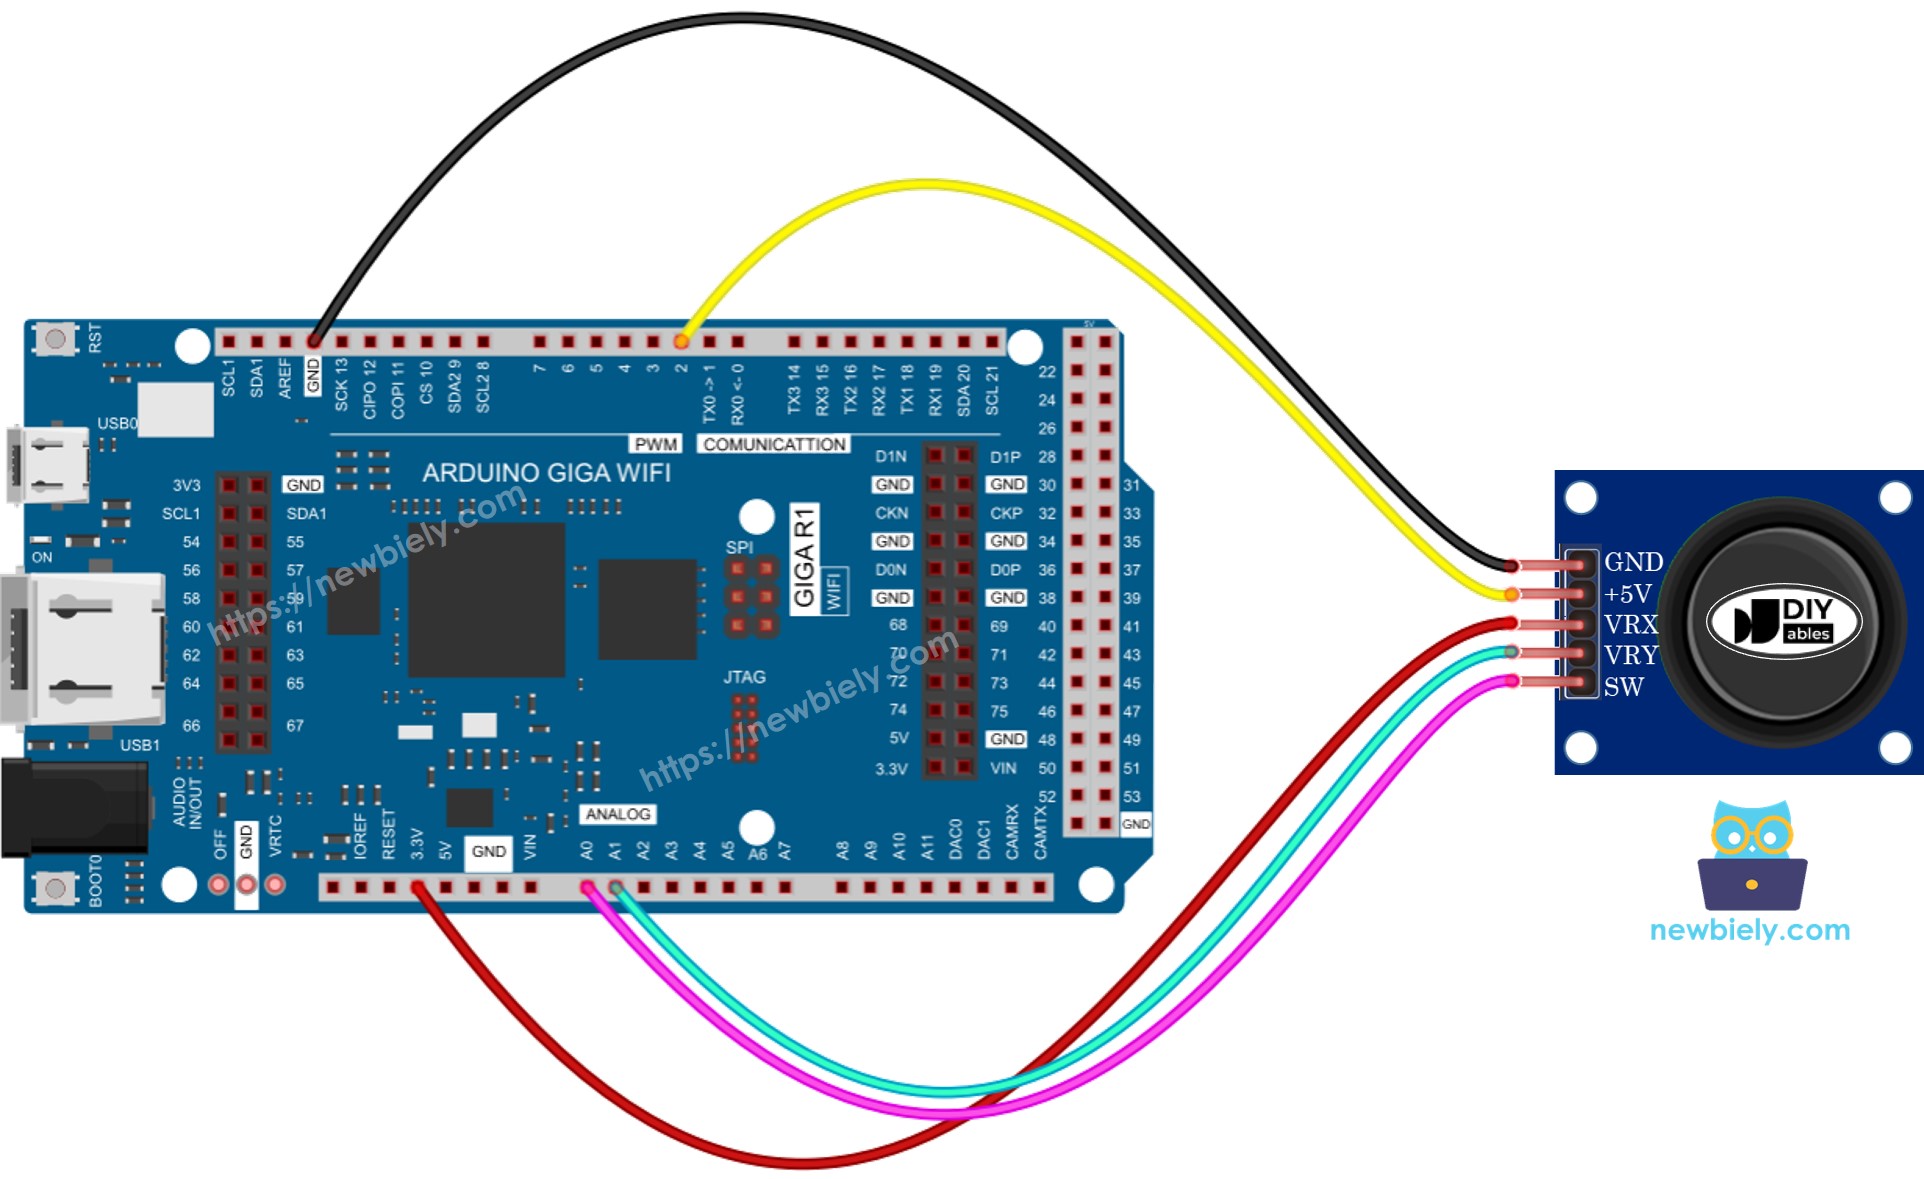
This image is created using Fritzing. Click to enlarge image

Arduino MicroPython Code - Reads Joystick's state

The following MicroPython script:

  • Reads the analog values from the joystick.
  • Detects whether the joystick button is pressed or released.
  • Tracks the number of times the joystick button has been pressed.
""" This Arduino MicroPython script was developed by newbiely.com This Arduino MicroPython script is made available for public use without any restriction For comprehensive instructions and wiring diagrams, please visit: https://newbiely.com/tutorials/arduino-micropython/arduino-micropython-joystick """ from DIYables_MicroPython_Joystick import Joystick from machine import Pin, ADC import time VRX_PIN = 'A0' # The Arduino Giga R1 WiFi's pin connected to VRX pin of joystick VRY_PIN = 'A1' # The Arduino Giga R1 WiFi's pin connected to VRY pin of joystick SW_PIN = 'D2' # The Arduino Giga R1 WiFi's pin connected to SW pin of joystick joystick = Joystick(pin_x=VRX_PIN, pin_y=VRY_PIN, pin_button=SW_PIN) # Configure the debounce time if necessary (default is 50ms) joystick.set_debounce_time(100) # debounce time set to 100 milliseconds while True: joystick.loop() # Must be called frequently to process button debouncing # Read the analog values from the X and Y axes x_value = joystick.read_x() y_value = joystick.read_y() press_count = joystick.get_press_count() # Check if the button has been pressed or released if joystick.is_pressed(): print("Button Pressed") if joystick.is_released(): print("Button Released") # Print the joystick's X and Y coordinates, and pressed count print(f'Joystick Position - X: {x_value}, Y: {y_value}, pressed count: {press_count}') time.sleep(0.1) # Delay to reduce the output frequency, note that, long delay can make it miss the thump press

Detailed Instructions

Here’s instructions on how to run the above MicroPython code on Arduino with Thonny IDE:

  • Make sure Thonny IDE is installed on your computer.
  • Make sure MicroPython firmware is installed on your Arduino board.
  • If you are new to Arduino with MicroPython, see the Getting Started with Arduino and MicroPython.
  • Connect the joystick to the Arduino according to the provided diagram.
  • Connect the Arduino board to your computer with a USB cable.
  • Open Thonny IDE and go to Tools Options.
  • Under the Interpreter tab, select MicroPython (generic) from the dropdown menu.
  • Select the COM port corresponding to your Arduino board (e.g., COM33 on Windows or /dev/ttyACM0 on Linux).
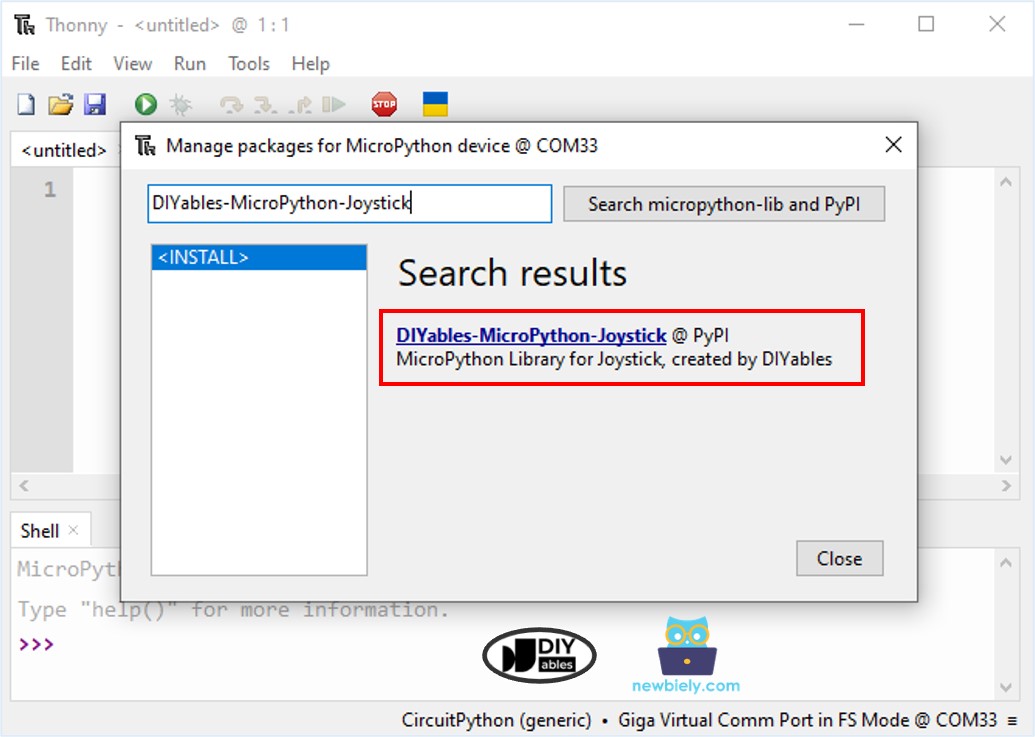
  • Navigate to the Tools Manage packages on the Thonny IDE.
  • Search “DIYables-MicroPython-Joystick”, then find the Joystick library created by DIYables.
  • Click on DIYables-MicroPython-Joystick, then click Install button to install Joystick library.
Arduino MicroPython Joystick library
  • Copy the provided Arduino MicroPython code and paste it into Thonny's editor.
  • Save the MicroPython code to your Arduino by:
    • Clicking the Save button or pressing Ctrl+S.
    • In the save dialog, choose MicroPython device and name the file main.py.
  • Click the green Run button (or press F5) to execute the code.
  • Slide the joystick left, right, up, or down.
  • Push down on the top of the joystick.
  • Check out the message in the Shell at the bottom of Thonny.
Shell x
>>> %Run -c $EDITOR_CONTENT
MPY: soft reboot MPY: soft reboot Joystick Position - X: 1806, Y: 1862, pressed count: 0 Joystick Position - X: 1413, Y: 1874, pressed count: 0 Joystick Position - X: 0, Y: 0, pressed count: 0 Joystick Position - X: 0, Y: 594, pressed count: 0 Joystick Position - X: 0, Y: 783, pressed count: 0 Joystick Position - X: 0, Y: 1084, pressed count: 0 Joystick Position - X: 0, Y: 2326, pressed count: 0 Joystick Position - X: 0, Y: 4092, pressed count: 0 Joystick Position - X: 0, Y: 4095, pressed count: 0 Joystick Position - X: 834, Y: 4095, pressed count: 0 Joystick Position - X: 1801, Y: 4095, pressed count: 0 Joystick Position - X: 4094, Y: 4095, pressed count: 0 Joystick Position - X: 4095, Y: 0, pressed count: 0 Joystick Position - X: 4095, Y: 0, pressed count: 0 Joystick Position - X: 2671, Y: 0, pressed count: 0 Joystick Position - X: 1155, Y: 0, pressed count: 0 Joystick Position - X: 0, Y: 0, pressed count: 0 Joystick Position - X: 0, Y: 1872, pressed count: 0 Joystick Position - X: 0, Y: 4095, pressed count: 0 Joystick Position - X: 0, Y: 4095, pressed count: 0 Joystick Position - X: 4095, Y: 1879, pressed count: 0 Joystick Position - X: 4095, Y: 4095, pressed count: 0 Joystick Position - X: 1803, Y: 1870, pressed count: 0 Joystick Position - X: 1800, Y: 1883, pressed count: 0 Joystick Position - X: 1805, Y: 1873, pressed count: 0 Joystick Position - X: 1797, Y: 1872, pressed count: 0 Button Pressed Joystick Position - X: 1801, Y: 1873, pressed count: 0 Button Pressed Joystick Position - X: 1803, Y: 4095, pressed count: 0 Button Released Joystick Position - X: 1801, Y: 4095, pressed count: 1 Joystick Position - X: 1805, Y: 4095, pressed count: 1 Joystick Position - X: 1802, Y: 1877, pressed count: 1 Joystick Position - X: 1802, Y: 1871, pressed count: 1 Joystick Position - X: 1797, Y: 4095, pressed count: 1 Button Pressed Joystick Position - X: 1805, Y: 1870, pressed count: 1 Joystick Position - X: 1806, Y: 1877, pressed count: 1 Joystick Position - X: 1804, Y: 1872, pressed count: 1 Joystick Position - X: 1799, Y: 1861, pressed count: 1 Button Released Joystick Position - X: 1808, Y: 1859, pressed count: 2 Joystick Position - X: 1805, Y: 1866, pressed count: 2 Button Pressed Joystick Position - X: 1799, Y: 1874, pressed count: 2 Joystick Position - X: 1808, Y: 1876, pressed count: 2 Joystick Position - X: 4095, Y: 4095, pressed count: 2 Joystick Position - X: 1803, Y: 1874, pressed count: 2 Button Released Joystick Position - X: 4095, Y: 4095, pressed count: 3 Joystick Position - X: 4095, Y: 4095, pressed count: 3
MicroPython (generic) • Giga Virtual Comm Port in FS Mode @ COM33 ≡

When using the joystick, observe the message in the Shell at the bottom of Thonny. If the X value is 0, it indicates a left position; otherwise, it indicates right. If the Y value is 0, it represents an upward position; otherwise, it indicates downward.

Keep in mind that although the theoretical range for X/Y values is from 0 to 4095, in practice, the values may not reach these extremes due to the joystick's mechanical characteristics. This variation is normal and acceptable for most applications.

Converts analog value to MOVE LEFT/RIGHT/UP/DOWN commands

The below MicroPython code converts analog values into commands: MOVE_LEFT, MOVE_RIGHT, MOVE_UP, MOVE_DOWN.

""" This Arduino MicroPython script was developed by newbiely.com This Arduino MicroPython script is made available for public use without any restriction For comprehensive instructions and wiring diagrams, please visit: https://newbiely.com/tutorials/arduino-micropython/arduino-micropython-joystick """ from DIYables_MicroPython_Joystick import Joystick from machine import Pin, ADC import time # Constants for threshold values LEFT_THRESHOLD = 1000 RIGHT_THRESHOLD = 3000 UP_THRESHOLD = 1000 DOWN_THRESHOLD = 3000 # Command constants COMMAND_NO = 0x00 COMMAND_LEFT = 0x01 COMMAND_RIGHT = 0x02 COMMAND_UP = 0x04 COMMAND_DOWN = 0x08 VRX_PIN = 'A0' # The Arduino Giga R1 WiFi's pin connected to VRX pin of joystick VRY_PIN = 'A1' # The Arduino Giga R1 WiFi's pin connected to VRY pin of joystick SW_PIN = 'D2' # The Arduino Giga R1 WiFi's pin connected to SW pin of joystick joystick = Joystick(pin_x=VRX_PIN, pin_y=VRY_PIN, pin_button=SW_PIN) # Configure the debounce time if necessary (default is 50ms) joystick.set_debounce_time(100) # debounce time set to 100 milliseconds def check_commands(x_value, y_value): command = COMMAND_NO # Check for left/right commands if x_value < LEFT_THRESHOLD: command |= COMMAND_LEFT elif x_value > RIGHT_THRESHOLD: command |= COMMAND_RIGHT # Check for up/down commands if y_value < UP_THRESHOLD: command |= COMMAND_UP elif y_value > DOWN_THRESHOLD: command |= COMMAND_DOWN return command while True: x_value = joystick.read_x() y_value = joystick.read_y() command = check_commands(x_value, y_value) if command & COMMAND_LEFT: print("COMMAND LEFT") if command & COMMAND_RIGHT: print("COMMAND RIGHT") if command & COMMAND_UP: print("COMMAND UP") if command & COMMAND_DOWN: print("COMMAND DOWN") time.sleep(0.1) # Delay to reduce the output frequency, note that, long delay can make it miss the thump press

Detailed Instructions

  • Copy the above code and paste it into the editor of Thonny IDE.
  • Save the script to your Arduino board.
  • Click the green Run button (or press F5) to execute the code.
  • Move the joystick left, right, up, down, or in any direction.
  • Check out the message in the Shell at the bottom of Thonny.
Shell x
>>> %Run -c $EDITOR_CONTENT
MPY: soft reboot MPY: soft reboot COMMAND UP COMMAND RIGHT COMMAND DOWN COMMAND DOWN COMMAND DOWN COMMAND RIGHT COMMAND DOWN COMMAND RIGHT COMMAND DOWN COMMAND LEFT COMMAND DOWN
MicroPython (generic) • Giga Virtual Comm Port in FS Mode @ COM33 ≡

※ NOTE THAT:

There might be no command, one command, or even two commands at the same time, like UP and LEFT together.

Converts analog values to angles to control two servo motors

Learn detail in this Arduino MicroPython Joystick Controls Servo Motor tutorial.

Video Tutorial

Learn More

※ OUR MESSAGES

  • As freelancers, We are AVAILABLE for HIRE. See how to outsource your project to us
  • Please feel free to share the link of this tutorial. However, Please do not use our content on any other websites. We invested a lot of effort and time to create the content, please respect our work!