Arduino MicroPython Keypad 4x4

This guide will show you how to use an Arduino with a 4x4 keypad and MicroPython. You will learn:

Arduino MicroPython 4x4 Keypad

Hardware Preparation

1×Arduino Giga R1 WiFi
1×USB Cable Type-C
1×Membrane Keypad 4x4
1×Jumper Wires
1×(Recommended) Screw Terminal Block Shield for Arduino Uno/Mega/Giga
1×(Recommended) Breadboard Shield For Arduino Uno/Mega/Giga
1×(Recommended) Enclosure For Arduino Giga

Or you can buy the following sensor kits:

1×DIYables Sensor Kit (30 sensors/displays)
1×DIYables Sensor Kit (18 sensors/displays)
Disclosure: Some of the links provided in this section are Amazon affiliate links. We may receive a commission for any purchases made through these links at no additional cost to you.
Additionally, some of these links are for products from our own brand, DIYables.

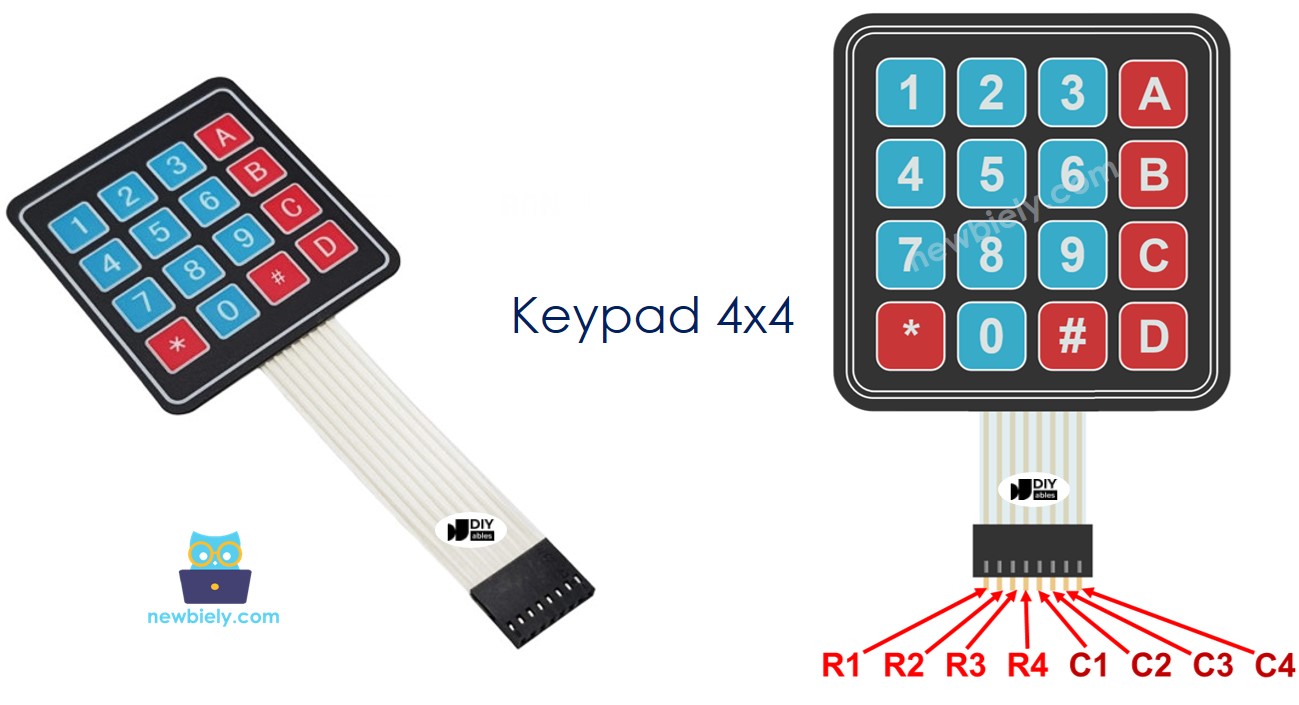
Overview of 4x4 Keypad

The 4x4 keypad includes 16 soft buttons organized in rows and columns, forming a grid. Each button is referred to as a key.

Pinout

A 4x4 keypad uses 8 pins, split into two types: rows and columns.

  • 4 pins connect to the rows (R1, R2, R3, R4).
  • 4 pins connect to the columns (C1, C2, C3, C4).
4x4 Keypad Pinout

Wiring Diagram

The wiring diagram between Arduino MicroPython Keypad 4x4

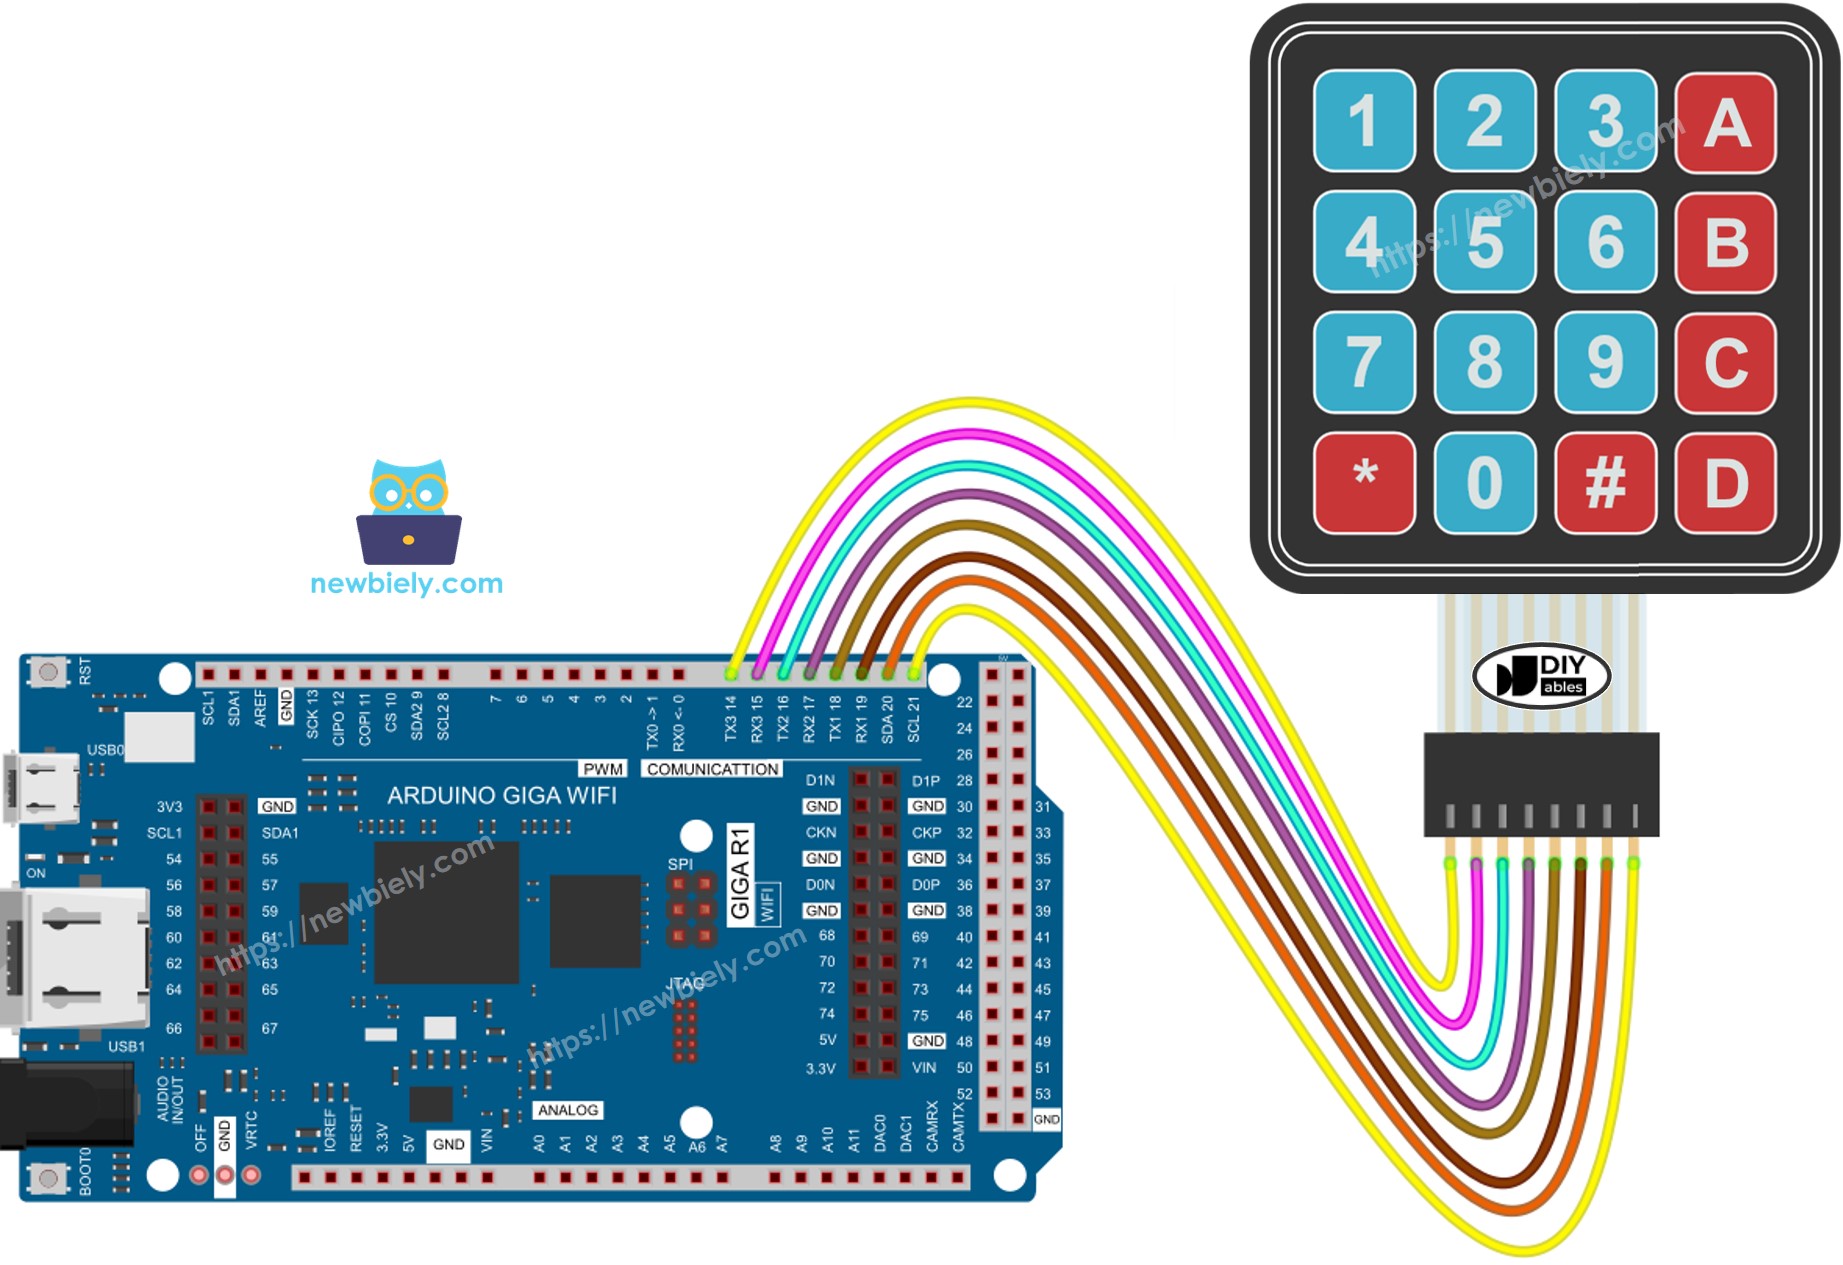
This image is created using Fritzing. Click to enlarge image

Arduino MicroPython Code

from DIYables_MicroPython_Keypad import Keypad import time NUM_ROWS = 4 NUM_COLS = 4 # Constants for GPIO pins ROW_PINS = ['D14', 'D15', 'D16', 'D17'] # The Arduino Giga WiFi pins connected to the row pins COLUMN_PINS = ['D18', 'D19', 'D20', 'D21'] # The Arduino Giga WiFi pins connected to the column pins # Keymap corresponds to the layout of the keypad 4x4 KEYMAP = ['1', '2', '3', 'A', '4', '5', '6', 'B', '7', '8', '9', 'C', '*', '0', '#', 'D'] # Initialize the keypad keypad = Keypad(KEYMAP, ROW_PINS, COLUMN_PINS, NUM_ROWS, NUM_COLS) keypad.set_debounce_time(400) # 400ms, addjust it if it detects twice for single press print("Arduino MicroPython - Keypad 4x4 example") # Main loop to check for key presses while True: key = keypad.get_key() if key: print("Key pressed: ", key)

Detailed Instructions

Here’s instructions on how to run the above MicroPython code on Arduino with Thonny IDE:

  • Make sure Thonny IDE is installed on your computer.
  • Make sure MicroPython firmware is installed on your Arduino board.
  • If you are new to Arduino with MicroPython, see the Getting Started with Arduino and MicroPython.
  • Connect the 4x4 keypad to the Arduino as shown in the diagram.
  • Connect the Arduino board to your computer with a USB cable.
  • Open Thonny IDE and go to Tools Options.
  • Under the Interpreter tab, select MicroPython (generic) from the dropdown menu.
  • Select the COM port corresponding to your Arduino board (e.g., COM33 on Windows or /dev/ttyACM0 on Linux).
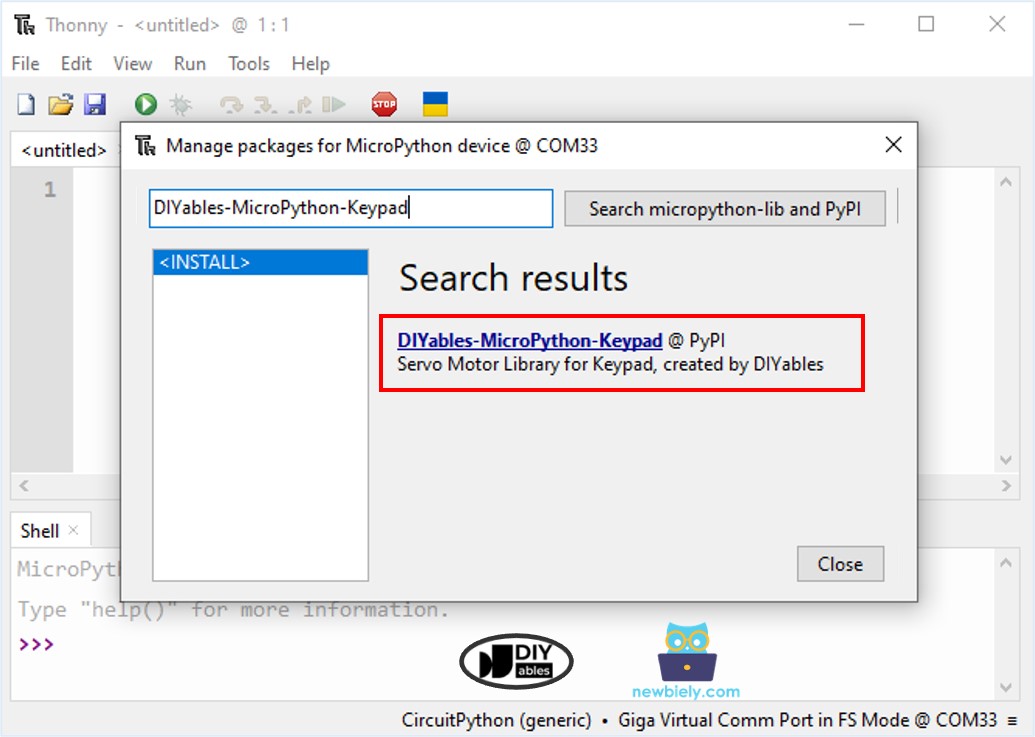
  • Navigate to the Tools Manage packages on the Thonny IDE.
  • Search “DIYables-MicroPython-Keypad”, then find the Keypad library created by DIYables.
  • Click on DIYables-MicroPython-Keypad, then click Install button to install Keypad library.
Arduino MicroPython Keypad library
  • Copy the provided Arduino MicroPython code and paste it into Thonny's editor.
  • Save the MicroPython code to your Arduino by:
    • Clicking the Save button or pressing Ctrl+S.
    • In the save dialog, choose MicroPython device and name the file main.py.
  • Click the green Run button (or press F5) to execute the code.
  • Press some keys on the 4x4 keypad.
  • Check out the message in the Shell at the bottom of Thonny.
Shell x
>>> %Run -c $EDITOR_CONTENT
MPY: soft reboot MPY: soft reboot Arduino MicroPython - Keypad 4x4 example Key pressed: 1 Key pressed: 2 Key pressed: 3 Key pressed: 4 Key pressed: 5 Key pressed: 6 Key pressed: A Key pressed: B Key pressed: C Key pressed: * Key pressed: #
MicroPython (generic) • Giga Virtual Comm Port in FS Mode @ COM33 ≡

If it doesn't work, check your wiring carefully. It's easy to make mistakes when connecting the Arduino to the 4x4 keypad.

Keypad and Password

A keypad is often used to type a password. Here, we use two special keys:

  • A key to begin or re-enter the password, like the "*" key.
  • A key to complete the password entry, like the "#" key.

The password will consist of other keys, except for the two special keys. When you press a key:

  • If the key is neither "*" nor "#", include it in the password being typed.
  • If the key is "#", verify if the typed password is correct. Then, reset the password.
  • If the key is "*", reset the password.

Keypad - Password Code

""" This Arduino MicroPython script was developed by newbiely.com This Arduino MicroPython script is made available for public use without any restriction For comprehensive instructions and wiring diagrams, please visit: https://newbiely.com/tutorials/arduino-micropython/arduino-micropython-keypad-4x4 """ from DIYables_MicroPython_Keypad import Keypad import time NUM_ROWS = 4 NUM_COLS = 4 # Constants for GPIO pins ROW_PINS = ['D14', 'D15', 'D16', 'D17'] # The Arduino Giga WiFi pins connected to the row pins COLUMN_PINS = ['D18', 'D19', 'D20', 'D21'] # The Arduino Giga WiFi pins connected to the column pins # Keymap corresponds to the layout of the keypad 4x4 KEYMAP = ['1', '2', '3', 'A', '4', '5', '6', 'B', '7', '8', '9', 'C', '*', '0', '#', 'D'] # Initialize the keypad keypad = Keypad(KEYMAP, ROW_PINS, COLUMN_PINS, NUM_ROWS, NUM_COLS) keypad.set_debounce_time(400) # 400ms, addjust it if it detects twice for single press # Define the correct password correct_password = "1234A" input_password = "" print("Arduino MicroPython - Keypad 4x4 password") # Main loop while True: key = keypad.get_key() if key: print(key) if key == '*': input_password = "" # Clear input password elif key == '#': if input_password == correct_password: print("Password is correct") # DO YOUR WORK HERE else: print("Password is incorrect, try again") input_password = "" # Clear input password else: input_password += key # Append new character to input password string
  • Copy the above code and paste it to the Thonny IDE's editor.
  • Save the script to your Arduino
  • Type the keys "123" and then hit "#".
  • Type the keys "1234A" and then hit "#".
  • Check out the message in the Shell at the bottom of Thonny.
Shell x
>>> %Run -c $EDITOR_CONTENT
MPY: soft reboot MPY: soft reboot Arduino MicroPython - Keypad 4x4 password 1 2 3 # Password is incorrect, try again 1 2 3 4 A # Password is correct
MicroPython (generic) • Giga Virtual Comm Port in FS Mode @ COM33 ≡

Video Tutorial

※ OUR MESSAGES

  • As freelancers, We are AVAILABLE for HIRE. See how to outsource your project to us
  • Please feel free to share the link of this tutorial. However, Please do not use our content on any other websites. We invested a lot of effort and time to create the content, please respect our work!