ESP32 MicroPython Button Debounce
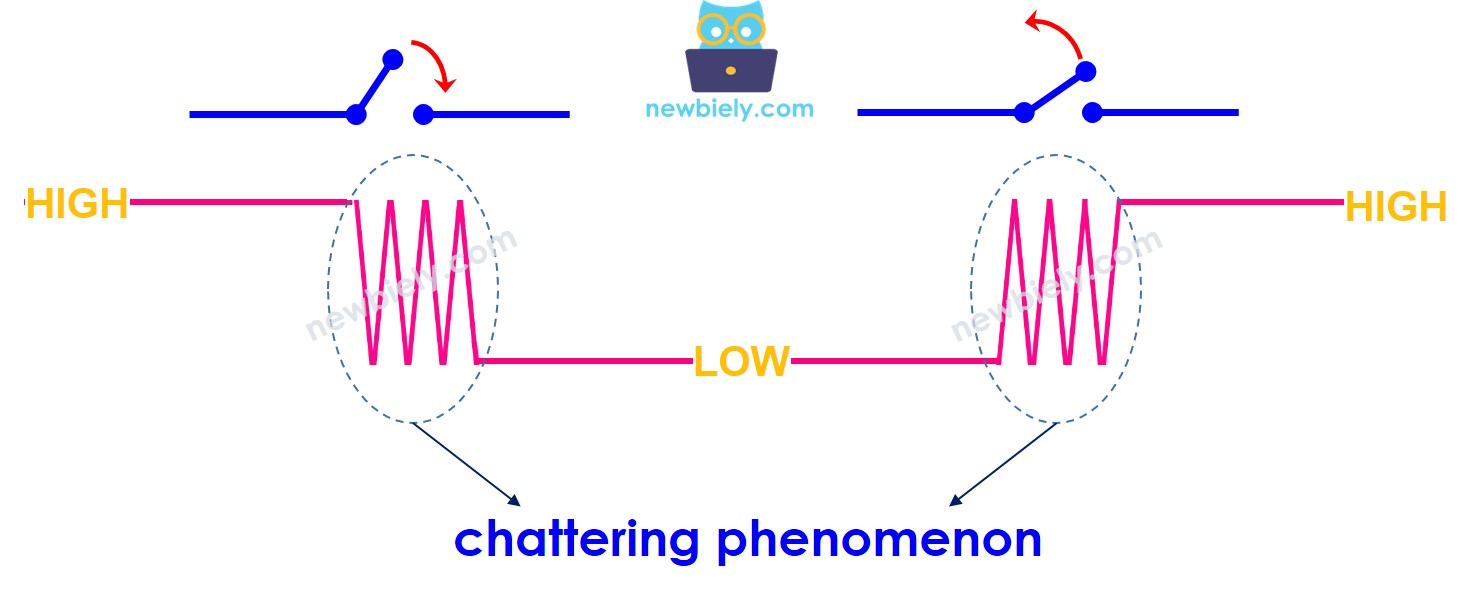
Sometimes, when you connect a button to an ESP32, it might seem like the button is pressed many times when you only press it once. This is because the button can quickly switch between being pressed and not pressed. This is called bouncing, also known as chattering. Bouncing can cause problems in your program.
This guide will show you how to fix this problem for ESP32 by using a technique called debouncing with MicroPython. Debouncing helps the ESP32 recognize a single button press as just one press.
We will learn though the below steps:
ESP32 MicroPython code without debouncing a button.
ESP32 MicroPython code with debouncing a button.
ESP32 MicroPython code with debouncing for multiple buttons.
Or you can buy the following kits:
Disclosure: Some of the links provided in this section are Amazon affiliate links. We may receive a commission for any purchases made through these links at no additional cost to you.
Additionally, some of these links are for products from our own brand,
DIYables .
If you're not yet familiar with button (including their pinout, how it works, interfacing with the ESP32, and writing MicroPython code for the ESP32 to interact with them), you can learn more at:
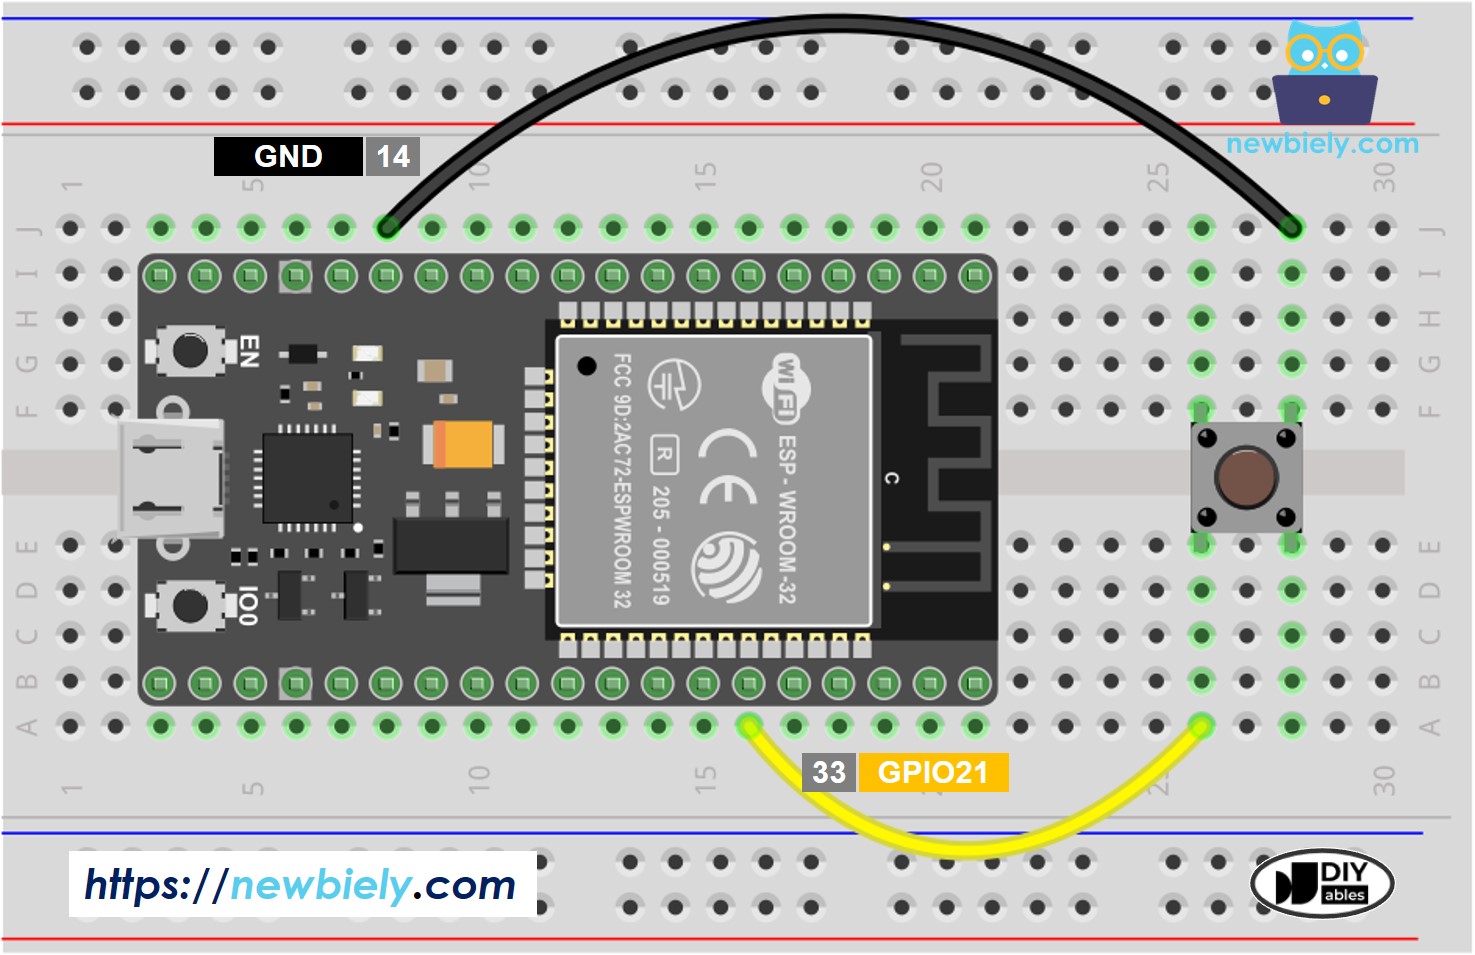
This image is created using Fritzing. Click to enlarge image
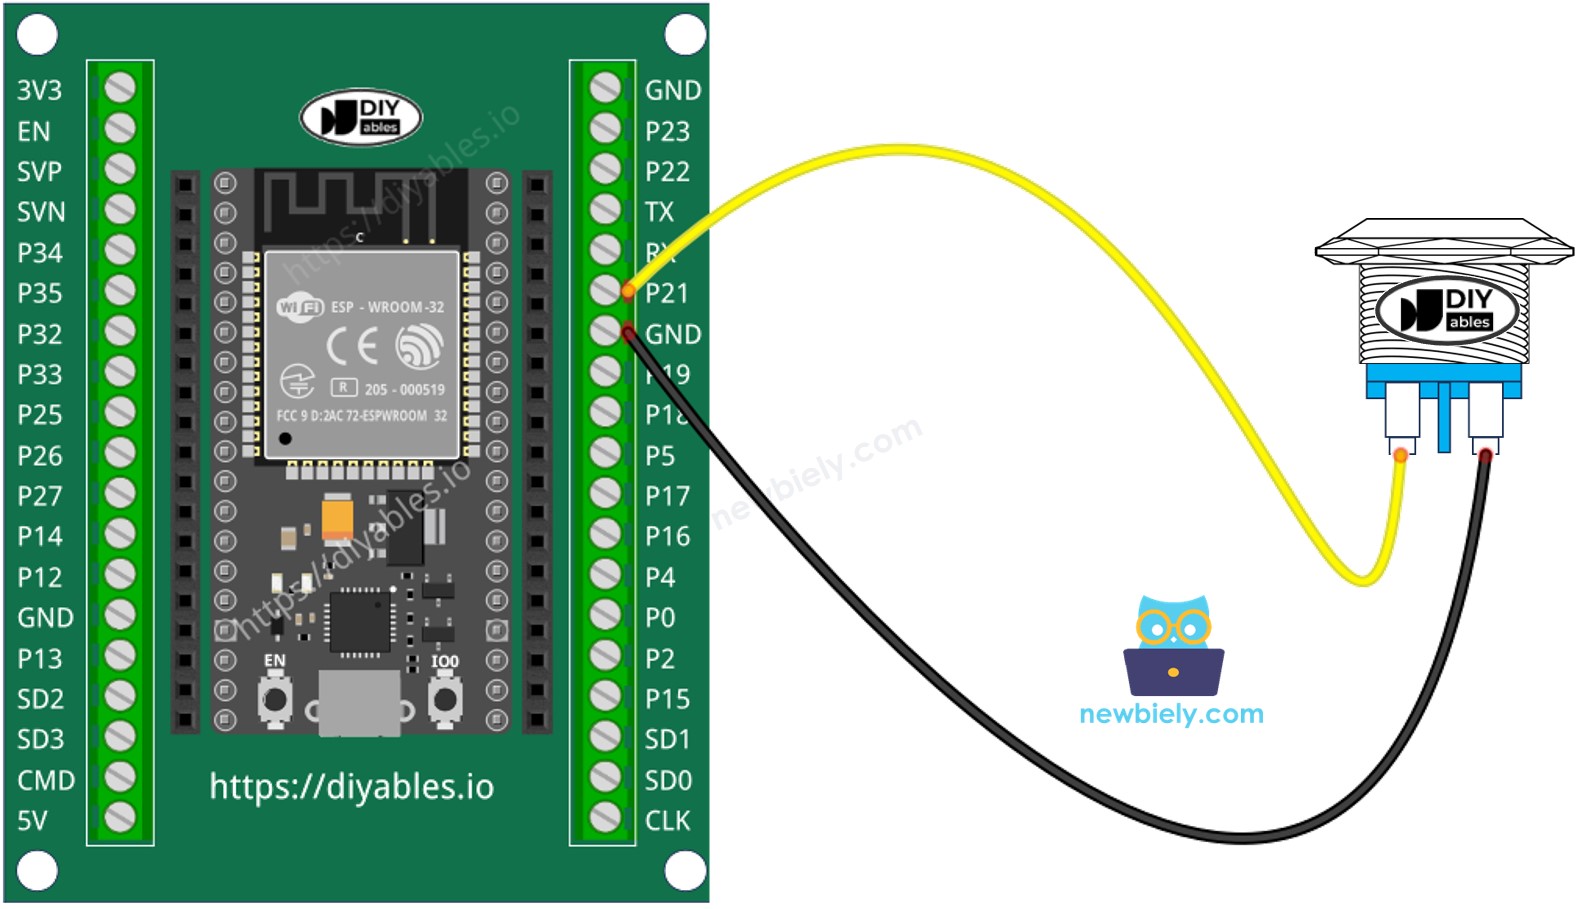
This image is created using Fritzing. Click to enlarge image
Let's compare the ESP32 MicroPython code without and with debouncing to see how debouncing affects the behavior.
First, let's examine the MicroPython code for ESP32 without debouncing to understand its behavior.
from machine import Pin
import time
BUTTON_PIN = 21
button = Pin(BUTTON_PIN, Pin.IN, Pin.PULL_UP)
prev_button_state = 1
while True:
button_state = button.value()
if prev_button_state == 0 and button_state == 1:
print("The button is released")
if prev_button_state == 1 and button_state == 0:
print("The button is pressed")
prev_button_state = button_state
Here’s instructions on how to set up and run your MicroPython code on the ESP32 using Thonny IDE:
Make sure Thonny IDE is installed on your computer.
Confirm that MicroPython firmware is loaded on your ESP32 board.
Connect the button to the ESP32 as shown in the diagram.
Connect the ESP32 board to your computer with a USB cable.
Open Thonny IDE on your computer.
In Thonny IDE, go to Tools Options.
Under the Interpreter tab, choose MicroPython (ESP32) from the dropdown menu.
Make sure the correct port is selected. Thonny IDE usually detects it automatically, but you might need to select it manually (like COM12 on Windows or /dev/ttyACM0 on Linux).
Copy the provided MicroPython code and paste it into Thonny's editor.
Save the code to your ESP32 by:
Click the green Run button (or press F5) to execute the script.
Press and hold the button for a few seconds, then release.
Check out the message in the Shell at the bottom of Thonny IDE.
>>> %Run -c $EDITOR_CONTENT
MPY: soft reboot
The button is pressed
The button is pressed
The button is pressed
The button is released
The button is released
MicroPython (ESP32) • CP2102 USB To UART Bridge Controller @ COM12 ≡
As you can see in the log, you pressed the button only once, but the ESP32 detected multiple presses.
from DIYables_MicroPython_Button import Button
import time
button = Button(21)
button.set_debounce_time(100)
while True:
button.loop()
if button.is_pressed():
print("The button is pressed")
if button.is_released():
print("The button is released")
In Thonny IDE, navigate to the Tools Manage packages on the Thonny IDE.
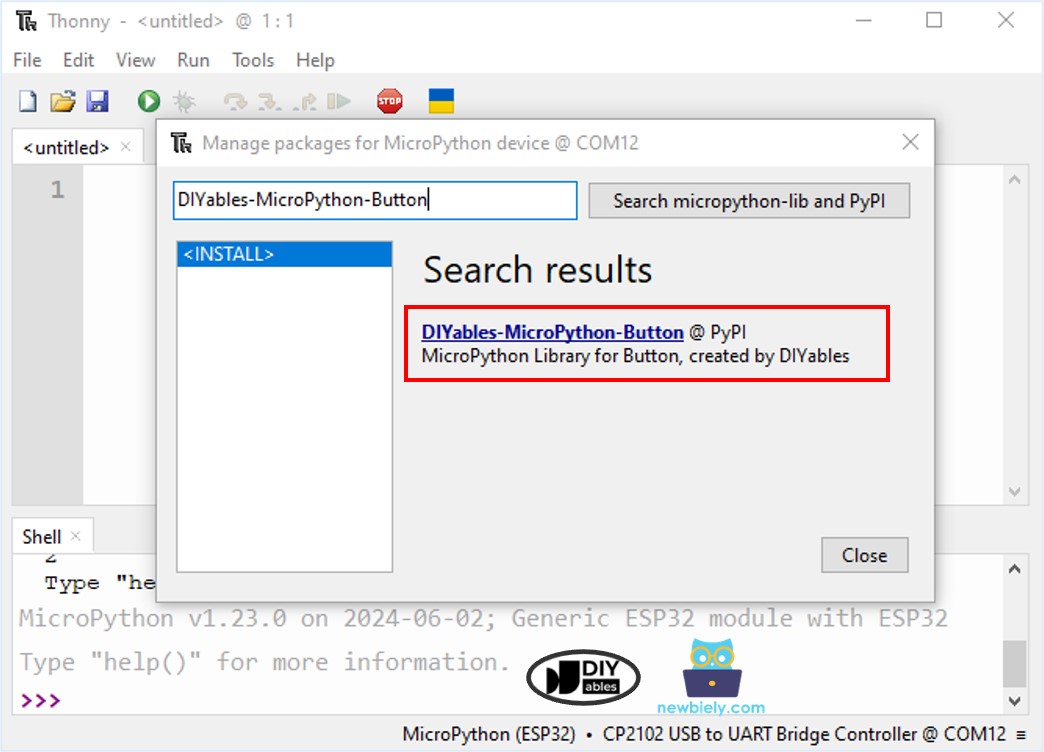
Search “DIYables-MicroPython-Button”, then find the Button library created by DIYables.
Click on DIYables-MicroPython-Button, then click Install button to install Button library.
Copy the given code and paste it into the Thonny IDE's editor.
Save the script on your ESP32 board.
Click the green Run button (or press F5) to start the script. The script will start running.
Press the button.
Check out the message in the Shell at the bottom of Thonny IDE.
>>> %Run -c $EDITOR_CONTENT
MPY: soft reboot
The button is pressed
The button is released
MicroPython (ESP32) • CP2102 USB To UART Bridge Controller @ COM12 ≡
You pressed the button once, and the ESP32 correctly identified it as a single push and release, with no additional disturbances.
※ NOTE THAT:
Different apps use different DEBOUNCE_TIME settings. Each app might have its own specific value.
Let's add debouncing to four buttons using ESP32 with MicroPython. Here's how to connect them to your ESP32:
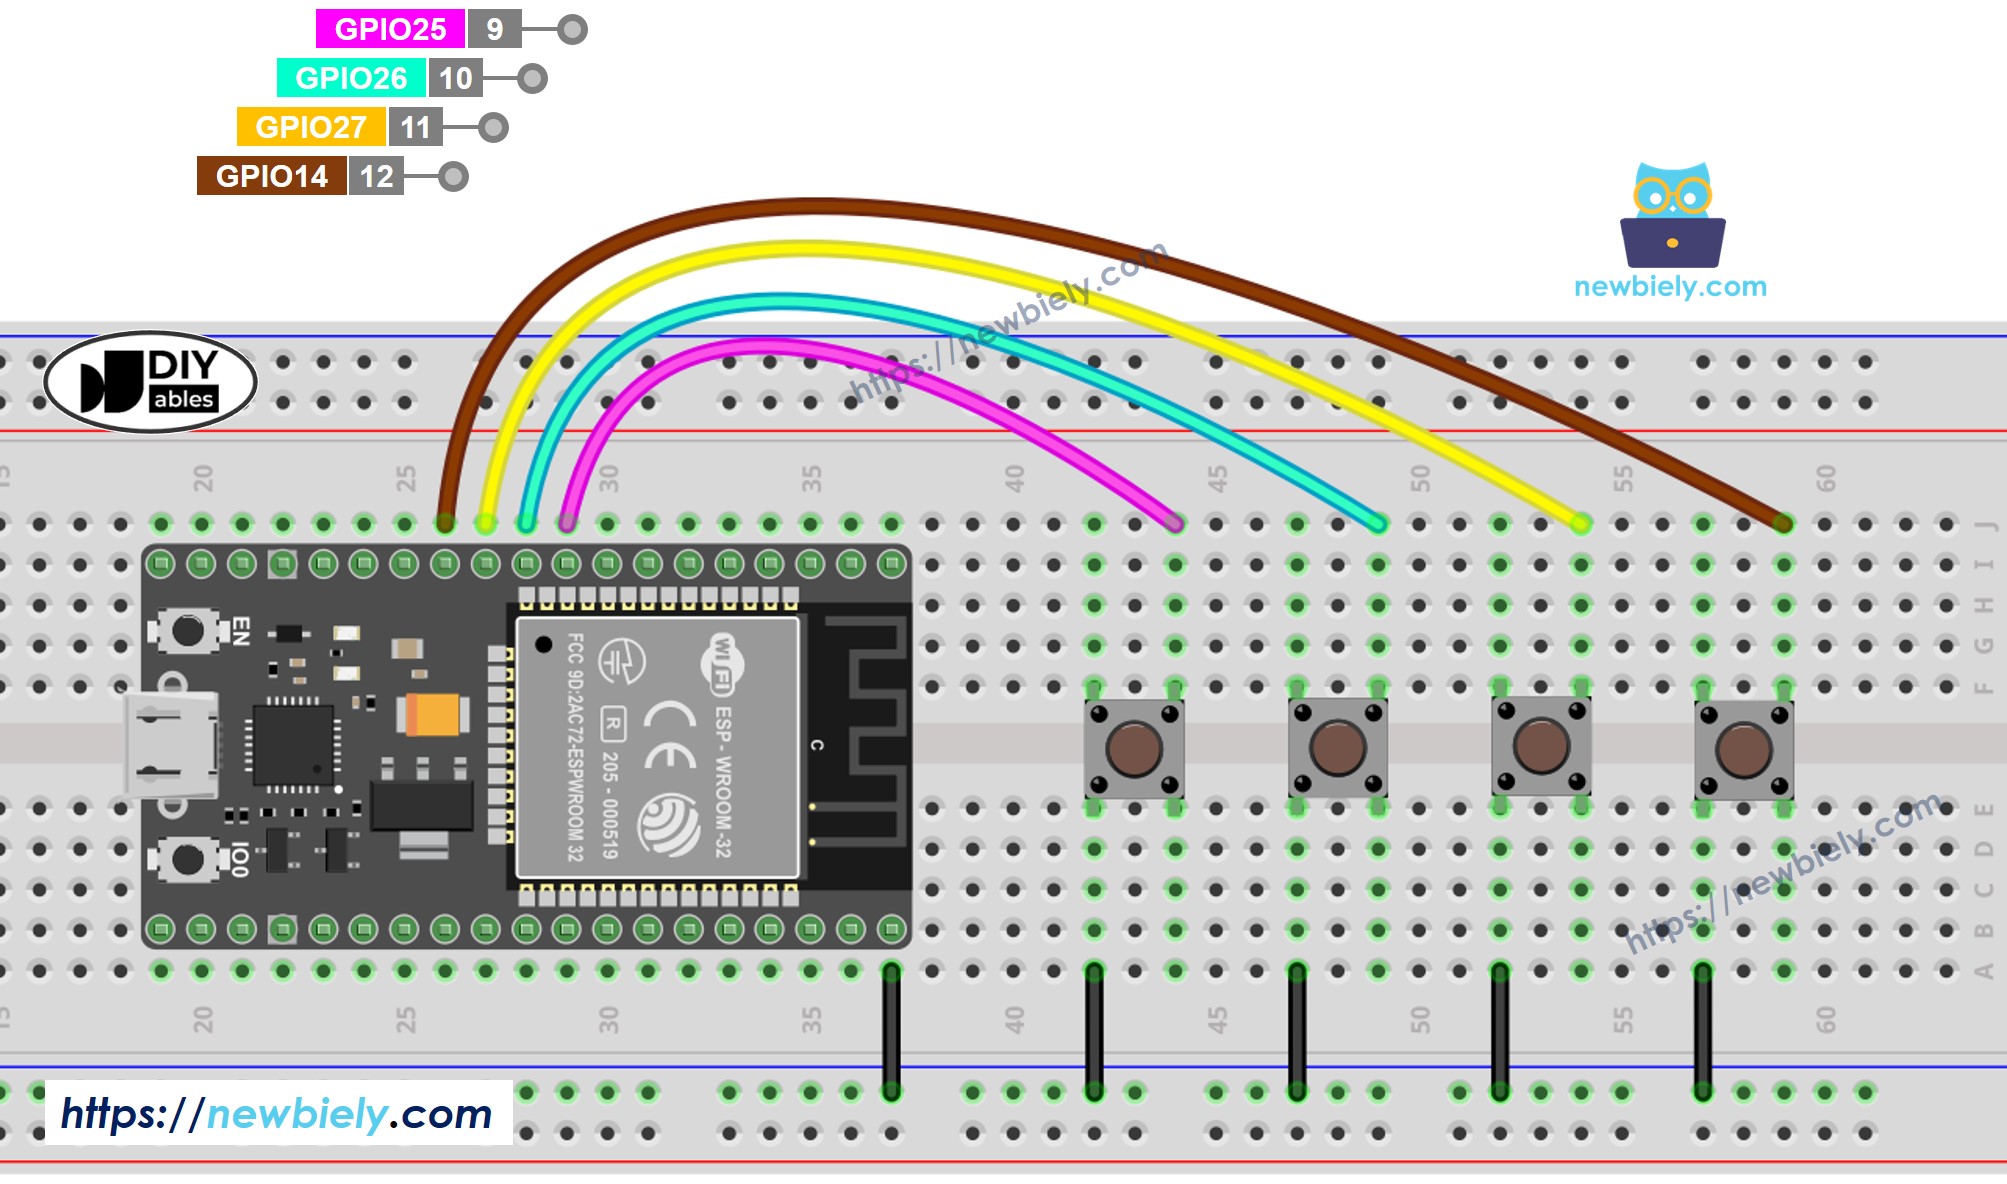
This image is created using Fritzing. Click to enlarge image
from DIYables_MicroPython_Button import Button
import time
button_1 = Button(25)
button_2 = Button(26)
button_3 = Button(27)
button_4 = Button(14)
button_1.set_debounce_time(100)
button_2.set_debounce_time(100)
button_3.set_debounce_time(100)
button_4.set_debounce_time(100)
while True:
button_1.loop()
button_2.loop()
button_3.loop()
button_4.loop()
if button_1.is_pressed():
print("The button 1 is pressed")
if button_1.is_released():
print("The button 1 is released")
if button_2.is_pressed():
print("The button 2 is pressed")
if button_2.is_released():
print("The button 2 is released")
if button_3.is_pressed():
print("The button 3 is pressed")
if button_3.is_released():
print("The button 3 is released")
if button_4.is_pressed():
print("The button 4 is pressed")
if button_4.is_released():
print("The button 4 is released")
