
ESP32 MicroPython Control Heating Element
This tutorial instructs you how to control a heating element with the ESP32 and MicroPython. In detail, we will learn:
- How a heating element works
- How to connect a heating element to ESP32
- How to write MicroPython code for ESP32 to control a heating element
- How to set the heat level of the heating element with a MOSFET module
A heating element can be driven by a relay or by a MOSFET module. The relay gives only two states: heating at full power, or not heating. The MOSFET module also switches it ON and OFF, but with PWM it can give the element only part of the power, so you can choose a lower heat level. It is silent, and it does not wear out when it switches many times. We go through both methods below.
Hardware Preparation
Or you can buy the following kits:
| 1 | × | DIYables ESP32 Starter Kit (ESP32 included) | |
| 1 | × | DIYables ESP32 S3 Starter Kit (ESP32 S3 included) | |
| 1 | × | DIYables Sensor Kit (18 sensors/displays) |
Additionally, some of these links are for products from our own brand, DIYables .
Overview of Heating Element
Pinout
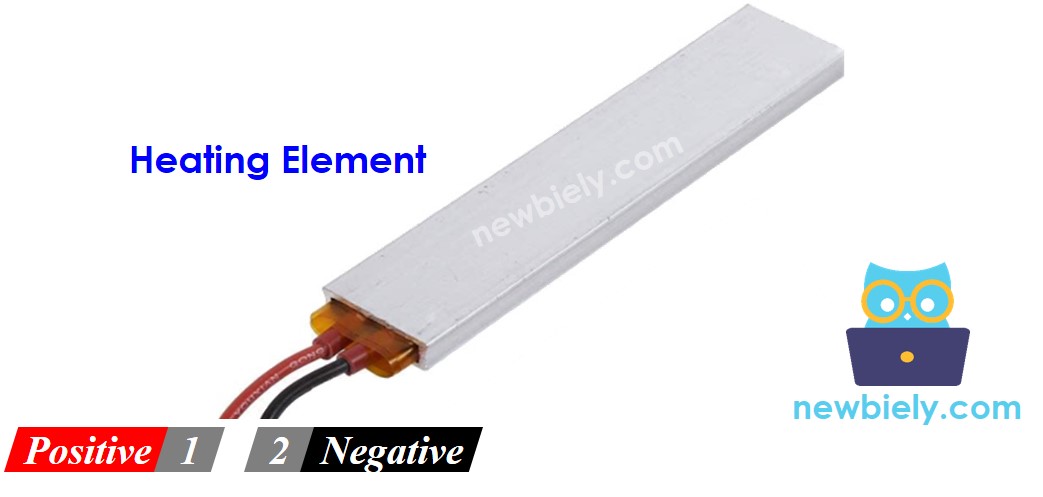
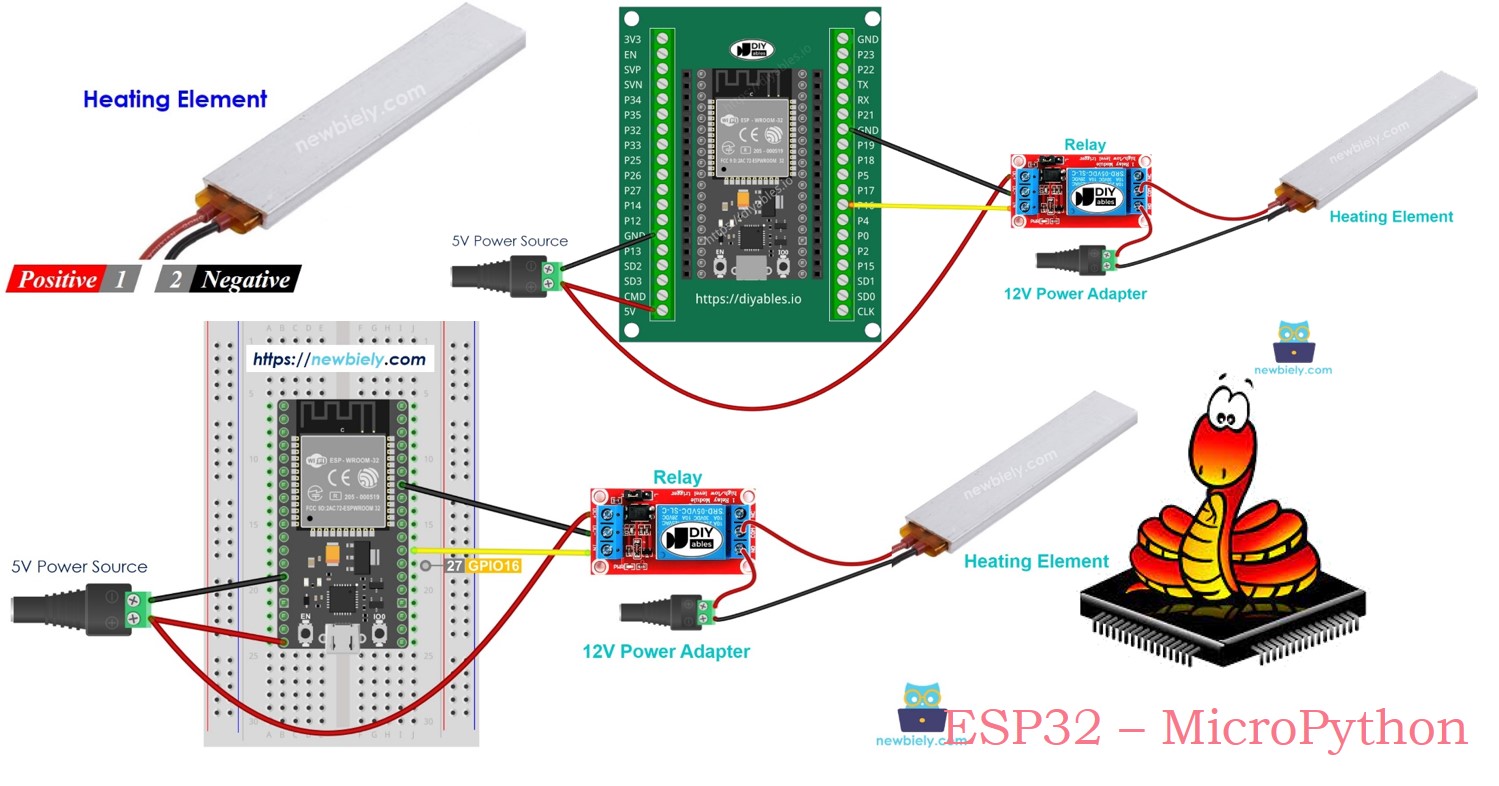
A heating element typically has two pins:
- Connect the positive (+) pin (red) to the 12V DC power supply.
- Connect the negative (-) pin (black) to the ground (GND) of the DC power supply.
How to Control Heating Element
When a 12V heating element is connected to a 12V power source, it produces heat. To control the heating element with an ESP32, we use a relay. The ESP32 sends signals to the relay, which then controls the heating element. If you need more information on how a relay works, its pin configuration, or how to set it up, check out the ESP32 MicroPython Relay tutorial.
The second option is a MOSFET module. The ESP32 MicroPython - MOSFET Module guide covers its pinout, the three chip versions, and how PWM changes the power.
Relay vs MOSFET Module for Heating Element
| Relay | MOSFET Module | |
|---|---|---|
| Heat control | full heat or no heat | full heat, no heat, or a heat level in between (PWM) |
| Switching often (for example, to keep a set temperature) | contacts wear out faster | fine, it has no moving parts |
| Sound | clicks | silent |
| Speed | slow (milliseconds) | very fast |
| Supply type | AC or DC | DC only |
| Minimum supply | no minimum (within rating) | about 6V, because the gate gets its voltage from this supply |
| Isolation | yes (coil and contacts are separate) | yes (PC817 optocoupler) |
| Use it for | AC heaters, simple ON/OFF | 12V DC heaters, heat level control, frequent switching |
If your heating element runs on 12V DC, the MOSFET module is a good match. It can hold a lower heat level, and it can switch on and off all day to keep a temperature without wearing out. For a mains (AC) heater, you must stay with the relay.
Wiring Diagram
- How to connect ESP32 and controls heating element using breadboard (powered via USB cable)
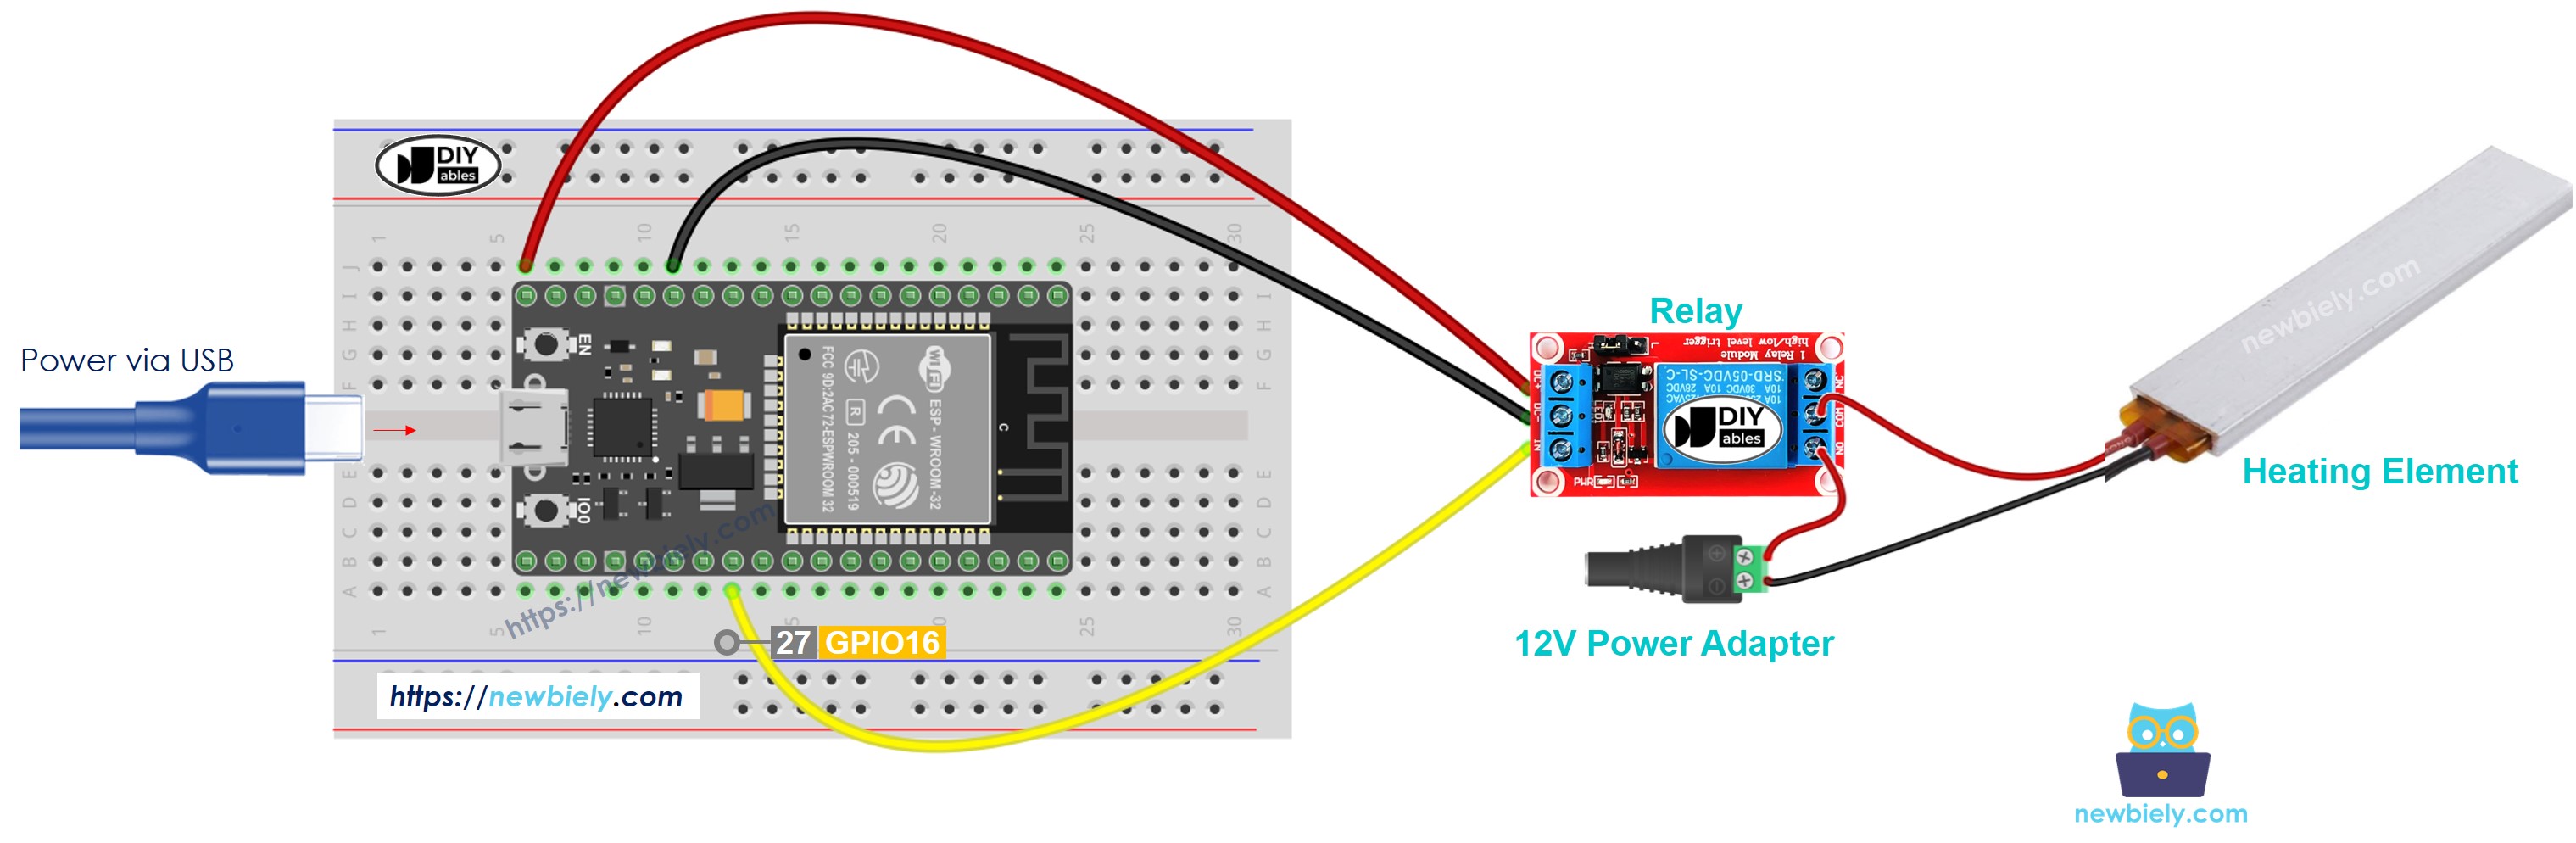
This image is created using Fritzing. Click to enlarge image
- How to connect ESP32 and controls heating element using breadboard (powered via Vin pin)
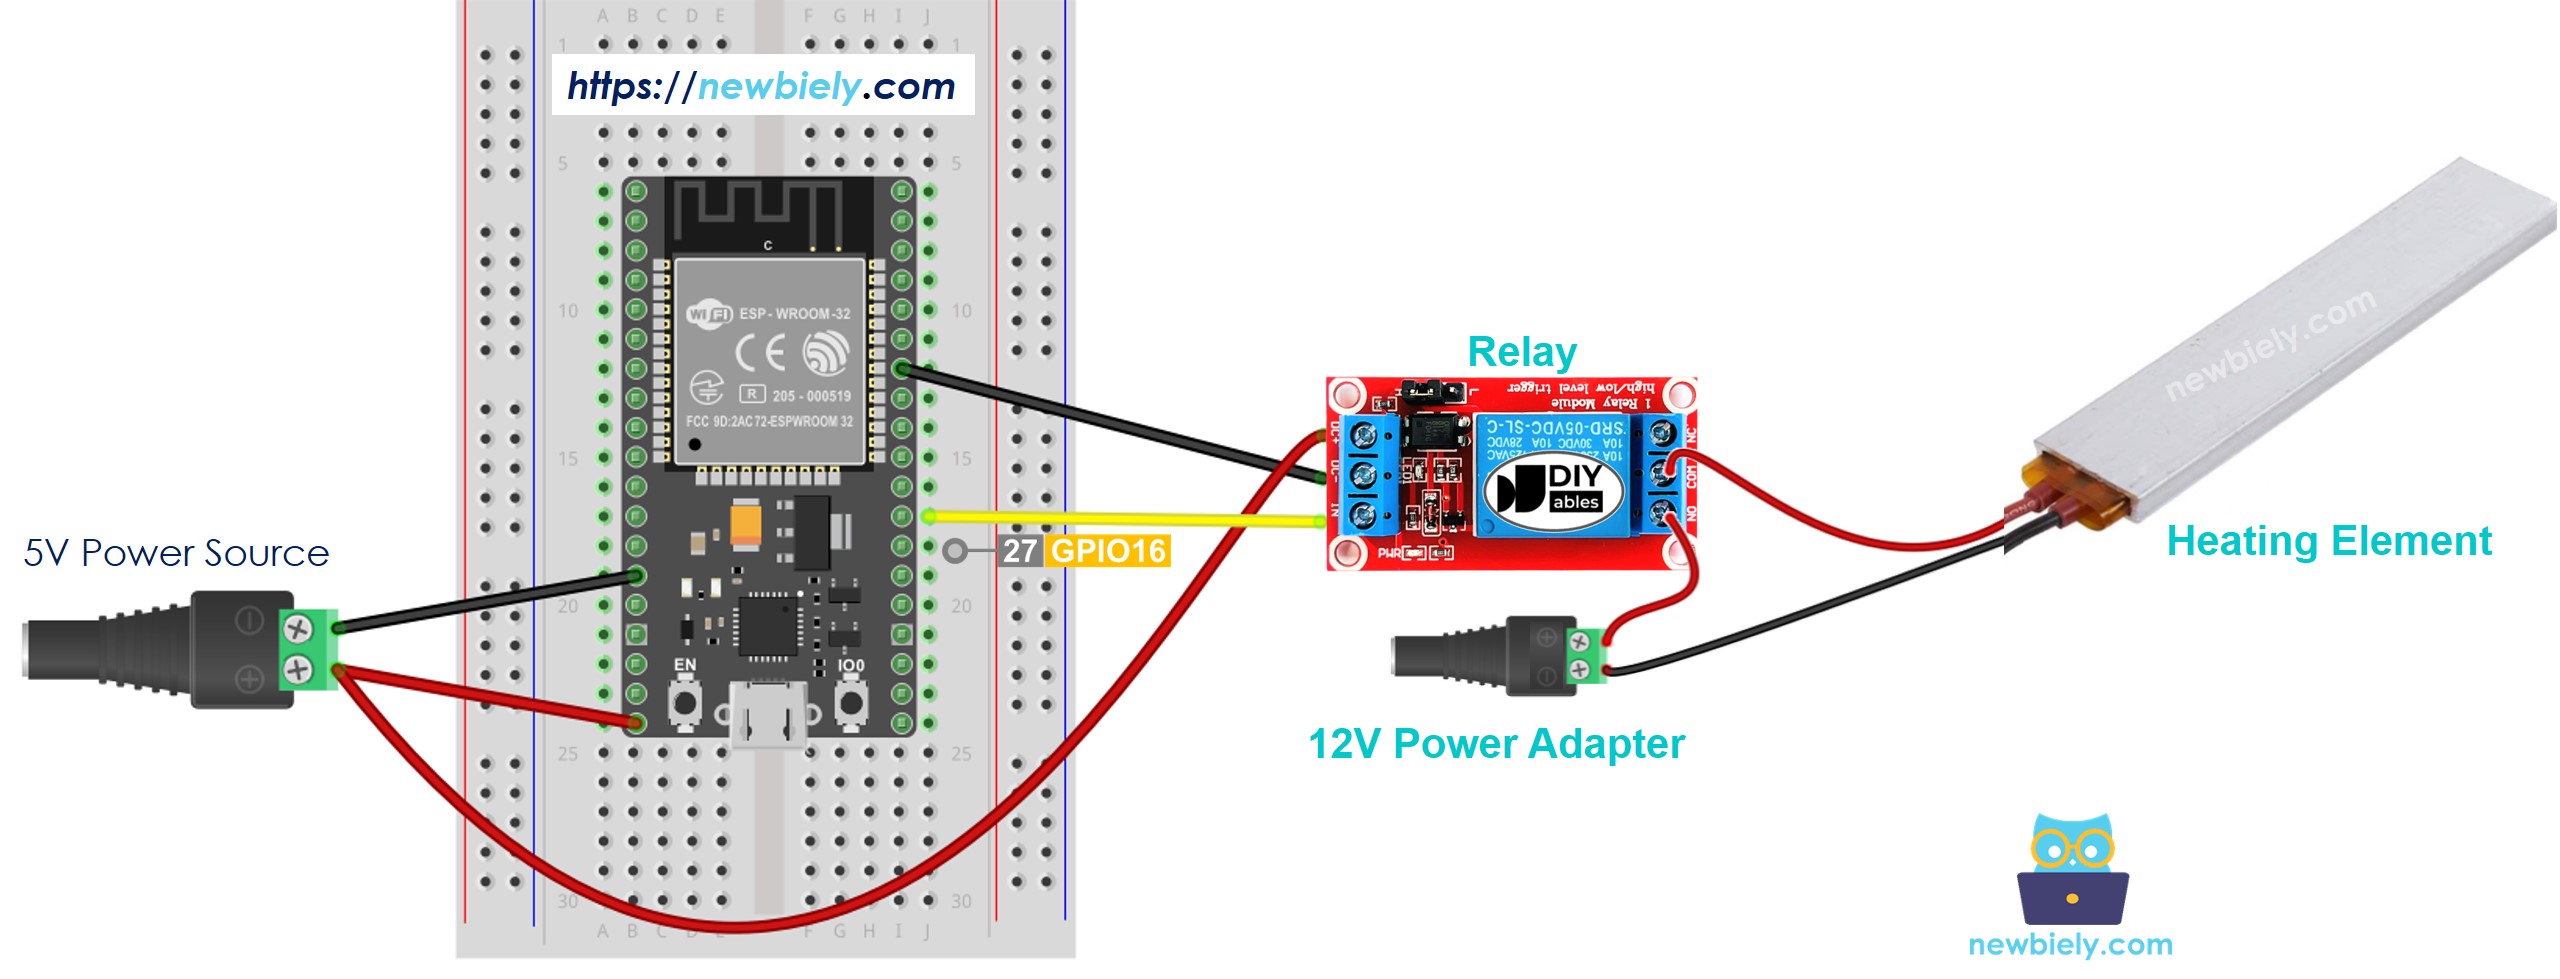
This image is created using Fritzing. Click to enlarge image
- How to connect ESP32 and controls heating element using screw terminal block breakout board (powered via USB cable)
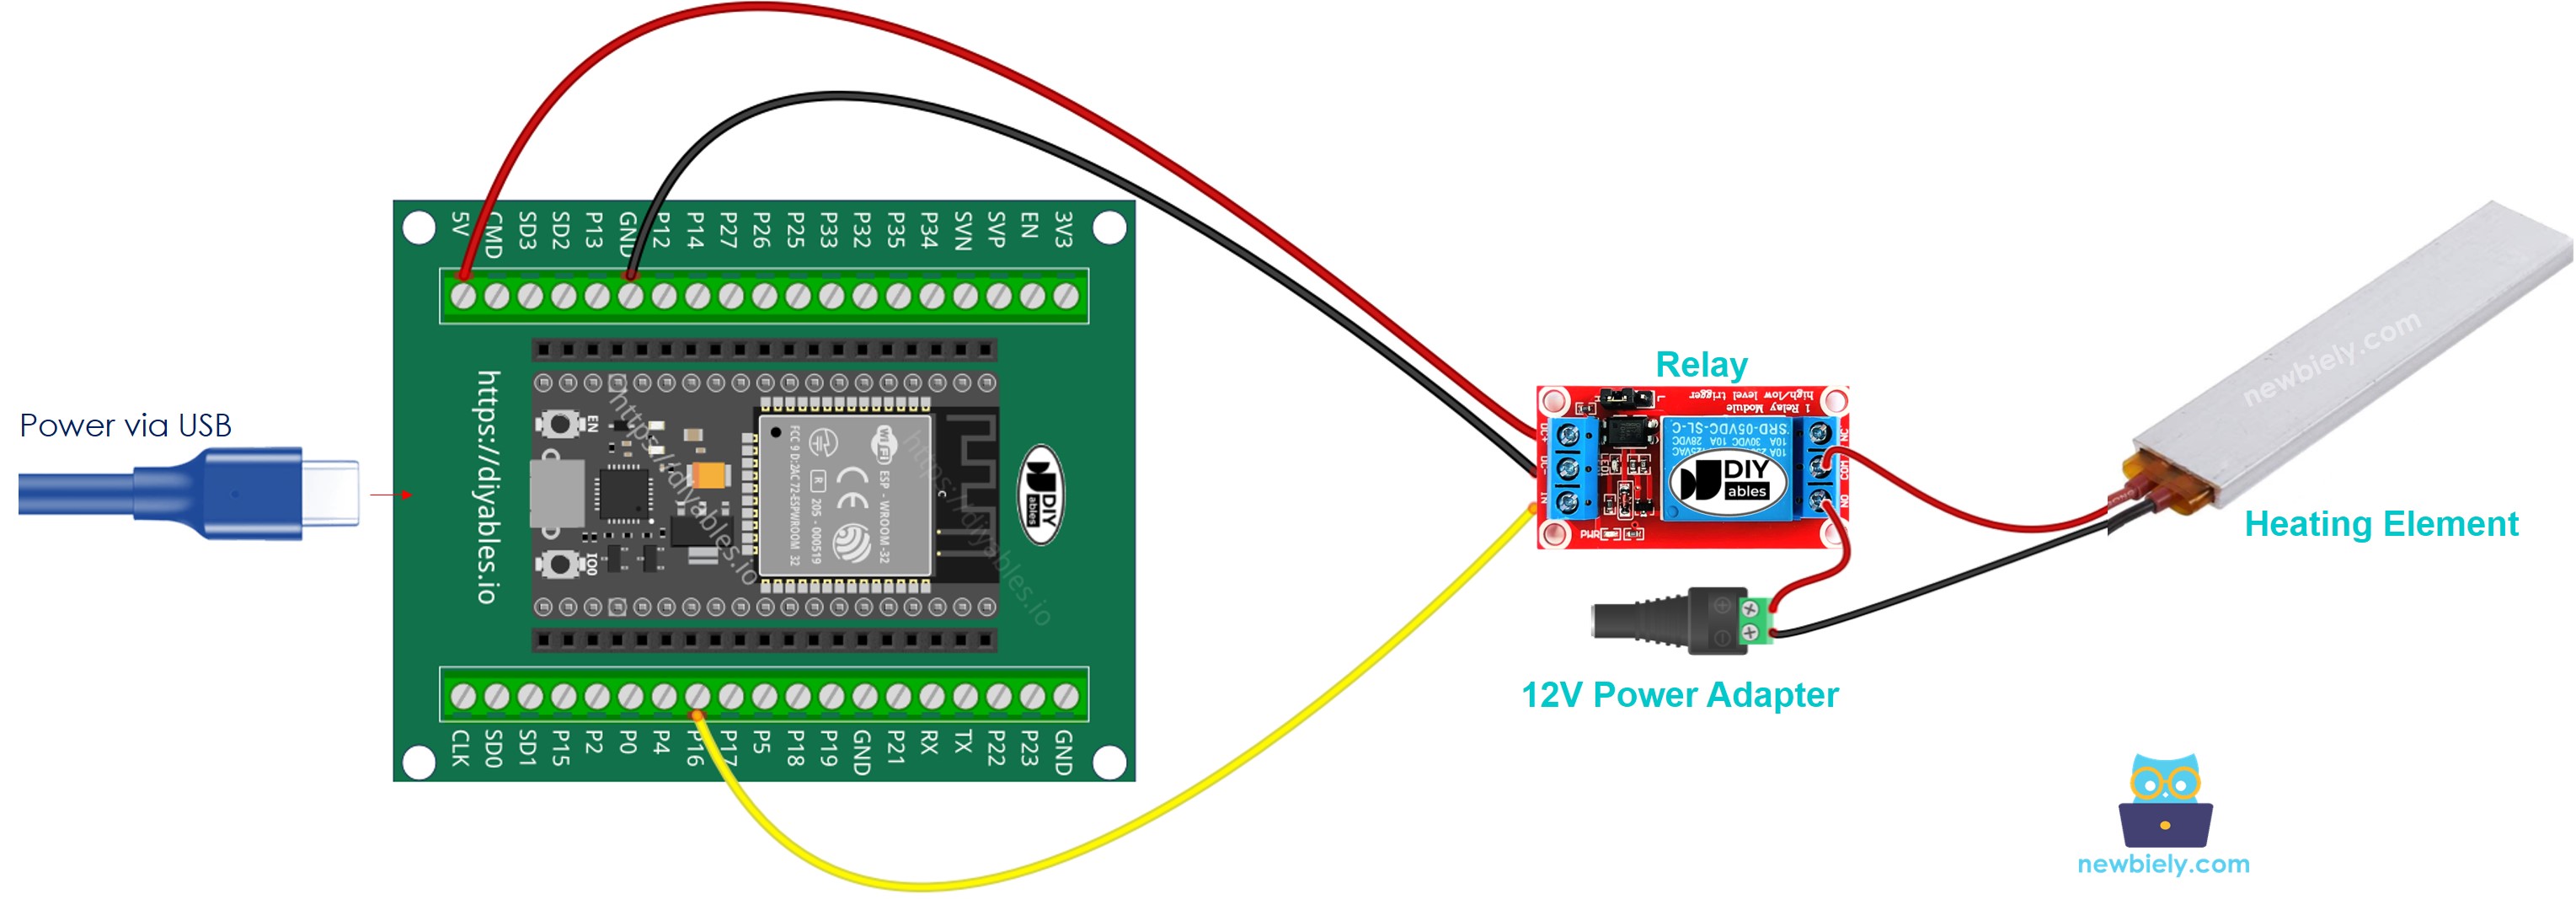
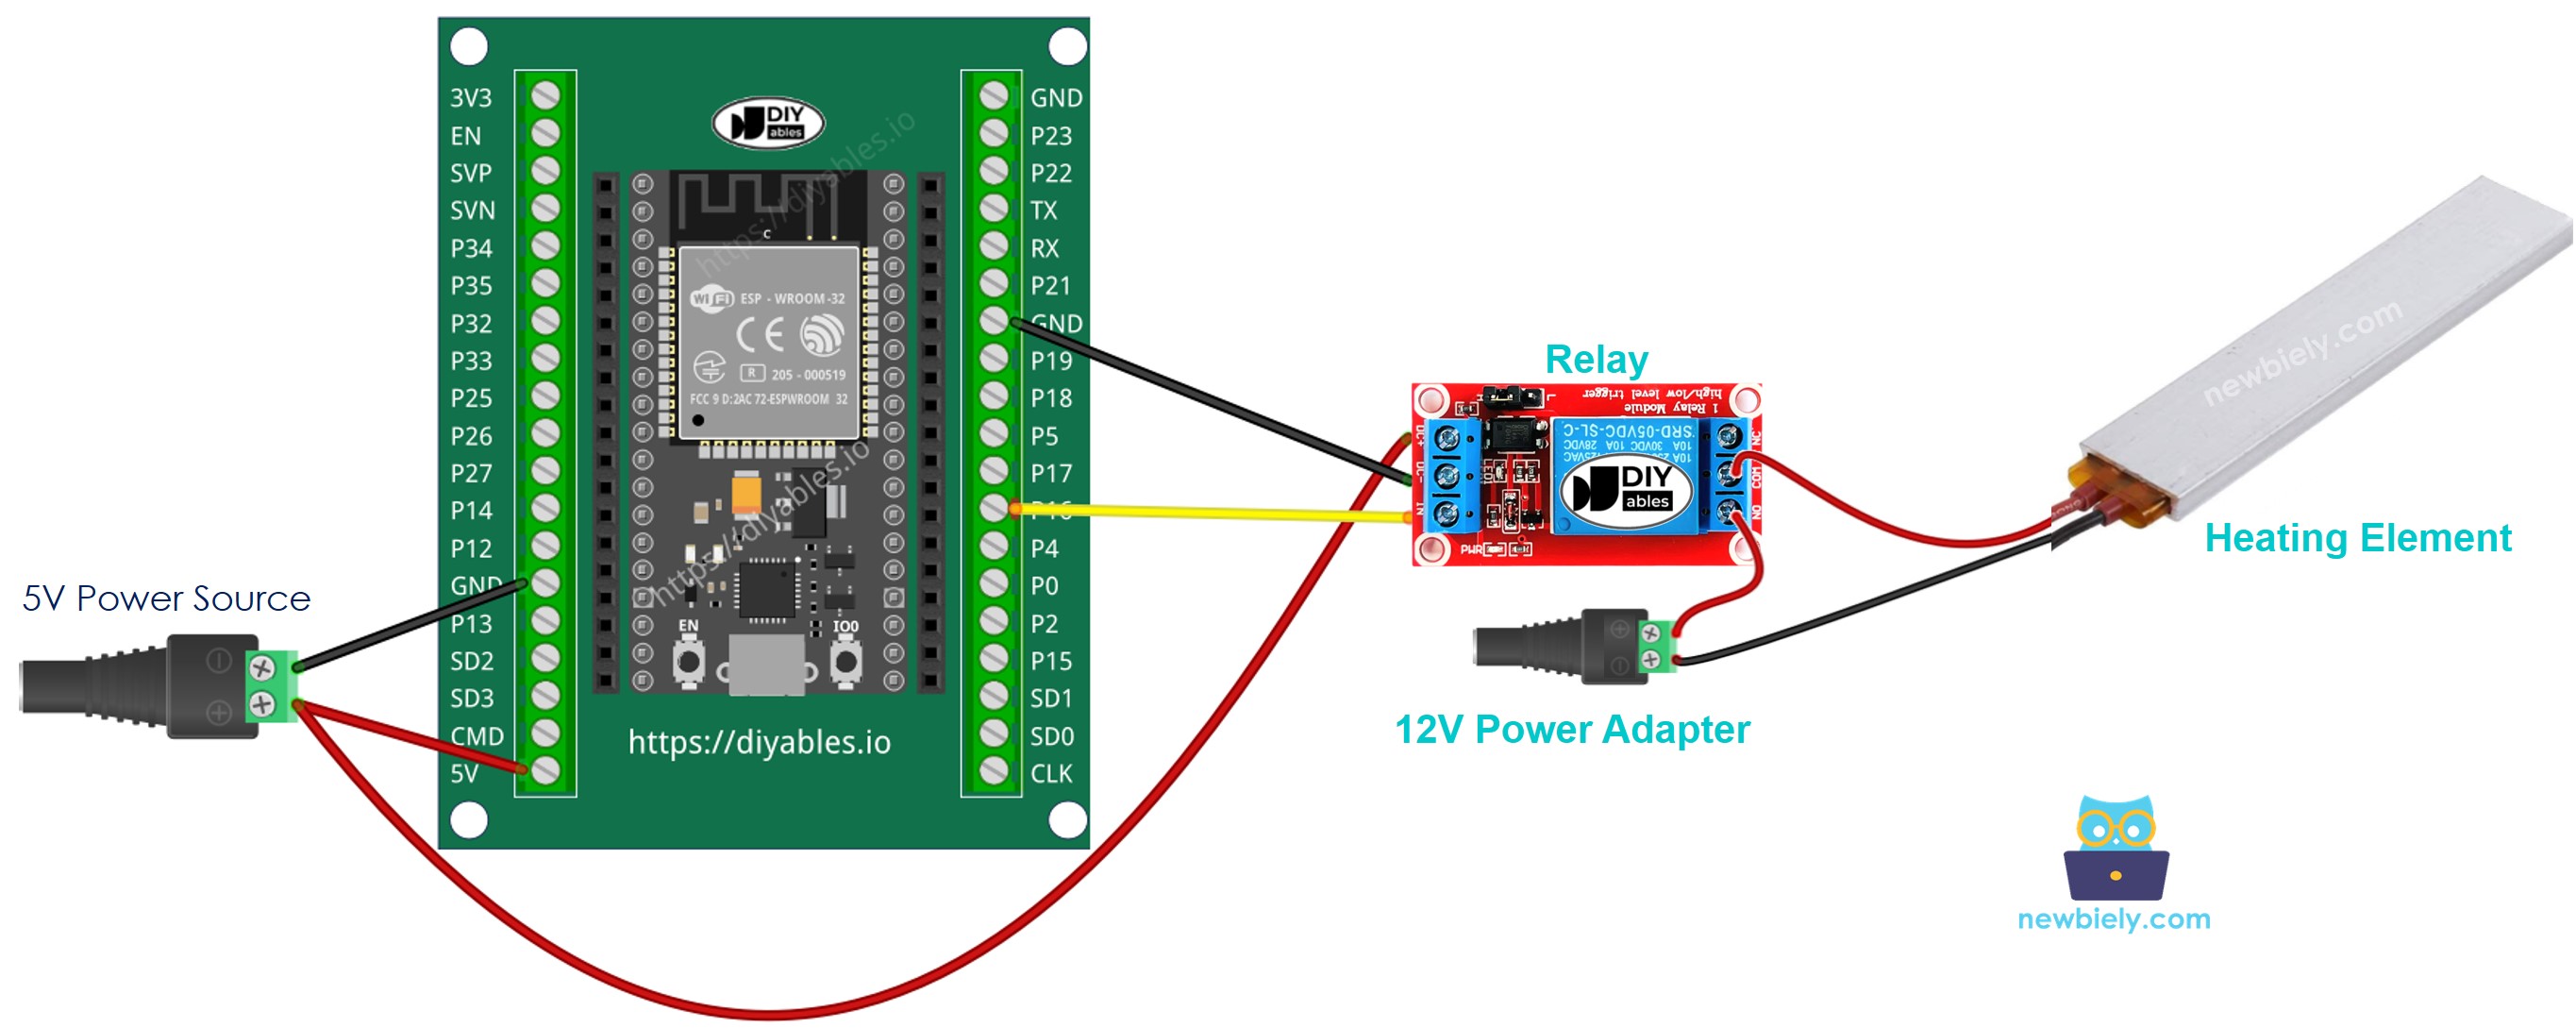
- How to connect ESP32 and controls heating element using screw terminal block breakout board (powered via Vin pin)
ESP32 MicroPython Code
This code switches the heating element ON for five seconds and then turns it OFF for five also, doing this continuously.
Detailed Instructions
Here’s instructions on how to set up and run your MicroPython code on the ESP32 using Thonny IDE:
- Make sure Thonny IDE is installed on your computer.
- Confirm that MicroPython firmware is loaded on your ESP32 board.
- If this is your first time using an ESP32 with MicroPython, check out the ESP32 MicroPython Getting Started guide for step-by-step instructions.
- Connect the ESP32 board to the heating element according to the provided diagram.
- Connect the ESP32 board to your computer with a USB cable.
- Open Thonny IDE on your computer.
- In Thonny IDE, go to Tools Options.
- Under the Interpreter tab, choose MicroPython (ESP32) from the dropdown menu.
- Make sure the correct port is selected. Thonny IDE usually detects it automatically, but you might need to select it manually (like COM12 on Windows or /dev/ttyACM0 on Linux).
- Copy the provided MicroPython code and paste it into Thonny's editor.
- Save the code to your ESP32 by:
- Clicking the Save button or pressing Ctrl+S.
- In the save dialog, choose MicroPython device.
- Name the file main.py.
- Click the green Run button (or press F5) to execute the script.
- Check the temperature of the heating element.
WARNING
Be careful, as handling this incorrectly can cause burns or even start a fire at home. Your safety is very important. If you are unsure, don’t attempt to do it yourself—seek help from someone experienced. We are not responsible for your safety.
Code Explanation
The explanation can be found in the comments section above this ESP32 MicroPython code.
ESP32 MicroPython Code - Control Heating Element with MOSFET Module
Now let's swap the relay for a MOSFET module. With a PWM signal from the ESP32, the heating element can run at 30%, 50%, or any other power level, not only at full power.
Wiring Diagram
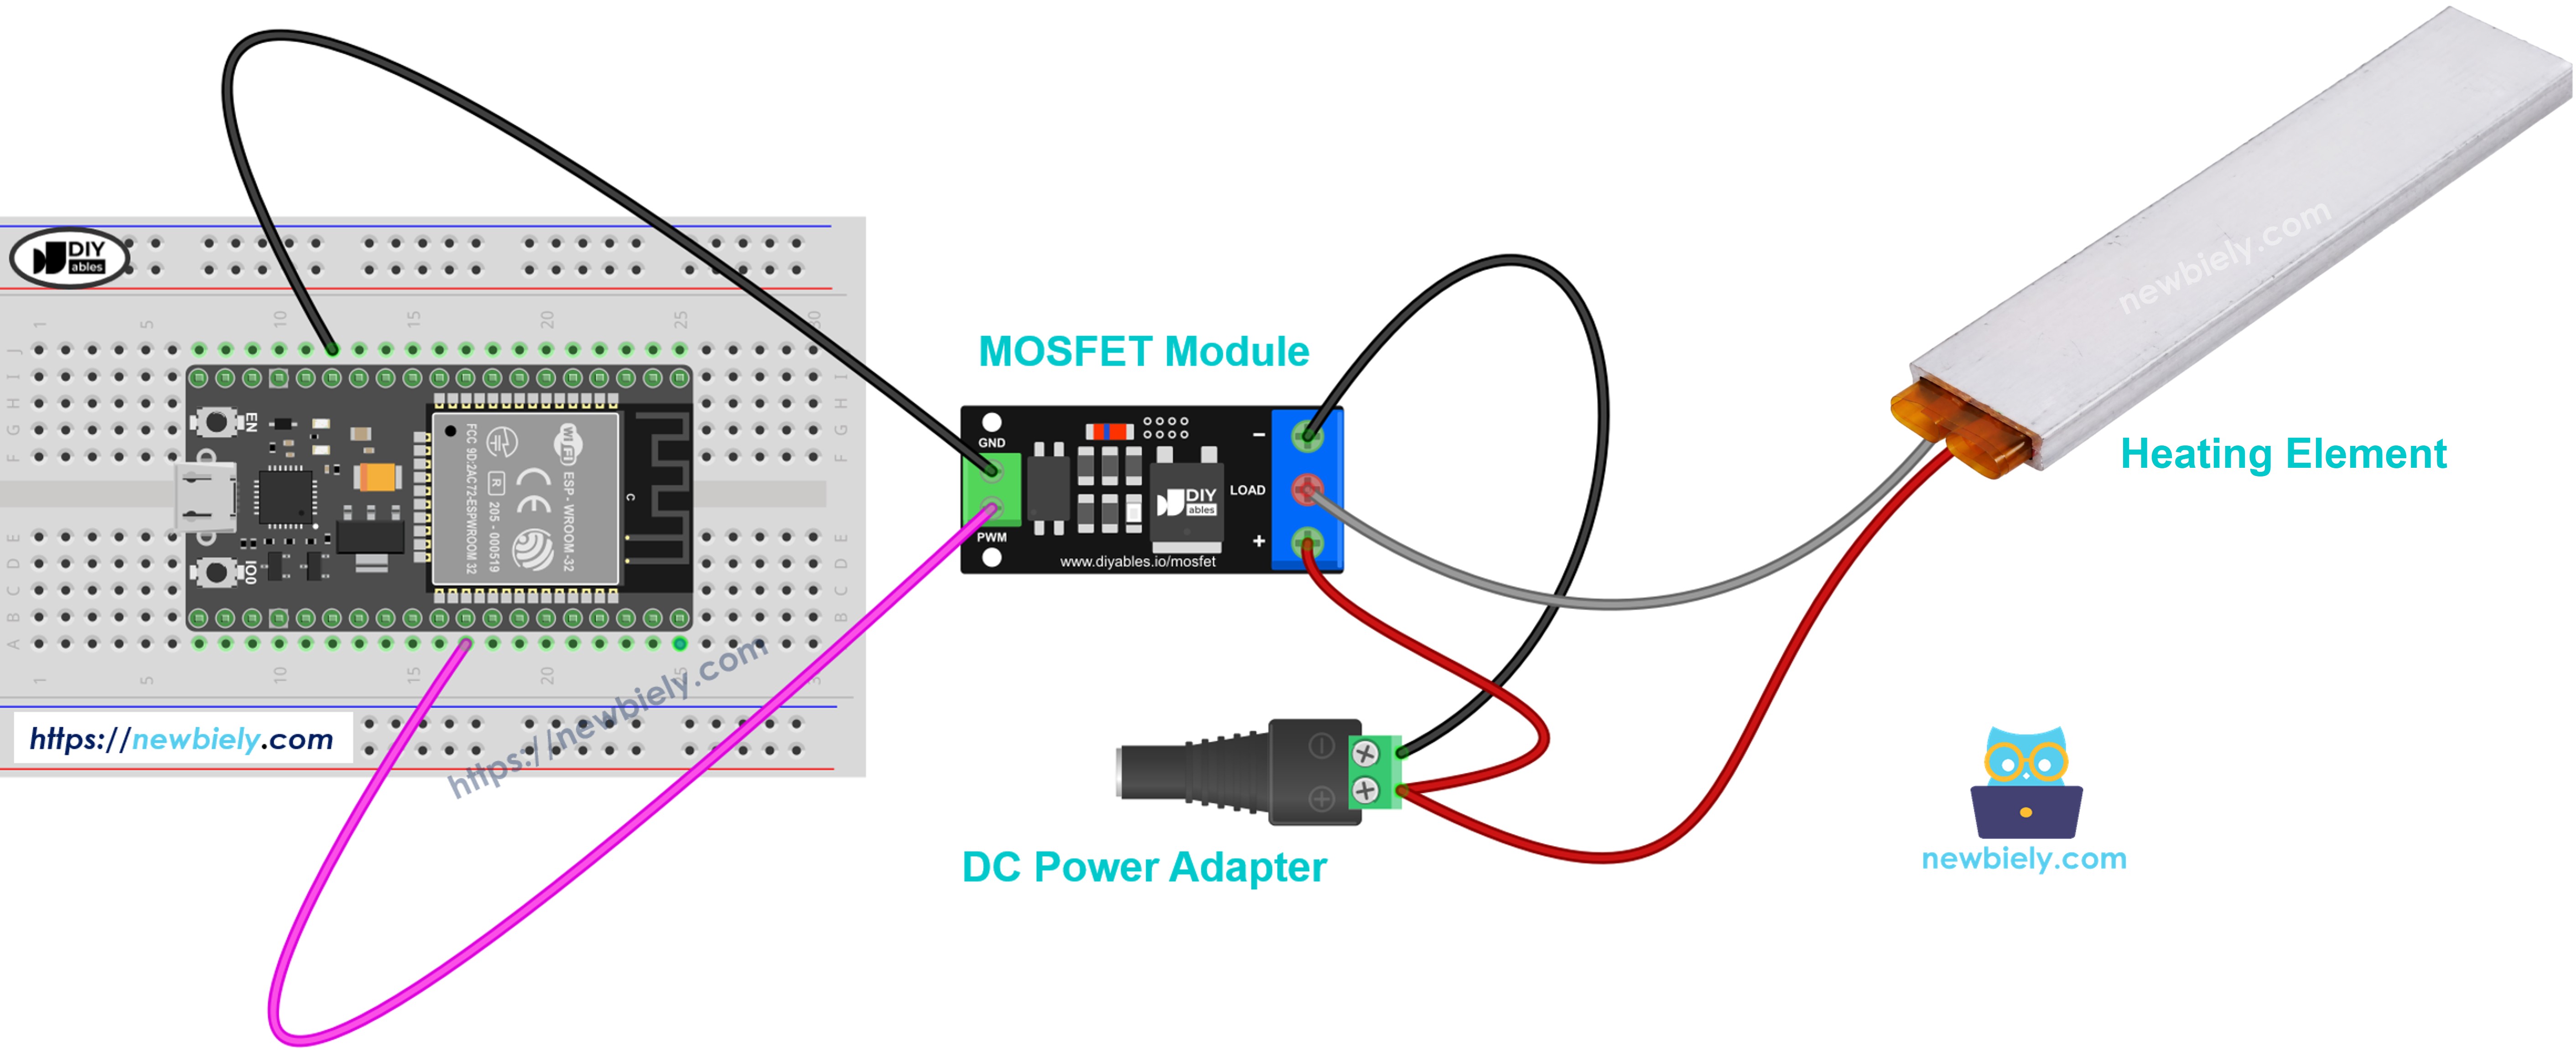
This image is created using Fritzing. Click to enlarge image
Make these connections:
- GPIO18 of the ESP32 → PWM pin of the module
- GND of the ESP32 → GND pin of the module
- 12V adapter + (through the DC power jack) → + terminal
- Heating element red wire (+) → also the + terminal
- Heating element black wire (−) → LOAD terminal
- 12V adapter − (through the DC power jack) → − terminal
A heating element has no coil, so you do not need a flyback diode here.
MicroPython Code
In each loop, the element gets full power for 2 seconds, then no power for 2 seconds. After that, the power goes up from 10% to 100% and back down. A heating element changes temperature slowly, so you will feel the change only after some time, not at each step.
Detailed Instructions
- Prepare Thonny and the ESP32 as described in the relay Quick Steps.
- Wire the heating element to the MOSFET module following the diagram, with the 12V adapter not plugged in yet.
- Copy the code into Thonny and save it on the ESP32 as main.py.
- Plug in the 12V adapter, then click Run (or press F5).
- Read the power level in the Shell. Do not touch the heating element to check it.
Tip: the MOSFET module is for DC heaters only, and the supply must be about 6V or higher. A heater can pull a big current, so check that the chip on your module does not get too hot.