
Arduino MicroPython Slide Switch
Some choices in a project should stay fixed until a person changes them: "demo mode" or "normal mode", sound on or sound off, pattern A or pattern B. The DIYables Mini Slide Switch SS12D10 is made for this job. You slide its handle once, and it stays there, even when the power is off. The Arduino Giga R1 WiFi only has to check where the handle is. On this page, MicroPython and Thonny do the work. Here is what we cover:
- Which of the three unmarked legs is COM, and what the handle connects inside the switch.
- How to hook it up with three jumper wires (pin 1 to GND, COM to D2, pin 3 to 3.3V), with no resistor.
- How to print the handle position once at start, and then one line per move, with a 50 ms check against contact bounce.
- How to drop the 3.3V wire and turn on Pin.PULL_UP instead, so that 0 means ON.
https://newbiely.com/images/cover/arduino-slide-switch-micropython.jpg
Hardware Preparation
Or you can buy the following kits:
| 1 | × | DIYables Sensor Kit (18 sensors/displays) |
Additionally, some of these links are for products from our own brand, DIYables .
Overview of Slide Switch and Pinout
The SS12D10 is a very small switch. Its plastic body has a 5 mm handle on top and three metal legs in one row underneath. It is a latching switch: push the handle to one end, and it stays at that end. A push button does the opposite and jumps back the moment you let go. Datasheets call this type SPDT (single pole, double throw) or 1P2T: one common pin that is joined to one of two other pins.
The idea inside is simple. A small metal bridge moves with the handle. It always touches the middle pin, COM, and it also touches the outer pin on the same side as the handle.
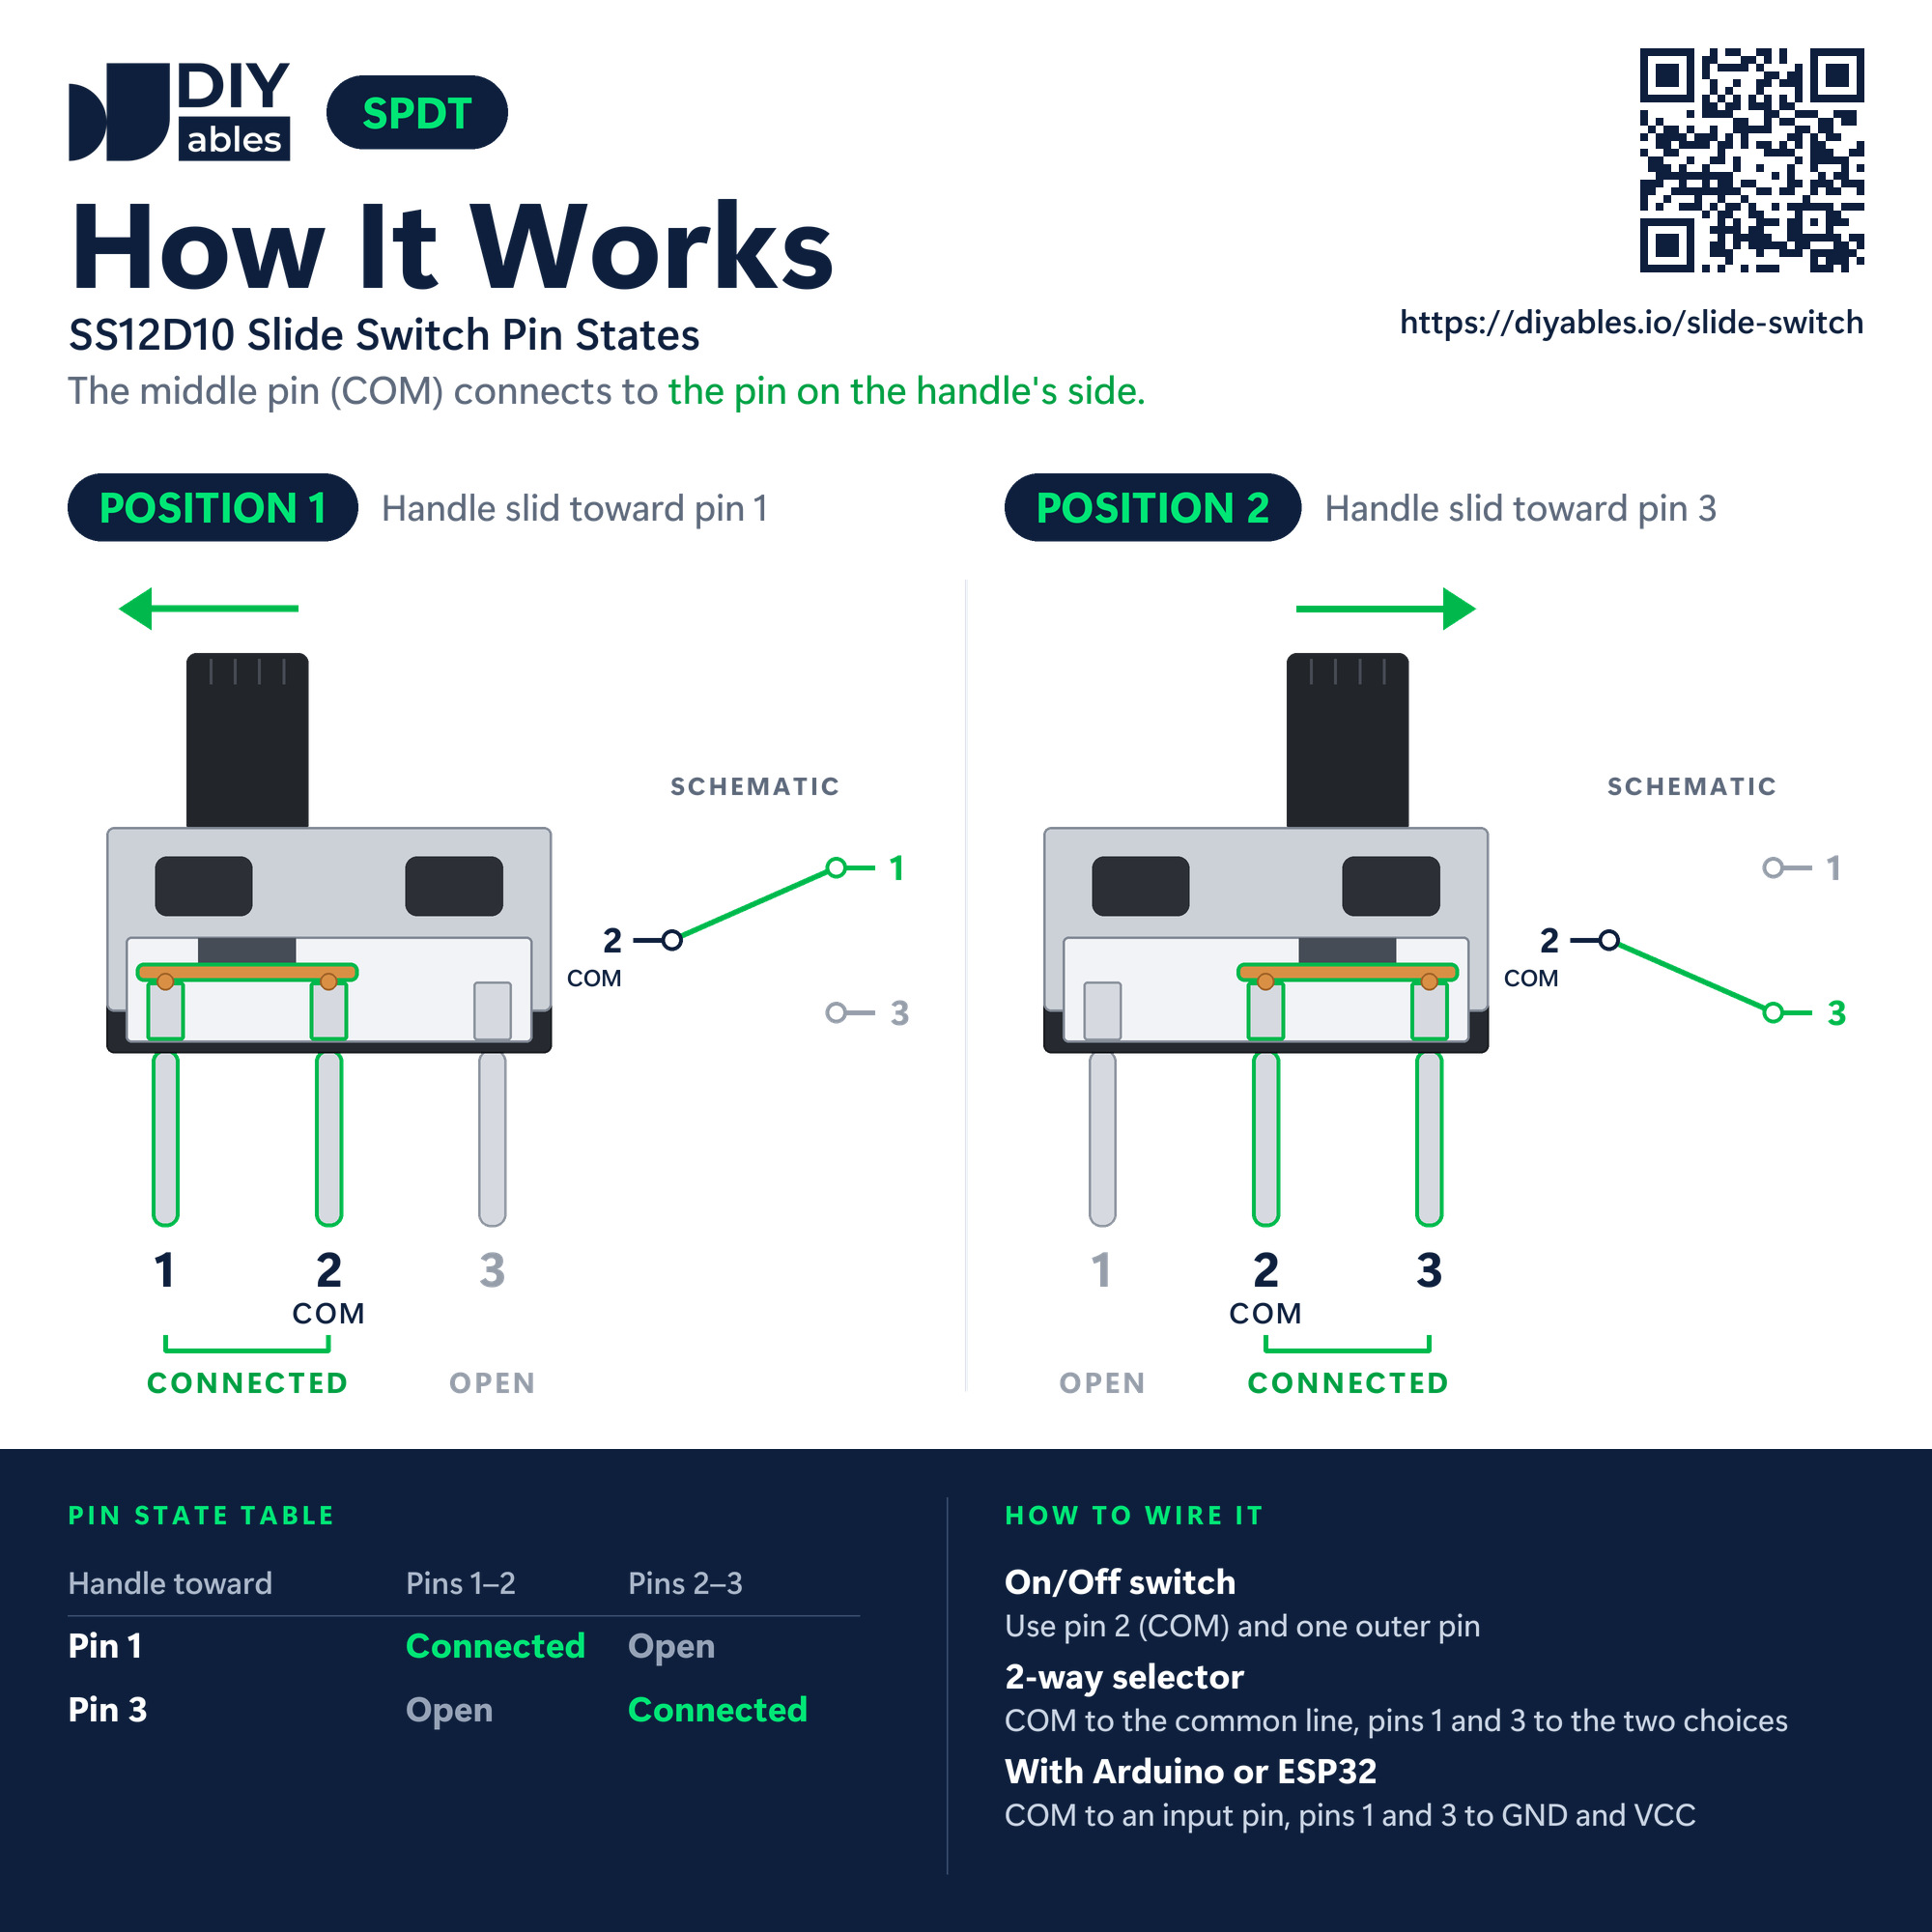
Nothing is printed on the switch. Just count the legs: the middle one is COM, and the two outer ones are pin 1 and pin 3.
- Pin 1 (outer pin): wire it to GND of the Arduino.
- Pin 2, COM (middle pin): the signal pin. Wire it to D2. It carries the voltage of the outer pin that the handle joins it to.
- Pin 3 (outer pin): wire it to 3.3V of the Arduino Giga.
The two handle positions:
- Handle toward pin 1: pin 1 and COM are connected. Pin 3 is open.
- Handle toward pin 3: COM and pin 3 are connected. Pin 1 is open.
What MicroPython sees on D2 with this wiring:
- Handle toward pin 3: COM is at 3.3V, so value() returns 1. We call this ON.
- Handle toward pin 1: COM is at GND, so value() returns 0. We call this OFF.
| DIYables Mini Slide Switch SS12D10 | |
|---|---|
| Contact type | SPDT (1P2T), 2 positions |
| Pins | 3, in one row |
| Pin pitch | 4.7 mm |
| Terminal length | 6.9 mm |
| Handle | 5 mm |
| Body | about 12.8 x 6.7 x 18.2 mm |
| Mounting | vertical, through-hole |
| Contact material | silver-plated brass |
| Contact rating | AC 125V 2A |
| Switching life | over 100,000 cycles |
| Operating temperature | -25°C to 80°C |
The AC 125V 2A rating is the limit of the contacts. Here, the switch only sends a logic signal to D2, so the current is tiny.
Like all metal contacts, the bridge bounces for a few milliseconds when the handle moves. In that short moment, a fast loop can read 0, 1, 0, 1. The script below waits 50 ms and reads again before it trusts a change.
Wiring Diagram
This wiring uses three jumper wires and no breadboard. COM is always tied to GND or to 3.3V, so D2 always has a clear level. That is why no pull-up or pull-down resistor is needed, and the code uses a plain Pin.IN.
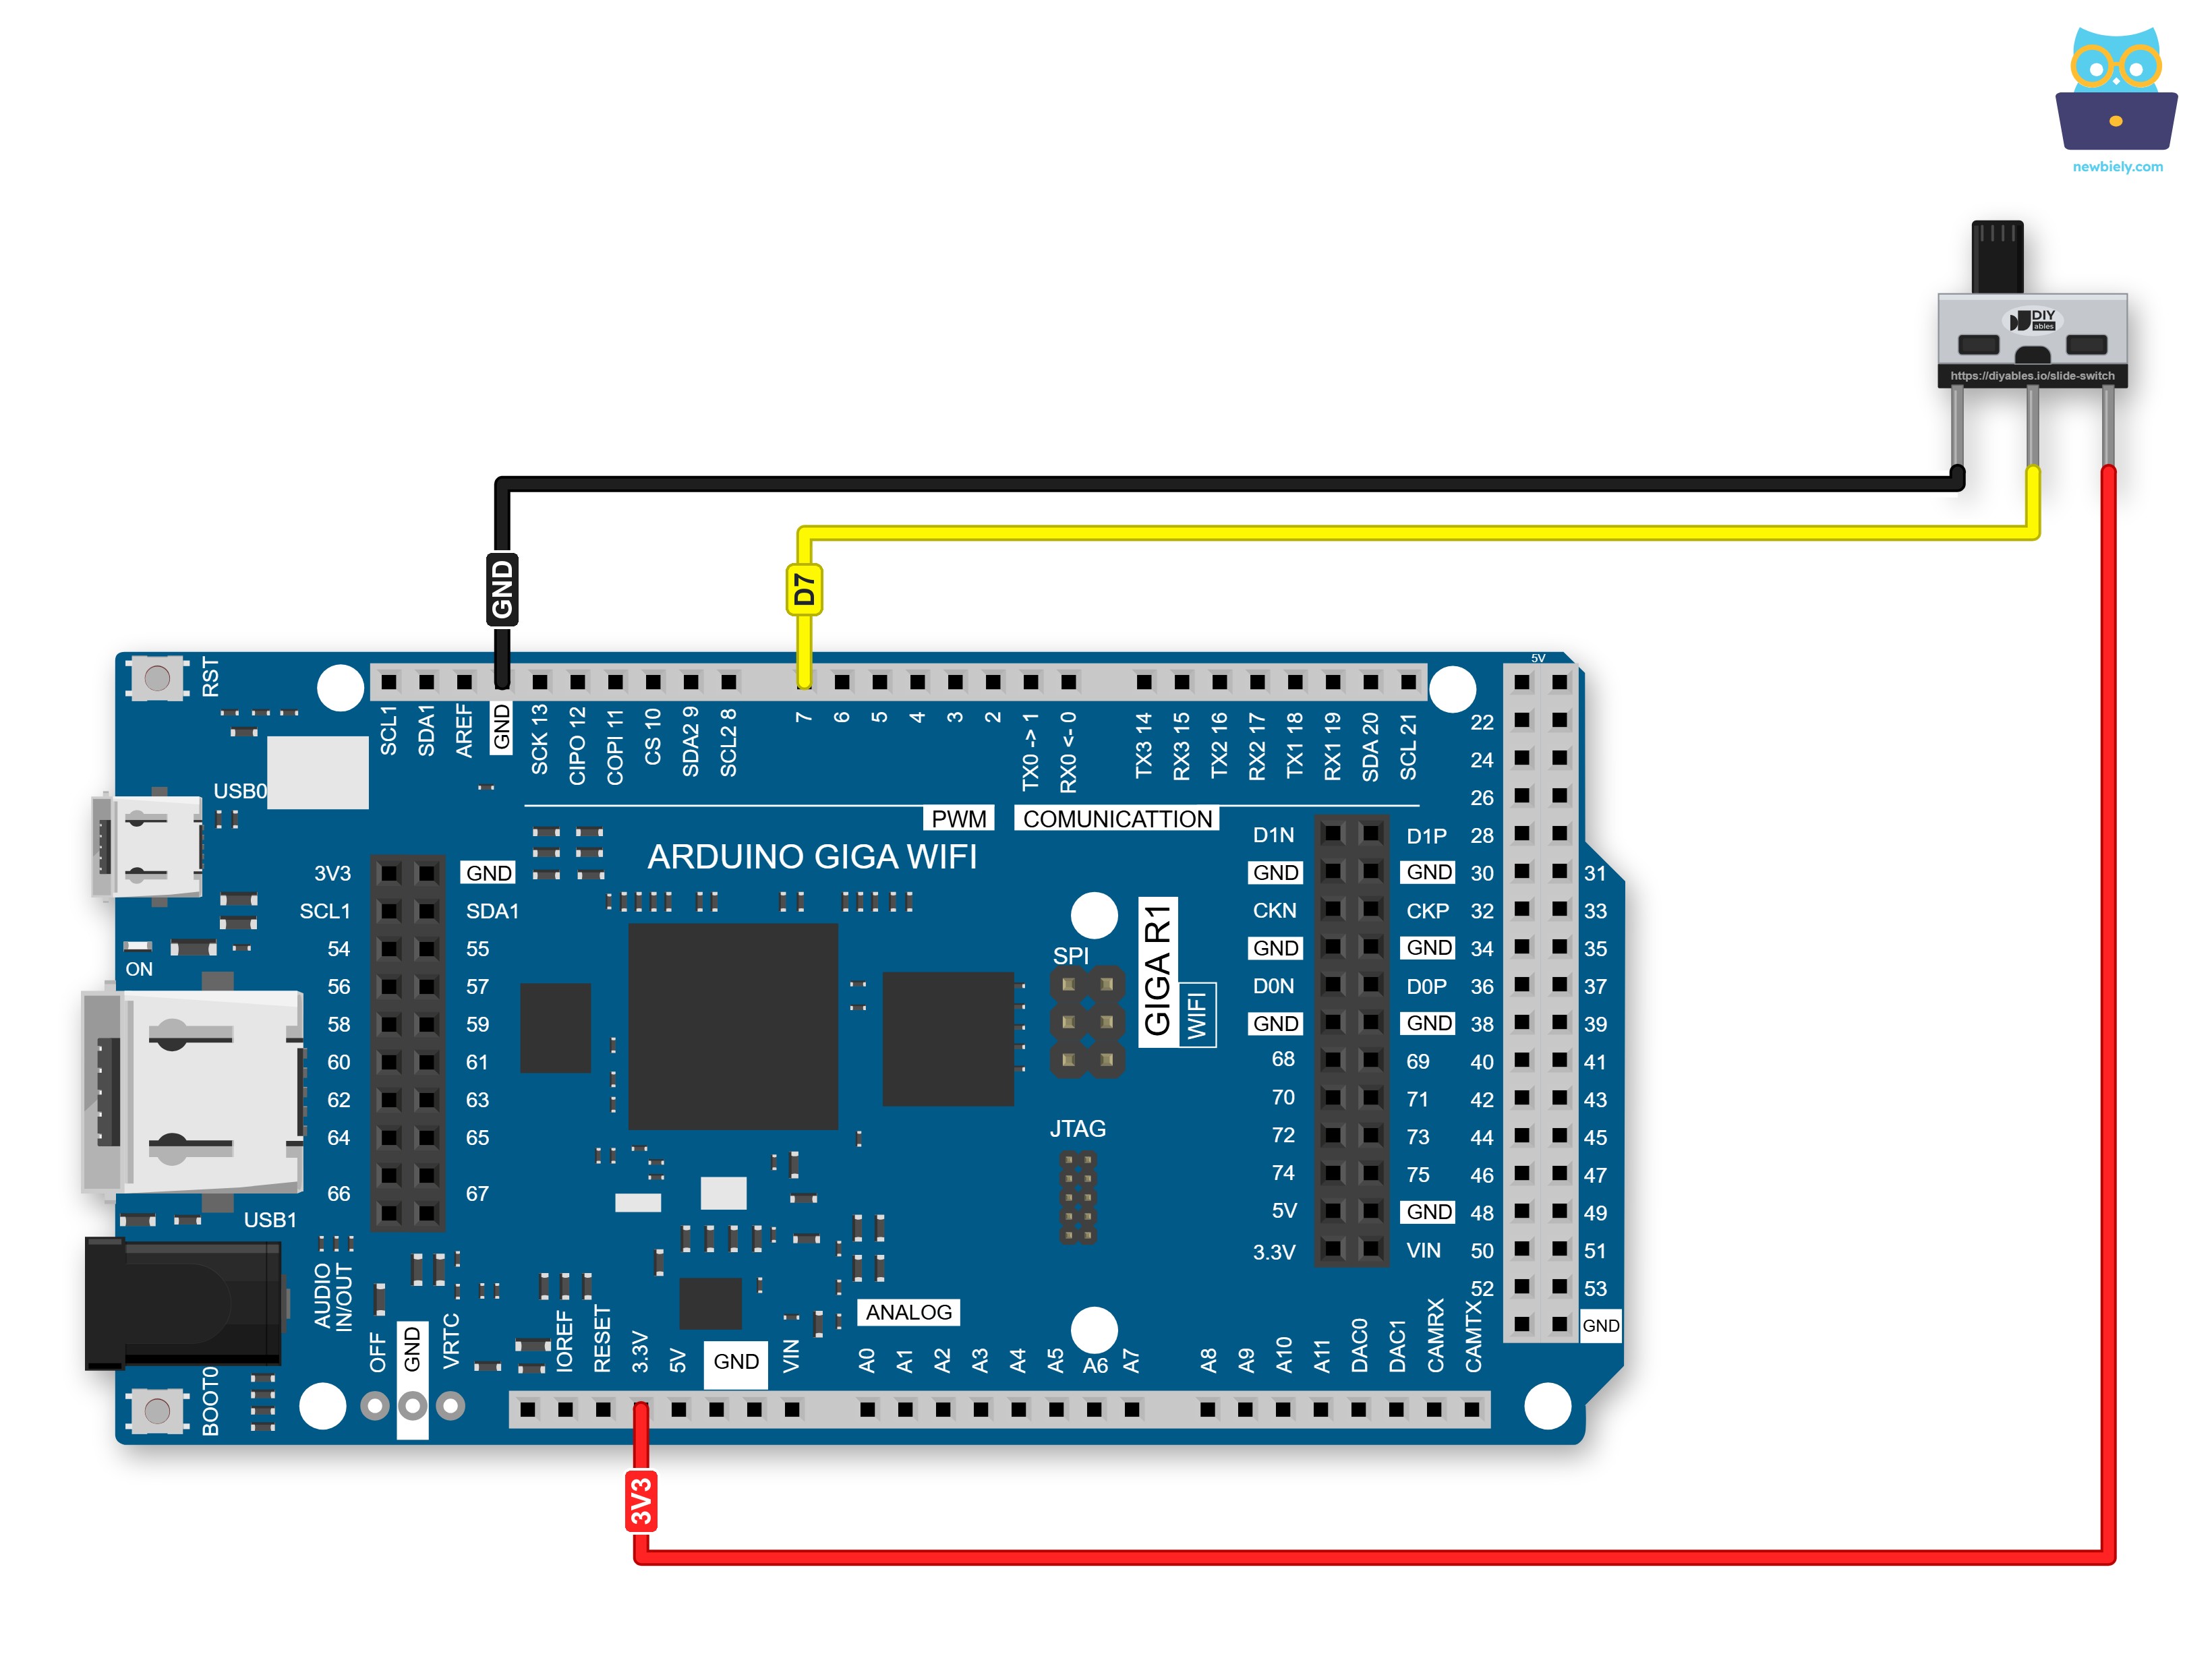
This image is created using Fritzing. Click to enlarge image
| Slide Switch Pin | Arduino Giga R1 WiFi Pin |
|---|---|
| Pin 1 | GND |
| Pin 2 (COM) | D2 |
| Pin 3 | 3.3V (not 5V) |
※ NOTE THAT:
- Use the 3.3V pin for pin 3, never 5V or VIN. The Giga R1 WiFi works with 3.3V logic, and when the handle is toward pin 3, COM passes that voltage straight into D2. Some pins of the Giga cannot take 5V at all, so 3.3V is the safe habit for every input.
- Keep D2 as an input. Do not make it Pin.OUT in another script. The switch ties the pin directly to 3.3V or GND, so an output that drives the other level would be shorted.
How To Program Slide Switch With MicroPython
No library is needed. The machine and time modules that come with MicroPython are enough.
- Make D2 an input. Leave out the pull argument, because pin 1 and pin 3 already give both levels:
- Read the handle. You get 1 when it is toward pin 3 (ON) and 0 when it is toward pin 1 (OFF):
- When a reading is not the same as the last one, wait 50 ms and read once more. Only a change that is still there counts as a real move:
Arduino MicroPython Code - Slide Switch
This script prints one line as soon as it starts, so you know where the handle is. After that, the Shell stays quiet until the handle goes to the other end. Each line also shows the raw value of D2, so you can see which number goes with ON and which with OFF.
Detailed Instructions
Here's how to run this MicroPython script on the Arduino Giga with Thonny IDE:
- Install Thonny IDE on your computer if you do not have it yet.
- Make sure MicroPython firmware is installed on your Arduino board.
- New to Arduino with MicroPython? Start with the Getting Started with Arduino and MicroPython tutorial.
- Wire the switch as in the table: pin 1 to GND, COM to D2, pin 3 to 3.3V.
- Connect the Arduino Giga to your computer with the USB Type-C cable.
- In Thonny IDE, open Tools Options.
- On the Interpreter tab, pick MicroPython (generic) from the dropdown menu.
- Choose the COM port of your Arduino board (e.g., COM33 on Windows or /dev/ttyACM0 on Linux).
- Paste the code above into Thonny's editor.
- Save the script on the Arduino:
- Click the Save button or press Ctrl+S.
- In the save dialog, choose MicroPython device and name the file main.py.
- Click the green Run button (or press F5).
- Push the handle to the other end and back, a few times. Stop for about one second at each end, and watch the Shell at the bottom of Thonny.
Five moves give five "Changed" lines. The bounce never shows up as an extra line. If the Shell never shows 1, check the wire from pin 3 to 3.3V. If it never shows 0, check the GND wire on pin 1. If new lines appear while nobody touches the handle, a wire is loose and D2 is floating.
Arduino MicroPython Code - Slide Switch with Pin.PULL_UP (2 Wires)
Inside a small case, every wire counts. Each input pin of the Giga has a pull-up resistor inside the chip, and Pin.PULL_UP turns it on. That resistor can take the place of the 3.3V wire on pin 3. Two wires are then enough: pin 1 to GND and COM to D2.
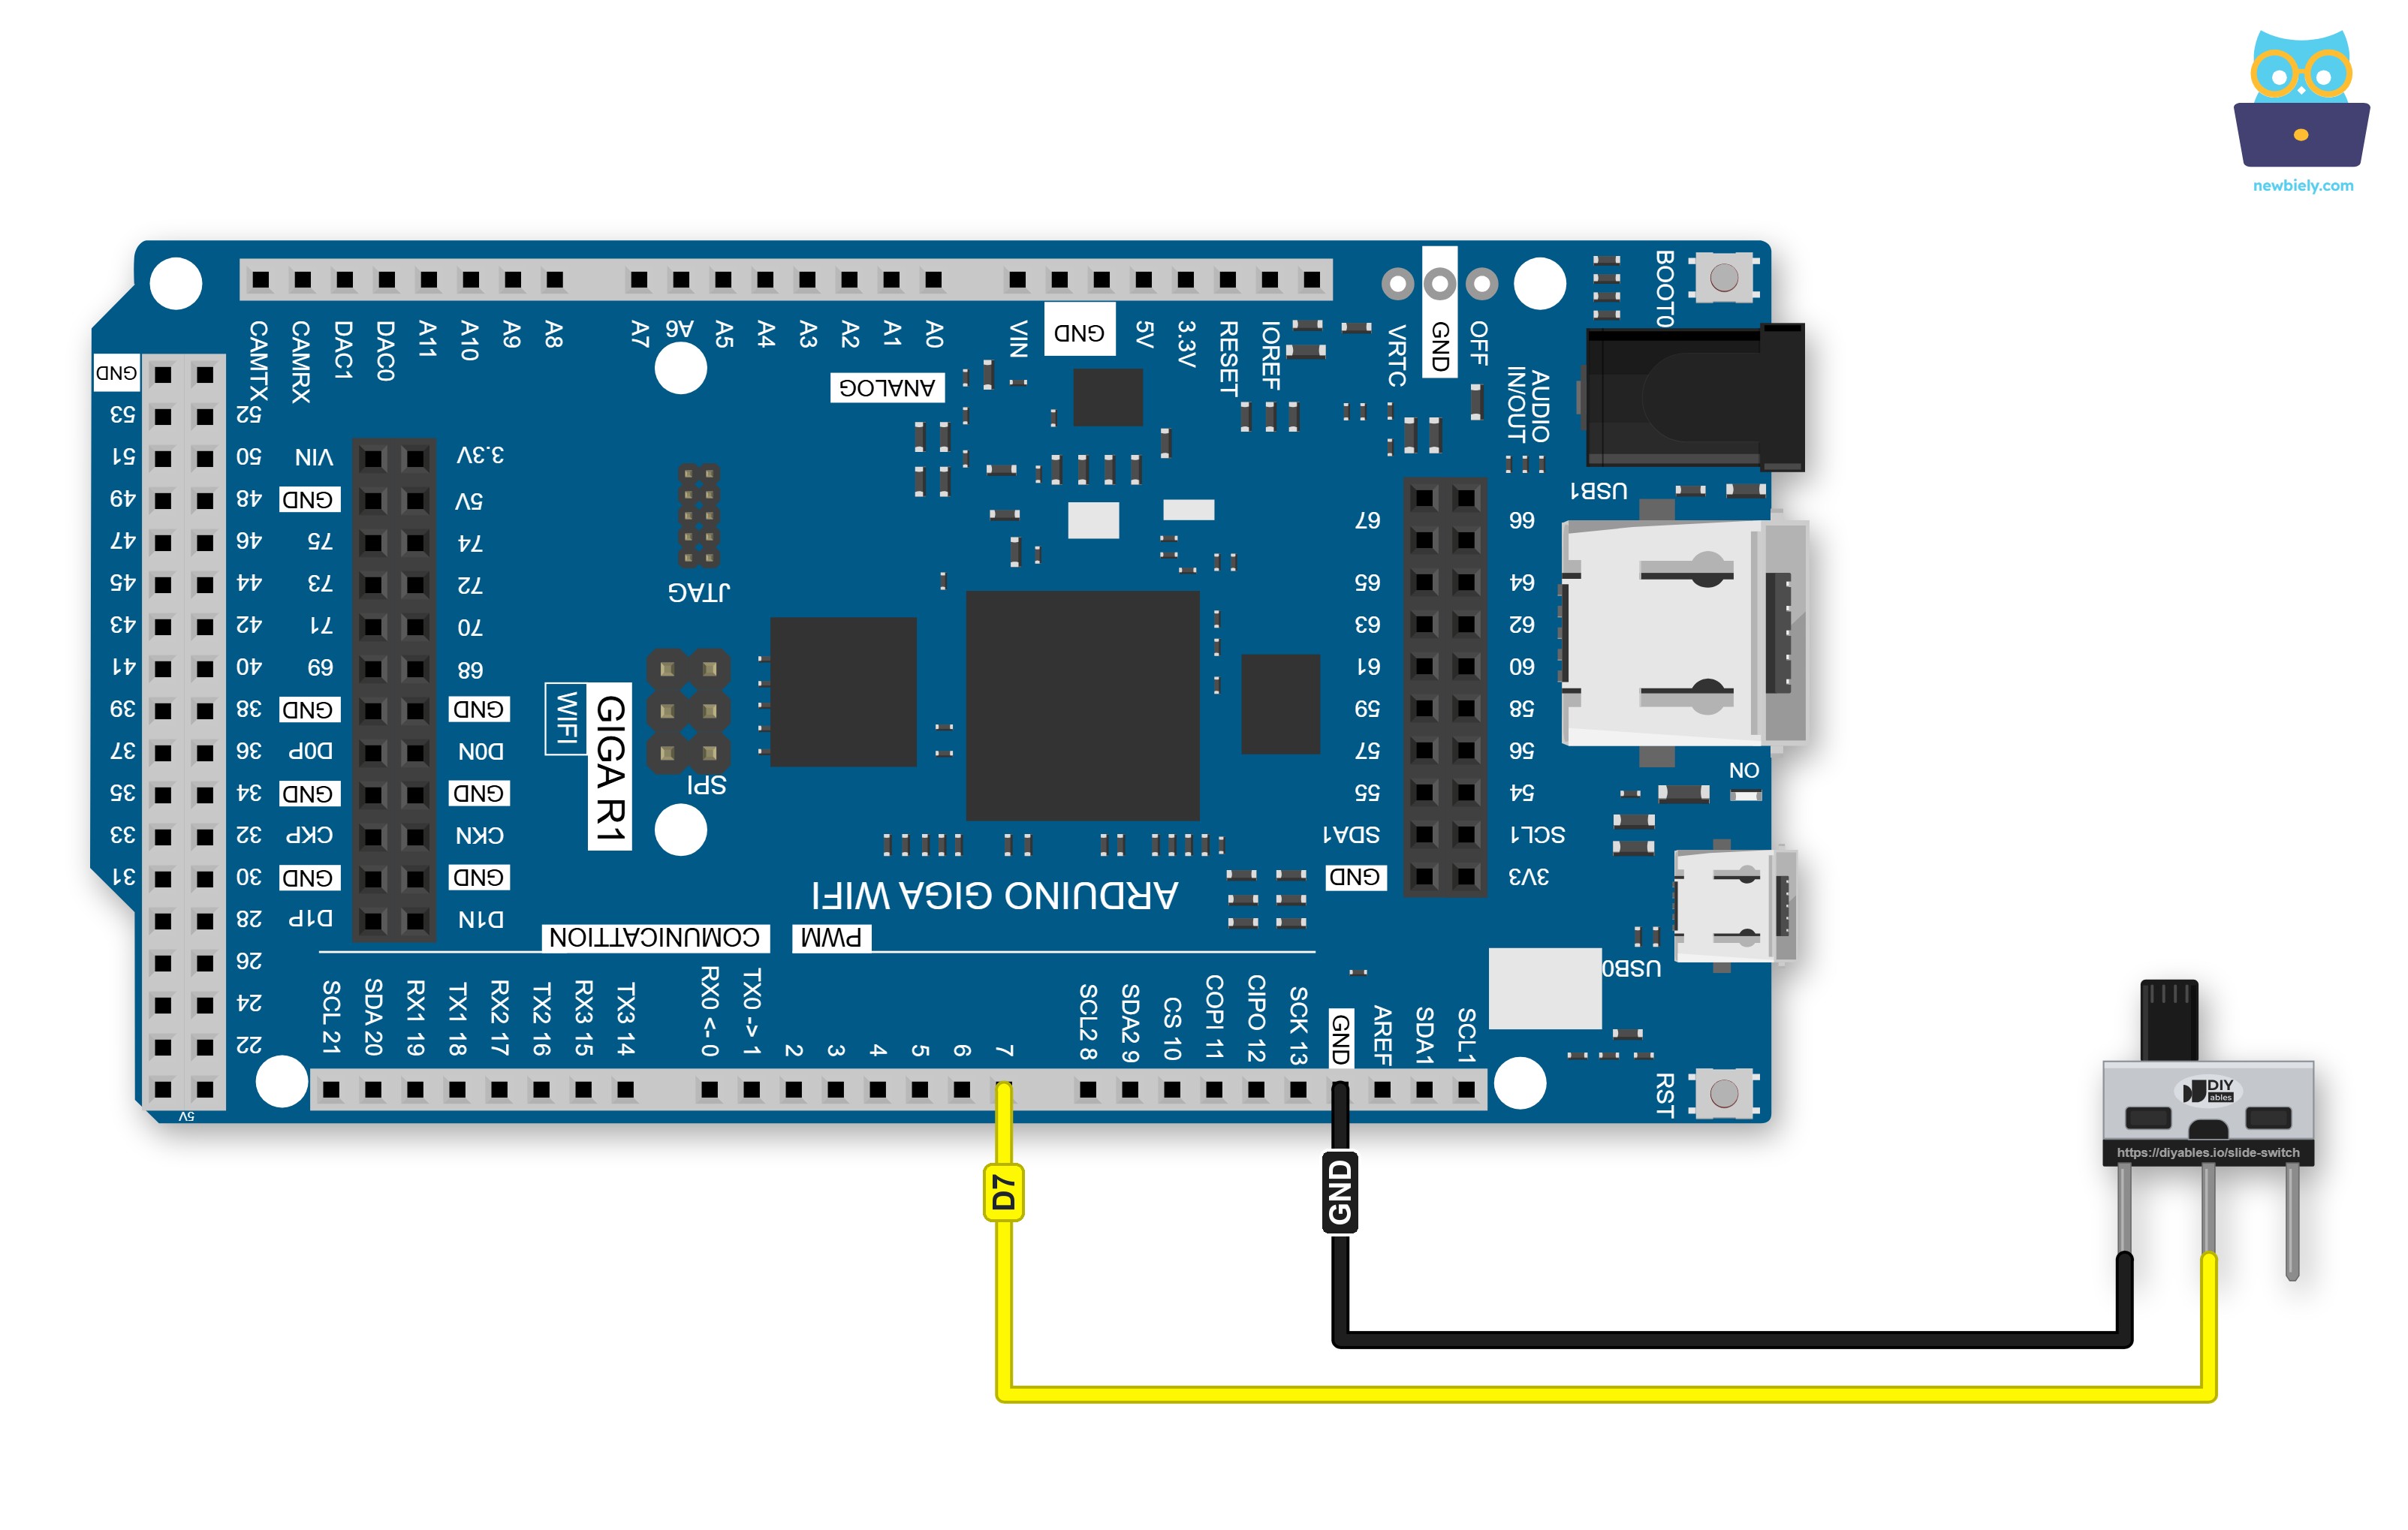
This image is created using Fritzing. Click to enlarge image
| Slide Switch Pin | Arduino Giga R1 WiFi Pin |
|---|---|
| Pin 1 | GND |
| Pin 2 (COM) | D2 |
| Pin 3 | not connected |
The numbers now mean the opposite:
- Handle toward pin 1: COM joins D2 to GND. value() returns 0, and the script prints ON.
- Handle toward pin 3: COM touches only the free pin 3. The pull-up lifts D2 to 1, and the script prints OFF.
Detailed Instructions
- Just remove the pin 3 wire. The GND wire and the D2 wire stay where they are.
- Paste the new code into Thonny and save it to the Arduino as main.py, over the old file.
- Slide the handle toward pin 1, then click Run (F5).
- Move the handle three more times.
Look at the first line. In the 3-wire test, 0 meant OFF. Here, 0 goes with ON, because the handle on the pin 1 side now pulls D2 down to GND. Both versions work well. Three wires give the natural "1 = ON" logic, and two wires keep the build smaller.
Which Switch Fits Your Project?
The slide switch is not the only way to give the Arduino Giga an input. A short guide:
- Pick the slide switch for a small setting that must stay as it is, like a mode or an option on a circuit board.
- Pick a bigger ON/OFF switch for a panel or the lid of a box, where a finger must reach it easily. See Arduino MicroPython Switch.
- Pick a limit switch when a moving part, not a person, should press it. See Arduino MicroPython Limit Switch.
- Pick a button when the input is a short action, like "start now", and must spring back. See Arduino MicroPython Button Module.