Welcome to this essential guide on button debouncing with the Arduino MKR WiFi 1010! If you've ever experienced unreliable button behavior—where one press registers as multiple presses—this tutorial will solve that frustrating problem.
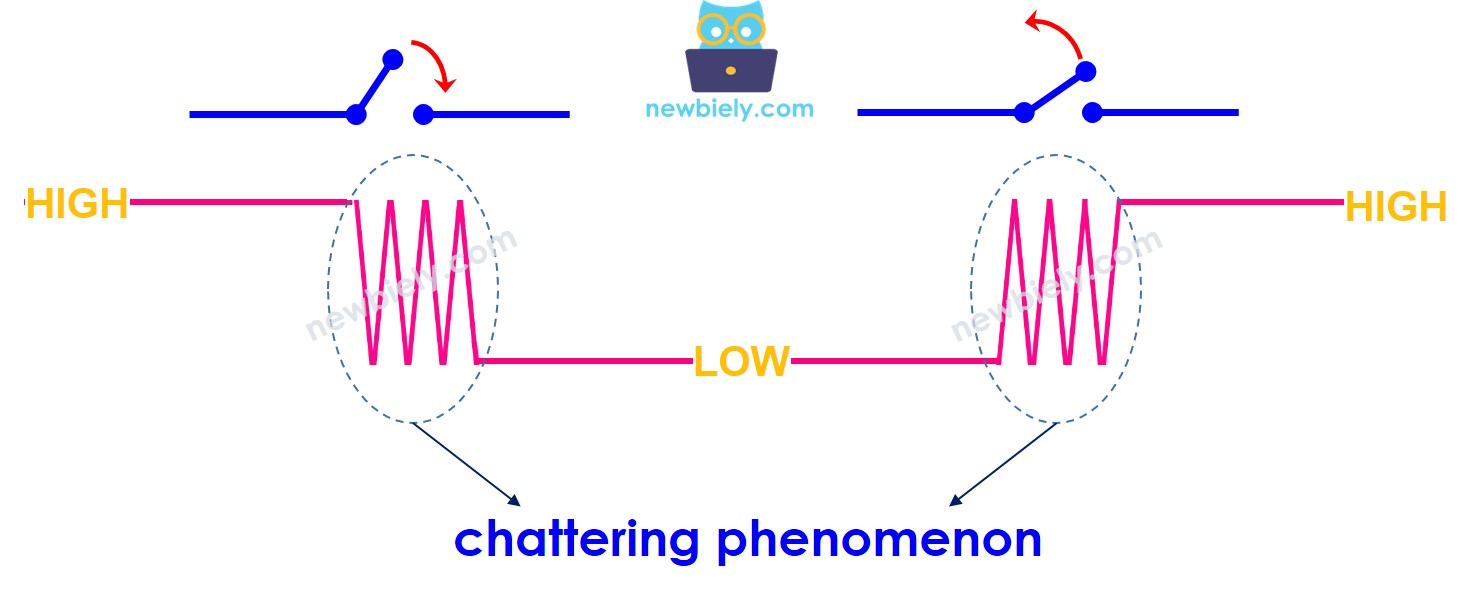
Understanding the Chattering Problem
Here's a question: When you press or release a button once, does its electrical state change exactly once from LOW to HIGH (or HIGH to LOW)?
You might think: Yes, one press = one state change.
The reality: No! In the physical world, mechanical buttons don't make clean transitions. When you press a button, the metal contacts inside bounce against each other multiple times before settling. This happens incredibly fast—within milliseconds—but microcontrollers like the Arduino are fast enough to detect each bounce as a separate press!
This phenomenon is called chattering or bounce, and it causes serious problems:
A single button press might be detected as 3, 5, or even 10 presses
Toggle functions behave erratically
Counters increment incorrectly
User interfaces become frustrating and unreliable
The solution is called debouncing—a technique to filter out these false signals and detect only genuine button presses.
What You'll Learn:
How to debounce a single button using manual timing code
How to debounce one button using the ezButton library (simpler!)
How to debounce multiple buttons efficiently with the library
Understanding the timing principles behind debouncing
Disclosure: Some of the links provided in this section are Amazon affiliate links. We may receive a commission for any purchases made through these links at no additional cost to you. Additionally, some of these links are for products from our own brand, DIYables .
Overview of Button
Before tackling debouncing, you should understand basic button operation with Arduino. If you're new to buttons, we highly recommend starting with our foundational button tutorial.
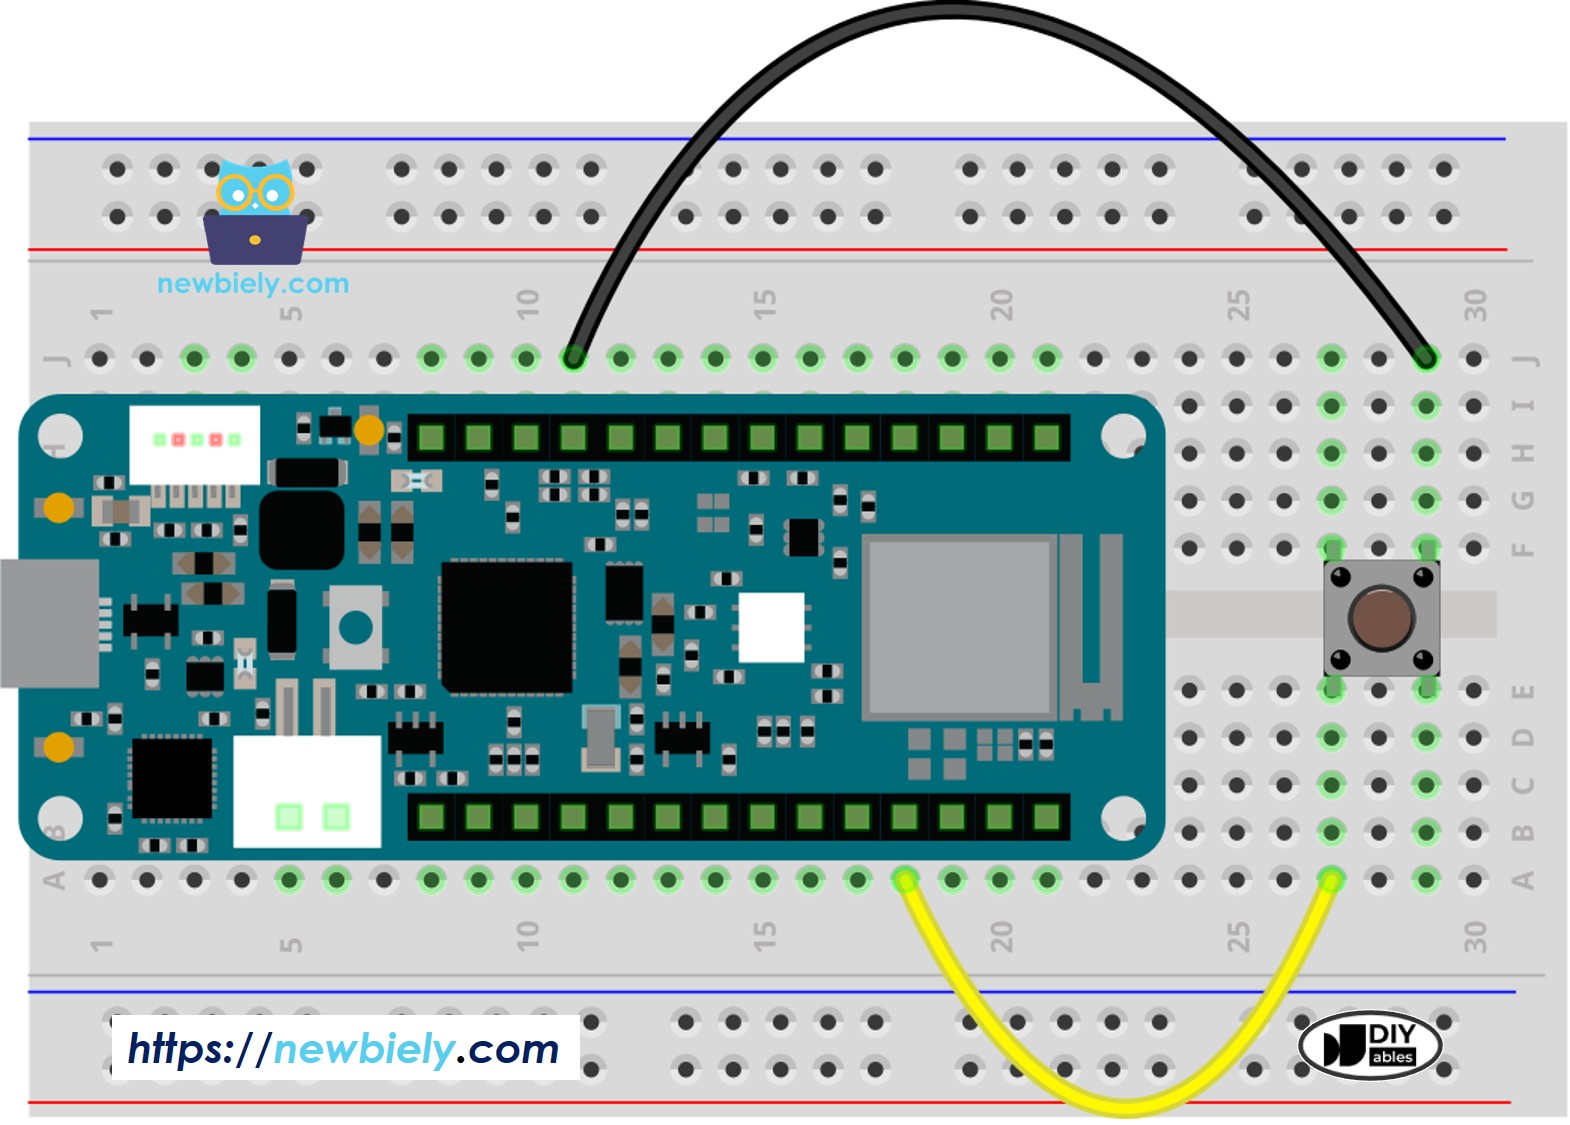
Connect the components to the Arduino MKR WiFi 1010 board as depicted in the diagram
Plug your Arduino MKR WiFi 1010 into your computer's USB port
Launch the Arduino IDE on your computer
Select the Arduino MKR WiFi 1010 board and its COM port
Copy the code below and paste it into the Arduino IDE
/* * This Arduino MKR WiFi 1010 code was developed by newbiely.com * * This Arduino MKR WiFi 1010 code is made available for public use without any restriction * * For comprehensive instructions and wiring diagrams, please visit: * https://newbiely.com/tutorials/arduino-mkr/arduino-mkr-wifi-1010-button-debounce */#define BUTTON_PIN 2 // Arduino Nano 33 IoT pin D2 pin connected to buttonint prev_state = LOW; // The previous state from the input pinint button_state; // The current reading from the input pinvoidsetup() {// Initialize the Serial to communicate with the Serial Monitor.Serial.begin(9600);// initialize the button pin as an pull-up input (HIGH when the switch is open and LOW when the switch is closed)pinMode(BUTTON_PIN, INPUT_PULLUP);}voidloop() {// read the state of the switch/button: button_state = digitalRead(BUTTON_PIN);if (prev_state == HIGH && button_state == LOW)Serial.println("The button is pressed");elseif (prev_state == LOW && button_state == HIGH)Serial.println("The button is released");// save the the last state prev_state = button_state;}
Click the Upload button to compile and upload
Open the Serial Monitor
Press the button and hold it for a few seconds, then release
Observe the results on the Serial Monitor
Newbiely | Arduino IDE 2.3.8
──
☐
✕
File
Edit
Sketch
Tools
Help
Arduino MKR WiFi 1010
Newbiely.ino
···
8Serial.println("Hello World!");
Output
Serial Monitor
Message (Enter to send message to 'Arduino MKR WiFi 1010' on 'COM15')
New Line
9600 baud
The button is pressed
The button is pressed
The button is pressed
The button is released
The button is released
Ln 11, Col 1
Arduino MKR WiFi 1010 on COM15
2
What Happened? You pressed the button once and released it once, but the Serial Monitor shows multiple press and release events! This is chattering in action.
Why This Happens: When the button contacts touch, they don't make a solid connection immediately. They bounce apart and together several times within 5-50 milliseconds. Your Arduino, running at millions of cycles per second, detects each bounce as a separate state change.
※ NOTE THAT:
Testing Note: Chattering doesn't occur consistently—it depends on how you press the button, the button's mechanical quality, and even environmental factors like temperature. If you don't observe chattering on your first try, test several times with different pressing speeds and pressures. You'll likely see it appear.
Reading Button With Debounce
Now let's solve the problem! This code implements debouncing using millis() timing. It ignores state changes that happen within a short time window (typically 50ms), filtering out the bounces.
Detailed Instructions
Copy the code below and paste it into your Arduino IDE.
/* * This Arduino MKR WiFi 1010 code was developed by newbiely.com * * This Arduino MKR WiFi 1010 code is made available for public use without any restriction * * For comprehensive instructions and wiring diagrams, please visit: * https://newbiely.com/tutorials/arduino-mkr/arduino-mkr-wifi-1010-button-debounce */#define BUTTON_PIN 2 // Arduino Nano 33 IoT pin D2 pin connected to button#define DEBOUNCE_TIME 50 // The debounce time in millisecond, increase this time if it still chattersint prev_state_steady = LOW; // The previous steady state from the input pinint prev_state_flick = LOW; // The previous flickerable state from the input pinint button_state; // The current reading from the input pinunsignedlong last_debounce_time = 0; // The last time the output pin was toggledvoidsetup() {// Initialize the Serial to communicate with the Serial Monitor.Serial.begin(9600);// initialize the button pin as an pull-up input (HIGH when the switch is open and LOW when the switch is closed)pinMode(BUTTON_PIN, INPUT_PULLUP);}voidloop() {// read the state of the switch/button: button_state = digitalRead(BUTTON_PIN);// check to see if you just pressed the button// (i.e. the input went from LOW to HIGH), and you've waited long enough// since the last press to ignore any noise:// If the switch/button changed, due to noise or pressing:if (button_state != prev_state_flick) {// reset the debouncing timer last_debounce_time = millis();// save the the last flickerable state prev_state_flick = button_state; }if ((millis() - last_debounce_time) > DEBOUNCE_TIME) {// whatever the reading is at, it's been there for longer than the debounce// delay, so take it as the actual current state:// if the button state has changed:if(prev_state_steady == HIGH && button_state == LOW)Serial.println("The button is pressed");elseif(prev_state_steady == LOW && button_state == HIGH)Serial.println("The button is released");// save the the last steady state prev_state_steady = button_state; }}
Click the Upload button to compile and upload
Open the Serial Monitor
Press and hold the button for a few seconds, then release
Observe the results on the Serial Monitor
Newbiely | Arduino IDE 2.3.8
──
☐
✕
File
Edit
Sketch
Tools
Help
Arduino MKR WiFi 1010
Newbiely.ino
···
8Serial.println("Hello World!");
Output
Serial Monitor
Message (Enter to send message to 'Arduino MKR WiFi 1010' on 'COM15')
New Line
9600 baud
The button is pressed
The button is released
Ln 11, Col 1
Arduino MKR WiFi 1010 on COM15
2
Success! Now you see exactly one press event and one release event—matching your physical button action perfectly. The false signals have been eliminated!
How Debouncing Works: The code uses millis() to track time. When it detects a state change, it waits 50 milliseconds before checking again. During this "debounce period," any additional state changes are ignored. After 50ms, the bouncing has settled, and the button is in its true stable state.
The 50ms delay is:
Long enough to let mechanical bouncing settle
Short enough that users don't perceive any lag
A good default for most buttons (adjust if needed for specific hardware)
We Made It Simple - Button Debounce with ezButton Library
While the manual millis() approach works, implementing debouncing for multiple buttons gets complex quickly. You need separate timing variables for each button, careful state tracking, and lots of repetitive code.
Enter the ezButton Library: We created this library specifically to make button handling simple and reliable, especially for beginners and multi-button projects.
Arduino MKR WiFi 1010 Button Debounce Code for A Single Button
Here's how simple it becomes with ezButton:
/* * This Arduino MKR WiFi 1010 code was developed by newbiely.com * * This Arduino MKR WiFi 1010 code is made available for public use without any restriction * * For comprehensive instructions and wiring diagrams, please visit: * https://newbiely.com/tutorials/arduino-mkr/arduino-mkr-wifi-1010-button-debounce */#include <ezButton.h>#define DEBOUNCE_TIME 50 // Set debounce duration in milliseconds; increase if button chatter persistsezButtonbutton(D2); // Instantiate an ezButton for digital pin D2voidsetup() {Serial.begin(9600);button.setDebounceTime(DEBOUNCE_TIME); // Configure the button's debounce duration to 50 ms}voidloop() {button.loop(); // Call the loop() method first to update the button stateif (button.isPressed())Serial.println("The button is pressed");if (button.isReleased())Serial.println("The button is released");}
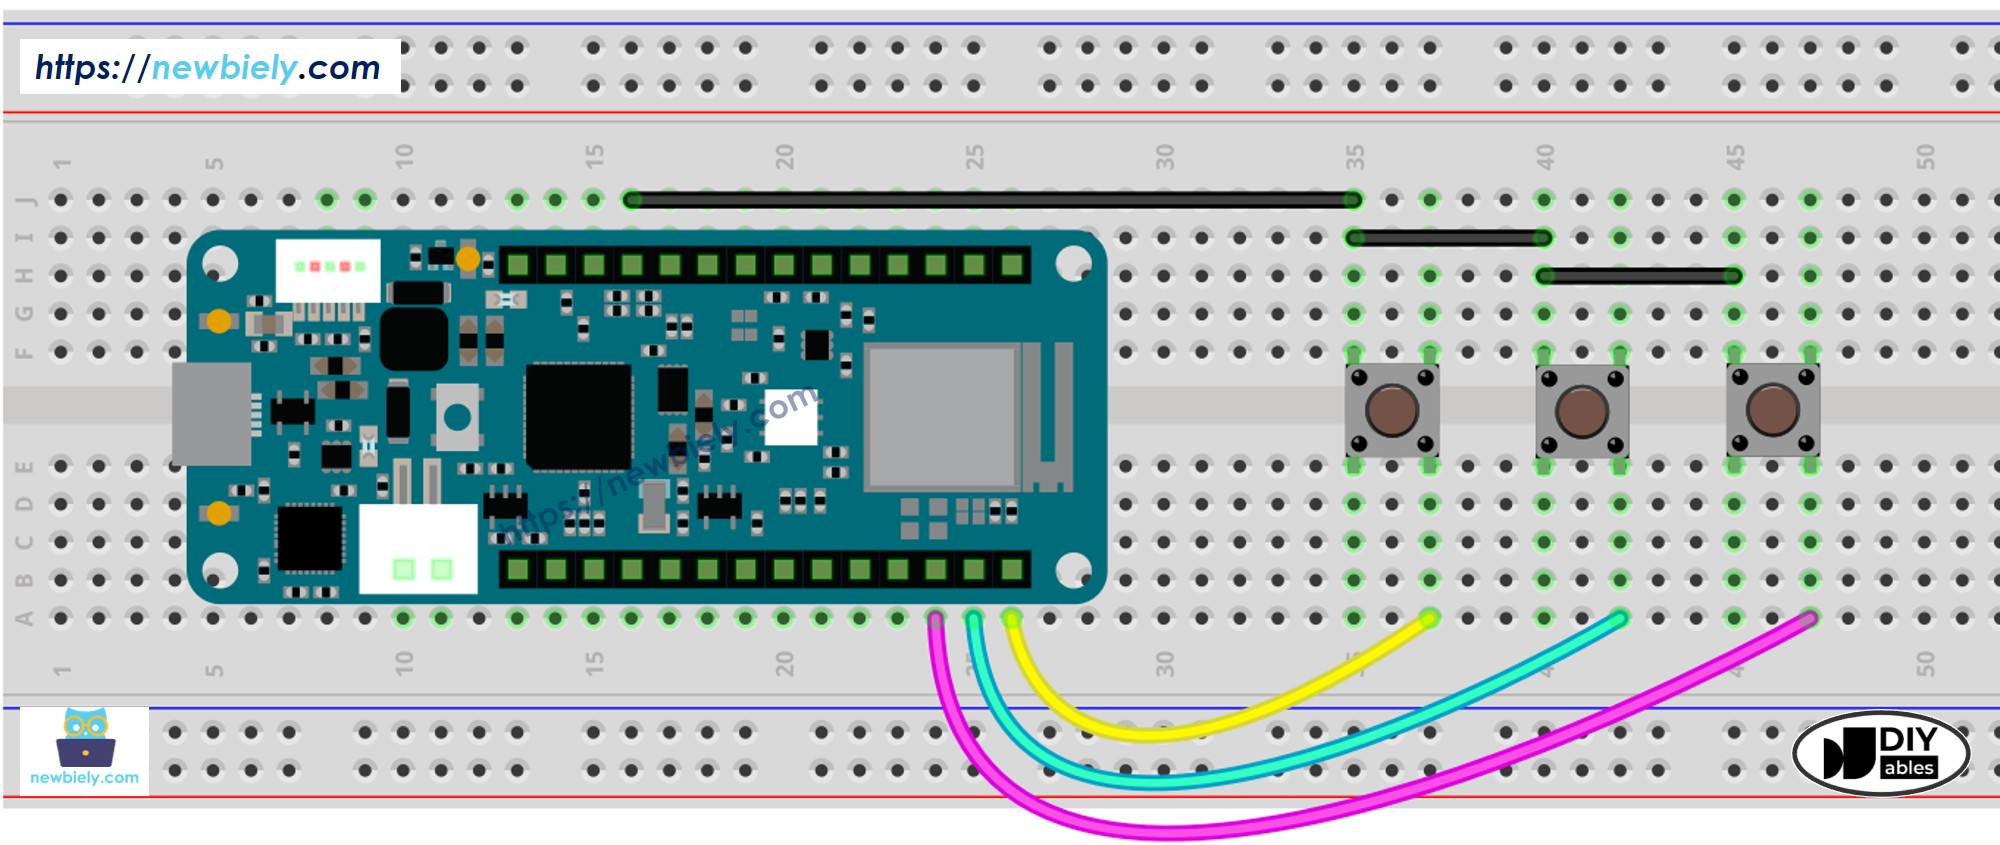
Arduino MKR WiFi 1010 Button Debounce Code for Multiple Buttons
Handling multiple buttons is where ezButton really shines. Instead of managing separate timing variables for each button, you simply create multiple button objects. The library handles everything!
Example: Let's debounce three buttons simultaneously.
The wiring diagram
This image is created using Fritzing. Click to enlarge image
/* * This Arduino MKR WiFi 1010 code was developed by newbiely.com * * This Arduino MKR WiFi 1010 code is made available for public use without any restriction * * For comprehensive instructions and wiring diagrams, please visit: * https://newbiely.com/tutorials/arduino-mkr/arduino-mkr-wifi-1010-button-debounce */#include <ezButton.h>#define DEBOUNCE_TIME 50 // define debounce duration in milliseconds, adjust upward if button chatter persistsezButtonbutton1(D6); // instantiate an ezButton object for digital pin D6ezButtonbutton2(D7); // instantiate an ezButton object for digital pin D7ezButtonbutton3(D8); // instantiate an ezButton object for digital pin D8voidsetup() {Serial.begin(9600);button1.setDebounceTime(DEBOUNCE_TIME); // apply debounce duration of 50 milliseconds to button1button2.setDebounceTime(DEBOUNCE_TIME); // apply debounce duration of 50 milliseconds to button2button3.setDebounceTime(DEBOUNCE_TIME); // apply debounce duration of 50 milliseconds to button3}voidloop() {button1.loop(); // call loop() method to update button1 statebutton2.loop(); // call loop() method to update button2 statebutton3.loop(); // call loop() method to update button3 stateif (button1.isPressed())Serial.println("The button 1 is pressed");if (button1.isReleased())Serial.println("The button 1 is released");if (button2.isPressed())Serial.println("The button 2 is pressed");if (button2.isReleased())Serial.println("The button 2 is released");if (button3.isPressed())Serial.println("The button 3 is pressed");if (button3.isReleased())Serial.println("The button 3 is released");}
Video Tutorial
Additional Knowledge
Choosing Debounce Time
The optimal DEBOUNCE_TIME value depends on your specific hardware:
Typical Range: 20-50ms works for most buttons
High-Quality Buttons: May need only 10-20ms
Cheap/Old Buttons: Might require 50-100ms
Switches: Toggle and slide switches often need longer (50-100ms)
How to Find Your Value: Start with 50ms. If you still see occasional double-triggers, increase it in 10ms increments until behavior is reliable.
Debouncing Other Devices
Debouncing isn't just for buttons! These devices also benefit from debouncing:
Toggle/Slide Switches: Any mechanical switch can chatter
Limit Switches: Common in CNC and robotics
Reed Switches: Magnetic sensors used in door/window sensors
Touch Sensors: Can have electrical noise requiring debouncing
The same debouncing techniques apply to all these devices—they're all reading digital inputs that can have noisy transitions!
Please feel free to share the link of this tutorial. However, Please do not use our content on any other websites. We invested a lot of effort and time to create the content, please respect our work!