Arduino MKR WiFi 1010 - Force Sensor
Detect pressure, touches, and squeezes with force sensors! Force-sensitive resistors (FSR) enable your Arduino MKR WiFi 1010 to measure physical pressure for touch interfaces, grip sensors, weight detection, and interactive projects. This tutorial teaches you how to connect a force sensor to your Arduino MKR WiFi 1010 and program it to read pressure levels.
What You'll Learn:
- Connecting force sensor to Arduino MKR WiFi 1010 analog pins
- Programming Arduino MKR WiFi 1010 to read force sensor resistance changes
- Using Arduino MKR WiFi 1010 to measure pressure levels with FSR sensors
- Creating touch-sensitive interfaces with Arduino MKR WiFi 1010 force sensors
- Understanding FSR operation principles with Arduino MKR WiFi 1010
- Building pressure-activated systems using Arduino MKR WiFi 1010 and force sensors
- Implementing threshold-based detection on Arduino MKR WiFi 1010
- Calibrating force sensor readings with Arduino MKR WiFi 1010 projects
Real-World Applications:
- Touch interfaces: Arduino MKR WiFi 1010 with force sensor creating pressure-sensitive controls
- Musical instruments: Arduino MKR WiFi 1010 force sensors detecting key press strength
- Grip sensors: Arduino MKR WiFi 1010 with FSR measuring hand grip strength
- Robotics: Arduino MKR WiFi 1010 force sensors detecting object contact
- Gaming controllers: Arduino MKR WiFi 1010 and force sensors for pressure-sensitive buttons
- Smart mats: Arduino MKR WiFi 1010 with force sensors detecting presence
- Exercise equipment: Arduino MKR WiFi 1010 force sensors monitoring workout pressure
- Medical devices: Arduino MKR WiFi 1010 and FSR sensors measuring patient pressure points
Interactive Applications:
You can extend this Arduino MKR WiFi 1010 force sensor project by adding displays to show pressure levels, or servos that respond to squeeze strength, creating fully interactive pressure-sensitive systems.
Hardware Preparation
| 1 | × | Arduino MKR WiFi 1010 | |
| 1 | × | Micro USB Cable | |
| 1 | × | Force Sensor | |
| 1 | × | 10 kΩ Resistor | |
| 1 | × | Breadboard | |
| 1 | × | Jumper Wires | |
| 1 | × | Optionally, DC Power Jack |
Or you can buy the following kits:
| 1 | × | DIYables Sensor Kit (18 sensors/displays) |
Additionally, some of these links are for products from our own brand, DIYables .
Overview of Force Sensor
What is a Force Sensor?
A force sensor (also called Force-Sensitive Resistor or FSR) is a piezoresistive sensor that changes its electrical resistance when mechanical force is applied.
How Force Sensors Work:
- Made of two thin polymer films with conductive material
- When force applied, conductive particles come closer together
- More pressure = Lower resistance = Higher voltage reading
- Less pressure = Higher resistance = Lower voltage reading
- Resistance can range from >10MΩ (no pressure) to <1kΩ (maximum pressure)
Popular FSR Models:
- FSR402: Round 12.7mm sensing area (most common)
- FSR406: Round 38.1mm sensing area (larger contact)
- Interlink FSR: Various sizes and shapes available
Key Characteristics:
Advantages:
- Simple interface: Acts like variable resistor
- Thin and flexible: Can bend and conform to surfaces
- Low cost: Inexpensive pressure sensing solution
- Fast response: Responds in milliseconds
- Wide force range: Typically 0.1N to 10N
- Easy integration: Works directly with Arduino analog inputs
Limitations:
- Not accurate for absolute measurements: ±5-25% variation
- Not suitable for precise weight: Use load cells for precision
- Best for relative measurements: Good for detecting pressure changes
- Contact area matters: Different pressures give same reading if area changes
- Temperature sensitive: Readings affected by temperature changes
- Hysteresis: Slight difference between increasing/decreasing pressure
Perfect For:
- Detecting presence (someone sitting, standing, touching)
- Relative pressure measurement (light, medium, strong squeeze)
- Touch-sensitive interfaces and buttons
- Grip strength detection
- Contact detection in robotics
- Interactive art installations
Not Suitable For:
- Precise weight measurement (use load cell instead)
- Long-term force monitoring (sensor drifts over time)
- Safety-critical applications requiring calibration
- Scientific measurements needing high accuracy
Force Sensor Pinout
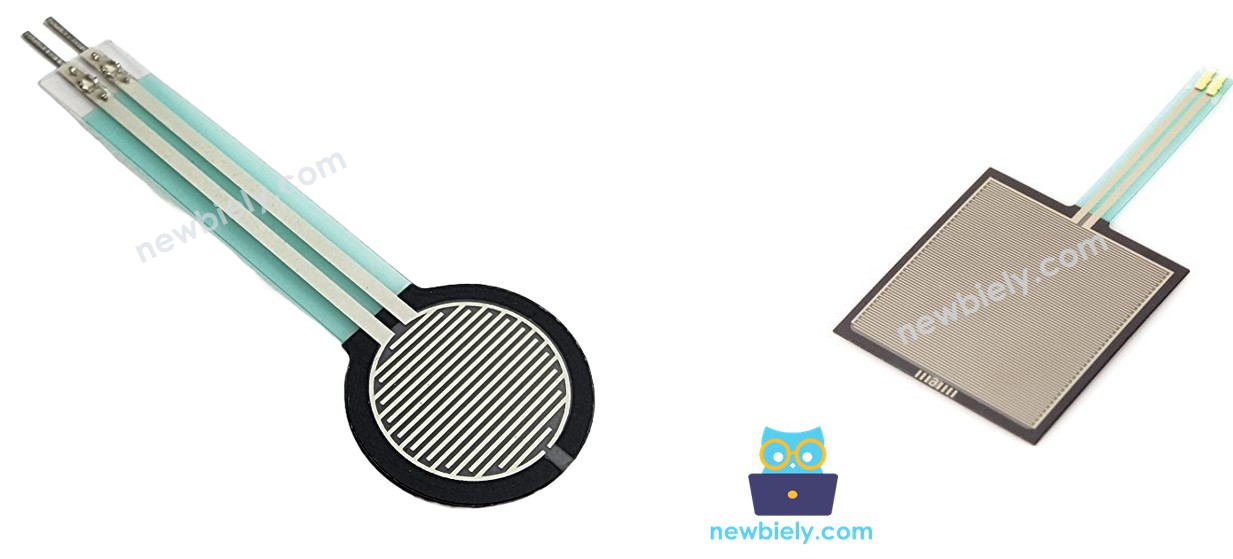
A force sensor has two terminals (pins/leads):
- Terminal 1: Either end of the FSR
- Terminal 2: Other end of the FSR
Important Notes:
- No polarity: FSR is like a resistor - orientation doesn't matter
- Both pins are identical: You can connect either way
- Two wires: Some FSRs have pre-attached wires, others have bare terminals
Voltage Divider Circuit Required
Unlike digital sensors, FSRs need a voltage divider circuit to work with Arduino:
Why Voltage Divider?
- Arduino reads voltage, not resistance
- FSR changes resistance, not voltage directly
- Voltage divider converts resistance change to voltage change
Circuit Configuration:
How It Works:
No Pressure:
- FSR resistance: Very high (>10MΩ)
- Most voltage drops across FSR
- Analog pin reads LOW voltage (~0V)
- Arduino reads low value (~0-50)
Light Pressure:
- FSR resistance: Moderate (10-100kΩ)
- Voltage divides between FSR and resistor
- Analog pin reads MEDIUM voltage (~1-2V)
- Arduino reads medium value (~200-400)
Strong Pressure:
- FSR resistance: Low (<5kΩ)
- Most voltage drops across 10kΩ resistor
- Analog pin reads HIGH voltage (~3-5V)
- Arduino reads high value (600-1023)
Why 10kΩ Resistor?
- Good balance between sensitivity and range
- Works well with typical FSR resistance range
- Can use 5kΩ-47kΩ depending on application:
- Lower resistance (5kΩ): More sensitive to light touch
- Higher resistance (47kΩ): Better for strong pressure
Mathematical Formula:
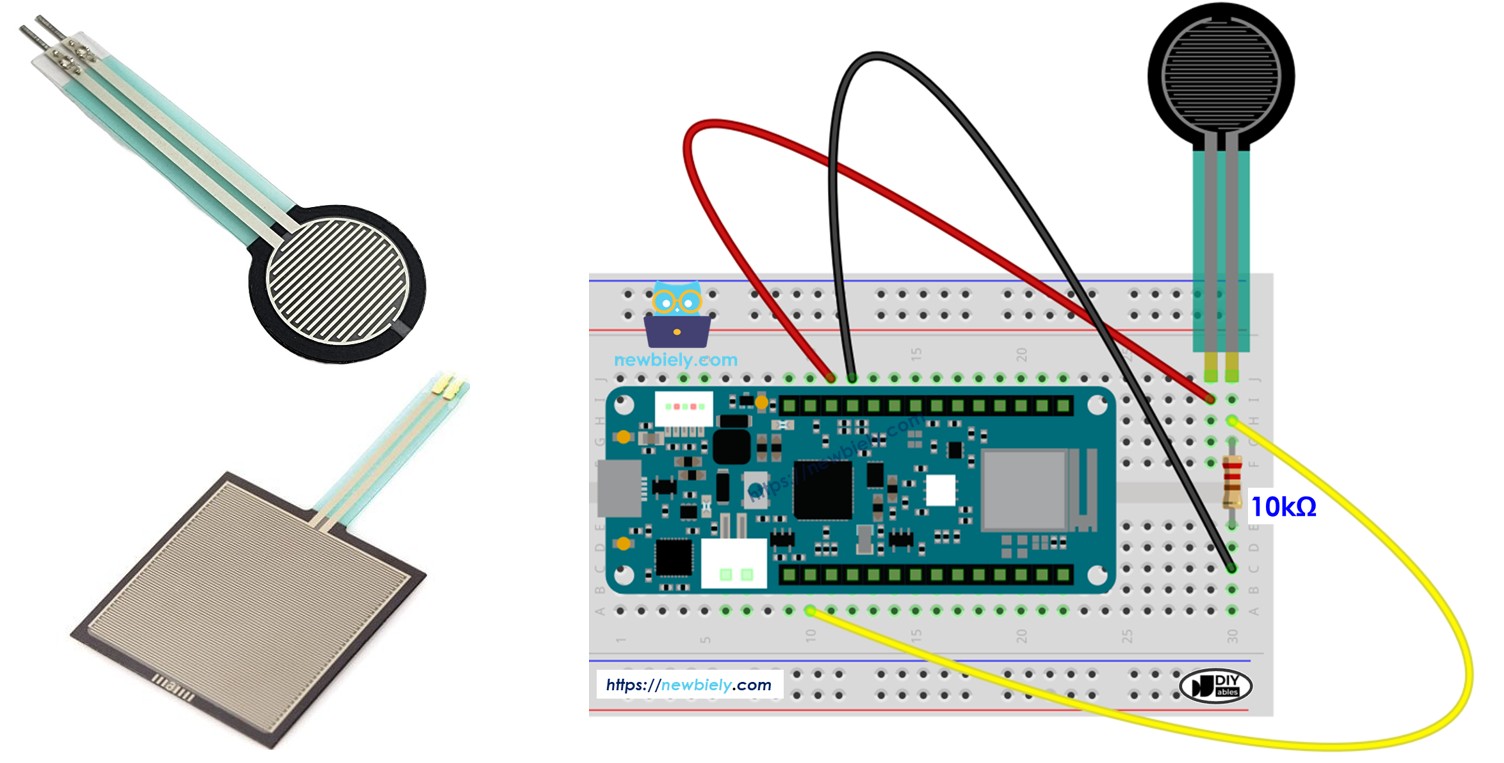
Wiring Diagram between Force Sensor and Arduino MKR WiFi 1010
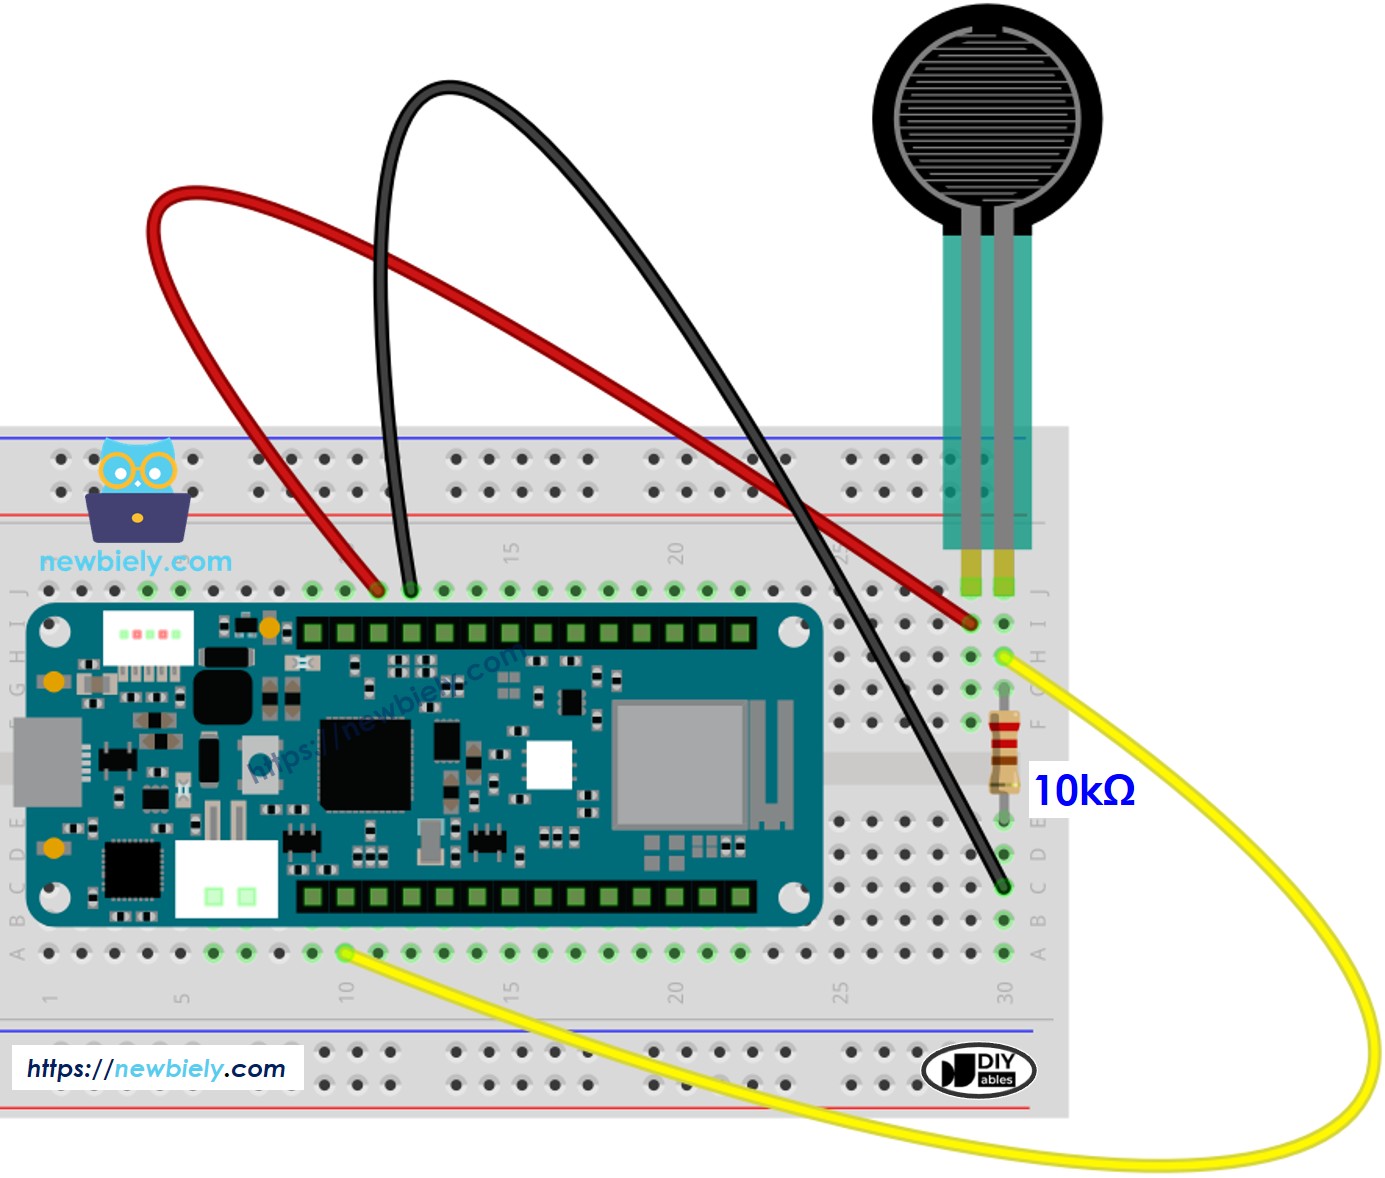
This image is created using Fritzing. Click to enlarge image
Detailed Connection Guide:
Force Sensor Connections:
- FSR Terminal 1 → Arduino 5V
- Provides reference voltage for voltage divider
- FSR Terminal 2 → Two connections:
- Connection 1: Arduino A0 (analog input pin)
- Connection 2: Through 10kΩ resistor to GND
- Force sensor acts as variable resistor (top of divider)
- 10kΩ resistor acts as fixed resistor (bottom of divider)
- Arduino A0 measures voltage at the junction point
- As FSR resistance decreases (more pressure), voltage increases
- Insert components into breadboard:
- Connect FSR first terminal:
- Connect FSR second terminal:
- Connect 10kΩ resistor:
- Complete ground connection:
- Always use a pull-down resistor (10kΩ to GND) - never connect FSR directly between 5V and analog pin
- Keep wires short to minimize noise
- FSR has no polarity - either orientation works
- Secure FSR to flat surface for consistent readings
Circuit Explanation:
This creates a voltage divider circuit where:
Wiring Steps:
- Place FSR leads in separate rows
- Place 10kΩ resistor nearby
- Wire from FSR Terminal 1 to Arduino 5V
- Wire from FSR Terminal 2 to breadboard row
- Wire from same row to Arduino A0
- One end to same row as FSR Terminal 2 and A0
- Other end to GND rail on breadboard
- Wire from breadboard GND rail to Arduino GND
Power Supply:
For This Project: Simply plug your Arduino MKR WiFi 1010 into your computer's USB port. The force sensor circuit draws negligible current (<1mA).
Important Notes:
How To Program Force Sensor
Understanding FSR Programming
Programming a force sensor with Arduino MKR WiFi 1010 involves reading analog voltage from the voltage divider circuit.
The Process:
Step 1: Read Analog Value
Returns a value from 0 to 1023 (10-bit ADC).
Step 2: Interpret the Value
Step 3: Apply Thresholds
Optional: Convert to Voltage
Optional: Estimate Resistance
Key Programming Concepts:
- Relative measurement: FSR readings are relative, not absolute
- Calibration: Determine your own thresholds through testing
- Smoothing: Average multiple readings to reduce noise
- Baseline: Store no-pressure reading and subtract from all measurements
Arduino MKR WiFi 1010 Code
This example reads the force sensor and categorizes pressure into five levels: no pressure, light touch, light squeeze, medium squeeze, and strong squeeze.
What the Code Does:
- Configures analog pin A0 as input for force sensor reading
- Continuously reads analog value from voltage divider circuit
- Maps readings to pressure categories using threshold values
- Displays both raw value and pressure interpretation
- Updates readings every 100ms for real-time feedback
- Perfect for touch detection and pressure-sensitive interfaces
Code Explanation - Force Sensor Reading
Pin Configuration:
Defines A0 as the analog input for reading voltage from the voltage divider.
Reading Analog Value:
Reads 10-bit value (0-1023) representing voltage at analog pin.
Threshold-Based Categorization:
Classifies pressure into five categories based on analog value ranges.
Understanding Thresholds:
- <10: Essentially no pressure (noise level)
- 10-200: Finger barely touching
- 200-500: Light finger pressure
- 500-800: Firm finger squeeze
- 800-1023: Maximum pressure
Calibration Note: These thresholds work well for FSR402 with 10kΩ resistor. Adjust based on your specific FSR model and resistor value.
Detailed Instructions
New to Arduino MKR WiFi 1010? Complete our Getting Started with Arduino MKR WiFi 1010 tutorial first to set up your development environment.
Step 1: Build Voltage Divider Circuit
- Connect FSR Terminal 1 to Arduino 5V
- Connect FSR Terminal 2 to breadboard row
- Connect same row to Arduino A0
- Connect 10kΩ resistor from same row to GND
- Connect Arduino GND to breadboard GND rail
Step 2: Upload Code
- Use USB cable to connect Arduino MKR WiFi 1010 to your computer
- Launch Arduino IDE
- Select Arduino MKR WiFi 1010 board and COM port
- Copy the code above into Arduino IDE
- Click Upload button
Step 3: Test Force Sensor
- Open Serial Monitor (baud rate: 9600)
- Place finger on FSR sensing area
- Gradually increase pressure
- Watch values and categories change
- Release pressure and watch values return to zero
Expected Serial Monitor Output:
Testing Tips:
- No reading: Check wiring, ensure 10kΩ resistor connected to GND
- Always high values: FSR might be damaged or always pressed
- Always ~512: Check that FSR Terminal 2 connects to both A0 and resistor
- Noisy readings: Add small capacitor (0.1µF) across 10kΩ resistor
- Inconsistent: FSR needs flat, stable mounting surface
Troubleshooting Common Issues
Problem: Always Reads 0 or Very Low Values
Possible Causes:
- Wiring error in voltage divider
- FSR not connected properly
- Wrong resistor value
- FSR damaged
Solutions:
- Verify FSR Terminal 1 connects to 5V
- Confirm FSR Terminal 2 connects to BOTH A0 and resistor
- Check resistor connects to GND (not 5V)
- Verify 10kΩ resistor (brown-black-orange bands)
- Test FSR with multimeter - resistance should change when pressed
Problem: Always Reads High Values (~1023)
Possible Causes:
- No pull-down resistor
- Resistor disconnected from GND
- Short circuit
Solutions:
- Verify 10kΩ resistor present in circuit
- Check resistor connects to GND, not floating
- Ensure no short between A0 and 5V
- Try different analog pin
Problem: Reads Around 512 Constantly
Cause: A0 pin floating (not properly connected).
Solutions:
- Check connection from FSR Terminal 2 to A0
- Ensure breadboard contacts are good
- Try different breadboard row
- Check jumper wire continuity
Problem: Noisy or Erratic Readings
Possible Causes:
- Electrical interference
- Poor connections
- Long wires
- Unstable FSR mounting
Solutions:
- Add 0.1µF capacitor parallel to 10kΩ resistor
- Use shorter wires
- Secure FSR to flat surface
- Average multiple readings in code:
Problem: Inconsistent Readings at Same Pressure
Causes:
- FSR characteristic - they have inherent variation
- Contact area changing
- Temperature effects
- FSR mounting not stable
Solutions:
- Accept ±10-20% variation as normal
- Use thresholds with hysteresis
- Mount FSR firmly to rigid surface
- Ensure consistent contact area (same finger position)
- Calibrate for specific application
Problem: FSR Stops Responding After Some Time
Causes:
- FSR overheated (continuous high pressure)
- Adhesive layer delaminating
- Physical damage
Solutions:
- Avoid continuous high pressure for extended periods
- Let FSR rest between tests
- Don't exceed 10N force specification
- Replace if permanently damaged
Challenge Yourself - Creative Extensions
Once you have the basic force sensor working, try these enhancements:
1. Visual Pressure Indicator
Show pressure level on LED bar graph:
2. Pressure-Controlled Servo
Move servo based on squeeze strength:
3. Musical Instrument
Create pressure-sensitive tones:
4. Pressure-Activated Lock
Unlock when specific pressure applied:
5. Grip Strength Tester
Record and display maximum grip:
6. Multi-Point Pressure Mat
Monitor multiple FSRs for position detection:
7. Pressure-Modulated LED Brightness
Control LED brightness with squeeze:
8. Touch-Sensitive Game Controller
Create pressure-sensitive game inputs:
9. Data Logging
Record pressure events over time:
10. Smart Seat Occupancy Detector
Detect presence and sitting duration:
Experiment and create pressure-sensitive interactions!