Arduino MKR WiFi 1010 - Rain Sensor
Welcome to your complete guide on using a rain sensor with the Arduino MKR WiFi 1010! Rain detection is a valuable skill for weather monitoring, automation, and smart home projects. In this comprehensive tutorial, you'll learn how to connect a rain sensor to your Arduino MKR WiFi 1010 board and detect rainfall both digitally and with analog measurements. The Arduino MKR WiFi 1010 is perfect for rain sensing applications because of its accurate analog input capabilities, built-in WiFi connectivity for IoT weather stations, and reliable digital input pins. Whether you're building an automatic window closer, smart irrigation system, weather station, or car sunroof controller, the Arduino MKR WiFi 1010 with a rain sensor provides reliable rain and snow detection. This tutorial will guide you through wiring the rain sensor to your Arduino MKR WiFi 1010, understanding how rain sensors work with digital and analog outputs, programming your board step-by-step to detect and measure rainfall, and adjusting sensitivity for accurate readings. By the end of this tutorial, you'll have a fully functional rain detection system using the Arduino MKR WiFi 1010 and rain sensor, displaying rain status on the Serial Monitor, with skills you can apply to countless weather-responsive projects.
What You'll Learn
- How to wire a rain sensor to the Arduino MKR WiFi 1010 with proper power management
- Understanding rain sensor digital output (DO) and analog output (AO) pins and their uses
- Programming the Arduino MKR WiFi 1010 to detect rain using digital signals
- Reading rain intensity measurements using the Arduino MKR WiFi 1010 analog input
- Adjusting rain sensor sensitivity with the onboard potentiometer for your Arduino MKR WiFi 1010 projects
- Implementing power-saving techniques by controlling sensor power with your Arduino MKR WiFi 1010
- Building weather-responsive automation systems with the Arduino MKR WiFi 1010 and rain sensor
Real-World Applications
- Automatic Window Closers: Close windows automatically when rain is detected using the Arduino MKR WiFi 1010
- Smart Irrigation Systems: Pause watering systems when rain is falling to save water and money
- Weather Stations: Build DIY weather monitoring stations that track rainfall with your Arduino MKR WiFi 1010
- Car Sunroof Controllers: Automatically close convertible tops or sunroofs when rain starts falling
- Laundry Line Alerts: Send notifications when rain is detected so outdoor laundry can be brought inside
- Greenhouse Automation: Adjust ventilation and heating based on rainfall detection
- Outdoor Event Monitors: Alert systems that notify when rain threatens outdoor activities or equipment
Ready to start detecting rain with your Arduino MKR WiFi 1010? Let's begin building your rain sensing project!
Hardware Preparation
| 1 | × | Arduino MKR WiFi 1010 | |
| 1 | × | Micro USB Cable | |
| 1 | × | Rain Sensor | |
| 1 | × | Breadboard | |
| 1 | × | Jumper Wires |
Or you can buy the following kits:
| 1 | × | DIYables Sensor Kit (18 sensors/displays) |
Additionally, some of these links are for products from our own brand, DIYables .
Overview of Rain Sensor
A rain sensor detects the presence of water (rain or snow) and measures rainfall intensity. It provides both digital output (rain detected: YES/NO) and analog output (rainfall intensity: 0-4095) making it versatile for different applications.
The rain sensor consists of two main parts:
- Sensing Pad: The waterproof detection board exposed to weather
- Electronic Module: The signal processing board with adjustable sensitivity
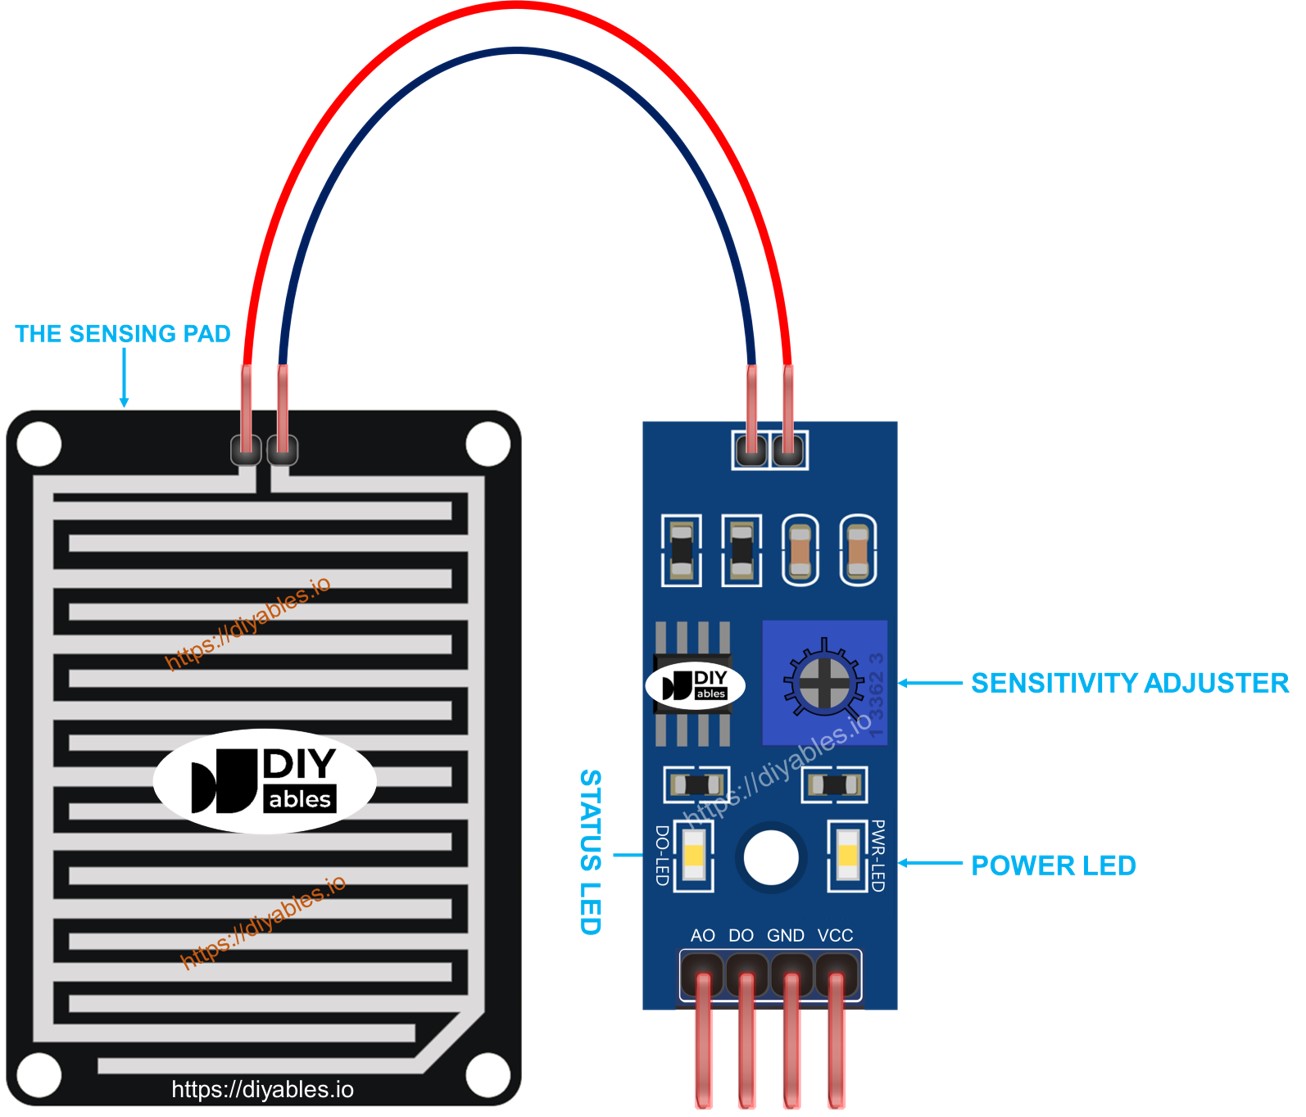
The Sensing Pad
The sensing pad is placed outdoors (roof, window sill, etc.) where it's exposed to rain or snow. It contains parallel copper traces arranged in two groups: power traces and sensing traces. These traces are normally separated, but when water droplets land on the pad, they create conductive bridges between the traces, changing the electrical resistance. This change is detected by the electronic module.
The Electronic Module
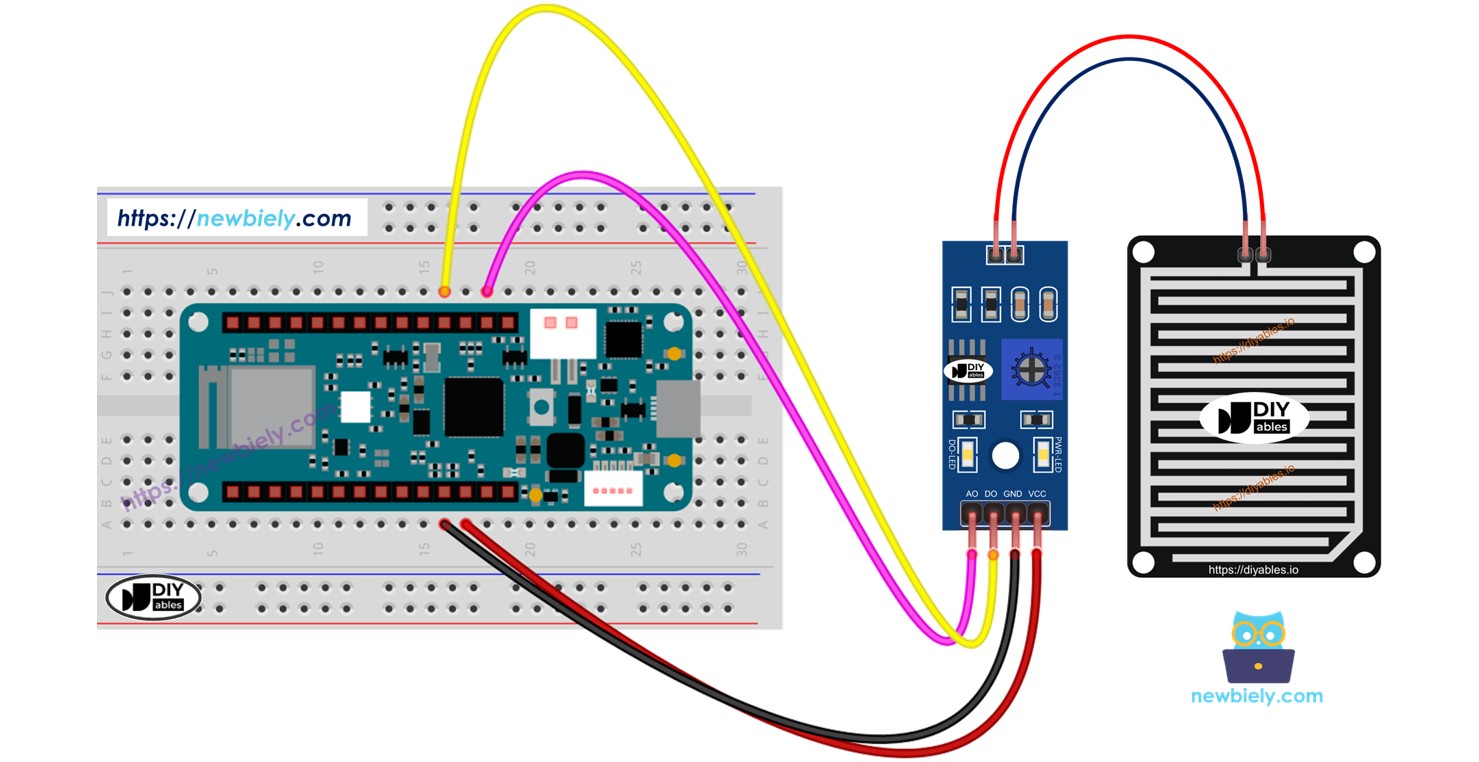
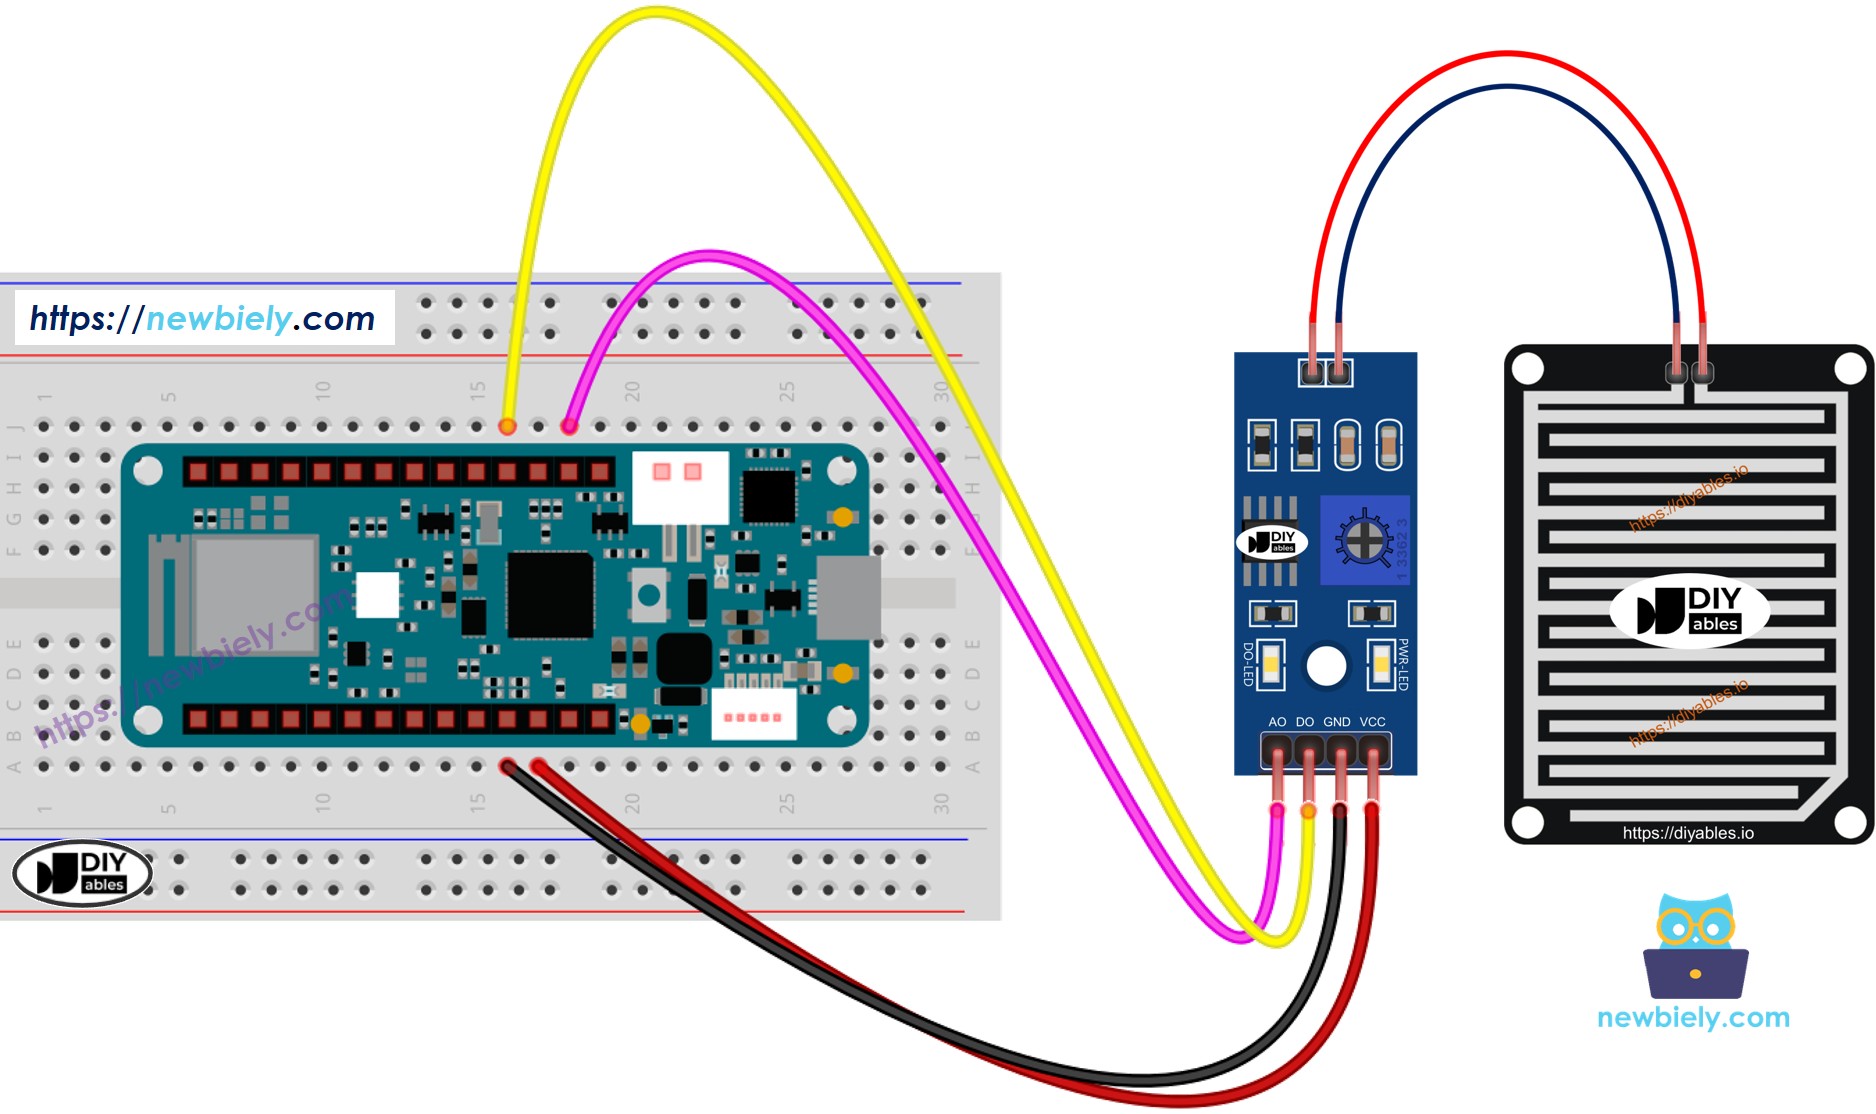
The electronic module processes the sensing pad's signal and provides easy-to-use outputs for your Arduino MKR WiFi 1010. It has four pins:
- VCC: Power supply (3.3V or 5V)
- GND: Ground (0V)
- DO (Digital Output): HIGH when dry, LOW when rain detected (threshold adjustable via potentiometer)
- AO (Analog Output): Variable value (lower value = more water, higher value = less water)
The module also has two LED indicators:
- PWR LED: Lights when power is supplied
- DO LED: Lights when rain is detected (DO pin is LOW)
How It Works
Digital Output (DO Pin):
- The onboard potentiometer sets the rain detection threshold
- When rainfall exceeds the threshold: DO = LOW, LED turns ON
- When rainfall is below the threshold: DO = HIGH, LED stays OFF
Analog Output (AO Pin):
- Provides continuous measurements of water amount on the sensing pad
- More water = Lower analog value (closer to 0)
- Less water = Higher analog value (closer to 4095)
- The potentiometer does NOT affect the analog output value
Wiring Diagram
The sensor's VCC pin should be connected to a 3.3V or 5V power source. However, if you connect it directly to the Arduino MKR WiFi 1010’s power pin, the sensor might not last as long because of damage from chemical reactions. A better method is to attach the sensor's VCC pin to one of the Arduino MKR WiFi 1010’s output pins. You can then program that pin to power the sensor only when taking readings. This approach helps reduce the risk of damage.
The rain sensor has two outputs, so you can use one or both, depending on what you need.
This image is created using Fritzing. Click to enlarge image
Arduino MKR WiFi 1010 Code - Read value from DO pin
Detailed Instructions
New to Arduino MKR WiFi 1010? Complete our Getting Started with Arduino MKR WiFi 1010 tutorial first to set up your development environment.
- Wire the components according to the diagram above
- Connect the Arduino MKR WiFi 1010 to your computer via USB cable
- Open Arduino IDE and select the correct board and COM port
- Copy the code and upload it to your board
- Place a few drops of water on the rain sensor pad
- View the results on the Serial Monitor:
Remember, if you see the LED light staying on all the time or off, even when it’s raining, you can adjust the knob (called a potentiometer) to change how sensitive the sensor is.
Arduino MKR WiFi 1010 Code - Read value from AO pin
Detailed Instructions
- Copy the code and upload it to your Arduino MKR WiFi 1010
- Place a few drops of water on the rain sensor pad
- View the analog readings on the Serial Monitor:
Challenge Yourself
Ready to take your rain sensing skills further? Try these exciting projects:
- Smart Window System: Automatically close windows with servo motors when rain is detected
- WiFi Rain Alert: Send push notifications to your phone when rain starts using the MKR WiFi 1010's connectivity
- Weather Logger: Record rainfall data to an SD card with timestamps for long-term weather analysis
- Multi-Zone Rain Detection: Use multiple rain sensors around your property to detect rain in different areas
- Irrigation Scheduler: Build a smart sprinkler system that skips watering when recent rainfall is detected
- Rain Gauge: Create a digital rain gauge that measures cumulative rainfall over days, weeks, or months
- Outdoor Equipment Protector: Automatically cover outdoor electronics or furniture when rain is detected