Arduino MKR WiFi 1010 - Serial Monitor
Arduino MKR WiFi 1010 - Serial Monitor
Need to debug your Arduino MKR WiFi 1010 projects? The Serial Monitor is essential for viewing data and controlling your Arduino MKR WiFi 1010 from your PC.
What you'll learn (Arduino MKR WiFi 1010 + Serial Monitor):
- Opening Serial Monitor for Arduino MKR WiFi 1010 projects
- Sending data from Arduino MKR WiFi 1010 to PC
- Controlling Arduino MKR WiFi 1010 from PC via commands
- Debugging Arduino MKR WiFi 1010 programs in real-time
Real-world uses for Arduino MKR WiFi 1010 and Serial Monitor:
- Sensor monitoring (Arduino MKR WiFi 1010 data viewing)
- Remote control (Arduino MKR WiFi 1010 command interface)
- System debugging (Arduino MKR WiFi 1010 troubleshooting)
- Data logging from Arduino MKR WiFi 1010 experiments
You'll master bidirectional communication between your Arduino MKR WiFi 1010 and computer.
Hardware Preparation
| 1 | × | Arduino MKR WiFi 1010 | |
| 1 | × | Micro USB Cable | |
| 1 | × | Optionally, DC Power Jack | |
| 1 | × | Breadboard | |
| 1 | × | Jumper Wires |
Or you can buy the following kits:
| 1 | × | DIYables Sensor Kit (18 sensors/displays) |
Additionally, some of these links are for products from our own brand, DIYables .
Overview of Serial Monitor
The Serial Monitor in Arduino IDE is your debugging window for Arduino MKR WiFi 1010 projects. It handles bidirectional communication:
- Arduino MKR WiFi 1010 to PC: Your Arduino sends data through the USB cable to the Serial Monitor on your computer screen. Perfect for debugging and monitoring.
- PC to Arduino MKR WiFi 1010: Type commands on your PC and send them to control your Arduino remotely.
You'll use the same USB cable that uploads code to your Arduino MKR WiFi 1010.
How To Use Serial Monitor
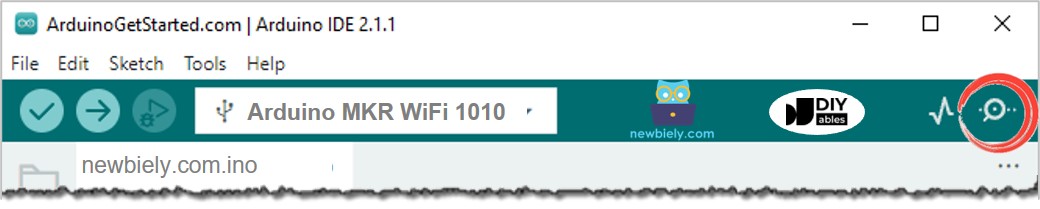
Open Serial Monitor
Simply click on the icon in the Arduino IDE shown in the image below:
Components on Serial Monitor
The Serial Monitor has 8 functional parts:
① Output console: Displays data received from Arduino MKR WiFi 1010.
② Autoscroll checkbox: Enable/disable automatic scrolling as new data arrives.
③ Timestamp checkbox: Add timestamps before each line of data.
④ Clear output button: Remove all text from the output console.
⑤ Baud rate selection: Set communication speed between PC and Arduino MKR WiFi 1010. Must match the value in Serial.begin() in your code.
⑥ Textbox: Enter characters to send to Arduino MKR WiFi 1010.
⑦ Ending Selection: Choose ending characters appended to sent data:
- No ending: No added characters
- Newline: Adds LF ('\n')
- Carriage Return: Adds CR ('\r')
- Both NL and CR: Adds both CR and LF
⑧ Send button: Transmits textbox content with selected ending characters to Arduino MKR WiFi 1010.
Arduino MKR WiFi 1010 To PC
To send data from Arduino MKR WiFi 1010 to your computer:
1. Initialize Serial communication with desired baud rate:
2. Send data using these functions:
- Serial.print() – https://arduinogetstarted.com/reference/serial-print
- Serial.println() – https://arduinogetstarted.com/reference/serial-println
- Serial.write() – https://arduinogetstarted.com/reference/serial-write
For example, to display "Hello World!" on the Serial Monitor:
Example Use
This code sends "newbiely.com" from Arduino MKR WiFi 1010 to Serial Monitor every second:
Detailed Instructions
New to Arduino MKR WiFi 1010? Complete our Getting Started with Arduino MKR WiFi 1010 tutorial first to set up your development environment.
- Plug your Arduino MKR WiFi 1010 into your computer's USB port.
- Open the Arduino IDE.
- Select the Arduino MKR WiFi 1010 board and correct COM port.
- Copy the code above and paste it into a new sketch.
- Click Upload to compile and upload to the Arduino MKR WiFi 1010.
- Open the Serial Monitor in Arduino IDE.
- Select 9600 baud rate.
- Observe the output on Serial Monitor:
Try it: Replace Serial.println() with Serial.print() and see the difference.
PC To Arduino MKR WiFi 1010
How to send data from PC to Arduino MKR WiFi 1010
On your computer:
- Type your message in the Serial Monitor textbox.
- Click the "Send" button.
On Arduino MKR WiFi 1010:
1. Initialize Serial communication:
2. Check for incoming data:
3. Read data using these functions:
- Serial.read()
- Serial.readBytes()
- Serial.readBytesUntil()
- Serial.readString()
- Serial.readStringUntil()
For example:
Example Use
This Arduino MKR WiFi 1010 code controls the built-in LED via Serial Monitor commands:
- Command "ON" → LED turns on
- Command "OFF" → LED turns off
Understanding Command Detection:
How does Arduino MKR WiFi 1010 differentiate between "O", "OF", and "OFF"?
We use an ending character (newline '\n') to mark command completion. Select "Newline" in the Serial Monitor's ending dropdown before sending. The Arduino reads until it finds the newline, which acts as the command separator.
Detailed Instructions
- Copy the code above and paste it into Arduino IDE.
- Click Upload to send code to Arduino MKR WiFi 1010.
- Open Serial Monitor in Arduino IDE.
- Select 9600 baud rate and "Newline" ending option.
- Type "ON" and click Send button:
- Check the built-in LED on your Arduino MKR WiFi 1010 – it should light up.
- View confirmation on Serial Monitor:
- Type "OFF" and click Send to turn LED off.
- Try multiple ON/OFF commands.
Troubleshooting
- No data displayed: Verify correct COM port and matching baud rates in code and Serial Monitor.
- Garbage characters: Baud rate mismatch – ensure Serial.begin() matches Serial Monitor setting.
- Commands not working: Check "Newline" ending option is selected for command-based communication.
- Serial Monitor not opening: Close and reopen Arduino IDE, or try different USB cable.
Challenge Yourself - Creative Customizations
Once Serial Monitor works with your Arduino MKR WiFi 1010, try these extensions:
Quick Variations
- Create a menu system with multiple commands on Arduino MKR WiFi 1010.
- Add sensor readings display in real-time on Arduino MKR WiFi 1010.
Advanced Features to Try
- Build a command parser for complex inputs on Arduino MKR WiFi 1010.
- Create data logging to timestamp sensor values on Arduino MKR WiFi 1010.
- Implement password-protected commands on Arduino MKR WiFi 1010.
- Build a two-way chat system between multiple Arduino MKR WiFi 1010 boards.