Arduino MKR WiFi 1010 - Button - Long Press Short Press

Welcome to this advanced button tutorial! Learn how to detect different types of button presses—short taps versus long holds—enabling sophisticated user interfaces with just a single button.

What You'll Master:

Why This Matters:

Differentiating between short and long presses dramatically expands what you can do with a single button:

Practical Applications:

Two Detection Approaches:

  1. Detect on release: Measure press duration when button is released
  2. Detect during press: Trigger action while button is still held (more responsive for long presses)

Hardware Preparation

1×Arduino MKR WiFi 1010
1×Micro USB Cable
1×Breadboard-mount Button with Cap
1×Breadboard-mount Button Kit
1×Panel-mount Push Button
1×Push Button Module
1×Breadboard
1×Jumper Wires
1×Optionally, DC Power Jack

Or you can buy the following kits:

1×DIYables Sensor Kit (30 sensors/displays)
1×DIYables Sensor Kit (18 sensors/displays)
Disclosure: Some of the links provided in this section are Amazon affiliate links. We may receive a commission for any purchases made through these links at no additional cost to you.
Additionally, some of these links are for products from our own brand, DIYables .

Overview of Button

This tutorial builds on fundamental button concepts. If you're new to buttons or debouncing, please review these prerequisite tutorials first:

Essential Background:

These tutorials cover:

  • Button pinouts and connection methods
  • Pull-up and pull-down resistors
  • Reading button state changes
  • Why debouncing is crucial

Understanding these basics makes timing-based detection straightforward!

Wiring Diagram

Connect a button to your Arduino MKR WiFi 1010 as shown. This simple circuit enables all the press detection examples in this tutorial.

The wiring diagram between Arduino MKR WiFi 1010 Button

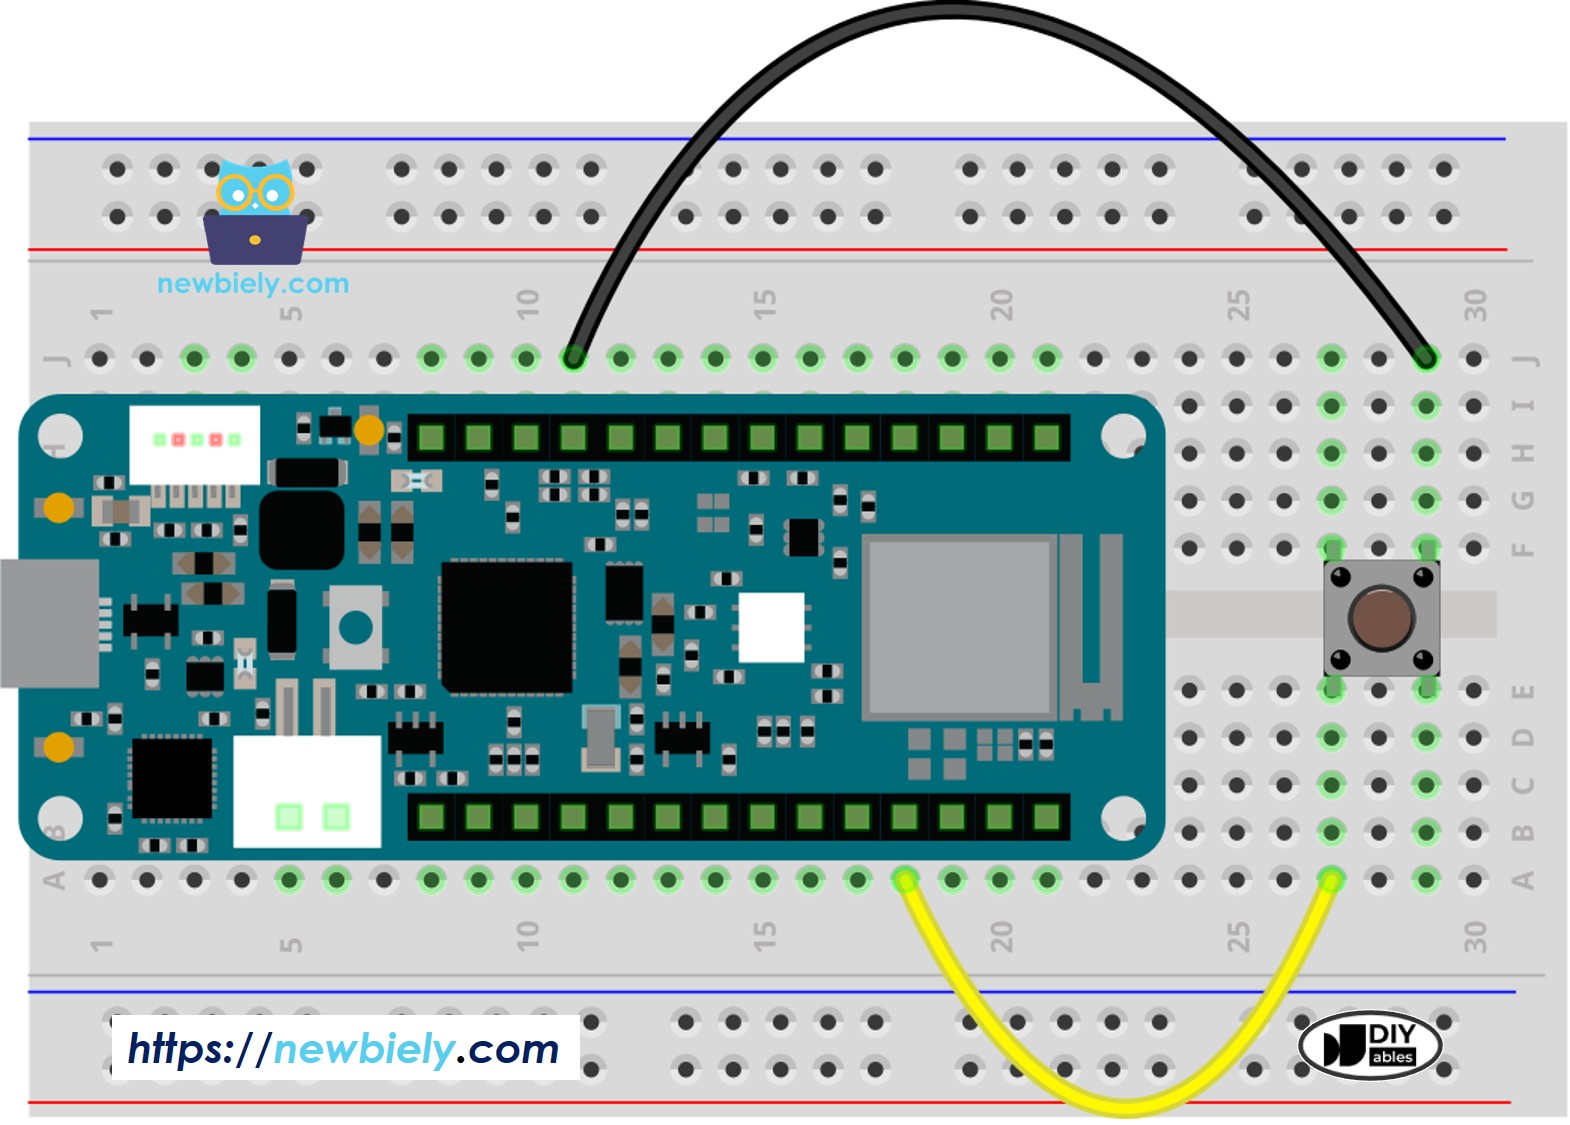
This image is created using Fritzing. Click to enlarge image

Configuration Note: This tutorial uses the Arduino's internal pull-up resistor (enabled in code with INPUT_PULLUP). With this configuration:

  • Button NOT pressed = pin reads HIGH
  • Button pressed = pin reads LOW

This inverted logic is normal and handled in the code!

How To Detect Short Press

Concept: A short press is detected by measuring the duration between button press and release. If the duration is below your threshold, it's a short press.

Algorithm:

  1. Detect button press (HIGH to LOW transition)
  2. Record the press timestamp
  3. Detect button release (LOW to HIGH transition)
  4. Record the release timestamp
  5. Calculate duration = release time - press time
  6. If duration < SHORT_PRESS_TIME threshold → It's a short press!

Let's implement this step by step:

Step 1: Define the short press threshold

#define SHORT_PRESS_TIME 500 // Short press = less than 500 milliseconds (half second)

This threshold is customizable based on your application. 500ms is a good default that feels natural to users.

Step 2: Detect button press and record timestamp

if(prev_state == HIGH && button_state == LOW) // Button just pressed (HIGH to LOW) pressed_time = millis(); // Record when press occurred

We use millis() to get the current time in milliseconds since the Arduino started.

Step 3: Detect button release and record timestamp

if(prev_state == LOW && button_state == HIGH) // Button just released (LOW to HIGH) released_time = millis(); // Record when release occurred

Step 4: Calculate press duration

long press_duration = released_time - pressed_time;

This gives us how many milliseconds the button was held.

Step 5: Determine if it's a short press

if( press_duration < SHORT_PRESS_TIME ) Serial.println("A short press is detected");

Arduino MKR WiFi 1010 Code for detecting the short press

/* * This Arduino MKR WiFi 1010 code was developed by newbiely.com * * This Arduino MKR WiFi 1010 code is made available for public use without any restriction * * For comprehensive instructions and wiring diagrams, please visit: * https://newbiely.com/tutorials/arduino-mkr/arduino-mkr-wifi-1010-button-long-press-short-press */ #define BUTTON_PIN 2 // Arduino Nano 33 IoT pin D2 pin connected to button #define SHORT_PRESS_TIME 500 // 500 milliseconds int prev_button_state = LOW; // The previous state from the input pin int button_state; // The current reading from the input pin unsigned long pressed_time = 0; unsigned long released_time = 0; void setup() { Serial.begin(9600); pinMode(BUTTON_PIN, INPUT_PULLUP); } void loop() { // read the state of the switch/button: button_state = digitalRead(BUTTON_PIN); if (prev_button_state == HIGH && button_state == LOW) // button is pressed pressed_time = millis(); else if (prev_button_state == LOW && button_state == HIGH) { // button is released released_time = millis(); long press_duration = released_time - pressed_time; if ( press_duration < SHORT_PRESS_TIME ) Serial.println("A short press is detected"); } // save the the last state prev_button_state = button_state; }

Detailed Instructions

New to Arduino MKR WiFi 1010? Complete our Getting Started with Arduino MKR WiFi 1010 tutorial first to set up your development environment.

  • Connect the components to the Arduino MKR WiFi 1010 board as depicted in the diagram
  • Plug your Arduino MKR WiFi 1010 into your computer's USB port
  • Launch the Arduino IDE on your computer
  • Select the Arduino MKR WiFi 1010 board and its COM port
  • Upload the code above to your Arduino MKR WiFi 1010 using the Arduino IDE.
  • Press the button quickly a few times.
  • Look at the result on the Serial Monitor. It should look like this:
COM6
Send
A short press is detected
Autoscroll Show timestamp
Clear output
9600 baud  
Newline  

※ NOTE THAT:

Important: The Serial Monitor may show multiple "short press" messages for a single button press. This is the chattering phenomenon—mechanical bouncing causing multiple detections.

This is expected without debouncing! We'll fix this issue in the final section using the ezButton library. For now, focus on understanding the timing logic.

How To Detect Long Press

Two Approaches: Long press detection can be implemented two different ways, each with distinct advantages:

Approach 1: Detect After Release

  • Wait until button is released
  • Measure the total press duration
  • If duration > threshold → Long press
  • Advantage: Simple logic, complete duration known
  • Disadvantage: User must wait until release for feedback

Approach 2: Detect During Press

  • Continuously check press duration while button is held
  • Trigger action as soon as threshold is exceeded (while still pressed)
  • Advantage: Immediate feedback, more responsive UX
  • Disadvantage: Slightly more complex logic

Let's implement both approaches!

Arduino MKR WiFi 1010 Code for detecting long press when released

/* * This Arduino MKR WiFi 1010 code was developed by newbiely.com * * This Arduino MKR WiFi 1010 code is made available for public use without any restriction * * For comprehensive instructions and wiring diagrams, please visit: * https://newbiely.com/tutorials/arduino-mkr/arduino-mkr-wifi-1010-button-long-press-short-press */ #define BUTTON_PIN 2 // Arduino Nano 33 IoT pin D2 pin connected to button #define LONG_PRESS_TIME 1000 // 1000 milliseconds int prev_button_state = LOW; // The previous state from the input pin int button_state; // The current reading from the input pin unsigned long pressed_time = 0; unsigned long released_time = 0; void setup() { Serial.begin(9600); pinMode(BUTTON_PIN, INPUT_PULLUP); } void loop() { // read the state of the switch/button: button_state = digitalRead(BUTTON_PIN); if(prev_button_state == HIGH && button_state == LOW) // button is pressed pressed_time = millis(); else if(prev_button_state == LOW && button_state == HIGH) { // button is released released_time = millis(); long press_duration = released_time - pressed_time; if( press_duration > LONG_PRESS_TIME ) Serial.println("A long press is detected"); } // save the the last state prev_button_state = button_state; }

Detailed Instructions

  • Upload the code to the Arduino MKR WiFi 1010 using the Arduino IDE.
  • After one second, press the button and then let go.
  • Look at the result on the Serial Monitor. It should look like the image below.
COM6
Send
A long press is detected
Autoscroll Show timestamp
Clear output
9600 baud  
Newline  

Arduino MKR WiFi 1010 Code for detecting long press during pressing

/* * This Arduino MKR WiFi 1010 code was developed by newbiely.com * * This Arduino MKR WiFi 1010 code is made available for public use without any restriction * * For comprehensive instructions and wiring diagrams, please visit: * https://newbiely.com/tutorials/arduino-mkr/arduino-mkr-wifi-1010-button-long-press-short-press */ #define BUTTON_PIN 2 // Arduino Nano 33 IoT pin D2 pin connected to button #define LONG_PRESS_TIME 1000 // 1000 milliseconds int prev_button_state = LOW; // The previous state from the input pin int button_state; // The current reading from the input pin unsigned long pressed_time = 0; bool is_pressing = false; bool is_long_detected = false; void setup() { Serial.begin(9600); pinMode(BUTTON_PIN, INPUT_PULLUP); } void loop() { // read the state of the switch/button: button_state = digitalRead(BUTTON_PIN); if(prev_button_state == HIGH && button_state == LOW) { // button is pressed pressed_time = millis(); is_pressing = true; is_long_detected = false; } else if(prev_button_state == LOW && button_state == HIGH) { // button is released is_pressing = false; } if(is_pressing == true && is_long_detected == false) { long press_duration = millis() - pressed_time; if( press_duration > LONG_PRESS_TIME ) { Serial.println("A long press is detected"); is_long_detected = true; } } // save the the last state prev_button_state = button_state; }

Detailed Instructions

  • Load the code above onto your Arduino MKR WiFi 1010 using the Arduino IDE.
  • Wait a few seconds, then press and release the button.
  • Open the Serial Monitor to see the result. It should look like this.
COM6
Send
A long press is detected
Autoscroll Show timestamp
Clear output
9600 baud  
Newline  

How To Detect Both Long Press and Short Press

Now let's combine both detection methods! Your program can respond differently based on whether the user taps quickly or holds the button down.

Use Cases:

  • Short press = Turn on LED, Long press = Start motor
  • Short press = Next menu item, Long press = Select item
  • Short press = Snooze alarm, Long press = Turn off alarm

Short Press and Long Press after released

This approach detects the press type when the button is released:

/* * This Arduino MKR WiFi 1010 code was developed by newbiely.com * * This Arduino MKR WiFi 1010 code is made available for public use without any restriction * * For comprehensive instructions and wiring diagrams, please visit: * https://newbiely.com/tutorials/arduino-mkr/arduino-mkr-wifi-1010-button-long-press-short-press */ #define BUTTON_PIN 2 // Arduino Nano 33 IoT pin D2 pin connected to button #define SHORT_PRESS_TIME 1000 // 1000 milliseconds #define LONG_PRESS_TIME 1000 // 1000 milliseconds int prev_button_state = LOW; // The previous state from the input pin int button_state; // The current reading from the input pin unsigned long pressed_time = 0; unsigned long released_time = 0; void setup() { Serial.begin(9600); pinMode(BUTTON_PIN, INPUT_PULLUP); } void loop() { // read the state of the switch/button: button_state = digitalRead(BUTTON_PIN); if (prev_button_state == HIGH && button_state == LOW) // button is pressed pressed_time = millis(); else if (prev_button_state == LOW && button_state == HIGH) { // button is released released_time = millis(); long press_duration = released_time - pressed_time; if ( press_duration < SHORT_PRESS_TIME ) Serial.println("A short press is detected"); if ( press_duration > LONG_PRESS_TIME ) Serial.println("A long press is detected"); } // save the the last state prev_button_state = button_state; }

Detailed Instructions

  • Use Arduino IDE to upload the code to your Arduino MKR WiFi 1010.
  • Press the button quickly and then hold it down.
  • Open the Serial Monitor to see the result. It should look like the example shown.

※ NOTE THAT:

The Serial Monitor might show several quick presses when you hold the button down. This is normal and is called the bouncing effect. We will explain how to fix it at the end of this guide.

Short Press and Long Press During pressing

/* * This Arduino MKR WiFi 1010 code was developed by newbiely.com * * This Arduino MKR WiFi 1010 code is made available for public use without any restriction * * For comprehensive instructions and wiring diagrams, please visit: * https://newbiely.com/tutorials/arduino-mkr/arduino-mkr-wifi-1010-button-long-press-short-press */ #define BUTTON_PIN 2 // Arduino Nano 33 IoT pin D2 pin connected to button #define SHORT_PRESS_TIME 1000 // 1000 milliseconds #define LONG_PRESS_TIME 1000 // 1000 milliseconds int prev_button_state = LOW; // The previous state from the input pin int button_state; // The current reading from the input pin unsigned long pressed_time = 0; unsigned long released_time = 0; bool is_pressing = false; bool is_long_detected = false; void setup() { Serial.begin(9600); pinMode(BUTTON_PIN, INPUT_PULLUP); } void loop() { // read the state of the switch/button: button_state = digitalRead(BUTTON_PIN); if (prev_button_state == HIGH && button_state == LOW) { // button is pressed pressed_time = millis(); is_pressing = true; is_long_detected = false; } else if (prev_button_state == LOW && button_state == HIGH) { // button is released is_pressing = false; released_time = millis(); long press_duration = released_time - pressed_time; if ( press_duration < SHORT_PRESS_TIME ) Serial.println("A short press is detected"); } if (is_pressing == true && is_long_detected == false) { long press_duration = millis() - pressed_time; if ( press_duration > LONG_PRESS_TIME ) { Serial.println("A long press is detected"); is_long_detected = true; } } // save the the last state prev_button_state = button_state; }

Detailed Instructions

  • Upload the code above to the Arduino MKR WiFi 1010 using the Arduino IDE.
  • Press the button quickly and then press it for a longer time.
  • Open the Serial Monitor to see the result. It should look like this:

Long Press and Short Press with Debouncing

Critical for Production Code: All the examples above work conceptually, but they suffer from button chattering. For reliable, professional applications, debouncing is absolutely essential!

Implementing timing-based detection AND debouncing manually is complex. The ezButton library handles both automatically, providing:

  • Built-in debouncing
  • Clean press/release detection
  • Press duration tracking
  • Simple, readable API

Let's see how clean the code becomes with ezButton!

Short Press and Long Press with debouncing after released

/* * This Arduino MKR WiFi 1010 code was developed by newbiely.com * * This Arduino MKR WiFi 1010 code is made available for public use without any restriction * * For comprehensive instructions and wiring diagrams, please visit: * https://newbiely.com/tutorials/arduino-mkr/arduino-mkr-wifi-1010-button-long-press-short-press */ #include <ezButton.h> #define SHORT_PRESS_TIME 1000 // 1000 milliseconds #define LONG_PRESS_TIME 1000 // 1000 milliseconds ezButton button(2); // create ezButton object for pin Arduino Nano 33 IoT pin D2 unsigned long pressed_time = 0; unsigned long released_time = 0; void setup() { Serial.begin(9600); button.setDebounceTime(50); // set debounce time to 50 milliseconds } void loop() { button.loop(); // MUST call the loop() function first if (button.isPressed()) pressed_time = millis(); if (button.isReleased()) { released_time = millis(); long press_duration = released_time - pressed_time; if ( press_duration < SHORT_PRESS_TIME ) Serial.println("A short press is detected"); if ( press_duration > LONG_PRESS_TIME ) Serial.println("A long press is detected"); } }

Detailed Instructions

  • Install the ezButton library. For instruction, visit ezButton Library Reference
  • Upload the code to your Arduino MKR WiFi 1010 using the Arduino IDE.
  • Press the button briefly and press it for a long time.
  • Look at the Serial Monitor to see the results, which should look similar to the example below.

Short Press and Long Press with debouncing During Pressing

/* * This Arduino MKR WiFi 1010 code was developed by newbiely.com * * This Arduino MKR WiFi 1010 code is made available for public use without any restriction * * For comprehensive instructions and wiring diagrams, please visit: * https://newbiely.com/tutorials/arduino-mkr/arduino-mkr-wifi-1010-button-long-press-short-press */ #include <ezButton.h> #define SHORT_PRESS_TIME 1000 // 1000 milliseconds #define LONG_PRESS_TIME 1000 // 1000 milliseconds ezButton button(2); // create ezButton object for pin Arduino Nano 33 IoT pin D2 unsigned long pressed_time = 0; unsigned long released_time = 0; bool is_pressing = false; bool is_long_detected = false; void setup() { Serial.begin(9600); button.setDebounceTime(50); // set debounce time to 50 milliseconds } void loop() { button.loop(); // MUST call the loop() function first if (button.isPressed()) { pressed_time = millis(); is_pressing = true; is_long_detected = false; } if (button.isReleased()) { is_pressing = false; released_time = millis(); long press_duration = released_time - pressed_time; if ( press_duration < SHORT_PRESS_TIME ) Serial.println("A short press is detected"); } if (is_pressing == true && is_long_detected == false) { long press_duration = millis() - pressed_time; if ( press_duration > LONG_PRESS_TIME ) { Serial.println("A long press is detected"); is_long_detected = true; } } }

Detailed Instructions

  • Copy and upload the code above to your Arduino MKR WiFi 1010 using the Arduino IDE.
  • Press the button briefly and then press it for a longer time.
  • Look at the result in the Serial Monitor. It will appear similar to the example shown below.

Video Tutorial

Why Use Long Press and Short Press?

1. Maximize Button Functionality (Save GPIO Pins)

Each button can perform multiple functions, reducing the number of physical buttons and GPIO pins needed:

  • Example: Smart home controller
    • Short press = Toggle room light
    • Long press = Activate dimming mode
  • Benefit: One button replaces two, freeing a GPIO pin for other sensors

2. Prevent Accidental Actions

Critical or destructive operations should require deliberate long presses to avoid accidents:

  • Example: Factory reset button
    • Short press = Ignored (prevents accidental resets)
    • Long press (3+ seconds) = Initiate reset sequence
  • Benefit: User must intentionally hold button, reducing errors

3. Intuitive User Interfaces

Modern users understand long-press conventions from smartphones and appliances:

  • Example: Menu navigation
    • Short press = Scroll through options
    • Long press = Select current option
  • Benefit: Familiar interaction pattern

4. Contextual Actions

Different press types can trigger related but distinct actions:

  • Example: Media player
    • Short press = Pause/Play
    • Long press = Skip to next track
  • Benefit: Related functions grouped on one button

This technique transforms simple buttons into sophisticated input devices!

※ OUR MESSAGES

  • As freelancers, We are AVAILABLE for HIRE. See how to outsource your project to us
  • Please feel free to share the link of this tutorial. However, Please do not use our content on any other websites. We invested a lot of effort and time to create the content, please respect our work!