Arduino MKR WiFi 1010 - Gas Sensor
Detect dangerous gases and monitor air quality! The MQ2 gas sensor enables your Arduino MKR WiFi 1010 to detect flammable gases including LPG, smoke, alcohol, propane, hydrogen, methane, and carbon monoxide for safety alarms and ventilation control. This tutorial teaches you how to connect an MQ2 gas sensor to your Arduino MKR WiFi 1010 and program it to monitor air quality.
What You'll Learn:
- Connecting MQ2 gas sensor to Arduino MKR WiFi 1010 digital and analog pins
- Programming Arduino MKR WiFi 1010 to detect gas leaks using MQ2 sensor
- Using Arduino MKR WiFi 1010 to measure gas concentration with MQ2 analog output
- Understanding MQ2 sensor warm-up requirements with Arduino MKR WiFi 1010
- Calibrating MQ2 sensor sensitivity on Arduino MKR WiFi 1010 projects
- Creating gas leak alarm systems using Arduino MKR WiFi 1010 and MQ2 sensors
- Building automatic ventilation control with Arduino MKR WiFi 1010 and MQ2 gas sensors
- Implementing safety monitoring with Arduino MKR WiFi 1010 MQ2 detection
Real-World Applications:
- Gas leak detection: Arduino MKR WiFi 1010 with MQ2 sensor detecting kitchen gas leaks
- Smoke alarms: Arduino MKR WiFi 1010 MQ2 sensors for fire safety systems
- Air quality monitoring: Arduino MKR WiFi 1010 and MQ2 measuring indoor air quality
- Automatic ventilation: Arduino MKR WiFi 1010 with MQ2 controlling exhaust fans
- Industrial safety: Arduino MKR WiFi 1010 MQ2 sensors in factory gas monitoring
- Parking garage safety: Arduino MKR WiFi 1010 with MQ2 detecting carbon monoxide
- Laboratory safety: Arduino MKR WiFi 1010 and MQ2 sensors monitoring chemical fumes
- Home automation: Arduino MKR WiFi 1010 MQ2 sensors for smart safety systems
Safety Systems:
You can extend this Arduino MKR WiFi 1010 MQ2 sensor project by adding buzzers for alarms, relays to control ventilation fans, or WiFi connectivity to send alerts when dangerous gas levels are detected.
Hardware Preparation
| 1 | × | Arduino MKR WiFi 1010 | |
| 1 | × | Micro USB Cable | |
| 1 | × | MQ2 Gas Sensor | |
| 1 | × | Breadboard | |
| 1 | × | Jumper Wires |
Or you can buy the following kits:
| 1 | × | DIYables Sensor Kit (18 sensors/displays) |
Additionally, some of these links are for products from our own brand, DIYables .
Overview of MQ2 Gas Sensor
What is an MQ2 Gas Sensor?
The MQ2 gas sensor is a metal oxide semiconductor (MOS) sensor that detects multiple types of flammable gases and smoke. It's one of the most popular sensors in the MQ series for general-purpose gas detection.
How MQ2 Sensors Work:
- Contains a tin dioxide (SnO₂) sensing element
- Heated to ~200-300°C by internal heating coil
- Gas particles react with heated element, changing electrical resistance
- More gas concentration = Lower resistance = Higher voltage reading
- Built-in comparator converts analog signal to digital output
Detectable Gases:
| Gas Type | Detection Range | Most Sensitive To |
|---|---|---|
| LPG | 200-5000 ppm | ✓ |
| Propane | 200-5000 ppm | ✓ |
| Butane | 300-5000 ppm | ✓ |
| Methane (Natural Gas) | 300-5000 ppm | |
| Hydrogen | 300-5000 ppm | |
| Alcohol | 100-2000 ppm | |
| Smoke | Yes | ✓ |
| Carbon Monoxide (CO) | 300-10000 ppm |
Key Characteristics:
Advantages:
- Wide detection range: Detects multiple gas types
- Fast response: Responds in seconds after warm-up
- Dual outputs: Both digital (threshold) and analog (concentration) available
- Adjustable sensitivity: Built-in potentiometer for threshold adjustment
- Low cost: Inexpensive multi-gas detection solution
- Easy integration: Works directly with Arduino
Limitations:
- Non-selective: Cannot distinguish between different gases
- Requires warm-up: Needs 24-48 hours for first use (5-10 minutes thereafter)
- Power hungry: Heating element consumes 150-200mA
- Not for precise measurement: Good for leak detection, not quantitative analysis
- Temperature and humidity sensitive: Readings affected by environment
- Cross-sensitivity: Responds to multiple gases simultaneously
Perfect For:
- Gas leak detection (LPG, natural gas)
- Smoke and fire detection
- Air quality monitoring
- Safety alarm systems
- Automatic ventilation control
- Educational gas sensing projects
Not Suitable For:
- Identifying specific gas types
- Precise concentration measurement
- Medical or scientific applications
- Safety-critical certified systems
- Low-power battery applications
Important Safety Note:
MQ2 sensors are suitable for detecting gas presence but should not be the sole safety device in life-threatening applications. Use multiple sensors and certified safety equipment for critical applications.
Pinout
The MQ2 gas sensor has four pins, and each one serves a different purpose.
- VCC Pin: Connect this pin to the power source (5V).
- GND Pin: Connect this pin to the ground (0V).
- DO Pin: This digital output tells you if there is flammable gas nearby. When gas is detected, it shows a LOW signal; when no gas is detected, it shows a HIGH signal. You can adjust the gas detection level with the built-in knob.
- AO Pin: This analog output gives a voltage that changes with the gas level. When the gas level goes up, the voltage goes up; when the gas level goes down, the voltage goes down.
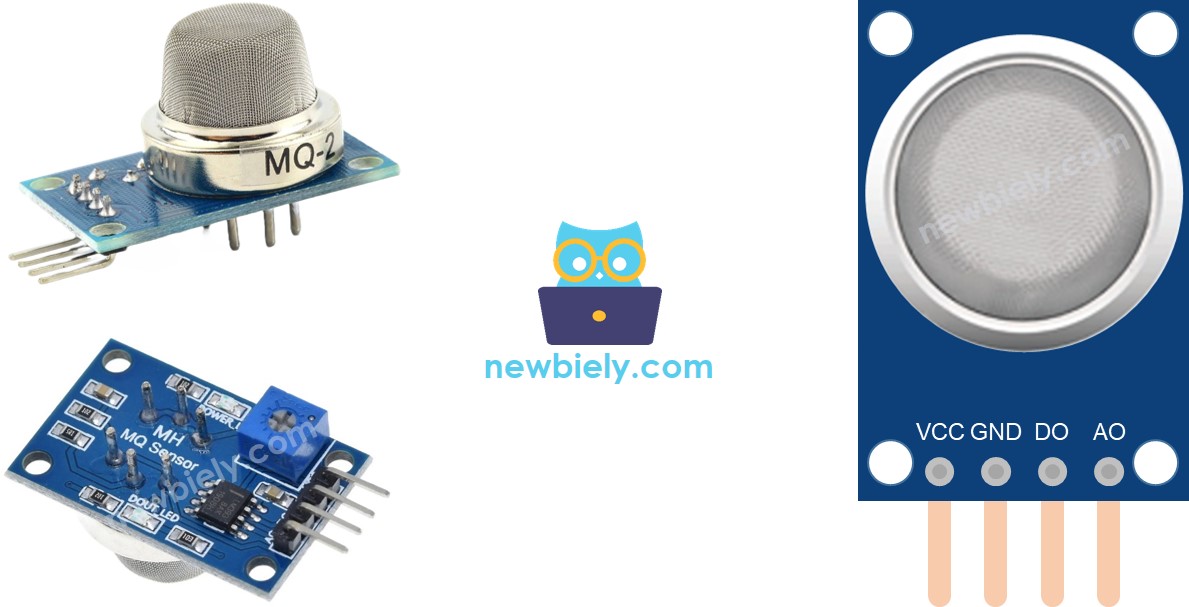
Also, the MQ2 gas sensor has two LED lights:
- PWR-LED indicator: This light shows that the sensor has power. It turns on when the sensor is working.
- DO-LED indicator: This light is connected to the sensor’s DO pin. It shows the gas level by the number it receives from the DO pin. When there is gas and the DO pin is LOW, the light turns on. When there is no gas and the DO pin is HIGH, the light stays off.
How It Works
Digital Output (DO Pin) Operation
The digital output provides simple YES/NO gas detection:
Internal Operation:
- Sensor measures gas concentration (changes resistance)
- Converts resistance to analog voltage
- Compares voltage against threshold set by potentiometer
- Outputs digital signal based on comparison
Detection States:
Sensitivity Adjustment Process:
- Power on and warm up sensor (5-10 minutes minimum)
- Expose to target gas at desired detection concentration
- For LPG: Use lighter without igniting, or small gas leak
- For smoke: Use extinguished candle or incense
- Adjust potentiometer while watching DO-LED:
- LED doesn't light → Turn counterclockwise (more sensitive)
- LED lights too easily → Turn clockwise (less sensitive)
- Test in clean air - LED should turn off
- Repeat until detection range matches requirements
Analog Output (AO Pin) Operation
The analog output provides gas concentration measurement:
Behavior:
- High gas concentration → Low resistance → High analog value
- Low gas concentration → High resistance → Low analog value
- Clean air → Baseline value (typically 100-300)
Typical Value Ranges:
| Scenario | Approximate AO Value |
|---|---|
| Clean air | 100-300 |
| Very small gas leak | 300-500 |
| Small gas leak | 500-700 |
| Moderate gas leak | 700-900 |
| Large gas leak | 900-4000+ |
| Direct exposure | 4000+ |
Important Note: Potentiometer does not affect AO pin. Implement thresholds in Arduino code, not via potentiometer.
The MQ2 Sensor Warm-up
The MQ2 sensor contains a tin dioxide (SnO₂) sensing element that must be heated to ~200-300°C before it can accurately detect gas. At operating temperature, oxygen molecules bond to the surface, and gas particles interact with this bonded oxygen, changing the sensor's electrical resistance.
Warm-up Time Required
First-Time Use (stored for 1+ month):
- Warm-up time: 24-48 hours continuous
- Purpose: Burns off manufacturing residues and stabilizes sensor chemistry
- Behavior: Readings start very high, gradually decrease and stabilize
- Method: Connect VCC to 5V and GND to ground, leave powered for 24-48 hours
Regular Use (recently used):
- Warm-up time: 5-10 minutes
- Purpose: Heat sensor to operating temperature
- Behavior: Readings stabilize after a few minutes
- Method: Power on sensor and wait 5-10 minutes before use
How to Tell When Sensor is Ready
Warming Up (first 5-10 minutes):
- PWR-LED: ON
- AO values: High and gradually decreasing
- DO-LED: May flicker
- Readings: Unstable
Ready (after warm-up):
- PWR-LED: ON
- AO values: Stable baseline (100-300)
- DO-LED: OFF in clean air
- Readings: Stable and accurate
Warm-up Tips:
- Leave sensor powered during development/testing sessions
- Note your baseline AO value in clean air after warm-up
- If powered off overnight, allow 5-10 minute warm-up before use
- USB power is sufficient (sensor draws ~150-200mA)
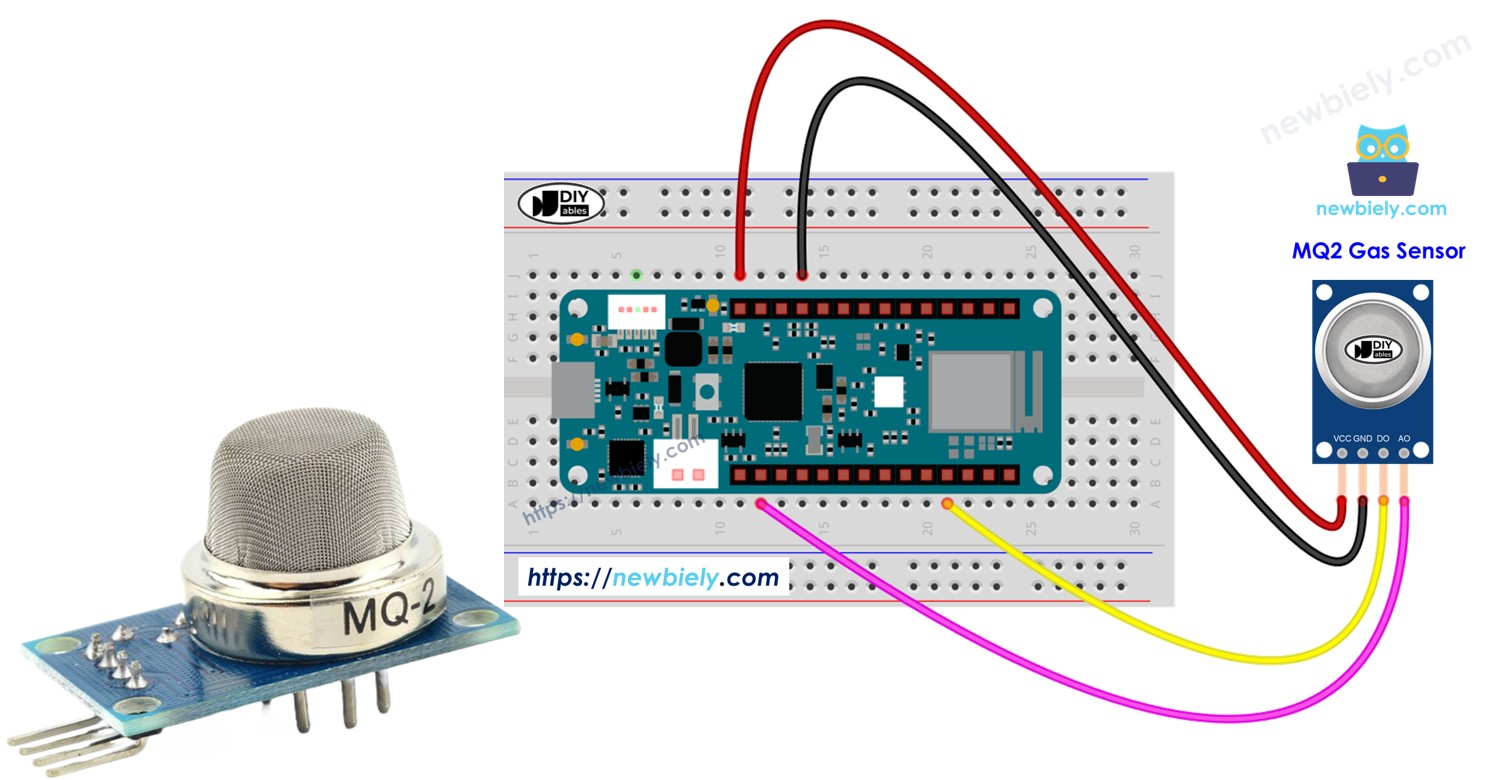
Wiring Diagram
The MQ2 gas sensor module provides two outputs (DO and AO). You can use either one or both depending on your project requirements.
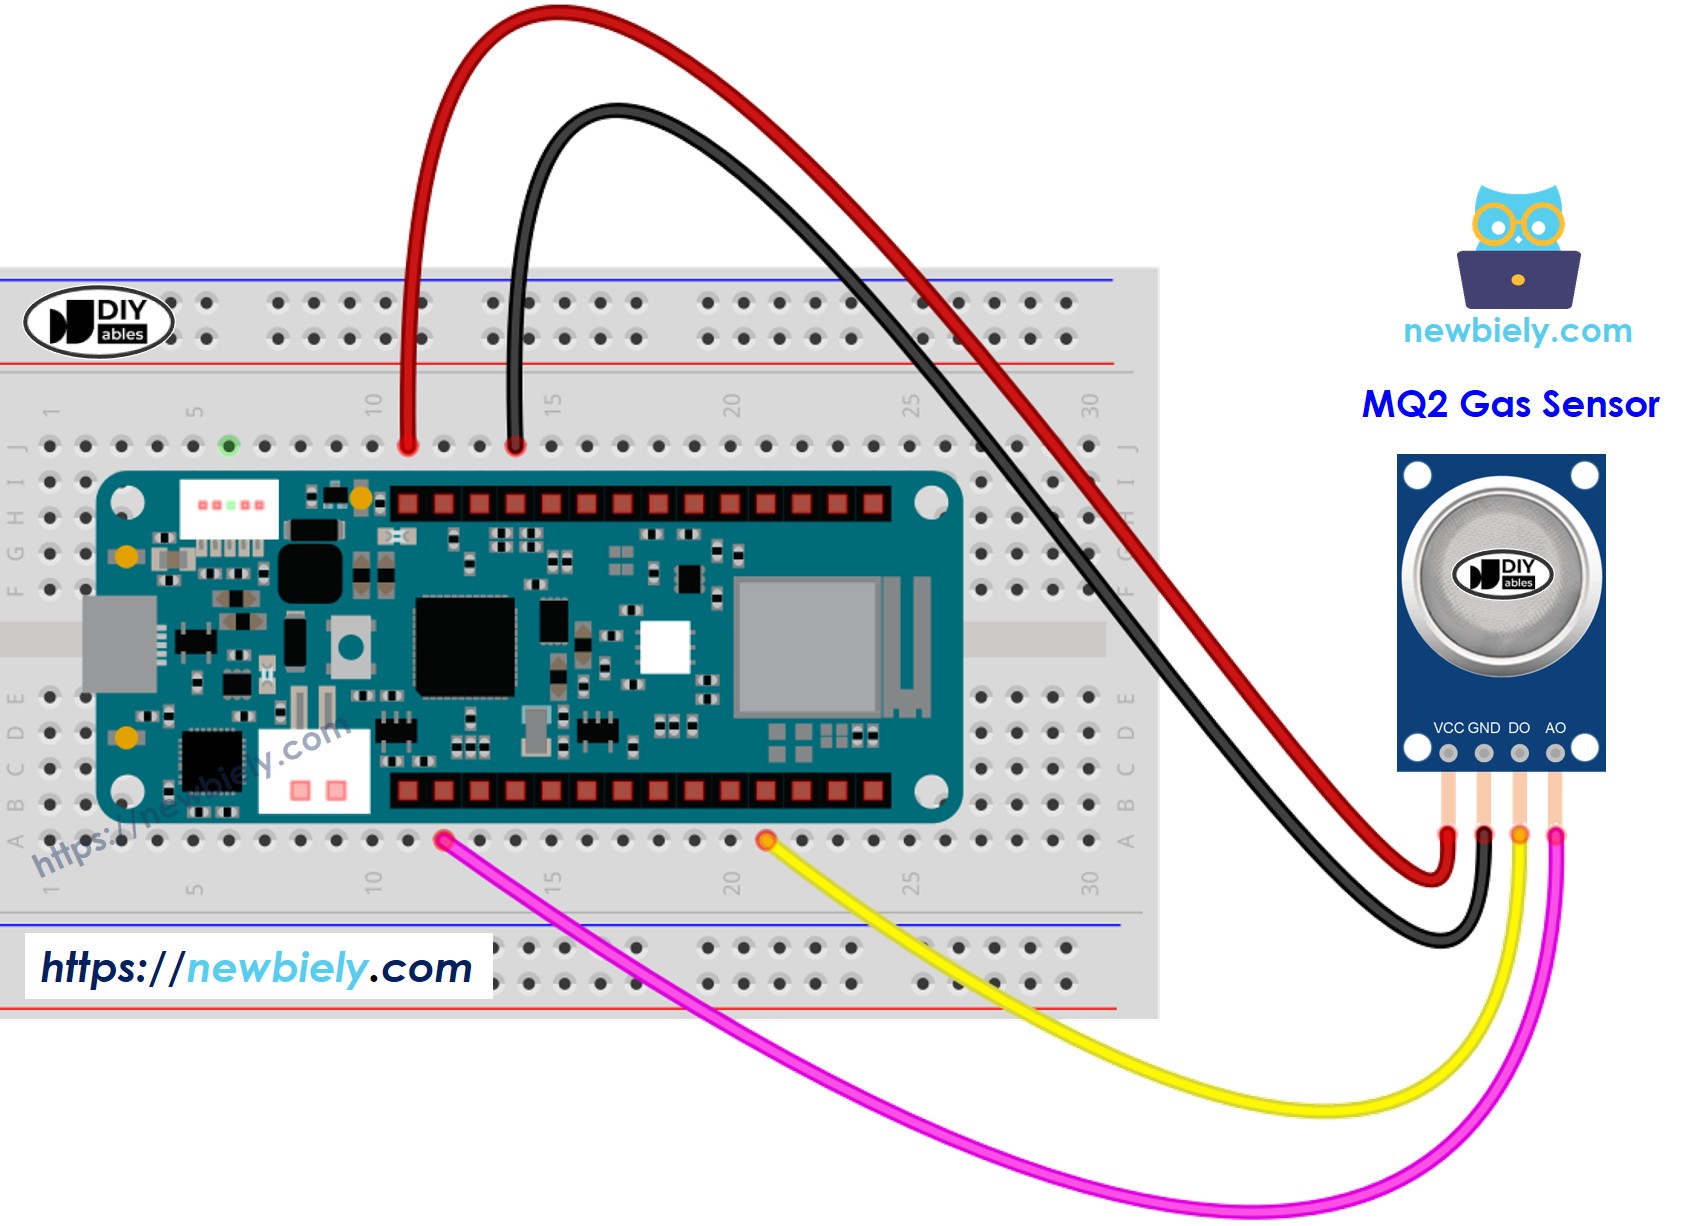
This image is created using Fritzing. Click to enlarge image
This wiring diagram shows how to connect the MQ2 gas sensor to Arduino MKR WiFi 1010:
| MQ2 Gas Sensor Pin | Arduino MKR WiFi 1010 Pin |
|---|---|
| VCC | 5V |
| GND | GND |
| DO | D2 |
| AO | A0 |
Notes:
- MQ2 requires 5V power (not 3.3V)
- USB power provides sufficient current (~150-200mA for MQ2)
- DO pin provides digital gas detection signal (configure as INPUT)
- AO pin provides analog gas concentration signal (read with analogRead())
Wiring Tips:
- Sensor placement: Mount in area where gas might accumulate
- Airflow: Don't enclose sensor - needs air circulation
- Orientation: Sensor mesh should face expected gas source
- Height: For LPG (heavier than air), mount low; for methane (lighter), mount high
- Distance from heat: Keep away from hot objects that could affect readings
- Stable mounting: Vibration can affect readings
Arduino MKR WiFi 1010 Code - Read Value from DO Pin
This first example uses the digital output for simple gas detection. Perfect for gas leak alarms, safety cutoff systems, or any application requiring YES/NO gas detection.
What the Code Does:
- Configures digital pin D2 as input for MQ2 DO pin
- Continuously reads digital state (HIGH = clean air, LOW = gas detected)
- Displays clear "PRESENT" or "NOT present" messages
- Updates readings every 500ms for real-time monitoring
- Simple binary detection - ideal for alarm triggers
Code Explanation - Digital Gas Detection
Pin Configuration:
Configures D2 as digital input. No pull-up resistor needed - MQ2 module has active output driver.
Reading Digital State:
Reads current DO pin state:
- LOW: Gas detected (concentration above threshold)
- HIGH: Clean air (concentration below threshold)
Interpreting Results:
Important: LOW means gas detected (inverse logic).
Practical Applications:
1. Gas Leak Alarm:
2. Automatic Safety Cutoff:
3. Automatic Ventilation:
Detailed Instructions
New to Arduino MKR WiFi 1010? Complete our Getting Started with Arduino MKR WiFi 1010 tutorial first to set up your development environment.
Step 1: Warm-up Sensor (Critical)
- First-time use: Power sensor for 24-48 hours before use
- Regular use: Power sensor for 5-10 minutes before testing
- Connect VCC to 5V and GND to ground
- Wait for readings to stabilize
- This step is ESSENTIAL for accurate detection
Step 2: Hardware Setup
- Connect MQ2 sensor to Arduino MKR WiFi 1010 following wiring diagram:
- VCC to 5V
- GND to GND
- DO to D2
- Mount sensor in well-ventilated area
Step 3: Upload Code
- Use USB cable to connect Arduino MKR WiFi 1010 to your computer
- Launch Arduino IDE
- Select Arduino MKR WiFi 1010 board and COM port
- Copy the code above into Arduino IDE
- Click Upload button
Step 4: Calibrate Sensitivity
- Open Serial Monitor (baud rate: 9600)
- Verify sensor reads "NOT present" in clean air
- Expose sensor to small gas leak or smoke:
- LPG: Use lighter without igniting
- Smoke: Use extinguished candle
- Adjust potentiometer on MQ2 module:
- If DO-LED doesn't light: Turn counterclockwise (more sensitive)
- If DO-LED lights in clean air: Turn clockwise (less sensitive)
- Find balance where sensor detects gas but ignores clean air
Step 5: Test Gas Detection
- Place MQ2 sensor close to target gas source
- Watch Serial Monitor for detection messages
- Observe DO-LED on sensor module (lights when gas detected)
- Remove gas source - should return to "NOT present"
Expected Serial Monitor Output:
Sensitivity Adjustment Tips:
- LED stays on constantly: Too sensitive - turn clockwise or improve ventilation
- LED never lights: Not sensitive enough - turn counterclockwise
- Slow response: Sensor may need more warm-up time
- False triggers: Reduce sensitivity or check for other gas sources (alcohol, cleaning products)
Arduino MKR WiFi 1010 Code - Read Value from AO Pin
This second example uses the analog output to measure gas concentration levels. Perfect for monitoring air quality, data logging, or implementing gradual responses based on gas levels.
What the Code Does:
- Configures analog pin A0 as input for MQ2 AO pin
- Continuously reads analog value (0-4095 range in this implementation)
- Displays raw analog readings for concentration analysis
- Higher values indicate higher gas concentration
- Updates readings every 500ms for continuous monitoring
- Potentiometer adjustment does NOT affect these readings
Code Explanation - Analog Gas Concentration
Reading Analog Value:
Reads analog value representing gas concentration:
- Low values (100-300): Clean air baseline
- Medium values (300-1000): Detectable gas present
- High values (1000-4000+): Significant gas concentration
Understanding the Values:
| Value Range | Air Quality / Gas Level |
|---|---|
| 100-300 | Clean air (baseline) |
| 300-500 | Slight gas detection |
| 500-1000 | Moderate gas level |
| 1000-2000 | High gas concentration |
| 2000-4000+ | Very high / dangerous levels |
Practical Applications:
1. Multi-Level Air Quality Monitor:
2. Variable Ventilation Control:
3. Data Logging:
4. Threshold-Based Alarm:
Detailed Instructions
New to Arduino MKR WiFi 1010? Complete our Getting Started with Arduino MKR WiFi 1010 tutorial first to set up your development environment.
Step 1: Sensor Warm-up
- Critical: Allow 5-10 minute warm-up (or 24-48 hours for first use)
- Connect MQ2 to Arduino: VCC to 5V, GND to GND
- Wait for readings to stabilize
Step 2: Hardware Setup
- Connect MQ2 AO pin to Arduino A0 (analog input)
- Verify power connections from Step 1
- Mount sensor in open area with airflow
Step 3: Upload and Monitor
- Copy code above into Arduino IDE
- Select Arduino MKR WiFi 1010 board and COM port
- Click Upload button
- Open Serial Monitor (baud rate: 9600)
Step 4: Establish Baseline
- In clean air, note baseline reading (typically 100-300)
- This is your "clean air" reference value
- Any significant increase indicates gas presence
Step 5: Test with Gas
- Slowly introduce gas source near sensor
- Watch values increase as gas concentration rises
- Remove gas - values should decrease back to baseline
Expected Serial Monitor Output:
Using the Data:
- Set software thresholds based on your observed values
- Implement automatic ventilation when values exceed safe levels
- Trigger alarms at dangerous concentration levels
- Log data for air quality trend analysis
Calibration Tips:
- Baseline (clean air) varies by environment - note YOUR baseline
- Higher baseline indoors due to cooking, cleaning products
- Outdoor baseline typically lower
- Potentiometer does NOT affect analog values - set thresholds in code
Troubleshooting Common Issues
Problem: Sensor Always Reads High Values
Possible Causes:
- Sensor not warmed up sufficiently
- Gas actually present in environment
- Sensor contaminated
- First-time use without 24-48 hour warm-up
Solutions:
- Wait longer: Extend warm-up to 15-30 minutes
- Improve ventilation: Open windows, move to fresh air
- Check environment: Remove sources (cleaning products, alcohol, perfumes)
- First use: Complete full 24-48 hour warm-up cycle
- Note baseline: Higher readings may be normal for your environment
Problem: Sensor Never Detects Gas
Possible Causes:
- Wiring error
- Wrong gas type (MQ2 doesn't detect all gases)
- Insufficient gas concentration
- Sensor damaged
- Not warmed up
Solutions:
- Verify wiring: VCC to 5V, GND to GND, DO/AO to Arduino pins
- Use known detectable gas (lighter fluid, smoke)
- Bring gas source closer (but safely)
- Check PWR-LED - should be lit
- Try different MQ2 sensor
- Ensure 5-10 minute warm-up completed
Problem: DO and AO Give Different Results
Cause: This is normal - they measure differently.
Explanation:
- DO pin: Compares against potentiometer threshold
- AO pin: Provides raw concentration reading
- Different thresholds: Adjust potentiometer for DO, set software threshold for AO
- Use independently: Choose DO for simple alarms, AO for detailed monitoring
Problem: Readings Fluctuate Wildly
Possible Causes:
- Poor power supply
- Sensor too close to airflow (fan, AC vent)
- Temperature changes
- Normal gas concentration variations
Solutions:
- Use stable 5V power supply
- Move sensor away from direct airflow
- Average multiple readings:
- Accept some variation as normal
Problem: Sensor Responds to Non-Gas Sources
Cause: MQ2 is cross-sensitive to multiple substances.
Common Triggers:
- Alcohol (hand sanitizer, rubbing alcohol)
- Cleaning products (window cleaner, disinfectants)
- Perfumes and air fresheners
- Cooking vapors
- Solvent fumes
Solutions:
- This is normal behavior - MQ2 detects many volatile compounds
- Use in controlled environment
- Adjust sensitivity to reduce false positives
- For specific gas detection, use gas-specific sensors (MQ4 for methane, MQ7 for CO)
Problem: Slow Response Time
Causes:
- Insufficient warm-up
- Low gas concentration
- Poor airflow around sensor
Solutions:
- Complete full warm-up cycle
- Increase gas concentration (safely)
- Ensure mesh on sensor not obstructed
- Position sensor in path of gas flow
- MQ2 typically responds in 10-30 seconds after warm-up
Challenge Yourself - Creative Extensions
Once you have the basic MQ2 gas sensor working, try these enhancements:
- Complete Gas Leak Alarm System: Combine MQ2 with buzzer and LED to create a pulsing alarm that activates when gas levels exceed a threshold
- Automatic Ventilation System: Control an exhaust fan with relay that turns on when gas is detected and turns off when air quality returns to normal
- Air Quality Display: Show real-time gas concentration levels and safety status (SAFE/CAUTION/DANGER) on an LCD screen
- Multi-Sensor Network: Monitor gas levels in multiple rooms simultaneously using several MQ2 sensors, each labeled with location names
- Gas Safety Interlock: Automatically shut off gas supply valve using a relay when dangerous concentration levels are detected
- Historical Data Logging: Record gas concentration readings to SD card with timestamps for trend analysis and safety audits
- Visual Gas Level Indicator: Create an LED bar graph that displays gas concentration visually using multiple LEDs
- Smart Baseline Calibration: Implement automatic baseline learning that averages clean air readings over several minutes for accurate threshold setting
- Composite Safety Score: Calculate overall safety score combining gas levels with temperature and other environmental sensors
- WiFi Notifications: Send email or push notifications when gas is detected using the MKR WiFi 1010's connectivity capabilities
Experiment safely and prioritize gas detection safety!