Arduino MKR WiFi 1010 - DHT22
Measure temperature and humidity with precision! The DHT22 sensor (also known as AM2302) is a digital sensor that accurately measures temperature and humidity. This tutorial shows you how to interface the DHT22 with your Arduino MKR WiFi 1010 and read environmental data through the Serial Monitor.
What You'll Learn:
- Reading precise temperature measurements (±0.5°C accuracy)
- Measuring humidity with high resolution (0.1% steps)
- Understanding DHT22 sensor specifications and capabilities
- Choosing between DHT22 sensor and module versions
- Working with the Adafruit DHT library
Real-World Applications:
- Greenhouses: Precise temperature control for optimal plant growth
- Incubators: Egg hatching monitoring with high accuracy
- Server rooms: Equipment protection through environmental monitoring
- Weather stations: Amateur meteorology with quality data
- Cigar humidors: Maintaining proper humidity levels
- Reptile terrariums: Species-specific climate requirements
- Cold storage: Sub-zero temperature monitoring
Hardware Preparation
| 1 | × | Arduino MKR WiFi 1010 | |
| 1 | × | Micro USB Cable | |
| 1 | × | DHT22 Temperature Humidity Sensor Module | |
| 1 | × | Alternatively, DHT22 Sensor | |
| 1 | × | 10 kΩ Resistor | |
| 1 | × | Breadboard | |
| 1 | × | Jumper Wires | |
| 1 | × | Optionally, DC Power Jack |
Or you can buy the following kits:
| 1 | × | DIYables Sensor Kit (18 sensors/displays) |
Additionally, some of these links are for products from our own brand, DIYables .
Overview of DHT22 Temperature and Humidity Sensor
The DHT22 is a precision digital sensor for measuring temperature and humidity. It uses a capacitive humidity sensor and thermistor to measure the surrounding environment, then outputs a calibrated digital signal.
DHT22 Specifications
| DHT22 | |
|---|---|
| Operating Voltage | 3 to 5V |
| The humidity range | 0% to 100% |
| The humidity accuracy | ± 2% to 5% |
| The temperature range | -40°C to 80°C |
| The temperature accuracy | ± 0.5°C |
| The reading rate | 0.5Hz (one time per 2 seconds) |
Key Features:
- High accuracy: ±0.5°C for temperature, ±2% for humidity
- Wide operating range: -40°C to 80°C temperature, 0-100% humidity (vs. DHT11's 0-50°C)
- Fine resolution: 0.1°C and 0.1% humidity readings (10× better than DHT11)
- Sampling rate: Can read every 2 seconds (0.5Hz)
- Digital interface: Simple one-wire communication protocol
- Low power: Minimal current draw during operation
- Factory calibrated: Pre-calibrated for accuracy out of the box
- Low cost: Affordable precision sensor (~$4-6)
Understanding the Specifications:
Temperature Accuracy (±0.5°C):
If the sensor reads 25.0°C, the actual temperature is between 24.5°C and 25.5°C. This is excellent for most applications - incubating eggs, climate control, or environmental monitoring.
Humidity Accuracy (±2%):
Reading 70% humidity means actual humidity is between 68% and 72%. Perfect for applications like cigar humidors (which require 70% ±2% RH).
Sampling Rate (Every 2 Seconds):
The sensor needs at least 2 seconds between readings to take accurate measurements. Faster polling will return error values or stale data.
DHT22 vs. DHT11 Comparison
If you're deciding between DHT22 and DHT11, here's how they compare:
| Feature | DHT11 | DHT22 |
|---|---|---|
| **Temperature Range** | 0 to 50°C | **-40 to 80°C** |
| **Temperature Accuracy** | ±2°C | **±0.5°C** (4× better!) |
| **Humidity Range** | 20-80% | **0-100%** (full range) |
| **Humidity Accuracy** | ±5% | **±2%** (2.5× better!) |
| **Resolution** | 1°C / 1% | **0.1°C / 0.1%** (10× finer) |
| **Price** | ~$2 | ~$4-6 |
| **Best For** | Learning, casual monitoring | Precision applications |
When to Use DHT22:
- Precision applications (incubators, climate control)
- Low-temperature monitoring (below 0°C)
- Full humidity range needed (wine cellars, humidors)
- Data logging requiring accuracy
- Professional or commercial projects
When DHT11 is Sufficient:
- Learning and educational projects
- Casual home monitoring
- Budget-constrained hobby projects
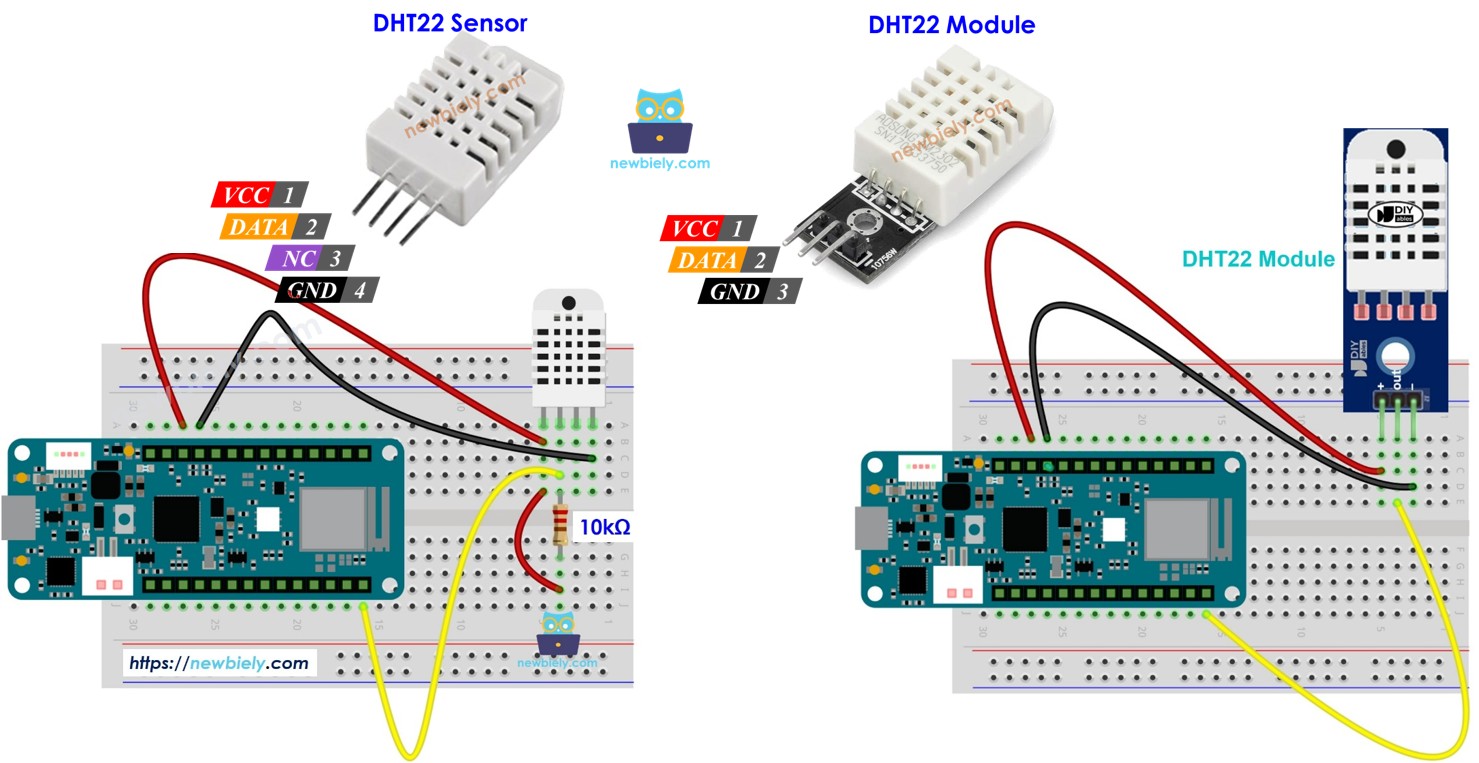
DHT22 Pinout
The DHT22 comes in two versions: bare sensor (4 pins) and module (3 pins with built-in resistor).
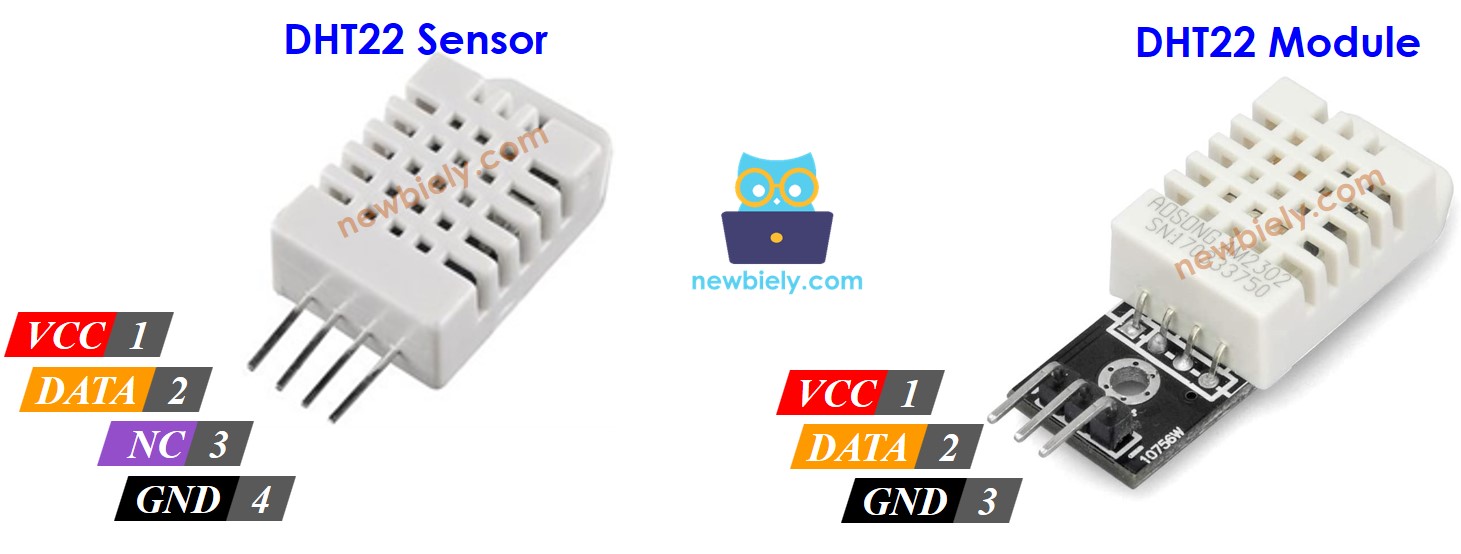
DHT22 Bare Sensor (4-Pin Version):
- VCC pin: Connect to 3.3V or 5V power (5V recommended for stability)
- DATA pin: Digital communication line - connects to Arduino digital pin
- NC pin: Not Connected - leave this pin unconnected
- GND pin: Connect to ground (0V)
Important: The bare sensor requires a 10kΩ pull-up resistor between DATA and VCC pins for reliable communication.
DHT22 Module (3-Pin Version) - Recommended:
- VCC (+): Connect to 5V power
- DATA (OUT or S): Digital communication line to Arduino
- GND (-): Connect to ground
Advantages of Module Version:
- Built-in pull-up resistor (no external resistor needed)
- Easier wiring (only 3 pins)
- More robust PCB mounting
- Better signal quality
- Beginner-friendly
We strongly recommend using the DHT22 module for simpler wiring and fewer potential connection issues.
Wiring Diagram between DHT22 and Arduino MKR WiFi 1010
This section shows how to connect the DHT22 sensor to your Arduino MKR WiFi 1010. The wiring is the same for both sensor and module versions, with one important difference: the bare sensor requires an external pull-up resistor.
Why Pull-up Resistor?
The DHT22 uses a single-wire communication protocol that requires the data line to be "pulled high" to 5V by default. The 10kΩ resistor ensures reliable communication. Most DHT22 modules include this resistor built-in.
Arduino MKR WiFi 1010 - DHT22 Sensor Wiring
If using the bare DHT22 sensor (4 pins), you must add a 10kΩ pull-up resistor between the DATA and VCC pins.
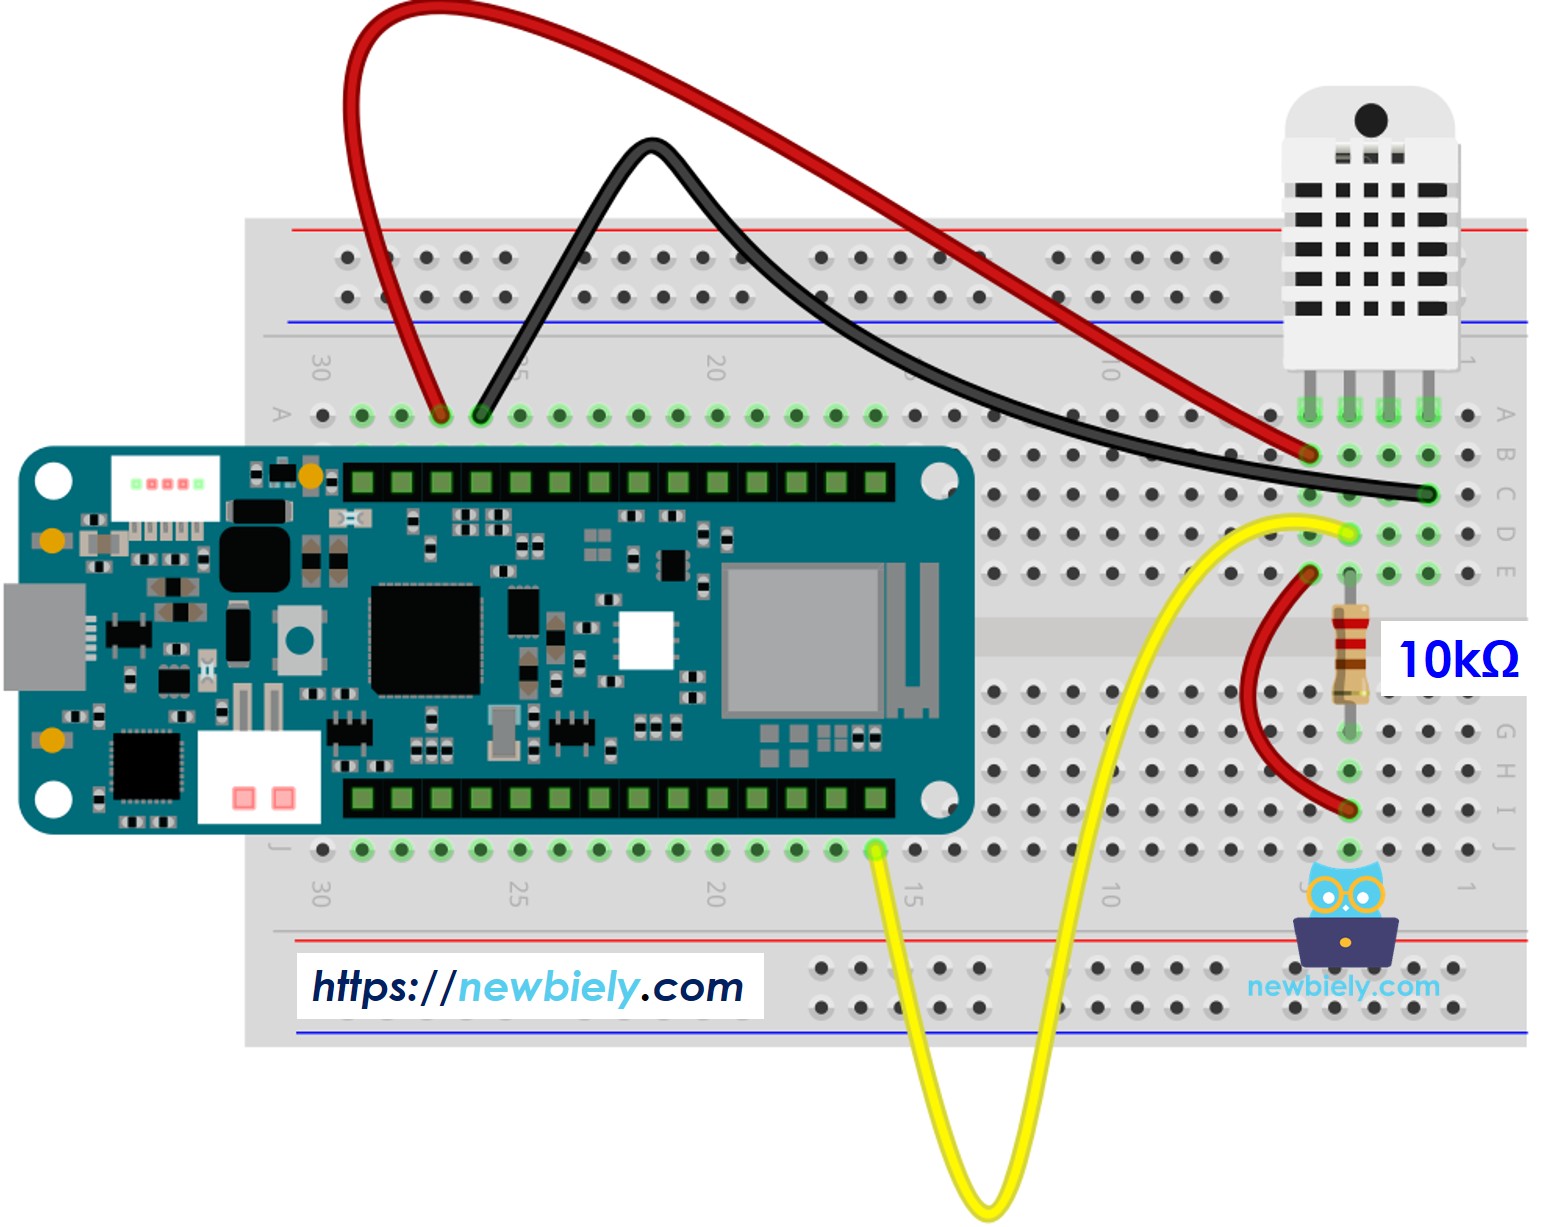
This image is created using Fritzing. Click to enlarge image
Connection Details:
- DHT22 VCC → Arduino 5V
- Provides stable power to the sensor
- Can use 3.3V, but 5V is recommended for better performance
- DHT22 DATA → Arduino D2 pin
- Digital communication line
- Also connect a 10kΩ resistor between DATA and VCC
- DHT22 NC → Leave unconnected
- No Connection pin - don't wire anything here
- DHT22 GND → Arduino GND
- Common ground reference
- DHT22 VCC (+) → Arduino 5V
- Module power supply
- DHT22 DATA (OUT or S) → Arduino D2 pin
- Digital communication line
- Built-in pull-up resistor already on module
- DHT22 GND (-) → Arduino GND
- Ground connection
- Use short jumper wires (under 50cm) for reliable communication
- Ensure solid connections in breadboard holes
- Double-check polarity - reversed VCC/GND can damage the sensor
- The code defines DATA pin as D2, but you can use any digital pin
- Keep the sensor away from heat sources for accurate readings
Arduino MKR WiFi 1010 - DHT22 Module Wiring
If using the DHT22 module (3 pins), no external resistor is needed - the module includes it built-in. This is the recommended option for beginners!
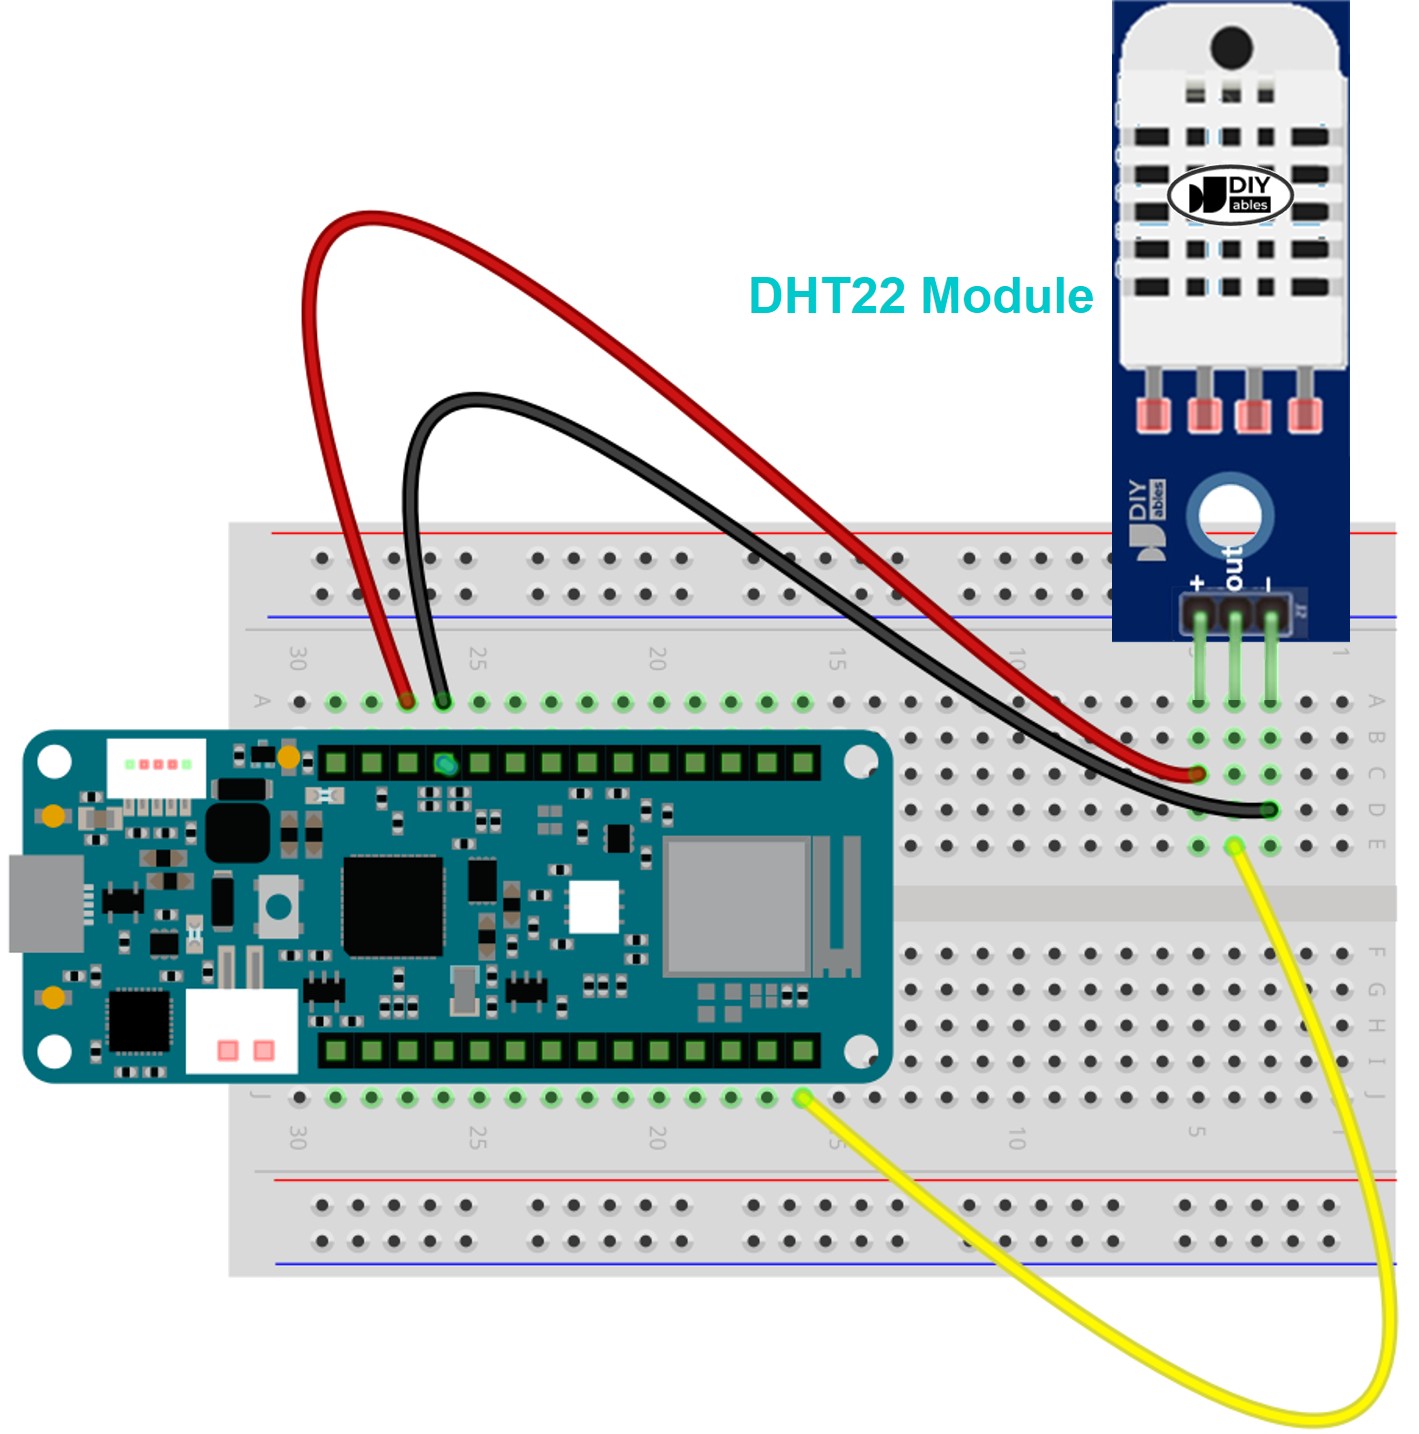
This image is created using Fritzing. Click to enlarge image
Connection Details:
Wiring Tips:
Power Supply:
For This Project: Simply plug the Arduino into your computer's USB port - it provides enough power for the DHT22 sensor.
Arduino MKR WiFi 1010 Code - DHT22
This code reads temperature and humidity from the DHT22 sensor every 2 seconds and displays the values in the Serial Monitor. Temperature is shown in both Celsius and Fahrenheit.
What the Code Does:
- Initializes the DHT22 sensor on pin D2
- Reads sensor data every 2 seconds (sensor's minimum sampling interval)
- Displays humidity percentage, temperature in Celsius, and temperature in Fahrenheit
- Checks for sensor communication errors
Detailed Instructions
If you are new to the Arduino MKR WiFi 1010, be sure to check out our Getting Started with Arduino MKR WiFi 1010 tutorial first. Then, follow these steps:
Hardware Setup:
- Connect the DHT22 to the Arduino MKR WiFi 1010 board as shown in the wiring diagram above
- If using bare sensor, don't forget the 10kΩ pull-up resistor!
- If using module, connect directly (resistor built-in)
- Use a USB cable to connect the Arduino MKR WiFi 1010 board to your computer
Software Setup:
- Launch the Arduino IDE on your computer
- Select the Arduino MKR WiFi 1010 board and choose its corresponding COM port
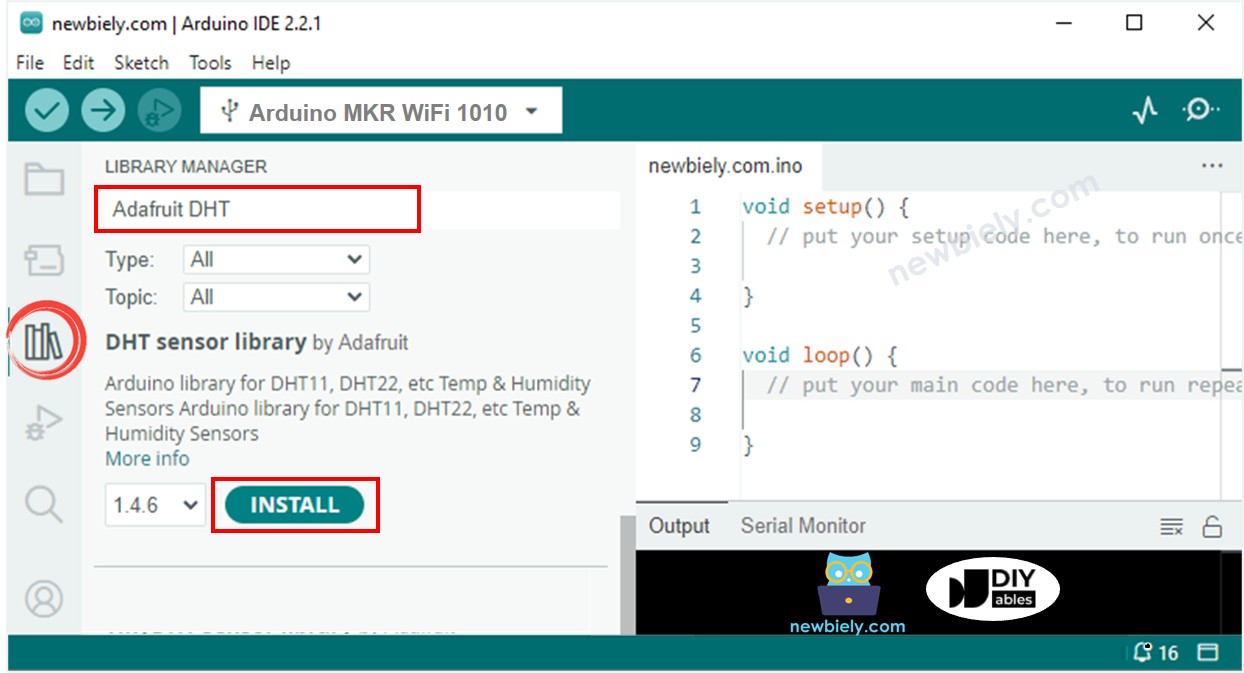
- Open the Library Manager by clicking on the Libraries icon on the left sidebar
- Type DHT in the search box
- Find the DHT sensor library by Adafruit
- Click the Install button
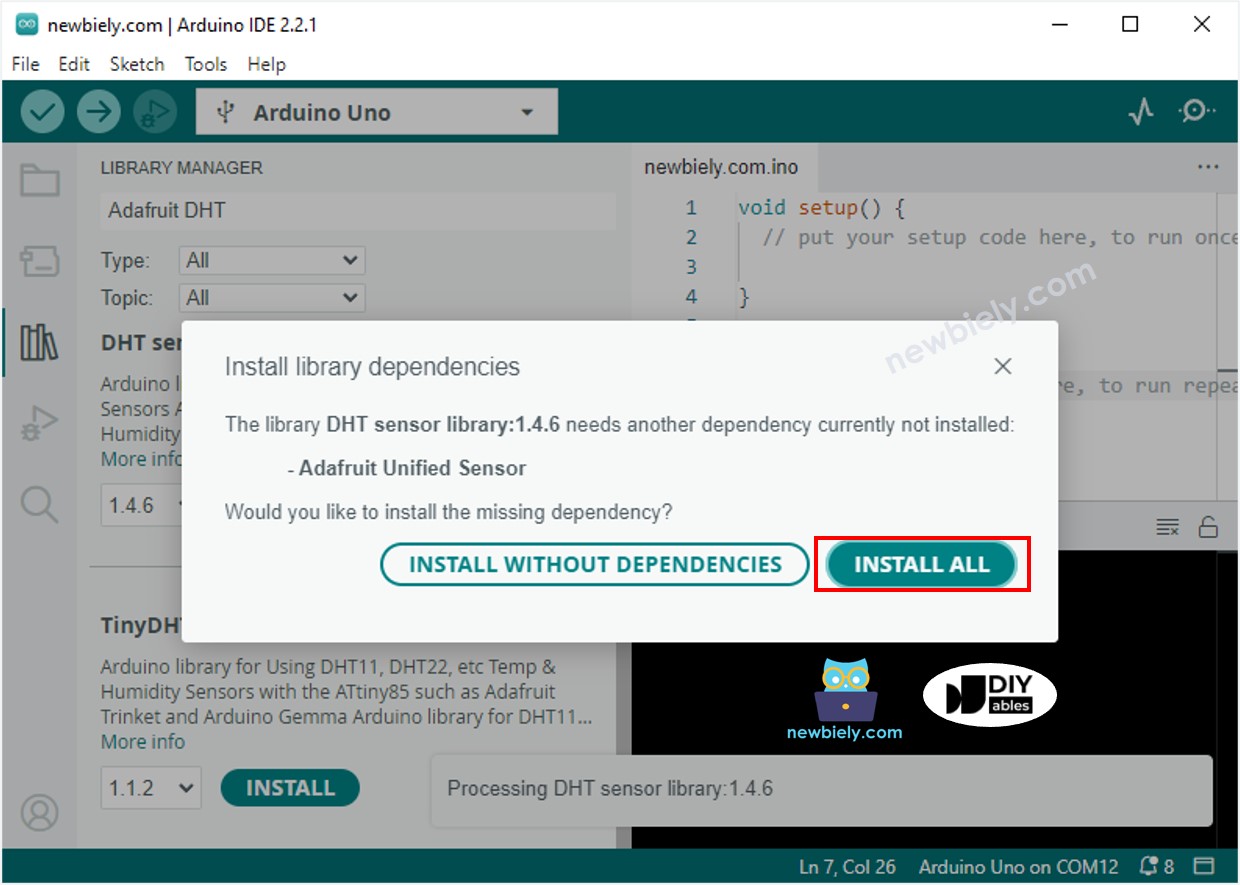
- A window will appear asking if you want to install additional dependencies
- Click Install All to install the required Adafruit Unified Sensor library
Upload and Test:
- Copy the code above and paste it into the Arduino IDE
- Click the Upload button to compile and upload the code to your Arduino MKR WiFi 1010
- Open the Serial Monitor (Tools → Serial Monitor or press Ctrl+Shift+M)
- Set the baud rate to 9600 in the Serial Monitor
- You should see temperature and humidity readings updating every 2 seconds
Test the Sensor:
- Try changing the sensor's temperature - place it near a hot cup of coffee or breathe on it gently
- Watch the temperature values increase in the Serial Monitor
- For humidity testing, breathe on the sensor (your breath is humid) - humidity percentage should rise
Expected Output:
Troubleshooting Common Issues
Problem: "Failed to read from DHT sensor!" Error
Possible Causes:
- Incorrect wiring connections
- Missing pull-up resistor (if using bare sensor)
- Faulty sensor
- Wrong pin number in code
- Insufficient power supply
Solutions:
- Check wiring carefully:
- VCC to 5V
- GND to GND
- DATA to D2
- If bare sensor: 10kΩ resistor between DATA and VCC
- Verify pin definition in code:
- Try different DHT22 sensor - sensors can occasionally be defective
- Check sensor orientation - ensure you're looking at pinout correctly
- Use USB hub with external power if your USB port provides low current
Problem: Readings Seem Inaccurate
DHT22 Accuracy Notes:
- Temperature: ±0.5°C tolerance is normal
- Humidity: ±2% variation is within spec
- Sensor needs 10-30 seconds to stabilize after power-on
- Keep sensor away from direct sunlight, heat sources, and airflow
Calibration Check:
- Compare with a reliable thermometer
- DHT22 is factory-calibrated and generally accurate
- If consistently off by same amount, you can add offset in code:
Problem: No Serial Monitor Output
Solutions:
- Verify Serial Monitor baud rate is set to 9600
- Check correct COM port is selected
- Close and reopen Serial Monitor
- Press Reset button on Arduino after opening Serial Monitor
Problem: Values Don't Update
Causes:
- Sensor polling too fast (must wait 2 seconds between reads)
- delay(2000) removed or changed in code
- Sensor frozen or damaged
Solution:
Ensure your code has proper delay:
Understanding Pull-up Resistor Issues
If you're using a bare DHT22 sensor without the pull-up resistor, you'll see intermittent failures or all readings as "Failed to read". The pull-up resistor is not optional for bare sensors - it's required for the communication protocol to work reliably.
Quick Test: If you have a DHT22 module with built-in resistor, try that first to rule out wiring issues.
Challenge Yourself - Creative Extensions
Once you have the basic temperature and humidity monitoring working, try these enhancements:
1. Data Logging to SD Card:
Add an SD card module to record temperature and humidity over time:
2. LCD Display:
Show readings on a 16x2 LCD instead of Serial Monitor (see our DHT22 LCD tutorial).
3. Temperature Alerts:
Add visual or audio alerts when temperature exceeds thresholds:
4. Relay Control:
Automatically control a fan or heater based on temperature (see our DHT22 Relay tutorial).
5. Web Server:
Create a web interface to view readings remotely using the Arduino MKR WiFi 1010's WiFi capabilities.
6. Min/Max Tracking:
Keep track of highest and lowest values:
7. Multiple Sensors:
Connect several DHT22 sensors on different pins to monitor multiple locations.
8. Heat Index Calculation:
Calculate "feels like" temperature combining temperature and humidity (search for heat index formula).
Experiment with these ideas to create your own custom environmental monitoring system!