Arduino MKR WiFi 1010 - DHT11
Measure temperature and humidity with your Arduino! The DHT11 is an affordable digital sensor that measures temperature and humidity. This tutorial shows you how to connect the DHT11 sensor to your Arduino MKR WiFi 1010 and read environmental data through the Serial Monitor.
What You'll Learn:
- Connecting DHT11 sensor to Arduino MKR WiFi 1010
- Reading temperature and humidity from DHT11 with Arduino MKR WiFi 1010
- Understanding DHT11 sensor specifications and limitations
- Choosing between DHT11 sensor and DHT11 module versions
- Installing and using the Adafruit DHT library for Arduino MKR WiFi 1010
- Programming Arduino MKR WiFi 1010 to display DHT11 sensor data in Serial Monitor
Real-World Applications:
- Home automation: Use Arduino MKR WiFi 1010 with DHT11 to monitor room temperature and humidity
- Plant monitoring: Arduino MKR WiFi 1010 and DHT11 sensor for tracking houseplant environment
- Learning projects: Perfect DHT11 sensor project for Arduino MKR WiFi 1010 beginners
- Comfort monitoring: Arduino MKR WiFi 1010 DHT11 system to check if rooms are too hot or humid
- Simple weather station: Build indoor climate tracker with Arduino MKR WiFi 1010 and DHT11
- HVAC projects: Arduino MKR WiFi 1010 with DHT11 for basic climate control systems
- Educational demonstrations: Teaching sensor interfacing using Arduino MKR WiFi 1010 and DHT11

Hardware Preparation
| 1 | × | Arduino MKR WiFi 1010 | |
| 1 | × | Micro USB Cable | |
| 1 | × | DHT11 Temperature Humidity Sensor Module | |
| 1 | × | Alternatively, DHT11 Sensor | |
| 1 | × | 10 kΩ Resistor | |
| 1 | × | Breadboard | |
| 1 | × | Jumper Wires | |
| 1 | × | Optionally, DC Power Jack |
Or you can buy the following kits:
| 1 | × | DIYables Sensor Kit (18 sensors/displays) |
Additionally, some of these links are for products from our own brand, DIYables .
Overview of DHT11 Temperature and Humidity Sensor
The DHT11 is an affordable digital sensor for measuring temperature and humidity. It uses a capacitive humidity sensor and thermistor to measure the surrounding environment, providing calibrated digital output.
DHT11 Specifications
| DHT11 | |
|---|---|
| The humidity range | 20% to 80% |
| The humidity accuracy | 5% |
| The temperature range | 0°C to 50°C |
| The temperature accuracy | ± 2°C |
| The reading rate | 1Hz (one time per second) |
| Operating Voltage | 3 to 5V |
Key Features:
- Low cost: Most affordable humidity sensor
- Digital interface: Simple one-wire communication protocol
- Beginner-friendly: Easy to use with Arduino libraries
- Wide voltage range: Works with both 3.3V and 5V systems
- Moderate accuracy: ±2°C temperature, ±5% humidity
- Fast sampling: Can read every second
- Compact size: Small form factor for easy integration
Understanding the Specifications:
Temperature Range (0-50°C):
The DHT11 works in typical room temperature ranges. It's perfect for indoor monitoring but won't work in freezing or very hot conditions (like outdoor winter or engine compartments).
Temperature Accuracy (±2°C):
If the sensor reads 25°C, the actual temperature is between 23°C and 27°C. This is acceptable for casual monitoring but not suitable for precision applications.
Humidity Range (20-80%):
Cannot measure very dry conditions (below 20%) or saturated environments (above 80%). Works well for normal indoor humidity.
Humidity Accuracy (±5%):
Reading 60% humidity means actual humidity is between 55% and 65%. Sufficient for general comfort monitoring.
Sampling Rate (Every Second):
Faster than DHT22 (which requires 2 seconds), but in practice, most applications don't need readings more than once per few seconds.
DHT11 vs. DHT22 Comparison
If you're deciding between DHT11 and DHT22, here's how they compare:
| Feature | DHT11 | DHT22 |
|---|---|---|
| **Temperature Range** | **0 to 50°C** | -40 to 80°C |
| **Temperature Accuracy** | **±2°C** | ±0.5°C (4× better!) |
| **Humidity Range** | **20-80%** | 0-100% (full range) |
| **Humidity Accuracy** | **±5%** | ±2% (2.5× better!) |
| **Resolution** | **1°C / 1%** | 0.1°C / 0.1% (10× finer) |
| **Price** | **~$2** | ~$4-6 |
| **Best For** | **Learning, casual monitoring** | Precision applications |
When to Use DHT11:
- Learning Arduino and sensor basics
- Casual home monitoring projects
- Budget-constrained hobby projects
- Non-critical applications
- Educational demonstrations
When to Upgrade to DHT22:
- Need precision (incubators, climate control)
- Require low-temperature monitoring (below 0°C)
- Need full humidity range (wine cellars, humidors)
- Data logging requiring accuracy
- Professional or commercial projects
DHT11 Pinout
The DHT11 comes in two versions: bare sensor (4 pins) and module (3 pins with built-in resistor).
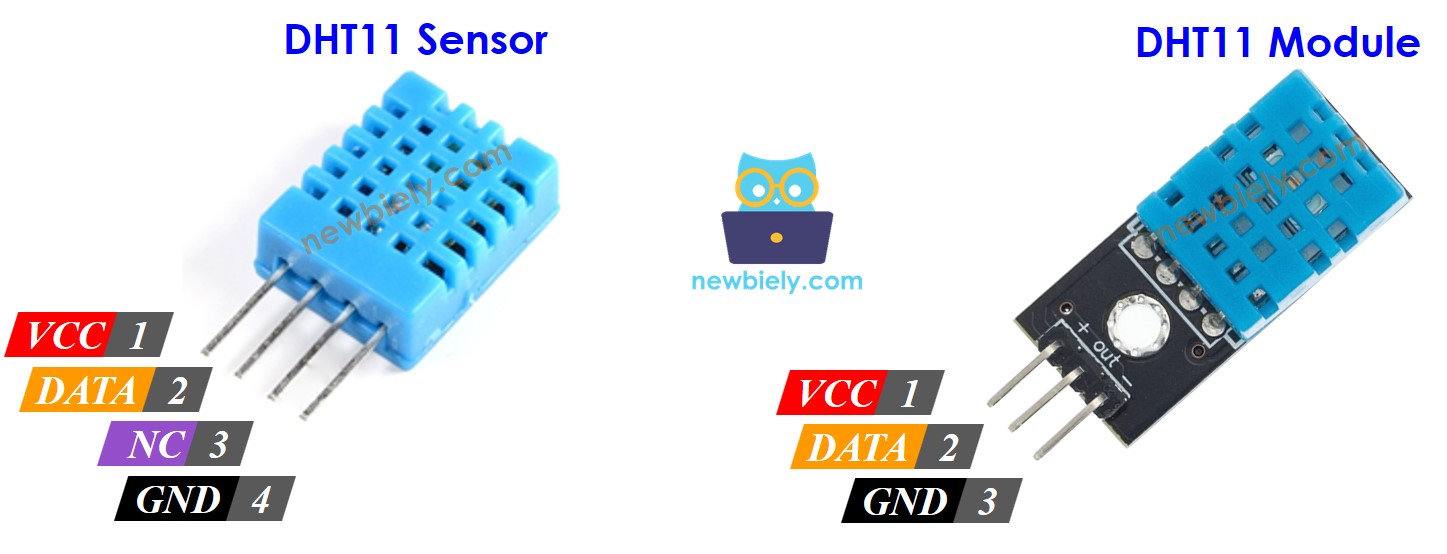
DHT11 Bare Sensor (4-Pin Version):
- VCC pin: Connect to 3.3V or 5V power (5V recommended for stability)
- DATA pin: Digital communication line - connects to Arduino digital pin
- NC pin: Not Connected - leave this pin unconnected
- GND pin: Connect to ground (0V)
Important: The bare sensor requires a 10kΩ pull-up resistor between DATA and VCC pins for reliable communication.
DHT11 Module (3-Pin Version) - Recommended:
- VCC (+): Connect to 5V power
- DATA (OUT or S): Digital communication line to Arduino
- GND (-): Connect to ground
Advantages of Module Version:
- Built-in pull-up resistor (no external resistor needed)
- Easier wiring (only 3 pins)
- More robust PCB mounting
- Better signal quality
- Beginner-friendly
We strongly recommend using the DHT11 module for simpler wiring and fewer potential connection issues.
Wiring Diagram between DHT11 and Arduino MKR WiFi 1010
This section shows how to connect the DHT11 sensor to your Arduino MKR WiFi 1010. The wiring is the same for both sensor and module versions, with one important difference: the bare sensor requires an external pull-up resistor.
Why Pull-up Resistor?
The DHT11 uses a single-wire communication protocol that requires the data line to be "pulled high" to 5V by default. The 10kΩ resistor ensures reliable communication. Most DHT11 modules include this resistor built-in.
Arduino MKR WiFi 1010 - DHT11 Sensor Wiring
If using the bare DHT11 sensor (4 pins), you must add a 10kΩ pull-up resistor between the DATA and VCC pins.
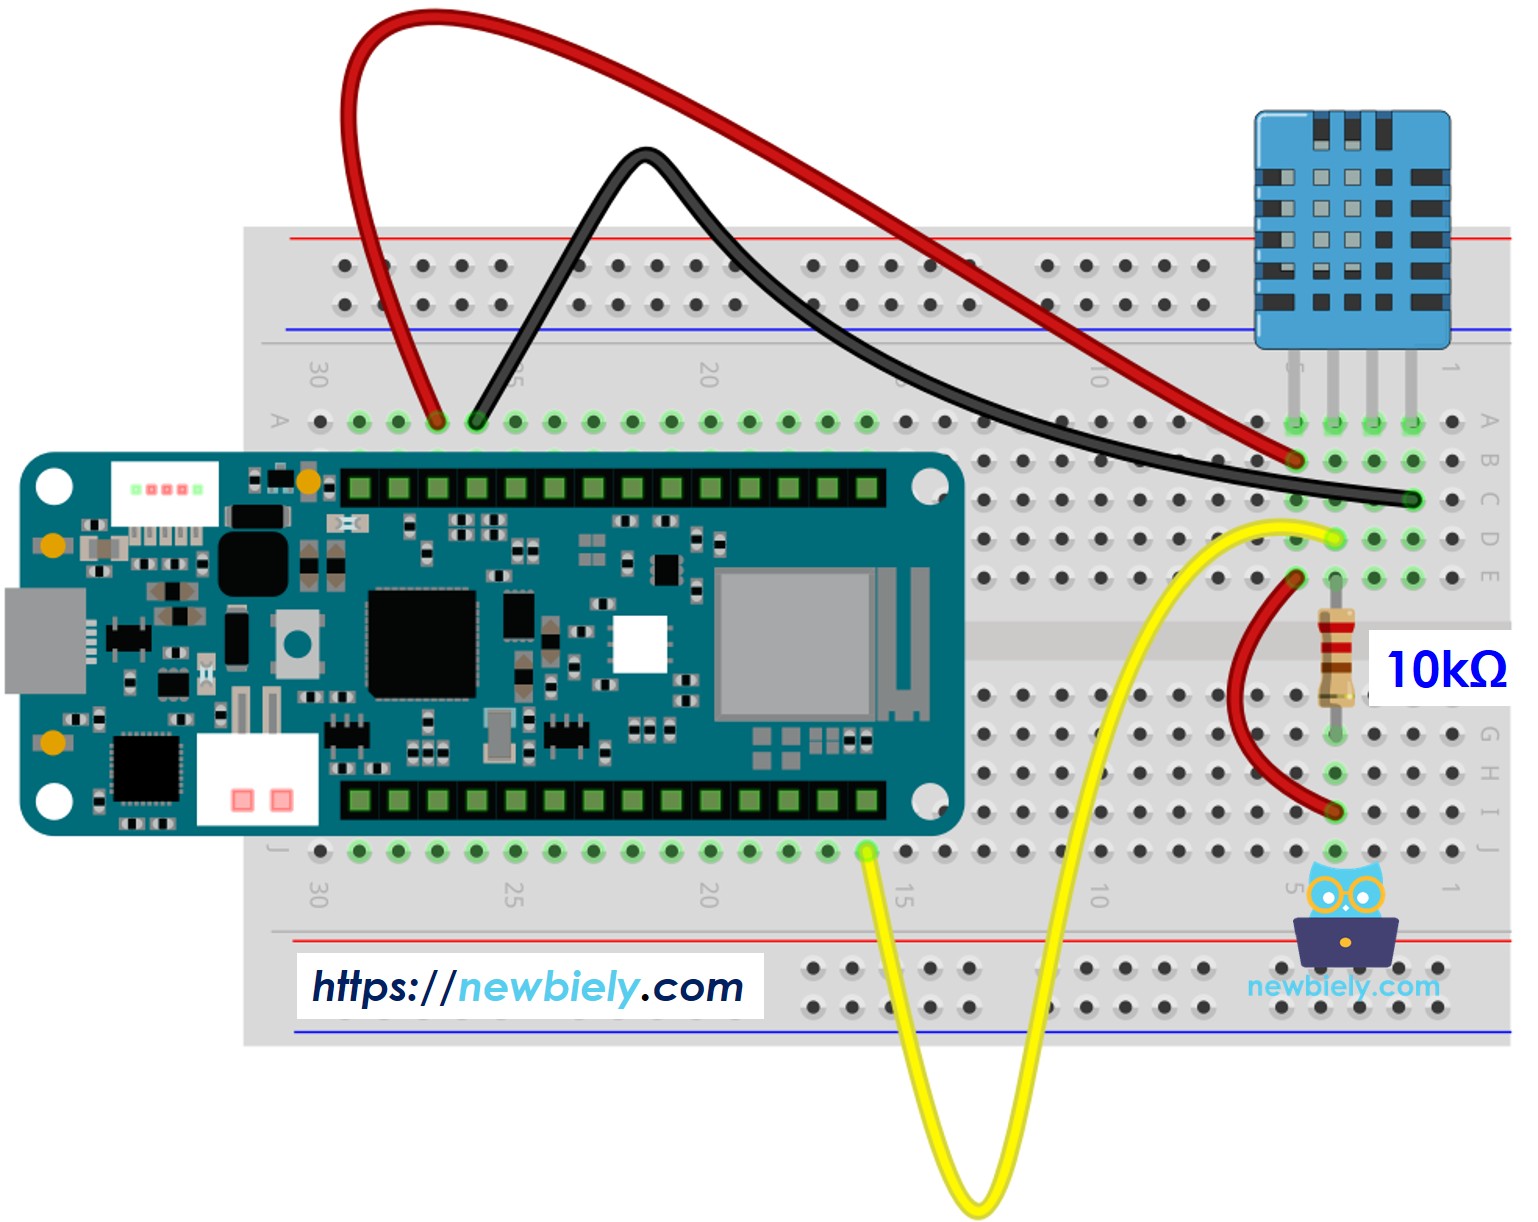
This image is created using Fritzing. Click to enlarge image
Connection Details:
- DHT11 VCC → Arduino 5V
- Provides stable power to the sensor
- Can use 3.3V, but 5V is recommended for better performance
- DHT11 DATA → Arduino D2 pin
- Digital communication line
- Also connect a 10kΩ resistor between DATA and VCC
- DHT11 NC → Leave unconnected
- No Connection pin - don't wire anything here
- DHT11 GND → Arduino GND
- Common ground reference
- DHT11 VCC (+) → Arduino 5V
- Module power supply
- DHT11 DATA (OUT or S) → Arduino D2 pin
- Digital communication line
- Built-in pull-up resistor already on module
- DHT11 GND (-) → Arduino GND
- Ground connection
- Use short jumper wires (under 50cm) for reliable communication
- Ensure solid connections in breadboard holes
- Double-check polarity - reversed VCC/GND can damage the sensor
- The code defines DATA pin as D2, but you can use any digital pin
- Keep the sensor away from heat sources for accurate readings
Arduino MKR WiFi 1010 - DHT11 Module Wiring
If using the DHT11 module (3 pins), no external resistor is needed - the module includes it built-in. This is the recommended option for beginners!
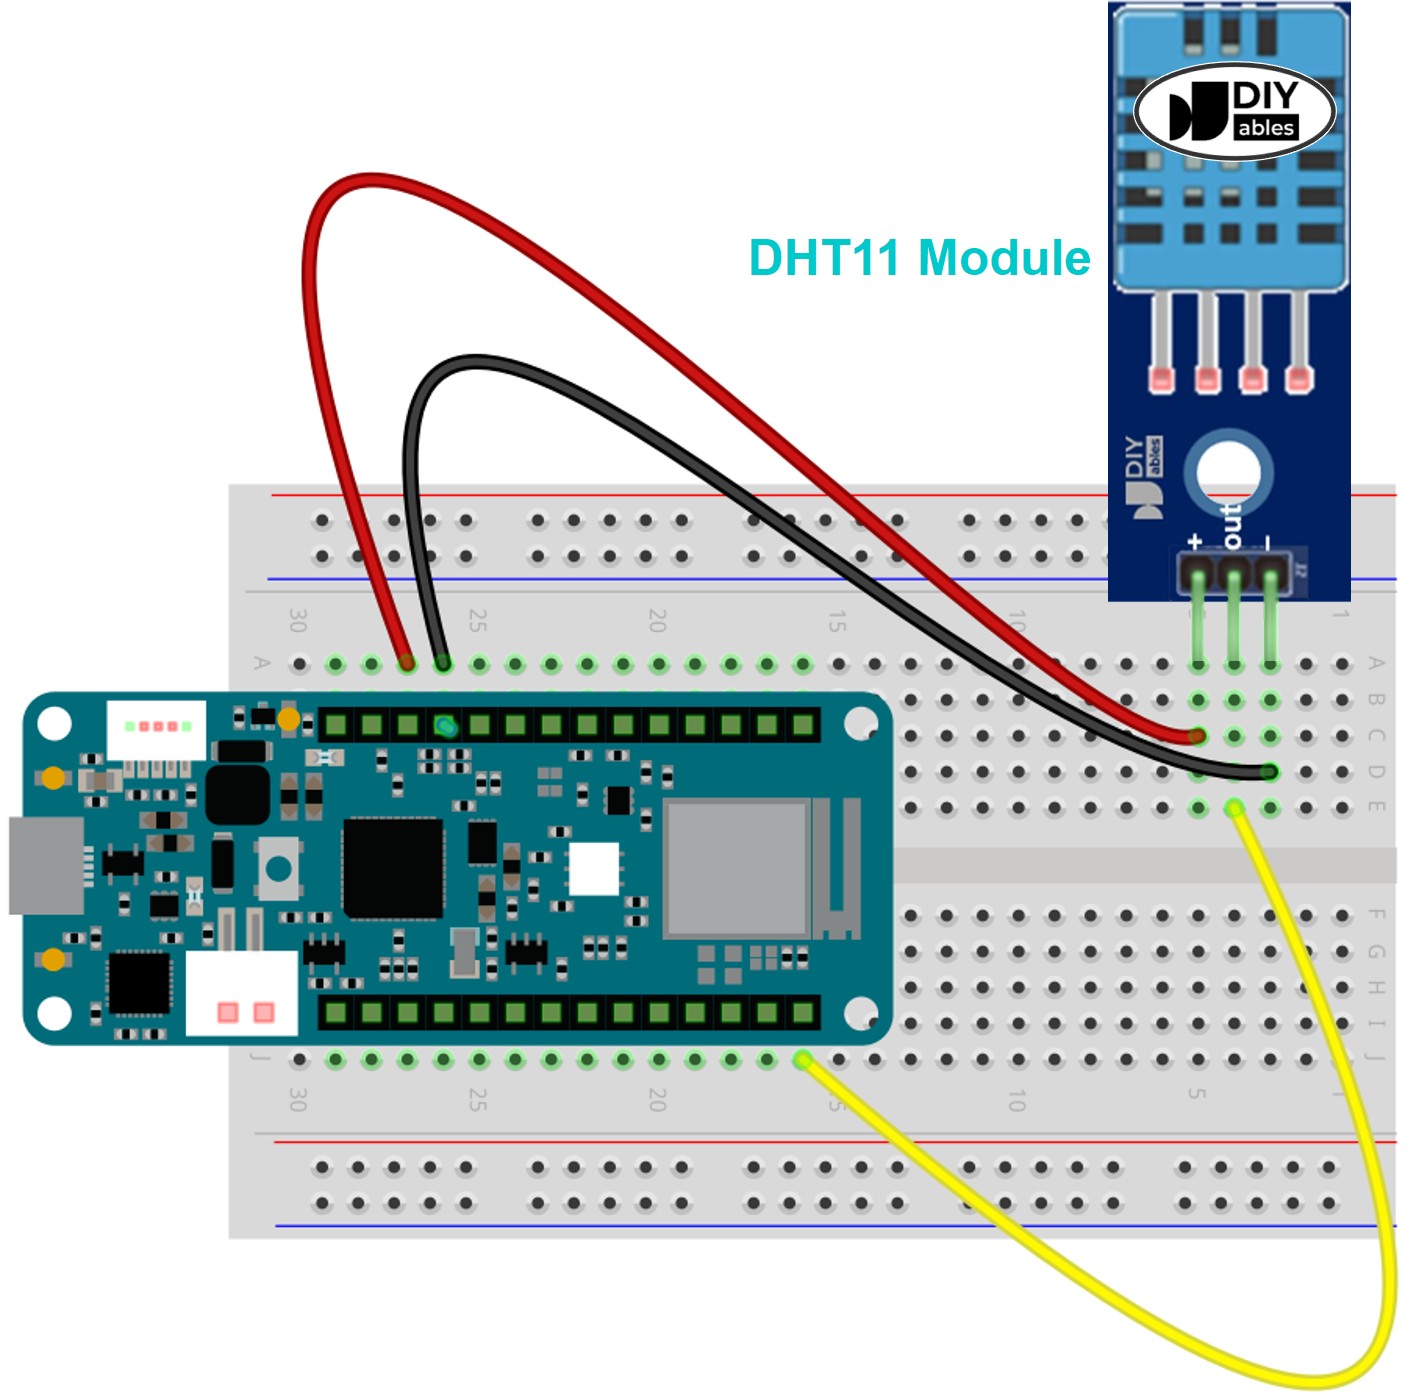
This image is created using Fritzing. Click to enlarge image
Connection Details:
Wiring Tips:
Power Supply:
For This Project: Simply plug the Arduino into your computer's USB port - it provides enough power for the DHT11 sensor.
Arduino MKR WiFi 1010 Code - DHT11
This code reads temperature and humidity from the DHT11 sensor every 2 seconds and displays the values in the Serial Monitor. Temperature is shown in both Celsius and Fahrenheit.
What the Code Does:
- Initializes the DHT11 sensor on pin D2
- Reads sensor data every 2 seconds (recommended sampling interval)
- Displays humidity percentage, temperature in Celsius, and temperature in Fahrenheit
- Checks for sensor communication errors
Detailed Instructions
New to Arduino MKR WiFi 1010? Complete our Getting Started with Arduino MKR WiFi 1010 tutorial first to set up your development environment.
- Connect the components to the Arduino MKR WiFi 1010 board as depicted in the diagram
- Plug your Arduino MKR WiFi 1010 into your computer's USB port
- Launch the Arduino IDE on your computer
- Select the Arduino MKR WiFi 1010 board and its COM port
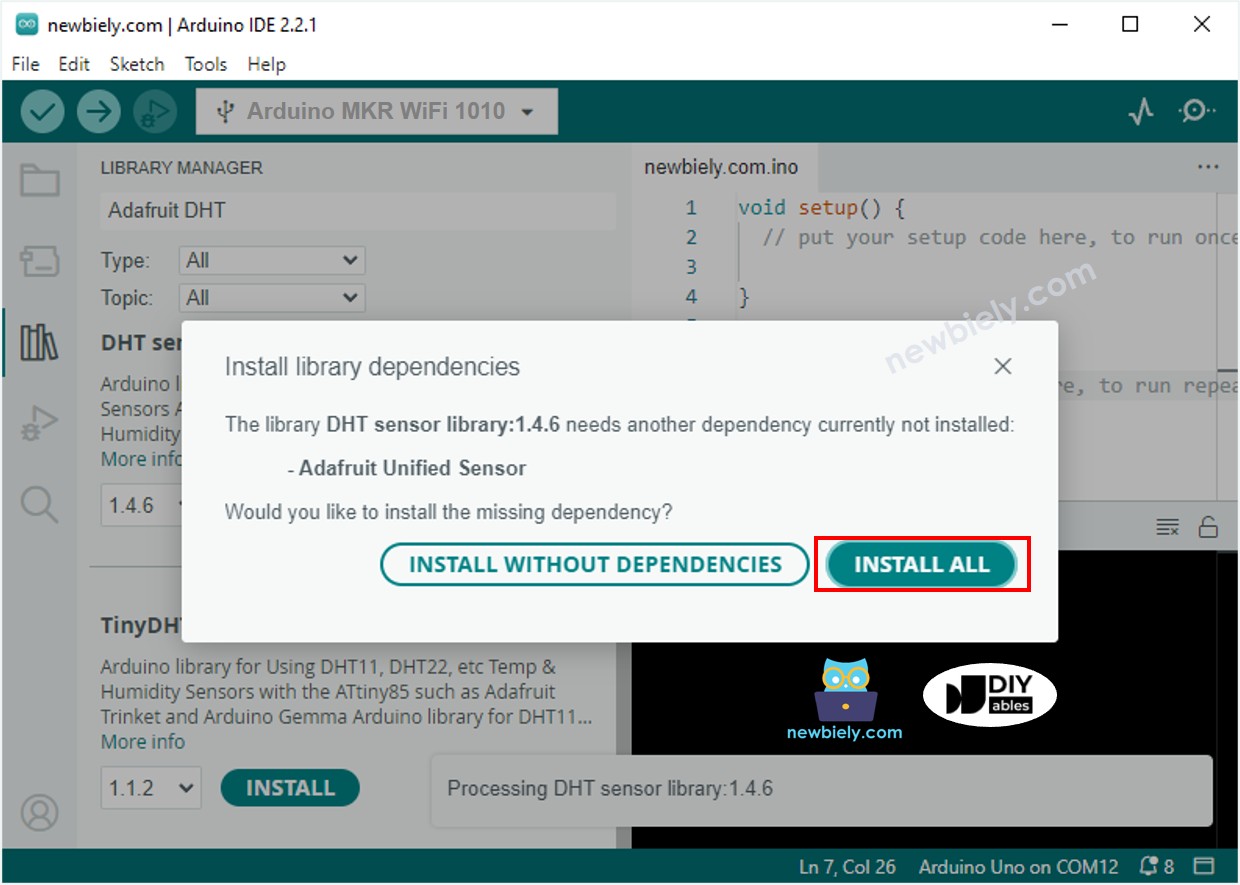
- Open the Library Manager by clicking the Library Manager icon on the left side of the Arduino IDE.
- In the search box, type DHT and find the DHT sensor library made by Adafruit.
- Click the Install button to add the library.
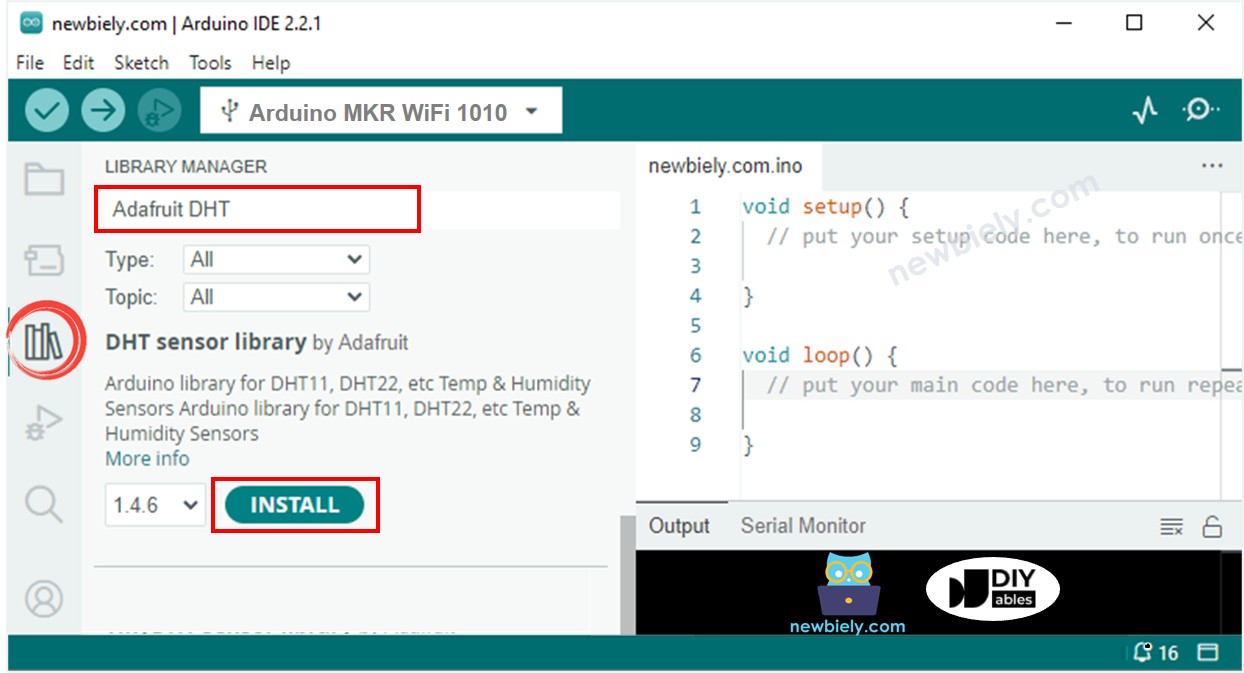
- A window will pop up asking if you want to install the parts needed for the library.
- Click the Install All button to add all the required parts.
- Copy one of the codes above and open it with the Arduino IDE.
- Compile and send the code to the Arduino MKR WiFi 1010 board by clicking the Upload button in the Arduino IDE.
- Change the sensor temperature by making it colder or warmer. For example, place the sensor near a hot cup of coffee.
- See the result in the Serial Monitor. It will look like the example shown below.
Troubleshooting Common Issues
Problem: "Failed to read from DHT sensor!" Error
Possible Causes:
- Incorrect wiring connections
- Missing pull-up resistor (if using bare sensor)
- Faulty sensor
- Wrong pin number in code
Solutions:
- Check wiring: VCC to 5V, GND to GND, DATA to D2
- If bare sensor: add 10kΩ resistor between DATA and VCC
- Verify pin definition in code: #define DHTPIN D2
- Try different DHT11 sensor
Problem: Readings Seem Inaccurate
DHT11 has 2C and 5% humidity tolerance. This is normal. For better accuracy, consider upgrading to DHT22.
Problem: No Serial Monitor Output
- Verify baud rate is 9600
- Check correct COM port selected
- Press Reset button after opening Serial Monitor
Challenge Yourself - Creative Extensions
Try these enhancements:
1. LCD Display: Show readings on 16x2 LCD
2. Temperature Alerts: Add LED warning when too hot
3. Relay Control: Auto-control fans/heaters
4. Data Logging: Record to SD card
5. Multiple Sensors: Monitor different rooms
Experiment and learn!