Arduino MKR WiFi 1010 - Temperature Humidity Sensor
Introduction to Arduino MKR WiFi 1010 DHT Temperature and Humidity Sensing
In this tutorial, we'll dive into how to use the Arduino MKR WiFi 1010 to read temperature and humidity from the popular DHT11 and DHT22 sensors. Monitoring the environment is a fundamental skill for any maker, and the Arduino MKR WiFi 1010 makes it easy to collect this data and display it in real-time.
Whether you're using a DHT11 for basic projects or a DHT22 for high-precision environment tracking, the Arduino MKR WiFi 1010 provides a robust platform for your sensors. We'll walk through the process of connecting your DHT11 or DHT22 to the Arduino MKR WiFi 1010, installing the necessary software libraries, and writing code to view the results on your computer's Serial Monitor.
What You'll Learn:
- How to interface a DHT11 or DHT22 sensor with the Arduino MKR WiFi 1010.
- Understanding the differences between DHT11 and DHT22 for your Arduino MKR WiFi 1010 project.
- Installing the Adafruit DHT library for the Arduino MKR WiFi 1010.
- Reading and displaying humidity and temperature data from the DHT11 or DHT22 on the Arduino MKR WiFi 1010.
- Troubleshooting common DHT11 and DHT22 connection issues with the Arduino MKR WiFi 1010.
Real-World Applications:
- Home Automation: Use the Arduino MKR WiFi 1010 and DHT11 to monitor your living room comfort.
- Smart Gardening: Track greenhouse conditions using an Arduino MKR WiFi 1010 and DHT22.
- Weather Station: Build a DIY weather node with DHT22 and Arduino MKR WiFi 1010.
- Lab Monitoring: Maintain stable storage temperatures with an Arduino MKR WiFi 1010 and DHT11.
Hardware Preparation
Or you can buy the following kits:
| 1 | × | DIYables Sensor Kit (18 sensors/displays) |
Additionally, some of these links are for products from our own brand, DIYables .
Overview of DHT11 and DHT22 Temperature and Humidity Sensors
When choosing a sensor for your Arduino MKR WiFi 1010, you'll likely choose between the DHT11 and DHT22. Both sensors use a single digital pin for communication with the Arduino MKR WiFi 1010, but they offer different levels of performance.
| Feature | DHT11 | DHT22 |
|---|---|---|
| Humidity Range | 20% to 80% | 0% to 100% |
| Humidity Accuracy | ± 5% | ± 2% to 5% |
| Temperature Range | 0°C to 50°C | -40°C to 80°C |
| Reading Rate | 1Hz (1 reading/sec) | 0.5Hz (1 reading/2sec) |
| Cost | Ultra Low Cost | Low Cost |
| Precision | Low | Moderate to High |
Choosing Between DHT11 and DHT22
While both work perfectly with the Arduino MKR WiFi 1010, the DHT22 is the superior choice for outdoor use or projects where high precision is required. For indoor beginner projects where exact accuracy isn't critical, the DHT11 is an excellent budget-friendly option.
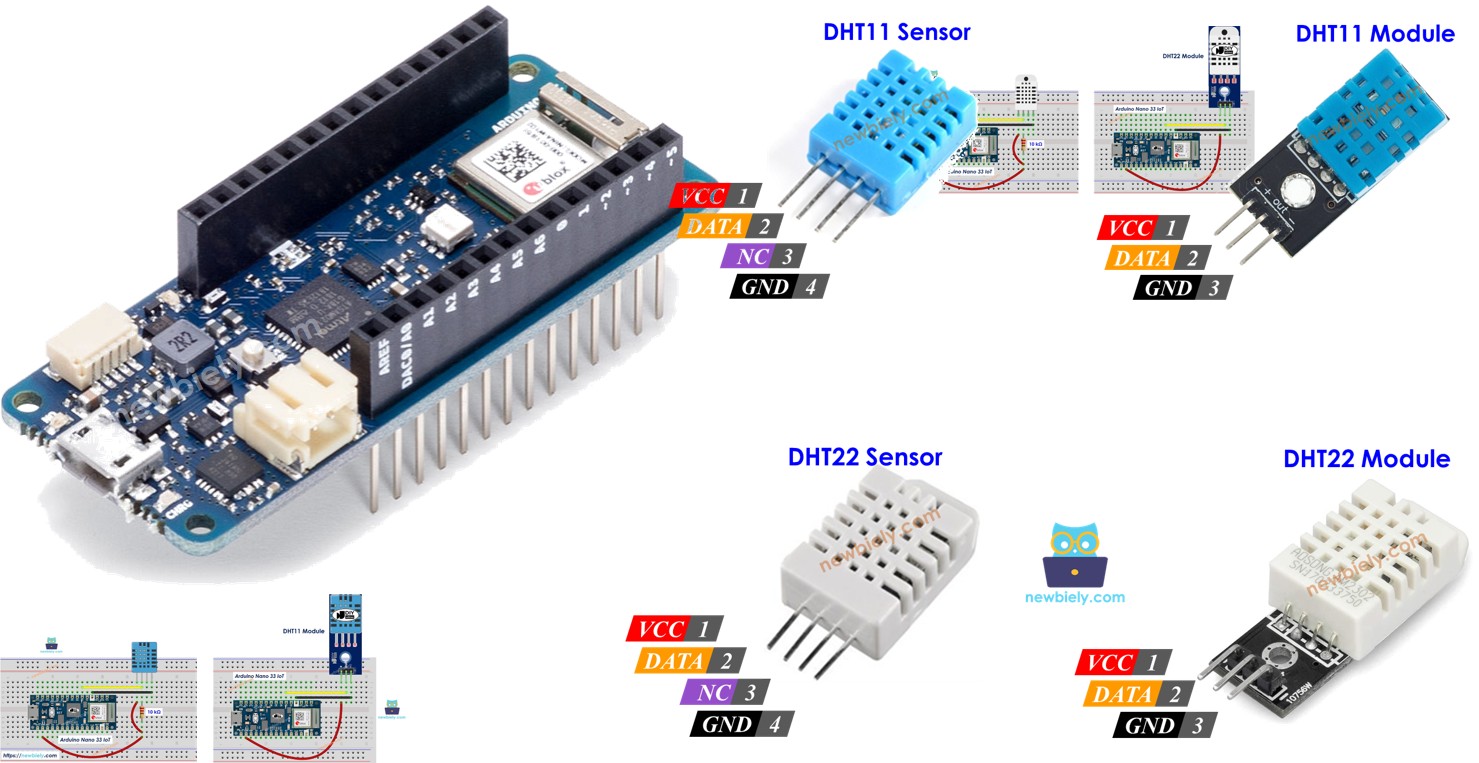
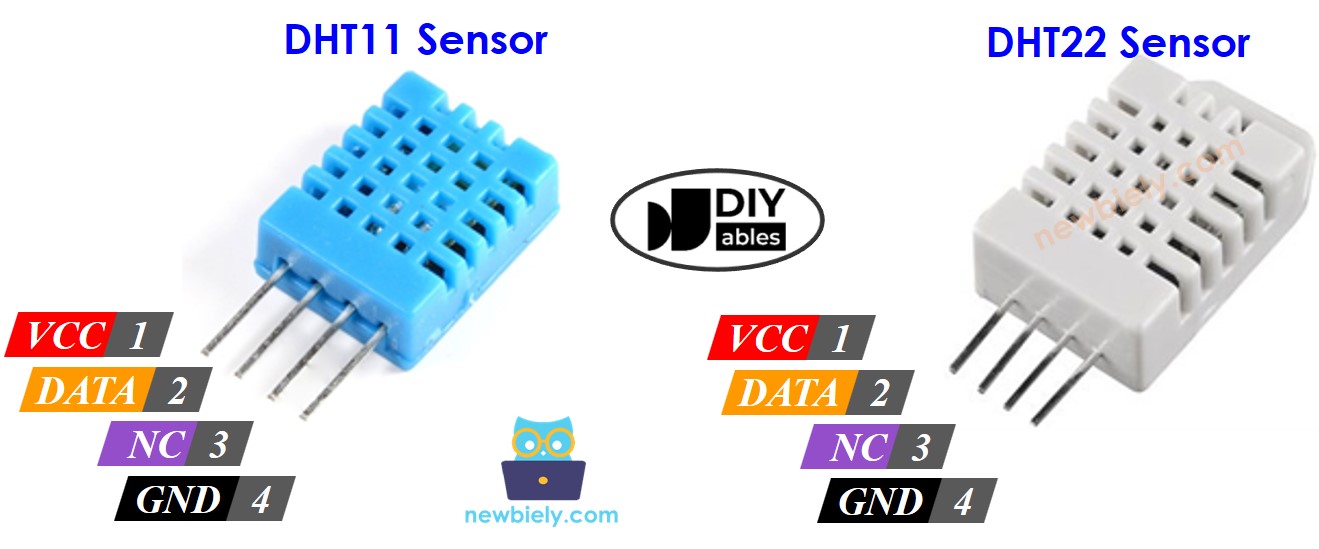
DHT11 and DHT22 Pinout
The standard DHT11 and DHT22 sensors have four pins, though only three are typically used with the Arduino MKR WiFi 1010.
- VCC: Power input (3.3V or 5V from the Arduino MKR WiFi 1010).
- DATA: Digital data signal connected to an Arduino MKR WiFi 1010 digital pin.
- NC: Not connected.
- GND: Ground connection to the Arduino MKR WiFi 1010.
We highly suggest using DHT11 or DHT22 sensor modules (like those from DIYables). These modules include a built-in pull-up resistor, making it much easier to connect directly to your Arduino MKR WiFi 1010 with just three pins.

Wiring Diagram
Connecting the DHT11 or DHT22 to your Arduino MKR WiFi 1010 is straightforward.
Note on Power: While the Arduino MKR WiFi 1010 can be powered via USB, if you experience unstable readings, consider using an external power source to ensure the sensor receives a consistent voltage.
Arduino MKR WiFi 1010 - DHT11 Sensor Wiring
If you are using the raw DHT11 sensor, you will need to add a 10K resistor as shown.
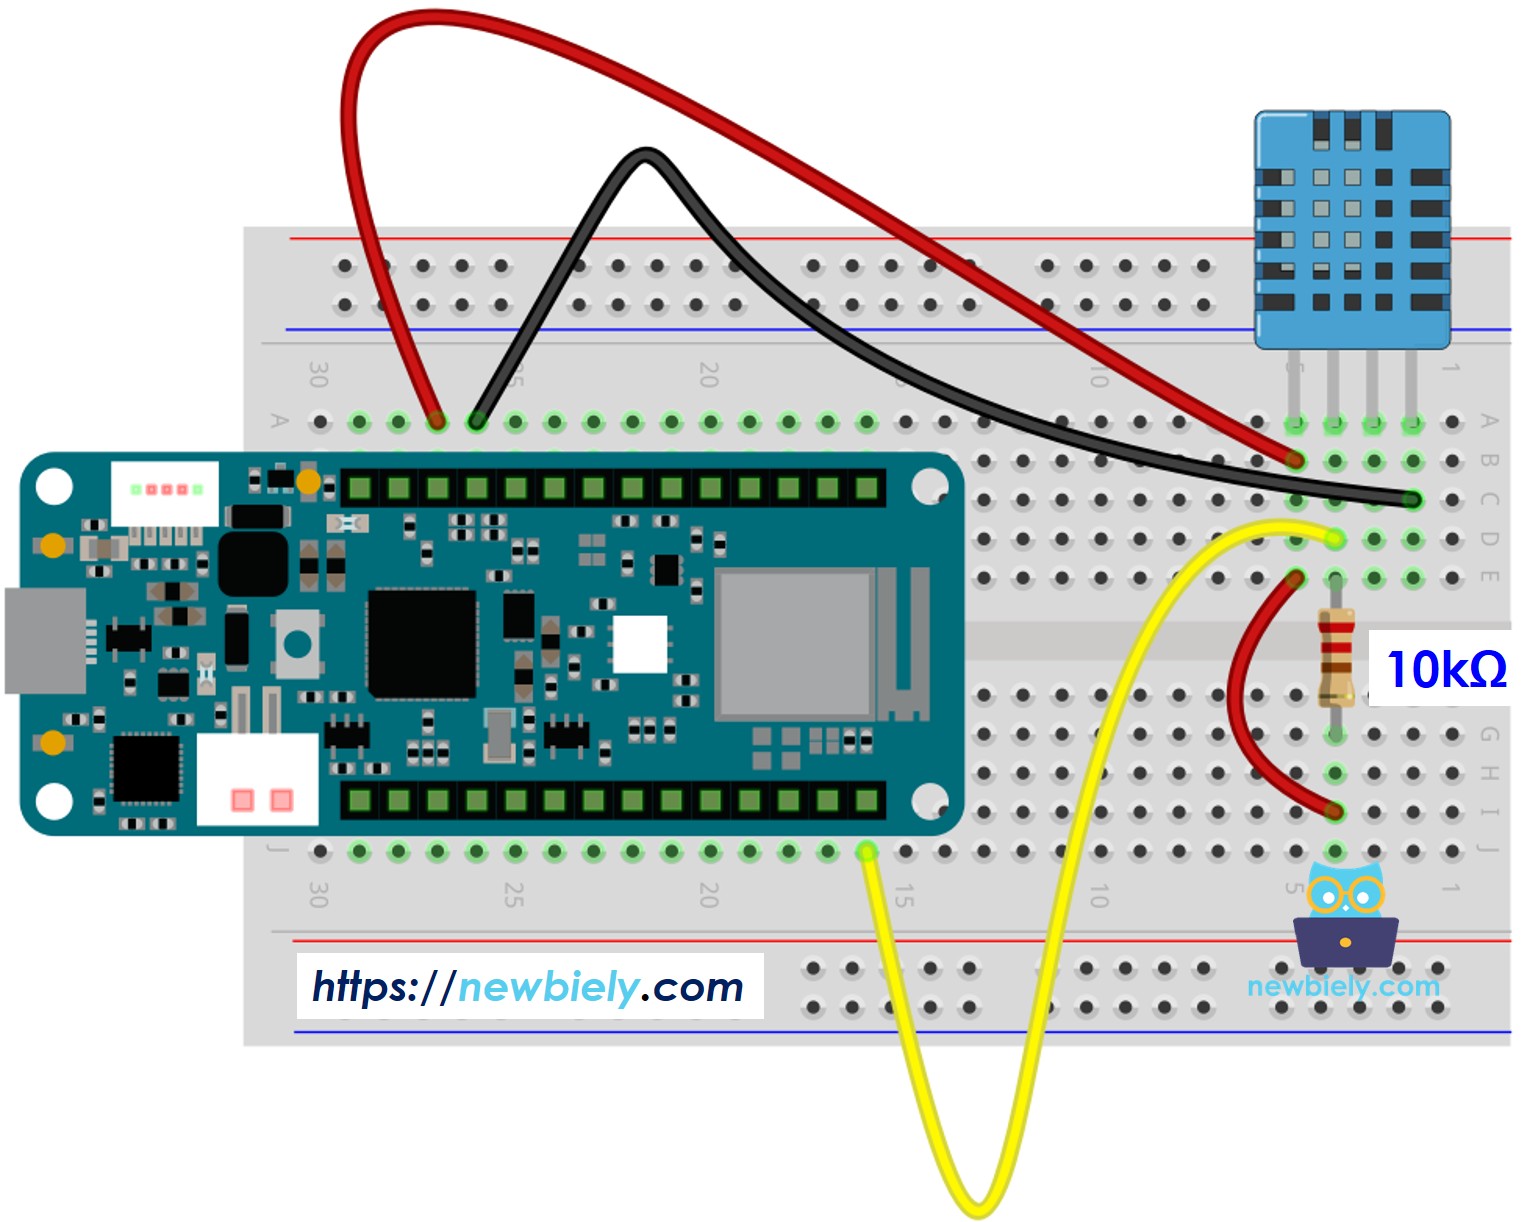
This image is created using Fritzing. Click to enlarge image
Arduino MKR WiFi 1010 - DHT22 Sensor Wiring
The raw DHT22 sensor requires the same 10K resistor for stable communication with the Arduino MKR WiFi 1010.
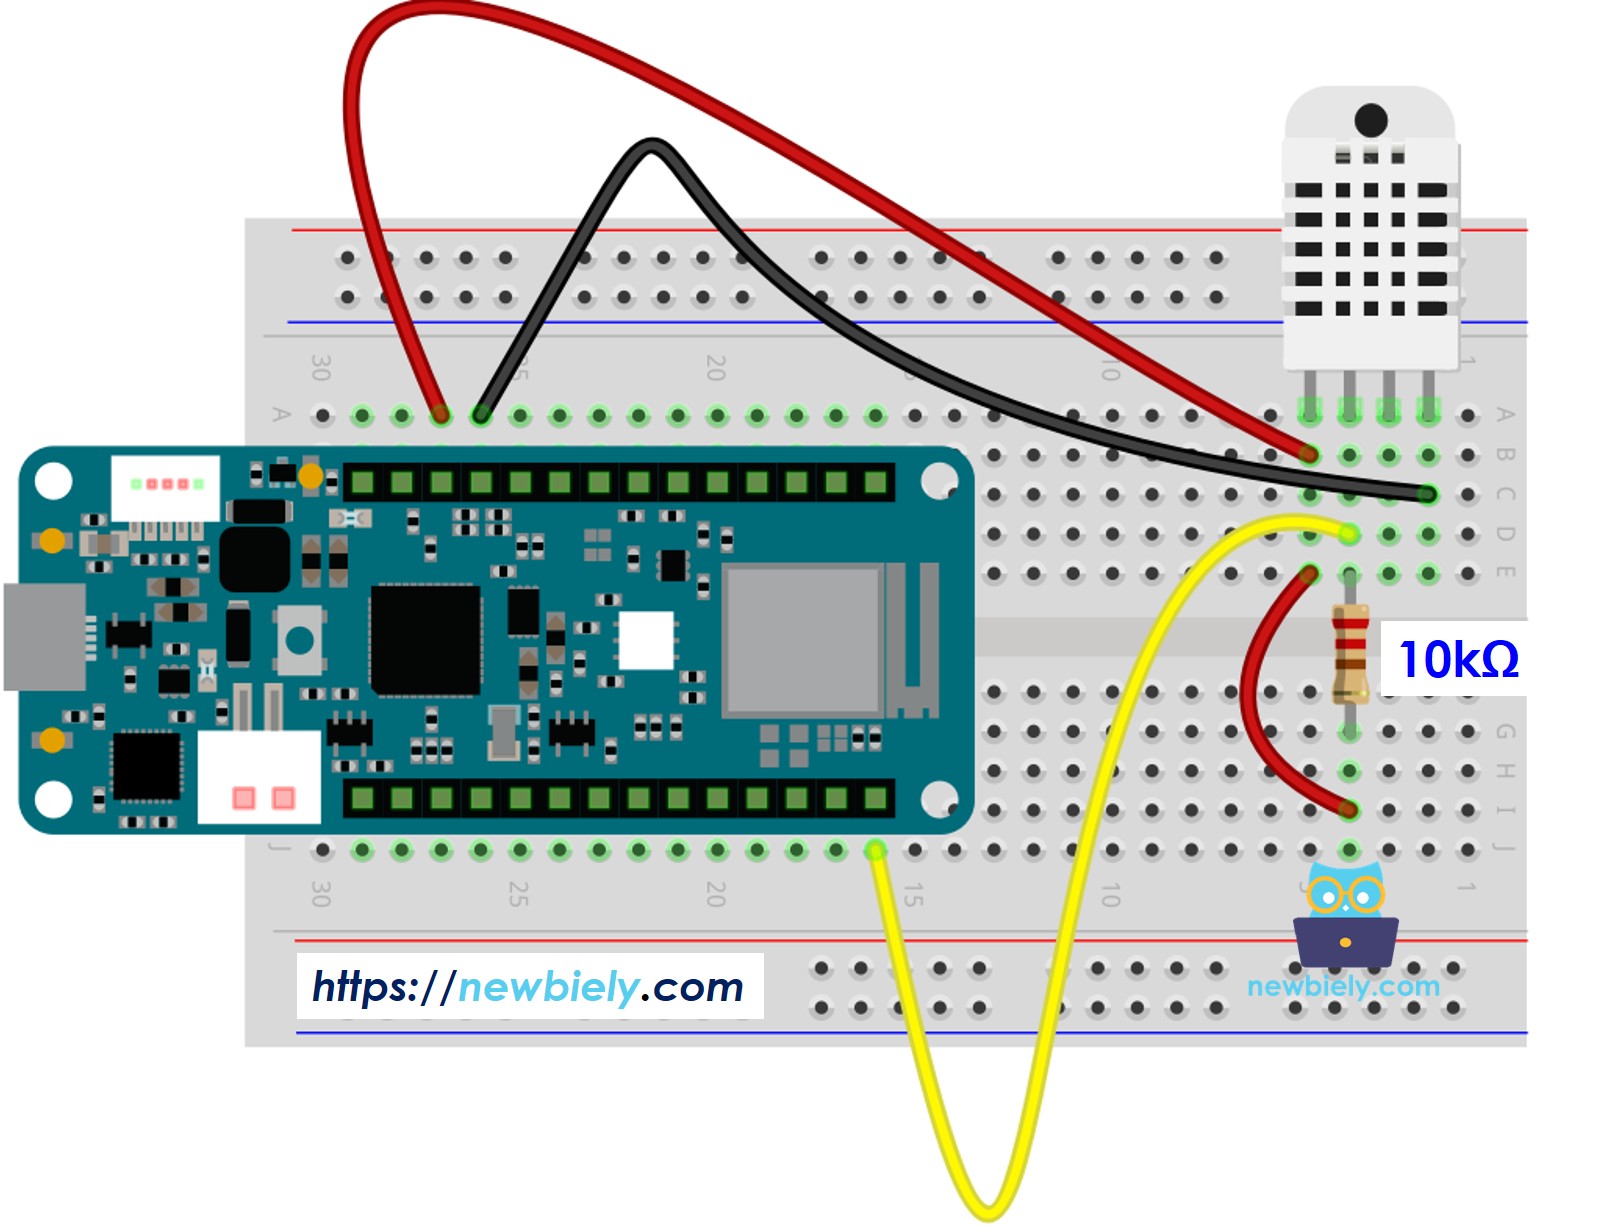
This image is created using Fritzing. Click to enlarge image
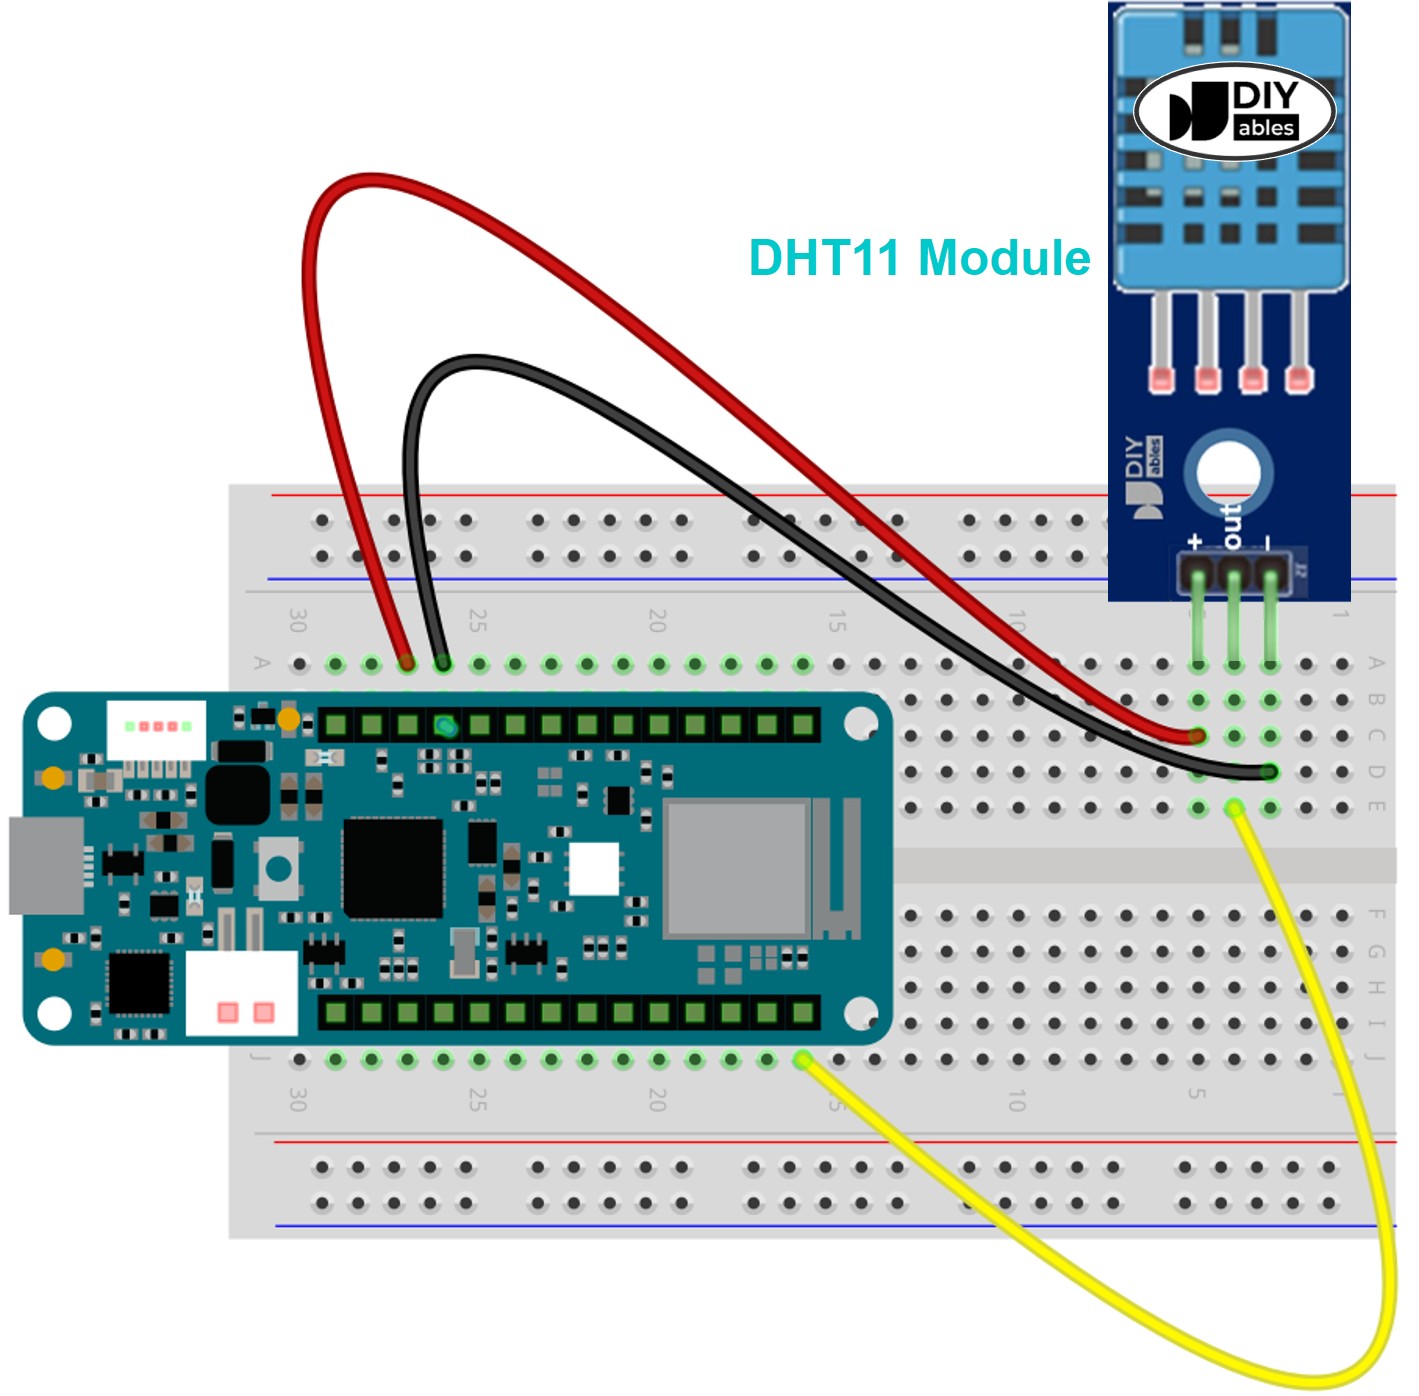
Arduino MKR WiFi 1010 - DHT11 Module Wiring
Using the DHT11 module is much easier! No external resistor is needed for your Arduino MKR WiFi 1010.
This image is created using Fritzing. Click to enlarge image
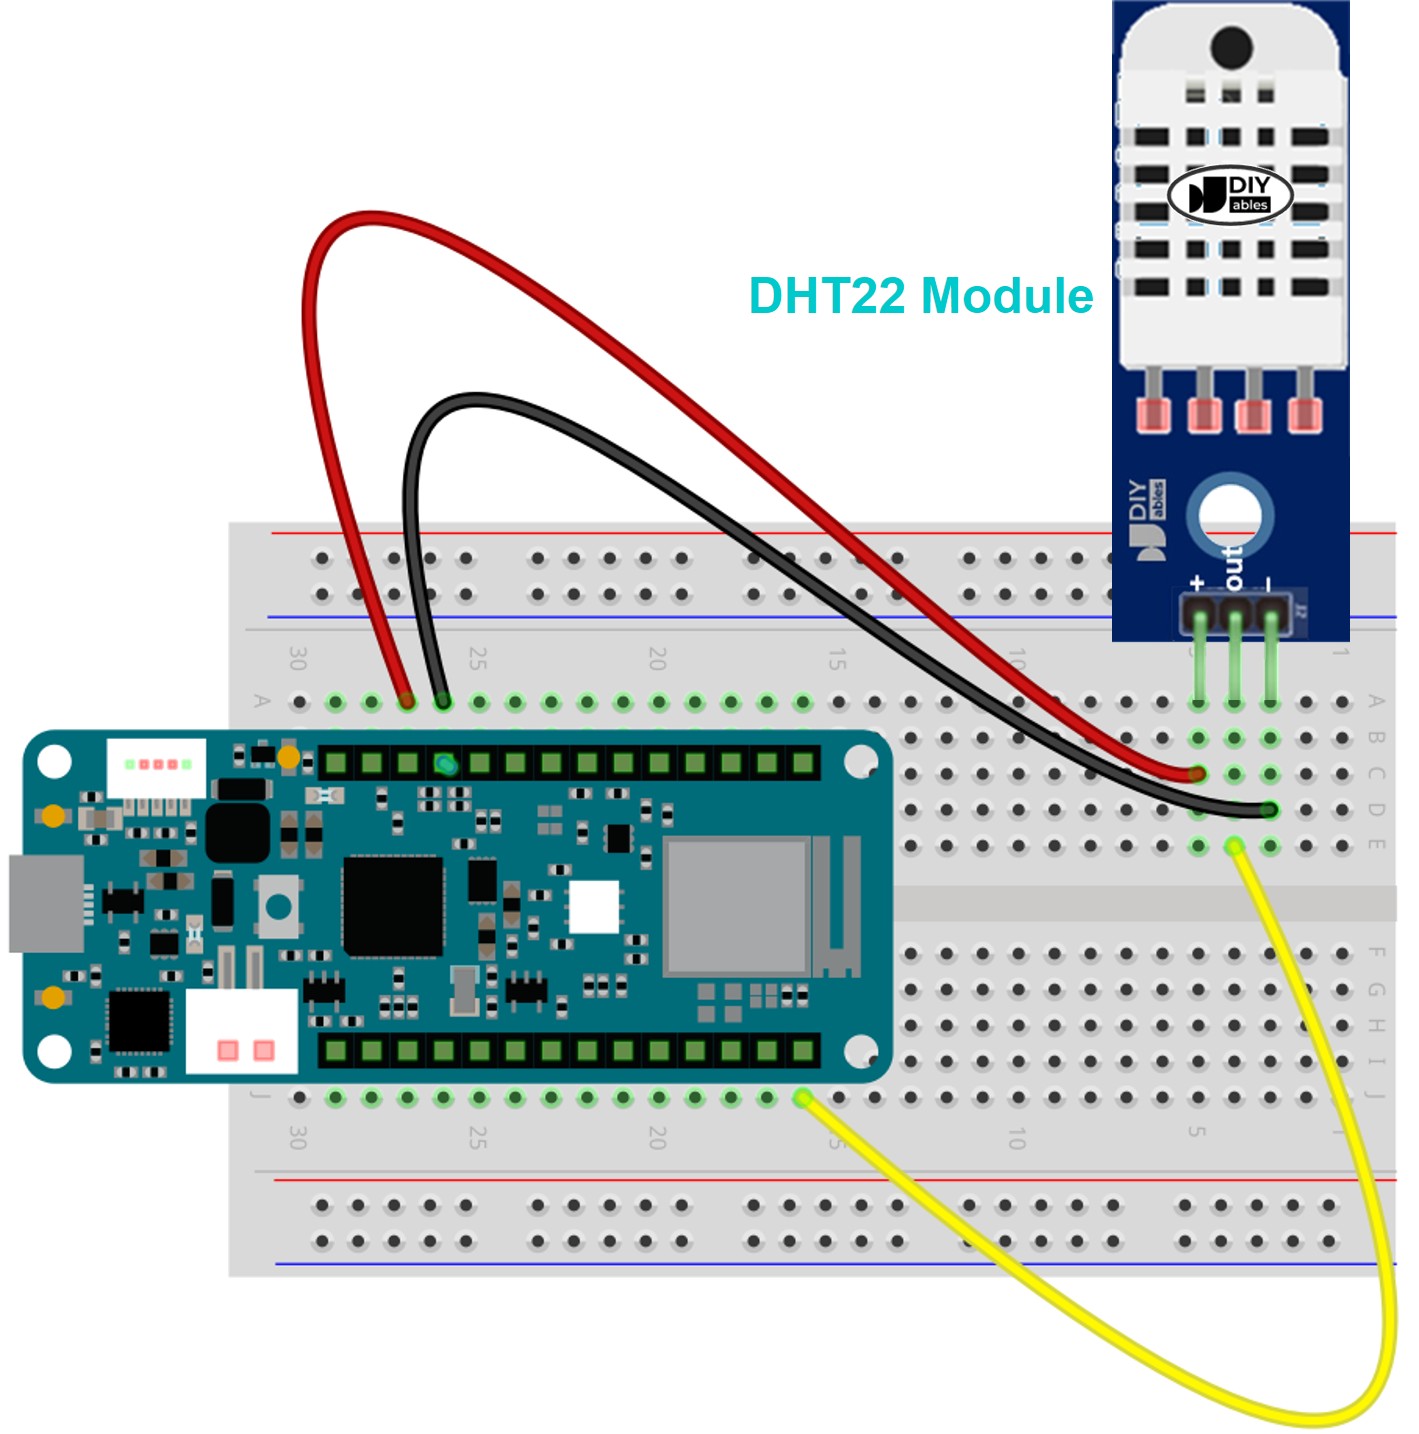
Arduino MKR WiFi 1010 - DHT22 Module Wiring
Similarly, the DHT22 module connects directly to the Arduino MKR WiFi 1010 without extra components.
This image is created using Fritzing. Click to enlarge image
Arduino MKR WiFi 1010 Code - DHT11
The following code allows the Arduino MKR WiFi 1010 to retrieve data from a DHT11 sensor.
Arduino MKR WiFi 1010 Code - DHT22
Use this version for your DHT22 sensor project with the Arduino MKR WiFi 1010.
Detailed Instructions
New to Arduino MKR WiFi 1010? Complete our Getting Started with Arduino MKR WiFi 1010 tutorial first to set up your development environment.
- Hardware Setup: Connect your DHT11 or DHT22 (sensor or module) to the Arduino MKR WiFi 1010 as shown in the diagrams.
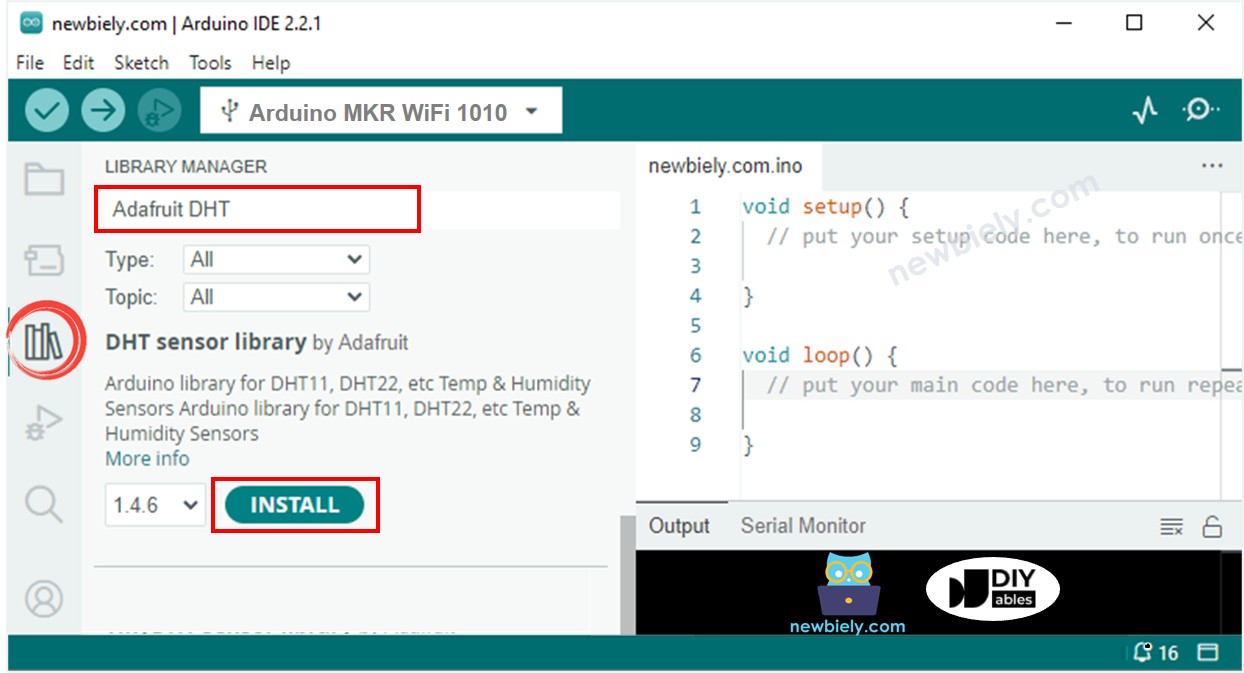
- Library Installation: Open the Library Manager in the Arduino IDE.
- Search for "DHT sensor library" by Adafruit and click Install.
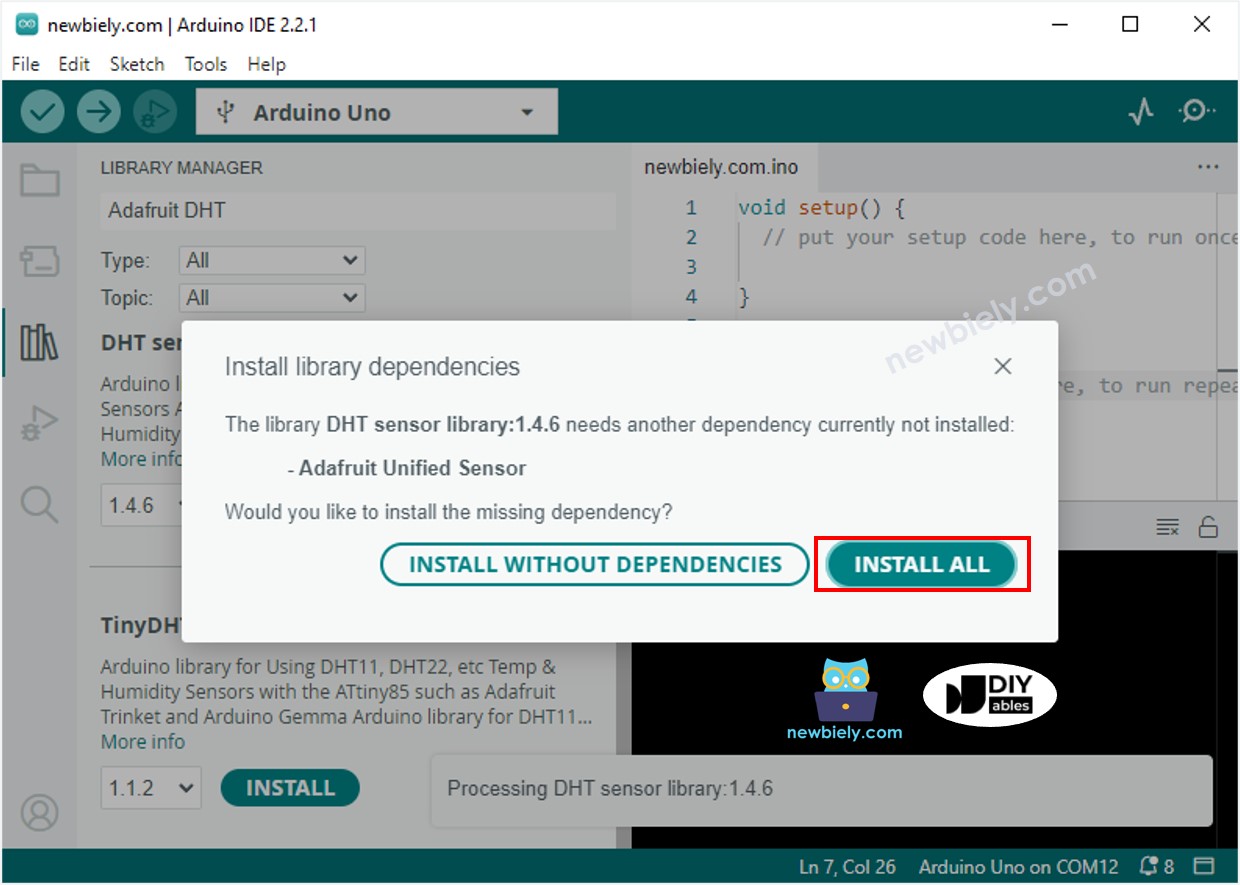
- If asked, click Install All to add the Adafruit Unified Sensor dependency.
- Upload Code: Select your Arduino MKR WiFi 1010 board, copy the matching code from above, and click Upload.
- View Results: Open the Serial Monitor at 9600 baud. You should see live temperature and humidity data from your Arduino MKR WiFi 1010!
Troubleshooting Tips
If your Arduino MKR WiFi 1010 shows "Failed to read from DHT sensor!" on the Serial Monitor, try these fixes:
- Check Wiring: Ensure the DATA pin of your DHT11 or DHT22 is connected to the matching pin number in your Arduino MKR WiFi 1010 code.
- Pull-up Resistor: If you are using a raw sensor (not a module), double-check that your 10K resistor is correctly placed.
- Library Version: Make sure you installed the "Adafruit Unified Sensor" library alongside the DHT library for your Arduino MKR WiFi 1010.
- Power: While USB is usually enough, ensure your cables are high quality to provide a stable 3.3V or 5V to the sensor.
Challenge Yourself - Creative Customizations
Now that you have your Arduino MKR WiFi 1010 reading data, try these expansion ideas:
Add a Visual Indicator
Connect an RGB LED to your Arduino MKR WiFi 1010. Program it to turn blue when the DHT11 humidity is high and red when the DHT22 temperature rises.
Data Logging with WiFi
Leverage the built-in WiFi of the Arduino MKR WiFi 1010 to post your DHT22 readings to an online dashboard like Thingspeak or Blink.
Max/Min Tracker
Modify the code to have your Arduino MKR WiFi 1010 remember the highest and lowest temperature it has ever seen during its current run!