Arduino MKR WiFi 1010 - MQ3 Alcohol Sensor
This tutorial demonstrates connecting the MQ3 alcohol sensor to Arduino MKR WiFi 1010 for alcohol vapor and ethanol detection. The MQ3 sensor works excellently in breath testing applications, alcohol warning devices, and air monitoring projects.
What you'll learn:
- Connecting the MQ3 alcohol sensor module to Arduino MKR WiFi 1010
- Programming Arduino MKR WiFi 1010 to measure alcohol concentrations
Hardware Preparation
| 1 | × | Arduino MKR WiFi 1010 | |
| 1 | × | Micro USB Cable | |
| 1 | × | MQ3 Alcohol Sensor | |
| 1 | × | Breadboard | |
| 1 | × | Jumper Wires |
Or you can buy the following kits:
| 1 | × | DIYables Sensor Kit (18 sensors/displays) |
Additionally, some of these links are for products from our own brand, DIYables .
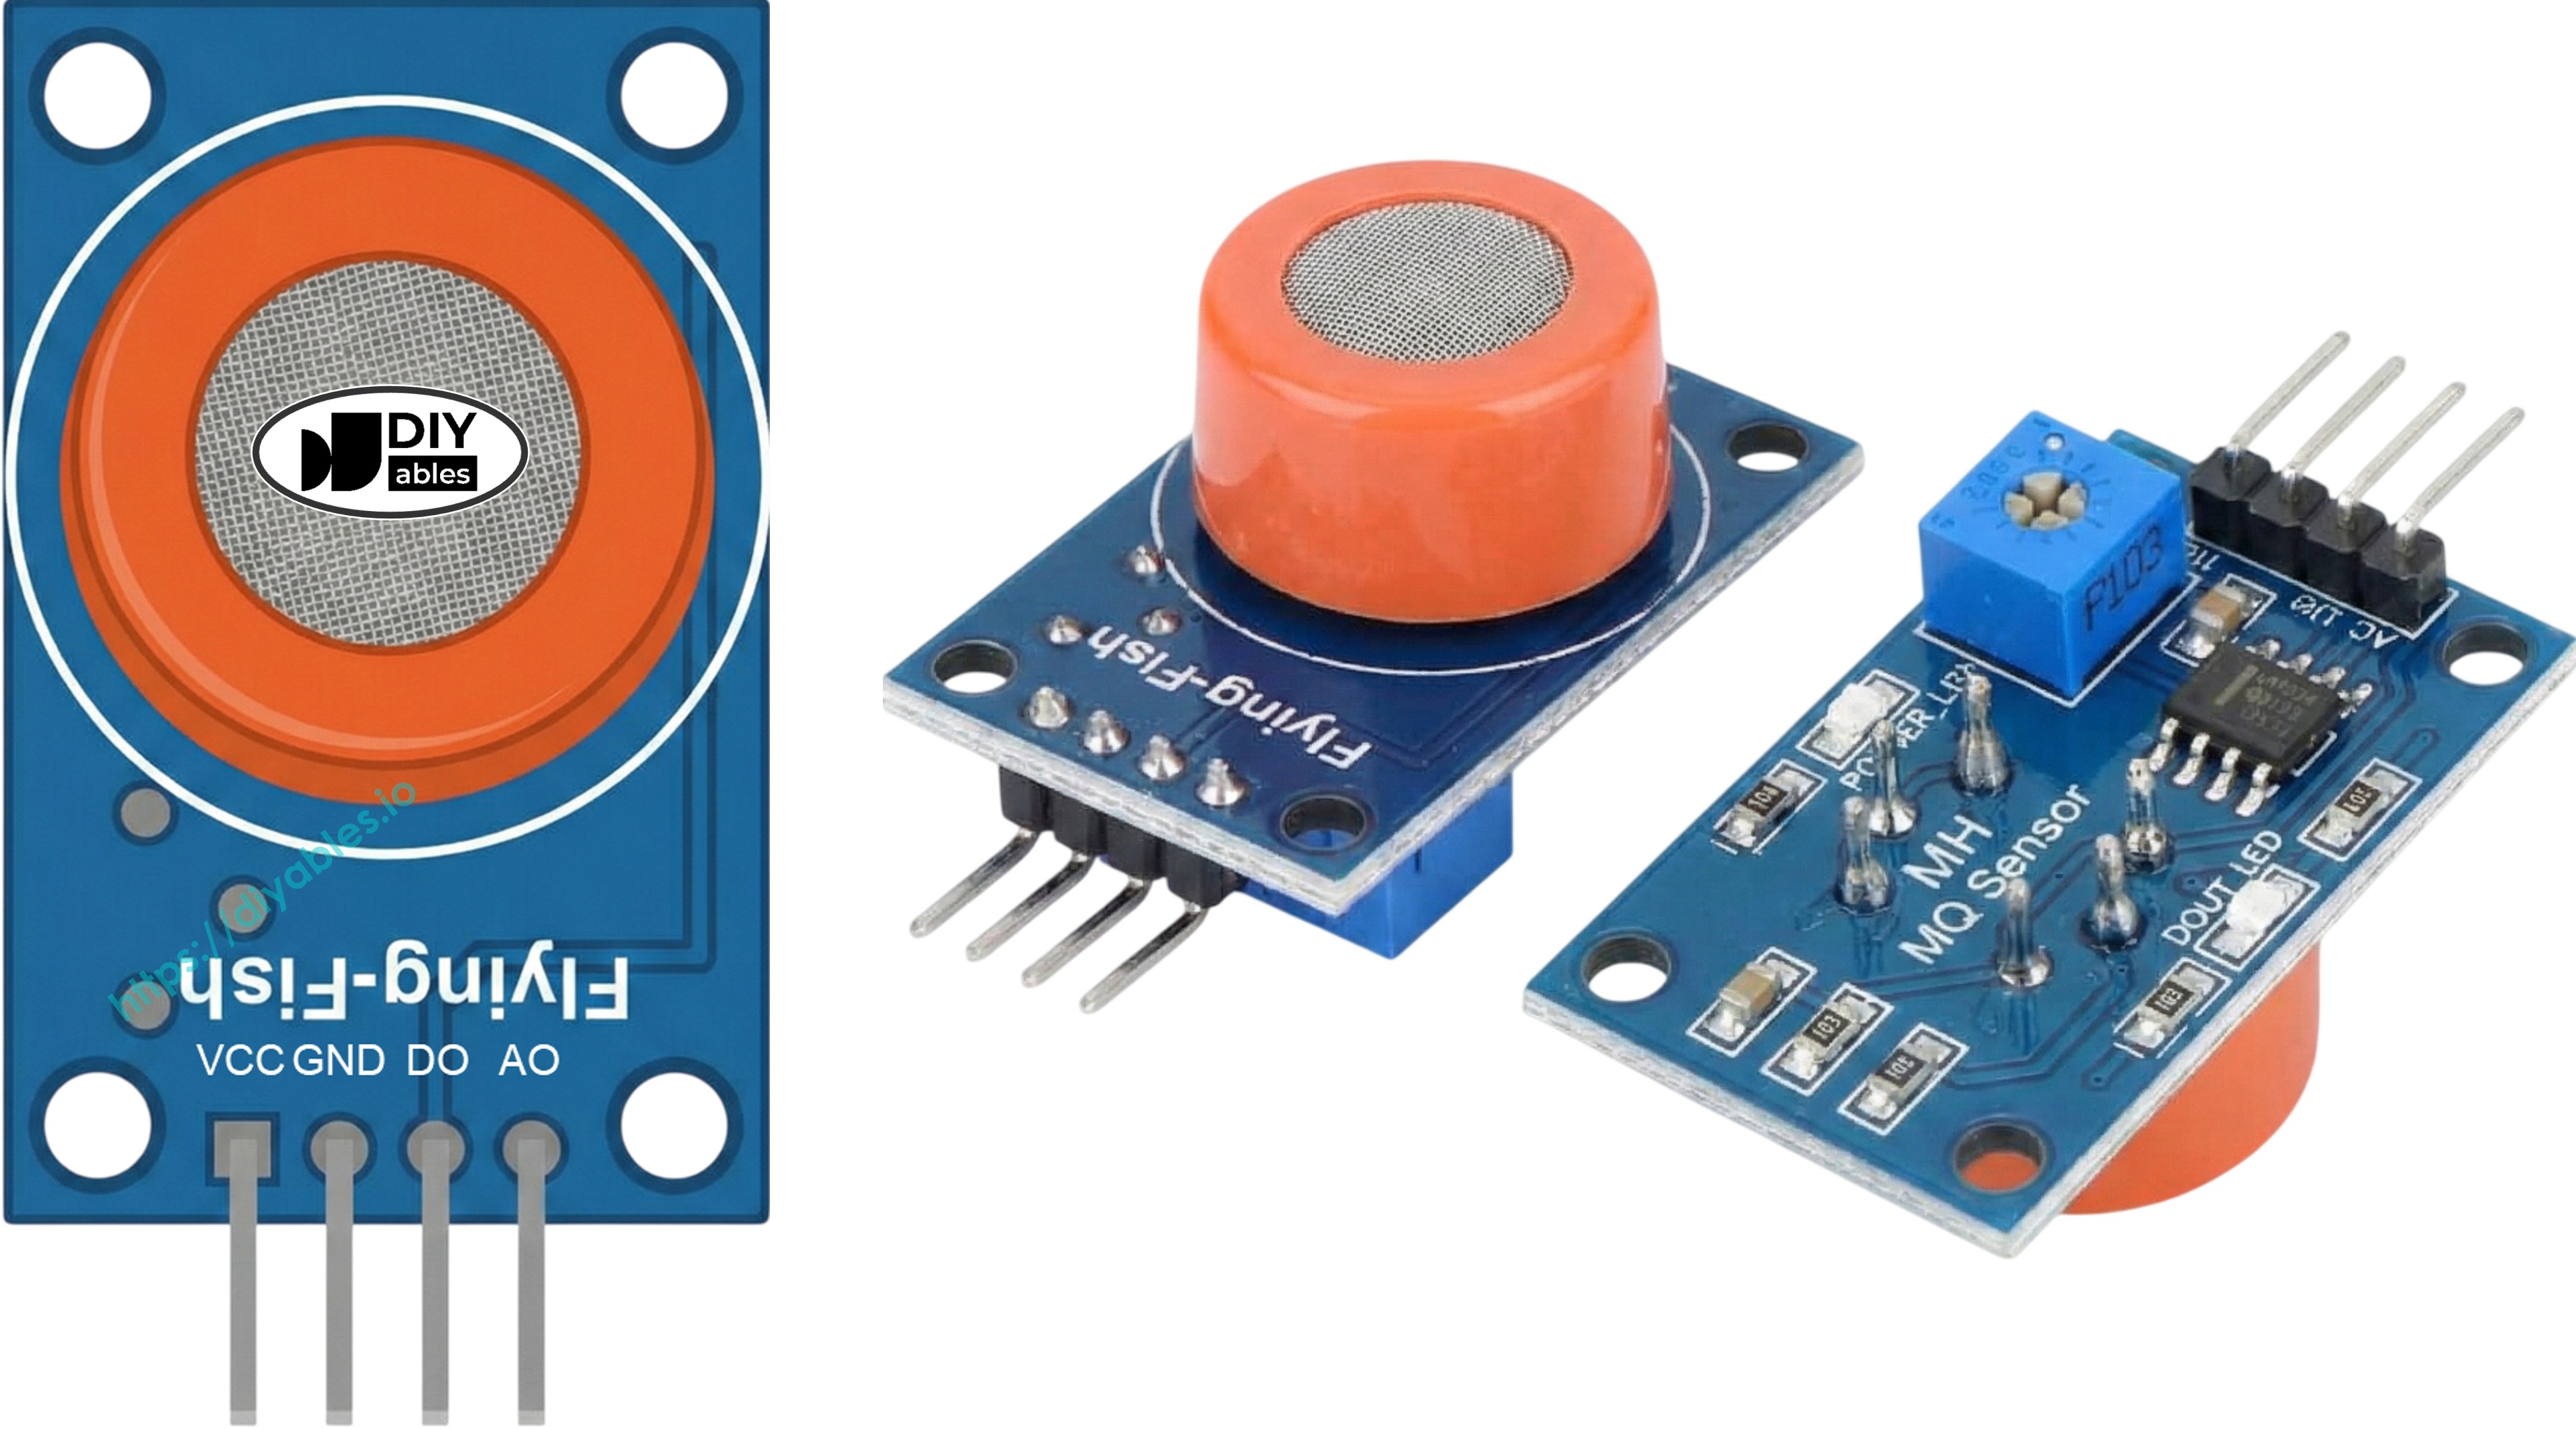
Overview of MQ3 Alcohol Sensor
Working as a Metal Oxide Semiconductor (MOS) Chemiresistor, the MQ3 detects alcohol by tracking resistance shifts in its detection material. This module provides sensitive ethanol vapor detection with stable readings across varied concentration ranges.
The sensor core uses a Tin Dioxide (SnO2) coating on a ceramic Aluminum Oxide base. Heat makes the SnO2 layer responsive to alcohol in the air. A stainless steel protective mesh covers the sensor, protecting the heater while allowing gas penetration to the detection surface.
Typical uses include handmade breathalyzer projects, intoxication detection equipment, alcohol presence alarms, and environmental alcohol tracking.
Technical Specifications
- Operating Voltage: 5V DC
- Load Resistance: 200 KΩ
- Heater Resistance: 33Ω ± 5%
- Heating Consumption: < 800mW
- Sensing Resistance: 1 MΩ – 8 MΩ
- Detection Range: 25 – 500 ppm (parts per million)
- Preheat Time: 24-48 hours for first use
What is ppm? The ppm (parts-per-million) unit expresses gas concentration as a ratio. At 500 ppm, you have 500 alcohol molecules for each 1,000,000 total gas molecules, with 999,500 being other air components.
Pinout
The MQ3 sensor module has four connection pins:
- VCC pin: Provide +5V power.
- GND pin: Connect to ground (0V).
- DO pin: Digital output switches LOW above alcohol threshold, HIGH below. Threshold adjusts via potentiometer.
- AO pin: Analog output voltage corresponds to alcohol level. More alcohol yields higher voltage.
Two LEDs show sensor status:
- PWR-LED: On when power is applied.
- DO-LED: Follows digital output—on for detection, off for no detection.
How It Works
The MQ3 detects alcohol through resistance changes in Tin Dioxide (SnO2):
Clean air conditions: Heated SnO2 binds with oxygen molecules, trapping electrons in a depletion layer. Trapped electrons form a barrier to current flow, keeping resistance high.
Alcohol exposure: Alcohol reacts with surface oxygen, freeing trapped electrons into the tin dioxide. Freed electrons boost conductivity—more alcohol means less resistance.
Two output types are available:
Digital Output (DO pin):
- Adjust threshold via onboard potentiometer.
- Alcohol over threshold sends DO LOW and turns on LED.
- Alcohol under threshold keeps DO HIGH with LED off.
Analog Output (AO pin):
- Voltage rises and falls with alcohol concentration.
- Higher alcohol = higher voltage.
- Lower alcohol = lower voltage.
- Note: Potentiometer only affects digital threshold, not analog voltage.
Warm-up and Calibration
Pre-heating Requirements
MQ3 sensor accuracy depends on proper heating:
- Initial use or storage (30+ days): Provide 24-48 hours continuous heating for sensor stabilization and reliable operation.
- Recent use: Brief 5-10 minute warm-up works fine. Readings may start high but stabilize quickly.
Heat the sensor by powering VCC and GND from 5V and ground—use a power supply or Arduino MKR WiFi 1010's power pins directly.
Finding Your Threshold Values
Gas sensors with heaters can drift when stored. For breathalyzer projects, calibrate thresholds using this method:
- Capture clean air baseline: Run sensor in fresh air and note analog output (usually 100-150).
- Test alcohol vapor: Hold isopropyl alcohol or hand sanitizer near (without touching) sensor, letting vapor reach it. Record higher values (often 400-900 based on vapor strength).
- Define zones: Use your data to set detection levels:
- No detection: Below baseline + 20 (example: < 120)
- Medium detection: Middle range (example: 120-400)
- High detection: Above medium (example: > 400)
Important: Sensors vary unit-to-unit and between environments. Always calibrate your actual hardware before deployment.
Setting the Digital Threshold
Configure DO pin activation using the potentiometer:
- Place alcohol vapor near sensor.
- Rotate potentiometer clockwise until LED comes on.
- Turn slowly counterclockwise until LED just goes off.
- Threshold is set.
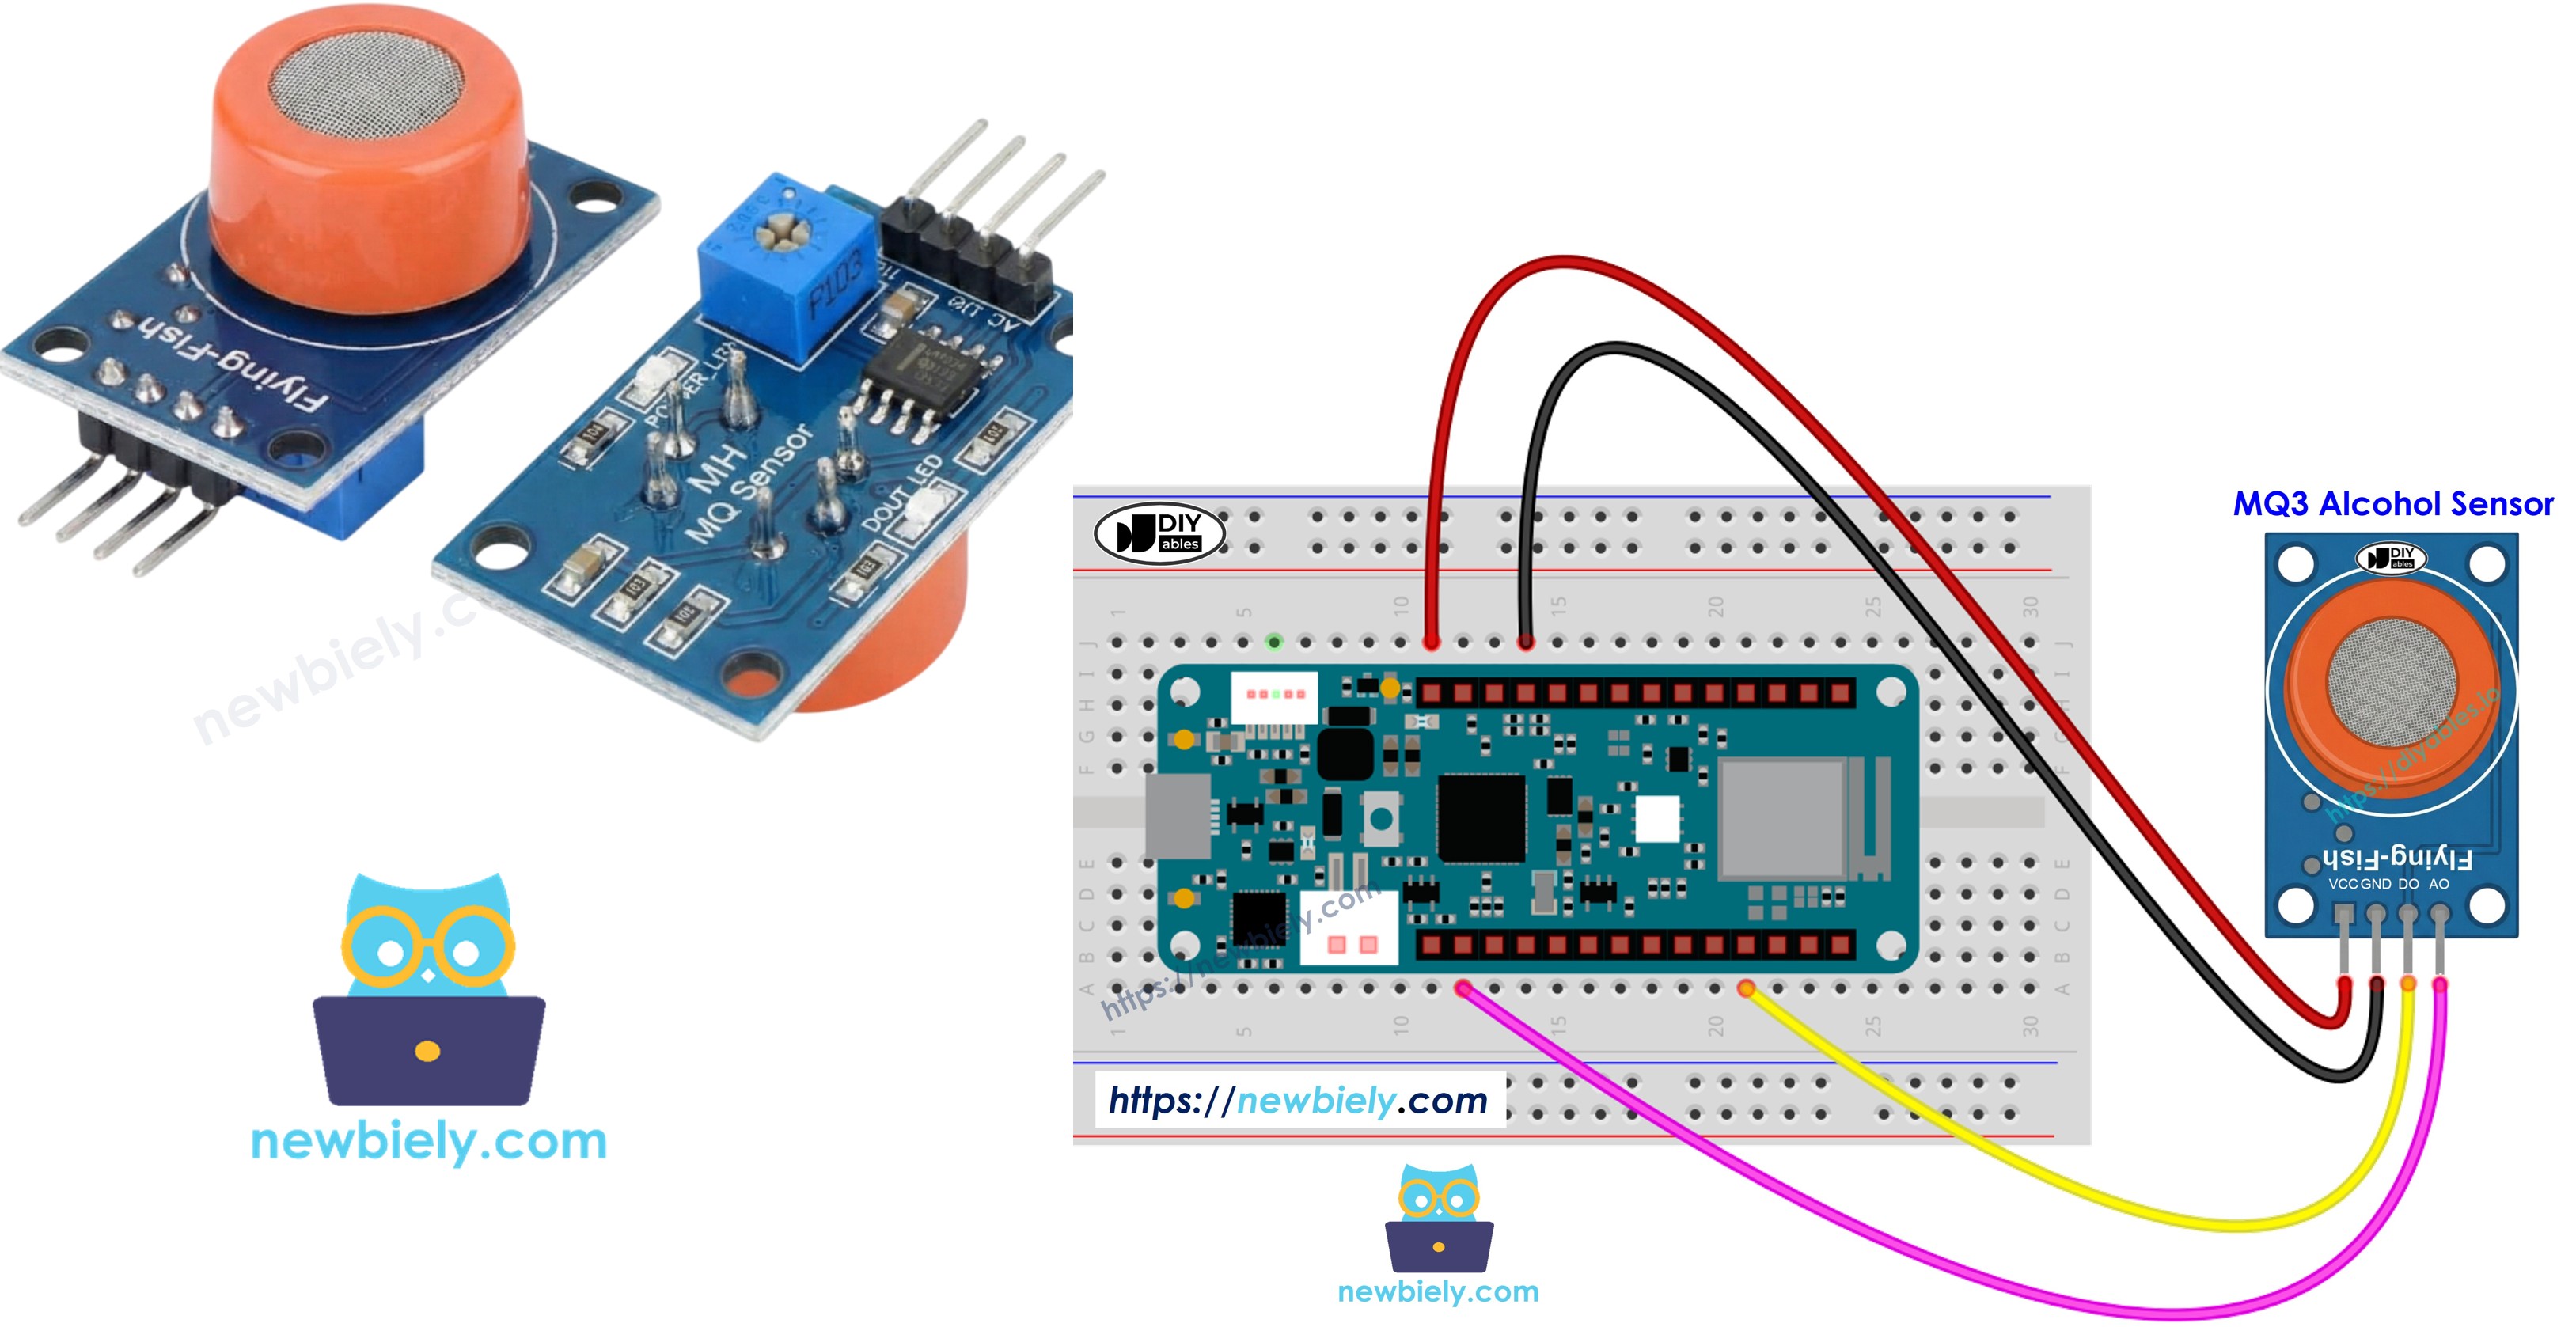
Wiring Diagram
Both outputs are accessible on the MQ3 module. Select one or use both based on application requirements.
| MQ3 Alcohol Sensor | Arduino MKR WiFi 1010 |
|---|---|
| VCC | 5V |
| GND | GND |
| DO | 2 |
| AO | A0 |
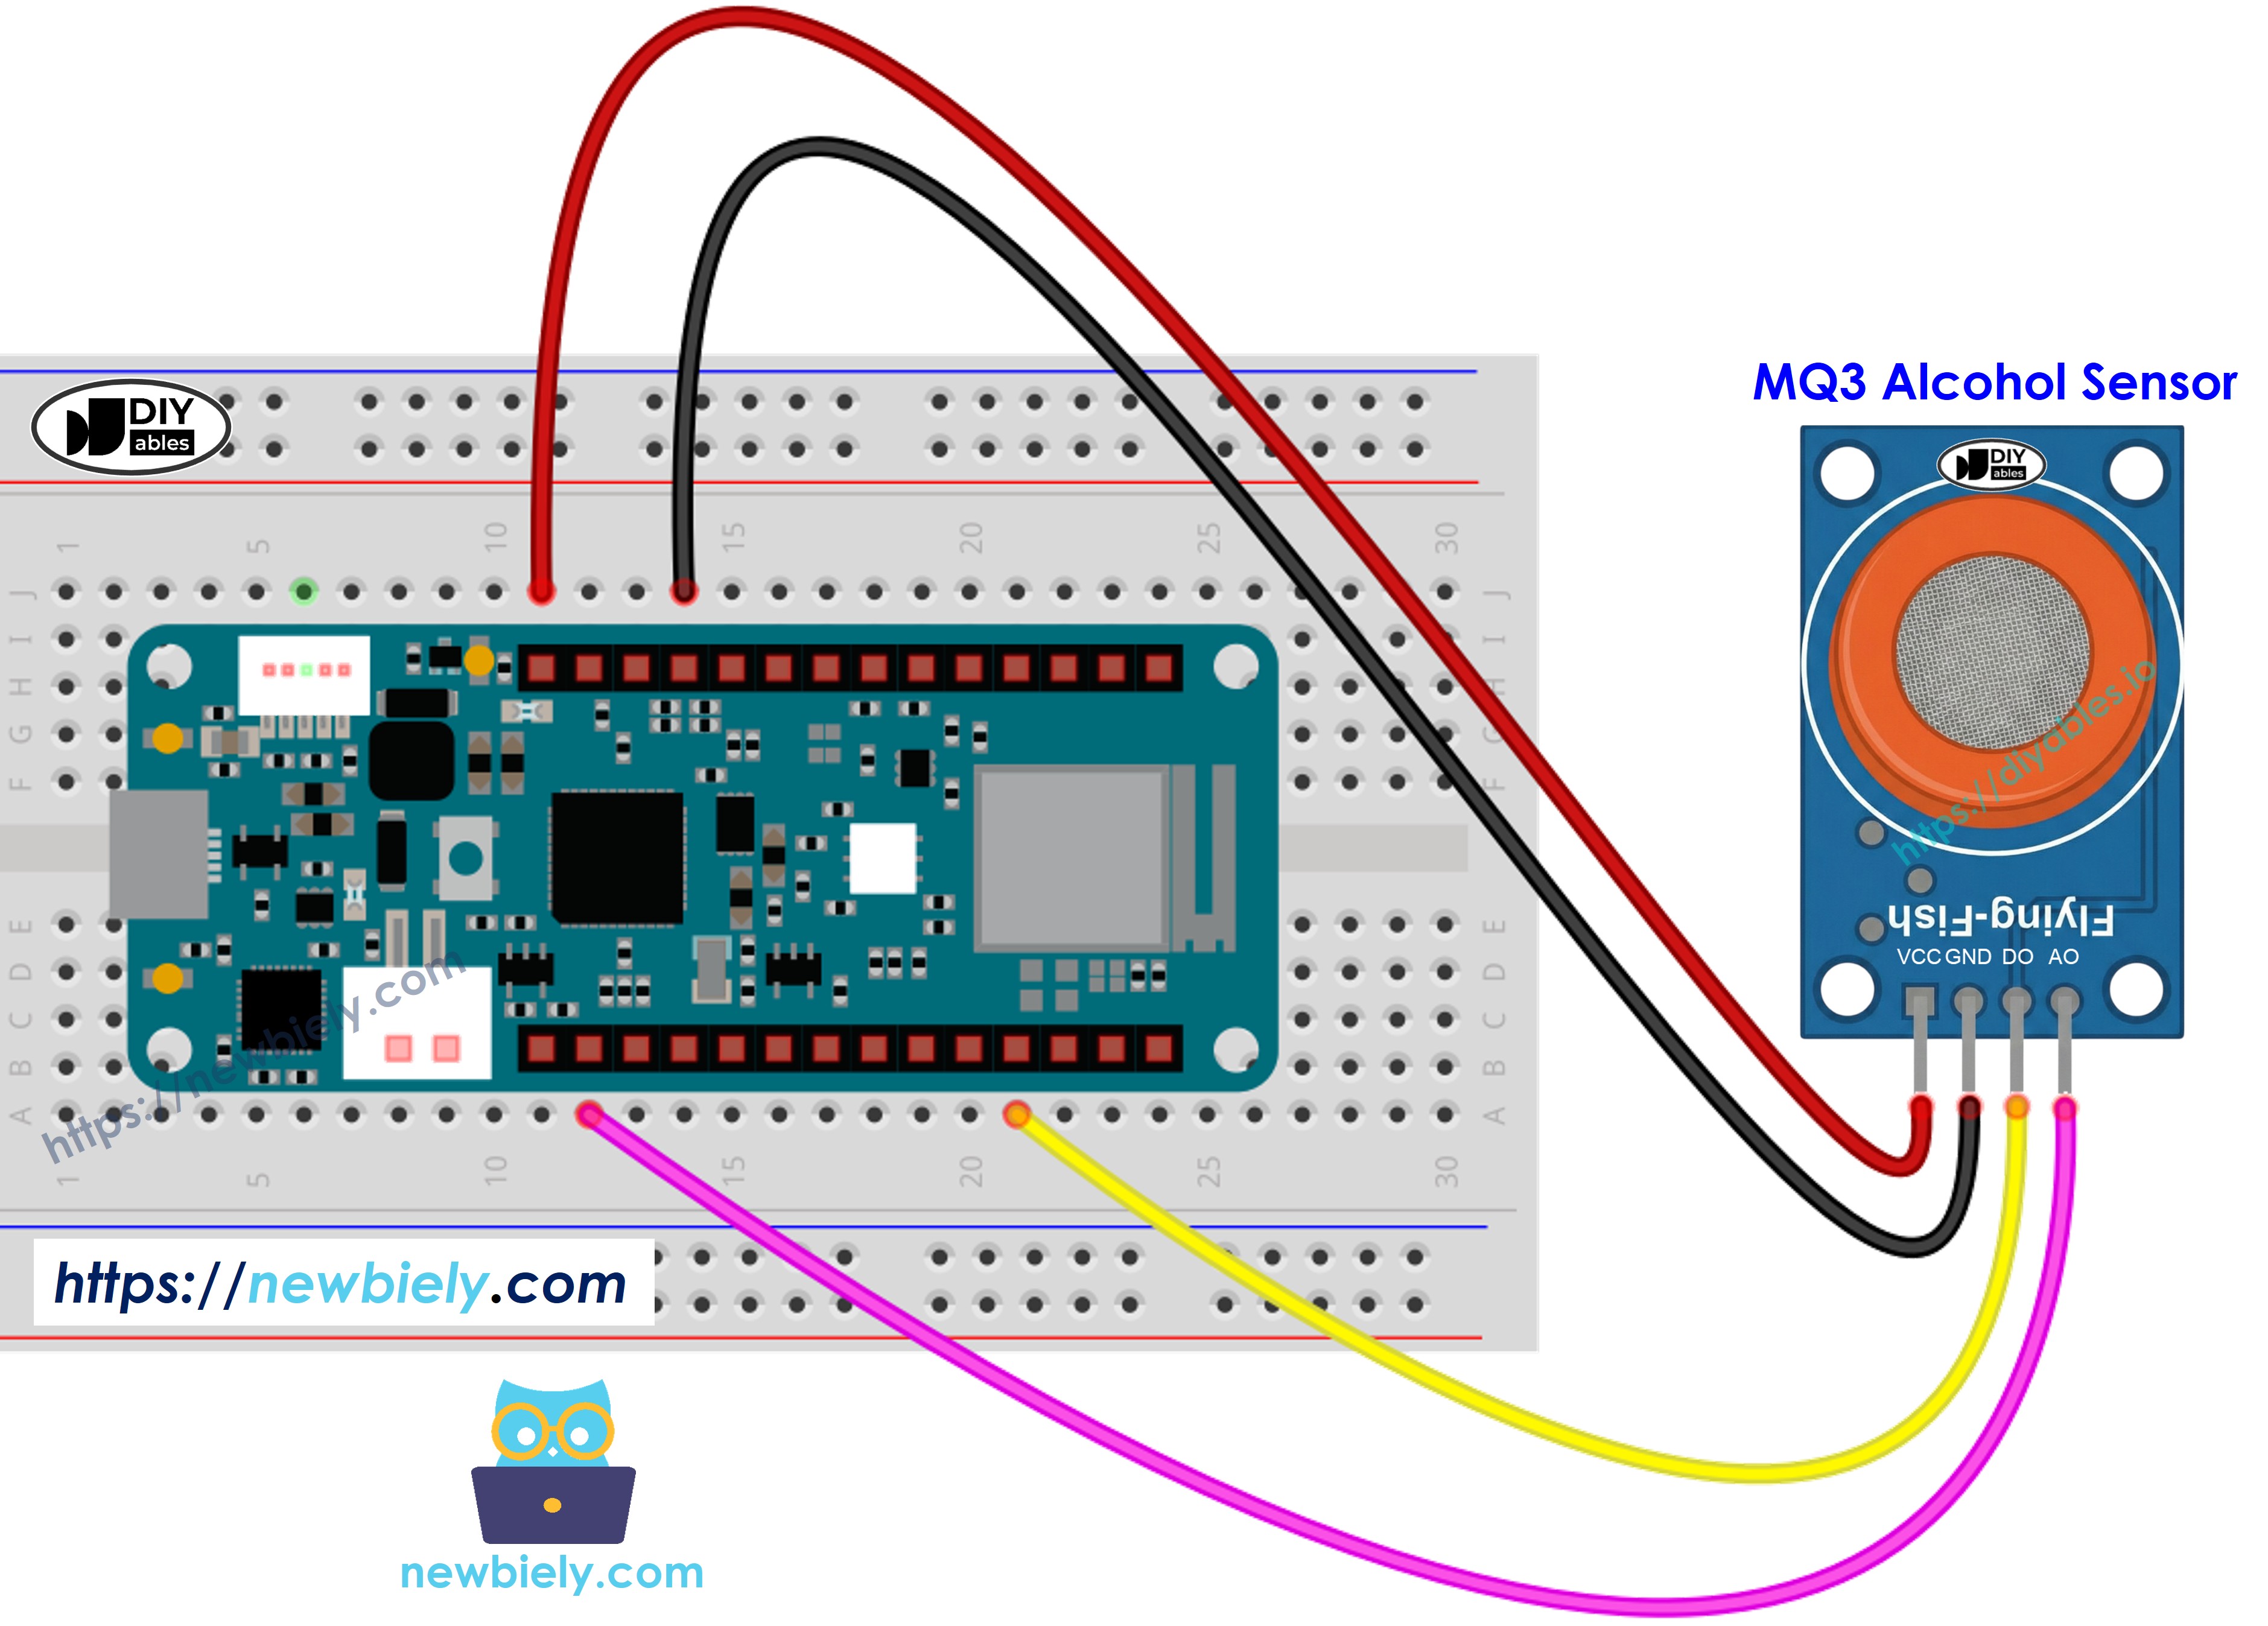
This image is created using Fritzing. Click to enlarge image
Arduino MKR WiFi 1010 Code - Digital Output Reading
Detailed Instructions
- Load the code into Arduino IDE
- Press the Upload button to send code to Arduino MKR WiFi 1010
- Bring alcohol vapor source near sensor (hand sanitizer or rubbing alcohol on cotton)
- View results in Serial Monitor
If detection is incorrect (always detecting or never detecting), adjust the potentiometer for proper sensitivity.
Arduino MKR WiFi 1010 Code - Analog Output Reading
Detailed Instructions
- Open the code in Arduino IDE
- Click Upload to program Arduino MKR WiFi 1010
- Introduce alcohol vapor to sensor (hand sanitizer or isopropyl alcohol)
- Check values in Serial Monitor
Using digital or analog outputs, implement threshold decisions to drive alarms, control indicators, or store breathalyzer data.
Arduino MKR WiFi 1010 Code - Breathalyzer with Threshold Detection
This code shows analog interpretation with calibrated thresholds for assessing consumption levels.
Detailed Instructions
- Must do first: Calibrate using the analog reading code to get proper threshold values for your sensor.
- Change SOBER_THRESHOLD and DRUNK_THRESHOLD in code to your calibrated numbers.
- Upload modified code to Arduino MKR WiFi 1010
- Test with alcohol vapor (isopropyl alcohol or hand sanitizer vapor)
- See status messages in Serial Monitor
Disclaimer: Educational purposes only. Do not use as a legal breathalyzer or for safety decisions.