Arduino MKR WiFi 1010 - Button LED
Welcome to this practical guide on controlling an LED with a button using your Arduino MKR WiFi 1010! Buttons and LEDs are fundamental building blocks for interactive electronics, and understanding their interaction is essential for countless projects—from simple switches to complex user interfaces.
What You'll Build: Two distinct button-LED control patterns:
Use Case 1: Direct Control (Synchronized States)
LED follows button state in real-time
Press button → LED turns ON
Release button → LED turns OFF
Simple and intuitive, like a flashlight button
Perfect for momentary actions
Use Case 2: Toggle Control (Press to Switch)
Each button press toggles LED state
Press once → LED turns ON and stays on
Press again → LED turns OFF and stays off
Releasing the button doesn't affect the LED
Like a light switch in your home
Requires debouncing for reliable operation!
In Use Case 2, we'll demonstrate why debouncing is critical by comparing behavior with and without it. You'll see firsthand how button chattering causes erratic LED behavior, and how debouncing creates a smooth, predictable user experience.
Or you can buy the following kits:
Disclosure: Some of the links provided in this section are Amazon affiliate links. We may receive a commission for any purchases made through these links at no additional cost to you.
Additionally, some of these links are for products from our own brand,
DIYables .
Buy Note: Use the LED Module for easier wiring. It includes an integrated resistor.
This project combines two fundamental components. If you're new to either LEDs or buttons, reviewing these prerequisite tutorials will make this guide much easier to follow:
Essential Background:
Important for Use Case 2:
These tutorials cover:
Component pinouts and electrical characteristics
Proper wiring techniques
Arduino MKR WiFi 1010 programming for each component
Common pitfalls and solutions
Understanding LEDs and buttons individually makes combining them straightforward!
Connect both the button and LED to your Arduino MKR WiFi 1010 as shown. This simple circuit works for both use cases we'll explore.
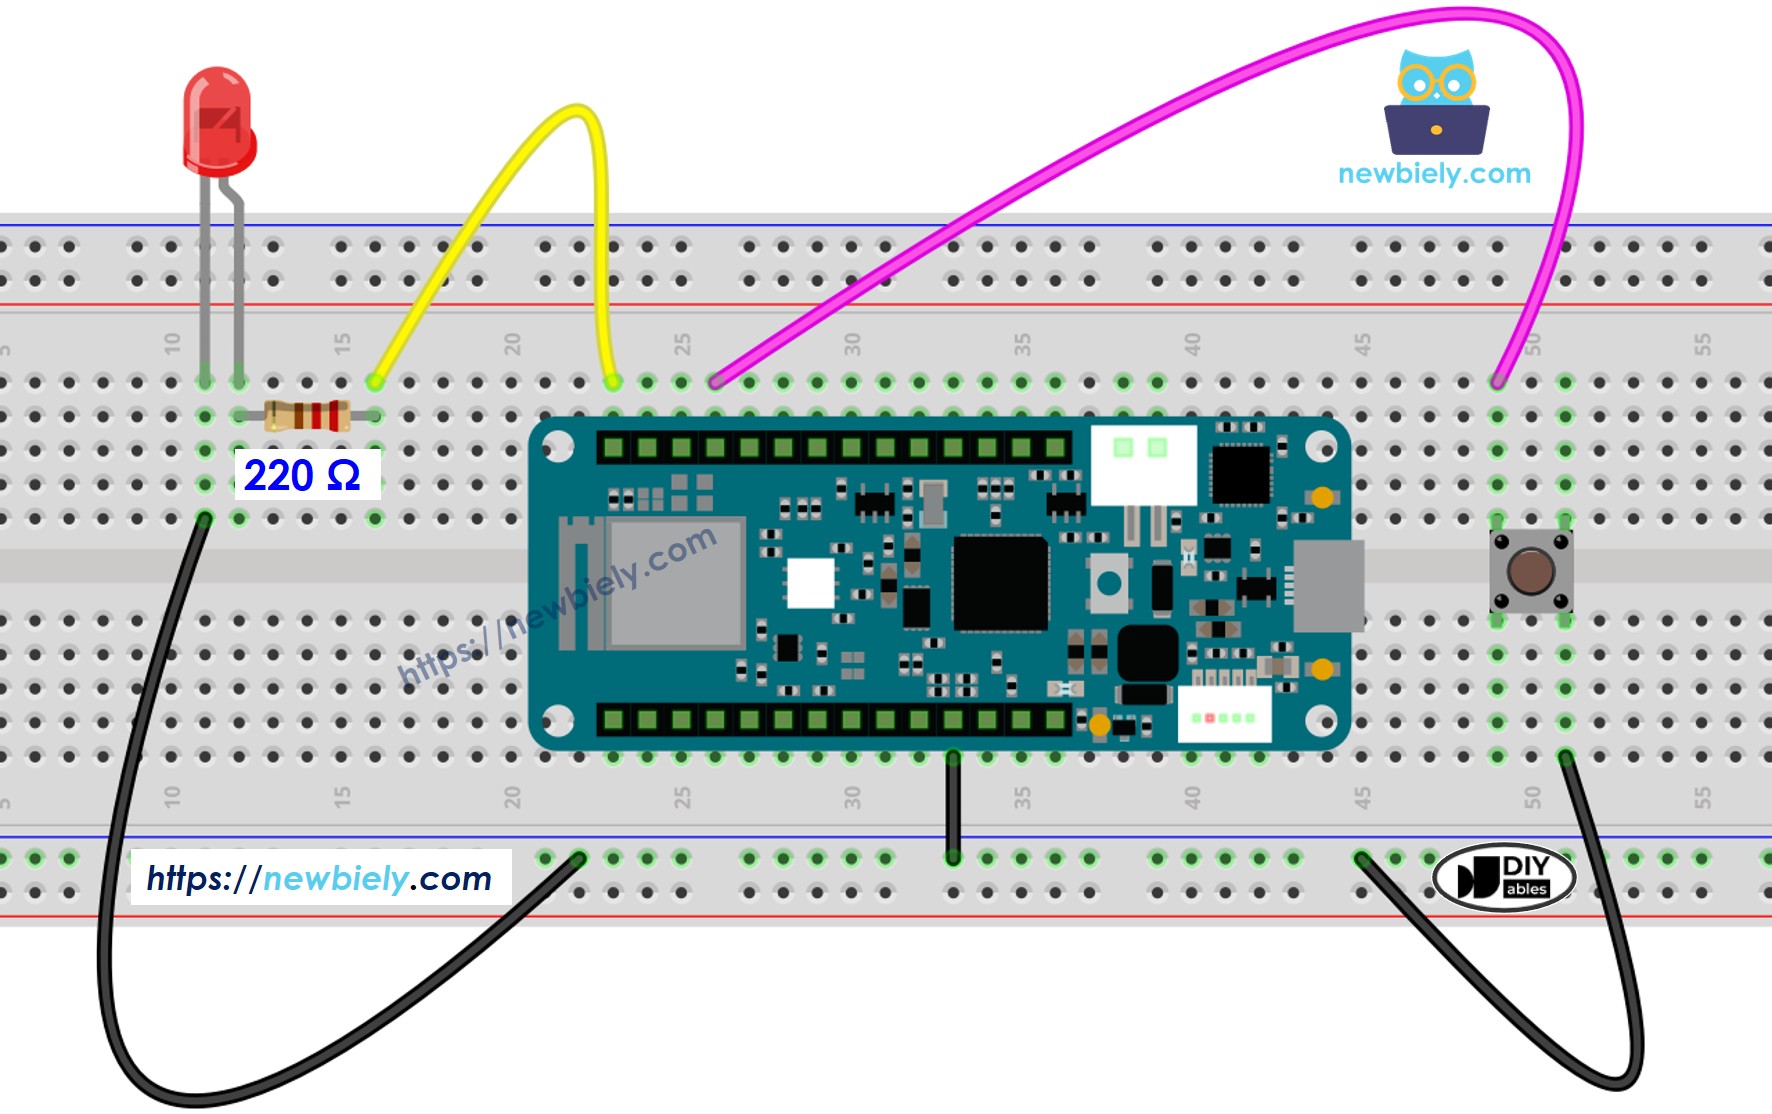
This image is created using Fritzing. Click to enlarge image
Wiring Notes:
Button connects to a digital input pin (with internal pull-up resistor enabled in code)
LED connects through a 220Ω current-limiting resistor to a digital output pin
Common ground connection for both components
This is the simplest form of button-LED control: the LED directly mirrors the button's state in real-time. Think of it like a doorbell button or a flashlight—the LED is on only while you're actively pressing the button.
Behavior:
Button pressed (LOW reading) → LED ON
Button released (HIGH reading) → LED OFF
Instantaneous response
No memory of previous state
const int BUTTON_PIN = 7;
const int LED_PIN = 3;
void setup() {
Serial.begin(9600);
pinMode(BUTTON_PIN, INPUT_PULLUP);
pinMode(LED_PIN, OUTPUT);
}
void loop() {
int buttonState = digitalRead(BUTTON_PIN);
if (buttonState == LOW) {
Serial.println("The button is being pressed");
digitalWrite(LED_PIN, HIGH);
}
else
if (buttonState == HIGH) {
Serial.println("The button is unpressed");
digitalWrite(LED_PIN, LOW);
}
}
New to Arduino MKR WiFi 1010? Complete our Getting Started with Arduino MKR WiFi 1010 tutorial first to set up your development environment.
Connect the components to the Arduino MKR WiFi 1010 board as depicted in the diagram
Plug your Arduino MKR WiFi 1010 into your computer's USB port
Launch the Arduino IDE on your computer
Select the Arduino MKR WiFi 1010 board and its COM port
Copy the code and paste it into the Arduino IDE
Click the Upload button to compile and upload
Press and hold the button for several seconds
Observe the LED behavior
Result: The LED lights up immediately when you press and stays lit while held. Release the button, and the LED turns off instantly. The LED state perfectly tracks the button state with no delay or memory.
Look at the step-by-step explanation in the comments of the code!
This use case implements toggle behavior—each button press switches the LED between ON and OFF states. The LED "remembers" its state, staying in that state until the next button press. This is how most light switches work!
Behavior:
First press → LED turns ON (and stays on)
Second press → LED turns OFF (and stays off)
Third press → LED turns ON again
Releasing the button has no effect
Challenge: To implement this, we must detect button presses (transitions from released to pressed), not just read the current state. And crucially, we must handle button bounce to avoid false triggers.
Let's first see what happens without debouncing:
const int BUTTON_PIN = 7;
const int LED_PIN = 3;
int ledState = LOW;
int lastButtonState;
int currentButtonState;
void setup() {
Serial.begin(9600);
pinMode(BUTTON_PIN, INPUT_PULLUP);
pinMode(LED_PIN, OUTPUT);
currentButtonState = digitalRead(BUTTON_PIN);
}
void loop() {
lastButtonState = currentButtonState;
currentButtonState = digitalRead(BUTTON_PIN);
if(lastButtonState == HIGH && currentButtonState == LOW) {
Serial.println("The button is pressed");
ledState = !ledState;
digitalWrite(LED_PIN, ledState);
}
}
You can find detailed explanations in the code comments above.
Key Programming Concept: The line led_state = !led_state; is a concise way to toggle a boolean value. It's equivalent to this longer code:
if(led_state == LOW)
led_state = HIGH;
else
led_state = LOW;
The ! operator inverts the boolean: LOW becomes HIGH, HIGH becomes LOW. This toggle pattern is extremely common in embedded programming!
New to Arduino MKR WiFi 1010? Complete our Getting Started with Arduino MKR WiFi 1010 tutorial first to set up your development environment.
Connect the components to the Arduino MKR WiFi 1010 board as depicted in the diagram
Plug your Arduino MKR WiFi 1010 into your computer's USB port
Launch the Arduino IDE on your computer
Select the Arduino MKR WiFi 1010 board and its COM port
Copy the code and paste it into the Arduino IDE
Click the Upload button to compile and upload
Press and release the button several times
Carefully observe the LED behavior
What You Might See:
Sometimes one press correctly toggles the LED
Sometimes one press toggles the LED multiple times (flickering or no apparent change)
Sometimes one press doesn't toggle at all
Behavior is inconsistent and unpredictable
Why This Happens: Button chattering! Each time you press, the button bounces multiple times. Without debouncing, each bounce is detected as a separate press, causing multiple toggles. Since toggles happen so fast (milliseconds apart), you might see:
Odd number of bounces → LED appears to toggle normally (luck!)
Even number of bounces → LED returns to original state (no visible change)
Random pattern → Unreliable, frustrating behavior
This unreliable behavior is unacceptable for any real application. The solution? Debouncing!
For a deep dive into why debouncing is necessary, check out this comprehensive guide.
Now let's implement the proper solution using the ezButton library. This library handles all the debouncing complexity for us, providing clean, reliable button press detection.
Why ezButton?
Automatic debouncing built-in
Simple isPressed() method detects state transitions
No manual timing code needed
Proven reliable across thousands of projects
For a detailed explanation of why debouncing is essential, see the Arduino MKR WiFi 1010 - Button Debounce guide.
Here's the clean, reliable code:
#include <ezButton.h>
const int BUTTON_PIN = 7;
const int LED_PIN = 3;
ezButton button(BUTTON_PIN);
int ledState = LOW;
void setup() {
Serial.begin(9600);
pinMode(LED_PIN, OUTPUT);
button.setDebounceTime(50);
}
void loop() {
button.loop();
if(button.isPressed()) {
Serial.println("The button is pressed");
ledState = !ledState;
digitalWrite(LED_PIN, ledState);
}
}
New to Arduino MKR WiFi 1010? Complete our Getting Started with Arduino MKR WiFi 1010 tutorial first to set up your development environment.
Connect the components to the Arduino MKR WiFi 1010 board as depicted in the diagram
Plug your Arduino MKR WiFi 1010 into your computer's USB port
Launch the Arduino IDE on your computer
Select the Arduino MKR WiFi 1010 board and its COM port
Download and install the ezButton library. Follow the instructions at the How To link for help.
Copy the code and open it in the Arduino program.
Click the Upload button in the Arduino program to send the code to the Arduino MKR WiFi 1010.
Press and release the button multiple times
Observe the LED behavior carefully
Result: Perfect, reliable toggling! Each button press produces exactly one LED state change. The LED alternates predictably between ON and OFF with each press, providing the smooth, professional behavior users expect.
The Difference: Compare this to the non-debounced version. With debouncing, you have:
Consistent behavior every single time
One press = one toggle (always!)
Professional-grade user experience
Code that's ready for real applications
This demonstrates why debouncing is not optional for toggle functionality—it's essential for reliable operation!