Arduino MKR WiFi 1010 - SD Card

Arduino MKR WiFi 1010 - SD Card

Need data storage with your Arduino MKR WiFi 1010? In this tutorial, you'll use a Micro SD card module to read and write files with the Arduino MKR WiFi 1010.

What you'll learn (Arduino MKR WiFi 1010 + Micro SD Card):

  • Connecting a Micro SD card module to the Arduino MKR WiFi 1010
  • Programming the Arduino MKR WiFi 1010 to create and open files on SD card
  • Writing data to files on Arduino MKR WiFi 1010 SD card
  • Reading files from SD card with Arduino MKR WiFi 1010
  • Appending and overwriting files on Arduino MKR WiFi 1010

Real-world uses for Arduino MKR WiFi 1010 and Micro SD Card:

  • Data logging (Arduino MKR WiFi 1010 saving sensor data)
  • File storage (Arduino MKR WiFi 1010 for configurations)
  • Media playback (Arduino MKR WiFi 1010 reading audio/files)
  • Offline data collection on Arduino MKR WiFi 1010

You'll see the Arduino MKR WiFi 1010 perform various SD card operations like writing and reading files.

Arduino MKR WiFi 1010 Micro SD Card Module

Hardware Preparation

1×Arduino MKR WiFi 1010
1×Micro USB Cable
1×Micro SD Card
1×Micro SD Card Module
1×Jumper Wires
1×Breadboard
1×Optionally, MicroSD to SD Memory Card Adapter

Or you can buy the following kits:

1×DIYables Sensor Kit (30 sensors/displays)
1×DIYables Sensor Kit (18 sensors/displays)
Disclosure: Some of the links provided in this section are Amazon affiliate links. We may receive a commission for any purchases made through these links at no additional cost to you.
Additionally, some of these links are for products from our own brand, DIYables .

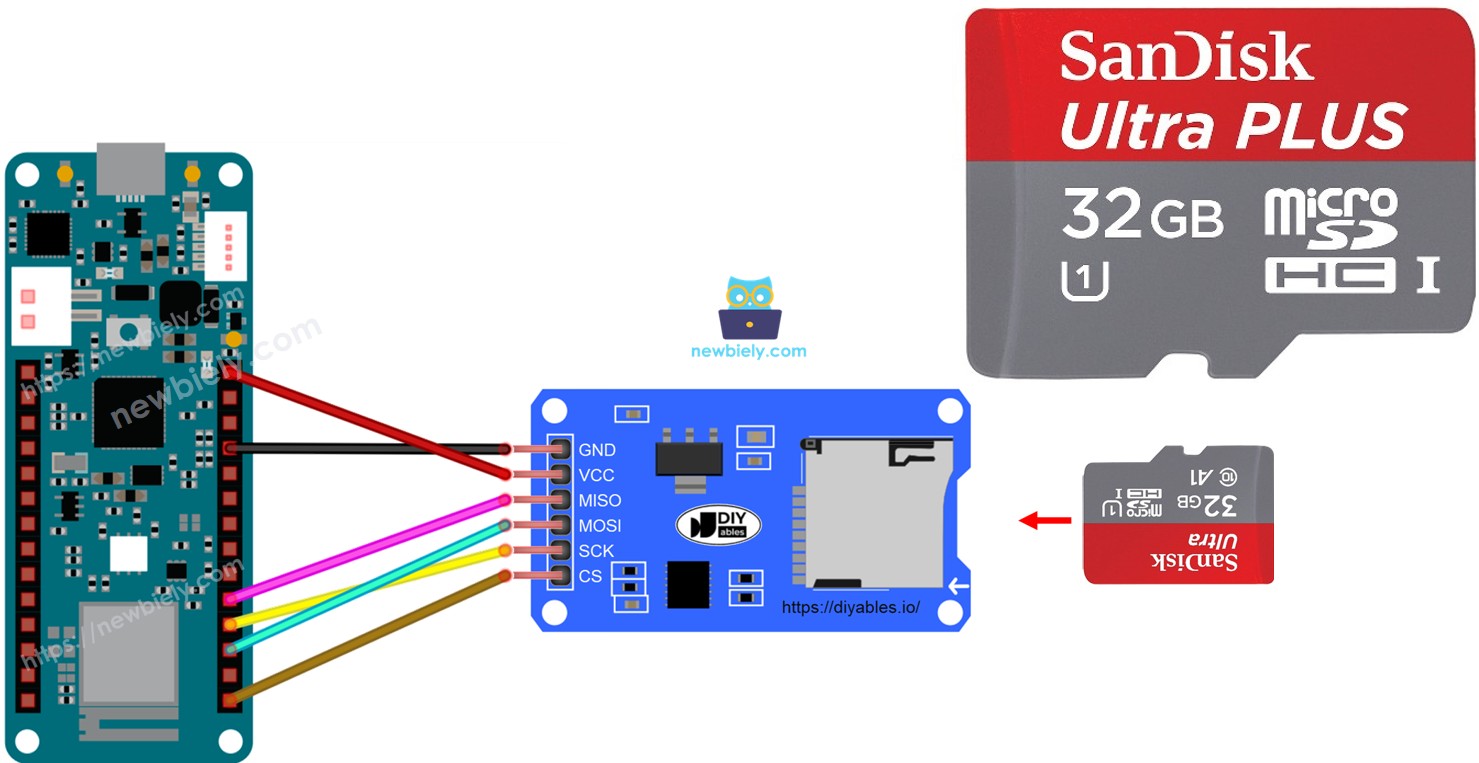
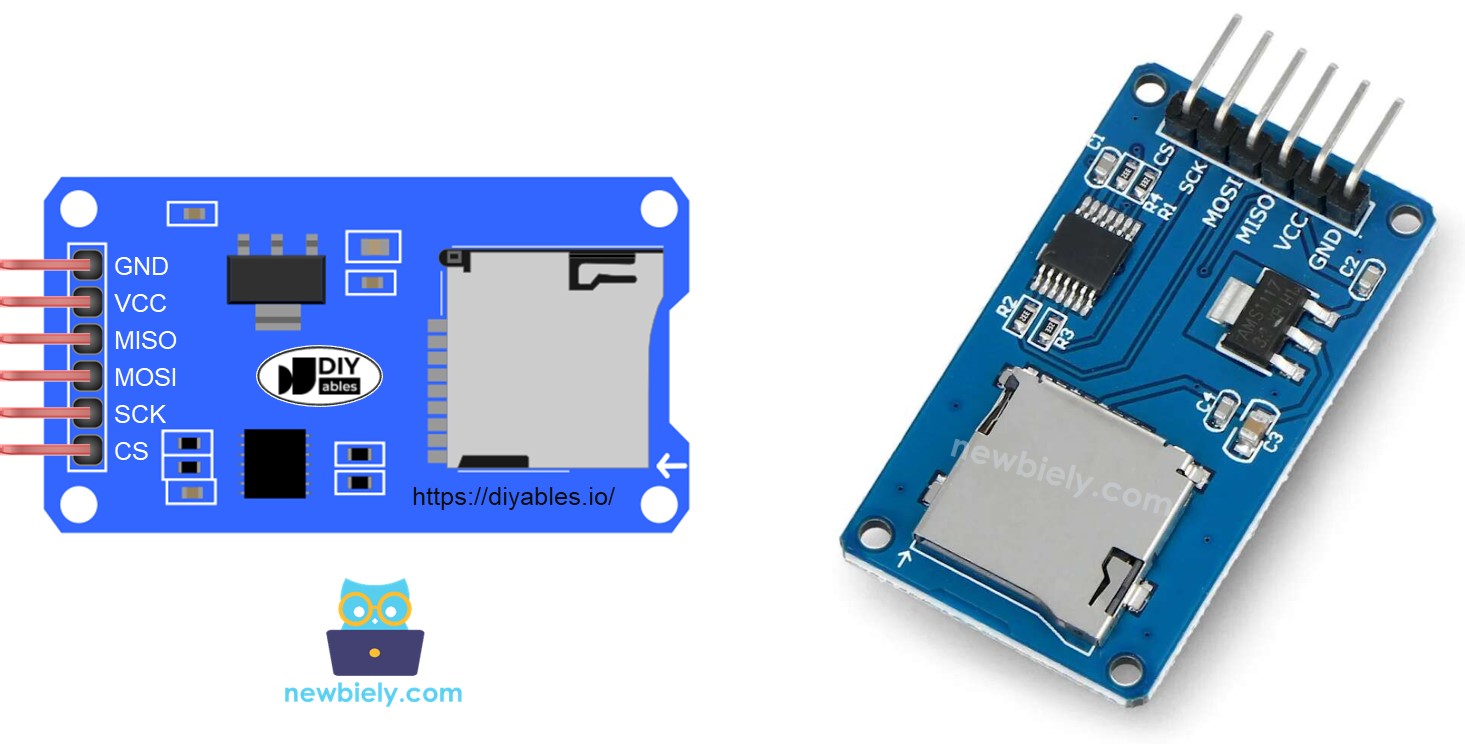
Overview of Micro SD Card Module

The Micro SD Card Module allows the Arduino MKR WiFi 1010 to read and write data to a Micro SD card using SPI communication.

Pinout

The Micro SD card module has these pins:

  • VCC: Power pin (5V)
  • GND: Ground pin
  • MISO: SPI data from SD to Arduino MKR WiFi 1010
  • MOSI: SPI data from Arduino MKR WiFi 1010 to SD
  • SCK: SPI clock pin
  • SS: Slave select pin
Micro SD Card Module Pinout

Preparation

  • Insert the Micro SD card into a USB card reader and connect to your computer.
  • Ensure the Micro SD card is formatted as FAT16 or FAT32.

Wiring Diagram

The wiring diagram between Arduino MKR WiFi 1010 Micro SD Card Module

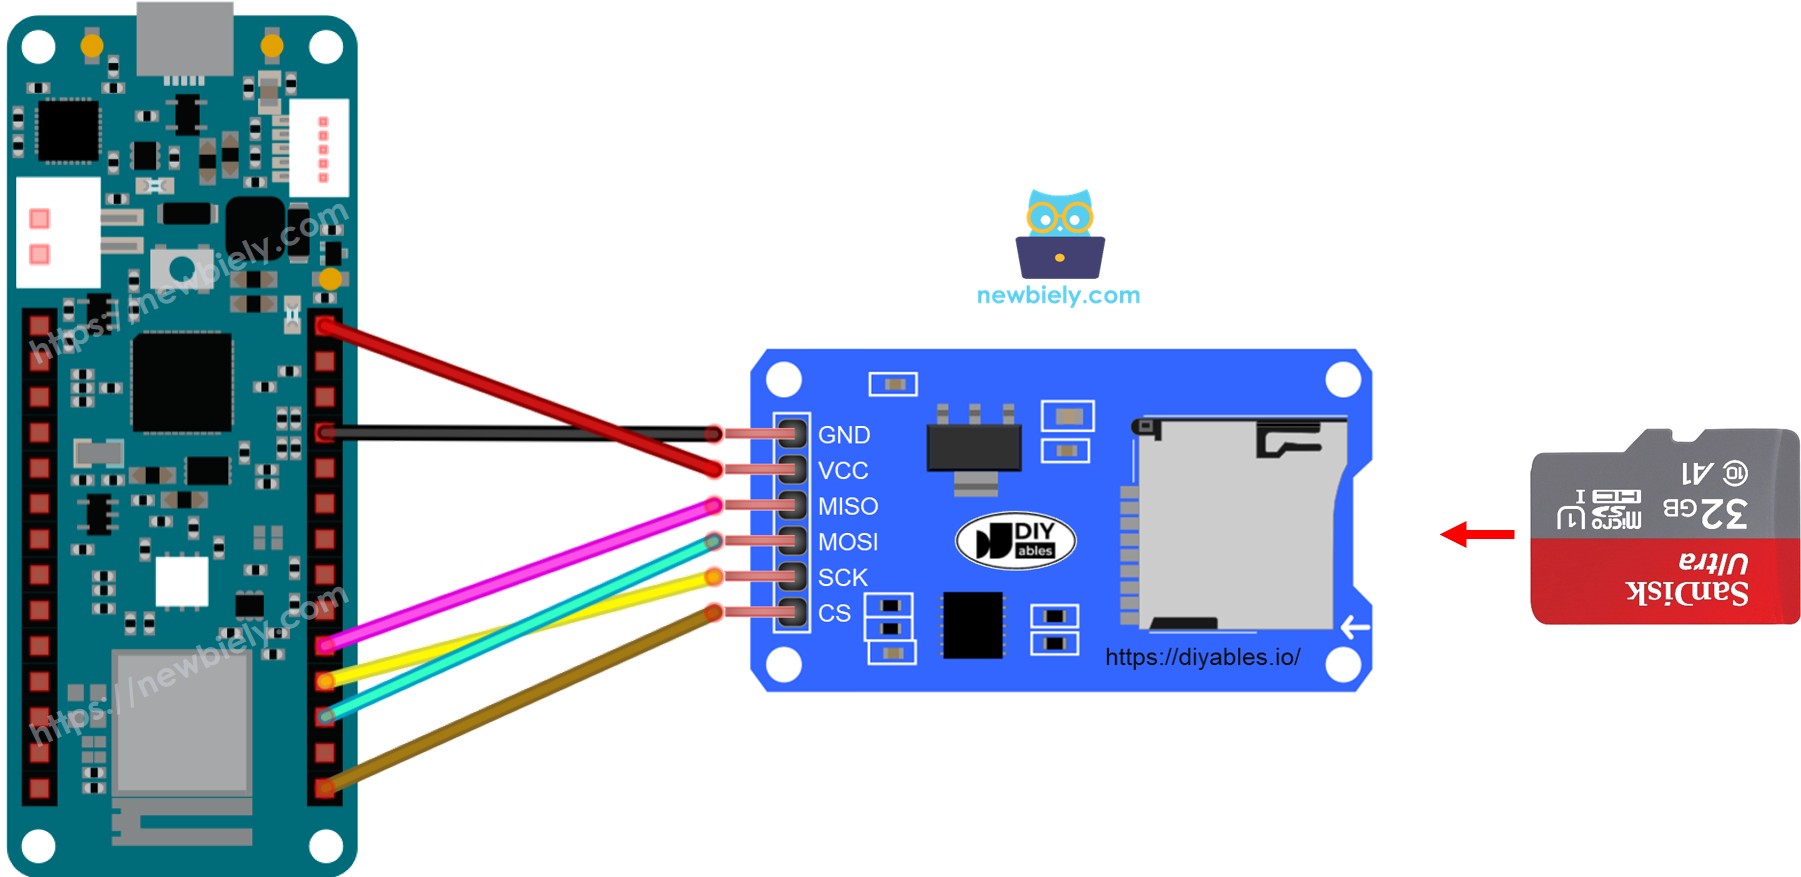
This image is created using Fritzing. Click to enlarge image

Arduino MKR WiFi 1010 - How to open a file on Micro SD Card and create if not existed

Arduino MKR WiFi 1010 Code

/* * This Arduino MKR WiFi 1010 code was developed by newbiely.com * * This Arduino MKR WiFi 1010 code is made available for public use without any restriction * * For comprehensive instructions and wiring diagrams, please visit: * https://newbiely.com/tutorials/arduino-mkr/arduino-mkr-wifi-1010-sd-card */ #include <SD.h> #define PIN_SPI_CS 4 File myFile; void setup() { Serial.begin(9600); if (!SD.begin(PIN_SPI_CS)) { Serial.println(F("SD CARD FAILED, OR NOT PRESENT!")); while (1); // don't do anything more: } Serial.println(F("SD CARD INITIALIZED.")); if (!SD.exists("arduino.txt")) { Serial.println(F("arduino.txt doesn't exist. Creating arduino.txt file...")); // create a new file by opening a new file and immediately close it myFile = SD.open("arduino.txt", FILE_WRITE); myFile.close(); } // recheck if file is created or not if (SD.exists("arduino.txt")) Serial.println(F("arduino.txt exists on SD Card.")); else Serial.println(F("arduino.txt doesn't exist on SD Card.")); } void loop() { }

Detailed Instructions

New to Arduino MKR WiFi 1010? Complete our Getting Started with Arduino MKR WiFi 1010 tutorial first to set up your development environment.

  1. Insert the Micro SD Card into the module.
  2. Connect the module to the Arduino MKR WiFi 1010 as shown in the wiring diagram.
  3. Plug your Arduino MKR WiFi 1010 into your computer's USB port.
  4. Open the Arduino IDE.
  5. Select the Arduino MKR WiFi 1010 board and correct COM port.
  6. Copy the code and paste it into a new sketch.
  7. Click Upload to compile and upload to the Arduino MKR WiFi 1010.
  8. Open the Serial Monitor.
  9. View the SD card operation results.
COM6
Send
SD CARD INITIALIZED. arduino.txt doesn't exist. Creating arduino.txt file... arduino.txt exists on SD Card.
Autoscroll Show timestamp
Clear output
9600 baud  
Newline  
  1. Upload the code again and check the Serial Monitor for the next test results.
COM6
Send
SD CARD INITIALIZED. arduino.txt exists on SD Card.
Autoscroll Show timestamp
Clear output
9600 baud  
Newline  

※ NOTE THAT:

You might not see any output on the Serial Monitor the first time because you uploaded your code before opening it.

  1. Remove the Micro SD Card from the module.
  2. Insert the Micro SD Card into a USB SD Card reader.
  3. Connect the USB SD Card reader to your computer.
  4. Verify that the file was created on the SD card.

Arduino MKR WiFi 1010 - How to write/read data to/from a file on Micro SD Card

This code demonstrates:

  • Writing data to a file on the Micro SD Card
  • Opening the file and reading it character by character
  • Displaying the file contents on the Serial Monitor
/* * This Arduino MKR WiFi 1010 code was developed by newbiely.com * * This Arduino MKR WiFi 1010 code is made available for public use without any restriction * * For comprehensive instructions and wiring diagrams, please visit: * https://newbiely.com/tutorials/arduino-mkr/arduino-mkr-wifi-1010-sd-card */ #include <SD.h> #define PIN_SPI_CS 4 File myFile; void setup() { Serial.begin(9600); if (!SD.begin(PIN_SPI_CS)) { Serial.println(F("SD CARD FAILED, OR NOT PRESENT!")); while (1); // don't do anything more: } Serial.println(F("SD CARD INITIALIZED.")); // open file for writing myFile = SD.open("arduino.txt", FILE_WRITE); if (myFile) { myFile.println("Created by ArduinoGetStarted.com"); // write a line to Arduino myFile.println("Learn Arduino and SD Card"); // write another line to Arduino myFile.close(); } else { Serial.print(F("SD Card: error on opening file arduino.txt")); } // open file for reading myFile = SD.open("arduino.txt", FILE_READ); if (myFile) { while (myFile.available()) { char ch = myFile.read(); // read characters one by one from Micro SD Card Serial.print(ch); // print the character to Serial Monitor } myFile.close(); } else { Serial.print(F("SD Card: error on opening file arduino.txt")); } } void loop() { }

The Serial Monitor displays the file contents:

COM6
Send
Created by newbiely.com Learn Arduino MKR WiFi 1010 and SD Card
Autoscroll Show timestamp
Clear output
9600 baud  
Newline  

※ NOTE THAT:

By default, data is appended to the end of the file. If you restart the Arduino MKR WiFi 1010 with the code above, the text will be added again, and the Serial Monitor will show additional lines:

COM6
Send
Created by newbiely.com Learn Arduino MKR WiFi 1010 and SD Card Created by newbiely.com Learn Arduino MKR WiFi 1010 and SD Card
Autoscroll Show timestamp
Clear output
9600 baud  
Newline  

You can remove the Micro SD Card from the module and view it on your computer using a USB SD Card reader to verify the file contents.

Arduino MKR WiFi 1010 - How to read a file on Micro SD Card line-by-line

/* * This Arduino MKR WiFi 1010 code was developed by newbiely.com * * This Arduino MKR WiFi 1010 code is made available for public use without any restriction * * For comprehensive instructions and wiring diagrams, please visit: * https://newbiely.com/tutorials/arduino-mkr/arduino-mkr-wifi-1010-sd-card */ #include <SD.h> #define PIN_SPI_CS 4 File myFile; void setup() { Serial.begin(9600); if (!SD.begin(PIN_SPI_CS)) { Serial.println(F("SD CARD FAILED, OR NOT PRESENT!")); while (1); // don't do anything more: } Serial.println(F("SD CARD INITIALIZED.")); // open file for writing myFile = SD.open("arduino.txt", FILE_WRITE); if (myFile) { myFile.println("Created by ArduinoGetStarted.com"); // write a line to Arduino myFile.println("Learn Arduino and SD Card"); // write another line to Arduino myFile.close(); } else { Serial.print(F("SD Card: error on opening file arduino.txt")); } // open file for reading myFile = SD.open("arduino.txt", FILE_READ); if (myFile) { int line_count = 0; while (myFile.available()) { char line[100]; // maximum is 100 characters, change it if needed int line_length = myFile.readBytesUntil('\n', line, 100); // read line-by-line from Micro SD Card line_count++; Serial.print(F("Line ")); Serial.print(line_count); Serial.print(F(": ")); Serial.write(line, line_length); // print the character to Serial Monitor // \n character is escaped by readBytesUntil function Serial.write('\n'); // print a new line charactor } myFile.close(); } else { Serial.print(F("SD Card: error on opening file arduino.txt")); } } void loop() { }

The Serial Monitor displays:

COM6
Send
SD CARD INITIALIZED. Line 1: Created by newbiely.com Line 2: Learn Arduino MKR WiFi 1010 and SD Card
Autoscroll Show timestamp
Clear output
9600 baud  
Newline  

※ NOTE THAT:

If you haven't cleared the file contents first, you may see additional lines on the Serial Monitor from previous writes.

Arduino MKR WiFi 1010 - How to overwrite a file on Micro SD Card

Normally, new data is appended to the end of the file. To overwrite a file, the simplest approach is to delete the existing file and create a new one with the same name.

/* * This Arduino MKR WiFi 1010 code was developed by newbiely.com * * This Arduino MKR WiFi 1010 code is made available for public use without any restriction * * For comprehensive instructions and wiring diagrams, please visit: * https://newbiely.com/tutorials/arduino-mkr/arduino-mkr-wifi-1010-sd-card */ #include <SD.h> #define PIN_SPI_CS 4 File myFile; void setup() { Serial.begin(9600); if (!SD.begin(PIN_SPI_CS)) { Serial.println(F("SD CARD FAILED, OR NOT PRESENT!")); while (1); // don't do anything more: } Serial.println(F("SD CARD INITIALIZED.")); SD.remove("arduino.txt"); // delete the file if existed // create new file by opening file for writing myFile = SD.open("arduino.txt", FILE_WRITE); if (myFile) { myFile.println("Created by ArduinoGetStarted.com"); // write a line to Arduino myFile.println("Learn Arduino and SD Card"); // write another line to Arduino myFile.close(); } else { Serial.print(F("SD Card: error on opening file arduino.txt")); } // open file for reading myFile = SD.open("arduino.txt", FILE_READ); if (myFile) { while (myFile.available()) { char ch = myFile.read(); // read characters one by one from Micro SD Card Serial.print(ch); // print the character to Serial Monitor } myFile.close(); } else { Serial.print(F("SD Card: error on opening file arduino.txt")); } } void loop() { }

The Serial Monitor displays:

COM6
Send
SD CARD INITIALIZED. Created by newbiely.com Learn Arduino MKR WiFi 1010 and SD Card
Autoscroll Show timestamp
Clear output
9600 baud  
Newline  
  • Restart the Arduino MKR WiFi 1010 and verify the file content is replaced (not appended) in the Serial Monitor.
  • You can remove the Micro SD Card from the module and view it on your computer using a USB SD Card reader to confirm the file was overwritten.

Troubleshooting

  • SD card not initialized: Check SPI connections and SD card format (FAT16/FAT32).
  • File not found: Ensure file exists or is created; check SD card.
  • No data written: Verify write permissions and SD card space.
  • Garbled data: Check baud rate and Serial Monitor settings.

Challenge Yourself - Creative Customizations

Once SD card works with your Arduino MKR WiFi 1010, try these extensions:

Quick Variations

  • Log sensor data to SD card from Arduino MKR WiFi 1010.
  • Read configuration files from SD card on Arduino MKR WiFi 1010.

Advanced Features to Try

  1. Implement file system navigation on Arduino MKR WiFi 1010.
  2. Compress data before writing to SD card with Arduino MKR WiFi 1010.
  3. Use SD card for firmware updates on Arduino MKR WiFi 1010.
  4. Create a data logger with timestamps using RTC and SD card on Arduino MKR WiFi 1010.

Video Tutorial

Learn More

※ OUR MESSAGES

  • As freelancers, We are AVAILABLE for HIRE. See how to outsource your project to us
  • Please feel free to share the link of this tutorial. However, Please do not use our content on any other websites. We invested a lot of effort and time to create the content, please respect our work!