Arduino MKR WiFi 1010 - Motion Sensor
Detect movement and build smart automation with your Arduino MKR WiFi 1010 and HC-SR501 motion sensor! This tutorial teaches you how to use PIR motion sensors with Arduino MKR WiFi 1010 for security systems, automatic lighting, and presence detection. Learn how to wire the HC-SR501 sensor to your Arduino MKR WiFi 1010, read motion signals, detect when movement starts and stops, and trigger actions based on motion detection. Perfect for building Arduino MKR WiFi 1010 projects like automatic lights, security alarms, and energy-saving systems.
What You'll Learn
- Connecting HC-SR501 motion sensors to your Arduino MKR WiFi 1010
- Reading motion detection signals with Arduino MKR WiFi 1010
- Programming Arduino MKR WiFi 1010 to detect movement start and stop
- Using digital input pins on Arduino MKR WiFi 1010 for motion sensors
- Adjusting HC-SR501 sensitivity for Arduino MKR WiFi 1010 projects
- Building security systems with Arduino MKR WiFi 1010 and motion detection
- Creating automatic lighting with Arduino MKR WiFi 1010 motion sensors
Real-World Applications
- Security alarms: Trigger Arduino MKR WiFi 1010 alarms when motion is detected
- Automatic lighting: Turn lights on with Arduino MKR WiFi 1010 when someone enters
- Energy saving: Arduino MKR WiFi 1010 systems that power off when no motion
- Intruder detection: Monitor spaces with Arduino MKR WiFi 1010 motion alerts
- Smart doors: Automatic door opening using Arduino MKR WiFi 1010 sensors
- Presence counting: Track room occupancy with Arduino MKR WiFi 1010
- Pet monitoring: Detect pet activity with Arduino MKR WiFi 1010 motion sensing
Motion sensors are essential for Arduino MKR WiFi 1010 automation and security projects!
Hardware Preparation
| 1 | × | Arduino MKR WiFi 1010 | |
| 1 | × | Micro USB Cable | |
| 1 | × | HC-SR501 Motion Sensor | |
| 1 | × | Alternatively, AM312 Mini Motion Sensor | |
| 1 | × | Breadboard | |
| 1 | × | Jumper Wires | |
| 1 | × | Optionally, DC Power Jack |
Or you can buy the following kits:
| 1 | × | DIYables Sensor Kit (18 sensors/displays) |
Additionally, some of these links are for products from our own brand, DIYables .
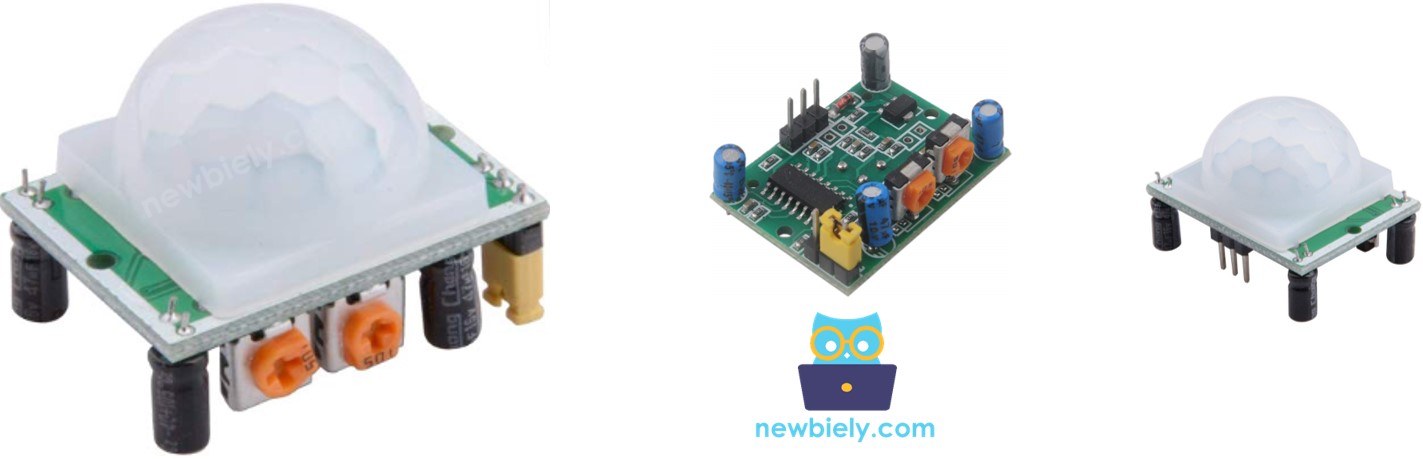
Overview of HC-SR501 Motion Sensor
The HC-SR501 is a PIR (Passive Infrared) motion sensor that detects movement by sensing changes in infrared radiation. It's commonly used in automatic lighting, security systems, and presence detection applications.
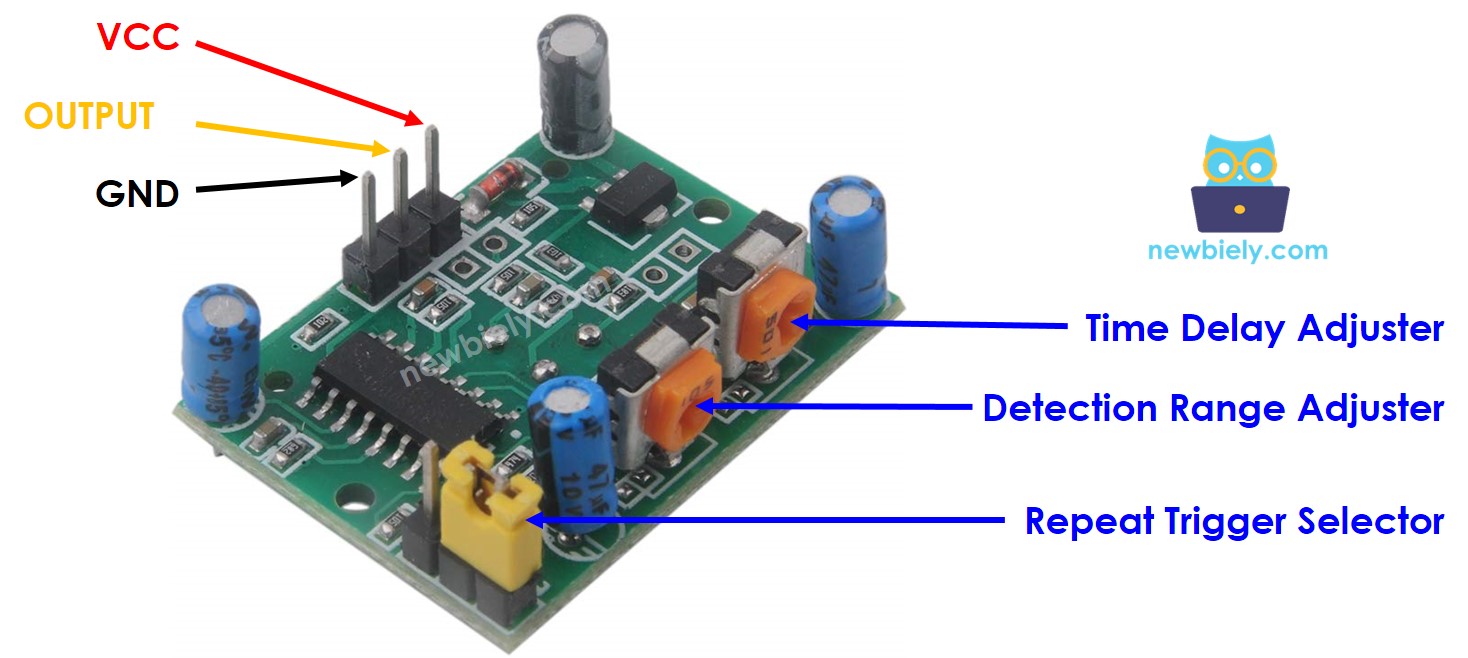
HC-SR501 Motion Sensor Pinout
The HC-SR501 has three pins:
- VCC pin: Connect to 5V power supply
- GND pin: Connect to ground (0V)
- OUTPUT pin: Connect to any digital input pin on your Arduino MKR WiFi 1010
- LOW when no motion detected
- HIGH when motion detected
- The object emits infrared radiation (body heat)
- The object is moving or changing position
- A person standing completely still won't be detected (no movement)
- A cold robot moving won't be detected (no heat signature)
- A moving person or animal will be detected (both heat and movement)
The sensor also features two adjustment potentiometers and a jumper for configuring sensitivity and timing. See the Advanced Uses section for detailed adjustment instructions.
How HC-SR501 Motion Sensor Works
The HC-SR501 detects motion by sensing changes in infrared (heat) radiation. For successful detection, two conditions must be met:
This means:
Important Note: The sensor detects movement, not specifically humans. When motion is detected, we infer human presence. This can lead to false negatives when people are present but stationary. However, the sensor's affordability and reliability make it excellent for most applications where occasional false negatives are acceptable.
Arduino MKR WiFi 1010 and HC-SR501 Motion Sensor
Reading the motion sensor with your Arduino MKR WiFi 1010 is simple! Configure a digital input pin, connect it to the sensor's OUTPUT pin, and use digitalRead() to check for HIGH (motion detected) or LOW (no motion) states.
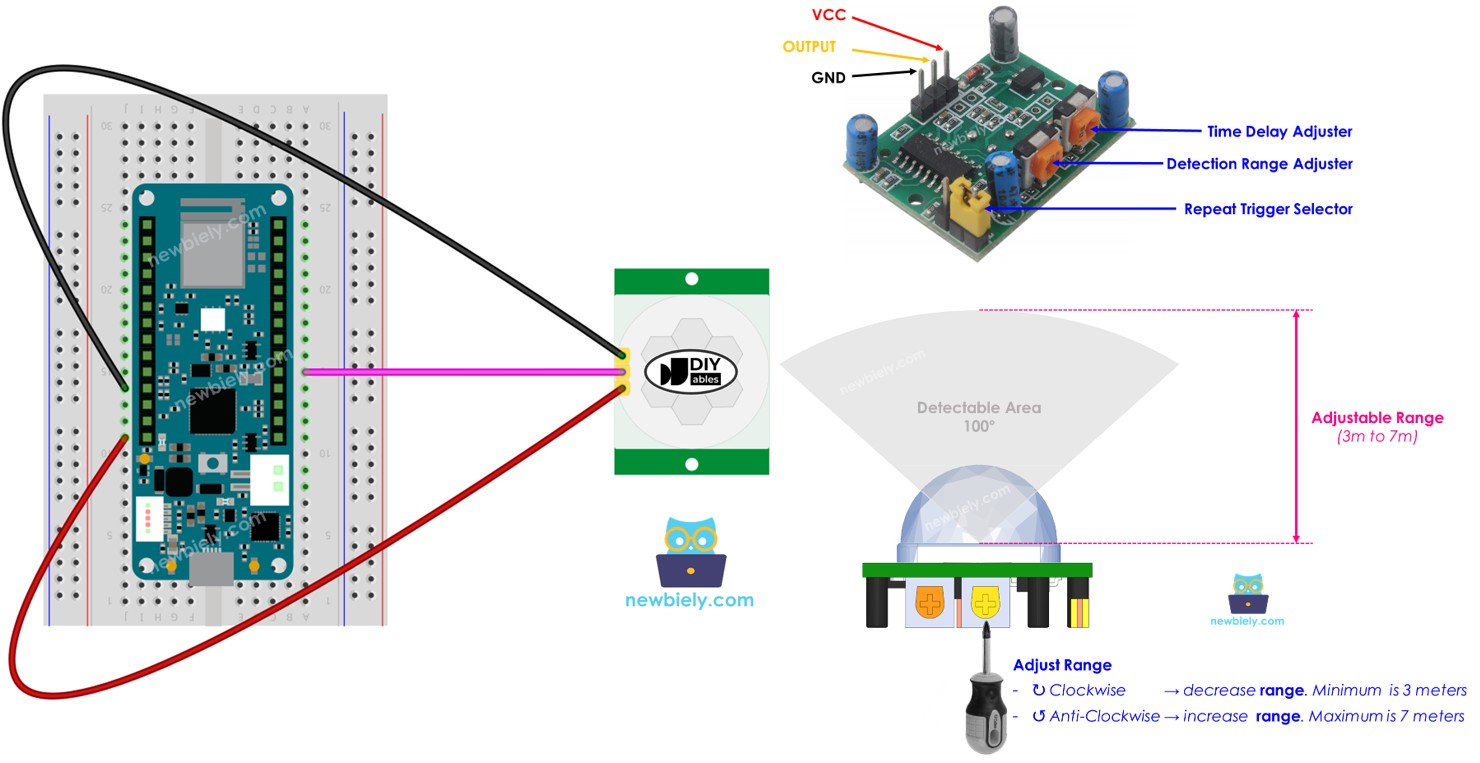
Wiring Diagram - Two Power Options
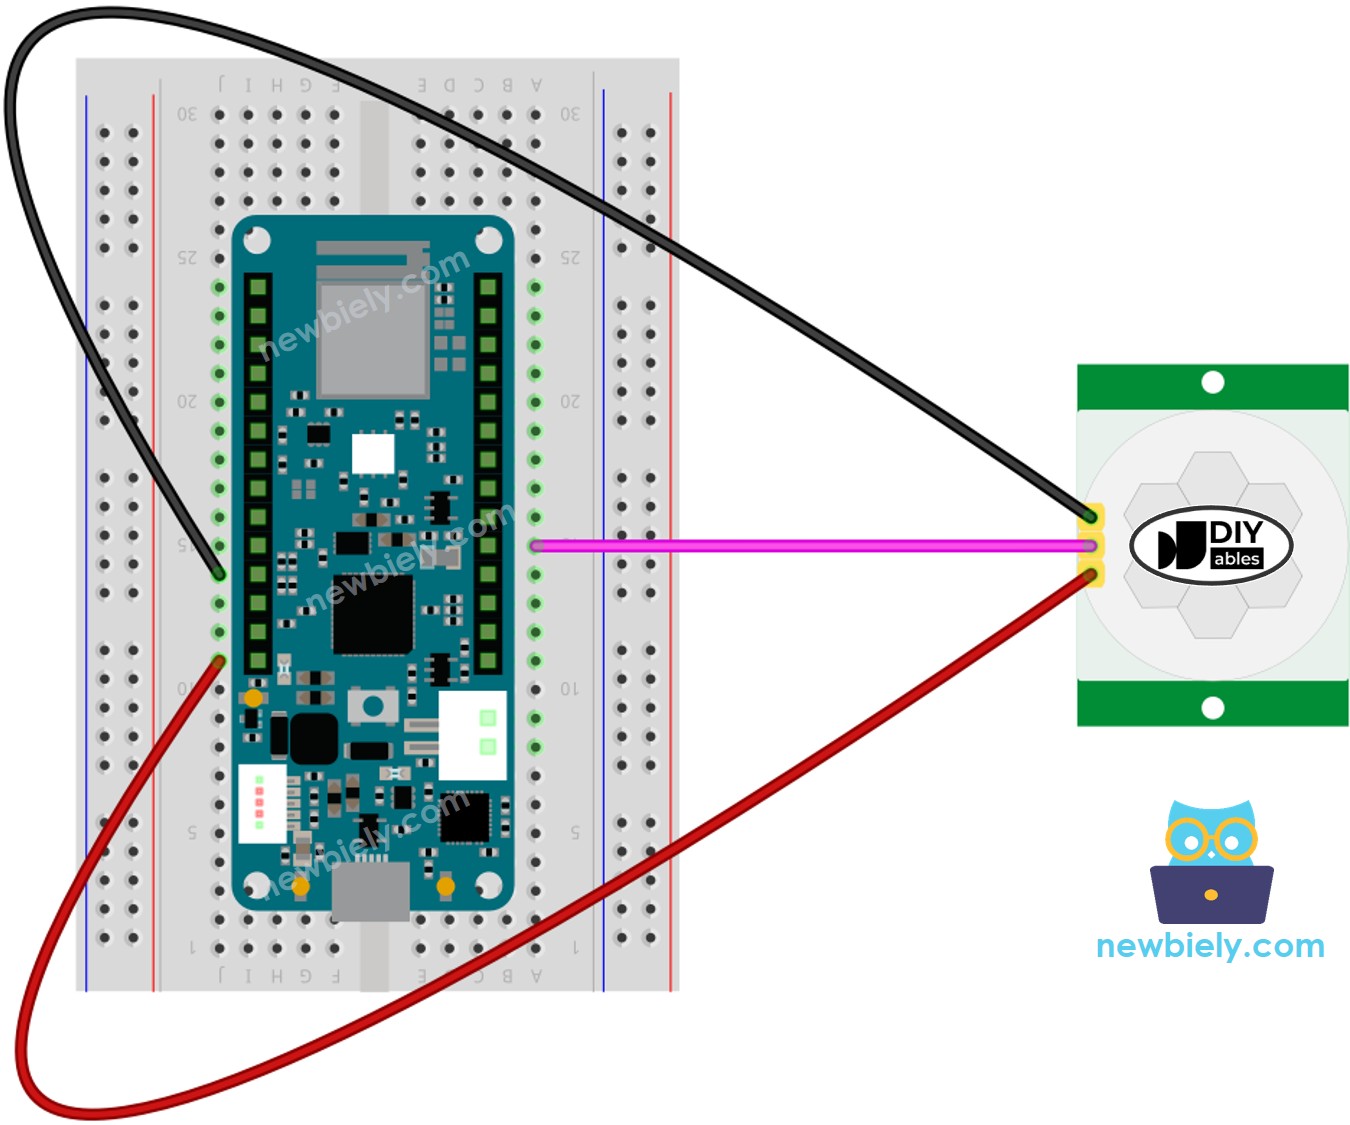
This image is created using Fritzing. Click to enlarge image
Wiring Table
| HC-SR501 Motion Sensor | Arduino MKR WiFi 1010 |
|---|---|
| VCC | 5V |
| GND | GND |
| OUTPUT | D18 |
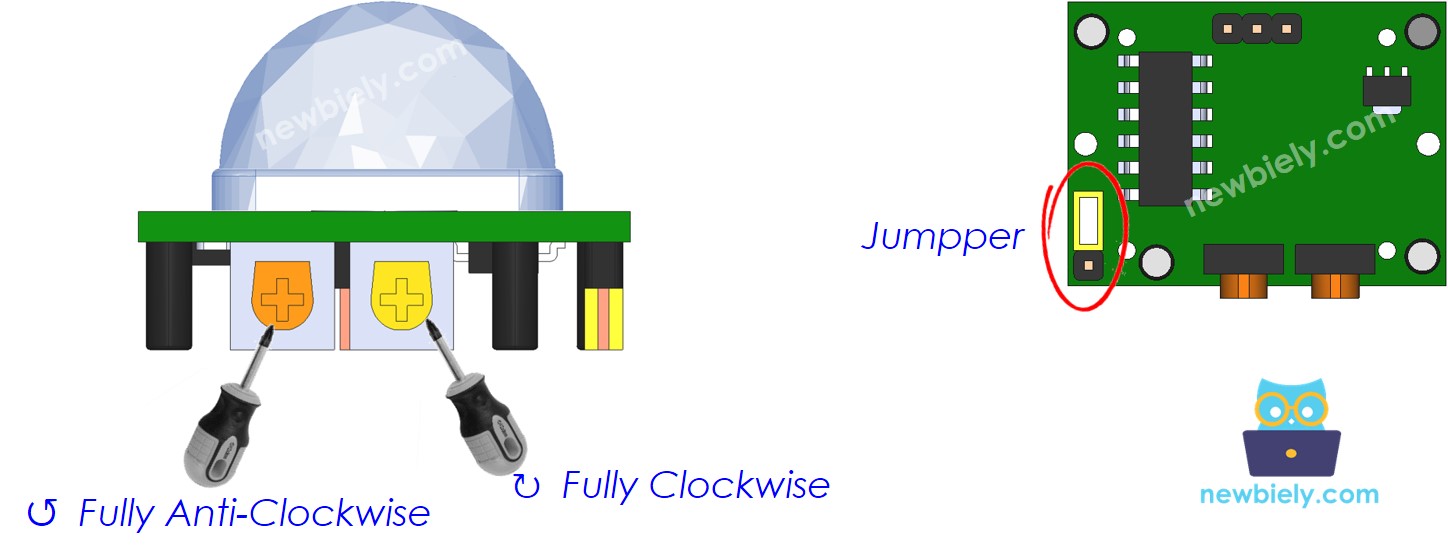
Initial Setting
| Detection Range Adjuster | Fully screw it in the clockwise direction. |
| Time Delay Adjuster | Fully screw it in the anti-clockwise direction. |
| Repeat Trigger Selector | Put jumper like the below image. |
How To Program Motion Sensor
- Set one of the pins on your Arduino MKR WiFi 1010 board as a digital input using the pinMode() function.
- Check the sensor's OUTPUT pin using the digitalRead() function.
- Detect when movement starts (when the pin changes from off to on)
- Detect when movement stops (when the pin changes from HIGH to LOW)
Arduino MKR WiFi 1010 Code
Detailed Instructions
New to Arduino MKR WiFi 1010? Complete our Getting Started with Arduino MKR WiFi 1010 tutorial first to set up your development environment.
- Wire the components according to the diagram above
- Connect the Arduino MKR WiFi 1010 to your computer via USB cable
- Open Arduino IDE and select the correct board and COM port
- Copy the code and upload it to your board
- Open the Serial Monitor

- Wave your hand in front of the motion sensor
- View motion detection results on the Serial Monitor:
Challenge Yourself
Ready to take your motion sensing skills further? Try these exciting projects:
- Automatic Room Lights: Make LEDs or relays turn lights on when motion is detected and off after no motion for 30 seconds
- Security Alarm System: Trigger a buzzer and send WiFi alerts when motion is detected in restricted areas
- People Counter: Count how many times people enter/exit a room using motion detection timing
- Smart Fan Controller: Automatically turn on a fan when someone enters and turn it off when they leave
- Multi-Zone Detection: Use multiple motion sensors to track movement through different rooms
- Pet Activity Monitor: Log your pet's activity patterns throughout the day using motion detection
- Energy-Saving System: Build a comprehensive system that controls lights, fans, and displays based on presence detection