Arduino MKR WiFi 1010 - Getting Started
Welcome to the world of Arduino MKR WiFi 1010 development! This comprehensive getting-started guide walks you through everything needed to begin programming your Arduino MKR WiFi 1010, from downloading software to uploading your first program.
The Arduino MKR WiFi 1010 combines powerful WiFi connectivity with the simplicity of Arduino programming, making it perfect for IoT projects, wireless sensors, and connected devices. Whether you're new to Arduino MKR WiFi 1010 or transitioning from other boards, this guide ensures you'll be creating projects within minutes.
What You'll Accomplish:
- Installing Arduino IDE for Arduino MKR WiFi 1010 development
- Configuring Arduino IDE to recognize Arduino MKR WiFi 1010
- Understanding the Arduino MKR WiFi 1010 programming workflow
- Connecting your Arduino MKR WiFi 1010 to your computer
- Uploading your first program to Arduino MKR WiFi 1010
- Troubleshooting common Arduino MKR WiFi 1010 setup issues
- Navigating the Arduino MKR WiFi 1010 development environment
Why Arduino MKR WiFi 1010?
- Built-in WiFi: Arduino MKR WiFi 1010 includes WiFiNINA module for wireless connectivity
- 3.3V Logic: Arduino MKR WiFi 1010 works directly with modern sensors (no level shifting)
- Compact: Arduino MKR WiFi 1010's small form factor fits anywhere
- Powerful: SAMD21 32-bit ARM processor on Arduino MKR WiFi 1010
- Beginner-friendly: Arduino MKR WiFi 1010 uses familiar Arduino programming
- IoT-ready: Arduino MKR WiFi 1010 perfect for cloud-connected projects
After This Tutorial: You'll have a fully configured Arduino MKR WiFi 1010 development environment and understand the complete workflow from writing code to seeing results. Ready to start your Arduino MKR WiFi 1010 journey? Let's begin!
Understanding the Arduino MKR WiFi 1010 Programming Process
Programming the Arduino MKR WiFi 1010 involves three steps that the Arduino IDE handles automatically:
Step 1: Writing Code - You write human-readable instructions (called a "sketch") in the Arduino programming language. The Arduino MKR WiFi 1010 uses a simplified version of C/C++ that's easy to learn.
Step 2: Compiling - The Arduino IDE translates your sketch into machine code (binary) that the Arduino MKR WiFi 1010's processor understands. This process checks for errors in your code.
Step 3: Uploading - The Arduino IDE transfers the compiled program to your Arduino MKR WiFi 1010's flash memory via USB, where it runs immediately and automatically on every power-up.
Don't worry if this sounds complex! The Arduino IDE combines all three steps into a single "Upload" button click. You write code, click Upload, and watch your Arduino MKR WiFi 1010 come to life!
Step 1: Download and Install Arduino IDE
The Arduino IDE (Integrated Development Environment) is free software that runs on Windows, Mac, and Linux. It's your primary tool for Arduino MKR WiFi 1010 development.
Download Arduino IDE:
- Visit the official Arduino website: https://www.arduino.cc/en/Main/Software
- Choose your operating system:
- Windows: Download Windows installer (recommended) or ZIP file
- Mac OS X: Download .dmg file
- Linux: Download appropriate package (AppImage, ZIP, or use package manager)
- Windows Installation:
- Run the downloaded installer
- Accept the license agreement
- Choose "Install Everything" (drivers, shortcuts, file associations)
- Click Install and wait for completion
- Arduino IDE will install USB drivers for Arduino MKR WiFi 1010 automatically
- Mac Installation:
- Open the .dmg file
- Drag Arduino icon to Applications folder
- First launch: Right-click Arduino > Open (to bypass security warning)
- Mac will recognize Arduino MKR WiFi 1010 automatically
- Linux Installation:
- Extract downloaded archive
- Run ./install.sh from terminal
- Add your user to dialout group for USB access:
- Log out and back in for changes to take effect
Verify Installation: Launch Arduino IDE - you should see a blank sketch with setup() and loop() functions. Arduino MKR WiFi 1010 programming starts here!
Step 2: Install Arduino MKR WiFi 1010 Board Support
The Arduino IDE needs additional files to work with Arduino MKR WiFi 1010. This process takes 2-3 minutes.
Install Board Package:
- Launch Arduino IDE on your computer
- Open Board Manager:
- Click the Board Manager icon on the left sidebar (looks like a chip/circuit board)
- Alternative: Menu > Tools > Board > Boards Manager
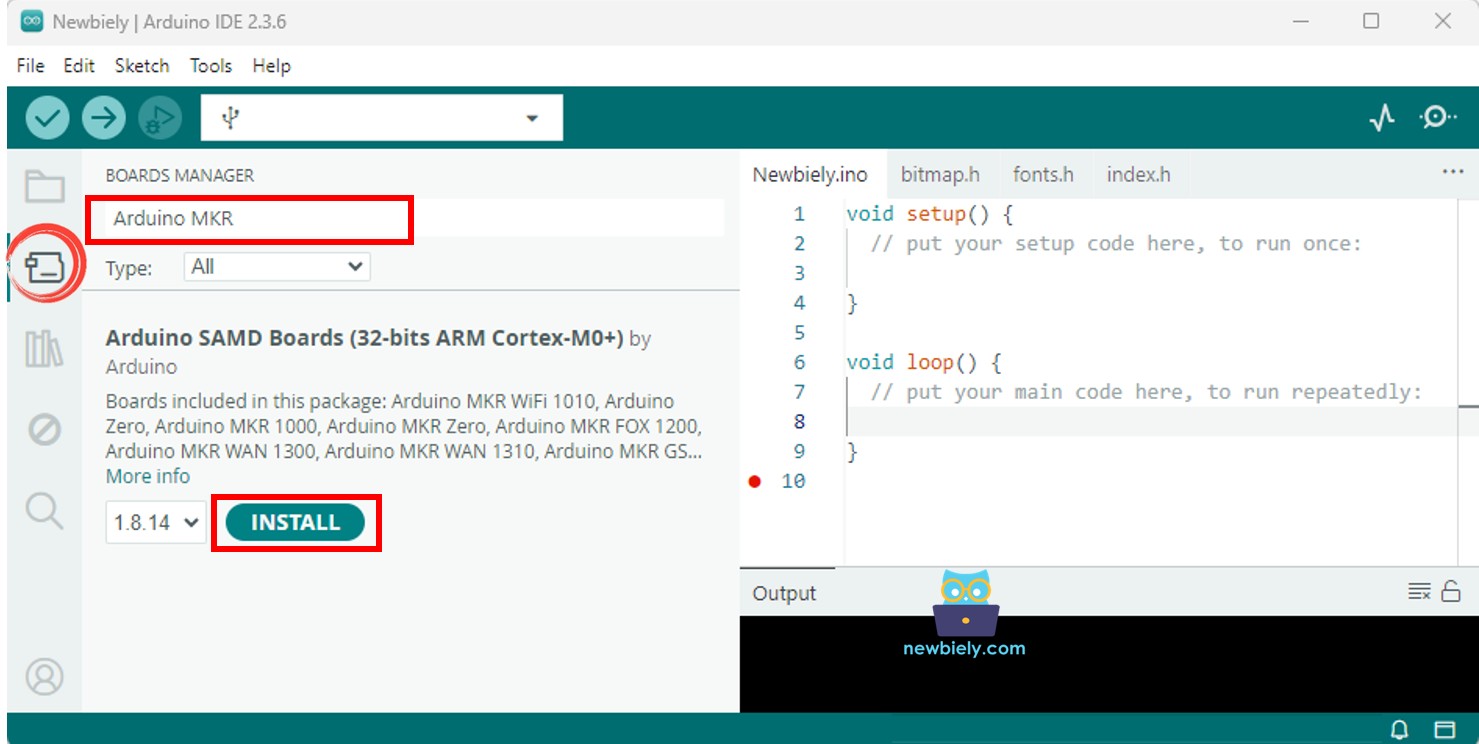
- Search for Arduino MKR WiFi 1010:
- Type "Arduino MKR" in the search box at the top
- Locate "Arduino SAMD Boards (32-bits ARM Cortex-M0+)" by Arduino
- This package includes support for Arduino MKR WiFi 1010 and related boards
- Install Board Support:
- Click the Install button
- Wait for download and installation (may take 2-5 minutes depending on internet speed)
- Progress bar shows download status
- "INSTALLED" tag appears when complete
- Verify Installation:
- Go to Tools > Board menu
- You should see "Arduino MKR WiFi 1010" in the list under "Arduino SAMD Boards"
- If visible, installation succeeded!
What Just Happened? You installed compiler tools, libraries, and USB drivers specifically for Arduino MKR WiFi 1010. The IDE now knows how to compile code for the SAMD21 processor and communicate with your board.
Step 3: Connect Your Arduino MKR WiFi 1010
Time to physically connect your Arduino MKR WiFi 1010 to your computer!
Connection Steps:
- Get a Micro USB Cable:
- Use the cable that came with your Arduino MKR WiFi 1010
- Or any quality Micro USB data cable (charging-only cables won't work!)
- Cable must support data transfer, not just power
- Plug Micro USB into Arduino MKR WiFi 1010:
- Find the Micro USB port on the Arduino MKR WiFi 1010 (near the center of the board)
- Insert cable carefully - don't force it
- Connector only fits one way
- Plug USB into Computer:
- Connect the standard USB end to your computer
- Use a direct USB port (not a hub if possible) for best reliability
- Watch for Signs of Life:
- Orange LED on Arduino MKR WiFi 1010 lights up (power indicator)
- Green LED may blink (shows preloaded demo program running)
- Windows: "USB Device Connected" notification appears
- Mac: Arduino MKR WiFi 1010 appears in System Information > USB
First Connection Behavior: Your Arduino MKR WiFi 1010 ships with a test program that may blink the built-in LED. This is normal! You'll upload your own programs soon.
Step 4: Select Arduino MKR WiFi 1010 Board and Port
Tell the Arduino IDE which board and communication port you're using.
Select Board:
- In Arduino IDE, go to Tools > Board
- Scroll through the list to find "Arduino SAMD Boards" section
- Click "Arduino MKR WiFi 1010"
- The selected board name appears in the Tools > Board menu
Select Port:
- Go to Tools > Port
- You'll see a list of available COM ports:
- Windows: Looks like "COM3", "COM4", etc. Arduino MKR WiFi 1010 usually shows with description "(Arduino MKR WiFi 1010)"
- Mac: Looks like "/dev/cu.usbmodem..." or "/dev/tty.usbmodem..."
- Linux: Looks like "/dev/ttyACM0" or "/dev/ttyUSB0"
- How to identify the correct port:
- Note which ports are listed
- Unplug your Arduino MKR WiFi 1010
- Check Tools > Port again - one port should have disappeared
- Plug Arduino MKR WiFi 1010 back in
- The port that reappears is your Arduino MKR WiFi 1010!
- Click the correct port to select it
Port Selection Tips:
- Only one port should appear for Arduino MKR WiFi 1010 (unless you have multiple Arduinos connected)
- If no ports appear, check USB cable (must be data cable, not charge-only)
- Try a different USB port on your computer
- Restart Arduino IDE and check again
Step 5: Upload Your First Program
Let's verify everything works by uploading a simple test program to your Arduino MKR WiFi 1010!
Upload Blink Example:
- Load Example Code:
- Go to File > Examples > 01.Basics > Blink
- A new window opens with the Blink sketch
- This simple program blinks the Arduino MKR WiFi 1010's built-in LED
- Verify Settings:
- Check Tools > Board shows "Arduino MKR WiFi 1010"
- Check Tools > Port shows your Arduino MKR WiFi 1010's port
- If not, go back to Step 4
- Click Upload:
- Click the Upload button (right arrow icon in toolbar)
- Or use Ctrl+U (Cmd+U on Mac)
- Watch the bottom status area for progress messages
- Upload Process (takes 10-20 seconds):
- "Compiling sketch..." appears first
- Arduino IDE translates your code to machine language
- "Uploading..." appears next
- Orange TX/RX LEDs on Arduino MKR WiFi 1010 flash rapidly
- "Done uploading" message appears when complete
- Success Indicators:
- Status bar shows "Done uploading"
- Green LED on Arduino MKR WiFi 1010 blinks on and off every second
- This confirms your Arduino MKR WiFi 1010 is running the Blink program!
Congratulations! You've successfully programmed your Arduino MKR WiFi 1010! The blinking LED proves that:
- Arduino IDE is properly installed and configured
- Arduino MKR WiFi 1010 board support is working
- USB connection is stable
- Your Arduino MKR WiFi 1010 can run programs
Next Steps with Arduino MKR WiFi 1010
Now that your development environment is configured, start building actual projects:
Beginner Projects for Arduino MKR WiFi 1010:
- Arduino MKR WiFi 1010 - Hello World: Display text in Serial Monitor - the classic first program for Arduino MKR WiFi 1010
- Arduino MKR WiFi 1010 - Button LED: Control an LED with a button on Arduino MKR WiFi 1010
- Arduino MKR WiFi 1010 - Blink Multiple LEDs: Learn digital output with Arduino MKR WiFi 1010
- Arduino MKR WiFi 1010 - Buzzer: Create sounds with Arduino MKR WiFi 1010
WiFi Projects for Arduino MKR WiFi 1010:
- Arduino MKR WiFi 1010 - Web Server: Host a webpage on Arduino MKR WiFi 1010
- Arduino MKR WiFi 1010 - HTTP Request: Connect Arduino MKR WiFi 1010 to internet services
Sensor Projects for Arduino MKR WiFi 1010:
- Arduino MKR WiFi 1010 - DHT11: Read temperature and humidity with Arduino MKR WiFi 1010
- Arduino MKR WiFi 1010 - Ultrasonic Sensor: Measure distance using Arduino MKR WiFi 1010
Learning Path: Start with Hello World to understand Serial communication, then progress to buttons/LEDs for digital I/O, followed by sensors for analog input. Once comfortable, explore WiFi features that make Arduino MKR WiFi 1010 special!
Troubleshooting
Problem 1: "Arduino MKR WiFi 1010" Not in Board List
Symptoms: Can't find Arduino MKR WiFi 1010 in Tools > Board menu after installing board support.
Solutions:
- Board Manager installation incomplete - most common cause
- Open Board Manager again, search "MKR WiFi 1010"
- Check if "Arduino SAMD Boards" shows "INSTALLED" status
- If not installed, click Install and wait for completion
- If shows installed but board not visible, try Uninstall then Install again
- Restart Arduino IDE after installation
- Verify internet connection during installation (downloads ~50MB)
- Try updating Board Manager: Tools > Board > Boards Manager > Update All
- Check Arduino IDE version - use 1.8.10 or newer for Arduino MKR WiFi 1010
Problem 2: No Port Appears for Arduino MKR WiFi 1010
Symptoms: Tools > Port menu is grayed out or empty when Arduino MKR WiFi 1010 connected.
Solutions:
- USB cable issue - most common problem
- Test with a different Micro USB cable (many cables are charge-only, not data cables)
- Try different USB port on computer (avoid USB hubs, use direct ports)
- Check orange power LED on Arduino MKR WiFi 1010 lights up
- Windows: Check Device Manager (Win+X > Device Manager)
- Look under "Ports (COM & LPT)" for Arduino
- If shows yellow warning, right-click > Update Driver
- If missing, USB drivers didn't install - reinstall Arduino IDE
- Mac: Check System Information > USB
- Arduino MKR WiFi 1010 should appear as "USB Serial Device"
- If missing, cable or USB port problem
- Linux: Check user permissions
- Run: ls -l /dev/ttyACM* (should show your username)
- Add to dialout group: sudo usermod -a -G dialout $USER
- Log out and back in for permissions to take effect
- Restart computer if drivers just installed
- Try pressing the reset button on Arduino MKR WiFi 1010 while USB connected
Problem 3: Upload Fails with "Error Opening Serial Port"
Symptoms: Upload starts but fails with serial port error, can't communicate with Arduino MKR WiFi 1010.
Solutions:
- Wrong board or port selected - verify both settings
- Confirm Tools > Board = "Arduino MKR WiFi 1010"
- Confirm Tools > Port = your Arduino MKR WiFi 1010's port
- Close Arduino Serial Monitor if open (uses same port as upload)
- Close any other programs that might use serial port (Processing, Putty, etc.)
- Disconnect and reconnect Arduino MKR WiFi 1010 USB cable
- Select the port again in Tools > Port
- Try pressing Arduino MKR WiFi 1010 reset button right before upload
- Windows: Check if another Arduino IDE instance is running (Task Manager)
- Restart Arduino IDE
- As last resort, restart computer
Problem 4: Upload Hangs at "Uploading..."
Symptoms: Upload process starts but never completes, stuck at "Uploading..." for minutes.
Solutions:
- Bootloader issue - Arduino MKR WiFi 1010 not entering programming mode
- Double-tap the reset button on Arduino MKR WiFi 1010 quickly
- Board enters bootloader mode (orange LED fades/pulses)
- Click Upload immediately while in bootloader mode
- Try different USB cable - poor connections cause upload failures
- Check USB cable securely plugged into both ends
- Lower baud rate: Tools > Upload Speed > 115200 (if available)
- Disable antivirus temporarily (may interfere with uploads)
- Try uploading from different computer to rule out computer-specific issues
- Very rare: Corrupted bootloader requires re-flashing (advanced)
Problem 5: "Board at PORT is Not Available" Error
Symptoms: Arduino IDE says the selected port doesn't exist or isn't responding.
Solutions:
- Port changed - Arduino MKR WiFi 1010 assigned different port number
- Unplug and replug Arduino MKR WiFi 1010
- Check Tools > Port for new port assignment
- May happen after uploading or reconnecting
- Windows: COM port numbers can change - select the new one
- Conflict with other device - disconnect other USB devices
- Try different USB port on your computer
- Update Arduino MKR WiFi 1010 drivers:
- Windows: Device Manager > Ports > Arduino > Update Driver
- Point to Arduino IDE installation folder
- USB power management issue on Windows:
- Device Manager > Universal Serial Bus controllers
- Right-click each USB Root Hub > Properties
- Power Management tab > Uncheck "Allow computer to turn off this device"
- Wrong board selected - compiled for different Arduino
- Double-check Tools > Board = "Arduino MKR WiFi 1010" (not UNO or other boards)
- Code compiled for wrong processor won't run correctly
- Press reset button on Arduino MKR WiFi 1010 to restart program
- Check if code has infinite loop or gets stuck in setup()
- Add debug Serial.println() statements to track execution
- Open Serial Monitor (Tools > Serial Monitor) to see debug output
- Verify baud rate in Serial.begin() matches Serial Monitor baud rate
- Try uploading Blink example to verify hardware working
- Arduino MKR WiFi 1010 may be running but not visible (no LEDs, no Serial output)
- Check wiring if controlling external components
- User lacks serial port permissions - Linux common issue
- Linux: Add user to dialout group
- Log out and log back in (or reboot)
- Verify with: groups (should list dialout and tty)
- Temporary fix (single session):
- Mac: Usually no permissions needed, but check:
- System Preferences > Security & Privacy > Privacy tab
- Allow Arduino IDE in relevant categories
- Don't run Arduino IDE as root/administrator (causes other problems)
- Timing issue - computer and Arduino MKR WiFi 1010 not synchronized
- Try double-tapping reset button quickly to enter bootloader mode
- Orange LED should fade/pulse indicating bootloader active
- Click Upload immediately while Arduino MKR WiFi 1010 in bootloader mode
- Verify correct bootloader installed (pre-installed on genuine boards)
- Check for loose USB connection
- Try different USB cable (many sync errors from bad cables)
- Ensure no other software accessing the serial port
- Disconnect other USB devices that might interfere
- Lower upload speed if option available in Arduino IDE
- Windows: Update USB drivers via Device Manager
Problem 6: Code Compiles But Doesn't Run on Arduino MKR WiFi 1010
Symptoms: Upload successful, "Done uploading" message appears, but Arduino MKR WiFi 1010 doesn't do anything.
Solutions:
Problem 7: "Access Denied" or Permission Errors (Linux/Mac)
Symptoms: Can't access serial port, permission denied errors when uploading to Arduino MKR WiFi 1010.
Solutions:
Problem 8: "Not in Sync" or "Programmer Not Responding"
Symptoms: Upload fails with sync errors, Arduino MKR WiFi 1010 not responding to programmer.
Solutions:
Understanding the Arduino IDE Interface
Familiarize yourself with the Arduino IDE's key features for Arduino MKR WiFi 1010 development:
Toolbar Buttons:
- Verify (checkmark icon): Compiles code without uploading - check for errors before upload to Arduino MKR WiFi 1010
- Upload (right arrow): Compiles and uploads to Arduino MKR WiFi 1010 in one click
- New (document icon): Creates new blank sketch for Arduino MKR WiFi 1010
- Open (folder icon): Opens existing Arduino MKR WiFi 1010 sketch
- Save (download icon): Saves current Arduino MKR WiFi 1010 sketch
- Serial Monitor (magnifying glass): Opens Serial Monitor to view Arduino MKR WiFi 1010 output
Code Editor Area:
- Where you write Arduino MKR WiFi 1010 programs
- Syntax highlighting helps read code
- Auto-indentation keeps code organized
- Line numbers for debugging
Message Area (Bottom):
- Shows compile progress and errors
- Upload status for Arduino MKR WiFi 1010
- File save confirmations
- Orange text = errors (must fix)
- Black text = normal messages
Status Bar:
- Displays current board (should show "Arduino MKR WiFi 1010")
- Shows selected port
- Indicates connection status
Left Sidebar:
- Board Manager: Install Arduino MKR WiFi 1010 support
- Library Manager: Add libraries for sensors, displays, WiFi features
- Examples: Pre-written code to learn from
- Board & Port Selector: Quick access to board/port settings
Tips for Successful Arduino MKR WiFi 1010 Development
Code Organization:
- Save sketches with descriptive names (e.g., "MKR_WiFi_Temperature_Logger")
- Arduino sketches must be in folder with same name
- Use comments to explain what your Arduino MKR WiFi 1010 code does
- Break complex projects into smaller functions
USB Connection:
- Use quality USB cables - cheap cables cause mysterious problems
- Keep cables under 3 meters for reliability with Arduino MKR WiFi 1010
- Avoid USB hubs when troubleshooting Arduino MKR WiFi 1010 issues
- Power demanding projects with external supply, not USB
Learning Resources:
- Start with File > Examples for Arduino MKR WiFi 1010
- Read code comments - they explain what each section does
- Arduino Reference: https://www.arduino.cc/reference/en/
- Arduino MKR WiFi 1010 documentation: Official Arduino site
Best Practices:
- Always verify code before uploading to Arduino MKR WiFi 1010
- Save your work frequently (Ctrl+S)
- Keep backup copies of working Arduino MKR WiFi 1010 projects
- Test changes incrementally - small steps catch errors early
- Use Serial.println() to debug - see what Arduino MKR WiFi 1010 is thinking
Power Management:
- USB provides enough power for Arduino MKR WiFi 1010 and small sensors
- Large displays, motors, many LEDs need external 5V supply
- Never connect motors directly to Arduino MKR WiFi 1010 pins
- Arduino MKR WiFi 1010 runs on 3.3V - most pins are 3.3V logic
What Makes Arduino MKR WiFi 1010 Special
Now that you can program your Arduino MKR WiFi 1010, understand what sets it apart:
Built-in WiFi: Arduino MKR WiFi 1010 includes WiFiNINA module (based on ESP32) for wireless connectivity. Build IoT projects without additional shields!
3.3V Logic: Unlike 5V Arduinos, Arduino MKR WiFi 1010 operates at 3.3V, matching modern sensors and modules directly. No level shifters needed!
32-bit ARM Processor: SAMD21 Cortex-M0+ runs at 48MHz - much faster than traditional 8-bit Arduino UNO (16MHz).
Compact MKR Form Factor: Arduino MKR WiFi 1010 measures just 61.5mm × 25mm - fits in small enclosures and wearables.
More Memory: 256KB flash (program storage) and 32KB RAM - room for complex Arduino MKR WiFi 1010 projects.
IoT Optimized: Arduino MKR WiFi 1010 designed specifically for connected devices, sensors, and cloud integration.
Cryptographic Security: Built-in crypto chip on Arduino MKR WiFi 1010 for secure communications.
Your Arduino MKR WiFi 1010 Journey Begins!
You've completed the essential setup! Your Arduino MKR WiFi 1010 is ready for any project you can imagine. The development environment is configured, you understand the workflow, and you've successfully uploaded your first program.
What's Next?
- Try modifying the Blink timing - change delay(1000) to different values
- Explore File > Examples to see what Arduino MKR WiFi 1010 can do
- Follow the "Next Steps" section for beginner-friendly projects
- Join Arduino community forums to share your Arduino MKR WiFi 1010 creations
Remember: Every Arduino expert started exactly where you are now. Take your time, experiment freely, and don't fear mistakes - that's how you learn Arduino MKR WiFi 1010 development!
The Arduino MKR WiFi 1010 world is yours to explore. Happy making!