Arduino MKR WiFi 1010 - LED - Fade
Create smooth LED fading effects with your Arduino MKR WiFi 1010! Learn to control LED brightness using PWM (Pulse Width Modulation), creating professional-looking fade-in and fade-out animations. Master both blocking delay() and non-blocking millis() techniques for smooth, responsive LED control.
What You'll Learn:
- Programming Arduino MKR WiFi 1010 to fade LEDs using PWM signals
- Using Arduino MKR WiFi 1010 analogWrite() for brightness control (0-255)
- Creating smooth fade-in effects with Arduino MKR WiFi 1010 and LEDs
- Implementing fade-out animations on Arduino MKR WiFi 1010 projects
- Non-blocking LED fading with Arduino MKR WiFi 1010 millis() function
- Understanding PWM duty cycle on Arduino MKR WiFi 1010 pins
- Building responsive animations with Arduino MKR WiFi 1010 without delay()
Real-World Applications:
- Ambient lighting: Arduino MKR WiFi 1010 fading LEDs for mood lighting
- Status indicators: Arduino MKR WiFi 1010 with pulsing LEDs showing system states
- User interfaces: Arduino MKR WiFi 1010 LED fades for button feedback
- Breathing effects: Arduino MKR WiFi 1010 creating sleep/standby indicators
- Visual alerts: Arduino MKR WiFi 1010 with fading LEDs for gentle notifications
- Art installations: Arduino MKR WiFi 1010 controlling dynamic light sculptures
- Product design: Arduino MKR WiFi 1010 LED fading for professional device aesthetics
Hardware Preparation
| 1 | × | Arduino MKR WiFi 1010 | |
| 1 | × | Micro USB Cable | |
| 1 | × | LED Kit | |
| 1 | × | LED (red) | |
| 1 | × | LED Module | |
| 1 | × | Alternatively, Button and LED Kit | |
| 1 | × | 220Ω Resistor | |
| 1 | × | Breadboard | |
| 1 | × | Jumper Wires | |
| 1 | × | Optionally, DC Power Jack |
Or you can buy the following kits:
| 1 | × | DIYables Sensor Kit (18 sensors/displays) |
Additionally, some of these links are for products from our own brand, DIYables .
Buy Note: Use the LED Module for easier wiring. It includes an integrated resistor.
Overview of LED
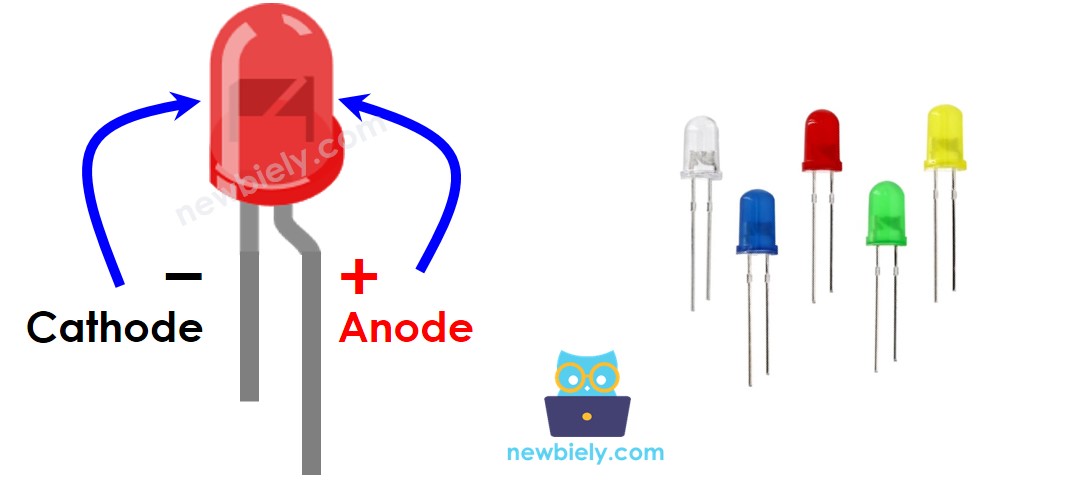
LED Pinout
An LED has two metal legs:
- Cathode (-) pin: Plug this pin into the ground (0V).
- Anode (+) pin: Use this pin to turn the LED on or off.
How LED Works
After connecting the negative (-) side to the ground:
- Connect GND (ground) to the positive (anode) side, and the LED will be off.
- Connect VCC (power) to the positive side, and the LED will be on.
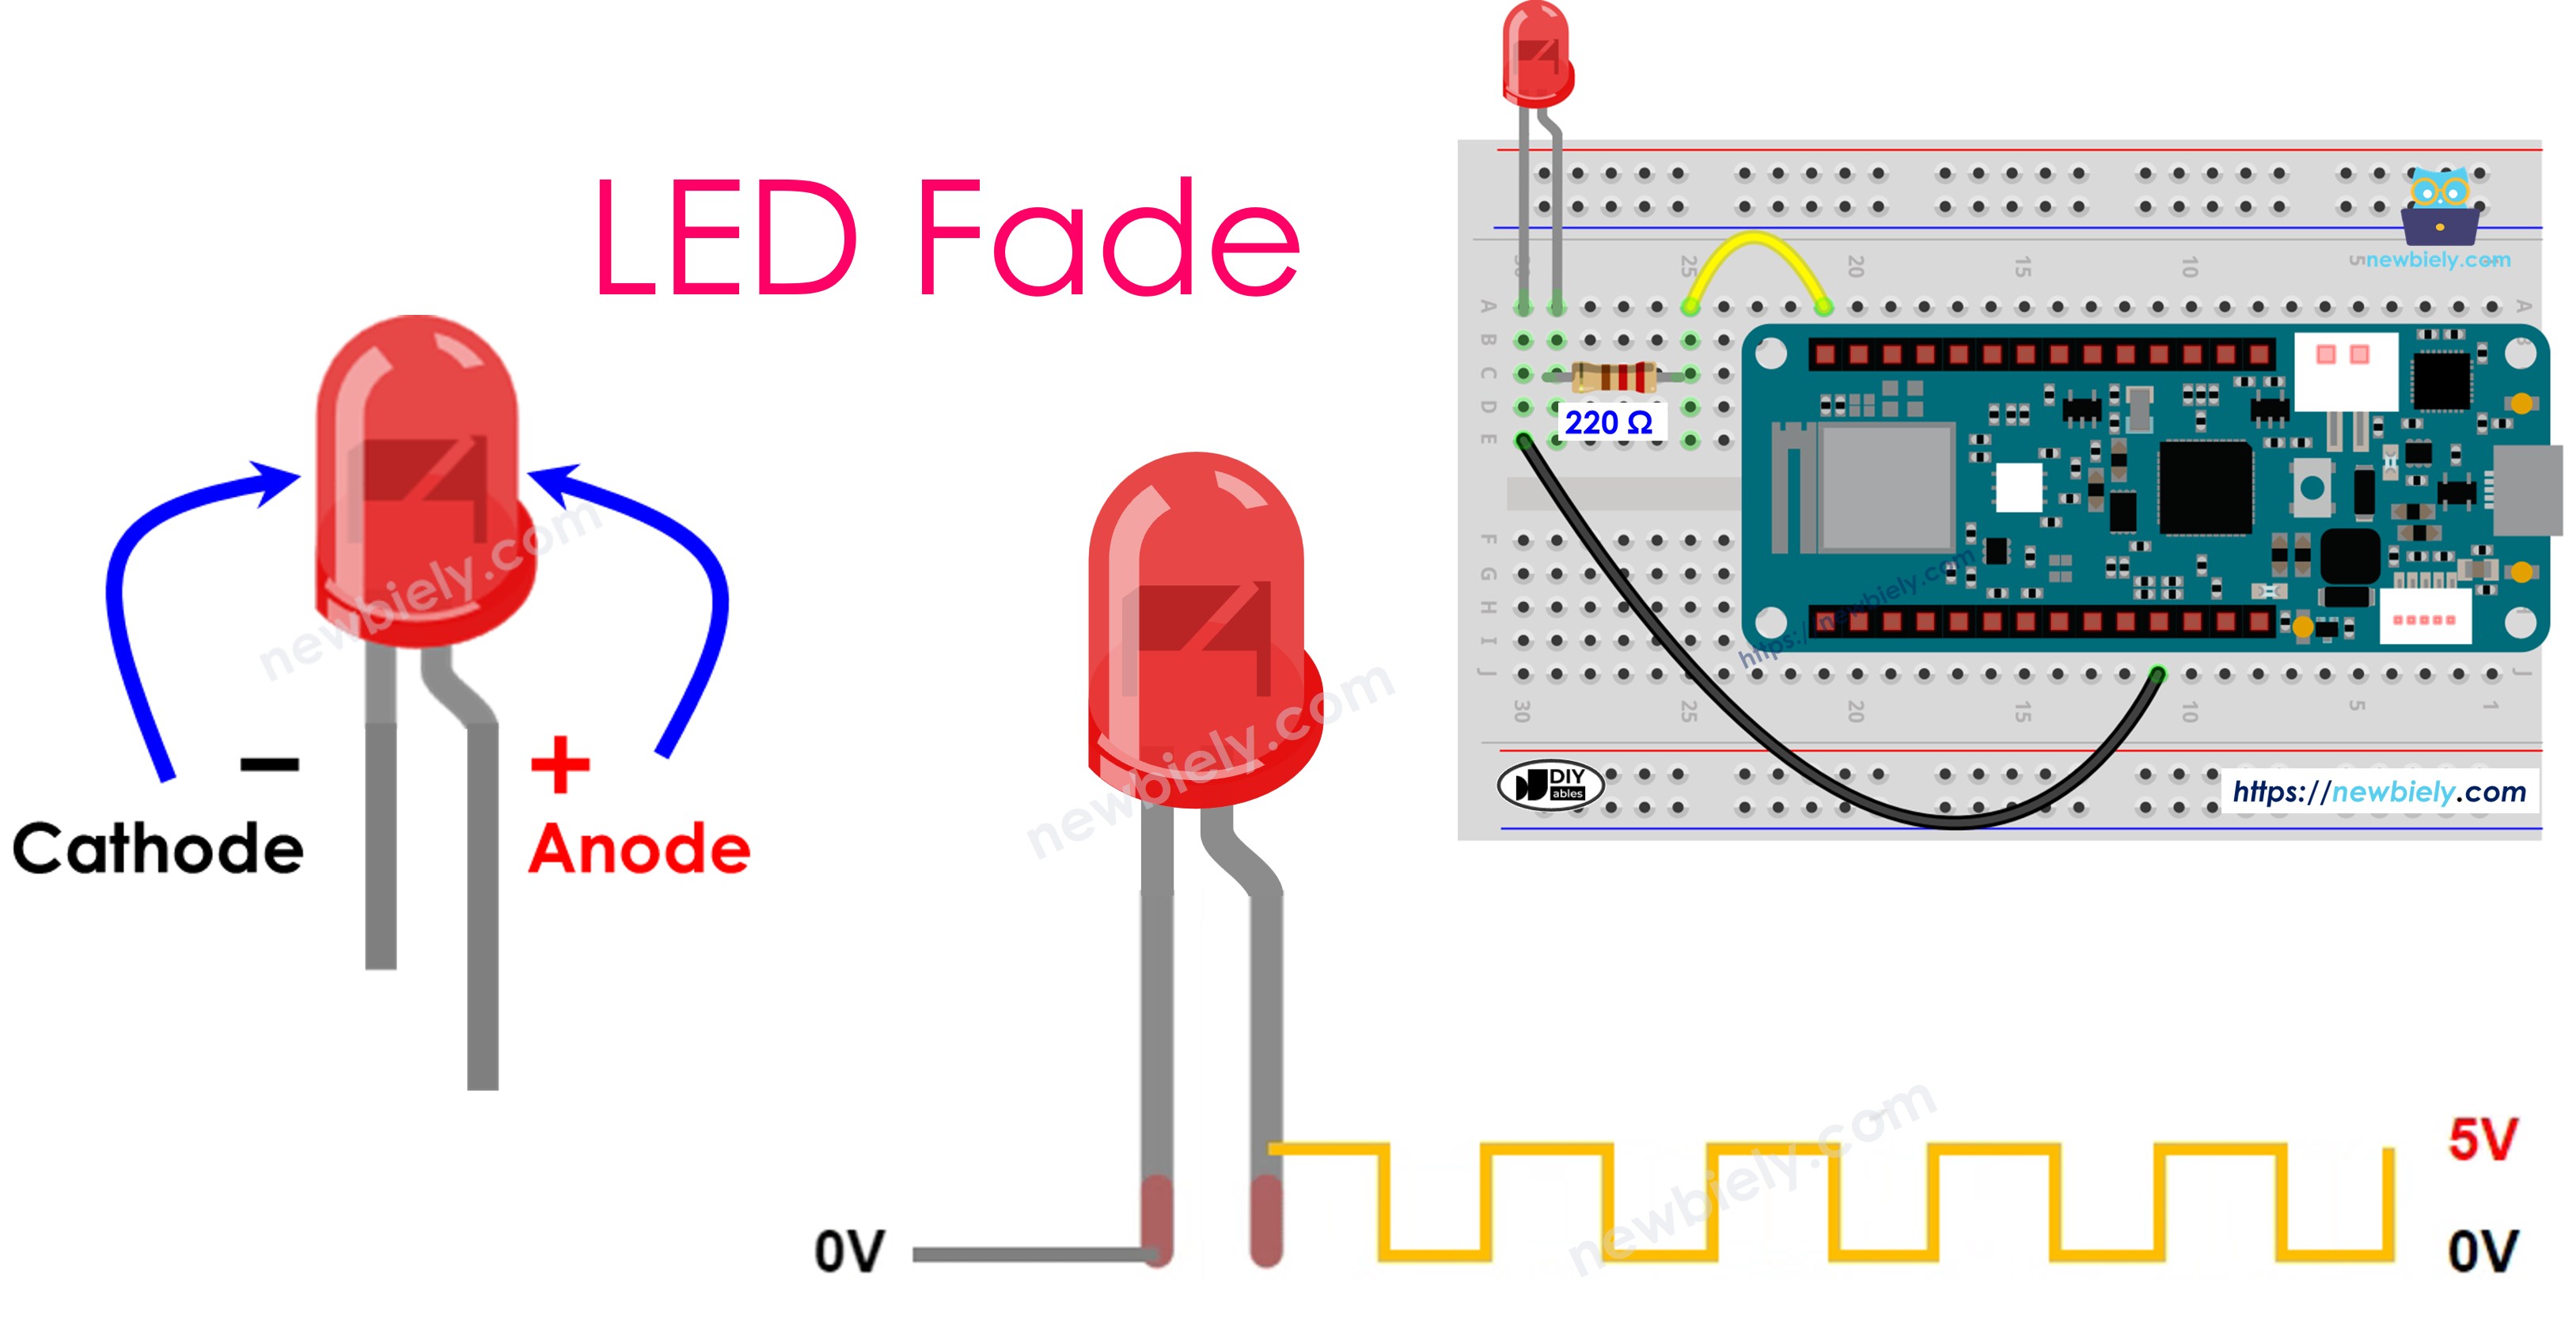
- Apply a PWM (Pulse Width Modulation) signal to the positive side, and the LED's brightness will change depending on the PWM duty cycle. The duty cycle can be from 0 to 255—the higher the number, the brighter the LED.
- A PWM value of 0 acts like connecting to GND, so the LED stays off.
- A PWM value of 255 acts like connecting to VCC, so the LED shines at full brightness.
※ NOTE THAT:
Most of the time, you need a resistor to keep the LED from burning out. The resistor’s value depends on the LED's specifications.
Arduino MKR WiFi 1010 - fade LED
The digital output pins on the Arduino MKR WiFi 1010 can be set to create a PWM signal. By connecting the positive side of an LED to a pin on the Arduino MKR WiFi 1010 and the negative side to the ground, and programming the Arduino to change the PWM duty cycle, you can make the LED slowly turn on and off.
Wiring Diagram between LED and Arduino MKR WiFi 1010
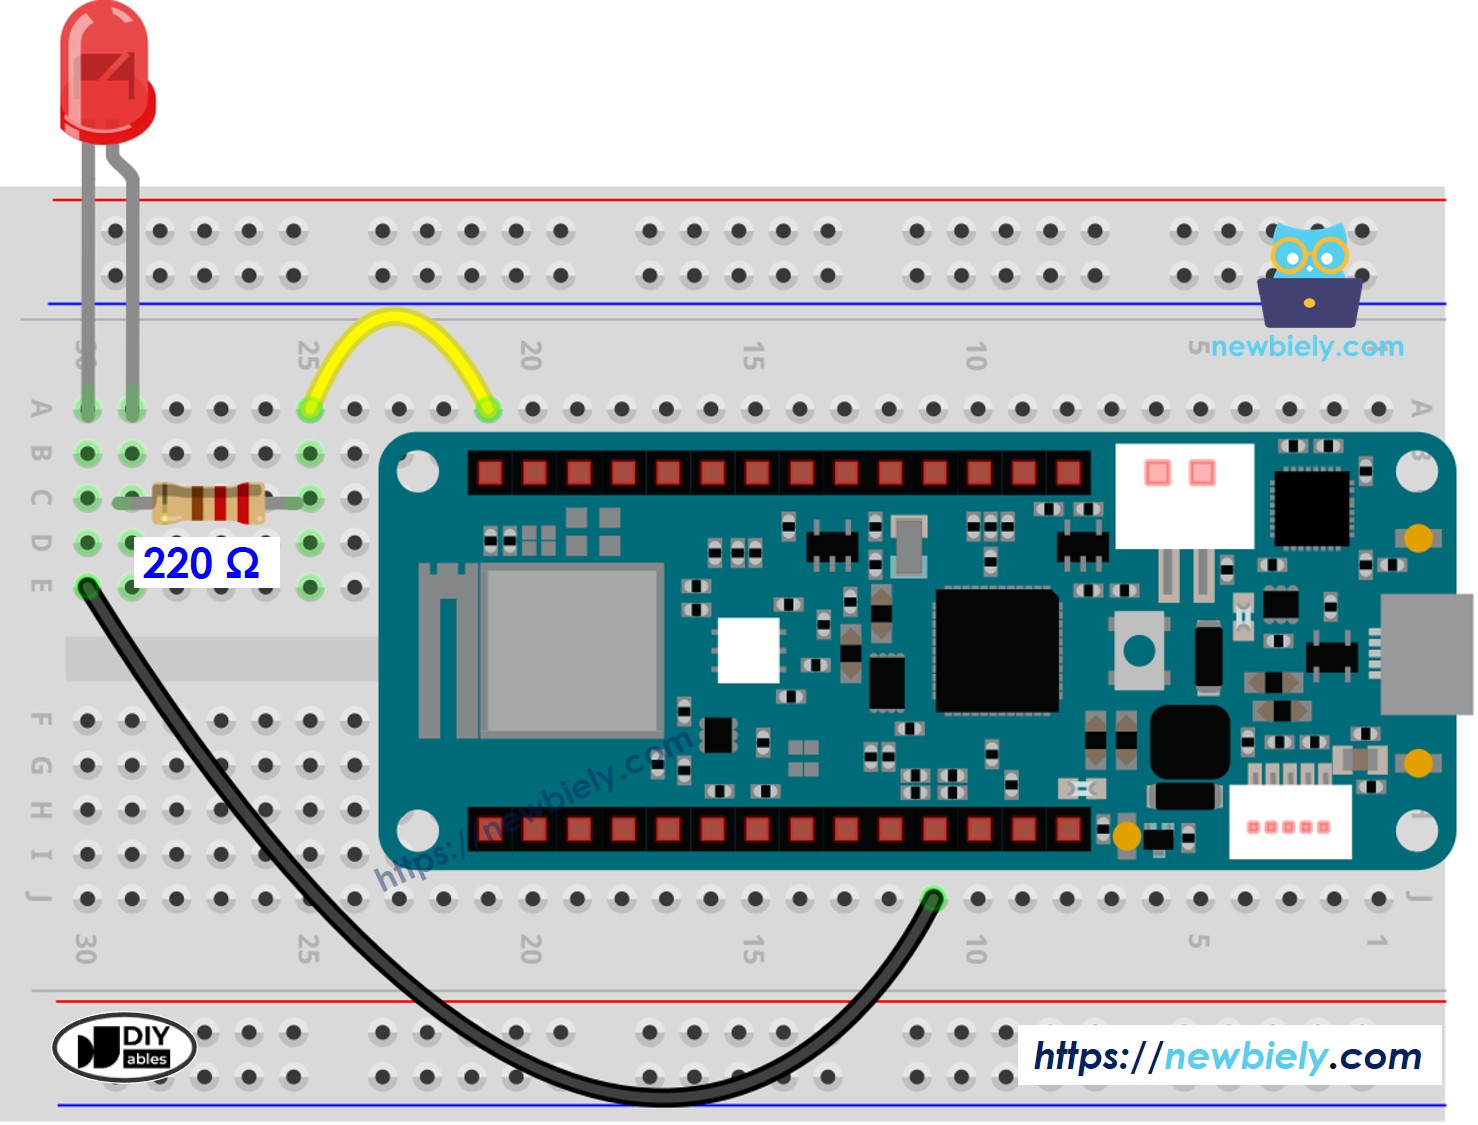
This image is created using Fritzing. Click to enlarge image
How To Program LED Fading
Step 1: Configure Pin as Output
Set up an Arduino MKR WiFi 1010 pin as an output using pinMode():
Step 2: Control LED Brightness with PWM
Use analogWrite() to set LED brightness (0-255):
Creating Fade Effects:
Method 1 - Fade In (using delay()):
Method 2 - Fade Out (using delay()):
Method 3 - Non-Blocking Fade (using millis()):
See advanced examples below for multitasking-friendly fading that doesn't block other code.
Key Parameters:
- Brightness range: 0-255 (8-bit resolution)
- Step size: Larger steps = faster but choppier fade (try 1, 5, or 10)
- Delay time: Larger delays = slower fade (try 5ms, 10ms, 20ms)
Arduino MKR WiFi 1010 Code - Simple Fade Example
Detailed Instructions
New to Arduino MKR WiFi 1010? Complete our Getting Started with Arduino MKR WiFi 1010 tutorial first to set up your development environment.
- Connect the components to the Arduino MKR WiFi 1010 board as depicted in the diagram
- Plug your Arduino MKR WiFi 1010 into your computer's USB port
- Launch the Arduino IDE on your computer
- Select the Arduino MKR WiFi 1010 board and its COM port
- Copy the code below and paste it in the Arduino program.
- Compile your code and send it to your Arduino MKR WiFi 1010 board by clicking the Upload button in the Arduino software.
- Look at how bright the LED is.
Line-by-line Code Explanation
The Arduino MKR WiFi 1010 code above has an explanation for each line. Please check the notes in the code!
※ NOTE THAT:
The example above uses the delay() function to slowly turn the LED on and off. However, delay() does not make the fading smooth and stops other parts of your program from running at the same time. In the next sections, we will learn how to create a smooth fade with the LED without stopping other code, by using the millis() function.
How to fade-in LED in a period without using delay()
How to fade-out LED in a period without using delay()
Code Explanation - Non-Blocking Fade
The Problem with delay():
Using delay() pauses the entire program. During fading, your Arduino can't:
- Read sensors
- Respond to buttons
- Communicate via Serial
- Control other components
The millis() Solution:
The millis() function returns milliseconds since Arduino started. By checking elapsed time without blocking, you can fade LEDs while doing other tasks simultaneously.
Key Concept - Elapsed Time Tracking:
Advantages of millis() Approach:
- Non-blocking: Code continues running
- Precise timing: Accurate fade duration
- Multitasking: Handle multiple fades, sensors, buttons simultaneously
- Professional: Industry-standard technique
Challenge Yourself
Ready to explore more LED fading with your Arduino MKR WiFi 1010? Try these creative experiments:
- Rainbow Breathing: Connect RGB LED (3 PWM pins). Create smooth color-changing breathing effect cycling through rainbow hues.
- Heartbeat Pattern: Make LED pulse like a heartbeat—two quick pulses, then pause. Adjust timing for realistic effect.
- Button-Controlled Fade Speed: Use potentiometer to control fade speed in real-time (map 0-1023 to delay values).
- Multi-LED Wave: Connect 5 LEDs. Create wave effect where fade travels from LED 1→5→repeat. Use millis() for smooth animation.
- Sensor-Responsive Brightness: Use light sensor (LDR)—LED brightness inversely proportional to ambient light (dim room = bright LED).
- Morse Code Fade: Instead of sharp blinks, use smooth fades for dots and dashes. Spell "SOS" or your name.
- Music Visualizer: Connect microphone module—LED brightness follows sound amplitude. Create audio-reactive lighting.
- Sunrise Simulator: Create 15-minute sunrise effect (very slow fade from off to bright). Wake-up light alarm clock.