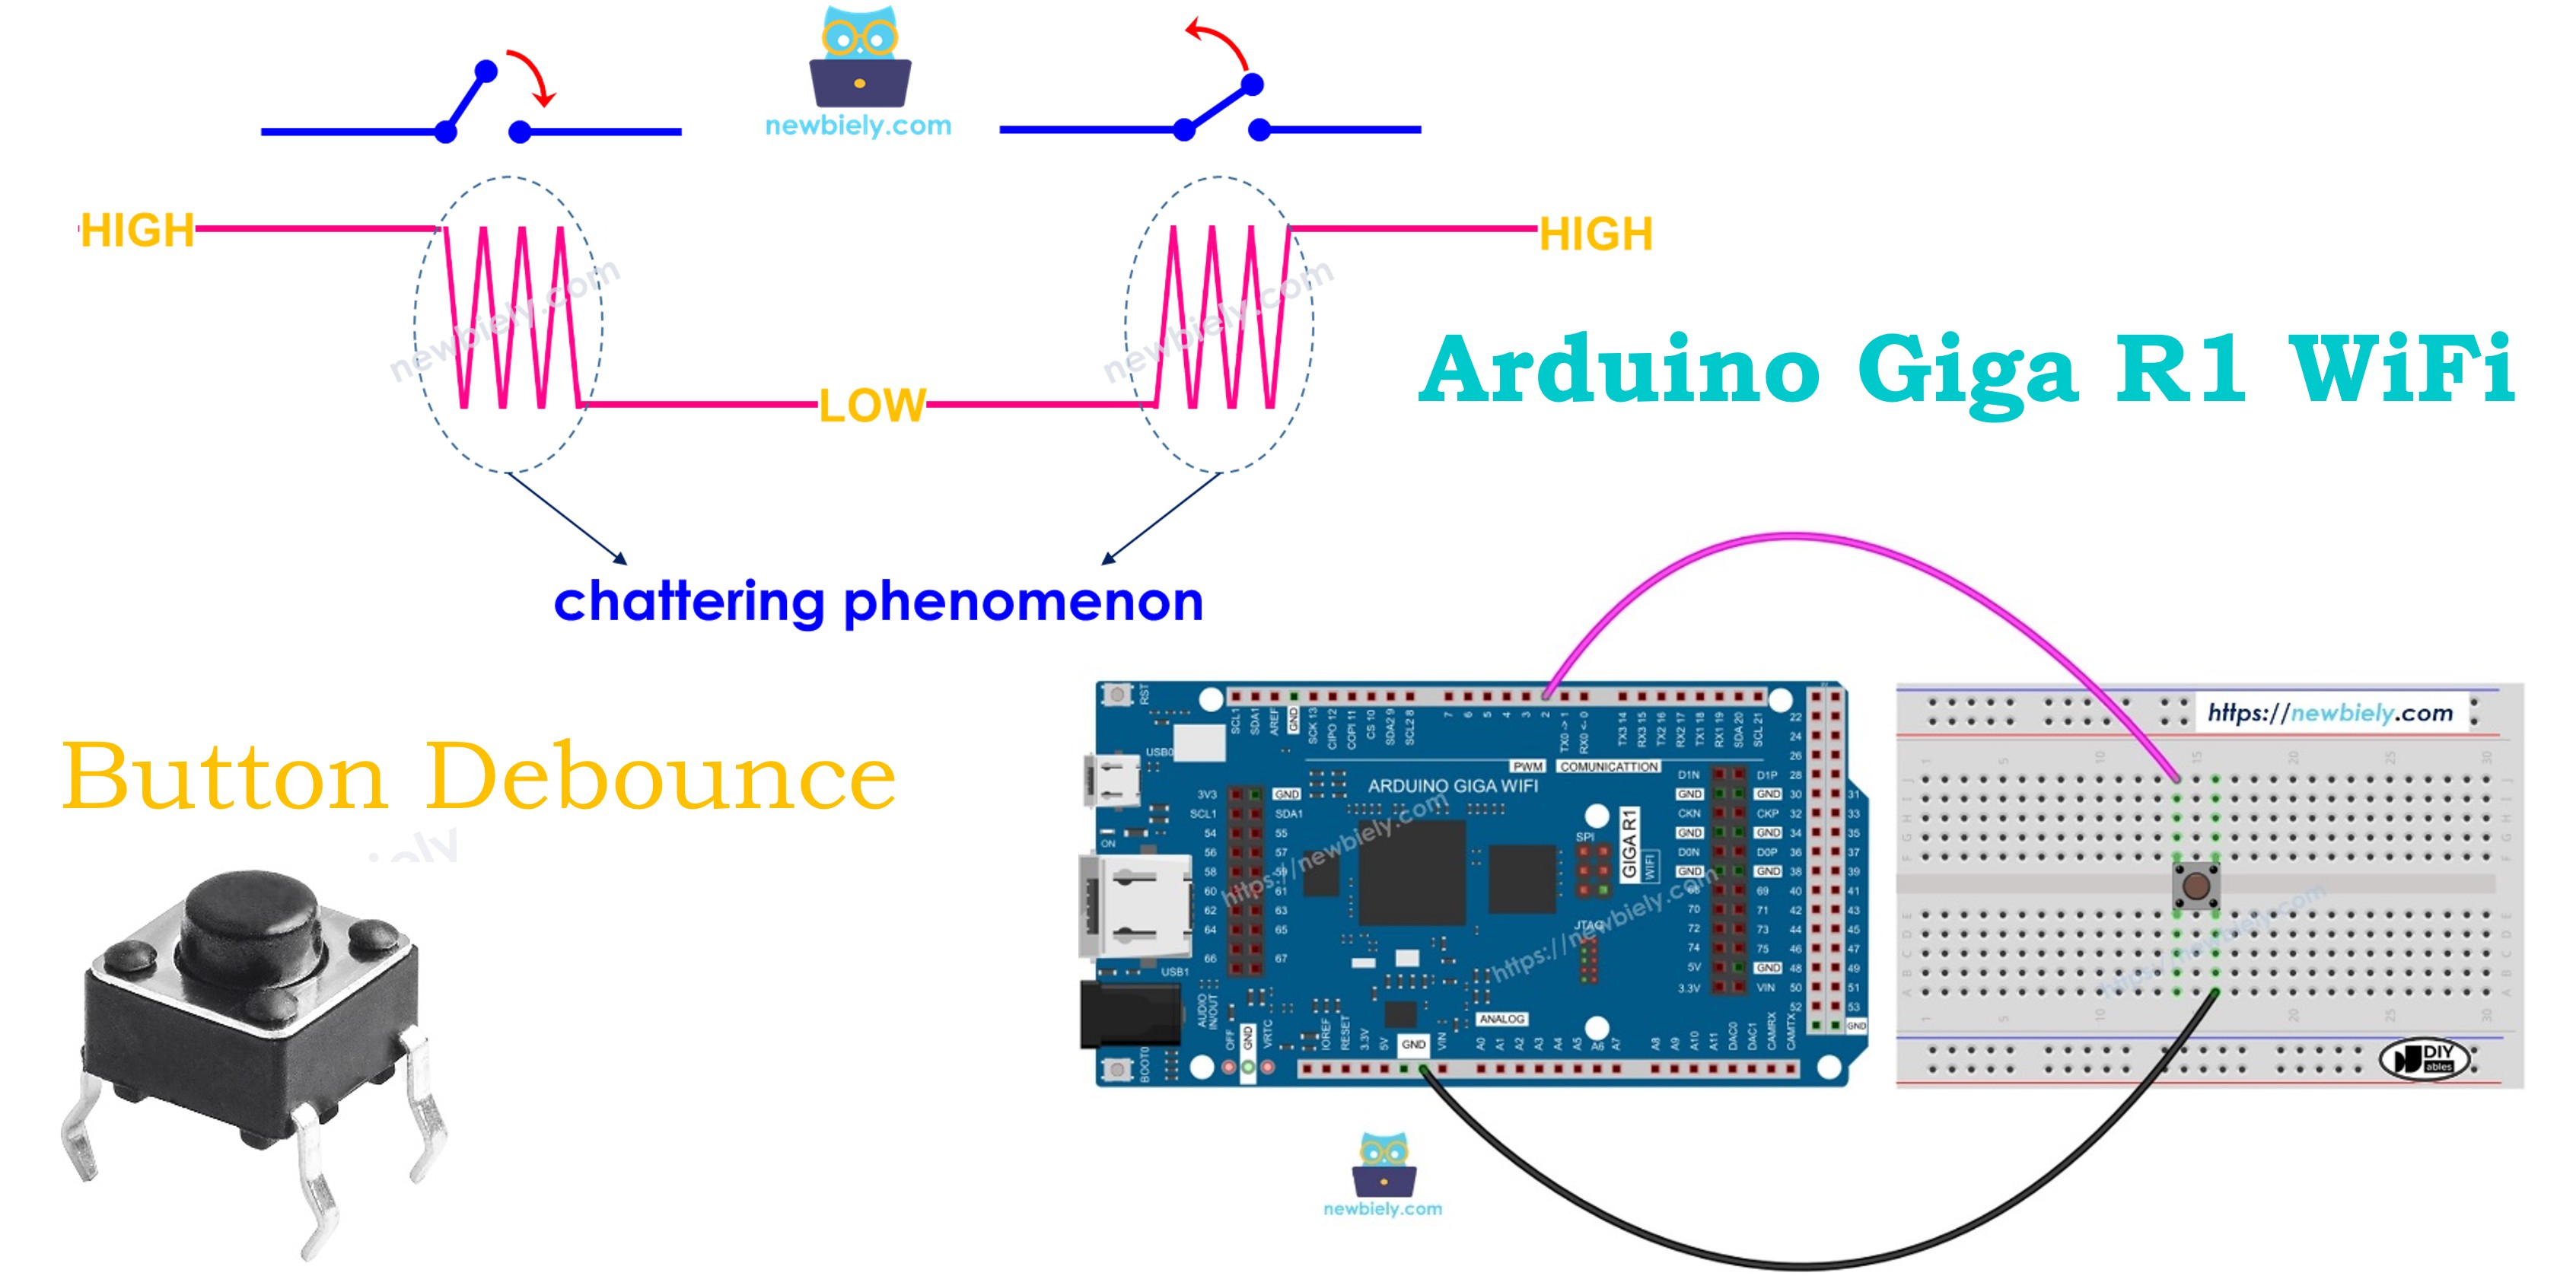
Arduino Giga R1 WiFi Button Debounce
This guide covers button debouncing implementation with the Arduino Giga R1 WiFi. Button debouncing is essential for reliable input handling, addressing the mechanical chattering that occurs when physical switches make and break contact.
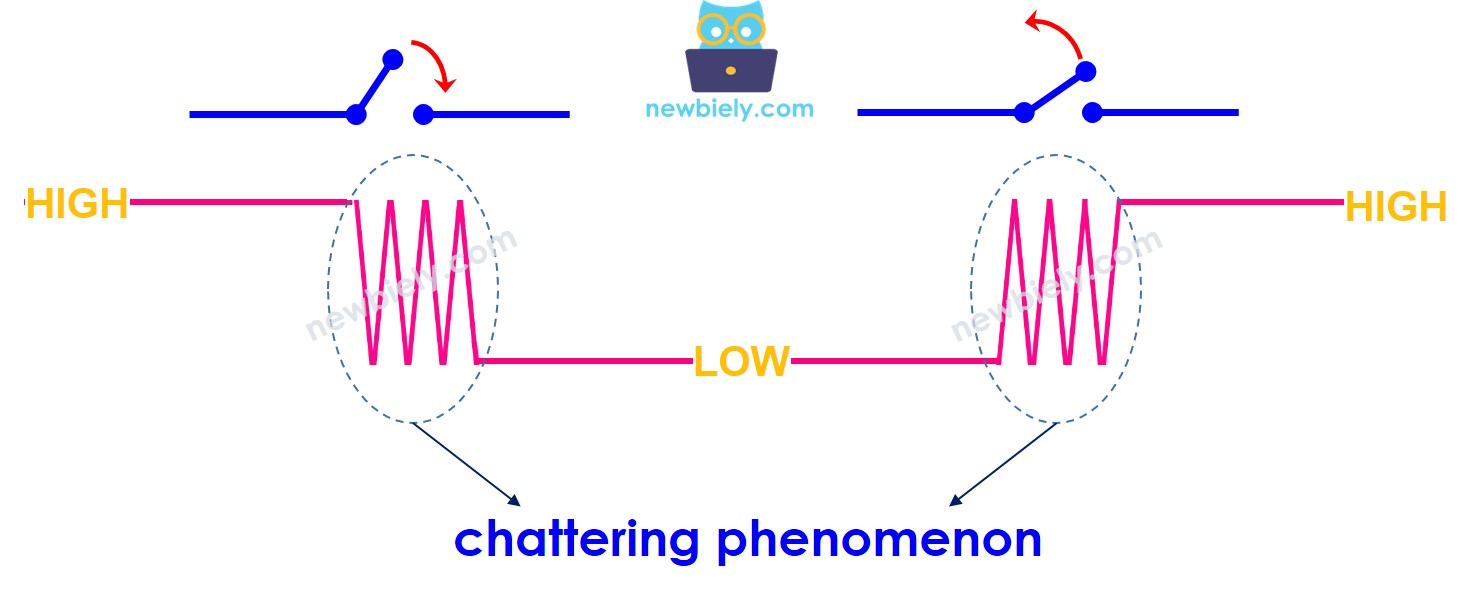
When a button is pressed, the electrical contacts bounce multiple times within milliseconds due to elastic properties of the metal contacts. Without proper debouncing, a single button press may register as multiple input events. This tutorial demonstrates both software-based debouncing using the millis() function and library-based solutions.
Hardware Preparation
Or you can buy the following kits:
| 1 | × | DIYables Sensor Kit (18 sensors/displays) |
Additionally, some of these links are for products from our own brand, DIYables .
Wiring Diagram
The wiring diagram demonstrates the fundamental connection between a push button and the Arduino Giga R1 WiFi digital input. This configuration utilizes the microcontroller's internal pull-up resistor, eliminating the need for external components while ensuring reliable signal integrity during button bouncing periods.
Electrical Note: The diagram above shows the minimum viable connection using internal pull-up resistors. For production applications or electrically noisy environments, consider adding a 0.1µF ceramic capacitor across the button terminals for additional hardware debouncing, and a 1kΩ series resistor to limit surge currents during rapid switching events.
The internal pull-up resistor configuration creates a voltage divider when the button is pressed. In the released state, the internal 40kΩ pull-up resistor maintains the input at VCC (3.3V logic level). When pressed, the button creates a low-resistance path to ground, pulling the input to 0V. The Arduino Giga R1 WiFi's Schmitt trigger input buffers provide hysteresis to improve noise immunity during the transition periods.
| Button Terminal 1 | Arduino Giga R1 WiFi Pin 2 |
|---|---|
| Button Terminal 2 | GND |
Power consumption for this configuration is minimal — approximately 80µA flows through the pull-up resistor when the button is pressed, well within the GPIO pin's current sourcing capability. The Arduino Giga R1 WiFi's advanced power management features allow efficient debouncing even in battery-powered applications.
Let's examine and compare Arduino button debouncing implementations, contrasting the behavior between non-debounced and properly debounced input handling techniques.
Reading Button without Debounce
Before implementing debouncing solutions, observe the problematic behavior of raw button input to understand why debouncing is essential for reliable embedded system operation. This demonstration reveals the mechanical chattering phenomenon and its impact on application logic.
The following implementation reads button state changes without any debouncing mechanism, exposing the raw electrical transitions that occur during mechanical switch operation. Each bounce registers as a separate press/release event, demonstrating why robust input handling requires software filtering techniques.
Detailed Instructions
For initial Arduino Giga R1 WiFi setup, refer to the Arduino Giga R1 WiFi Getting Started guide before proceeding.
- Connect Hardware: Wire the button to Arduino Giga R1 WiFi pin 2 and GND according to the wiring diagram. Verify connections are secure to prevent intermittent contact issues that could confuse bouncing behavior with loose wiring.
- Configure IDE: Open Arduino IDE and verify the Arduino Giga R1 WiFi board package is selected with the correct COM port. The board's USB interface provides reliable serial communication for monitoring debounce behavior.
- Upload Code: Copy the provided code and upload to the Arduino Giga R1 WiFi. The implementation uses digitalRead() to sample button state continuously without any timing delays or filtering.
- Execute Test: Click Upload button in Arduino IDE to flash the code to the microcontroller. Monitor the compilation process to ensure no library dependencies are missing.
- Monitor Output: Open Serial Monitor and set baud rate to 9600. The Arduino Giga R1 WiFi's UART peripheral provides real-time visibility into state change detection.
- Trigger Bouncing: Press and hold the button for several seconds, then release it in a single deliberate motion. Observe the serial output during both press and release transitions.
- Analyze Results: Count the number of detected press/release events compared to your single physical action. Note the timing patterns and frequency of bouncing events.
Technical Note: The multiple detections occur because digitalRead() samples the GPIO pin faster than the mechanical bouncing period. Each contact bounce creates a valid logic transition that triggers the state change detection logic, demonstrating why embedded systems require input filtering for reliable operation.
We Made It Simple - Arduino Button Debounce Code with Library
To streamline button debouncing implementation, especially for multi-button applications, we developed the ezButton library that encapsulates debouncing logic into an easy-to-use object-oriented interface. This library handles timing management, state tracking, and bounce filtering automatically, allowing developers to focus on application logic rather than low-level input conditioning.
The ezButton library leverages the Arduino Giga R1 WiFi's processing capabilities to manage multiple button instances efficiently. Each button object maintains its own debounce timer and state history, enabling complex multi-button interfaces without timing conflicts or resource contention. You can learn about ezButton library here.
Arduino Button Debounce Code for A Single Button
This single-button implementation demonstrates the ezButton library's object-oriented approach to input debouncing. The library abstracts the timing logic while providing clear methods for detecting press and release events. The setDebounceTime() function allows customization of the filtering period based on switch characteristics and application requirements.
Arduino Button Debounce Code for Multiple Buttons
Managing multiple buttons with individual debouncing requires careful resource allocation and timing coordination. The ezButton library handles this complexity by maintaining separate state machines for each button instance. The Arduino Giga R1 WiFi's abundant memory and processing power support dozens of simultaneous button objects without performance degradation.
The wiring diagram for the multiple button configuration demonstrates proper GPIO allocation across the Arduino Giga R1 WiFi's digital pins. Each button requires two connections — signal and ground — with the internal pull-up resistors providing appropriate logic levels.
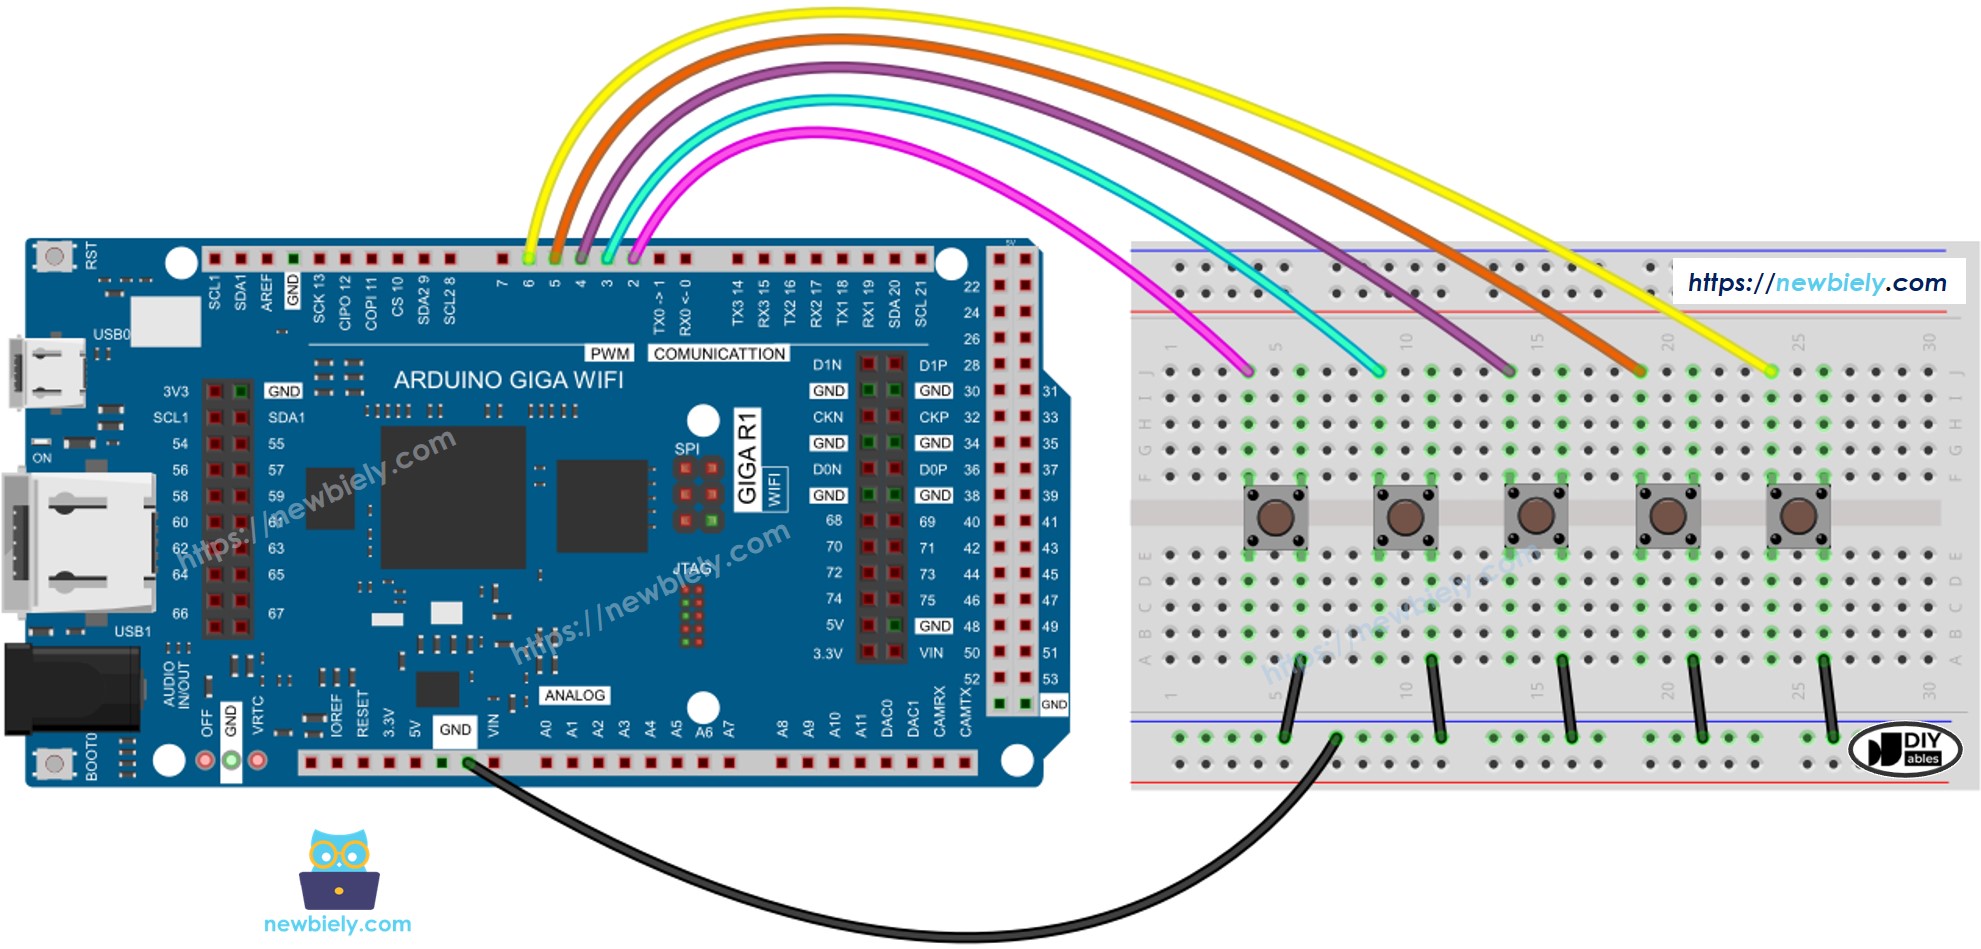
This image is created using Fritzing. Click to enlarge image
Additional Knowledge
Debounce Delay Configuration: The DEBOUNCE_DELAY value requires careful tuning based on specific application requirements and switch characteristics. User interface applications typically benefit from 50ms delays that feel responsive while filtering bouncing effectively. Industrial control systems may use 100-200ms delays in electrically noisy environments, while gaming or high-frequency applications might require 10-20ms for rapid response.
Switch-Specific Considerations: Different button and switch types exhibit varying bounce characteristics. Tactile push buttons typically bounce for 5-15ms, while mechanical toggle switches may bounce for 20-50ms due to their lever mechanisms. Membrane switches often have minimal bouncing (1-5ms) due to their construction, while automotive-grade switches are designed for harsh environments and may require longer debounce periods.
Timing Precision: The Arduino Giga R1 WiFi's system timer resolution enables precise debounce timing control. The millis() function provides 1ms resolution sufficient for most applications, while microsecond timing is available via micros() for specialized high-speed applications. The STM32H747XI's multiple timer peripherals support hardware-assisted debouncing for deterministic timing in real-time systems.
Power Management Integration: Button debouncing algorithms can integrate with the Arduino Giga R1 WiFi's power management features for battery-operated applications. Sleep mode implementations can use external interrupts for button wake-up while maintaining debouncing through interrupt service routines or post-wake filtering periods.
Extendability
The debouncing methodology demonstrated with buttons applies broadly to various digital input devices that exhibit similar mechanical or electrical switching characteristics. Touch sensors, particularly resistive and capacitive types, can benefit from debouncing techniques to filter environmental noise and contact variations. Mechanical limit switches in industrial automation systems require robust debouncing to prevent false triggers from vibration or electromagnetic interference.
Reed switches and magnetic proximity sensors exhibit bouncing behavior when magnetic fields fluctuate near the switching threshold. The Arduino Giga R1 WiFi's debouncing algorithms effectively filter these transitions while maintaining reliable detection of magnetic state changes. Optical sensors with mechanical chopper wheels or moving reflective elements also benefit from software debouncing to compensate for mechanical irregularities.
Toggle switches, rotary encoders (for individual detent positions), and membrane keypads all exhibit varying degrees of contact bouncing that can be addressed using the same timing-based filtering principles. The ezButton library's object-oriented approach scales effectively across mixed input types, allowing unified debouncing management for complex user interface systems.
Environmental Adaptations: Industrial environments with high electromagnetic interference may require adaptive debouncing algorithms that adjust timing based on detected noise levels. The Arduino Giga R1 WiFi's dual-core architecture enables sophisticated filtering algorithms that analyze bounce patterns and optimize debounce delays automatically for changing environmental conditions.
Application Ideas
Industrial Control Panel: Implement a multi-button control interface for manufacturing equipment monitoring and control. The Arduino Giga R1 WiFi's WiFi capability enables remote status reporting while robust button debouncing ensures reliable operator input under industrial conditions with vibration and electrical noise.
Home Automation Controller: Design a wall-mounted control panel with multiple buttons for lighting, HVAC, and security system control. The Arduino Giga R1 WiFi's generous memory supports complex automation logic and scheduling, while consistent button debouncing prevents accidental activations from mechanical variations or user interaction patterns.
Data Logging Station: Create a portable environmental monitoring system with user buttons for mode selection, calibration, and data marking. Button debouncing ensures accurate event timestamping and mode changes, while the Arduino Giga R1 WiFi's processing power enables real-time data analysis and wireless transmission to cloud services.
Gaming Input Device: Develop a custom gaming controller or arcade-style input panel with precise button response requirements. The Arduino Giga R1 WiFi's timing precision enables competitive-level input latency while debouncing algorithms filter mechanical bouncing without introducing perceptible delays.
Safety Interlock System: Implement an emergency stop or safety interlock system where button reliability is critical. Multi-stage debouncing algorithms can differentiate between legitimate safety activations and false triggers from environmental factors, integrating with the Arduino Giga R1 WiFi's communication capabilities for immediate alert distribution.
Educational Demonstration Platform: Build an interactive electronics learning system that visualizes button bouncing phenomena and demonstrates various debouncing techniques. The Arduino Giga R1 WiFi's dual-core capability enables real-time signal analysis and graphical display of bounce characteristics while implementing educational software.
Challenge Yourself
Challenge: Implement adaptive debouncing that automatically adjusts timing based on detected bounce patterns. Analyze the frequency and duration of bounce events to optimize debounce delays for different switch types and environmental conditions.
Challenge: Create a button state machine that supports press, release, hold, and multi-click detection with individual debouncing for each state transition. Use the Arduino Giga R1 WiFi's timer peripherals to track hold durations and multi-click timing windows.
Challenge: Design a wireless button interface that transmits debounced button events over WiFi to a central controller. Implement packet queuing and acknowledgment protocols to ensure no button presses are lost during network communication delays.
Challenge: Develop a capacitive touch button system with software debouncing that compensates for environmental factors like humidity and temperature. Integrate with the Arduino Giga R1 WiFi's analog inputs to monitor touch sensor sensitivity and adjust debouncing algorithms accordingly.
Challenge: Build a button matrix scanner that handles multiple simultaneous button presses with individual debouncing for each matrix position. Optimize the scanning algorithm to minimize ghosting effects while maintaining responsive debouncing across all button positions using the Arduino Giga R1 WiFi's GPIO capabilities.