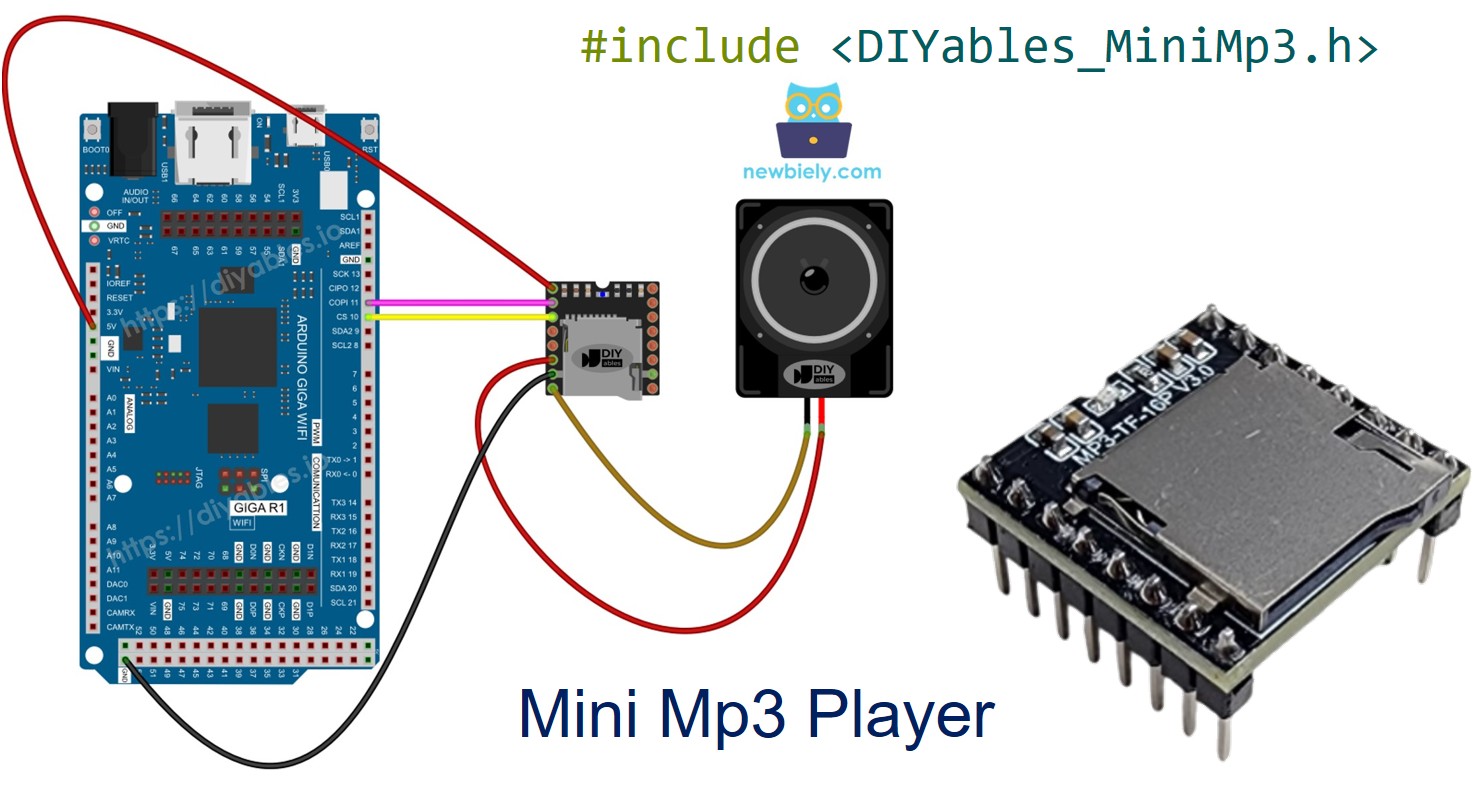
Arduino Giga R1 WiFi Mini Mp3 Player Module
The Arduino Giga R1 WiFi is a feature-rich board built on the STM32H747 dual-core processor, with WiFi and Bluetooth connectivity, multiple hardware serial ports, and 3.3V logic. Its abundant resources make it an excellent platform for audio projects using the DIYables Mini Mp3 Player module.
What you will accomplish in this tutorial:
Wire the Mini Mp3 Player to the Giga R1 using hardware serial — no resistor necessary.
Correctly format an SD card and load mp3 files.
Program the Giga R1 to play tracks, adjust volume, and navigate a playlist.
Implement looping, shuffling, and folder-organized playback.
Read real-time status from the module (current track, volume, play state).
Or you can buy the following kits:
Disclosure: Some of the links provided in this section are Amazon affiliate links. We may receive a commission for any purchases made through these links at no additional cost to you.
Additionally, some of these links are for products from our own brand,
DIYables .
The Giga R1 runs at 3.3V logic. No series resistor is needed on the UART lines.
The DIYables Mini Mp3 Player module houses the YX5200-24SS decoder. It pulls mp3 files from a micro SD card and drives a small speaker directly (up to 3W) through its built-in amplifier. For higher-fidelity setups, the DAC output pins can feed an external amplifier.
Control is via UART at 9600 baud:
Complete transport: play, pause, resume, stop, next, previous
Volume from 0 (mute) to 30 (maximum)
Six EQ presets: Normal, Pop, Rock, Jazz, Classic, Bass
Repeat a single track, repeat a folder, repeat all, or shuffle
Folder-organized playback for categorized audio content
Advertisement overlay — interrupt and resume seamlessly
Query the module for its current state at any time
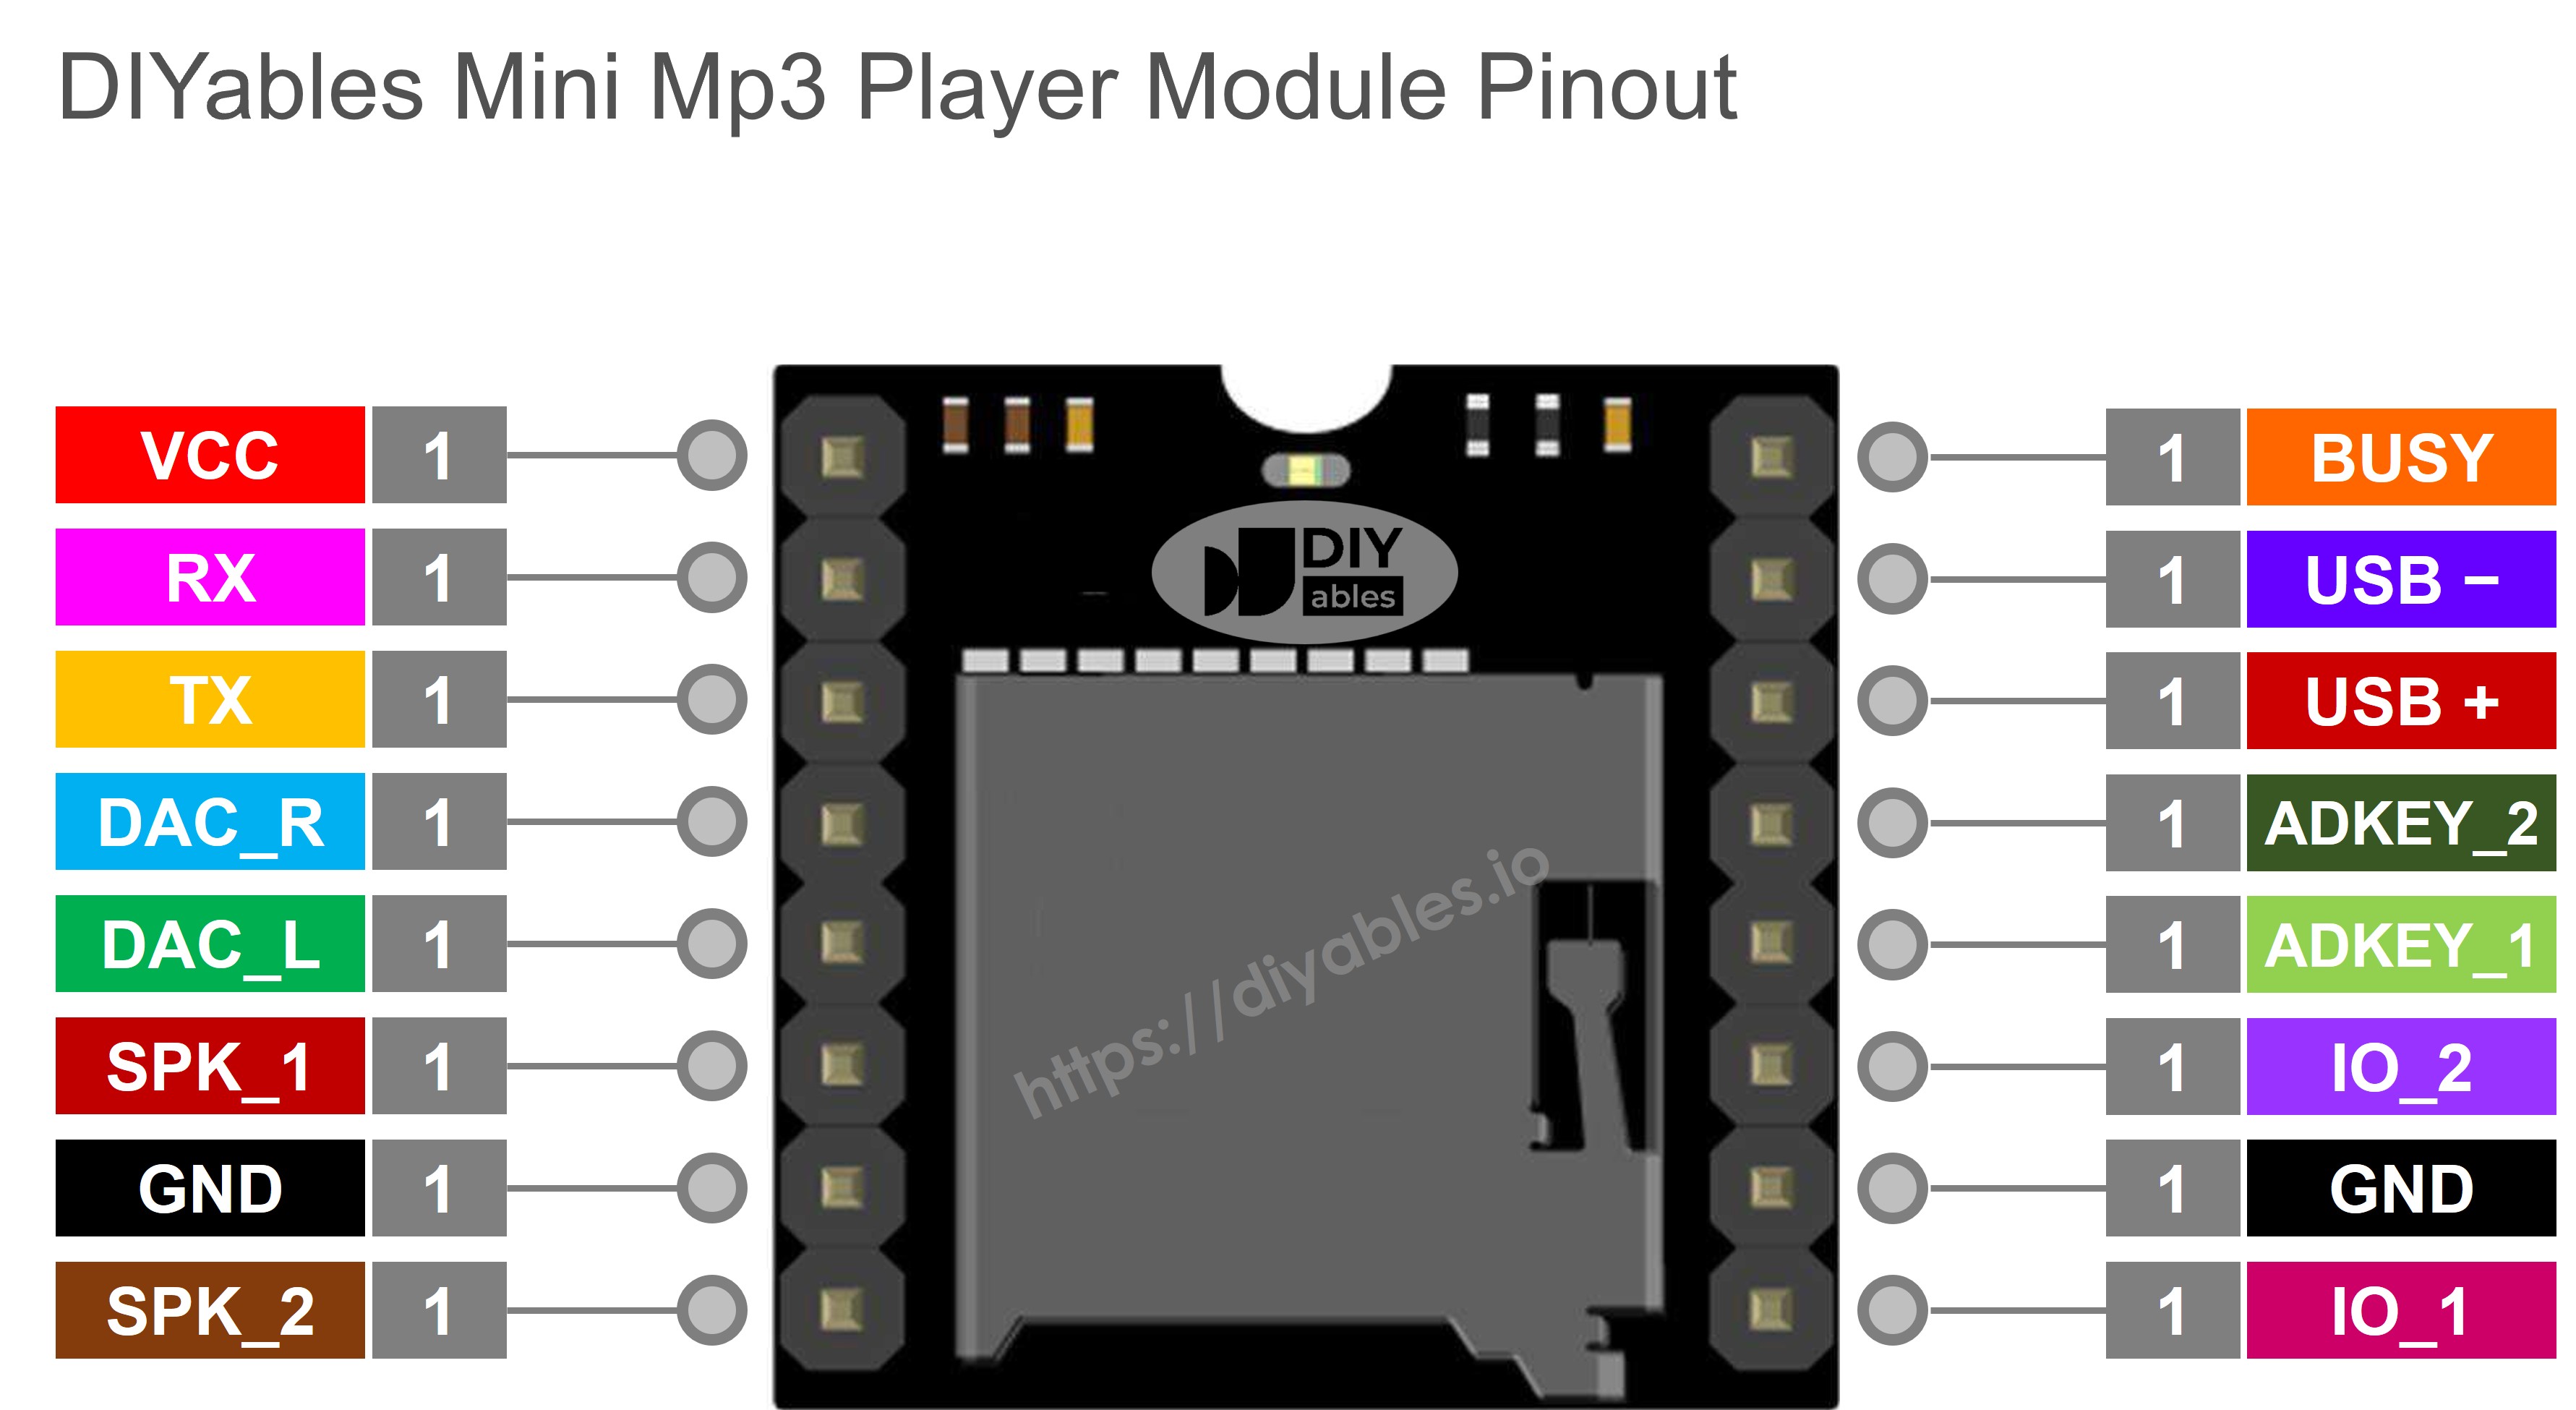
| Pin | Role |
|---|
| VCC | Power input (3.2V – 5.0V) |
| GND | Ground reference |
| RX | Serial data in (from Giga TX) |
| TX | Serial data out (to Giga RX) |
| SPK_1 | Speaker positive (internal amplifier, max 3W) |
| SPK_2 | Speaker negative |
| DAC_R | Right channel line output |
| DAC_L | Left channel line output |
| BUSY | Pulled LOW during playback |
| IO_1 | Short press → previous track; long press → vol down |
| IO_2 | Short press → next track; long press → vol up |
We use Serial1 on the Giga R1 WiFi. The board operates at 3.3V so the connection is direct.
| Mini Mp3 Player | Arduino Giga R1 WiFi | Notes |
|---|
| VCC | 3.3V | |
| GND | GND | |
| RX | Pin 1 (Serial1 TX) | Direct — matched 3.3V logic |
| TX | Pin 0 (Serial1 RX) | Direct |
| SPK_1 | Speaker + | |
| SPK_2 | Speaker − | |
The Giga R1 also has Serial2, Serial3, and Serial4 available if Serial1 is already in use.
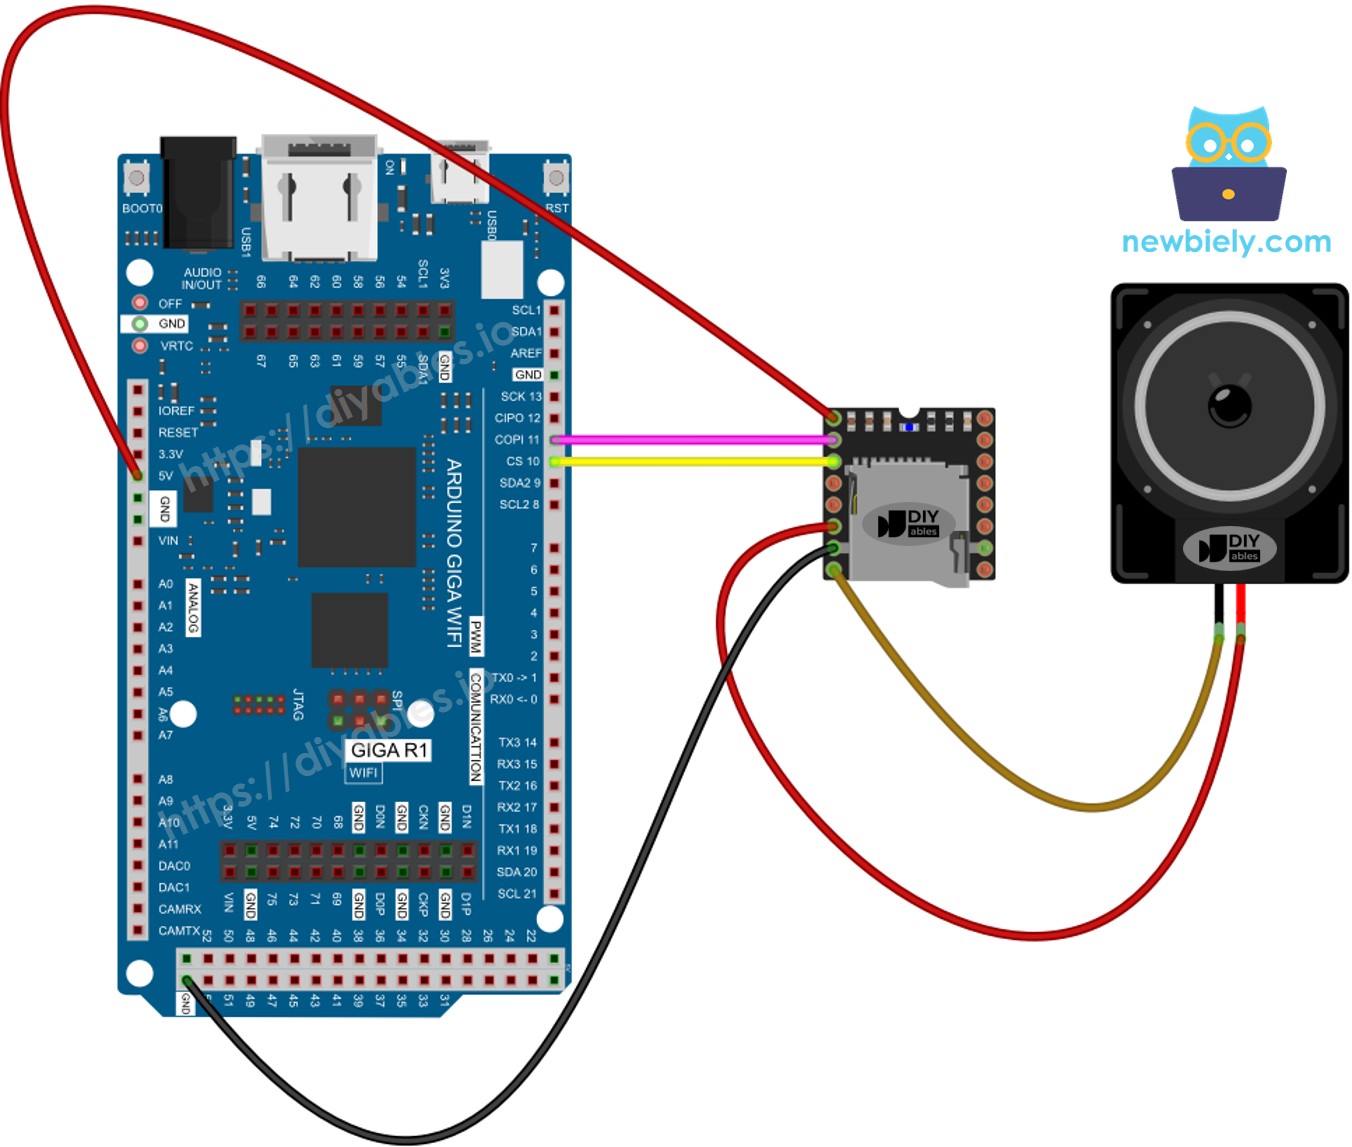
This image is created using Fritzing. Click to enlarge image
Prepare the micro SD card before inserting it into the module:
Format as FAT16 or FAT32.
Copy mp3 files to the root directory:
/001.mp3
/002.mp3
/003.mp3
Optionally create numbered folders for organized playback:
/01/001.mp3
/01/002.mp3
/02/001.mp3
Key details:
Numbering begins at 1, not 0.
The module assigns track numbers based on the sequence in which files were copied, not alphabetical order of filenames. Format the card first, then copy each file individually in the intended sequence.
Folder names: 2 digits (01 to 99). File names within folders: 3 digits (001 to 255).
Connect the Giga R1 WiFi to your computer via USB-C.
In the Arduino IDE, select Arduino Giga R1 WiFi and the correct port.
Navigate to the Libraries panel.
Search for "DIYables_MiniMp3" and install the library by DIYables.
The library is self-contained — no dependencies.
With the Giga R1's hardware serial, the setup is clean:
#include <DIYables_MiniMp3.h>
DIYables_MiniMp3 mp3;
void setup() {
Serial.begin(115200);
Serial1.begin(9600);
mp3.begin(Serial1);
delay(1000);
mp3.setVolume(25);
}
void loop() {
}
#include <DIYables_MiniMp3.h>
#include <SoftwareSerial.h>
SoftwareSerial mp3Serial(10, 11);
DIYables_MiniMp3 mp3;
void setup()
{
Serial.begin(9600);
mp3Serial.begin(9600);
mp3.begin(mp3Serial);
delay(1000);
mp3.setVolume(25);
Serial.println("Playing track 1...");
mp3.play(1);
}
void loop()
{
}
Load the SD card, wire the module, and connect the Giga R1 via USB-C.
Select Arduino Giga R1 WiFi and upload.
| Function | Description | Code |
|---|
| play(n) | Play track number n | mp3.play(1) |
| playNext() | Advance to next | mp3.playNext() |
| playPrevious() | Return to previous | mp3.playPrevious() |
| pause() | Pause playback | mp3.pause() |
| resume() | Resume playback | mp3.resume() |
| stop() | Halt playback | mp3.stop() |
#include <DIYables_MiniMp3.h>
#include <SoftwareSerial.h>
SoftwareSerial mp3Serial(10, 11);
DIYables_MiniMp3 mp3;
int currentTrack = 1;
int totalTracks = 3;
unsigned long lastTrackTime = 0;
unsigned long trackDuration = 5000;
void setup()
{
Serial.begin(9600);
mp3Serial.begin(9600);
mp3.begin(mp3Serial);
delay(1000);
mp3.setVolume(20);
Serial.println("Playing track 1...");
mp3.play(currentTrack);
lastTrackTime = millis();
}
void loop()
{
if (millis() - lastTrackTime >= trackDuration)
{
currentTrack++;
if (currentTrack > totalTracks)
currentTrack = 1;
Serial.print("Playing track ");
Serial.println(currentTrack);
mp3.play(currentTrack);
lastTrackTime = millis();
}
}
#include <DIYables_MiniMp3.h>
#include <SoftwareSerial.h>
SoftwareSerial mp3Serial(10, 11);
DIYables_MiniMp3 mp3;
const int BUTTON_VOL_UP = 2;
const int BUTTON_VOL_DOWN = 3;
int volume = 15;
void setup()
{
Serial.begin(9600);
mp3Serial.begin(9600);
pinMode(BUTTON_VOL_UP, INPUT_PULLUP);
pinMode(BUTTON_VOL_DOWN, INPUT_PULLUP);
mp3.begin(mp3Serial);
delay(1000);
mp3.setVolume(volume);
mp3.loopTrack(1);
Serial.print("Volume: ");
Serial.println(volume);
}
void loop()
{
if (digitalRead(BUTTON_VOL_UP) == LOW)
{
if (volume < 30)
{
volume++;
mp3.setVolume(volume);
Serial.print("Volume: ");
Serial.println(volume);
}
delay(200);
}
if (digitalRead(BUTTON_VOL_DOWN) == LOW)
{
if (volume > 0)
{
volume--;
mp3.setVolume(volume);
Serial.print("Volume: ");
Serial.println(volume);
}
delay(200);
}
}
| Function | Description | Code |
|---|
| setVolume(v) | Set to specific level | mp3.setVolume(20) |
| volumeUp() | Step up by 1 | mp3.volumeUp() |
| volumeDown() | Step down by 1 | mp3.volumeDown() |
| getVolume() | Read the current value | mp3.getVolume() |
#include <DIYables_MiniMp3.h>
#include <SoftwareSerial.h>
SoftwareSerial mp3Serial(10, 11);
DIYables_MiniMp3 mp3;
const int BUTTON_NEXT = 2;
const int BUTTON_PREV = 3;
void setup()
{
Serial.begin(9600);
mp3Serial.begin(9600);
pinMode(BUTTON_NEXT, INPUT_PULLUP);
pinMode(BUTTON_PREV, INPUT_PULLUP);
mp3.begin(mp3Serial);
delay(1000);
mp3.setVolume(20);
mp3.play(1);
Serial.println("Press NEXT or PREV button to change track");
}
void loop()
{
if (digitalRead(BUTTON_NEXT) == LOW)
{
Serial.println("Next track");
mp3.playNext();
delay(300);
}
if (digitalRead(BUTTON_PREV) == LOW)
{
Serial.println("Previous track");
mp3.playPrevious();
delay(300);
}
}
#include <DIYables_MiniMp3.h>
#include <SoftwareSerial.h>
SoftwareSerial mp3Serial(10, 11);
DIYables_MiniMp3 mp3;
const int BUTTON_PIN = 2;
bool paused = false;
void setup()
{
Serial.begin(9600);
mp3Serial.begin(9600);
pinMode(BUTTON_PIN, INPUT_PULLUP);
mp3.begin(mp3Serial);
delay(1000);
mp3.setVolume(20);
mp3.play(1);
Serial.println("Playing. Press button to pause/resume.");
}
void loop()
{
if (digitalRead(BUTTON_PIN) == LOW)
{
if (paused)
{
mp3.resume();
Serial.println("Resumed");
}
else
{
mp3.pause();
Serial.println("Paused");
}
paused = !paused;
delay(300);
}
}
#include <DIYables_MiniMp3.h>
#include <SoftwareSerial.h>
SoftwareSerial mp3Serial(10, 11);
DIYables_MiniMp3 mp3;
void setup()
{
Serial.begin(9600);
mp3Serial.begin(9600);
mp3.begin(mp3Serial);
delay(1000);
mp3.setVolume(25);
mp3.setEQ(DIYables_MiniMp3::EQ_NORMAL);
Serial.println("Playing track 1 on loop...");
mp3.loopTrack(1);
}
void loop()
{
}
| Function | Behavior | Code |
|---|
| loopTrack(n) | Repeat track n continuously | mp3.loopTrack(1) |
| loopFolder(f) | Repeat all tracks in folder f | mp3.loopFolder(1) |
| loopAll() | Repeat every track on the card | mp3.loopAll() |
| stopLoop() | Cancel active repeat | mp3.stopLoop() |
| shuffle() | Randomize play order | mp3.shuffle() |
#include <DIYables_MiniMp3.h>
#include <SoftwareSerial.h>
SoftwareSerial mp3Serial(10, 11);
DIYables_MiniMp3 mp3;
void setup()
{
Serial.begin(9600);
mp3Serial.begin(9600);
mp3.begin(mp3Serial);
delay(1000);
mp3.setVolume(20);
Serial.println("Playing folder 01, track 001...");
mp3.playFolder(1, 1);
delay(5000);
Serial.println("Playing folder 01, track 002...");
mp3.playFolder(1, 2);
delay(5000);
Serial.println("Playing folder 02, track 001...");
mp3.playFolder(2, 1);
}
void loop()
{
}
| Function | Description | Code |
|---|
| playFolder(f, t) | Play track t in folder f (max 99 folders, 255 tracks) | mp3.playFolder(1, 1) |
| playLargeFolder(f, t) | Extended mode (15 folders, 3000 tracks) | mp3.playLargeFolder(1, 2000) |
| playFromMP3Folder(t) | Play from dedicated /mp3 folder | mp3.playFromMP3Folder(1) |
#include <DIYables_MiniMp3.h>
#include <SoftwareSerial.h>
SoftwareSerial mp3Serial(10, 11);
DIYables_MiniMp3 mp3;
void setup()
{
Serial.begin(9600);
mp3Serial.begin(9600);
mp3.begin(mp3Serial);
delay(1000);
mp3.setVolume(20);
Serial.println("=== DIYables Mini Mp3 Player ===");
Serial.println("Commands:");
Serial.println(" 1-9 Play track number");
Serial.println(" + Volume up");
Serial.println(" - Volume down");
Serial.println(" p Pause");
Serial.println(" r Resume");
Serial.println(" s Stop");
Serial.println(" n Next track");
Serial.println(" b Previous track");
Serial.println(" ? Show status");
Serial.println("================================");
}
void loop()
{
if (Serial.available())
{
char cmd = Serial.read();
switch (cmd)
{
case '1': case '2': case '3':
case '4': case '5': case '6':
case '7': case '8': case '9':
Serial.print("Playing track ");
Serial.println(cmd - '0');
mp3.play(cmd - '0');
break;
case '+':
Serial.println("Volume up");
mp3.volumeUp();
break;
case '-':
Serial.println("Volume down");
mp3.volumeDown();
break;
case 'p':
Serial.println("Paused");
mp3.pause();
break;
case 'r':
Serial.println("Resumed");
mp3.resume();
break;
case 's':
Serial.println("Stopped");
mp3.stop();
break;
case 'n':
Serial.println("Next track");
mp3.playNext();
break;
case 'b':
Serial.println("Previous track");
mp3.playPrevious();
break;
case '?':
{
Serial.println("--- Status ---");
int16_t vol = mp3.getVolume();
Serial.print("Volume: ");
Serial.println(vol);
int16_t track = mp3.getCurrentTrack();
Serial.print("Current track: ");
Serial.println(track);
bool playing = mp3.isPlaying();
Serial.print("Playing: ");
Serial.println(playing ? "Yes" : "No");
int16_t total = mp3.getTrackCount();
Serial.print("Total tracks: ");
Serial.println(total);
Serial.println("--------------");
break;
}
default:
break;
}
}
}
| Command | Action |
|---|
| 1–9 | Play track by number |
| + / − | Volume adjustment |
| p | Pause |
| r | Resume |
| s | Stop |
| n | Next track |
| b | Previous track |
| ? | Status display |
| Constant | Value | Description |
|---|
| DIYables_MiniMp3::EQ_NORMAL | 0 | Neutral |
| DIYables_MiniMp3::EQ_POP | 1 | Pop |
| DIYables_MiniMp3::EQ_ROCK | 2 | Rock |
| DIYables_MiniMp3::EQ_JAZZ | 3 | Jazz |
| DIYables_MiniMp3::EQ_CLASSIC | 4 | Classical |
| DIYables_MiniMp3::EQ_BASS | 5 | Bass-heavy |
mp3.setEQ(DIYables_MiniMp3::EQ_JAZZ);
Each of these methods blocks for up to 100 ms while awaiting a response. A return value of −1 signals a timeout or communication error.
| Method | Returns | What It Tells You |
|---|
| isPlaying() | bool | Whether audio is currently active |
| getVolume() | int16_t | Current volume setting (0–30) |
| getEQ() | int16_t | Active equalizer preset (0–5) |
| getTrackCount() | int16_t | Total mp3 files on the SD card |
| getCurrentTrack() | int16_t | Track number being played |
| getFolderCount() | int16_t | Number of folders on the card |
| getTrackCountInFolder(f) | int16_t | Number of tracks inside folder f |