Arduino Giga R1 WiFi MP3 Player
This guide covers building a complete MP3 player system with the Arduino Giga R1 WiFi — from hardware setup to working code with control buttons. The Arduino Giga R1 WiFi's dual-core STM32H747XI processor and generous memory allocation make it exceptionally well-suited for audio applications that require real-time control and buffer management.
The implementation uses a serial MP3 player module to handle audio decoding and digital-to-analog conversion, while the Arduino manages playback control through UART communication. This architecture offloads the computationally intensive MP3 decoding from the microcontroller, allowing the Arduino Giga R1 WiFi to focus on user interface management and system coordination. The MP3 files are stored on a micro SD card, with each track indexed sequentially for programmatic access.
You'll implement both a basic MP3 player and an advanced version with play, pause, next, and previous controls. The system supports standard MP3 file formats and provides volume control through software commands. Real-world applications include embedded audio systems, educational tools, interactive installations, and prototype development for commercial audio products.
This tutorial covers the complete implementation process: hardware integration, UART protocol configuration, file management on the SD card, and user interface development. By the end, you'll have a fully functional MP3 player system that can be extended with additional features like remote control, RFID activation, or networked playback control using the Arduino Giga R1 WiFi's WiFi capabilities.
Hardware Preparation
Or you can buy the following kits:
| 1 | × | DIYables Sensor Kit (18 sensors/displays) |
Additionally, some of these links are for products from our own brand, DIYables .
Overview of Serial MP3 Player Module and Speaker
The Serial MP3 Player Module is a dedicated audio processing device designed for microcontroller-based applications requiring high-quality MP3 playback without burdening the host processor. The module integrates an MP3 decoder chip, digital-to-analog converter, amplifier stage, and UART interface controller in a compact form factor optimized for embedded systems integration.
Technical Specifications:
- Audio Format Support: MP3, WAV (16-bit, 8kHz to 48kHz sampling rates)
- Communication Protocol: UART serial at 9600 baud (default), configurable
- Operating Voltage: 3.3V to 5V DC, current consumption 15-40mA during playback
- Audio Output: Line level (approximately 1V RMS), 3.5mm stereo jack
- Storage Interface: Micro SD Card (FAT16/FAT32), supports up to 32GB capacity
- Control Commands: 25+ software commands including play, pause, volume, track selection
- File Indexing: Automatic sequential indexing (001-999) based on storage order
Operating Principle:
The module operates by receiving command packets via UART from the Arduino Giga R1 WiFi. Upon receiving a play command with a track index, the module accesses the corresponding MP3 file from the micro SD card, performs real-time MP3 decoding using its onboard DSP, converts the digital audio stream to analog signals through an integrated DAC, and outputs the amplified audio signal through the 3.5mm connector. The module maintains an internal state machine that tracks playback status, current track, and volume settings.
Integration Advantages with Arduino Giga R1 WiFi:
The Arduino Giga R1 WiFi's multiple UART interfaces allow dedicated communication with the MP3 module without interfering with debugging or other serial communications. The dual-core architecture enables simultaneous user interface processing and audio control management, while the expanded memory supports larger command queues and playlist management systems.
Speaker Compatibility:
The module outputs line-level audio signals suitable for powered speakers, headphones, or external amplifier circuits. For direct speaker connection, ensure the speaker system includes built-in amplification, as the module's output stage provides insufficient current for passive speaker drivers.
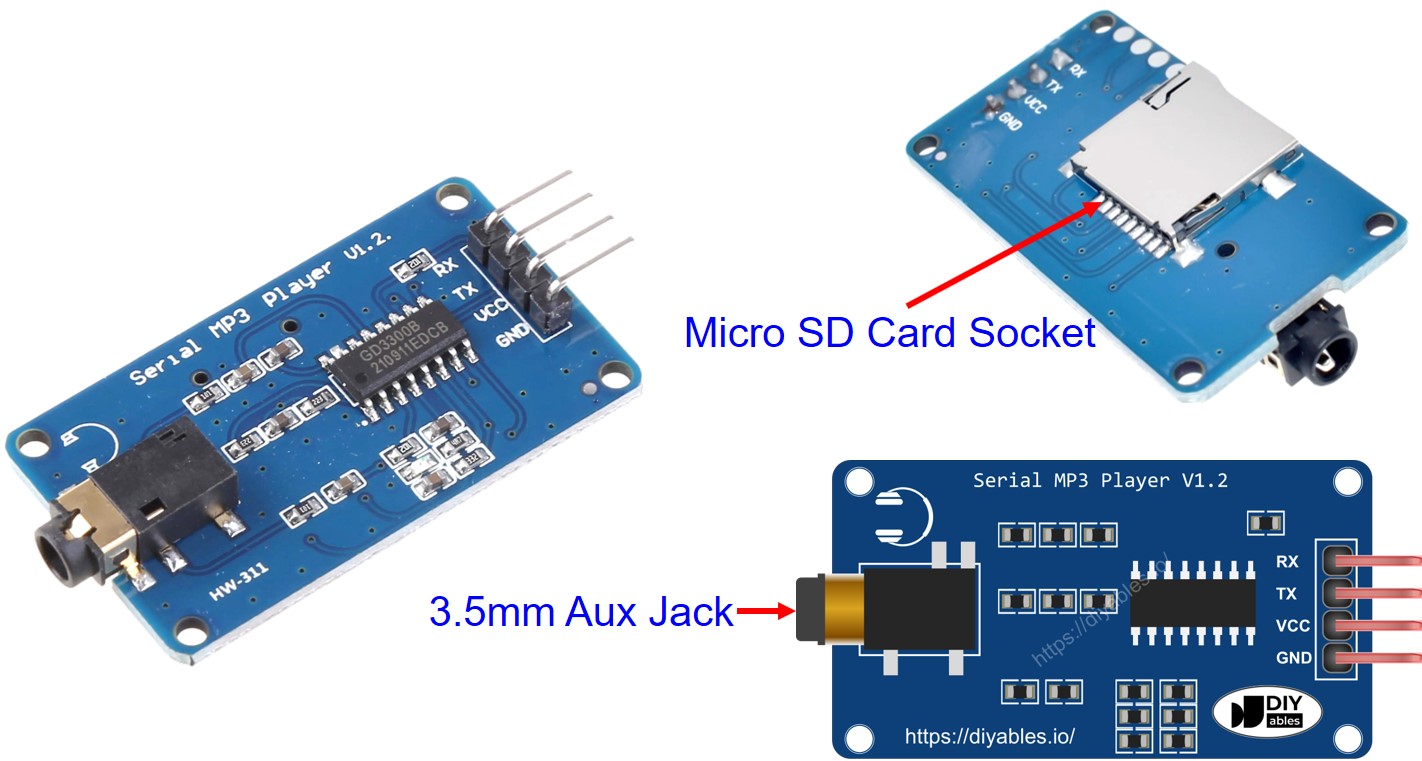
Serial MP3 Player Module Pinout
The pinout establishes the electrical interface between the Arduino Giga R1 WiFi and the MP3 module. Correct wiring is essential — an incorrect power connection may damage the module, while swapped TX/RX lines will prevent communication and result in unresponsive playback control.
Power Supply Connections:
- VCC: +5V DC power input, 100mA maximum current. Connects to Arduino 5V output to provide module operating power and SD card interface voltage.
- GND: Ground reference (0V). Connects to Arduino GND to establish common electrical reference for power and signal integrity.
Serial Communication Interface:
- RX: UART receive input, 3.3V/5V logic compatible. Connects to Arduino TX pin to receive command packets from the microcontroller.
- TX: UART transmit output, 3.3V logic level. Connects to Arduino RX pin to send status responses and acknowledgment packets.
Audio Output Interface:
- 3.5mm Jack: Line-level stereo audio output (1V RMS typical). Connects to powered speakers, headphones, or external amplifier input stage.
Storage Interface:
- Micro SD Socket: Located on module rear, supports FAT16/FAT32 formatted cards. Files must be named sequentially (001.mp3, 002.mp3) for proper indexing.
Electrical Considerations:
The Arduino Giga R1 WiFi's UART pins operate at 3.3V logic levels, which are fully compatible with the MP3 module's input specifications. The module's current consumption varies with playback volume and complexity, requiring stable 5V supply regulation. For extended operation or multiple modules, consider external power supply distribution with appropriate current capacity.
Speaker Interface Requirements:
Speakers used with MP3 player modules require integrated amplification to convert the line-level output to sufficient power for acoustic transduction. The module cannot drive passive speakers directly due to current limitations in the output stage.
Audio Signal Interface: 3.5mm TRS (tip-ring-sleeve) male connector providing stereo line-level input. The tip carries left channel audio, ring carries right channel, and sleeve provides common ground reference.
Power Interface: Independent power connection required for amplifier circuit. Common configurations include USB 5V, wall adapter (6-12V DC), or battery pack depending on speaker design and power requirements.
How It Works
System Architecture and Data Flow:
The MP3 player system operates through a coordinated interaction between four primary components: the Arduino Giga R1 WiFi controller, Serial MP3 Player Module, micro SD card storage, and powered speaker output. The Arduino functions as the system controller, managing user interface inputs and sending command packets to the MP3 module via UART communication protocol.
File Preparation and Storage:
MP3 files must be stored on the micro SD card using a specific naming convention for proper indexing. Files should be named sequentially: 001.mp3, 002.mp3, 003.mp3, continuing through 999.mp3 maximum. The file index corresponds directly to the playback command parameter — requesting track 5 will play the file named 005.mp3. The SD card must be formatted as FAT16 or FAT32 file system for compatibility with the module's embedded file system driver.
Command Protocol and Execution:
The Arduino Giga R1 WiFi communicates with the MP3 module using a packet-based protocol transmitted over UART at 9600 baud. Each command packet contains a start byte (0x7E), command length, command code, parameter data, checksum, and end byte (0xEF). Supported commands include:
- Play Track: Specify track index (0-999) for immediate playback
- Pause/Resume: Toggle current playback state without losing position
- Volume Control: Set output level (0-30, where 30 is maximum volume)
- Next/Previous: Navigate through sequential track indices
- Stop: Halt playback and reset to track beginning
Audio Processing Pipeline:
When a play command is received, the MP3 module's internal processor accesses the specified file from the SD card through its SPI interface. The embedded MP3 decoder performs real-time decompression of the audio data, converting the compressed MP3 stream into raw PCM (Pulse Code Modulation) digital audio samples. These samples are processed through a digital-to-analog converter (DAC) to generate analog audio signals, which are then amplified to line level and output through the 3.5mm connector to the connected speaker system.
System Integration Benefits:
The Arduino Giga R1 WiFi's dual-core STM32H747XI processor enables efficient multitasking — one core can handle user interface processing and sensor inputs while the other manages MP3 module communication and playlist logic. The generous SRAM allocation (1MB) supports sophisticated playlist management, track metadata storage, and command buffering for seamless audio control.
Wiring Diagram
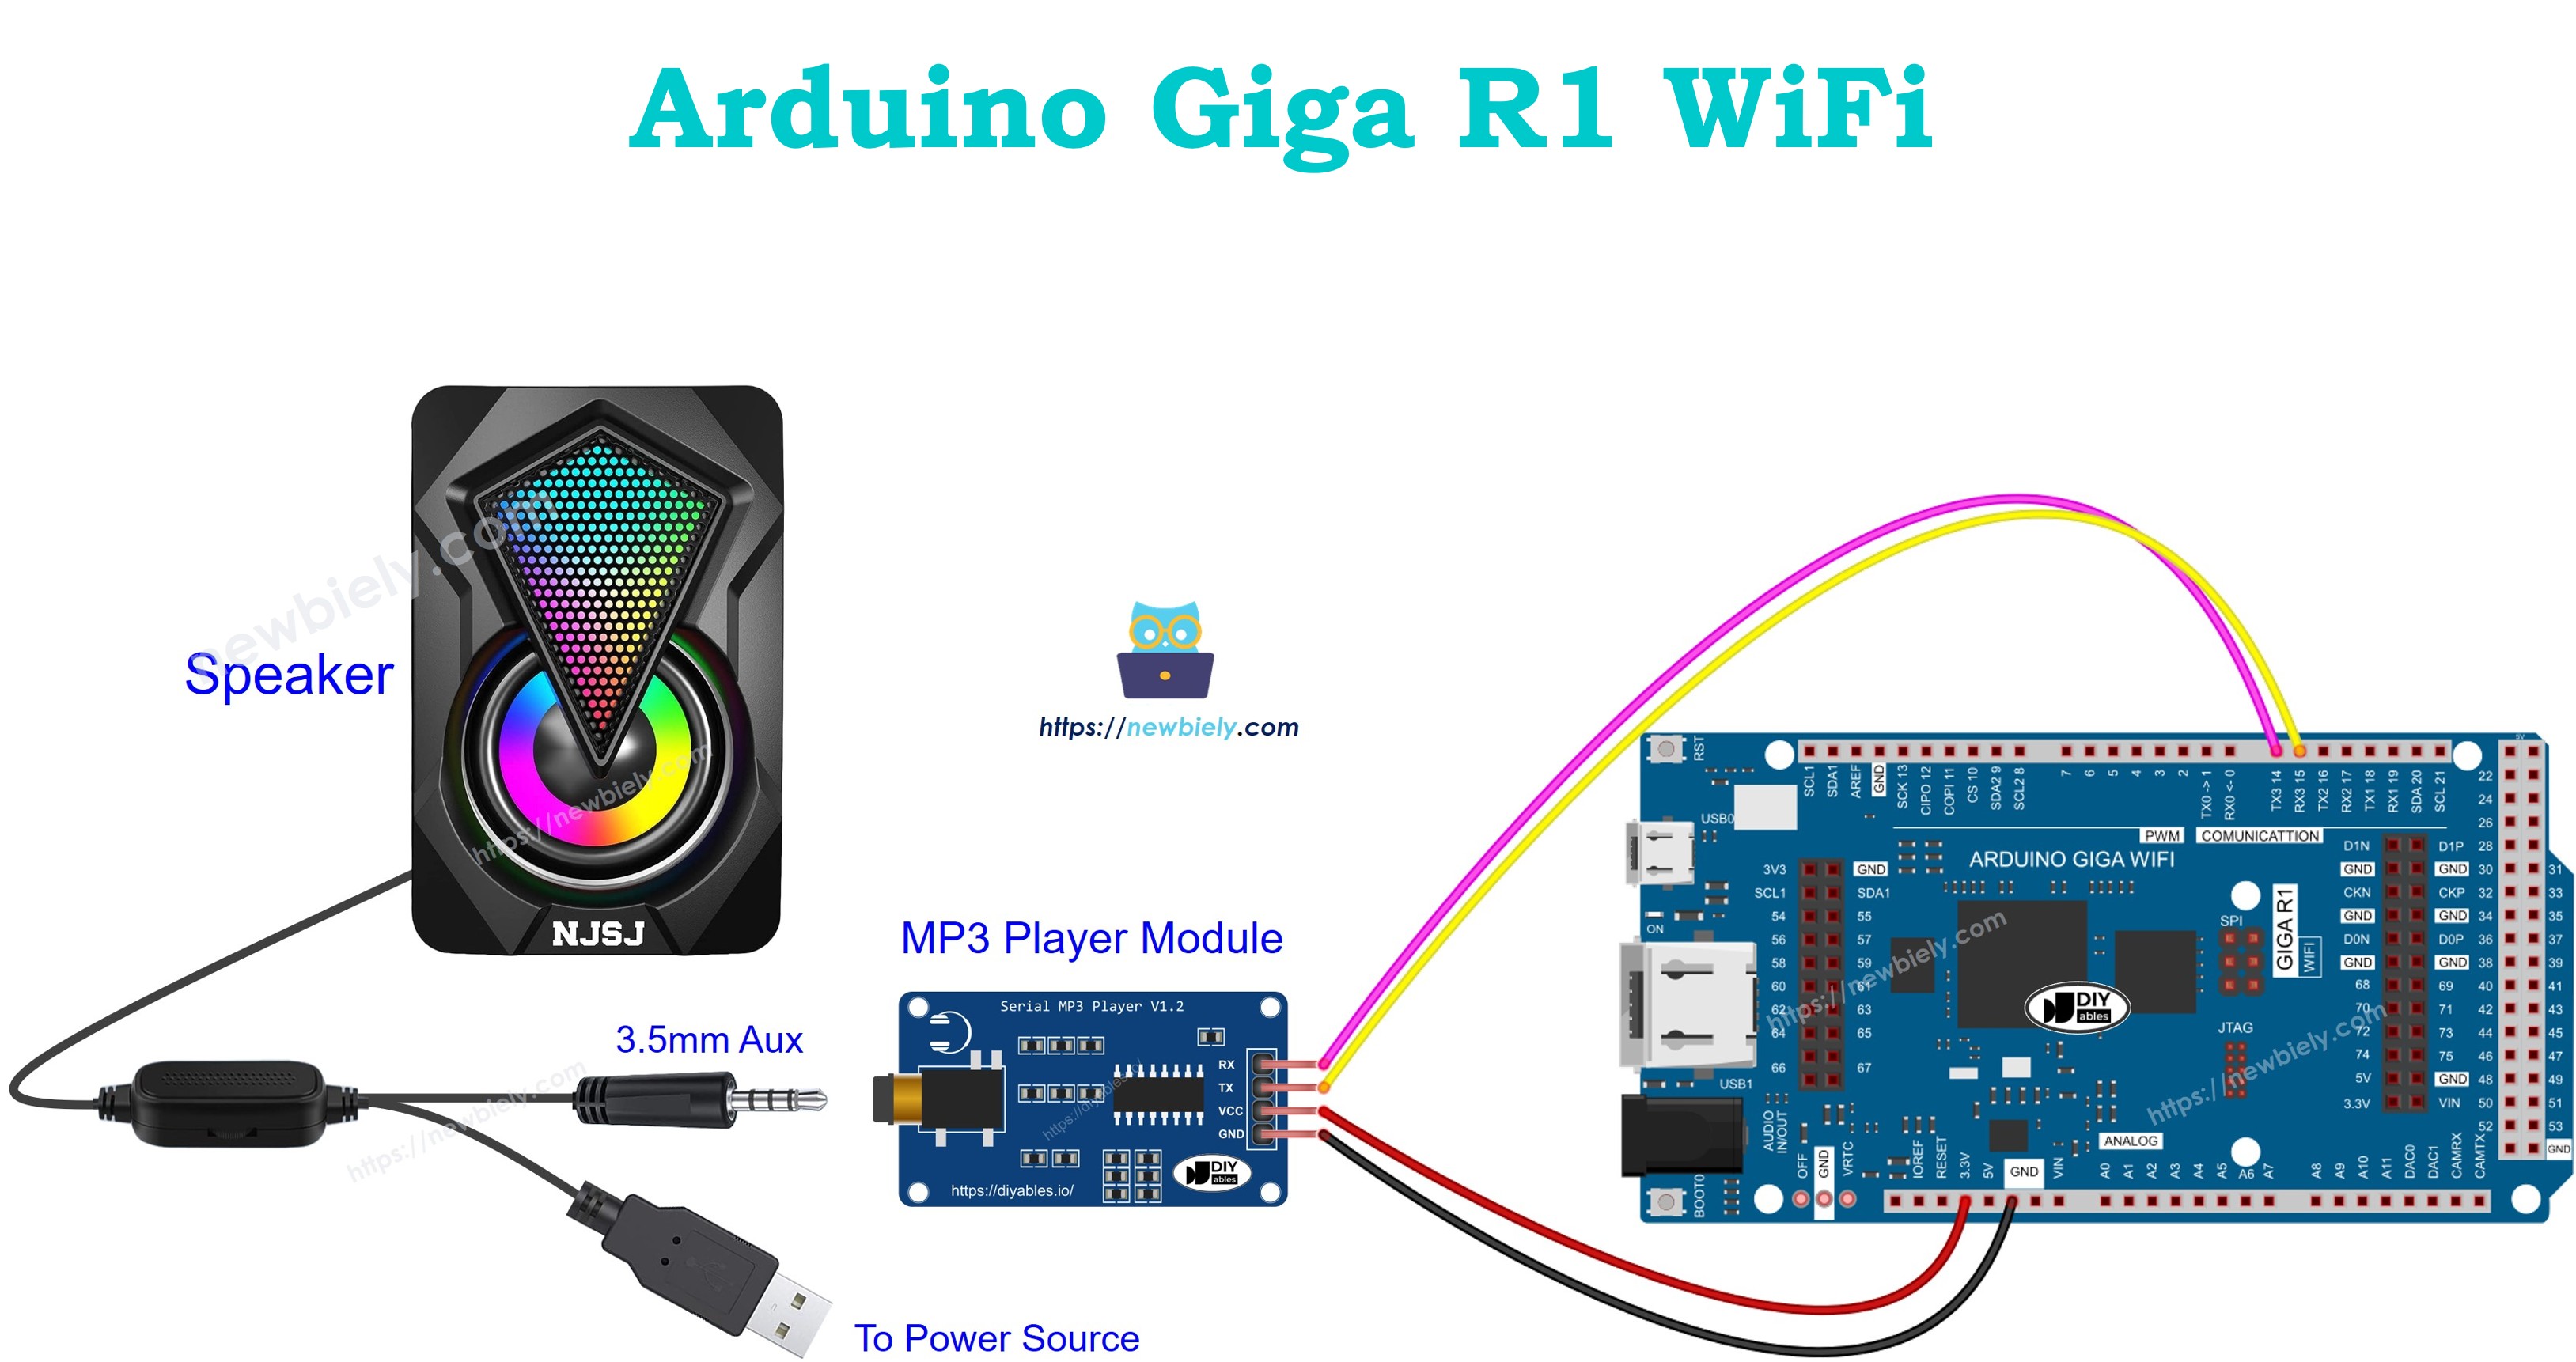
The following diagram demonstrates the electrical connections required for basic MP3 player functionality. The configuration uses the Arduino Giga R1 WiFi's Serial1 UART interface to communicate with the MP3 module, preserving the primary Serial interface for debugging and program monitoring.
Electrical Note: The diagram above shows the minimum viable connection for MP3 player operation. For production or extended use, consider adding a 100µF electrolytic capacitor between VCC and GND near the MP3 module to improve power supply stability during high-volume playback. Additionally, ensure the powered speaker has adequate current capacity — typical requirements range from 500mA to 2A depending on speaker power rating.
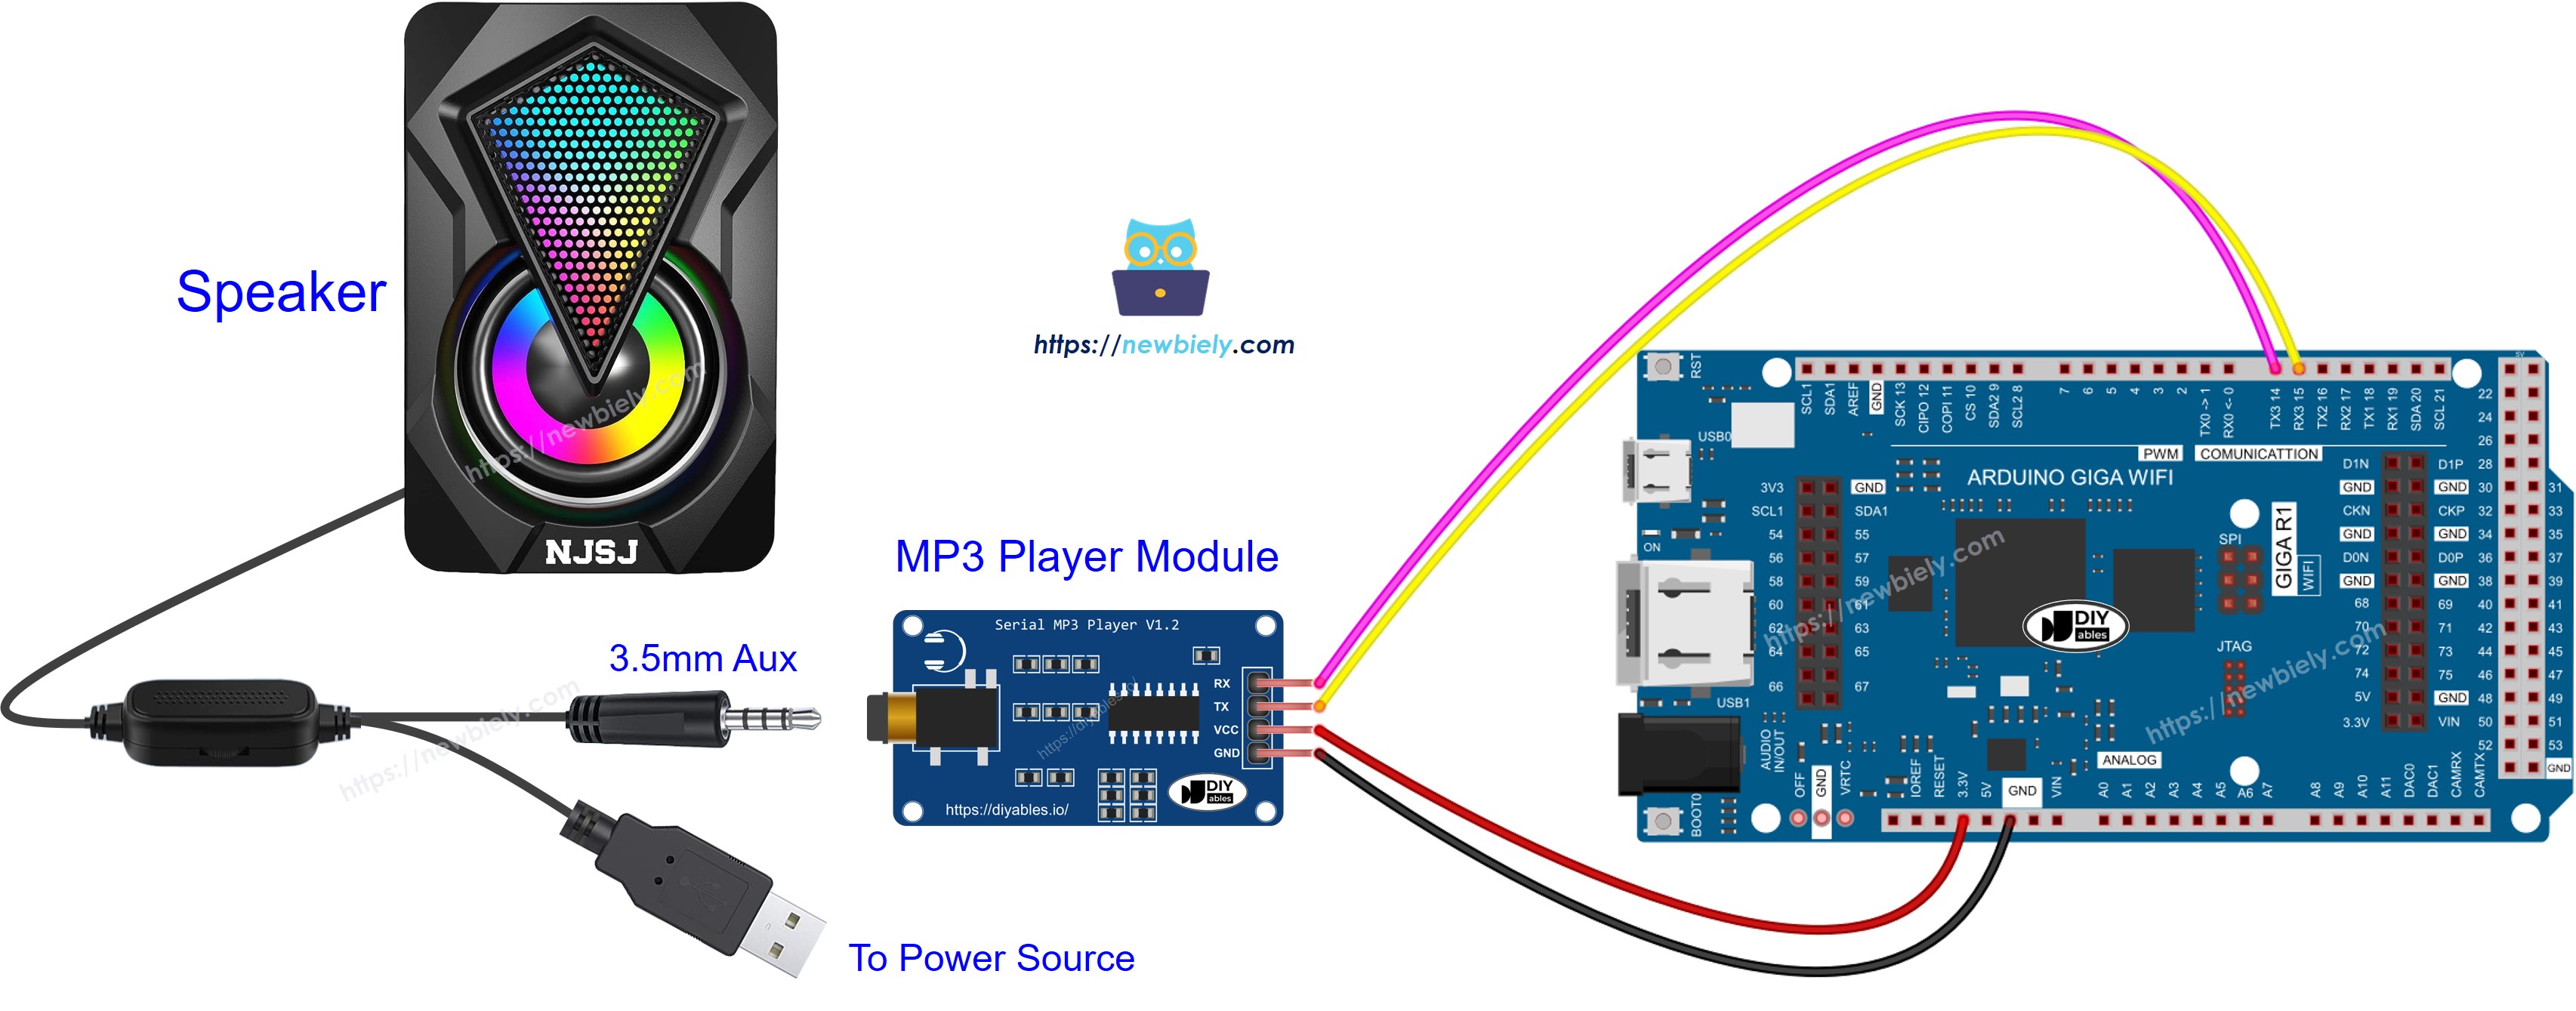
This image is created using Fritzing. Click to enlarge image
| MP3 Module Pin | Arduino Giga R1 WiFi Pin | Function |
|---|---|---|
| VCC | 5V | Power supply (+5V DC) |
| GND | GND | Ground reference (0V) |
| RX | TX1 (Pin 14) | Serial data to module |
| TX | RX1 (Pin 13) | Serial data from module |
| Audio Out | Speaker Input | 3.5mm audio connection |
Power Supply Considerations:
The MP3 module draws approximately 15-40mA during operation, well within the Arduino Giga R1 WiFi's 5V output capability (500mA maximum). The micro SD card interface adds approximately 5-20mA depending on card type and access frequency. Total system current consumption remains under 100mA, making USB power sufficient for development and testing phases.
Arduino Code - Play Music
The following implementation demonstrates basic MP3 playback control using the Arduino Giga R1 WiFi's Serial1 interface. The code is structured to initialize the MP3 module, configure default playback parameters, and initiate playback of the first track stored on the SD card. Key functions handle command packet construction and transmission to ensure reliable communication with the module.
The implementation uses the hardware Serial1 UART interface for optimal performance and reliability. Software serial alternatives are possible but may introduce timing constraints that affect audio quality during high-throughput operations. The command structure follows the module's standard protocol specification, with proper checksum calculation to ensure data integrity.
Detailed Instructions
For initial Arduino Giga R1 WiFi setup, refer to the Arduino Giga R1 WiFi Getting Started guide before proceeding with MP3 player implementation.
- Prepare Audio Files: Format the micro SD card as FAT32 and copy MP3 files named sequentially (001.mp3, 002.mp3, etc.). Verify file format compatibility — the module supports MP3 and WAV formats with sampling rates from 8kHz to 48kHz.
- Insert SD Card: Install the prepared micro SD card into the MP3 module's socket located on the rear of the board. Ensure proper insertion — the card should click into place and sit flush with the module surface.
- Connect Hardware: Follow the wiring diagram precisely, connecting VCC to 5V, GND to GND, MP3 module RX to Arduino TX1 (pin 14), and MP3 module TX to Arduino RX1 (pin 13). Double-check connections before applying power.
- Connect Speaker: Plug the powered speaker's 3.5mm connector into the MP3 module's audio output jack. Ensure the speaker has independent power supply and is powered on before testing.
- Upload Code: Open the provided code in Arduino IDE, select "Arduino Giga R1 WiFi" as the board type, choose the appropriate COM port, and click Upload. Monitor the compilation process for any library dependency errors.
- Verify Operation: Open the Serial Monitor at 9600 baud to observe initialization messages. The system should display "MP3 Player Initialized" followed by "Playing Track 001". Audio playback should begin automatically after a 2-3 second initialization delay.
- Test Playback: Verify audio output quality and volume level. If no audio is heard, check speaker power, volume settings, and SD card file format. The Serial Monitor will display error messages for common issues like missing files or communication failures.
Technical Note: The MP3 module requires 2-3 seconds for SD card initialization and file system mounting after power-on. Commands sent during this initialization period may be ignored, so the code includes appropriate delay intervals to ensure reliable startup sequencing.
Arduino Code - Play Music with Control Buttons
The below code is an enhanced version of the basic MP3 player that integrates four control buttons for interactive playback management. This implementation demonstrates advanced features including button debouncing, state management, and real-time user interface responsiveness while maintaining continuous audio playback.
The button interface uses the Arduino Giga R1 WiFi's digital input pins with internal pull-up resistors enabled. Each button triggers a specific playback command: play/pause toggles the current state, next and previous navigate through tracks sequentially, and a separate volume control system manages audio output level. The code implements proper debouncing algorithms to prevent false triggering and ensures reliable operation in noisy electrical environments.
The wiring diagram for the above code:
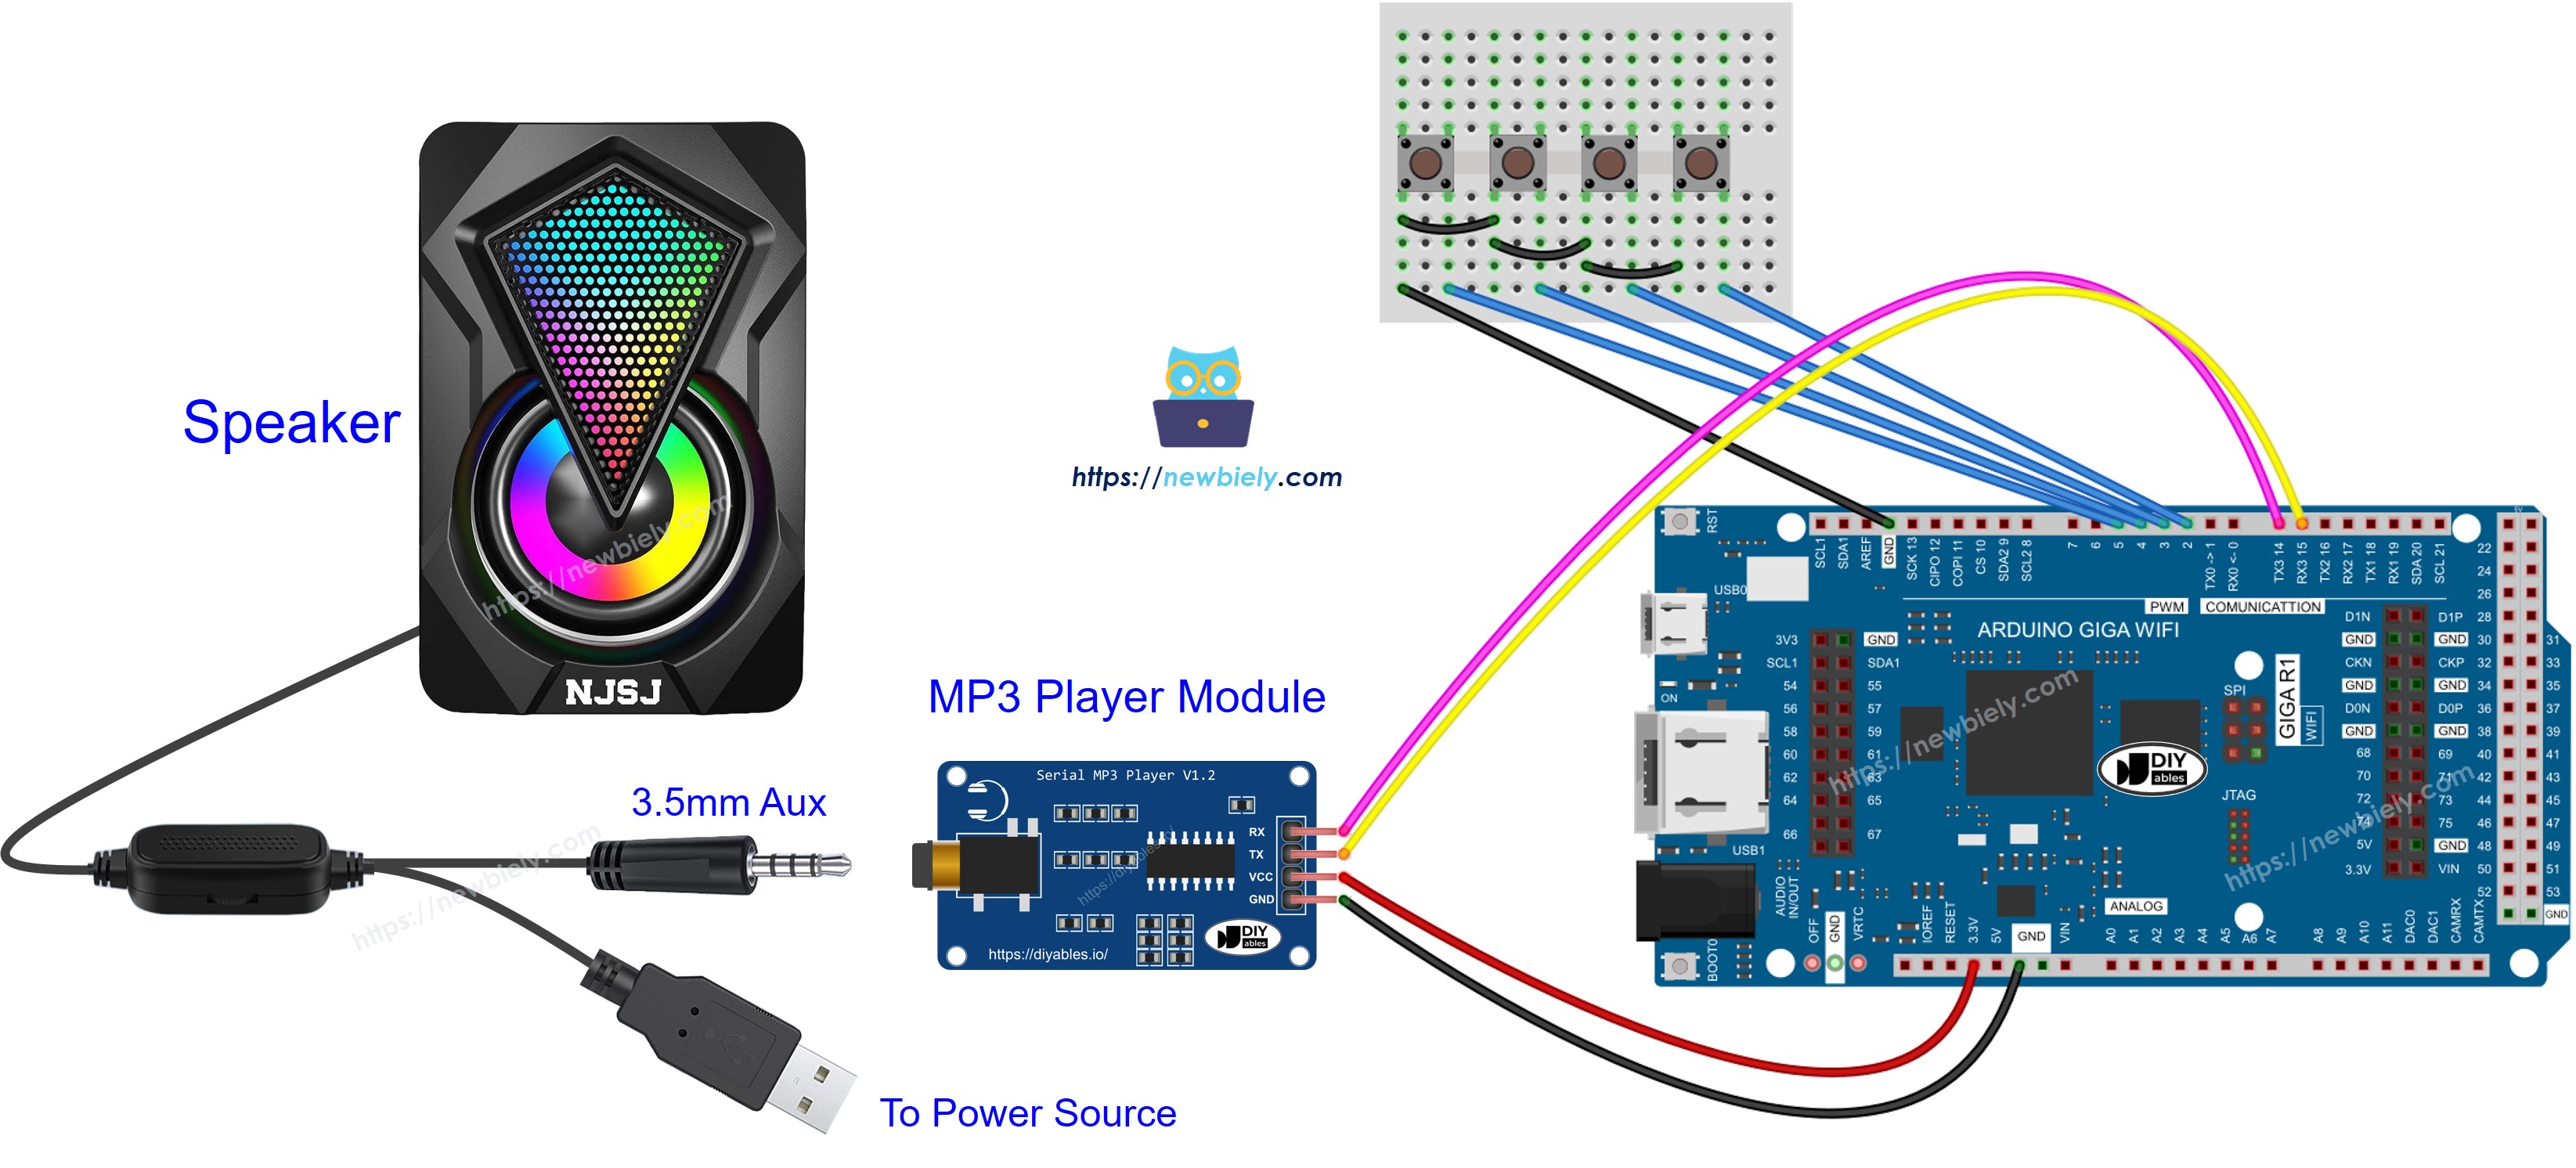
This image is created using Fritzing. Click to enlarge image
Enhanced Wiring Configuration:
| Component Pin | Arduino Giga R1 WiFi Pin | Function |
|---|---|---|
| MP3 Module VCC | 5V | Power supply |
| MP3 Module GND | GND | Ground reference |
| MP3 Module RX | TX1 (Pin 14) | Command data to module |
| MP3 Module TX | RX1 (Pin 13) | Status data from module |
| Play/Pause Button | Pin 2 | Playback control (INPUT_PULLUP) |
| Next Button | Pin 3 | Forward track navigation (INPUT_PULLUP) |
| Previous Button | Pin 4 | Reverse track navigation (INPUT_PULLUP) |
| Volume Button | Pin 5 | Volume adjustment cycle (INPUT_PULLUP) |
| Button Common | GND | Shared ground for all buttons |
Button Interface Design:
The button implementation uses active-low logic with internal pull-up resistors, eliminating the need for external resistors and simplifying the wiring requirements. Each button connects between its assigned digital pin and ground — pressing the button pulls the pin to 0V, triggering the corresponding function. The software implements 50ms debouncing delays to filter mechanical contact bounce and prevent multiple command transmissions from a single button press.
Advanced Control Features:
The enhanced code includes volume cycling (low, medium, high levels), track boundary management (wraps from last to first track), and playback state persistence across power cycles. The Arduino Giga R1 WiFi's expanded memory enables storage of user preferences and playlist information for sophisticated audio management applications.
Now you can modify the projects to add more advanced functionality:
- Volume Control Integration: Add a potentiometer to provide continuous volume adjustment, see Arduino Potentiometer tutorial for analog input implementation
- Remote Control System: Integrate an IR remote controller for wireless operation, see Arduino IR Remote Controller tutorial for infrared communication protocols
- RFID Activation System: Create an RFID-triggered MP3 player where different cards play specific tracks, see Arduino RFID tutorial for contactless identification integration
Serial Monitor Output
Application Ideas
Industrial Audio Notification System: Implement a factory or warehouse audio alert system that plays specific warning messages or musical signals triggered by sensor inputs or production events. The Arduino Giga R1 WiFi's multiple digital inputs can monitor various machine states, while its WiFi capability enables remote playlist updates and system monitoring from a central control station.
Interactive Museum Audio Guide: Develop a proximity-based audio guide system where visitors trigger location-specific audio content through RFID cards or ultrasonic sensors. The Arduino Giga R1 WiFi's generous memory enables storage of multiple language tracks and visitor interaction logging, while the dual-core architecture supports simultaneous audio playback and visitor tracking analytics.
Educational Training Simulator: Create hands-on training modules that provide audio feedback, instructions, or sound effects based on user actions and sensor inputs. The system can integrate with buttons, switches, and measurement devices to provide contextual audio responses. The Arduino Giga R1 WiFi's processing power enables complex decision trees and adaptive learning sequences.
Prototype Commercial Audio Product: Develop proof-of-concept designs for commercial audio devices such as doorbell systems, alarm clocks, or announcement systems. The modular approach allows rapid iteration and feature testing before committing to custom hardware development. Integration with WiFi enables IoT connectivity for smart home applications.
Automated Sound Effects Controller: Build a theater or presentation sound effects system that triggers audio clips based on DMX signals, wireless cues, or scheduled timing. The Arduino Giga R1 WiFi can manage multiple MP3 modules simultaneously, creating complex soundscapes with precise timing control and remote operation capability.
Vehicle Audio Alert System: Implement specialized audio warning systems for vehicles, boats, or heavy equipment that play specific safety messages or operational audio cues. The system can integrate with vehicle electrical systems and provide customizable audio feedback for various operational conditions and maintenance requirements.
Video Section
The accompanying video demonstrates the complete MP3 player assembly process and live code execution. It covers the critical wiring connections between the Arduino Giga R1 WiFi and MP3 module, proper SD card preparation with sequential file naming, and real-time demonstration of both basic playback and advanced button control functionality. The video shows expected Serial Monitor output during initialization and operation, providing visual confirmation of proper system behavior and troubleshooting guidance for common setup issues.
Challenge Yourself
Challenge: Implement a playlist management system that stores favorite tracks in EEPROM and allows cycling through custom playlists using button combinations. Add code to save and restore user-defined track sequences across power cycles.
Challenge: Integrate a rotary encoder for smooth volume control and track selection, replacing the discrete button interface with continuous adjustment capability. Implement acceleration curves for rapid navigation through large track libraries.
Challenge: Create a networked MP3 player that receives playlist commands via WiFi from a web interface or mobile application. Use the Arduino Giga R1 WiFi's dual-core architecture to handle network communication on one core while maintaining uninterrupted audio playback on the other core.
Challenge: Add an LCD display that shows current track information, playback time, and volume level with real-time updates. Implement a menu system that allows browsing tracks by name rather than index number, requiring SD card file system parsing and metadata extraction.
Challenge: Develop a multi-zone audio system using multiple MP3 modules controlled by a single Arduino Giga R1 WiFi, enabling synchronized or independent playback across different speakers. Implement zone volume control, source selection, and synchronized start/stop functionality for professional audio distribution applications.