Arduino Giga R1 WiFi Temperature Sensor
This guide covers DS18B20 temperature sensor implementation with the Arduino Giga R1 WiFi. The DS18B20 is a digital temperature sensor that communicates via the Dallas 1-Wire protocol, providing accurate temperature measurement with minimal GPIO usage.
This tutorial demonstrates DS18B20 integration, including pull-up resistor configuration, library implementation, and error handling. You'll learn to read temperature data in both Celsius and Fahrenheit and troubleshoot common wiring issues.
Hardware Preparation
Or you can buy the following kits:
| 1 | × | DIYables Sensor Kit (18 sensors/displays) |
Additionally, some of these links are for products from our own brand, DIYables .
Buy Note: Many DS18B20 sensors available in the market are unreliable. We strongly recommend buying the sensor from the DIYables brand using the link provided above. We tested it, and it worked reliably.
Overview of One Wire Temperature Sensor - DS18B20
The DS18B20 is a digital temperature sensor that operates on the Dallas 1-Wire protocol, providing 9 to 12-bit temperature resolution with ±0.5°C accuracy from -10°C to +85°C. The temperature range is -55°C to +125°C with conversion times from 93.75ms (9-bit) to 750ms (12-bit resolution). Supply voltage is 3.0V to 5.5V, compatible with both 3.3V and 5V systems.
The waterproof probe variant features a stainless steel enclosure with a 1-meter cable, ideal for liquid temperature monitoring. The 1-Wire protocol allows multiple sensors on a single data bus using unique 64-bit serial codes.
Pinout
The pinout maps each physical connection to its electrical function in the 1-Wire temperature sensing system. Correct wiring is essential — an incorrect connection may damage the sensor or produce unreliable temperature readings due to protocol timing violations.
DS18B20 temperature sensor pinout configuration:
GND: Ground reference, 0V. Connects to Arduino ground to establish common voltage reference for proper digital communication.
VCC: Power supply input, 3.0V to 5.5V DC. Connects to Arduino 5V or 3.3V rail. Current consumption: 1mA active, 750nA standby. External power is recommended for stable operation, though parasitic power mode is supported.
DATA: 1-Wire digital data bus, open-drain output. Connects to any Arduino Giga R1 WiFi digital GPIO pin (D2 recommended). Requires 4.7kΩ pull-up resistor to VCC for proper logic levels. Signal timing is critical — the Arduino Giga R1 WiFi's precise GPIO timing ensures reliable protocol communication.
The 1-Wire protocol operates with specific timing requirements: initialization requires a 480μs reset pulse, while data bits use 60μs time slots. The Arduino Giga R1 WiFi's STM32H747XI processor provides sufficient timing accuracy for reliable DS18B20 communication without additional hardware timing circuits.
Critical Wiring Note: The DATA pin must include a 4.7kΩ pull-up resistor to VCC. Without this resistor, communication will fail as the open-drain output cannot drive logic high levels. Many DS18B20 breakout boards include this resistor, simplifying integration.

Wiring Diagram
The following diagrams demonstrate proper DS18B20 integration with the Arduino Giga R1 WiFi. The implementation shown provides reliable temperature sensing with proper signal integrity and electrical protection.
Electrical Note: The diagrams show the minimum viable connection for DS18B20 temperature sensing. For extended use or multiple sensor installations, consider adding a 100nF ceramic capacitor between VCC and GND near the sensor to reduce power supply noise and improve measurement stability.
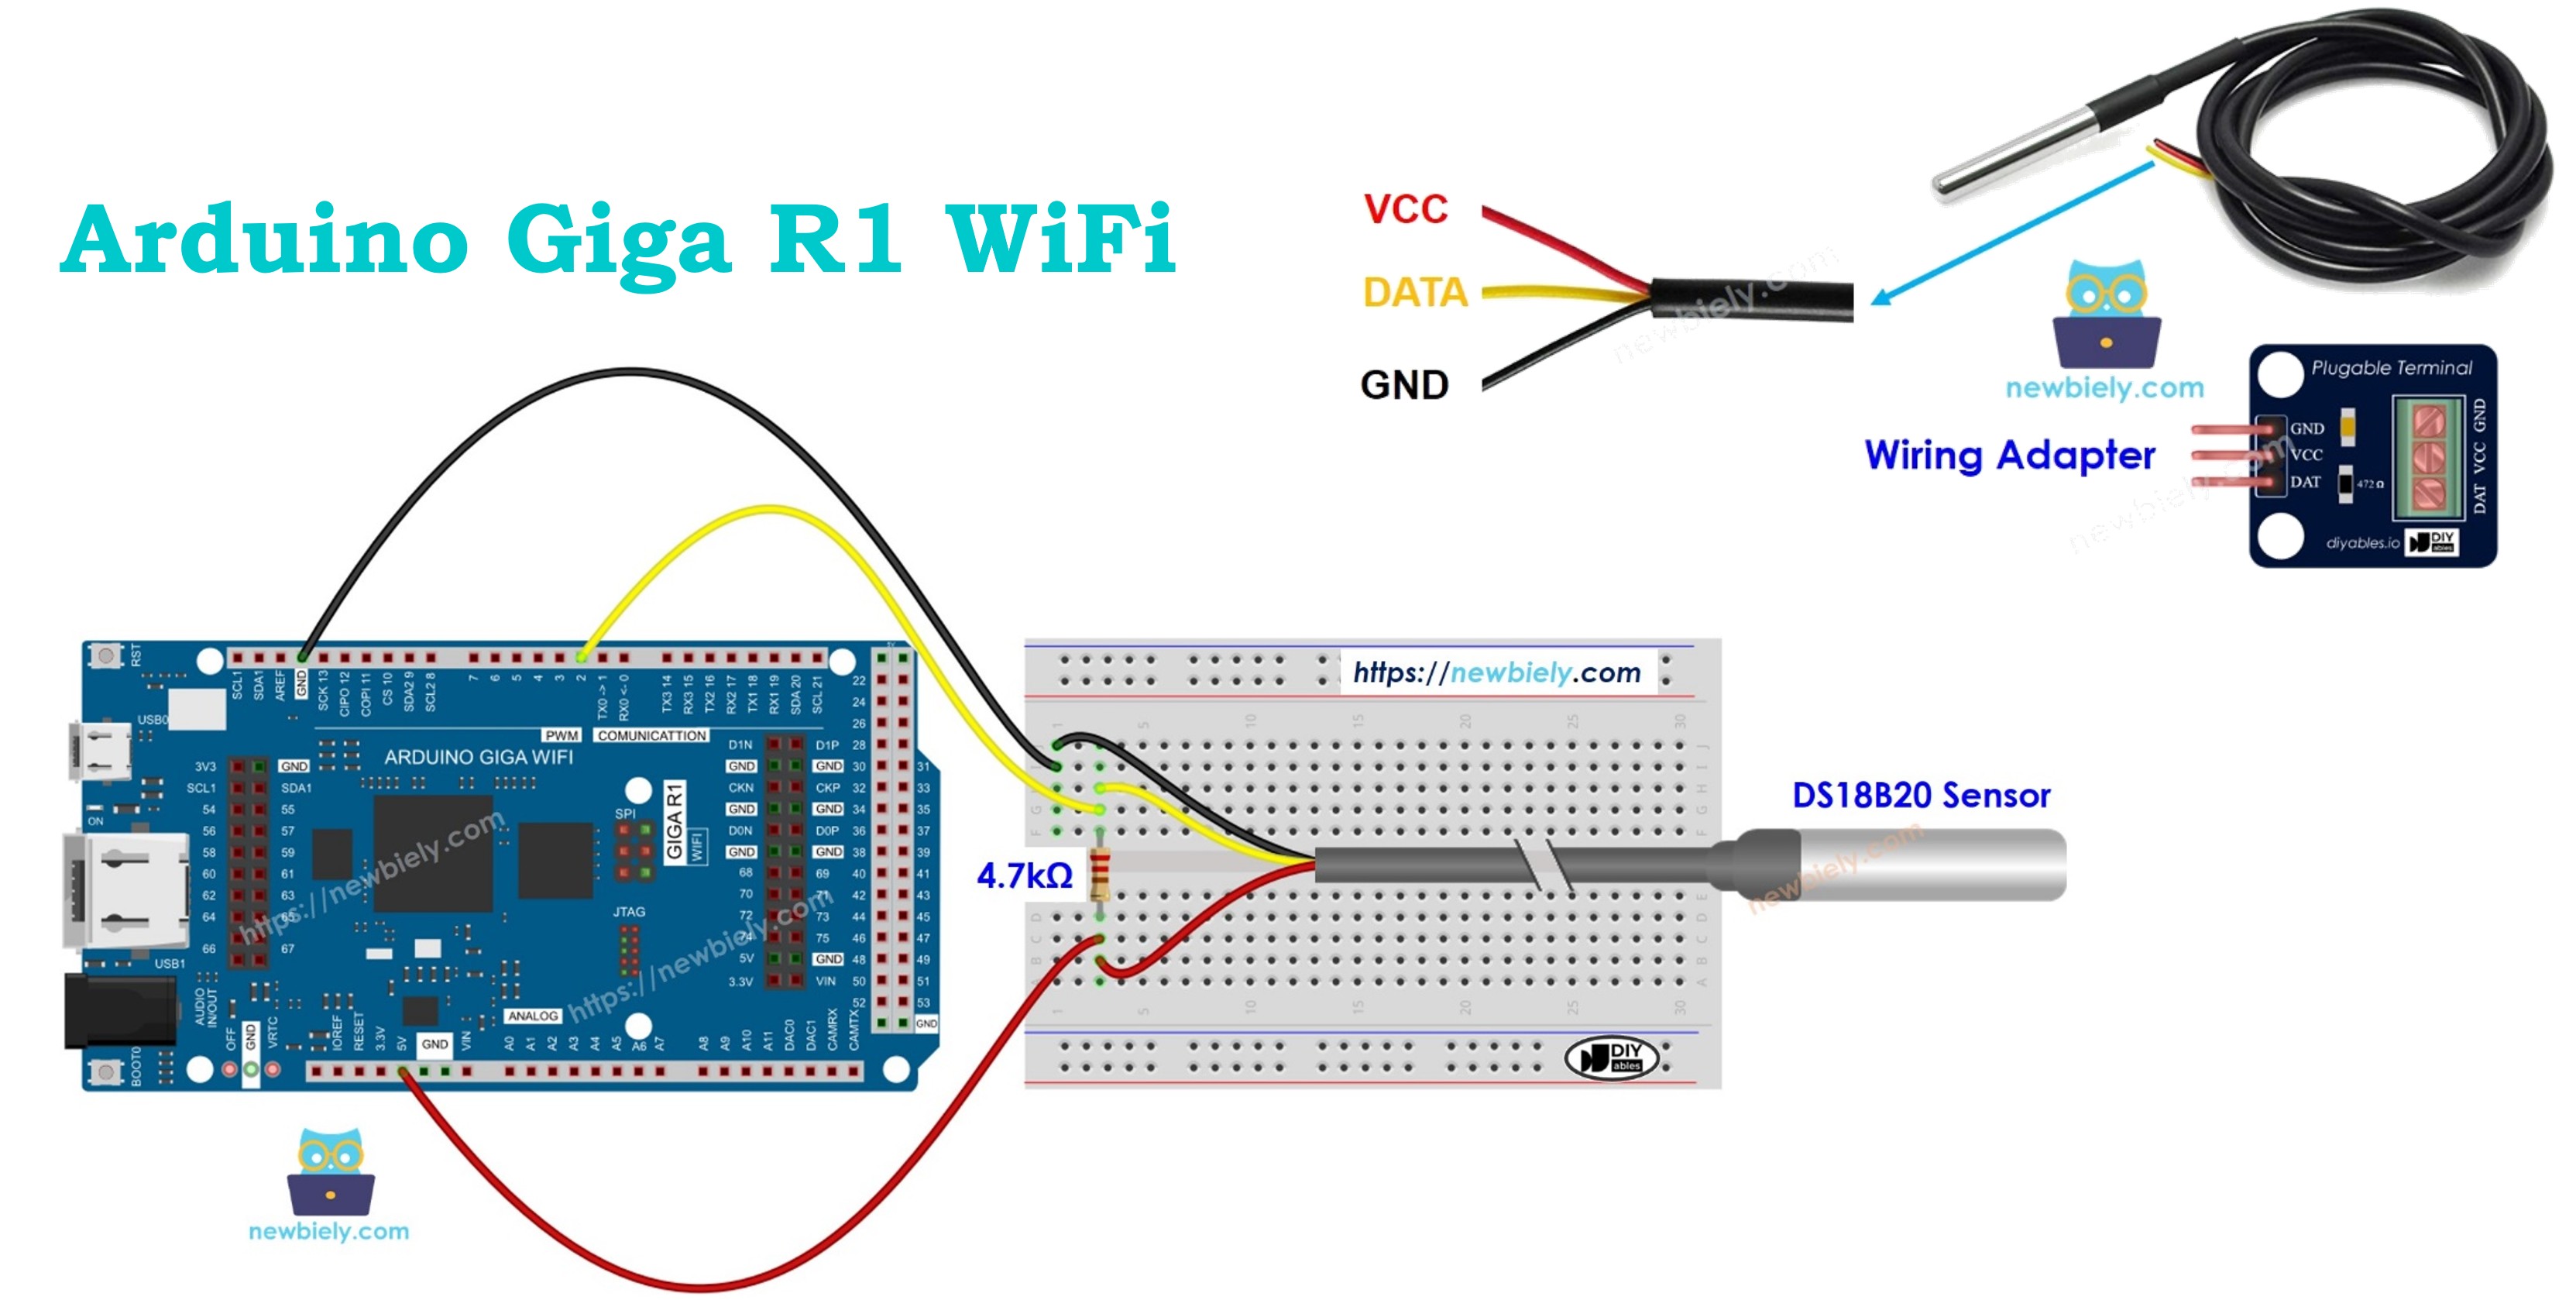
- Wiring diagram with breadboard
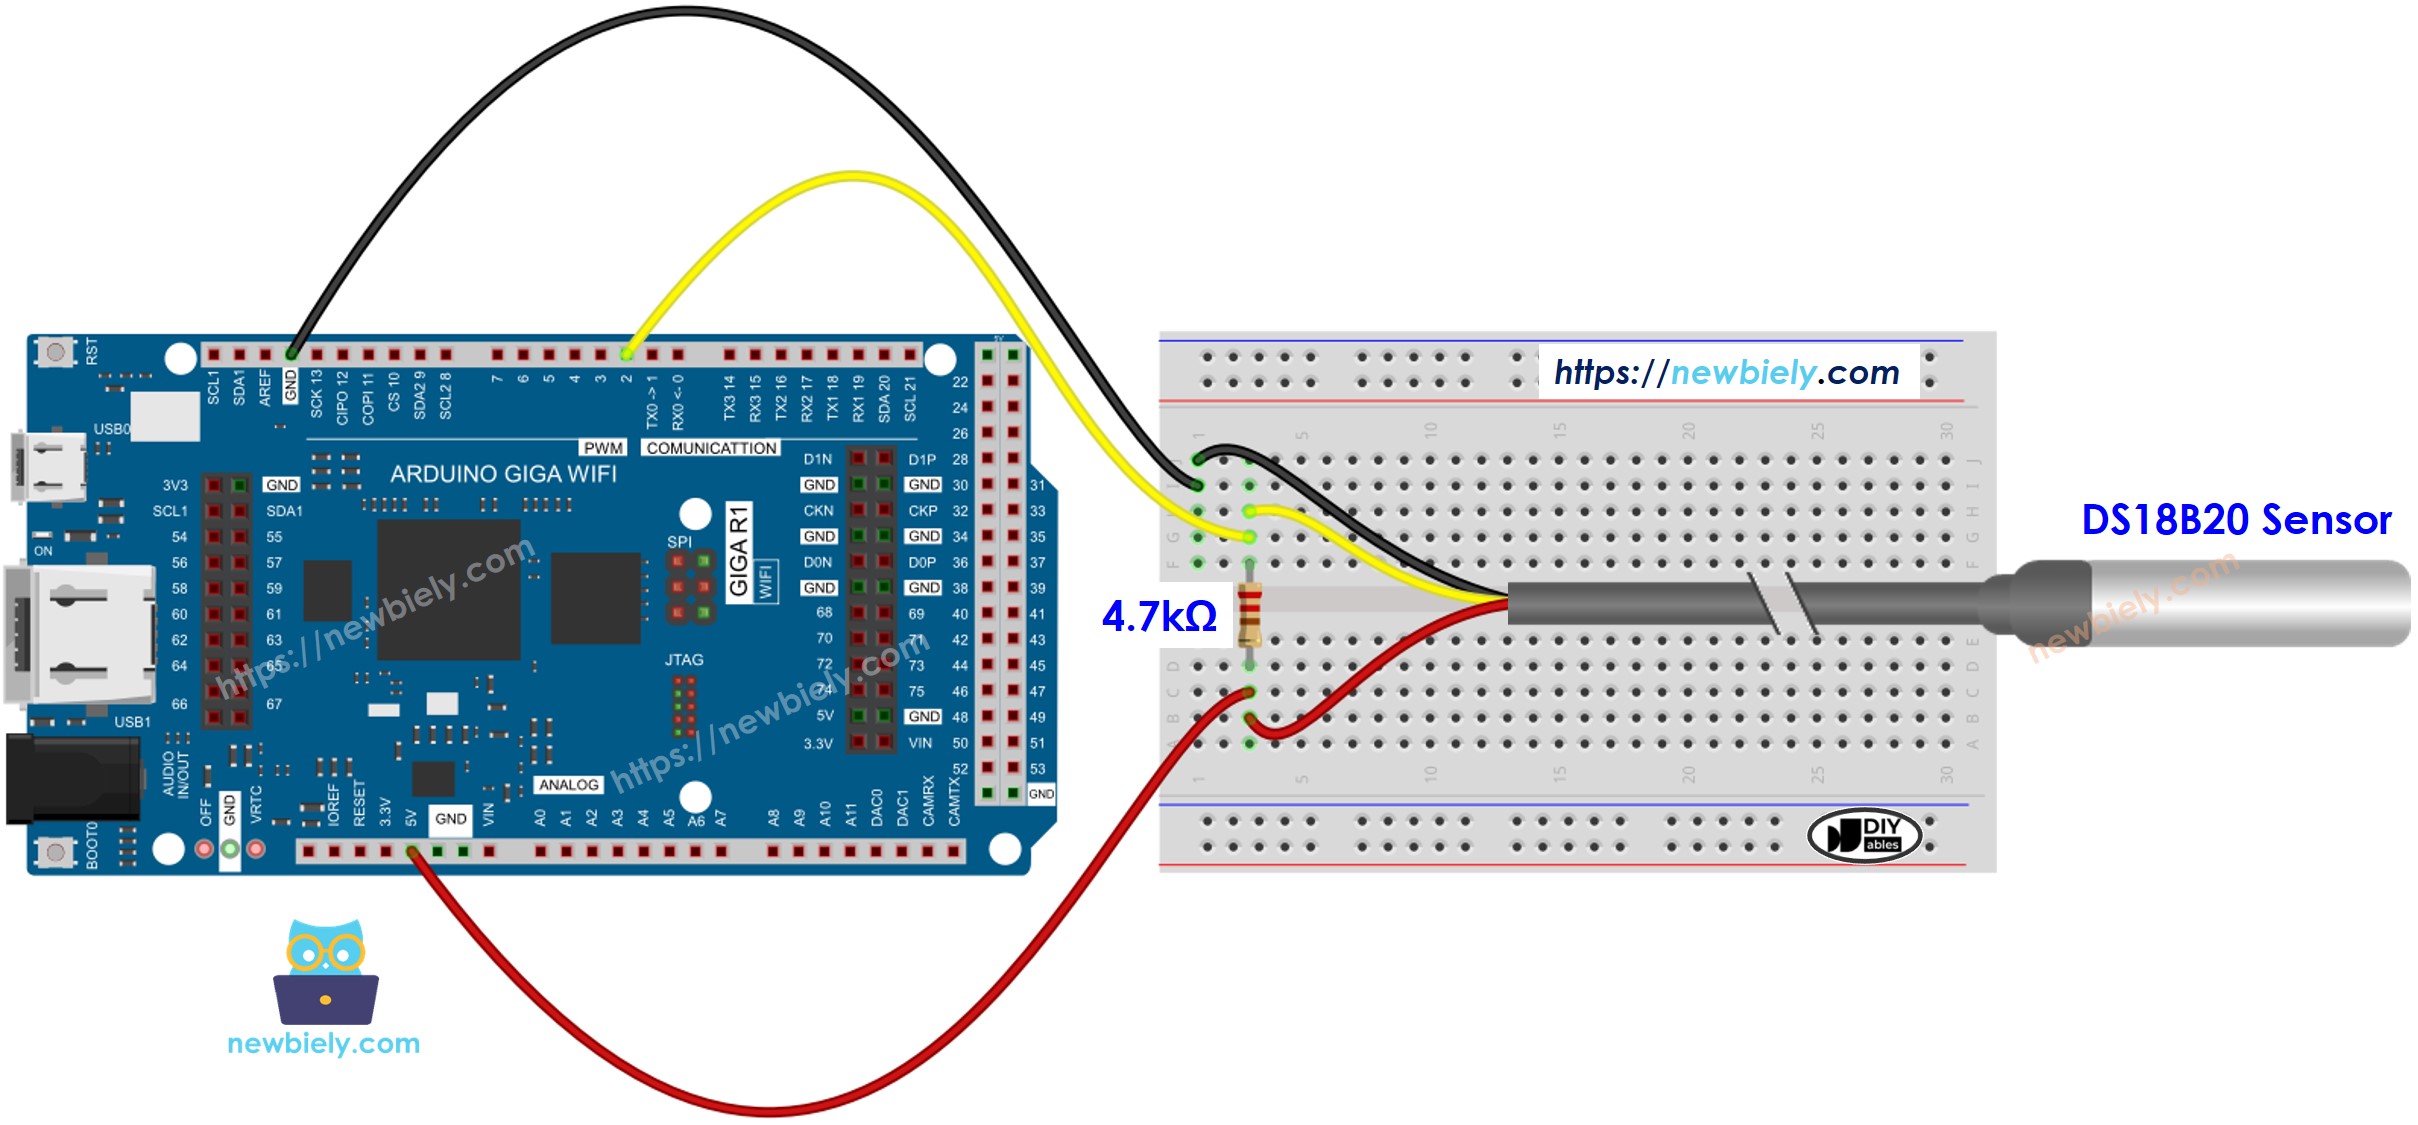
This image is created using Fritzing. Click to enlarge image
- Wiring diagram with adapter (recommended)
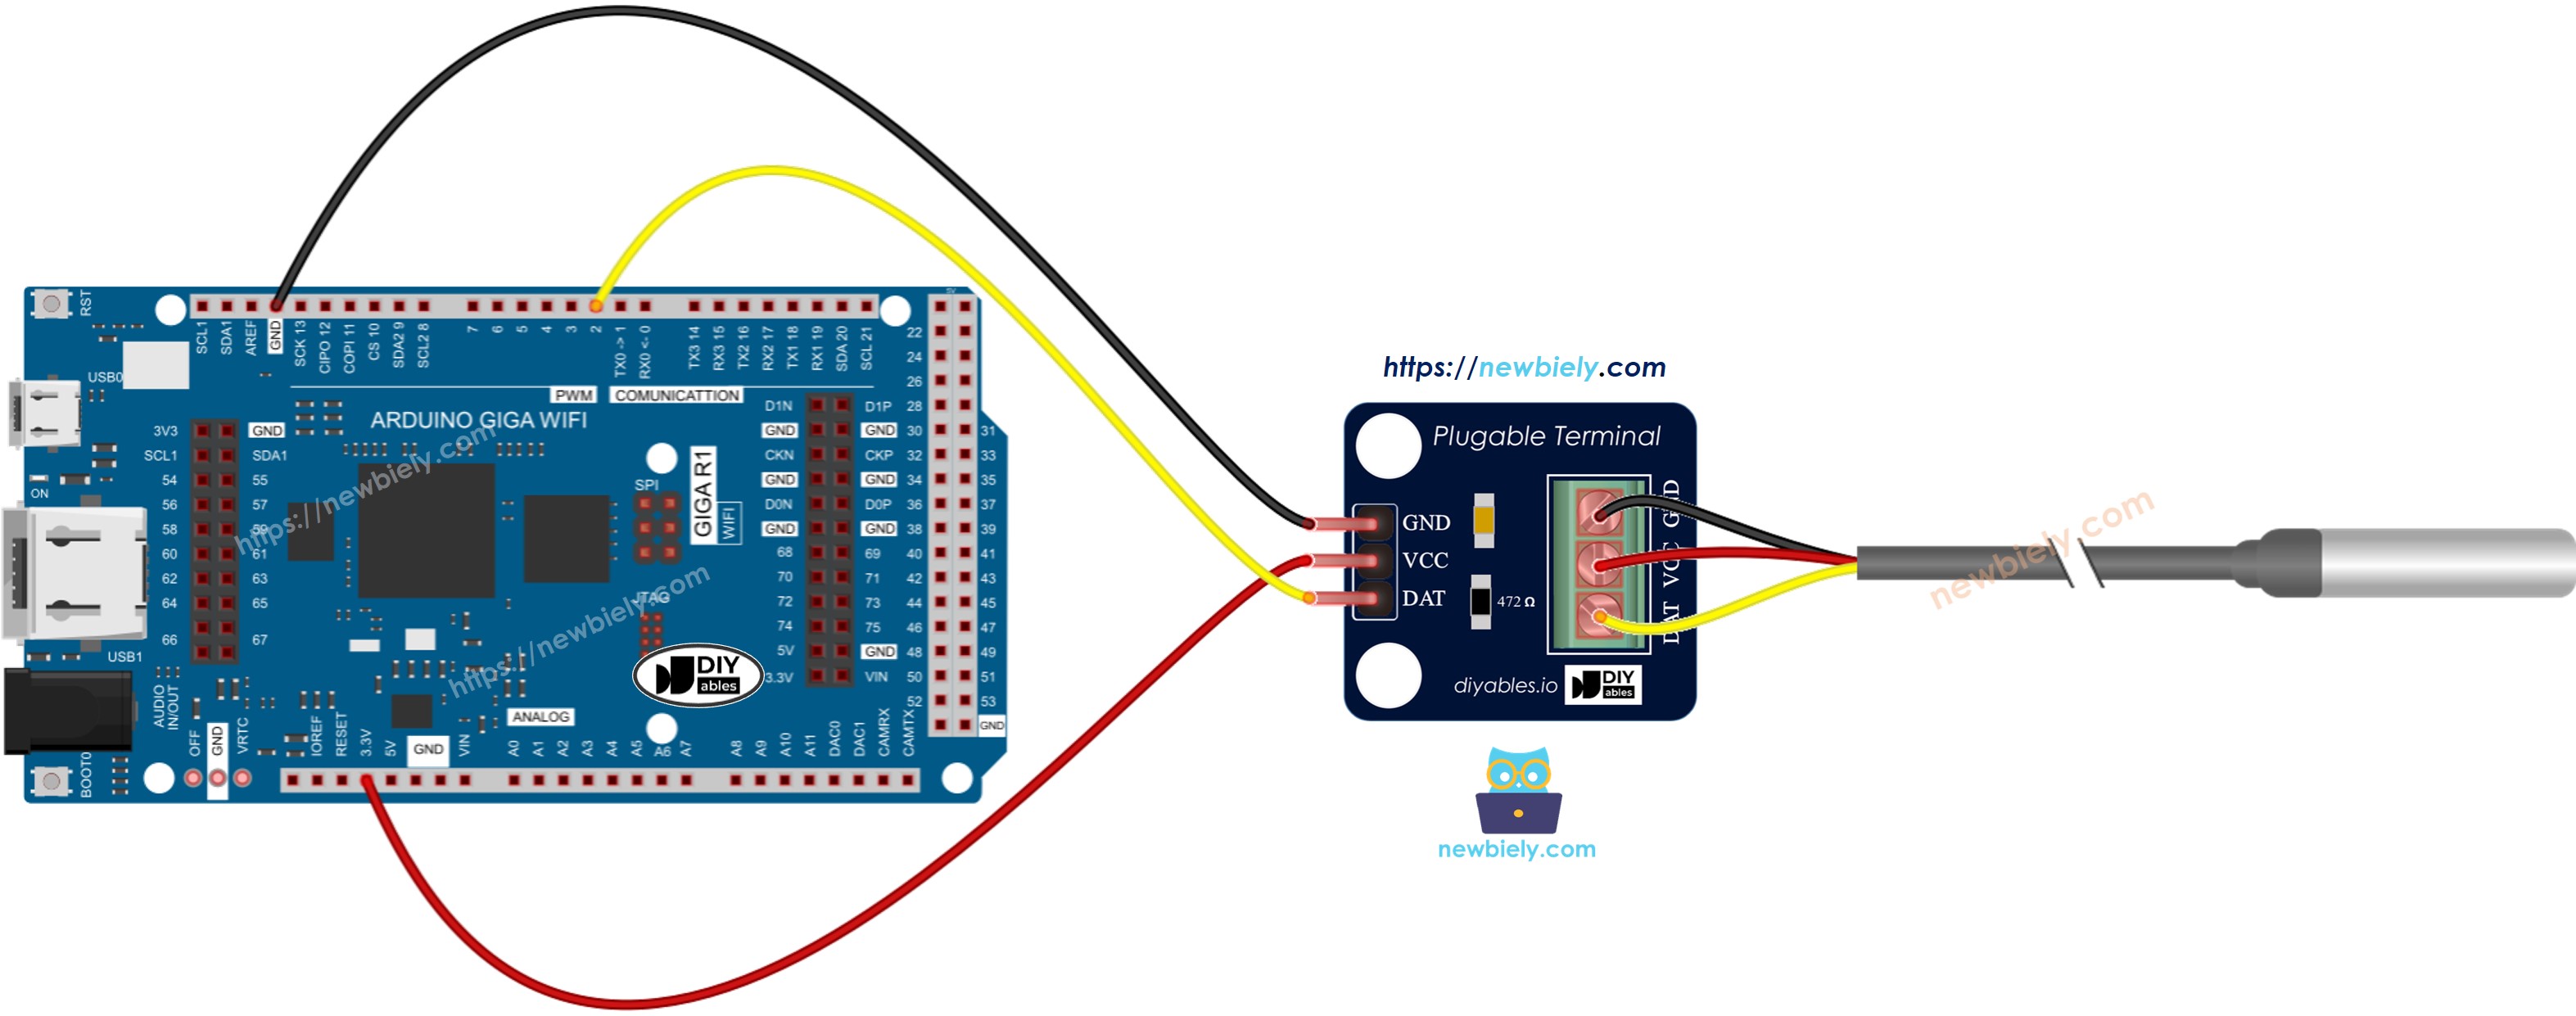
This image is created using Fritzing. Click to enlarge image
| DS18B20 Pin | Arduino Giga R1 WiFi Pin | Function |
|---|---|---|
| GND | GND | Ground reference |
| VCC | 5V | Power supply (3.0-5.5V) |
| DATA | Digital Pin 2 | 1-Wire communication bus |
The DS18B20 requires a 4.7kΩ pull-up resistor between the DATA line and VCC for proper 1-Wire protocol operation. The Arduino Giga R1 WiFi's 5V output provides adequate drive current for reliable sensor operation. Using the recommended adapter module eliminates the need for external pull-up resistors and provides convenient screw terminal connections.
Power consumption remains well within the Arduino Giga R1 WiFi's GPIO current limits. The sensor draws maximum 1mA during temperature conversion, easily supported by the microcontroller's power supply. For battery-powered applications, the 750nA standby current makes the DS18B20 suitable for low-power designs.
We suggest purchasing a DS18B20 sensor that comes with a wiring adapter for easy connection. The adapter has a built-in resistor, eliminating the need for a separate one in the wiring.
Arduino Code Implementation
The following implementation demonstrates DS18B20 temperature sensor integration using the DallasTemperature library. The code is structured to handle sensor initialization, temperature conversion timing, and data validation. Key sections include sensor discovery, conversion triggering, and temperature reading with proper error handling.
The DallasTemperature library abstracts the complex 1-Wire protocol timing requirements and provides high-level functions for temperature measurement. Built on top of the OneWire library, it handles device addressing, CRC validation, and temperature conversion commands automatically. The library supports multiple sensors on the same bus and provides both blocking and non-blocking temperature conversion modes.
The implementation uses blocking mode for simplicity, where requestTemperatures() waits for conversion completion before returning. For applications requiring precise timing or multiple sensor management, non-blocking mode allows the Arduino Giga R1 WiFi's dual-core processor to handle other tasks during the 750ms maximum conversion time.
Temperature readings are retrieved using getTempCByIndex(0), which accesses the first sensor on the bus. The library returns temperature values as floating-point Celsius, which can be converted to Fahrenheit using the standard formula. Error handling includes checking for invalid readings (-127°C indicates communication failure).
How To Program For DS18B20 Temperature Sensor
- Include the library:
- Declare OneWire and DallasTemperature object corresponding to the pin connected to sensor's DATA pin
- Initialize the sensor:
- Send the command to get temperatures:
- Read temperature in Celsius:
- (Optional) Convert Celsius to Fahrenheit:
Arduino Code
Detailed Instructions
For initial Arduino Giga R1 WiFi setup, refer to the Arduino Giga R1 WiFi Getting Started guide before proceeding.
- Connect Hardware: Wire the DS18B20 temperature sensor to the Arduino Giga R1 WiFi according to the wiring diagram. Ensure the 4.7kΩ pull-up resistor is present between DATA and VCC pins. Verify all connections are secure and match the pinout specifications.
- Launch Arduino IDE: Open the Arduino IDE and configure it for the Arduino Giga R1 WiFi board. Select the correct board type from Tools > Board and identify the appropriate COM port under Tools > Port. The IDE should recognize the Giga R1 WiFi automatically when connected.
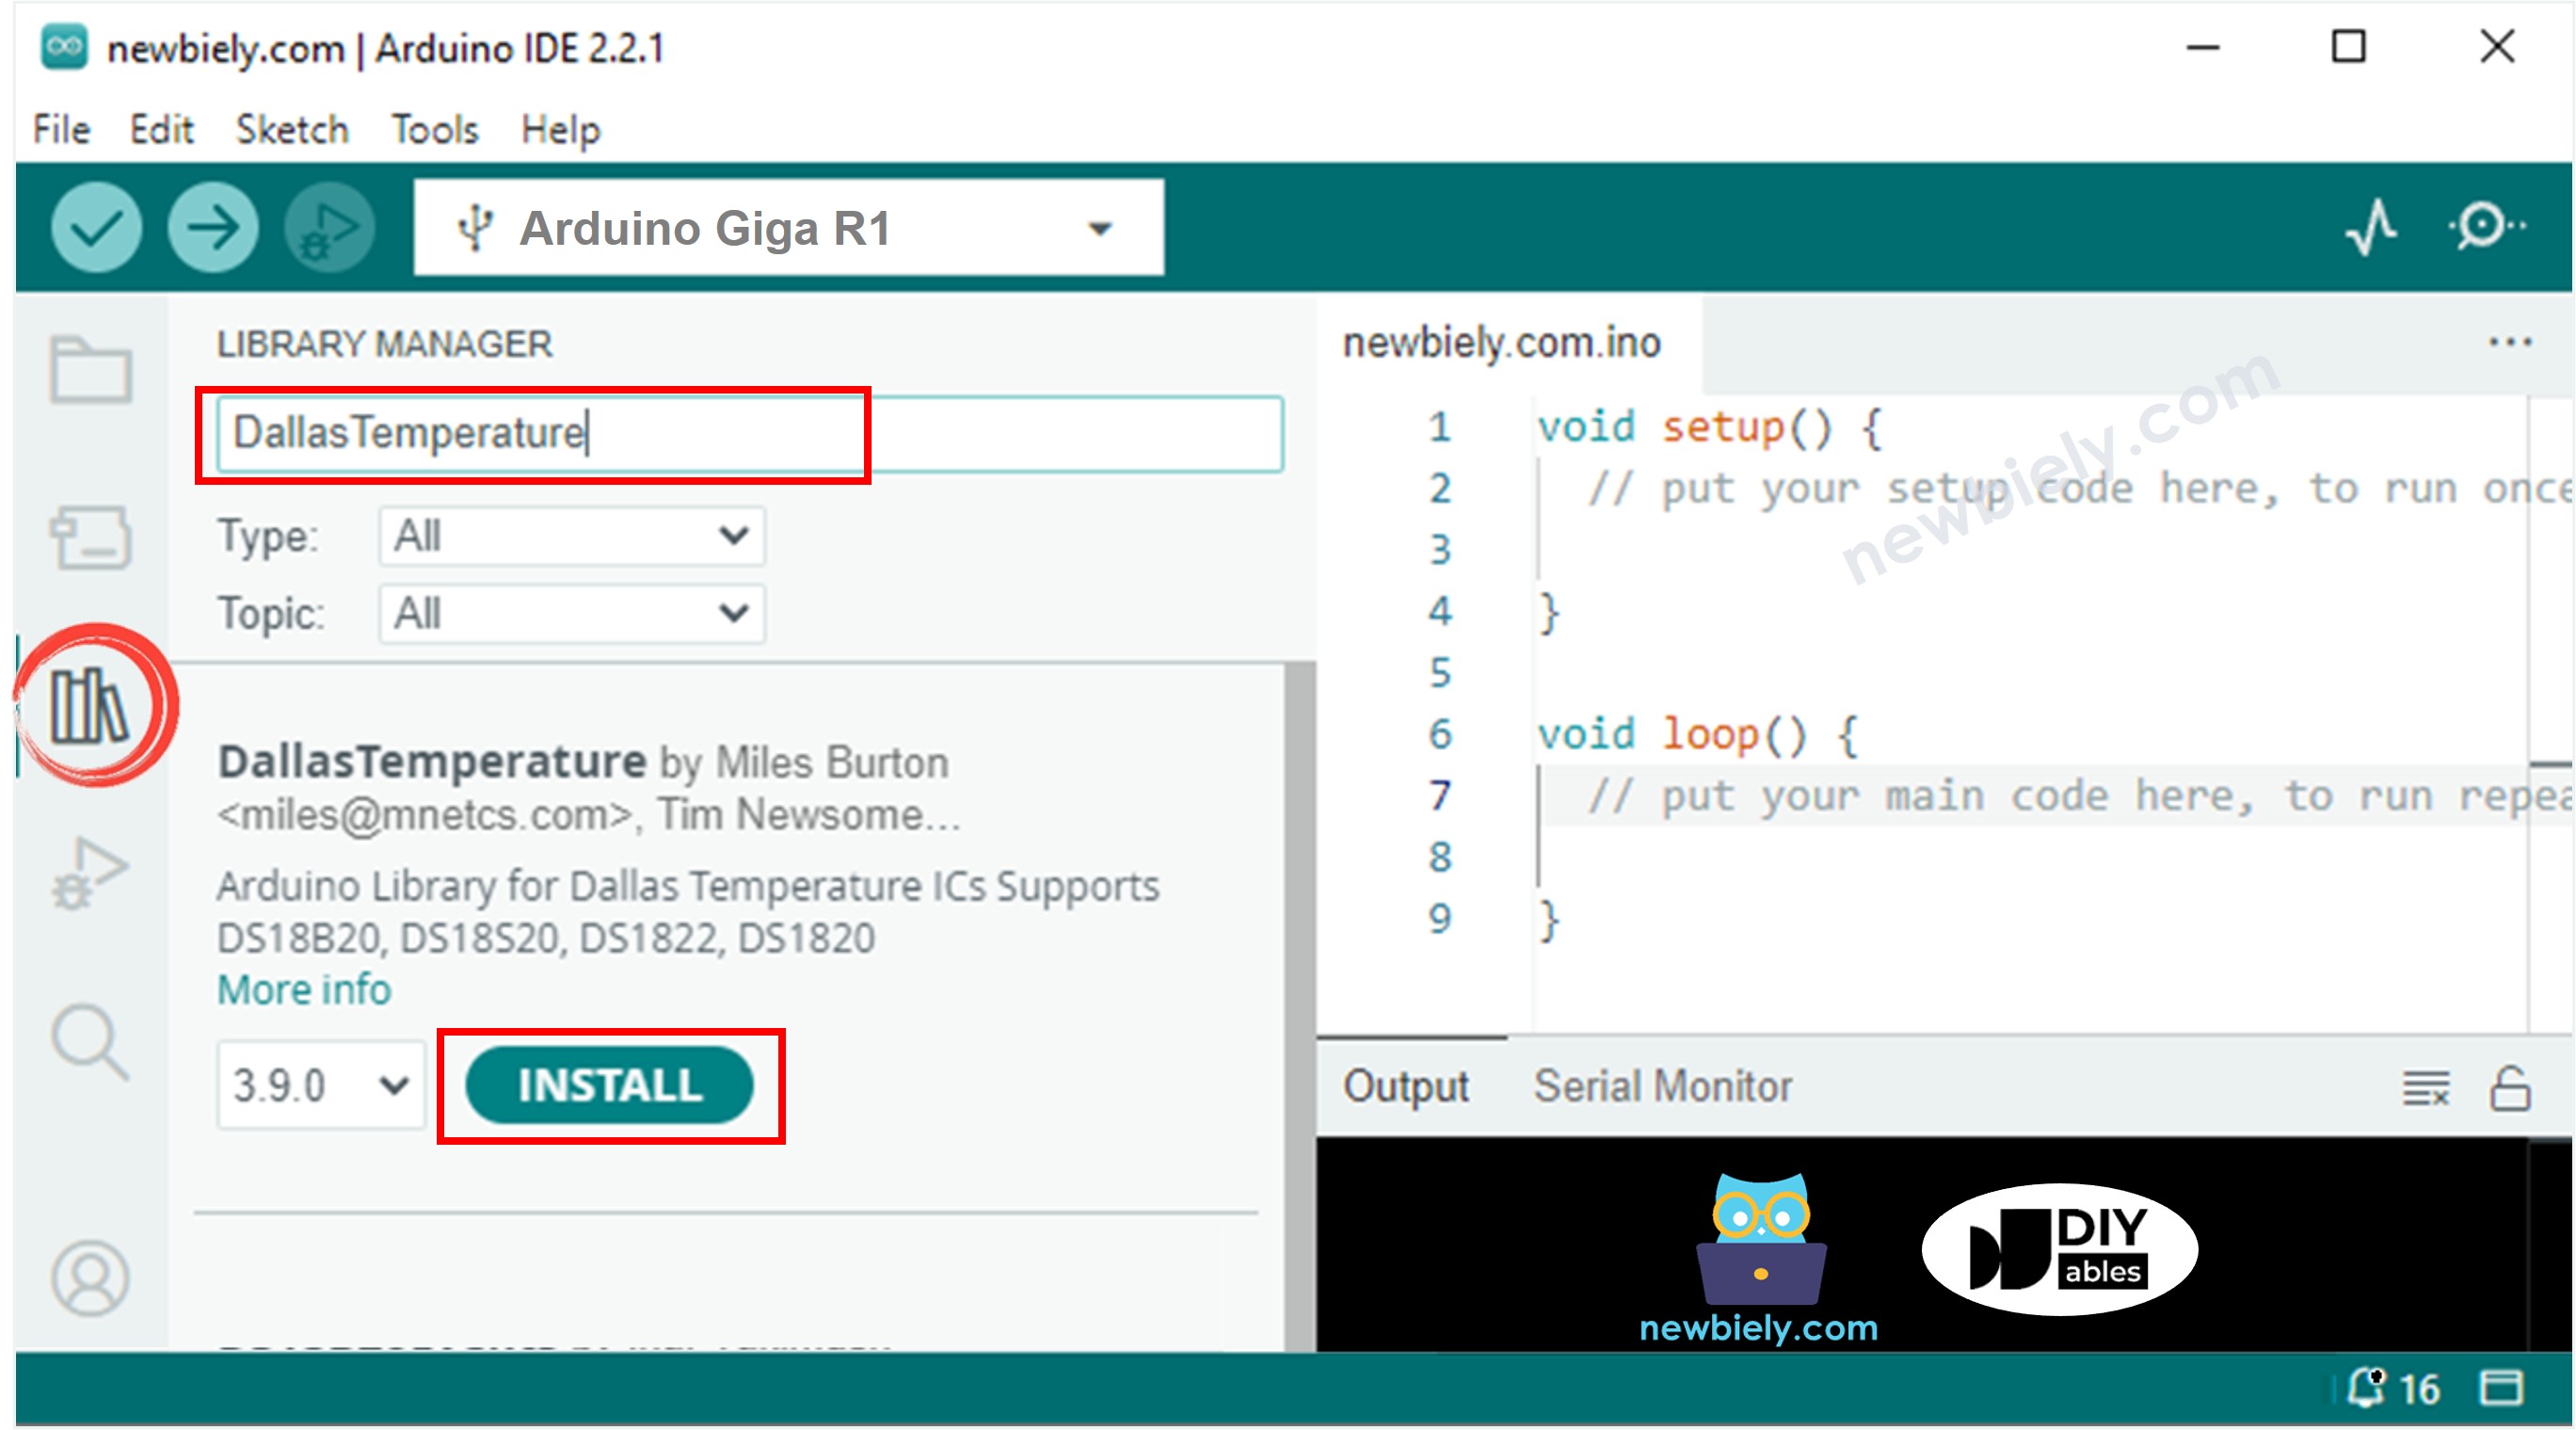
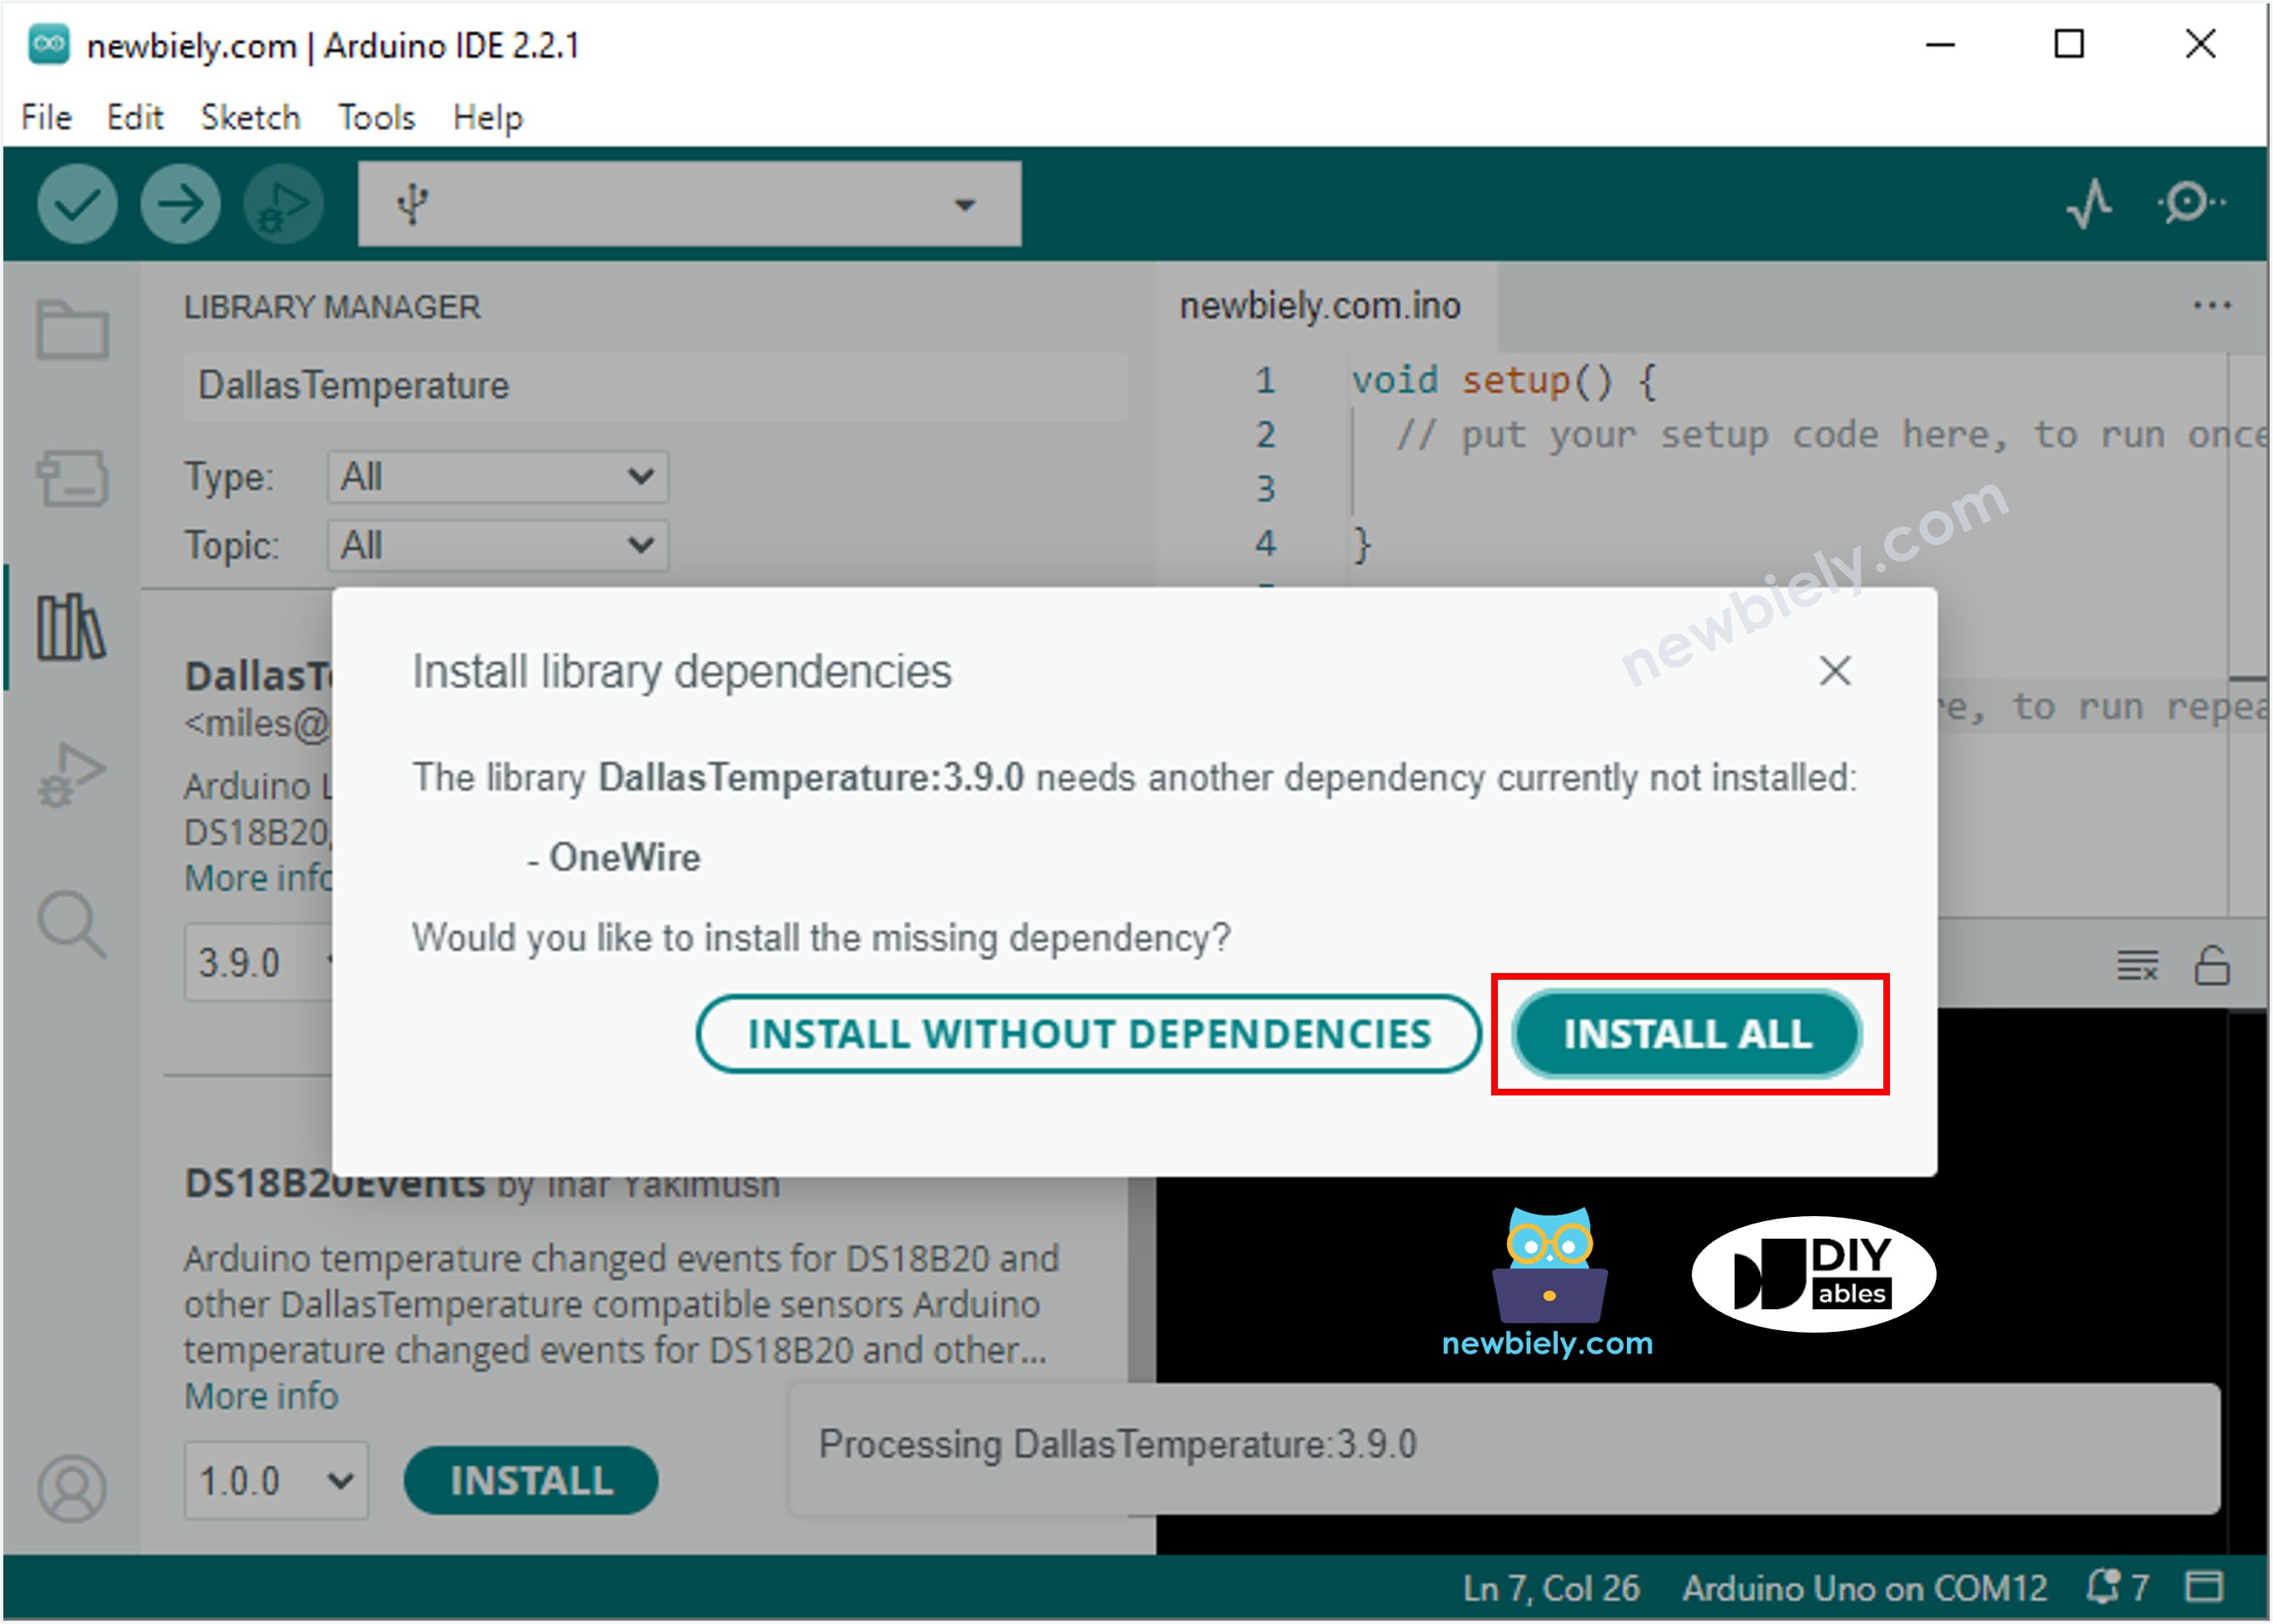
- Install Required Libraries: Navigate to the Libraries icon on the left bar of the Arduino IDE. Search for "DallasTemperature" and locate the library by Miles Burton. Click Install to add the DallasTemperature library to your environment.
- Install Library Dependencies: When prompted, click Install All to include the required OneWire library dependency. This library provides the low-level 1-Wire protocol communication functions that DallasTemperature requires for DS18B20 sensor access.
- Upload Code: Copy the provided code into the Arduino IDE editor. Click the Upload button to compile and transfer the program to the Arduino Giga R1 WiFi. Monitor the upload progress and verify successful completion without errors.
- Open Serial Monitor: Configure the Serial Monitor to 9600 baud rate to match the code's serial communication settings. The monitor should display temperature readings every second, showing both Celsius and Fahrenheit values with two decimal places of precision.
- Test Sensor Response: Grasp the waterproof sensor probe with your hand or immerse it in water at different temperatures. Observe the temperature readings change in real-time on the Serial Monitor. Room temperature should read approximately 20-25°C, while body heat should increase readings to 30-35°C.
- Verify Operation: Confirm that temperature readings are stable and respond appropriately to thermal changes. Invalid readings appearing as -127°C indicate wiring errors or sensor communication failures requiring connection verification.
Technical Note: The DS18B20 requires up to 750ms for maximum resolution temperature conversion. The code includes appropriate delays to ensure accurate readings. For applications requiring faster response times, configure the sensor to lower resolution modes (9-bit: 93.75ms, 10-bit: 187.5ms, 11-bit: 375ms) using the setResolution() function.
Serial Monitor Output
Project Applications
Industrial Process Monitoring: Implement continuous temperature monitoring for manufacturing processes requiring precise thermal control. The Arduino Giga R1 WiFi's WiFi connectivity enables real-time data transmission to SCADA systems, while the DS18B20's industrial-grade accuracy ensures reliable process control within ±0.5°C tolerances.
HVAC System Integration: Deploy multiple DS18B20 sensors across HVAC zones for comprehensive climate monitoring. The Arduino Giga R1 WiFi's dual-core processor handles multiple sensor polling while simultaneously managing WiFi communication for remote thermostat control and energy optimization algorithms.
Aquaculture Water Quality Management: Monitor water temperature in fish tanks, hydroponic systems, or aquaponics installations. The waterproof DS18B20 probe provides direct liquid contact measurement, while the Arduino Giga R1 WiFi logs data to cloud databases and triggers automated heating or cooling responses based on species-specific temperature requirements.
Cold Chain Logistics: Create temperature data loggers for pharmaceutical, food, or chemical transport monitoring. The Arduino Giga R1 WiFi's expanded memory capacity stores extended temperature histories, while WiFi connectivity enables automated compliance reporting and alert notifications for temperature excursions during transit.
Research Data Acquisition: Build multi-channel temperature measurement systems for scientific experiments or environmental studies. The 1-Wire protocol allows up to 127 DS18B20 sensors on a single Arduino GPIO pin, while the Giga R1 WiFi's processing power handles complex data analysis and wireless transmission to research databases.
Smart Building Automation: Integrate room-by-room temperature sensing for intelligent building management systems. The Arduino Giga R1 WiFi coordinates with other IoT devices to optimize energy consumption, implement occupancy-based climate control, and provide facilities management teams with detailed thermal performance analytics.
Video Documentation
The accompanying video demonstrates the complete DS18B20 temperature sensor integration process with the Arduino Giga R1 WiFi. It covers hardware assembly procedures, library installation steps, and live code execution showing real-time temperature measurements. The video includes troubleshooting common wiring issues and demonstrates the sensor's response to temperature changes in both air and liquid environments.
Challenge Yourself
Challenge: Implement temperature-based threshold alerting with configurable set points. Add code to trigger digital outputs when temperature exceeds user-defined limits, creating a basic thermal protection system suitable for equipment monitoring or greenhouse automation.
Challenge: Create a multi-sensor temperature monitoring network using the 1-Wire bus capability. Connect 3-5 DS18B20 sensors to the same data pin and modify the code to read each sensor individually by ROM address, displaying all temperatures simultaneously on the Serial Monitor.
Challenge: Develop a WiFi-enabled temperature logging system that stores readings to an SD card and transmits data to a web server. Utilize the Arduino Giga R1 WiFi's wireless capabilities to create IoT temperature monitoring with remote access and historical data analysis capabilities.
Challenge: Implement non-blocking temperature conversion to improve system responsiveness. Modify the code to use asynchronous temperature reading while the Arduino Giga R1 WiFi performs other tasks, demonstrating advanced embedded programming techniques for real-time applications.
Challenge: Design a temperature control system that interfaces the DS18B20 with relay modules or PWM outputs. Create a basic thermostat function that maintains target temperatures by controlling heating or cooling elements based on sensor feedback, incorporating PID control algorithms for precise thermal regulation.