Arduino Giga R1 WiFi Force Sensor
This guide covers force sensor integration with the Arduino Giga R1 WiFi. The force sensor (also known as Force Sensing Resistor or FSR) provides an analog output that varies with applied pressure.
This tutorial demonstrates analog signal conditioning, digital conversion, and practical pressure threshold detection.
Hardware Preparation
Or you can buy the following kits:
| 1 | × | DIYables Sensor Kit (18 sensors/displays) |
Additionally, some of these links are for products from our own brand, DIYables .
Overview of Force Sensor
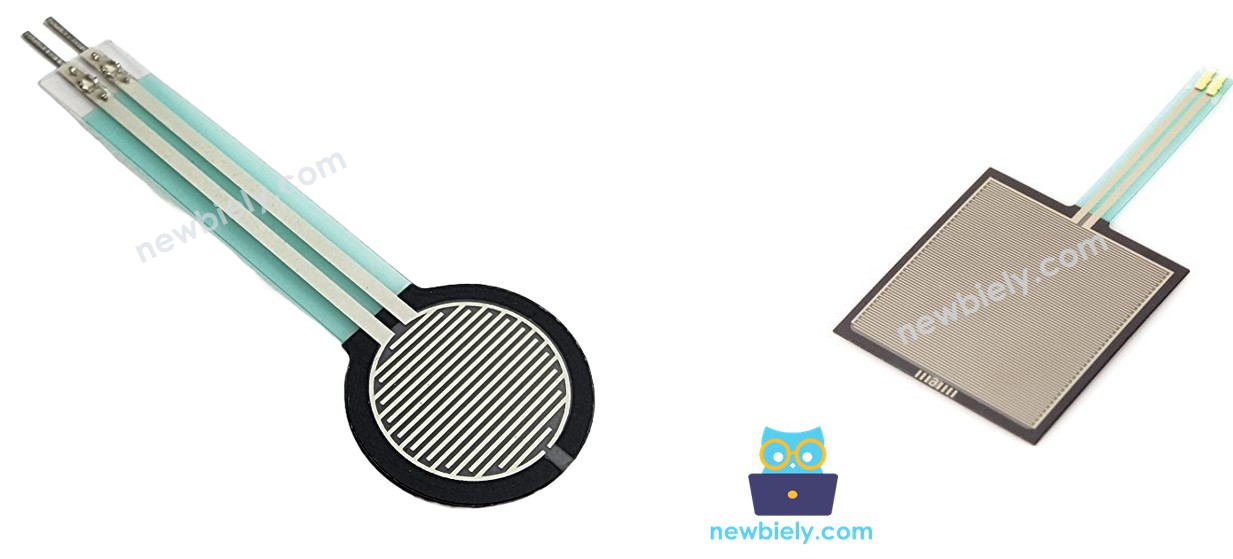
The Force Sensing Resistor (FSR) is a piezoresistive sensor that exhibits resistance change when force is applied. Resistance varies from >1MΩ at rest to <1kΩ under maximum pressure. Operating force range is 0.2N to 20N with response time under 1ms.
The sensor operates through quantum tunneling conduction in a polymer thick film. As applied pressure increases, particle contact density increases, decreasing resistance. The sensor exhibits logarithmic response characteristics, providing high sensitivity at low force levels while maintaining stability under heavy loading.
Pinout
Understanding the FSR pinout is essential for proper electrical integration and reliable operation. Incorrect connections may result in no signal output or potential damage to the Arduino's analog input circuitry.
PIN 1: Signal Output: Analog resistance terminal, 0V-5V operating range, high impedance. Connects to Arduino analog input pin through voltage divider configuration to convert resistance variation into measurable voltage changes.
PIN 2: Reference Terminal: Second analog resistance terminal, electrically identical to PIN 1. Connects to ground reference through pull-down resistor (typically 10kΩ) to establish voltage divider network and provide stable measurement baseline.
The FSR exhibits symmetric electrical characteristics—either pin can serve as signal or reference terminal. However, consistent wiring orientation ensures predictable voltage divider behavior and simplified troubleshooting. The sensor requires external bias circuitry since it functions as a variable resistor rather than an active voltage source.
Critical considerations for Arduino Giga R1 WiFi integration include the ADC input impedance (approximately 100MΩ) which prevents loading effects on the voltage divider, and the 3.3V/5V analog reference compatibility ensuring full-scale deflection utilizes the complete ADC range.
How It Works
The FSR operates through piezoresistive effect in a polymer thick film matrix. Under applied force, conductive particles within the polymer material compress, increasing contact surface area and creating additional conduction paths. This mechanical compression directly translates to reduced electrical resistance between the sensor terminals.
The relationship between applied force and resistance follows an inverse power law: as force increases exponentially, resistance decreases logarithmically. This characteristic provides high sensitivity at light touch levels while preventing damage under heavy loading. The sensor's construction includes a flexible substrate that distributes point loads across the active area, preventing damage from concentrated stress points.
Response time is primarily limited by the mechanical properties of the polymer matrix rather than electrical characteristics. Typical rise time is <1ms for step force inputs, making FSR sensors suitable for dynamic applications including vibration detection and impact sensing.
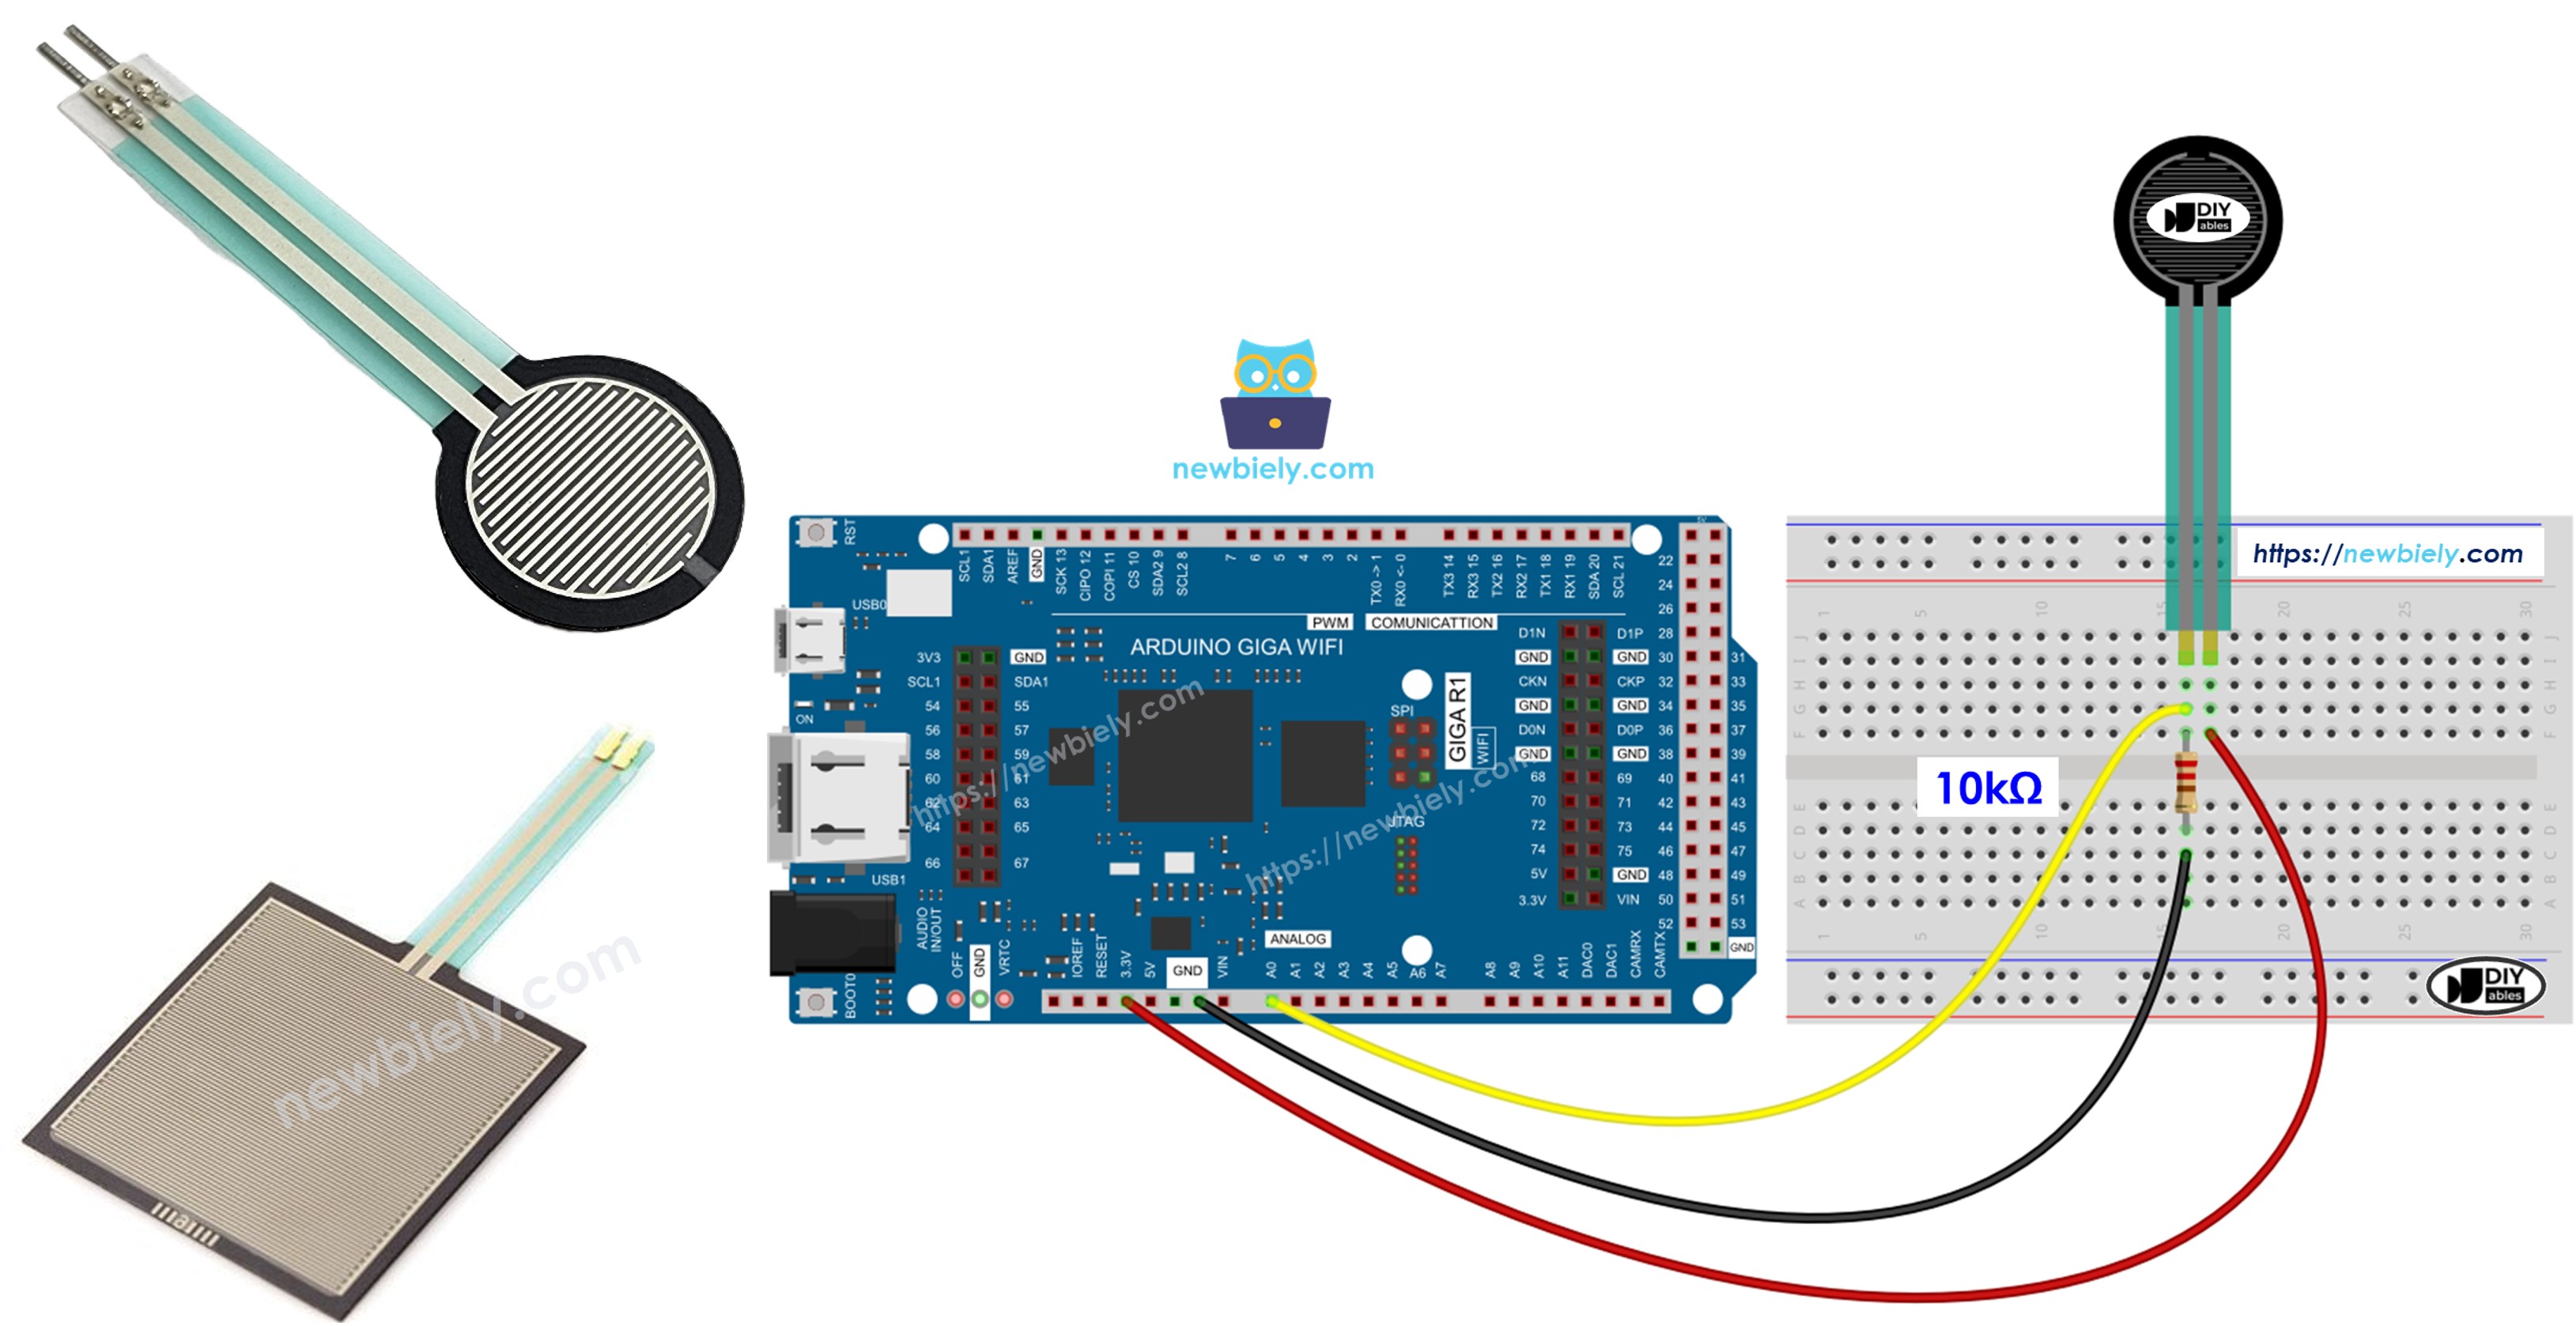
Wiring Diagram
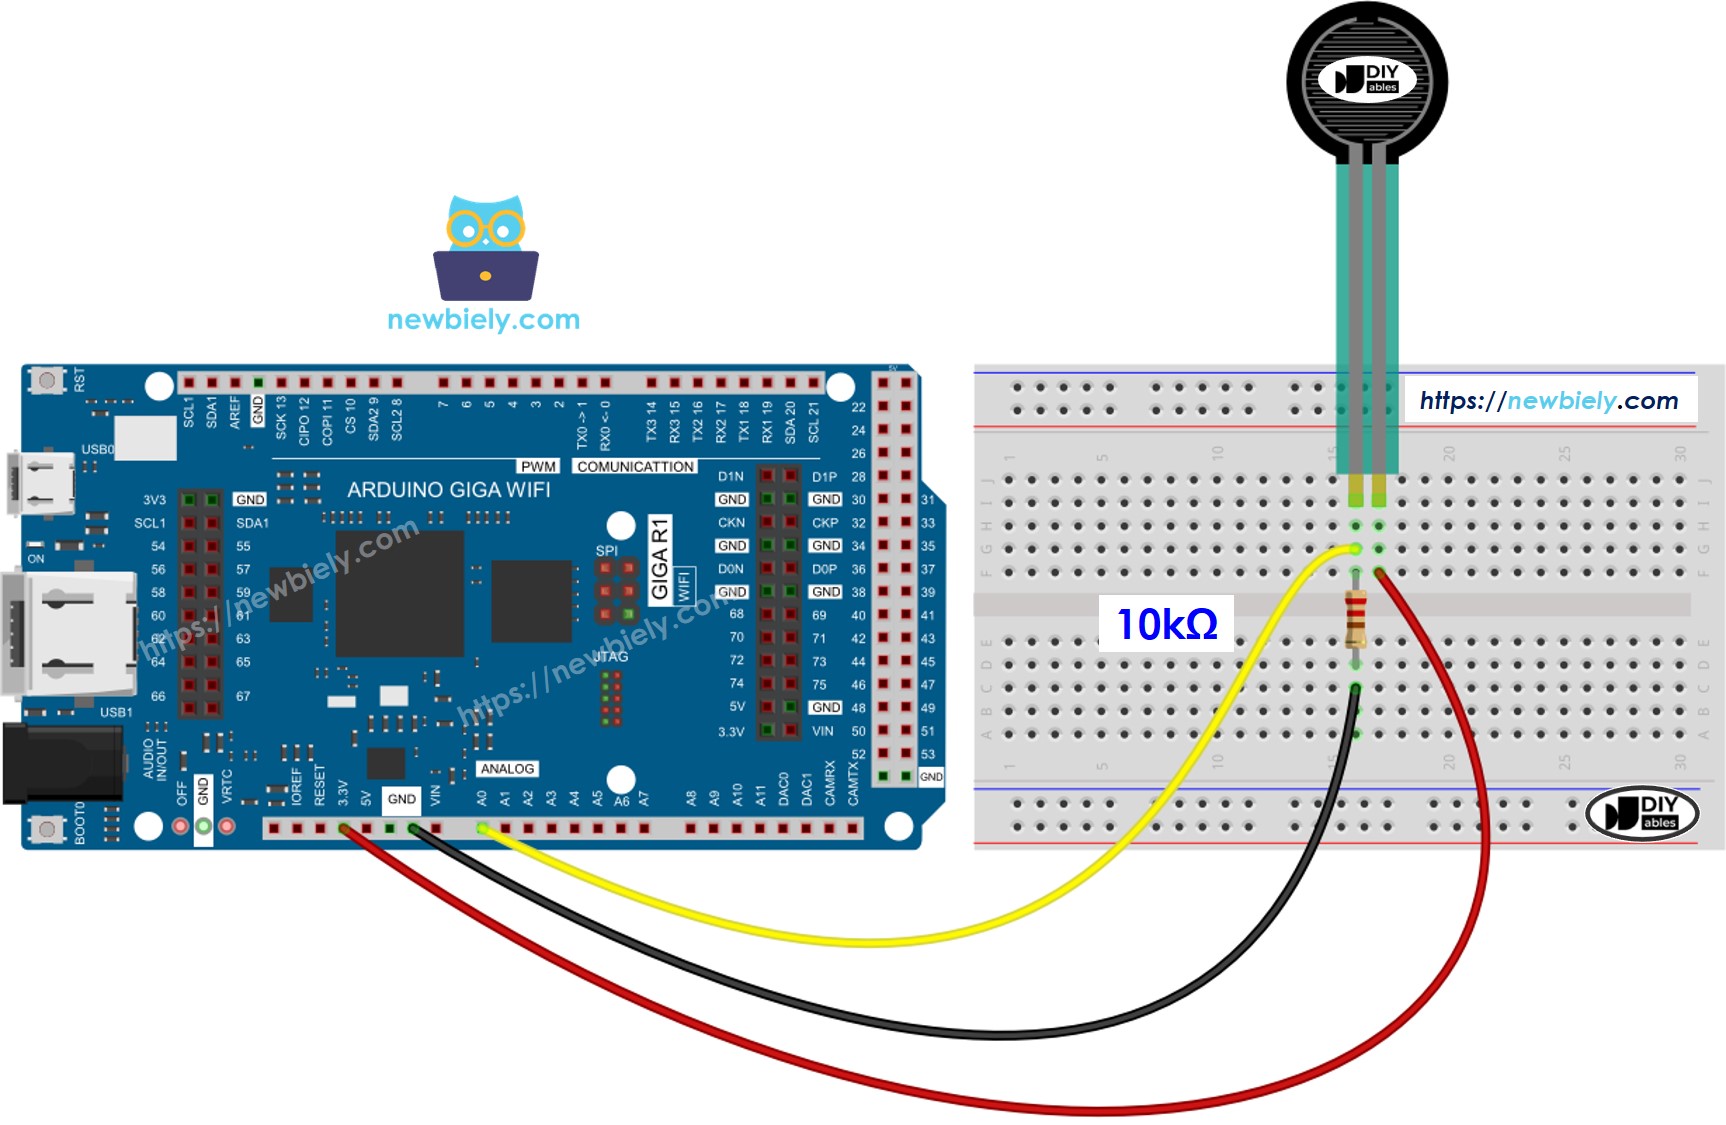
This image is created using Fritzing. Click to enlarge image
The wiring diagram demonstrates the voltage divider configuration required to convert the FSR's variable resistance into a measurable analog voltage. This configuration ensures optimal signal conditioning for the Arduino Giga R1 WiFi's ADC input requirements.
Electrical Note: The diagram above shows the minimum viable connection using a 10kΩ pull-down resistor to establish the voltage divider reference. For production applications or environments with electrical noise, consider adding a 100nF ceramic capacitor between the analog input and ground to filter high-frequency interference and improve measurement stability.
The 10kΩ resistor value provides optimal sensitivity across the FSR's operating range. Smaller resistance values (1kΩ-5kΩ) increase sensitivity to light touch but reduce maximum signal swing. Larger values (22kΩ-47kΩ) extend the linear response range for heavy pressure applications but decrease sensitivity at low force levels.
Power consumption in this configuration ranges from <1μA (no force applied) to approximately 5mA under maximum pressure, making it suitable for battery-powered applications. The voltage divider draws continuous current when force is applied, which should be considered in ultra-low power designs.
| Component Pin | Arduino Giga R1 WiFi Pin | Notes |
|---|---|---|
| FSR Terminal 1 | A0 | Analog input for voltage measurement |
| FSR Terminal 2 | 10kΩ Resistor | Forms voltage divider network |
| 10kΩ Resistor | GND | Pull-down reference for voltage divider |
| Power (5V) | 5V | Supply voltage for voltage divider |
| Ground | GND | Common ground reference |
How To Program For Force Sensor
The following implementation demonstrates analog-to-digital conversion with threshold-based pressure classification. The code is structured to handle the FSR's non-linear response characteristics by implementing discrete pressure categories rather than attempting absolute force measurement. Key sections include ADC reading, value mapping, and real-time serial output for debugging and calibration.
The Arduino Giga R1 WiFi's analogRead() function interfaces with the integrated 12-bit ADC to convert the voltage divider output into digital values ranging from 0 to 1023. This resolution provides sufficient precision to distinguish meaningful pressure variations across the FSR's operating range. The ADC reference voltage (5V) matches the supply voltage, ensuring full-scale utilization of the measurement range.
Library requirements are minimal since FSR sensors interface directly through analog I/O functions built into the Arduino core. No external libraries are required, simplifying deployment and reducing memory footprint. The implementation uses polling-based sampling with configurable delay intervals to balance responsiveness against serial communication overhead.
Critical timing considerations include the ADC conversion time (approximately 100μs) and serial communication latency. The code example implements 200ms sampling intervals, which provides smooth output display while allowing sufficient time for stable readings from the voltage divider network.
Arduino Code
Detailed Instructions
Prerequisites: Arduino IDE installed and the Giga R1 WiFi board package configured. Refer to the Getting Started guide for setup instructions.
- Connect Hardware: Wire the force sensor to analog pin A0 through the 10kΩ voltage divider as shown in the wiring diagram. Verify all connections match the pin assignments before applying power to prevent potential ADC damage.
- Open Arduino IDE: Launch the IDE and create a new sketch. Ensure the board is set to "Arduino Giga R1 WiFi" and the correct COM port is selected in the Tools menu.
- Upload Code: Copy the complete code example and upload to the Arduino Giga R1 WiFi. The compilation should complete without errors—if compilation fails, verify the board package is properly installed.
- Open Serial Monitor: Set the baud rate to 9600 to match the Serial.begin() configuration. The monitor should immediately display force readings at approximately 200ms intervals.
- Test Sensor Response: Apply varying pressure to the force sensor surface. Light finger pressure should register values in the 100-300 range, while firm pressure should exceed 500-800. No contact should read near zero.
- Calibrate Thresholds: Note the actual ADC values for your intended pressure levels. The code includes threshold values that may require adjustment based on your specific FSR model and resistor tolerance.
- Verify Operation: Confirm the serial output matches the applied pressure levels consistently. Erratic readings may indicate loose wiring connections or inadequate power supply decoupling.
Technical Note: The 10kΩ pull-down resistor value affects sensitivity and measurement range. For applications requiring detection of very light touch, consider reducing to 4.7kΩ. For heavy-duty applications, increase to 22kΩ to prevent ADC saturation under maximum force.
Serial Monitor Output
Application/Project Ideas
Industrial Machine Safety: Implement emergency stop functionality by integrating FSR sensors into control panels or machinery guards. The Arduino Giga R1 WiFi's dual-core processing enables real-time force monitoring while maintaining primary control loop execution, providing fail-safe pressure detection with configurable threshold alerting.
Robotic Gripper Feedback: Deploy force sensors in robotic end-effectors to provide tactile feedback for delicate object manipulation. The Giga R1 WiFi's expanded memory supports complex grip force algorithms and sensor data logging, enabling adaptive grasping strategies based on object material properties and handling requirements.
IoT Pressure Monitoring System: Create wireless pressure monitoring stations for remote equipment surveillance using the integrated WiFi capabilities. Force sensors can detect mechanical stress, vibration, or impact events, with data transmitted to cloud platforms for predictive maintenance analysis and automated alert generation.
Interactive Art Installations: Build responsive art pieces that react to human touch through strategically placed force sensors. The Arduino Giga R1 WiFi's processing power supports real-time audio/visual generation, creating immersive experiences that respond to pressure intensity, duration, and spatial patterns across multiple sensor arrays.
Assistive Technology Interface: Develop pressure-sensitive communication devices for individuals with limited mobility. Force sensors can provide alternative input methods for computer control, with the Giga R1 WiFi's USB host capability enabling direct interface to accessibility software and adaptive hardware systems.
Laboratory Force Measurement: Construct precision force measurement systems for materials testing and research applications. The high-resolution ADC combined with data logging capabilities enables capture of force-time profiles for mechanical property analysis, compression testing, and quality control validation in manufacturing environments.
Video Section
The accompanying video demonstrates the complete hardware assembly process and live code execution on the Arduino Giga R1 WiFi platform. It covers proper FSR handling techniques to prevent damage during installation, voltage divider construction on breadboard, and real-time serial monitor output showing the correlation between applied pressure and ADC readings across the full measurement range.
Challenge Yourself Section
Challenge: Implement pressure-based LED brightness control using PWM output. Connect an LED to a digital pin and use the analogWrite() function to vary brightness proportional to the force sensor reading, creating a visual pressure indicator.
Challenge: Add data logging functionality to record force measurements with timestamps to an SD card. Utilize the Arduino Giga R1 WiFi's expanded storage capabilities to implement circular buffering and periodic file rotation for continuous monitoring applications.
Challenge: Create a wireless force monitoring system that transmits sensor data to a web server using the integrated WiFi capability. Implement HTTP POST requests to send pressure readings and threshold violations to a remote dashboard for real-time monitoring.
Challenge: Develop a multi-sensor array system that can detect the location and magnitude of applied force across a grid of FSR sensors. Use the Arduino Giga R1 WiFi's multiple analog inputs and processing power to implement spatial pressure mapping with serial output visualization.
Challenge: Build an adaptive threshold system that automatically calibrates pressure detection levels based on environmental conditions and sensor aging. Implement machine learning algorithms to optimize threshold values over time, utilizing the Giga R1 WiFi's dual-core architecture for concurrent sensor processing and adaptation calculations.