Raspberry Pi Pico - Log Data with Timestamp to SD Card

This tutorial demonstrates how to create a data logger on the Raspberry Pi Pico using MicroPython. The main topics include:

Timestamps are retrieved from a DS3231 RTC module and recorded alongside each data entry on the Micro SD Card.

The data you log could be virtually anything, for example:

For simplicity, this tutorial reads values from two analog input pins as sample data. Feel free to adapt the code to log whatever information your project requires.

Raspberry Pi Pico Log to Micro SD Card

Hardware Preparation

1×Raspberry Pi Pico W
1×Raspberry Pi Pico Alternatively,
1×Micro USB Cable
1×Micro SD Card
1×Micro SD Card Module
1×Optionally, MicroSD to SD Memory Card Adapter
1×Real-Time Clock DS3231 Module
1×CR2032 battery
1×Jumper Wires
1×Breadboard
1×Recommended: Screw Terminal Expansion Board for Raspberry Pi Pico

Or you can buy the following kits:

1×DIYables Sensor Kit (30 sensors/displays)
1×DIYables Sensor Kit (18 sensors/displays)
Disclosure: Some of the links provided in this section are Amazon affiliate links. We may receive a commission for any purchases made through these links at no additional cost to you.
Additionally, some of these links are for products from our own brand, DIYables .

Overview of Micro SD Card Module and RTC Module

For detailed information on the Micro SD Card Module and RTC module — including pin descriptions, wiring, and programming examples — refer to these tutorials:

Wiring Diagram

https://newbiely.com/images/tutorial/raspberry-pi-pico-micro-sd-card-module-rtc-wiring-diagram.jpg

The wiring table below shows how to connect the Micro SD Card Module and the DS3231 RTC Module to the Raspberry Pi Pico:

Micro SD Card Module Raspberry Pi Pico
VCC VBUS (5V)
GND GND
MISO GP4
MOSI GP3
SCK GP2
CS GP5
DS3231 RTC Module Raspberry Pi Pico
VCC 3.3V
GND GND
SDA GP0
SCL GP1

※ NOTE THAT:

When using a shield that already includes a Micro SD Card slot (for example, an Ethernet shield), no additional SD Card Module is required — just slide the card straight into the shield's built-in slot.

Raspberry Pi Pico - Recording Timestamped Data to Micro SD Card

""" This Raspberry Pi Pico MicroPython code was developed by newbiely.com This Raspberry Pi Pico code is made available for public use without any restriction For comprehensive instructions and wiring diagrams, please visit: https://newbiely.com/tutorials/raspberry-pico/raspberry-pi-pico-log-data-with-timestamp-to-sd-card """ import machine import os import time import sdcard # Define SPI pins for the Micro SD Card module SPI_SCK_PIN = 2 # The Raspberry Pi Pico pin GP2 connected to SCK SPI_MOSI_PIN = 3 # The Raspberry Pi Pico pin GP3 connected to MOSI SPI_MISO_PIN = 4 # The Raspberry Pi Pico pin GP4 connected to MISO SPI_CS_PIN = 5 # The Raspberry Pi Pico pin GP5 connected to SS (CS) # Define I2C pins for the RTC module I2C_SDA_PIN = 0 # The Raspberry Pi Pico pin GP0 connected to SDA I2C_SCL_PIN = 1 # The Raspberry Pi Pico pin GP1 connected to SCL FILE_NAME = "/sd/log.txt" # Initialize I2C and RTC (DS3231) i2c = machine.I2C(0, sda=machine.Pin(I2C_SDA_PIN), scl=machine.Pin(I2C_SCL_PIN)) # DS3231 I2C address DS3231_ADDR = 0x68 def bcd_to_dec(bcd): return (bcd >> 4) * 10 + (bcd & 0x0F) def get_datetime(): buf = i2c.readfrom_mem(DS3231_ADDR, 0x00, 7) second = bcd_to_dec(buf[0]) minute = bcd_to_dec(buf[1]) hour = bcd_to_dec(buf[2]) day = bcd_to_dec(buf[4]) month = bcd_to_dec(buf[5] & 0x1F) year = bcd_to_dec(buf[6]) + 2000 return (year, month, day, hour, minute, second) # Initialize SD card using SoftSPI and sdcard driver spi = machine.SoftSPI(baudrate=1000000, polarity=0, phase=0, sck=machine.Pin(SPI_SCK_PIN), mosi=machine.Pin(SPI_MOSI_PIN), miso=machine.Pin(SPI_MISO_PIN)) cs = machine.Pin(SPI_CS_PIN, machine.Pin.OUT) try: sd = sdcard.SDCard(spi, cs) os.mount(sd, "/sd") print("SD CARD INITIALIZED.") except Exception as e: print("SD CARD FAILED, OR NOT PRESENT!", e) raise SystemExit print("--------------------") # Define analog pins analog_pin_1 = machine.ADC(machine.Pin(26)) # The Raspberry Pi Pico pin GP26 (ADC0) analog_pin_2 = machine.ADC(machine.Pin(27)) # The Raspberry Pi Pico pin GP27 (ADC1) while True: try: f = open(FILE_NAME, "a") print("Writing log to SD Card") # Get timestamp from RTC year, month, day, hour, minute, second = get_datetime() timestamp = "{}-{}-{} {}:{}:{}".format(year, month, day, hour, minute, second) # Read data analog_1 = analog_pin_1.read_u16() analog_2 = analog_pin_2.read_u16() # Write timestamp and data f.write("{} analog_1 = {}, analog_2 = {}\n".format(timestamp, analog_1, analog_2)) f.close() except Exception as e: print("SD Card: Issue encountered while attempting to open the file", FILE_NAME, e) time.sleep(2) # delay 2 seconds

Detailed Instructions

Follow the steps below to set up and run the code:

  • Verify that Thonny IDE is installed on your PC.
  • Make sure MicroPython firmware has been flashed onto your Raspberry Pi Pico.
  • First-time users should consult the Raspberry Pi Pico - Getting Started guide for setup details.
  • Assemble the circuit following the wiring diagram above.
  • Plug the Raspberry Pi Pico into your computer via USB cable.
  • Open Thonny IDE.
  • Go to Tools Options, then in the Interpreter tab pick MicroPython (Raspberry Pi Pico).
  • Check that the correct serial port is selected — Thonny usually finds it automatically, but manual selection may be needed (for example COM3 on Windows or /dev/ttyACM0 on Linux).
  • Paste the code above into the Thonny editor window.
  • Save the file to the Raspberry Pi Pico:
    • Press Ctrl+S or click Save.
    • When prompted, select the Raspberry Pi Pico location.
    • Name the file main.py.
  • Hit the green Run button (or press F5). The script will start executing.
  • Review the output in the Shell panel at the bottom of Thonny.

Saving your script as main.py in the Pico's root directory means it will launch automatically whenever the board powers up or resets — ideal for standalone projects. Scripts saved under a different name must be started manually through the Thonny Shell.

  • Make sure the Micro SD Card is formatted as FAT16 or FAT32 (look up instructions online).
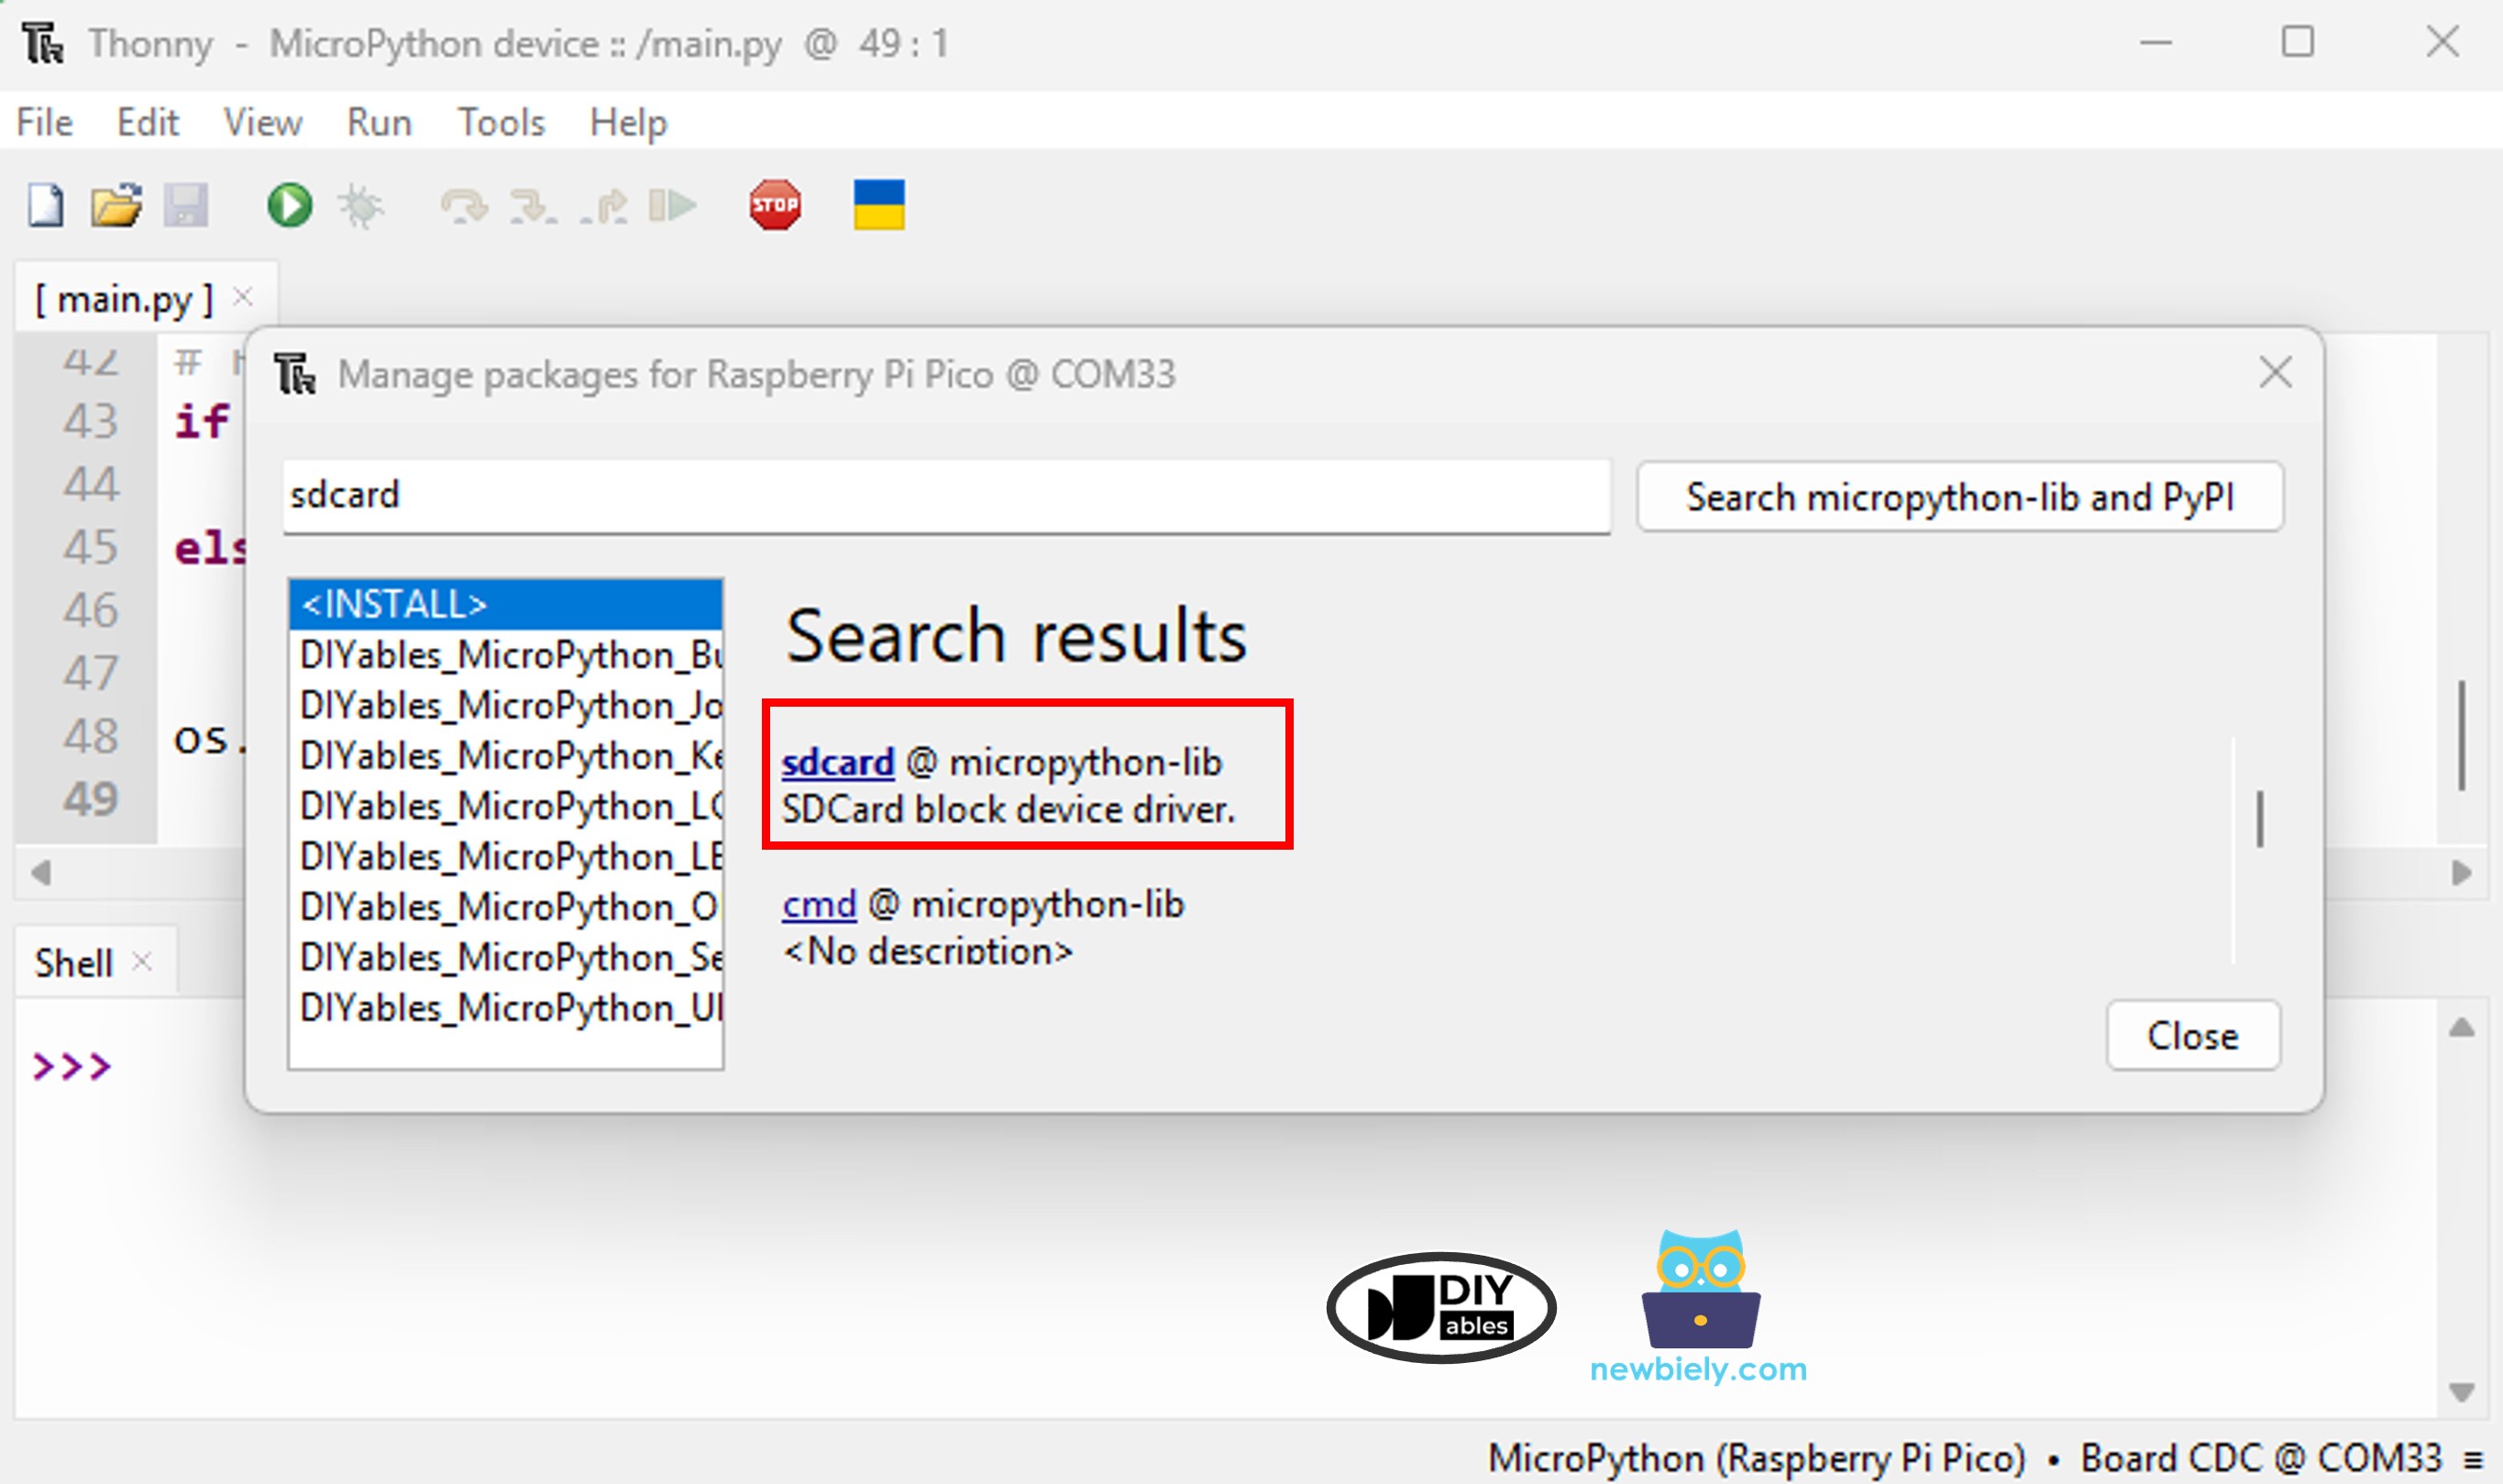
  • Install the sdcard library on the Raspberry Pi Pico via Thonny IDE:
    • Go to Tools Manage packages in Thonny IDE.
    • Type sdcard in the search box and install the micropython-sdcard package.
    Raspberry Pi Pico SD Card library
    • Paste the code into Thonny's editor.
    • Click Run to execute the code on the Raspberry Pi Pico.
    • Watch the Shell for output:
    Shell x
    >>> %Run -c $EDITOR_CONTENT
    MPY: soft reboot SD CARD INITIALIZED. -------------------- Writing log to SD Card Writing log to SD Card Writing log to SD Card Writing log to SD Card Writing log to SD Card Writing log to SD Card Writing log to SD Card
    MicroPython (Raspberry Pi Pico) • Board CDC @ COM29 ≡
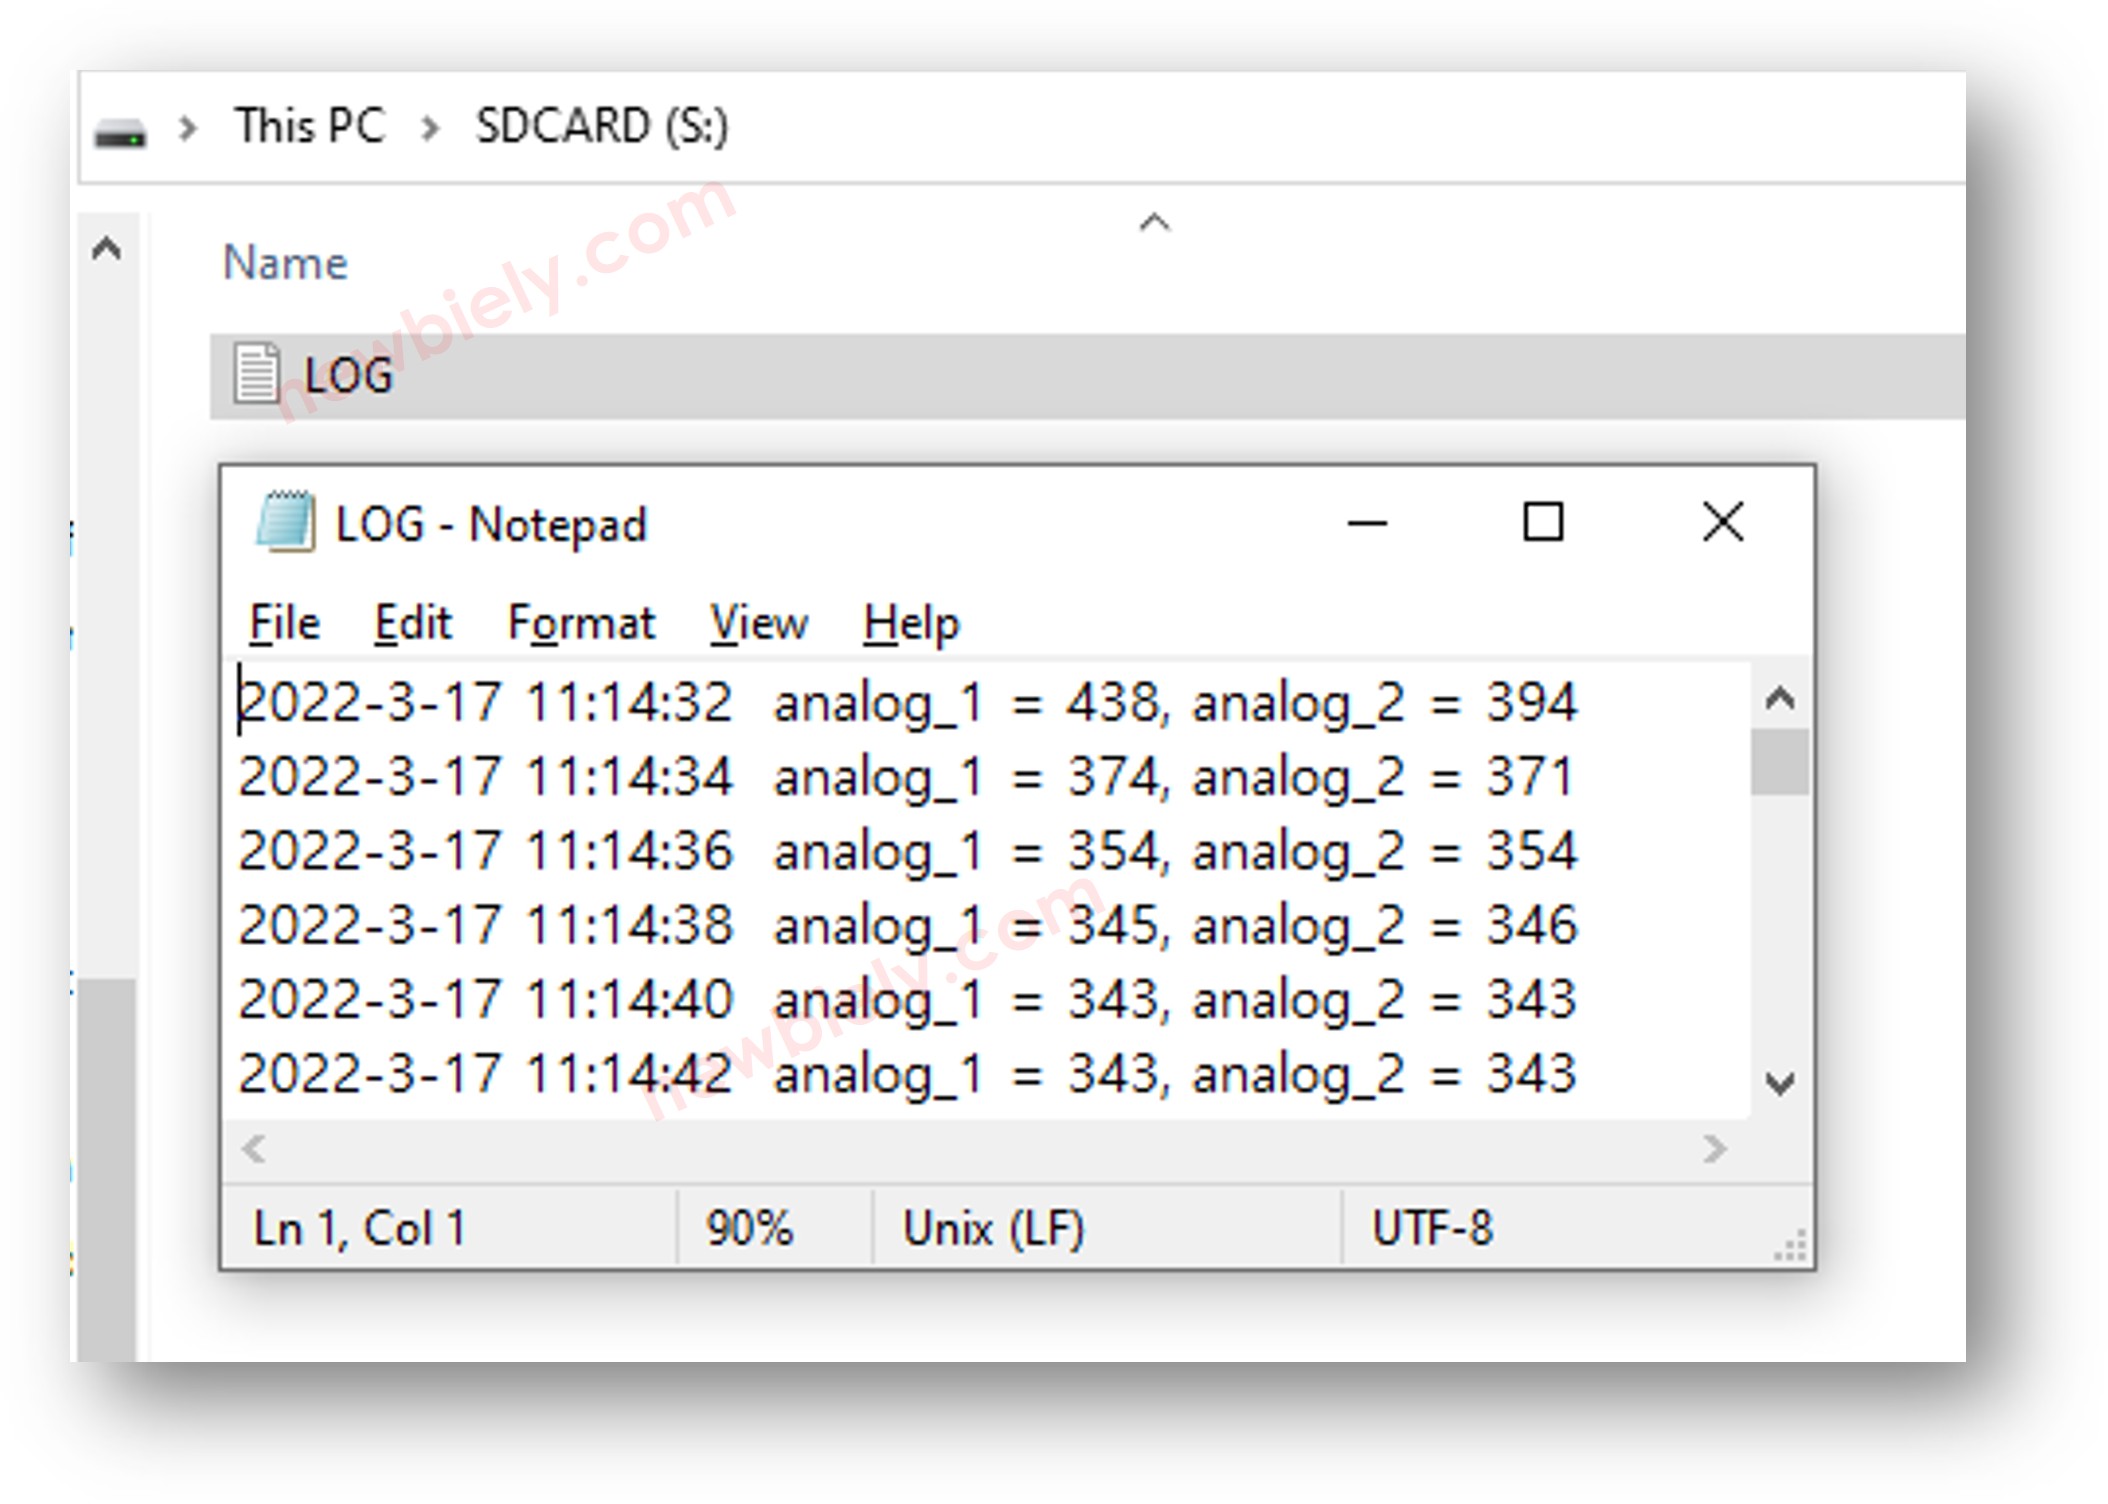
    • Remove the Micro SD Card from the module
    • Plug it into a USB SD Card reader connected to your PC
    • Open the log.txt file — its content should look like this:
    Raspberry Pi Pico log to Micro SD Card with time information

    If a USB SD Card reader is not available, the following MicroPython code lets you read the log file directly on the Raspberry Pi Pico.

    """ This Raspberry Pi Pico MicroPython code was developed by newbiely.com This Raspberry Pi Pico code is made available for public use without any restriction For comprehensive instructions and wiring diagrams, please visit: https://newbiely.com/tutorials/raspberry-pico/raspberry-pi-pico-log-data-with-timestamp-to-sd-card """ import machine import os import sdcard # Define SPI pins for the Micro SD Card module SPI_SCK_PIN = 2 # The Raspberry Pi Pico pin GP2 connected to SCK SPI_MOSI_PIN = 3 # The Raspberry Pi Pico pin GP3 connected to MOSI SPI_MISO_PIN = 4 # The Raspberry Pi Pico pin GP4 connected to MISO SPI_CS_PIN = 5 # The Raspberry Pi Pico pin GP5 connected to SS (CS) FILE_NAME = "/sd/log.txt" # Initialize SD card using SoftSPI and sdcard driver spi = machine.SoftSPI(baudrate=1000000, polarity=0, phase=0, sck=machine.Pin(SPI_SCK_PIN), mosi=machine.Pin(SPI_MOSI_PIN), miso=machine.Pin(SPI_MISO_PIN)) cs = machine.Pin(SPI_CS_PIN, machine.Pin.OUT) try: sd = sdcard.SDCard(spi, cs) os.mount(sd, "/sd") print("SD CARD INITIALIZED.") except Exception as e: print("SD CARD FAILED, OR NOT PRESENT!", e) raise SystemExit # Open file for reading try: f = open(FILE_NAME, "r") while True: ch = f.read(1) # read characters one by one from Micro SD Card if not ch: break print(ch, end="") # print the character to the Shell f.close() except Exception as e: print("SD Card: Issue encountered while attempting to open the file", FILE_NAME, e) os.umount("/sd")

Raspberry Pi Pico - Splitting Logs into Daily Files

Logging everything into a single file makes it grow continuously, which becomes impractical over time. The code below addresses this by creating separate files:

  • A new log file is generated each day
  • File names follow the pattern YYYYMMDD.txt
""" This Raspberry Pi Pico MicroPython code was developed by newbiely.com This Raspberry Pi Pico code is made available for public use without any restriction For comprehensive instructions and wiring diagrams, please visit: https://newbiely.com/tutorials/raspberry-pico/raspberry-pi-pico-log-data-with-timestamp-to-sd-card """ import machine import os import time import sdcard # Define SPI pins for the Micro SD Card module SPI_SCK_PIN = 2 # The Raspberry Pi Pico pin GP2 connected to SCK SPI_MOSI_PIN = 3 # The Raspberry Pi Pico pin GP3 connected to MOSI SPI_MISO_PIN = 4 # The Raspberry Pi Pico pin GP4 connected to MISO SPI_CS_PIN = 5 # The Raspberry Pi Pico pin GP5 connected to SS (CS) # Define I2C pins for the RTC module I2C_SDA_PIN = 0 # The Raspberry Pi Pico pin GP0 connected to SDA I2C_SCL_PIN = 1 # The Raspberry Pi Pico pin GP1 connected to SCL # Initialize I2C and RTC (DS3231) i2c = machine.I2C(0, sda=machine.Pin(I2C_SDA_PIN), scl=machine.Pin(I2C_SCL_PIN)) # DS3231 I2C address DS3231_ADDR = 0x68 def bcd_to_dec(bcd): return (bcd >> 4) * 10 + (bcd & 0x0F) def get_datetime(): buf = i2c.readfrom_mem(DS3231_ADDR, 0x00, 7) second = bcd_to_dec(buf[0]) minute = bcd_to_dec(buf[1]) hour = bcd_to_dec(buf[2]) day = bcd_to_dec(buf[4]) month = bcd_to_dec(buf[5] & 0x1F) year = bcd_to_dec(buf[6]) + 2000 return (year, month, day, hour, minute, second) # Initialize SD card using SoftSPI and sdcard driver spi = machine.SoftSPI(baudrate=1000000, polarity=0, phase=0, sck=machine.Pin(SPI_SCK_PIN), mosi=machine.Pin(SPI_MOSI_PIN), miso=machine.Pin(SPI_MISO_PIN)) cs = machine.Pin(SPI_CS_PIN, machine.Pin.OUT) try: sd = sdcard.SDCard(spi, cs) os.mount(sd, "/sd") print("SD CARD INITIALIZED.") except Exception as e: print("SD CARD FAILED, OR NOT PRESENT!", e) raise SystemExit print("--------------------") # Define analog pins analog_pin_1 = machine.ADC(machine.Pin(26)) # The Raspberry Pi Pico pin GP26 (ADC0) analog_pin_2 = machine.ADC(machine.Pin(27)) # The Raspberry Pi Pico pin GP27 (ADC1) while True: year, month, day, hour, minute, second = get_datetime() # Generate filename: /sd/YYYYMMDD.txt filename = "/sd/{:04d}{:02d}{:02d}.txt".format(year, month, day) try: f = open(filename, "a") print("Writing log to SD Card") # Write timestamp timestamp = "{}-{}-{} {}:{}:{}".format(year, month, day, hour, minute, second) # Read data analog_1 = analog_pin_1.read_u16() analog_2 = analog_pin_2.read_u16() # Write timestamp and data f.write("{} analog_1 = {}, analog_2 = {}\n".format(timestamp, analog_1, analog_2)) f.close() except Exception as e: print("SD Card: Issue encountered while attempting to open the file", filename, e) time.sleep(2) # delay 2 seconds

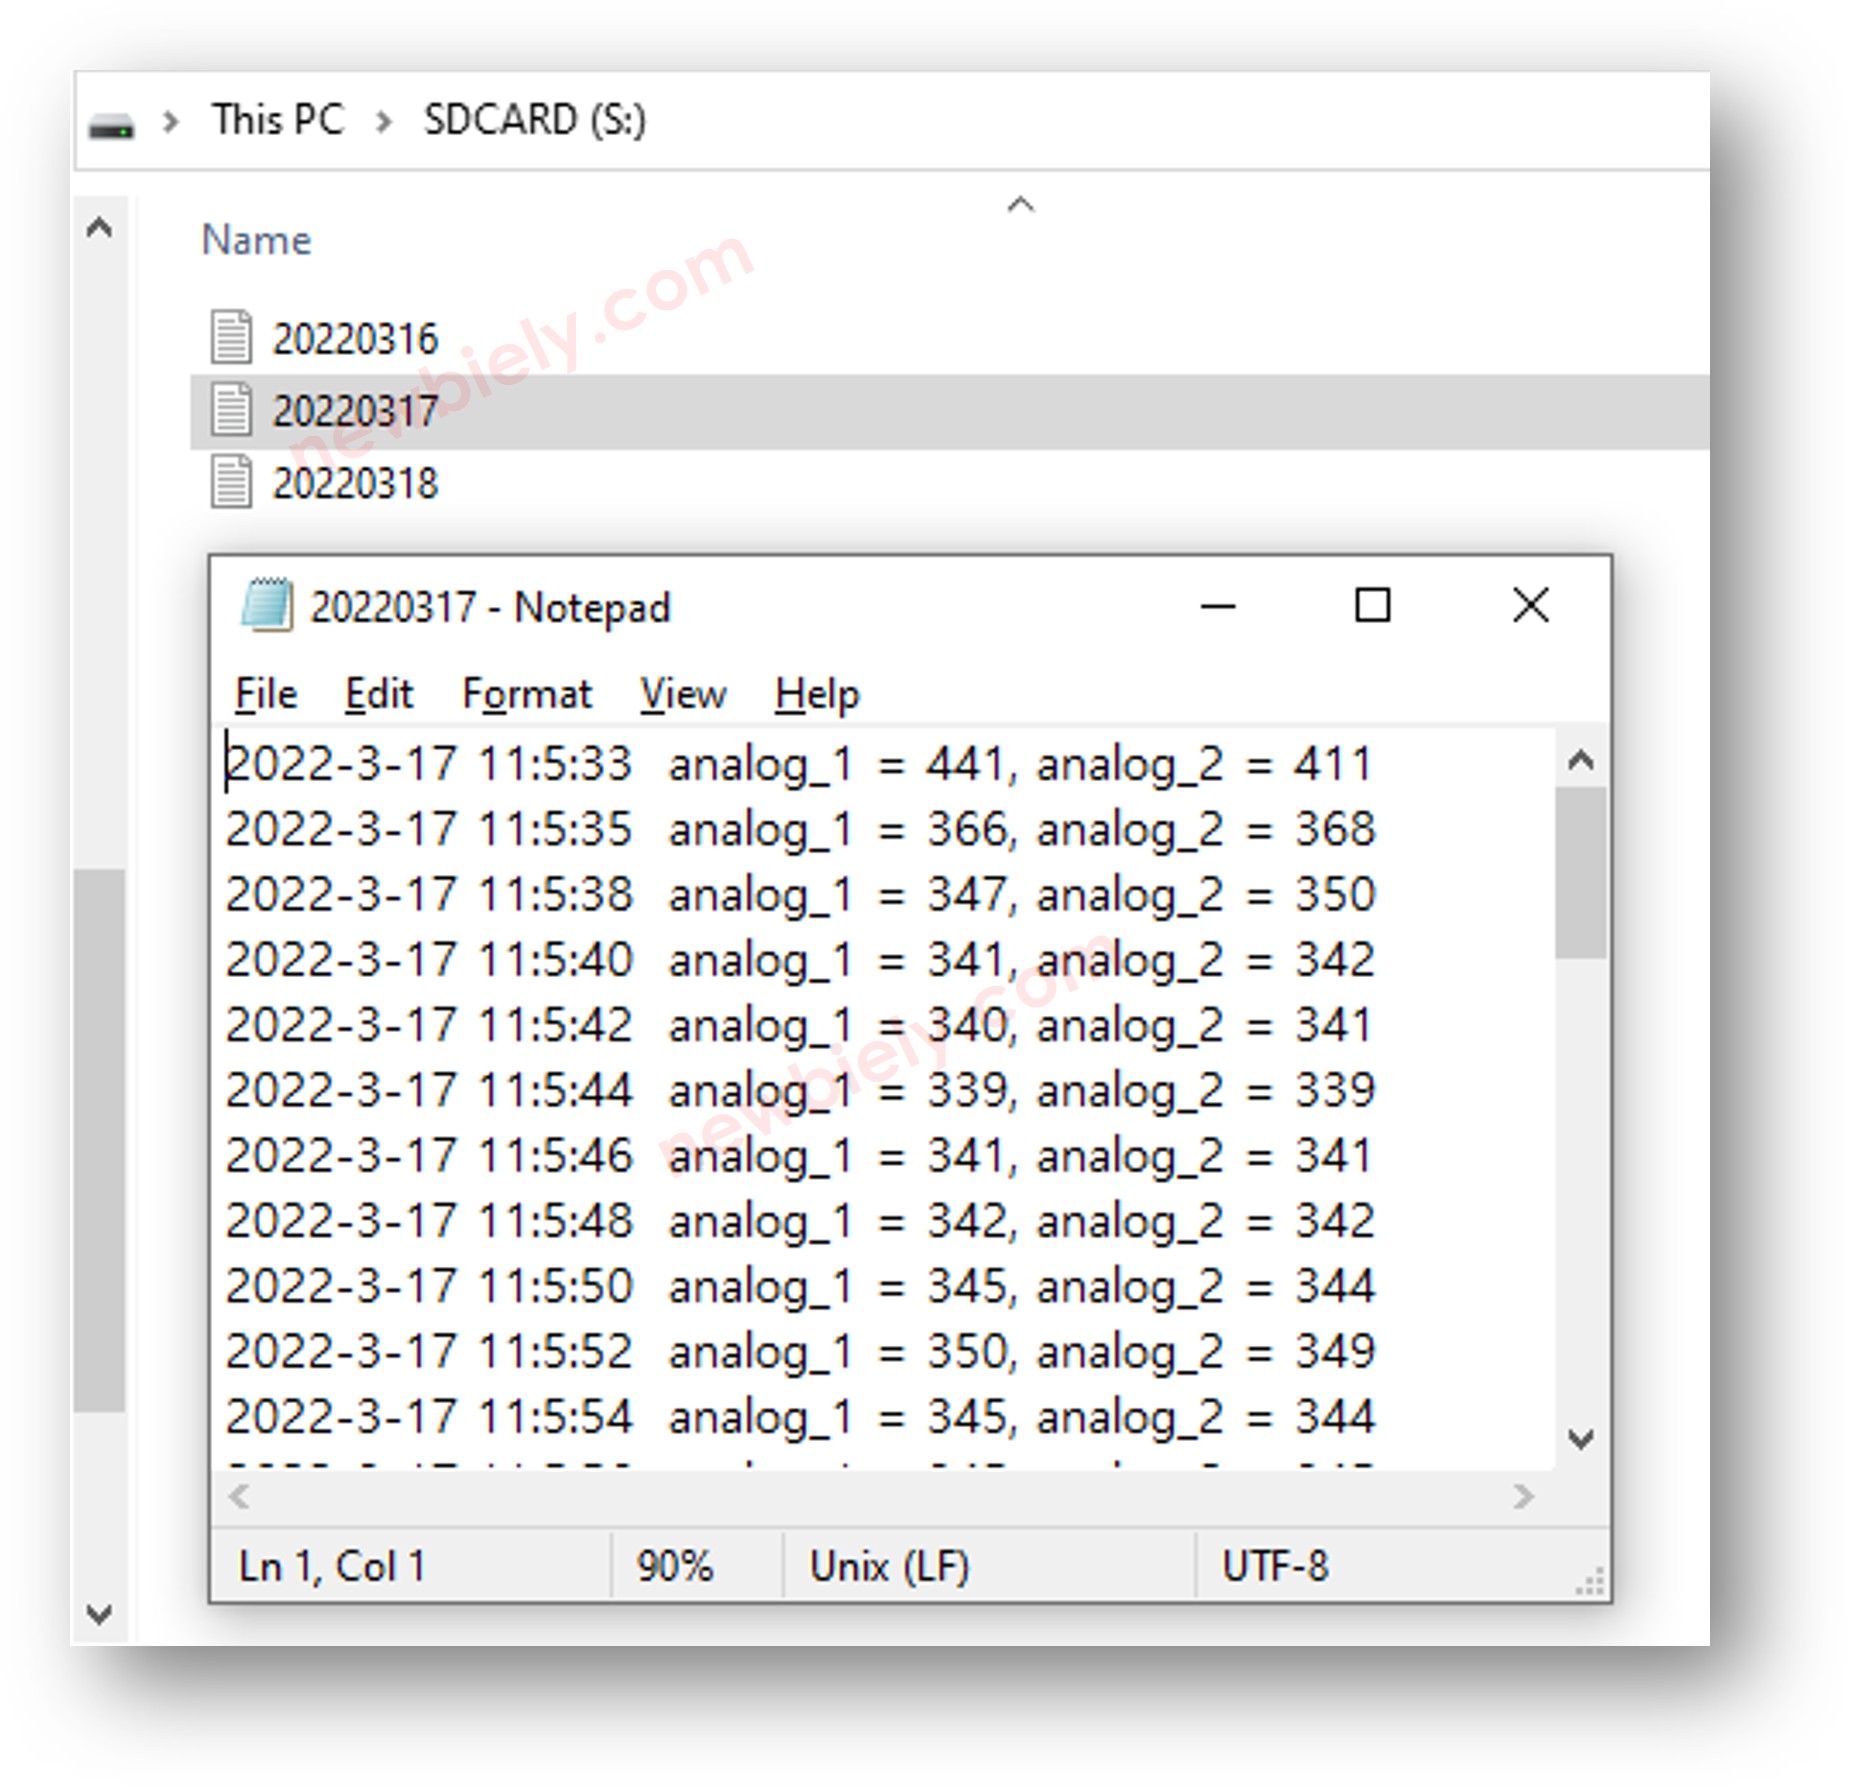
After the logger has been running for some time:

  • Eject the Micro SD Card from the module.
  • Insert the card into a USB SD Card reader and connect it to your PC.
  • You will find multiple date-stamped log files on the card:
Raspberry Pi Pico log to Micro SD Card multiple files

Video Tutorial

※ OUR MESSAGES

  • As freelancers, We are AVAILABLE for HIRE. See how to outsource your project to us
  • Please feel free to share the link of this tutorial. However, Please do not use our content on any other websites. We invested a lot of effort and time to create the content, please respect our work!