Raspberry Pi Pico - Micro SD Card
This tutorial explains how to connect and use a Micro SD Card with the Raspberry Pi Pico running MicroPython. The topics covered include:
- Creating a new file or opening an existing one on the Micro SD Card
- Writing text data into a file on the Micro SD Card
- Reading a file character by character from the Micro SD Card
- Reading a file one line at a time from the Micro SD Card
- Appending additional content to a file on the Micro SD Card
- Replacing all content in a file on the Micro SD Card
Hardware Preparation
Or you can buy the following kits:
| 1 | × | DIYables Sensor Kit (18 sensors/displays) |
Additionally, some of these links are for products from our own brand, DIYables .
Overview of Micro SD Card Module
The Micro SD Card Module is a small breakout board that lets the Raspberry Pi Pico access a Micro SD Card through the SPI bus. It handles the electrical level shifting between the Pico and the card.
Pinout
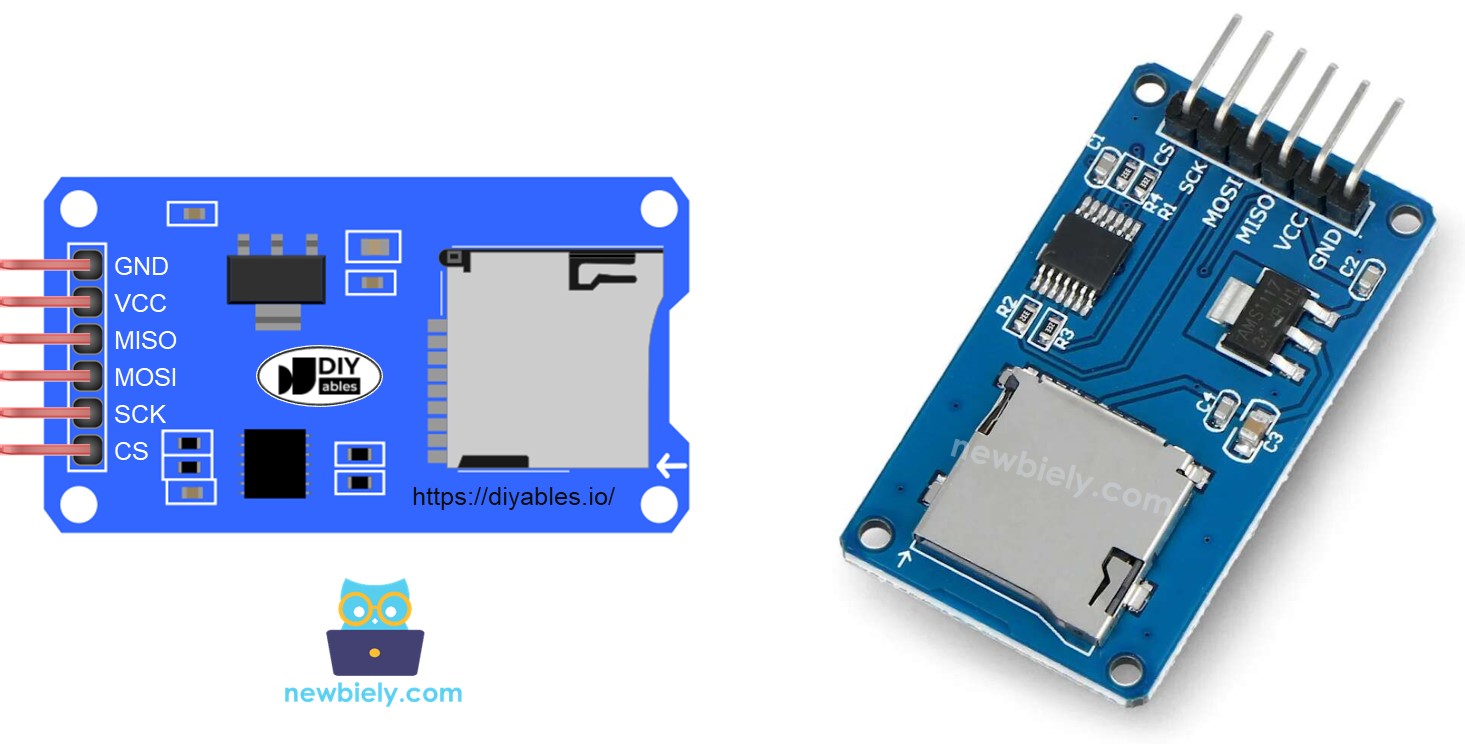
This module provides 6 connection pins:
- VCC: supply voltage — wire to the VBUS (5V) output on the Raspberry Pi Pico.
- GND: ground reference — wire to any GND pin on the Pico.
- MISO: data output from the SD card — wire to the Pico's MISO pin.
- MOSI: data input to the SD card — wire to the Pico's MOSI pin.
- SCK: SPI clock signal — wire to the Pico's SCK pin.
- SS (CS): chip select — wire to the GPIO pin specified in your MicroPython code.
Preparation
- Use a USB 3.0 SD Card Reader to plug the Micro SD Card into your computer.
- Confirm the card is formatted as FAT16 or FAT32 (search online for formatting instructions if necessary).
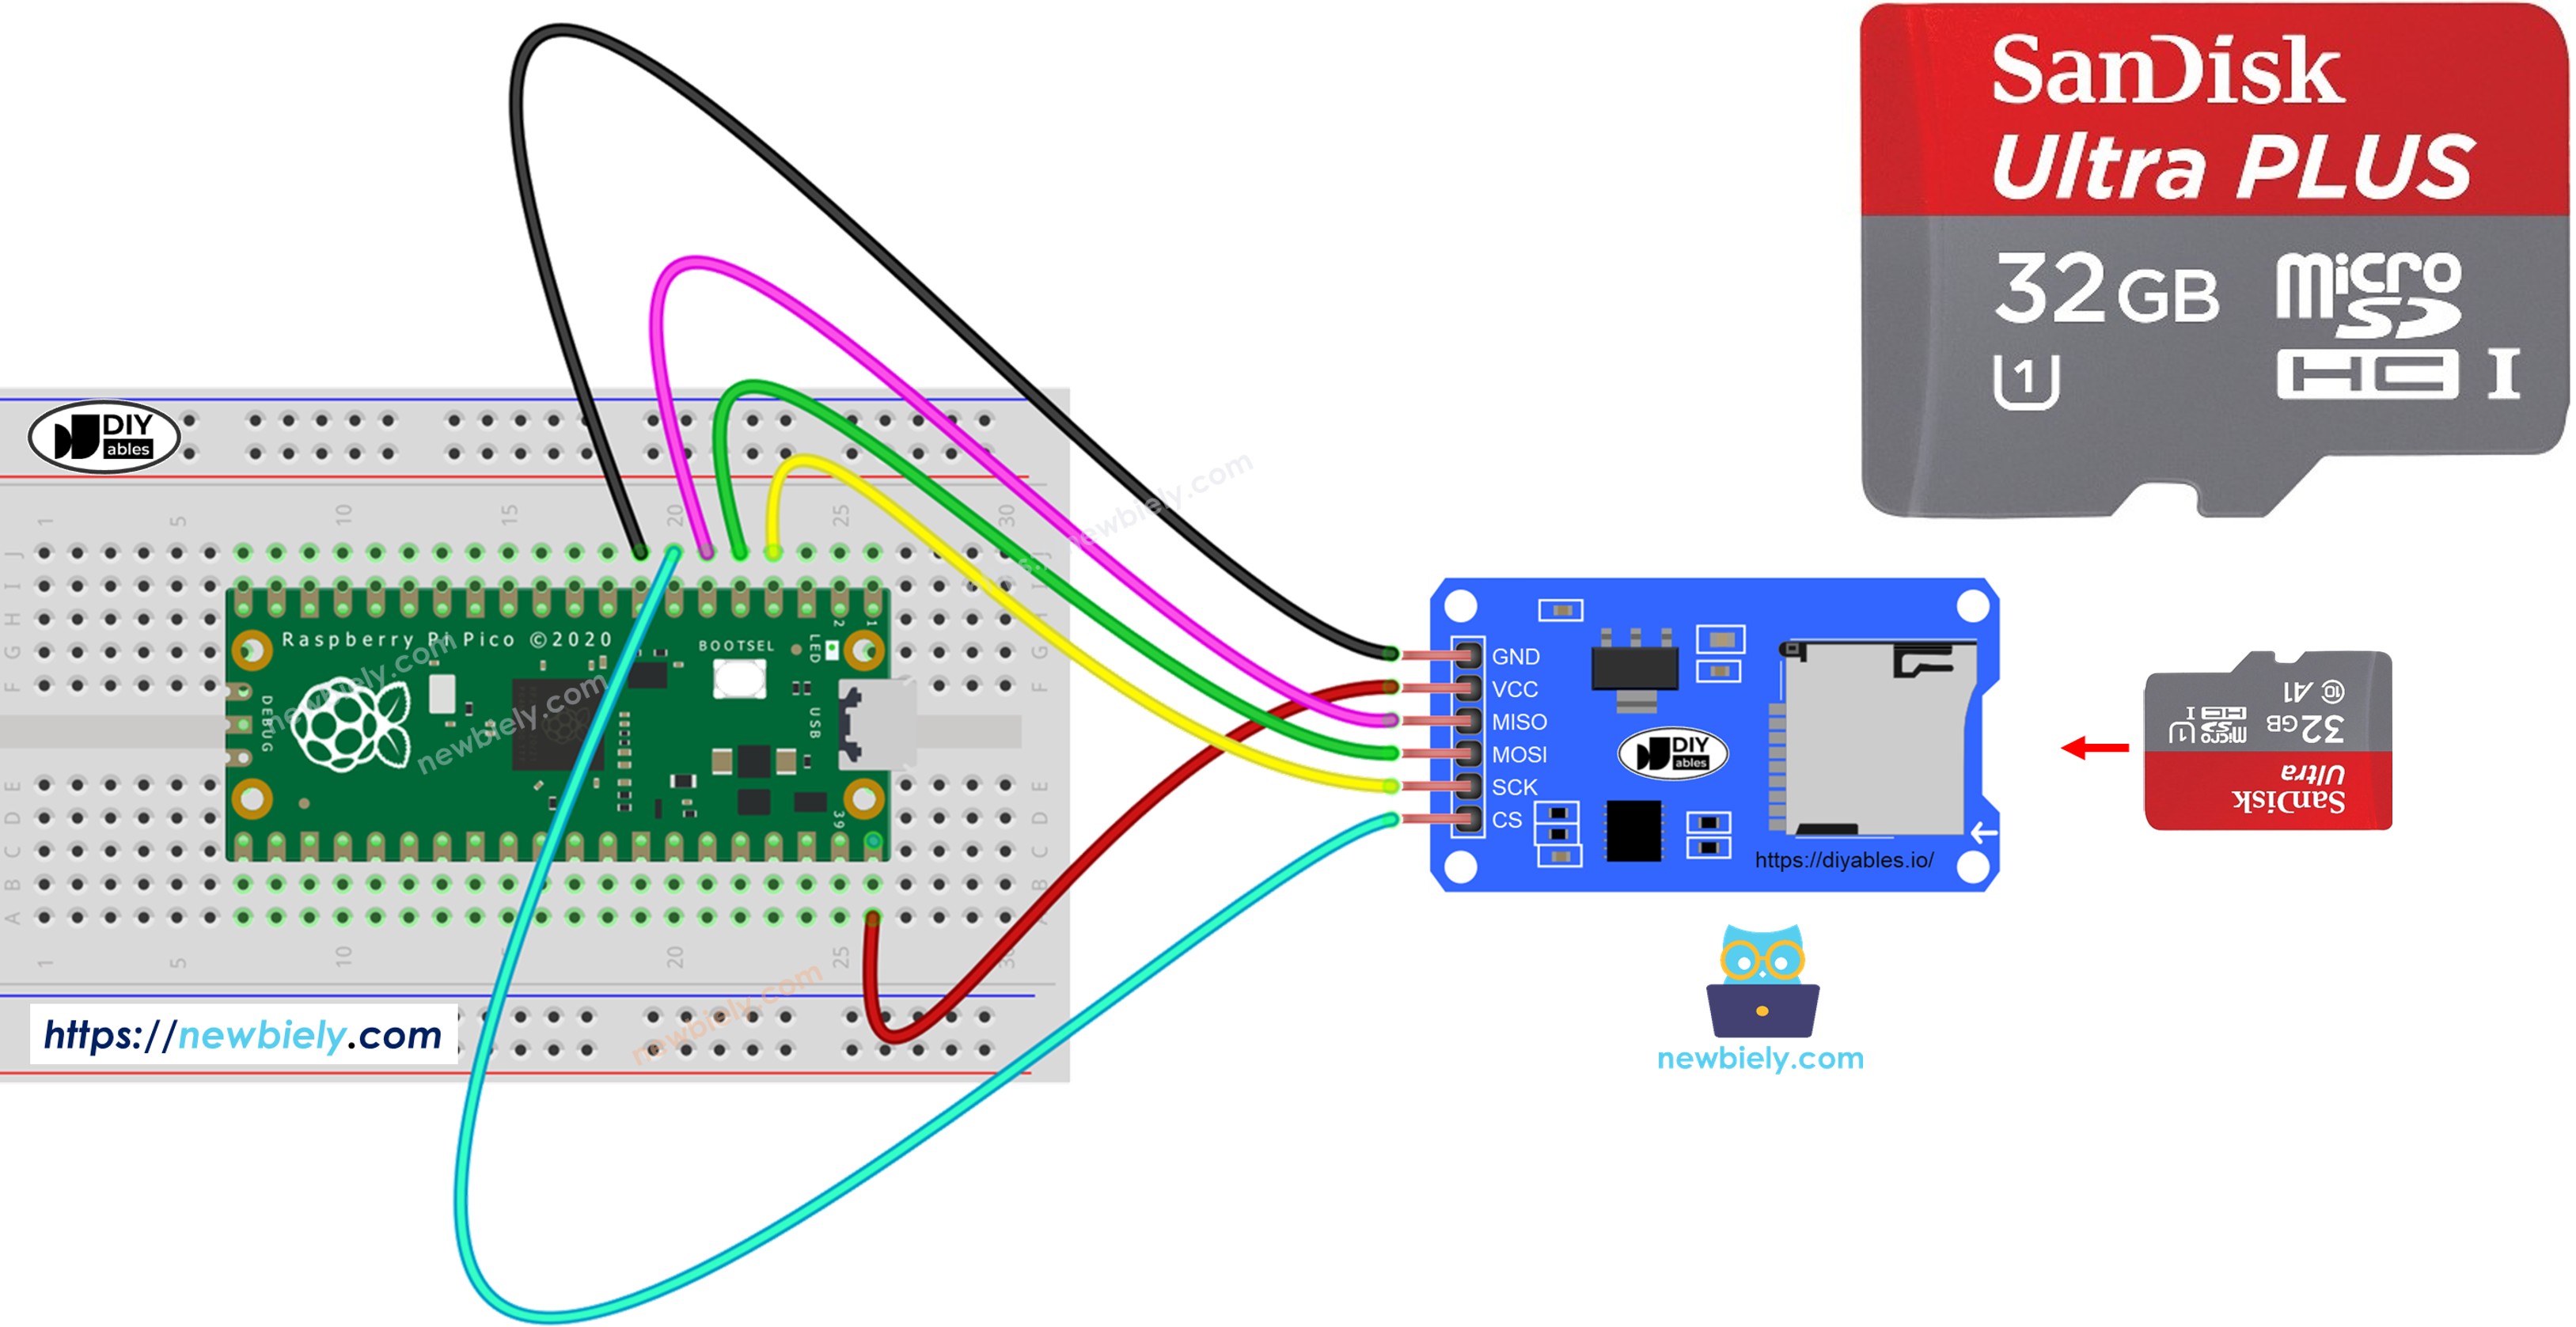
Wiring Diagram
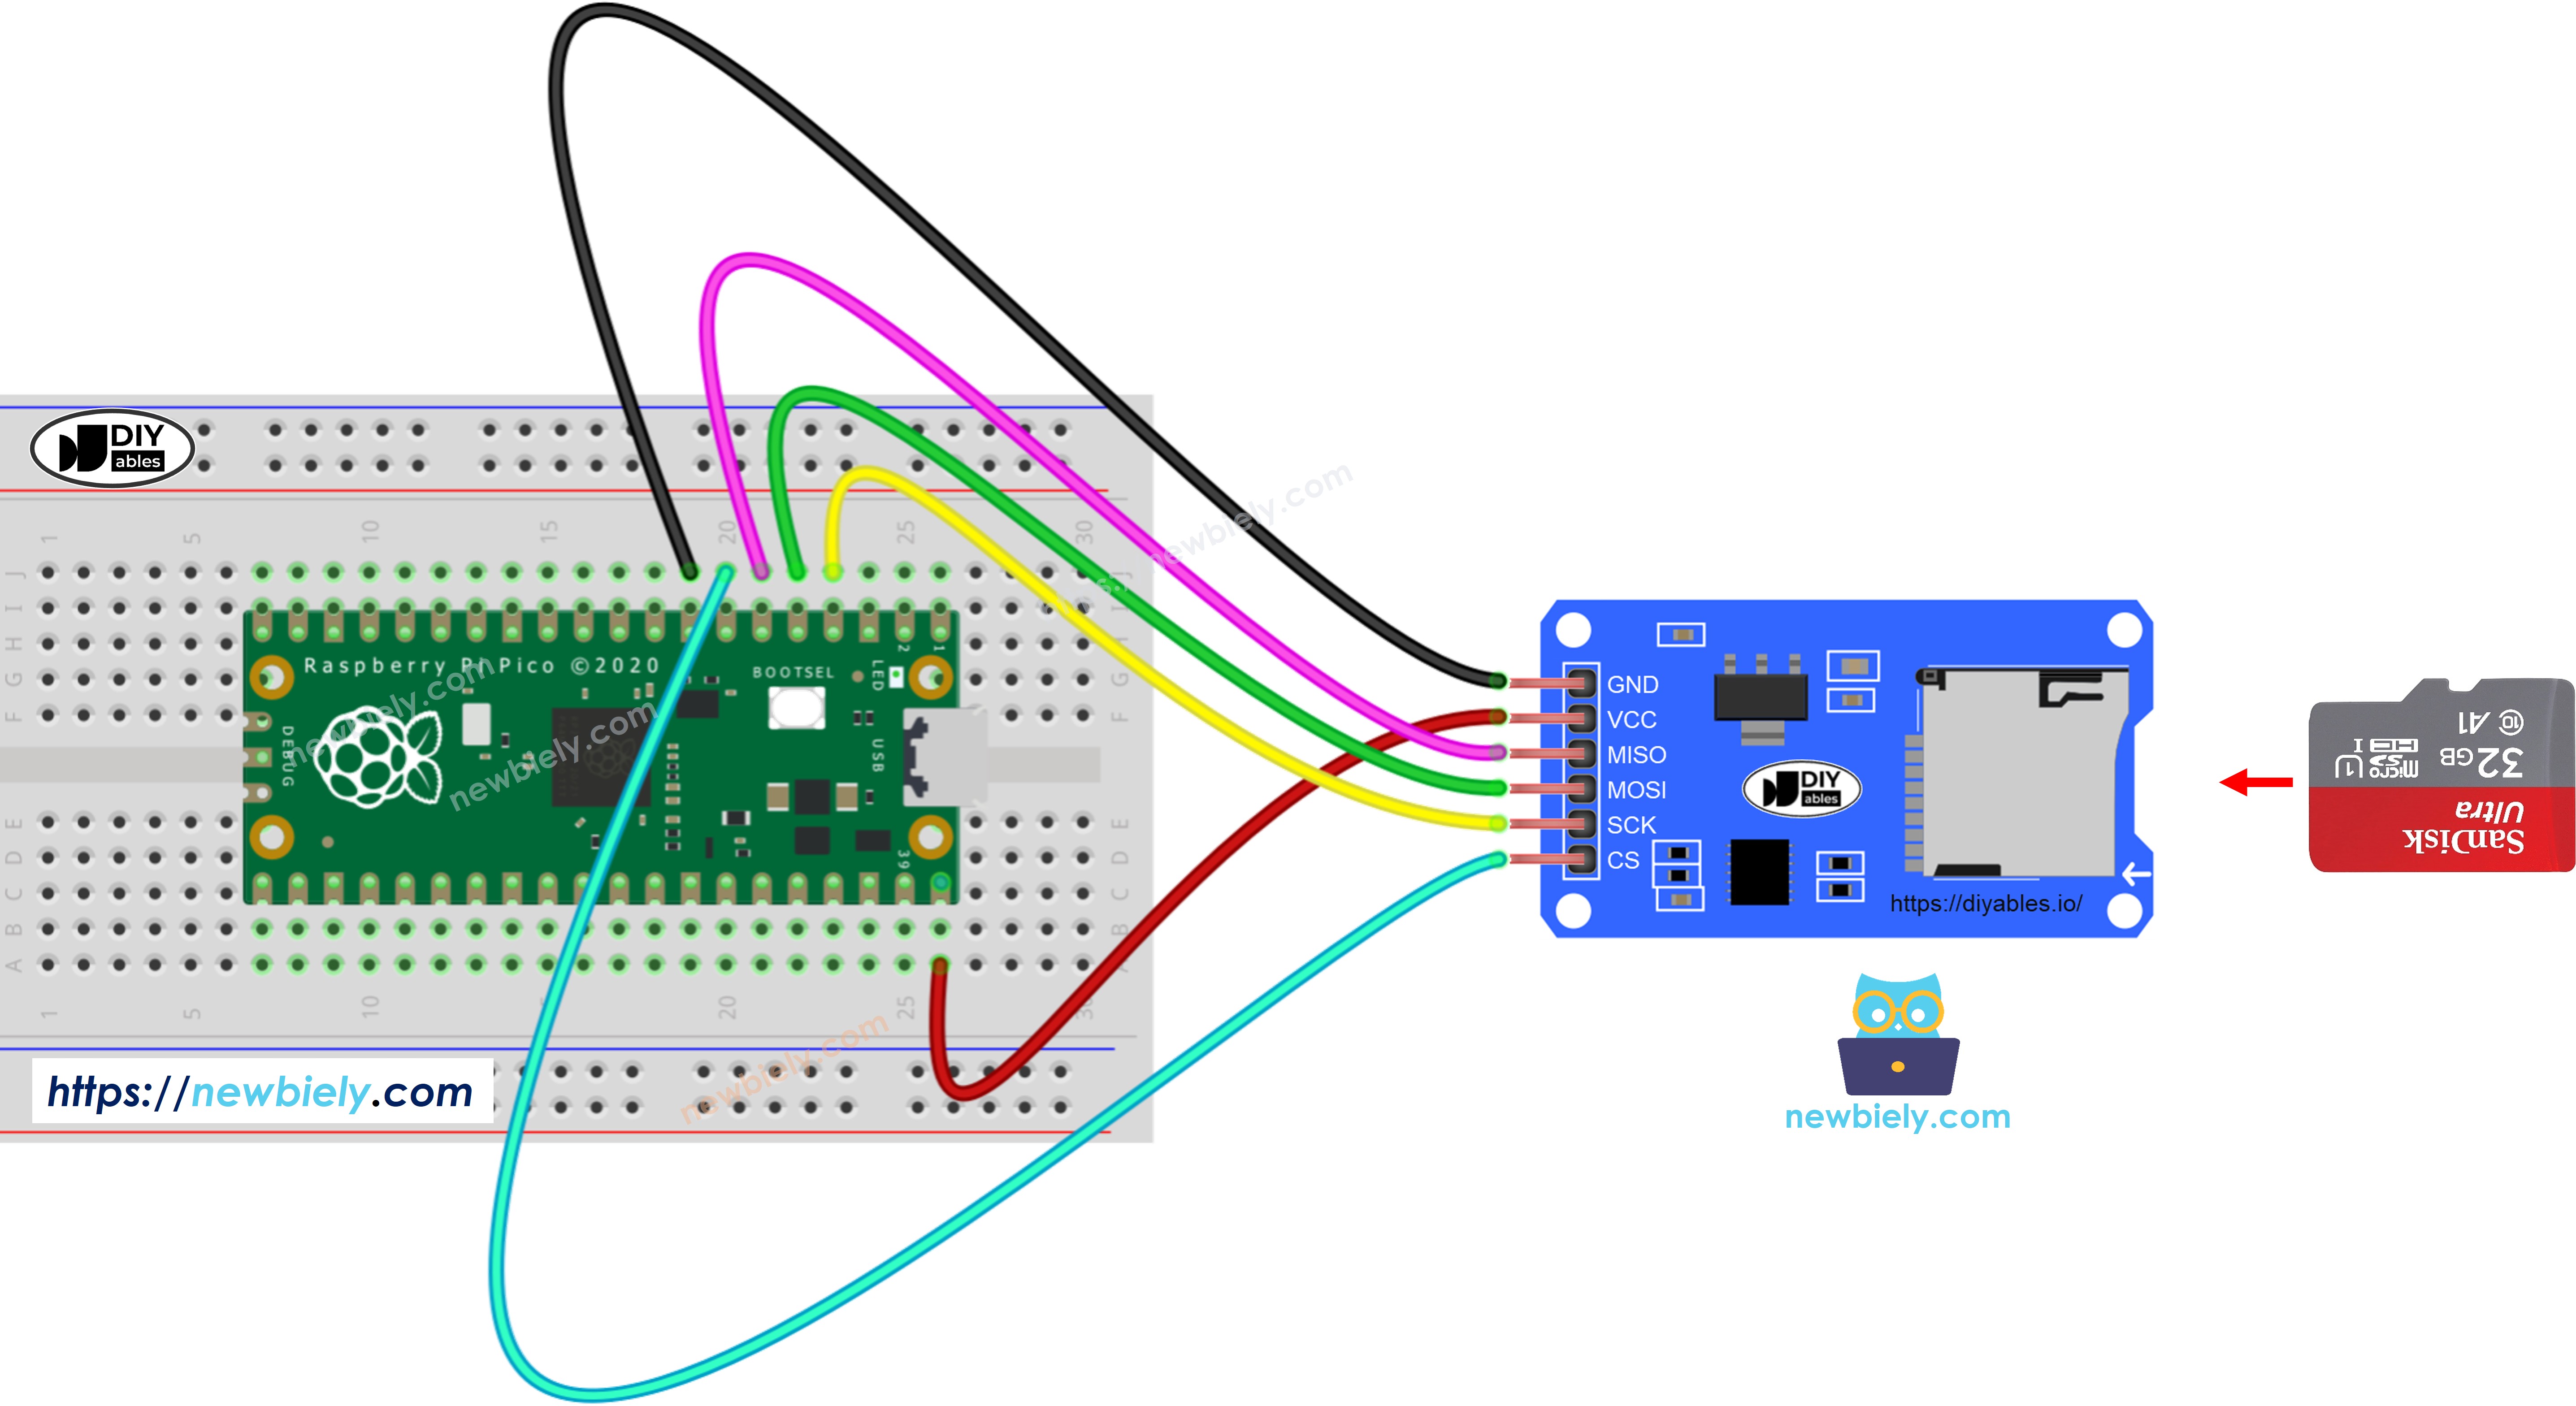
This image is created using Fritzing. Click to enlarge image
The wiring table below shows how to connect the Micro SD Card Module to the Raspberry Pi Pico:
| Micro SD Card Module | Raspberry Pi Pico |
|---|---|
| VCC | VBUS (5V) |
| GND | GND |
| MISO | GP4 |
| MOSI | GP3 |
| SCK | GP2 |
| CS | GP5 |
※ NOTE THAT:
When using a shield that already includes a Micro SD Card slot (for example, an Ethernet shield), no additional SD Card Module is required — just slide the card straight into the shield's built-in slot.
Raspberry Pi Pico - Creating or Opening a File on Micro SD Card
MicroPython Code
Detailed Instructions
Follow the steps below to set up and run the code:
- Verify that Thonny IDE is installed on your PC.
- Make sure MicroPython firmware has been flashed onto your Raspberry Pi Pico.
- First-time users should consult the Raspberry Pi Pico - Getting Started guide for setup details.
- Assemble the circuit following the wiring diagram above.
- Plug the Raspberry Pi Pico into your computer via USB cable.
- Open Thonny IDE.
- Go to Tools Options, then in the Interpreter tab pick MicroPython (Raspberry Pi Pico).
- Check that the correct serial port is selected — Thonny usually finds it automatically, but manual selection may be needed (for example COM3 on Windows or /dev/ttyACM0 on Linux).
- Paste the code above into the Thonny editor window.
- Save the file to the Raspberry Pi Pico:
- Press Ctrl+S or click Save.
- When prompted, select the Raspberry Pi Pico location.
- Name the file main.py.
- Hit the green Run button (or press F5). The script will start executing.
- Review the output in the Shell panel at the bottom of Thonny.
Saving your script as main.py in the Pico's root directory means it will launch automatically whenever the board powers up or resets — ideal for standalone projects. Scripts saved under a different name must be started manually through the Thonny Shell.
- Slot the Micro SD Card into the SD Card module.
- Wire the SD Card module to the Raspberry Pi Pico following the diagram.
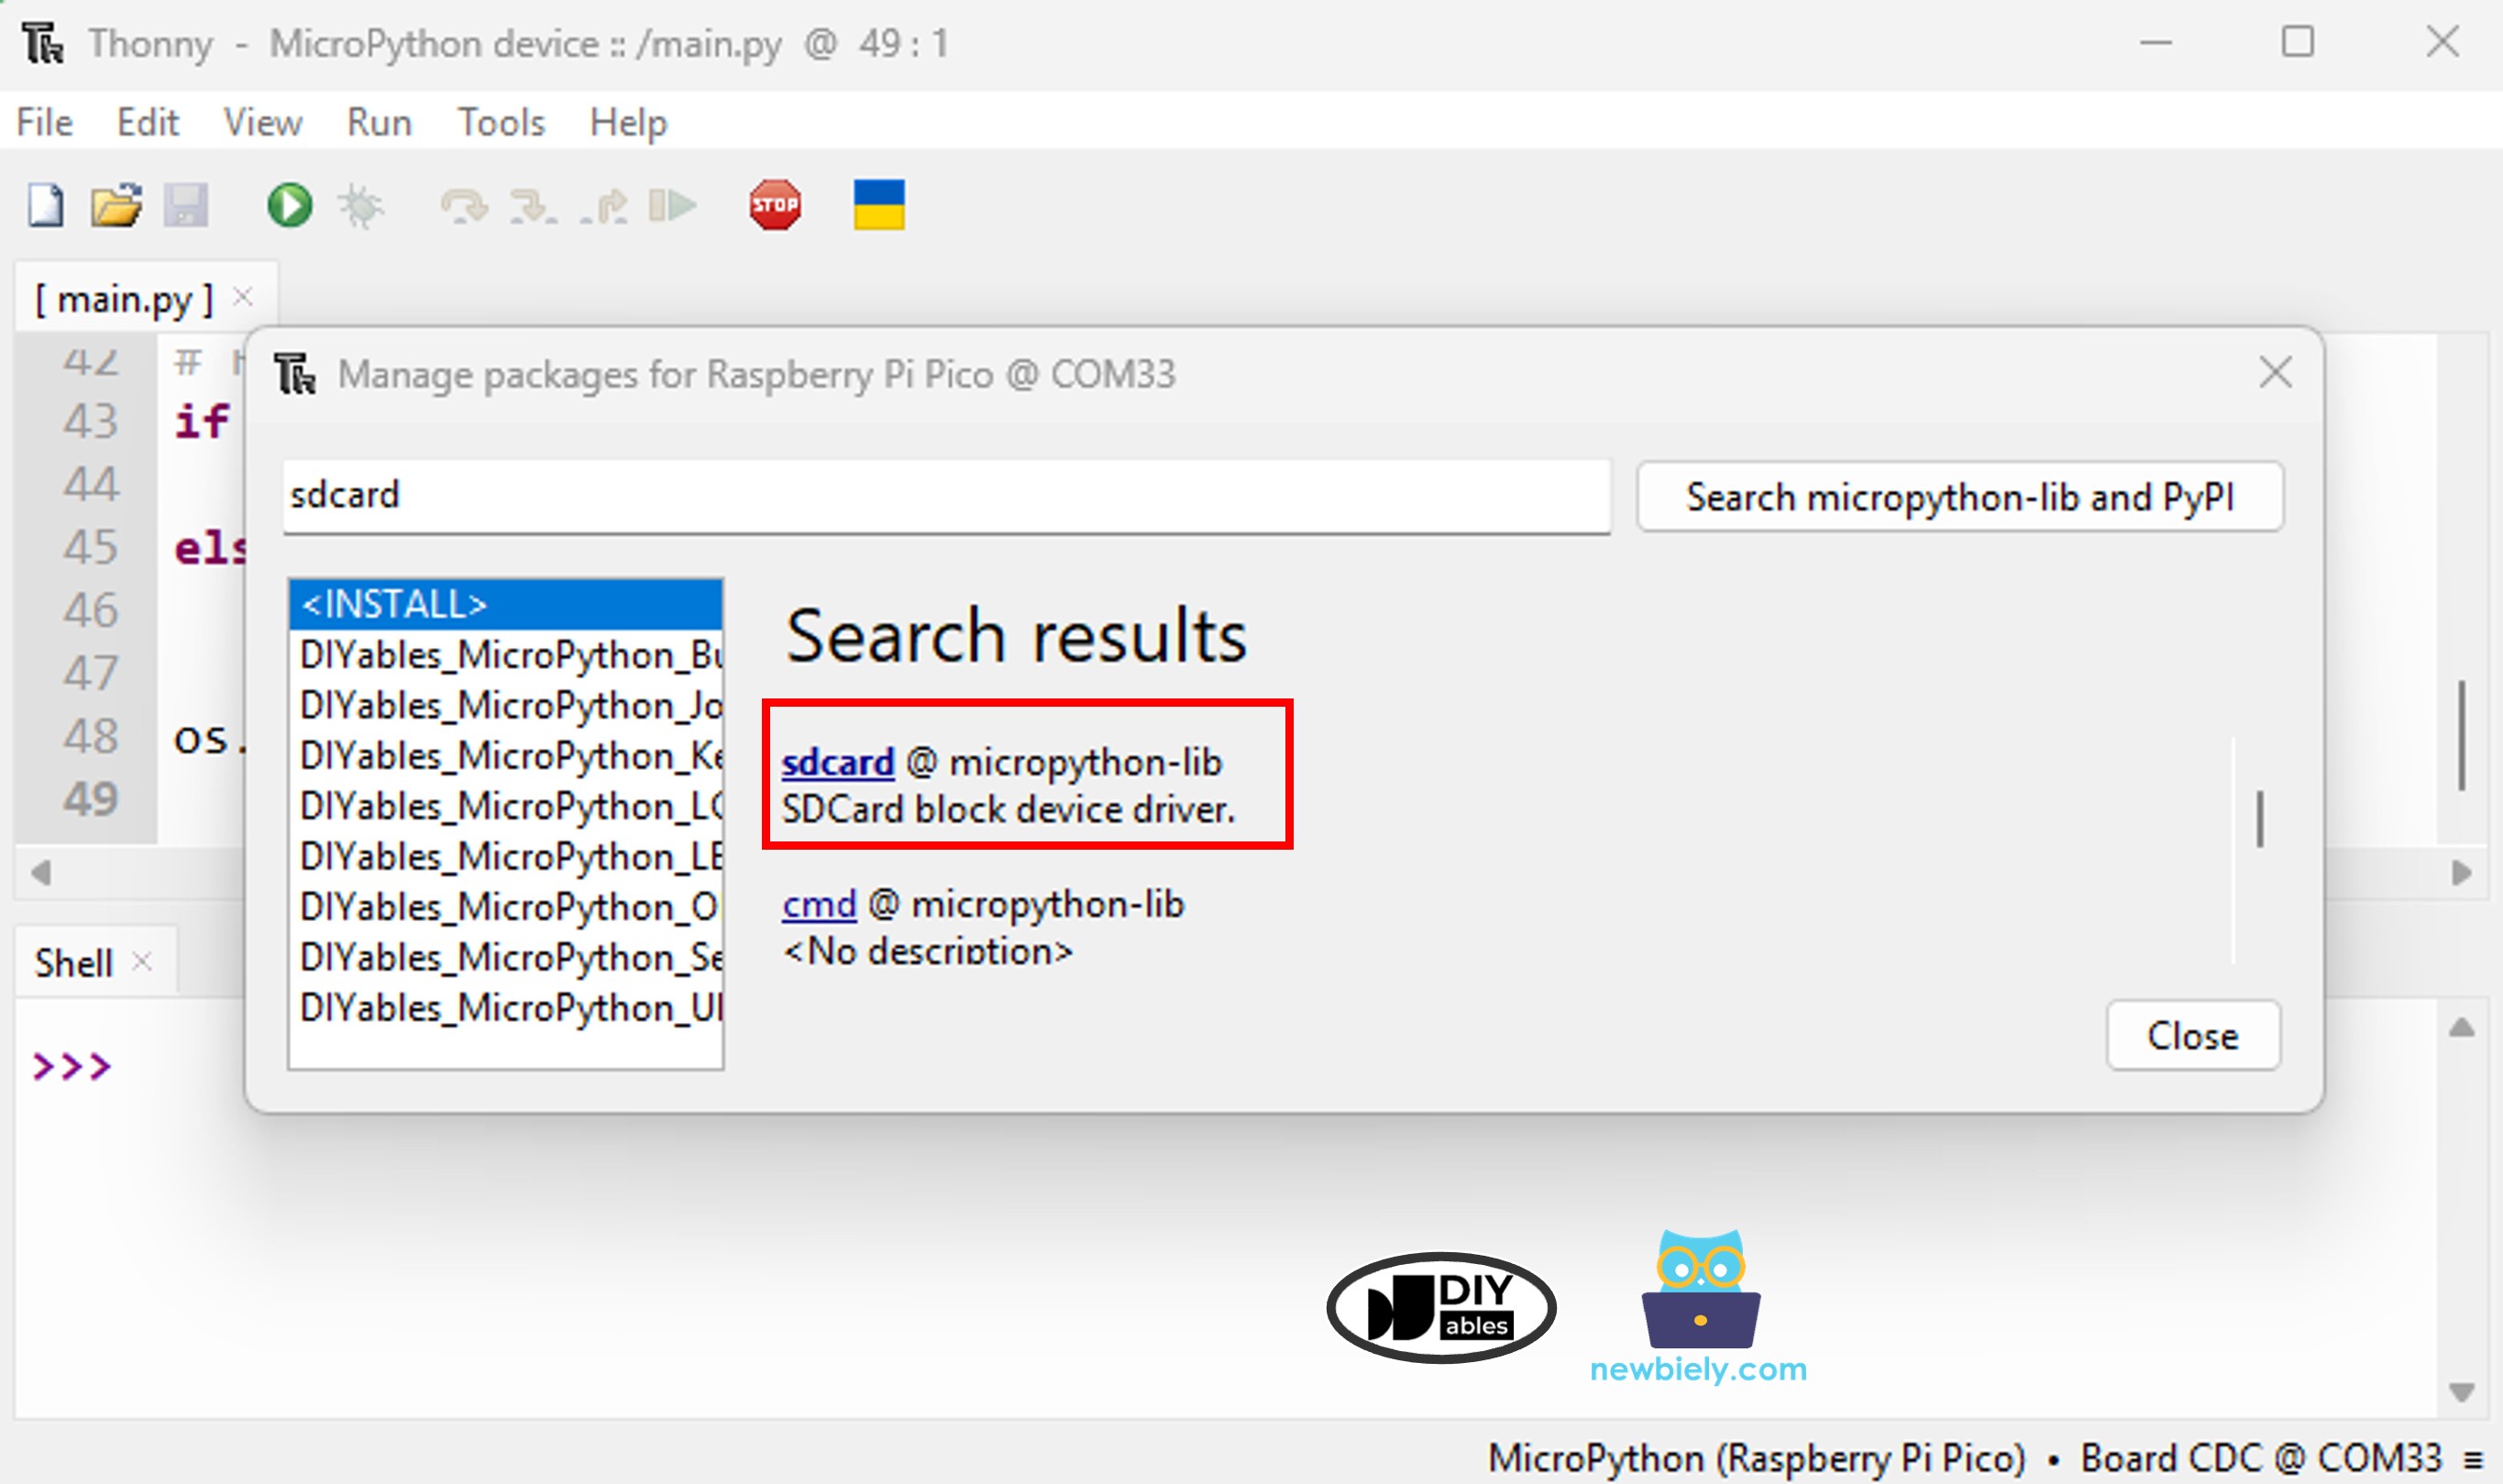
- Open the Shell panel in Thonny IDE.
- Install the sdcard library on the Raspberry Pi Pico via Thonny IDE:
- Go to Tools Manage packages in Thonny IDE.
- Type sdcard in the search box and install the micropython-sdcard package.
- Paste the code below into the Thonny editor.
- Click Run to upload and execute the code on the Raspberry Pi Pico.
- The Shell output after the first execution:
- On subsequent runs, the output will be:
- Eject the Micro SD Card from the module.
- Insert the card into a USB SD Card reader.
- Connect the reader to your computer.
- Verify that the file appears on the card.
※ NOTE THAT:
The Shell might not display anything if you open it after the script has already finished.
Raspberry Pi Pico - Writing Data and Reading It Back from Micro SD Card
The MicroPython code below performs two tasks:
- Appends text into a file on the SD card
- Opens the file and prints each character to the Shell
- The Shell displays the file contents:
※ NOTE THAT:
Each time the script runs, new text is added at the end of the file. After resetting the Pico and running again, the Shell will show duplicated lines like:
To inspect the file content externally, remove the Micro SD Card from the module and check it on your PC using a USB SD Card reader.
Raspberry Pi Pico - Processing a File Line by Line from Micro SD Card
- Shell output:
※ NOTE THAT:
You may see additional lines if earlier data was not cleared from the file.
Raspberry Pi Pico - Replacing File Content on Micro SD Card
Because data is appended by default, the simplest way to replace a file's content is to delete the file first and then write a new one under the same name.
- Shell output:
- Reset the Raspberry Pi Pico.
- Observe the Shell to confirm whether the content was replaced rather than appended.
Alternatively, eject the card and inspect the file on your computer with a USB SD Card reader.