Raspberry Pi Pico - TM1637 4-Digit 7-Segment Display
The Raspberry Pi Pico is a low-cost, high-performance microcontroller board built on the RP2040 chip. Paired with MicroPython and the DIYables TM1637 4-Digit 7-Segment Display Module, you can easily show numbers, text, temperature, and time on a bright LED display.
This tutorial walks you through:
- Connecting the TM1637 4-Digit 7-Segment Display to a Raspberry Pi Pico — only 2 data pins needed.
- Displaying integers with optional zero-padding.
- Displaying text and special characters (degree symbol).
- Showing time in HH:MM format with blinking colon separator.
- Controlling display brightness (8 levels).
- Blinking the display using off()/on().
Components Needed
Or you can buy the following kits:
| 1 | × | DIYables Sensor Kit (18 sensors/displays) |
Additionally, some of these links are for products from our own brand, DIYables .
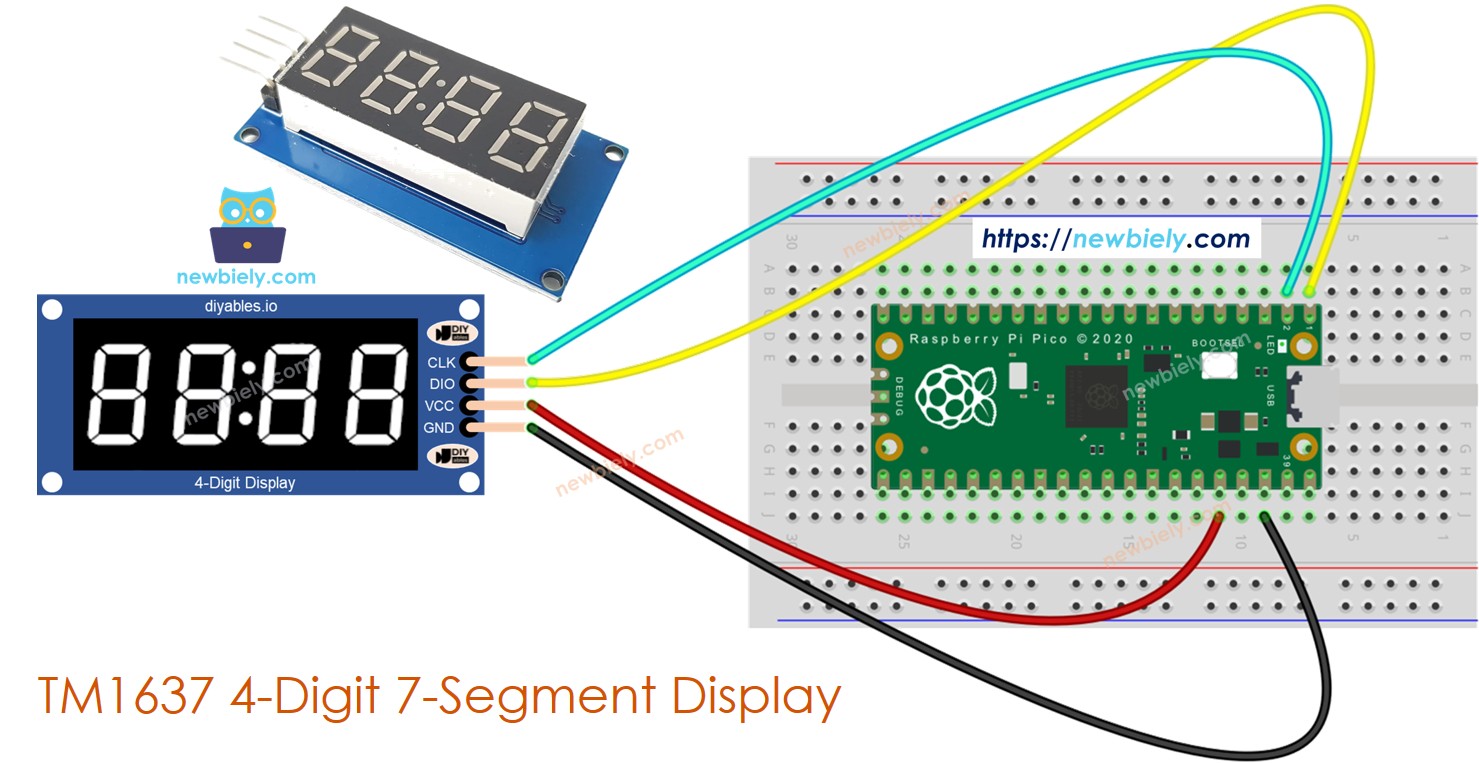
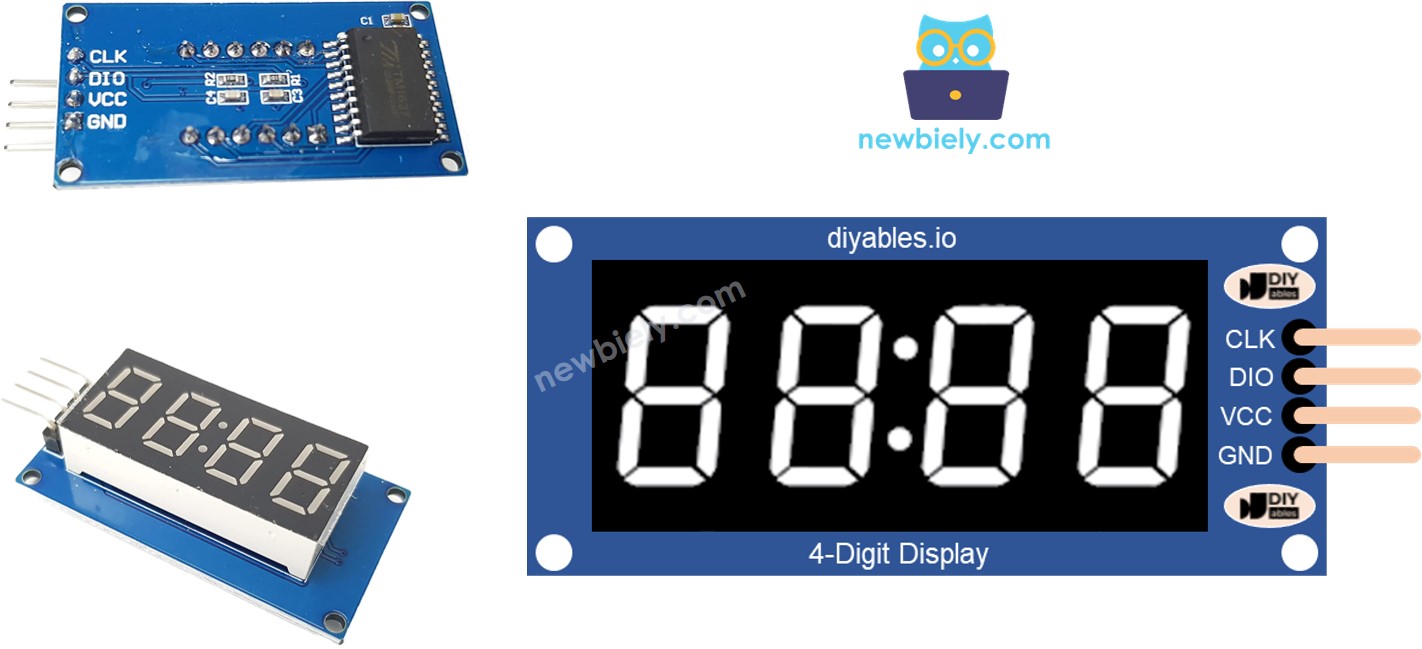
The TM1637 4-Digit 7-Segment Display Module
The TM1637 is a dedicated LED driver IC that handles both the multiplexing and segment driving for up to 6 digits. This module uses it to drive a 4-digit 7-segment LED display with a colon separator between the second and third digits, making it ideal for clock and timer applications.
Unlike shift-register-based displays (such as 74HC595), the TM1637 has built-in display memory. Once you write data to the chip, it keeps the display lit automatically — no Timer interrupt or refresh loop is needed. The TM1637 also supports 8 brightness levels (0–7) and uses only 2 GPIO pins (CLK and DIO) for communication.
The module communicates via a 2-wire serial protocol similar to I2C (but not standard I2C). The library handles all protocol details — you just call simple methods like print() and print_time().
Pin Description
| Pin | Purpose | Raspberry Pi Pico Connection |
|---|---|---|
| CLK | Serial clock input | Connect to GP1 |
| DIO | Serial data input/output | Connect to GP0 |
| VCC | 3.3V to 5V power input | Connect to 3V3(OUT) |
| GND | Ground | Connect to GND |
Wiring
The Raspberry Pi Pico operates at 3.3V logic natively. The TM1637 module works with both 3.3V and 5V, so it is directly compatible with the Pico without any level shifter.
| TM1637 Module | Raspberry Pi Pico | Notes |
|---|---|---|
| CLK | GP1 | Clock line |
| DIO | GP0 | Data I/O line |
| VCC | 3V3(OUT) | Power (3.3V output pin) |
| GND | GND | Ground |
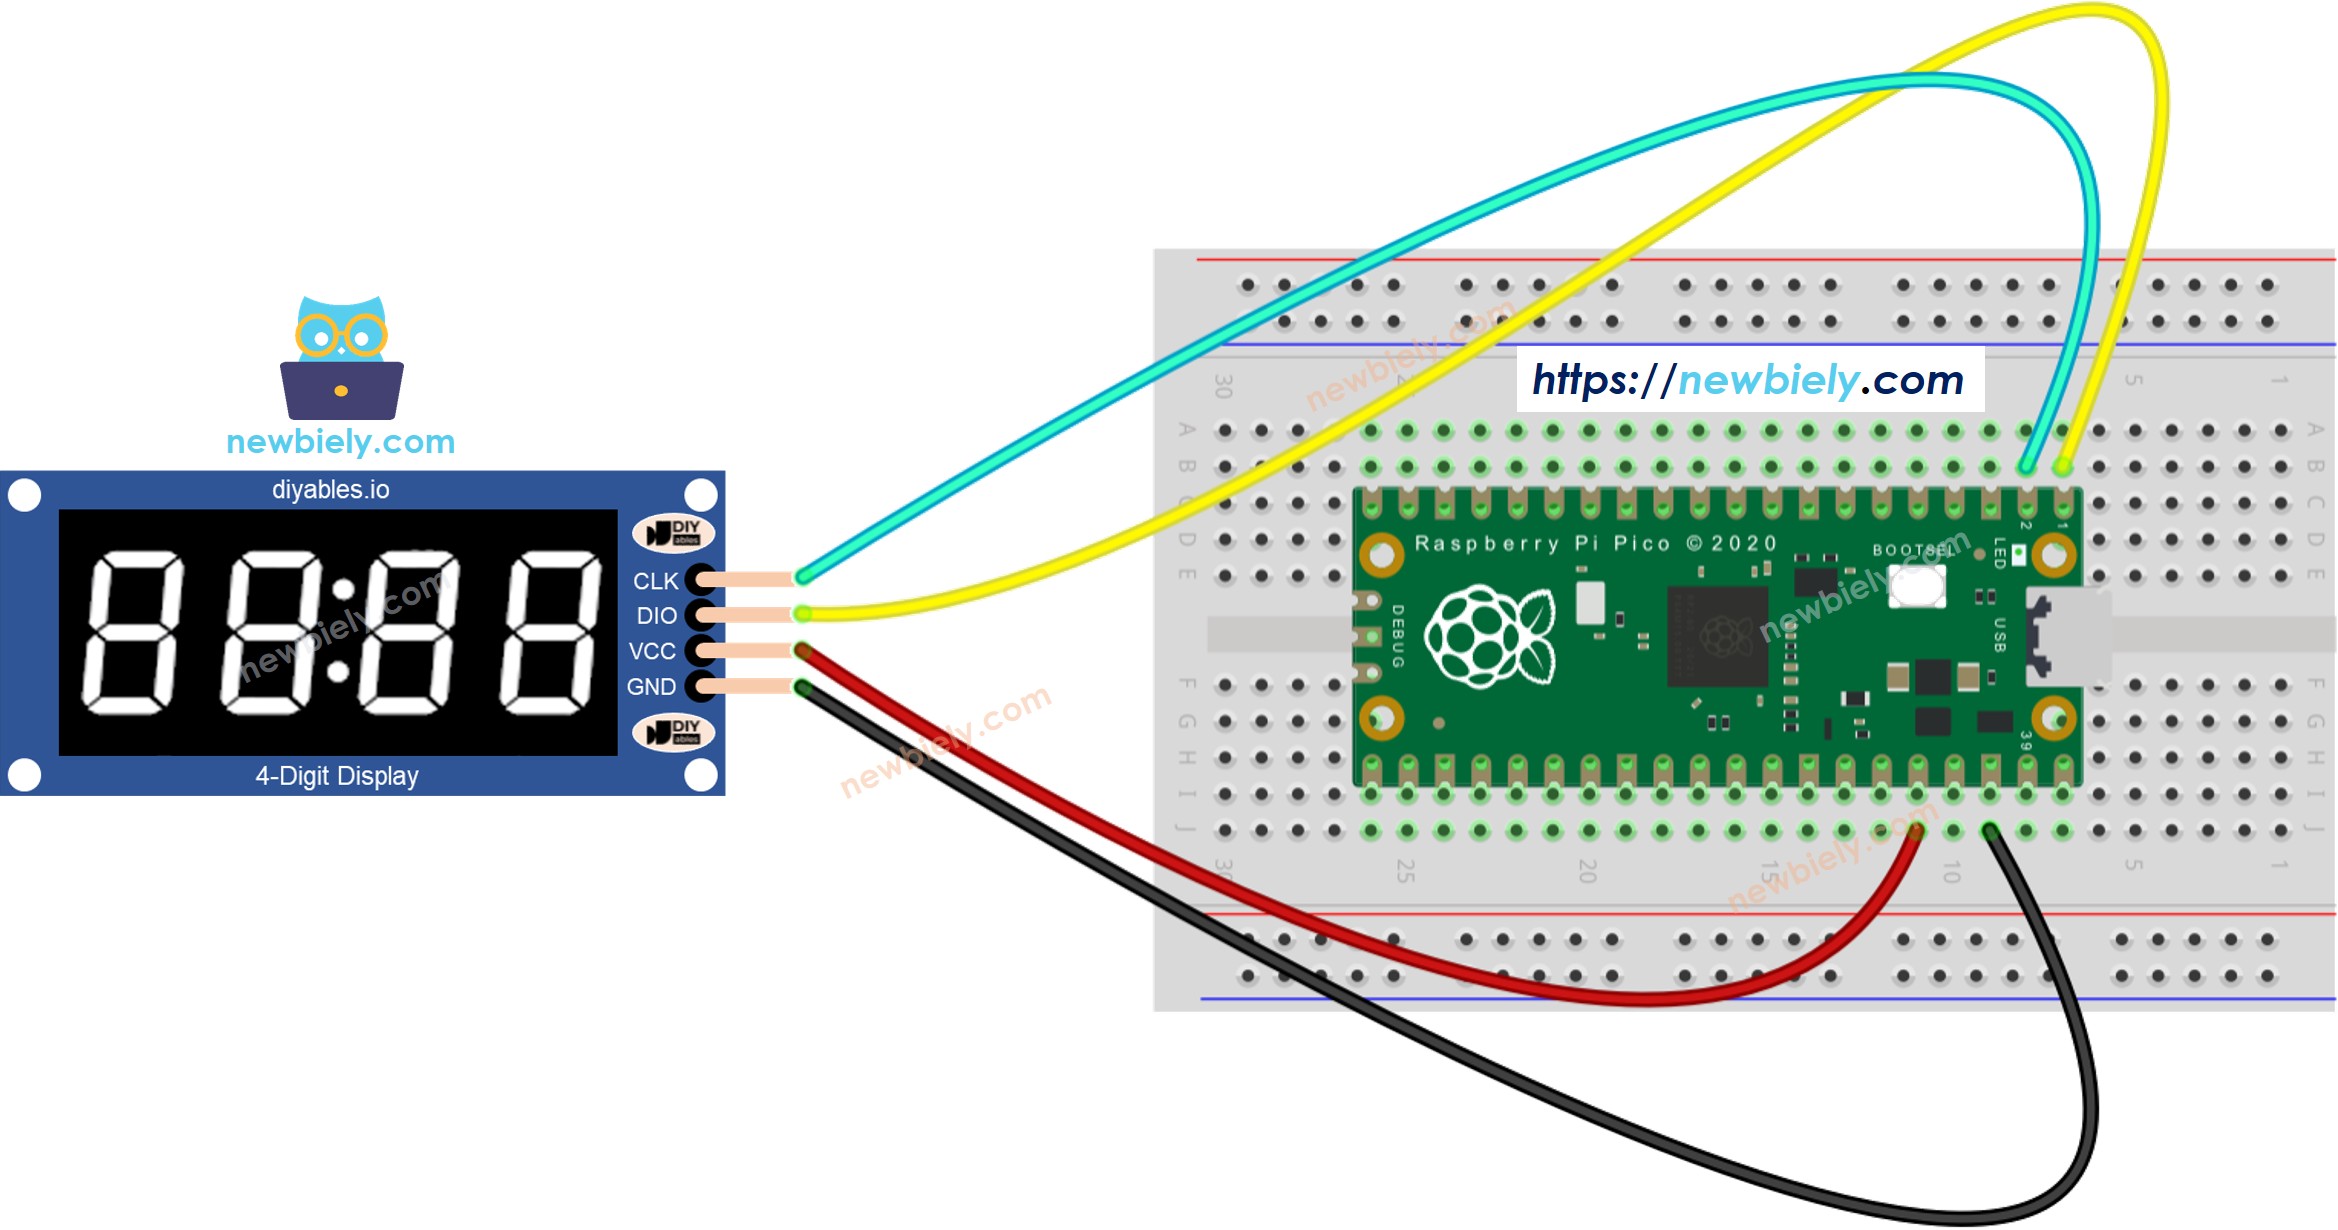
This image is created using Fritzing. Click to enlarge image
Tip: You can use any available GPIO pins on the Pico. Just update the pin numbers in the code.
Detailed Instructions
Here's instructions on how to set up and run your MicroPython code on the Raspberry Pi Pico using Thonny IDE:
- Make sure Thonny IDE is installed on your computer.
- Confirm that MicroPython firmware is loaded on your Raspberry Pi Pico board.
- If this is your first time using a Raspberry Pi Pico with MicroPython, check out the Raspberry Pi Pico MicroPython Getting Started guide for step-by-step instructions.
- Connect the Raspberry Pi Pico board to the TM1637 module according to the provided diagram.
- Connect the Raspberry Pi Pico board to your computer with a USB cable.
- Open Thonny IDE on your computer.
- In Thonny IDE, go to Tools Options.
- Under the Interpreter tab, choose MicroPython (Raspberry Pi Pico) from the dropdown menu.
- Make sure the correct port is selected. Thonny IDE usually detects it automatically, but you might need to select it manually (like COM12 on Windows or /dev/ttyACM0 on Linux).
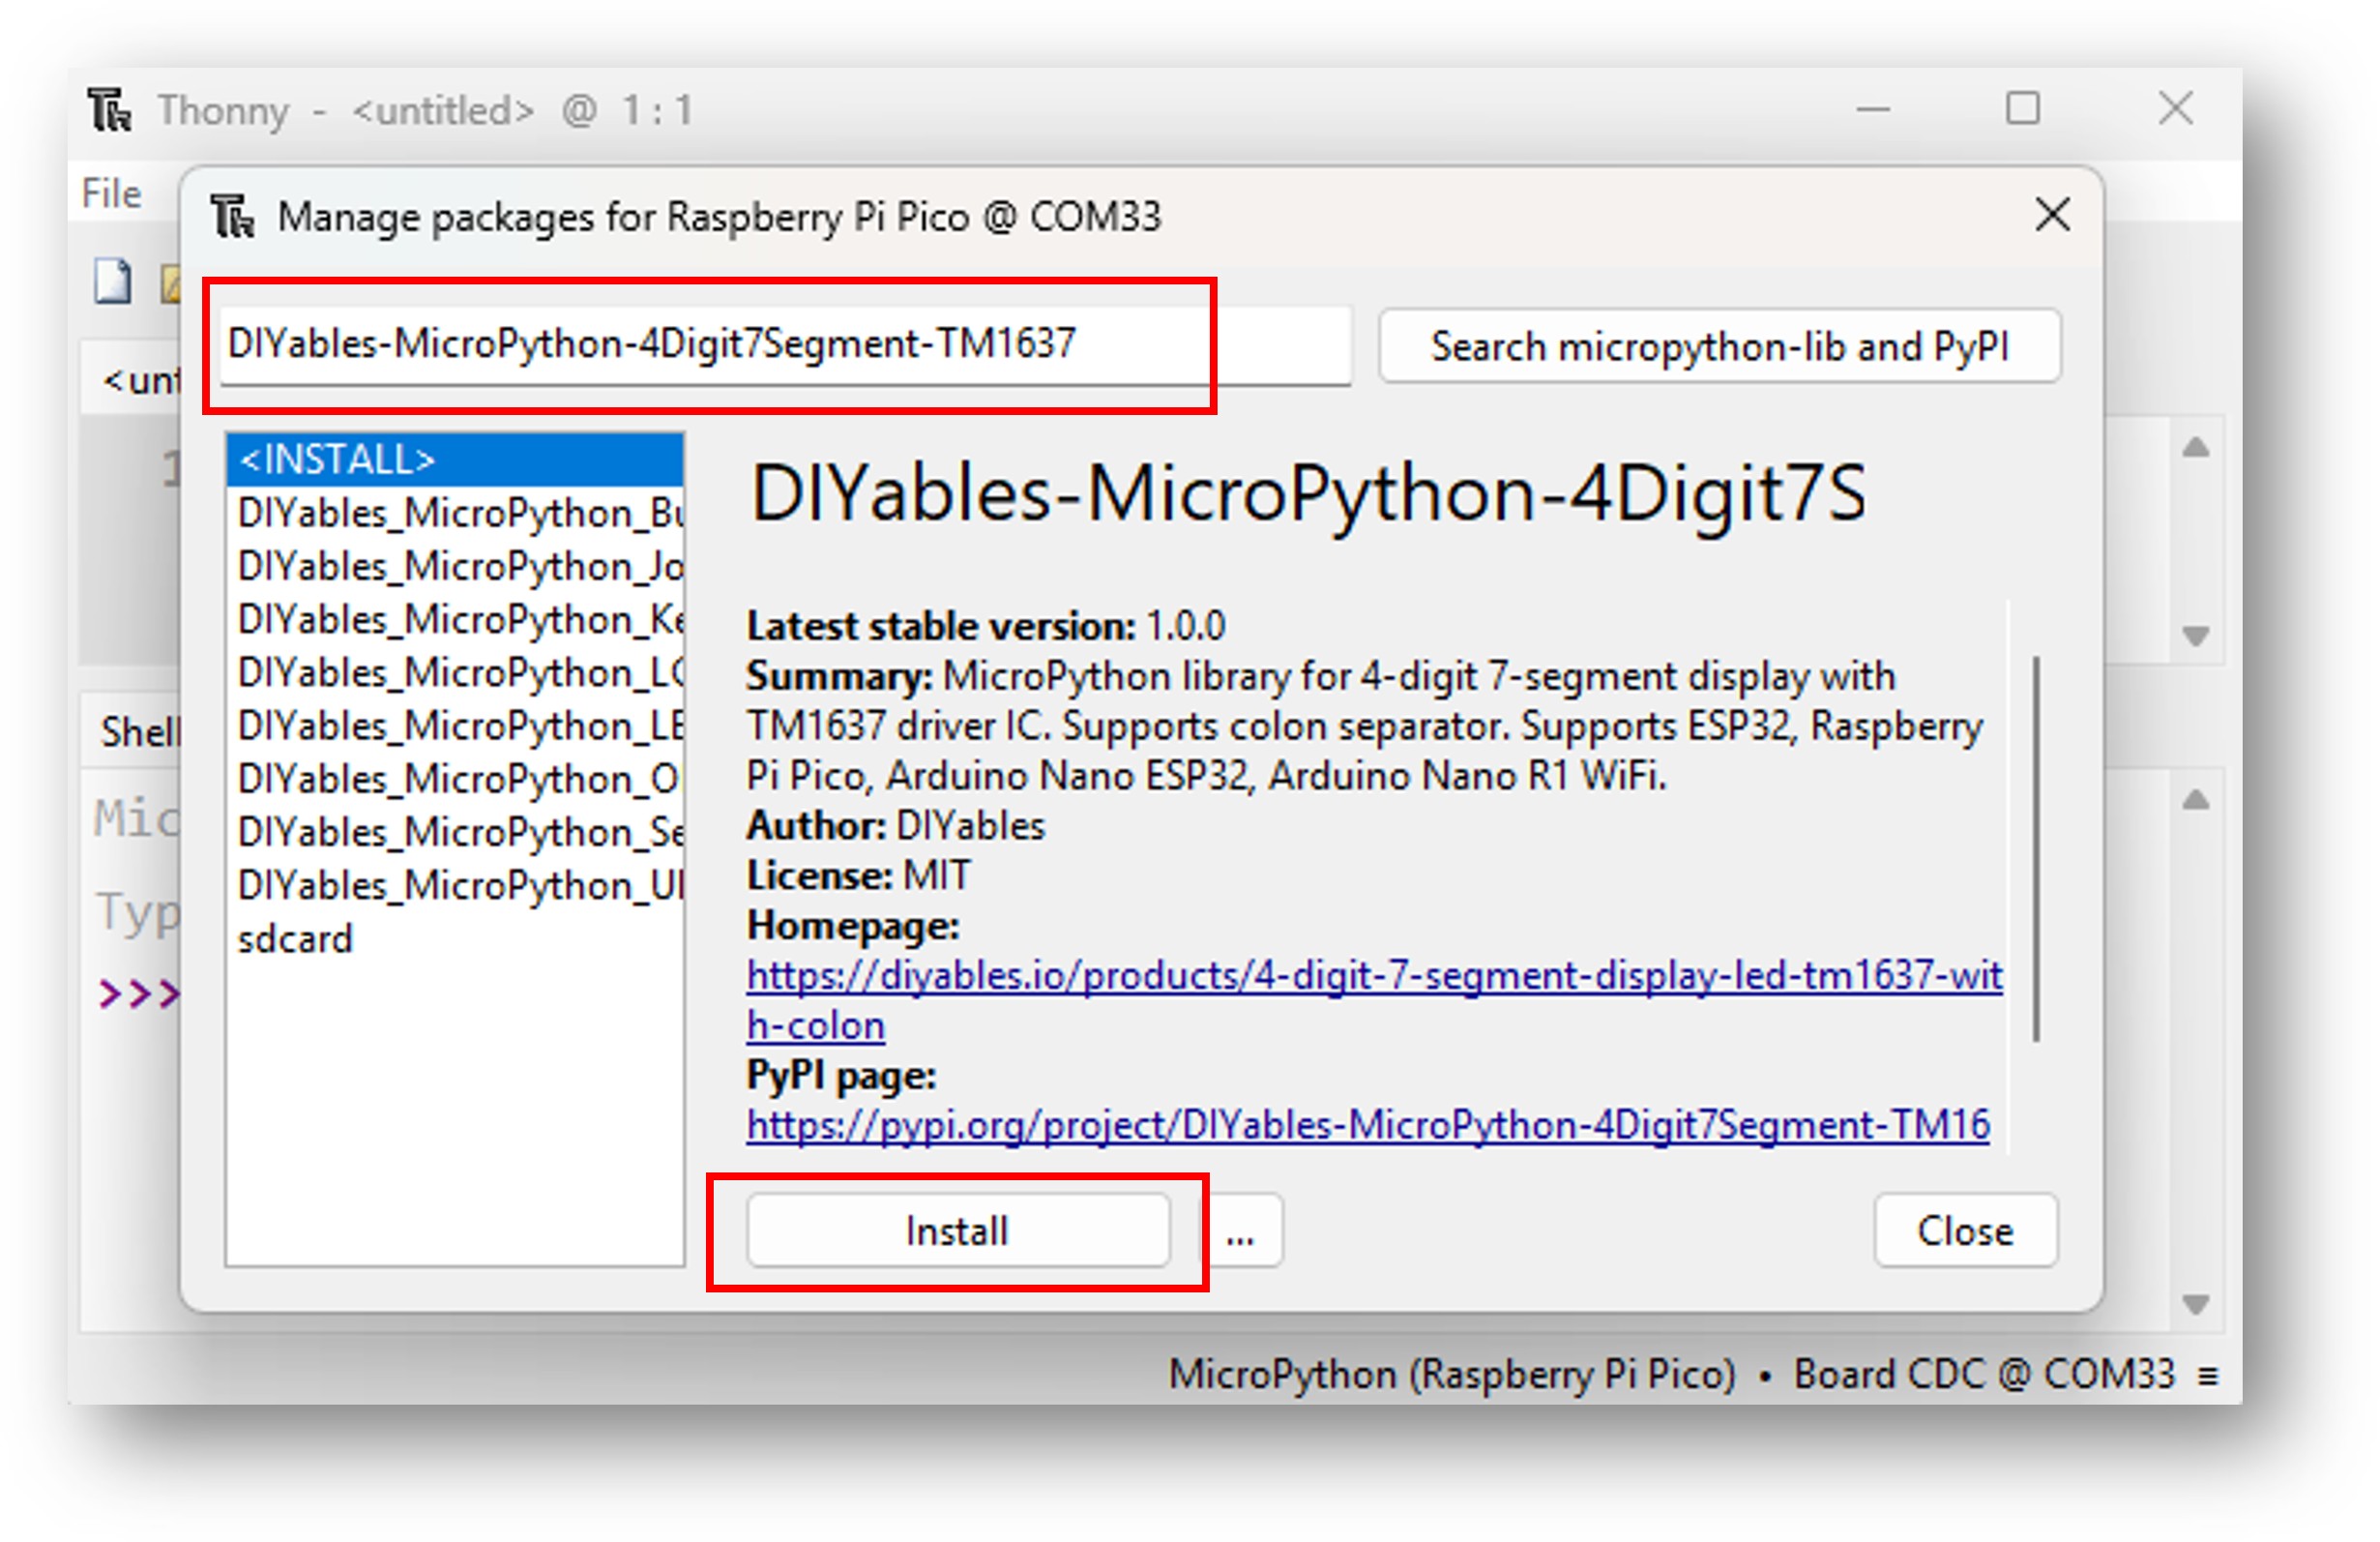
- Navigate to the Tools Manage packages on the Thonny IDE.
- Search "DIYables-MicroPython-4Digit7Segment-TM1637", then find the TM1637 4-Digit 7-Segment Display library created by DIYables.
- Click on DIYables-MicroPython-4Digit7Segment-TM1637, then click Install button to install the library.
- Copy the provided MicroPython code and paste it into Thonny's editor.
- Save the code to your Raspberry Pi Pico by:
- Clicking the Save button or pressing Ctrl+S.
- In the save dialog, choose MicroPython device.
- Name the file main.py.
- Click the green Run button (or press F5) to execute the script.
- Observe the result — the 4-digit 7-segment display shows numbers, text, or time depending on the example.
Starter Code Template
Raspberry Pi Pico Code — Display Integers
Try It
- Wire the module, connect the Pico via USB.
- Upload the code using Thonny IDE.
- The display cycles through several integers (0, 42, 1234, -5, -123, 9999), then shows zero-padded 42 as "0042".
Integer Display Reference
| Method Call | Display Shows | Notes |
|---|---|---|
| display.print(0) | 0 | Right-aligned single digit |
| display.print(42) | 42 | Right-aligned |
| display.print(1234) | 1234 | All 4 digits used |
| display.print(-5) | -5 | Negative sign + digit |
| display.print(-123) | -123 | Max 3-digit negative |
| display.print(9999) | 9999 | Maximum displayable value |
| display.print(10000) | Err | Overflow error |
| display.print(42, zero_pad=True) | 0042 | Zero-padded to 4 digits |
Raspberry Pi Pico Code — Display Text, Degree, and Temperature
Text and Temperature Reference
| Method Call | Display Shows | Notes |
|---|---|---|
| display.print("HELP") | HELP | Text display |
| display.print("Hi") | Hi | Left-aligned, 2 chars |
| display.print("COOL") | COOL | 4 characters |
| display.print_temperature(25, 'C') | 25°C | Celsius with degree symbol |
| display.print_temperature(72, 'F') | 72°F | Fahrenheit |
| display.print_temperature(-5, 'C') | -5°C | Negative temperature |
| display.print_temperature(100) | 100° | 3-digit, no room for unit |
The degree symbol can also be used directly in strings via the display.DEGREE constant.
Raspberry Pi Pico Code — Display Time with Blinking Colon
Time Display Reference
| Method Call | Display Shows | Notes | |
|---|---|---|---|
| display.print_time(12, 30) | 12 | 30 | Colon ON |
| display.print_time(9, 5) | 09 | 05 | Zero-padded hours and minutes |
| display.print_time(12, 30, colon=False) | 12 30 | Colon OFF (for blinking effect) |
Toggle the colon parameter every 500ms to create a blinking colon effect, commonly seen on clock displays.
Raspberry Pi Pico Code — Set Individual Digits and Colon
Individual Digits Reference
| Method Call | Description |
|---|---|
| display.set_number(position, number) | Set a single digit (0-9) at position 0-3 |
| display.set_char(position, char) | Set a character at position 0-3 |
| display.set_colon(True) | Turn on the colon between digit 1 and digit 2 |
| display.set_colon(False) | Turn off the colon |
You can mix set_number(), set_char(), and set_colon() to build custom displays digit by digit.
Raspberry Pi Pico Code — Blink Display
Blink Reference
Use display.off() to turn the display off and display.on() to turn it back on. The display data is preserved — on() restores the previous content without needing to call print() again.
Library Reference
See DIYables_MicroPython_4Digit7Segment_TM1637 Library Reference for the complete API documentation including all constructors, methods, and constants.
Next Steps
- Combine with a DS3231 RTC module to build a real-time clock.
- Add a DHT11/DHT22 sensor to display live temperature readings.
- Use buttons to switch between clock mode and temperature mode.