Raspberry Pi Pico - Mini Mp3 Player Module

The Raspberry Pi Pico is a low-cost, high-performance microcontroller board built on the RP2040 chip. Paired with MicroPython and the DIYables Mini Mp3 Player module, you can easily build audio projects like alarm clocks, sound effect boards, or interactive displays.

This tutorial walks you through:

Raspberry Pi Pico Mini Mp3 Player

Components Needed

1×Raspberry Pi Pico W
1×Raspberry Pi Pico Alternatively,
1×Micro USB Cable
1×DIYables Mini Mp3 Player module
1×Micro SD Card
1×Speaker
1×Breadboard
1×Jumper Wires
1×Recommended: Screw Terminal Expansion Board for Raspberry Pi Pico

Or you can buy the following kits:

1×DIYables Sensor Kit (18 sensors/displays)
Disclosure: Some of the links provided in this section are Amazon affiliate links. We may receive a commission for any purchases made through these links at no additional cost to you.
Additionally, some of these links are for products from our own brand, DIYables .

No resistor required. The Raspberry Pi Pico operates at 3.3V — the same voltage the Mini Mp3 Player's UART expects.

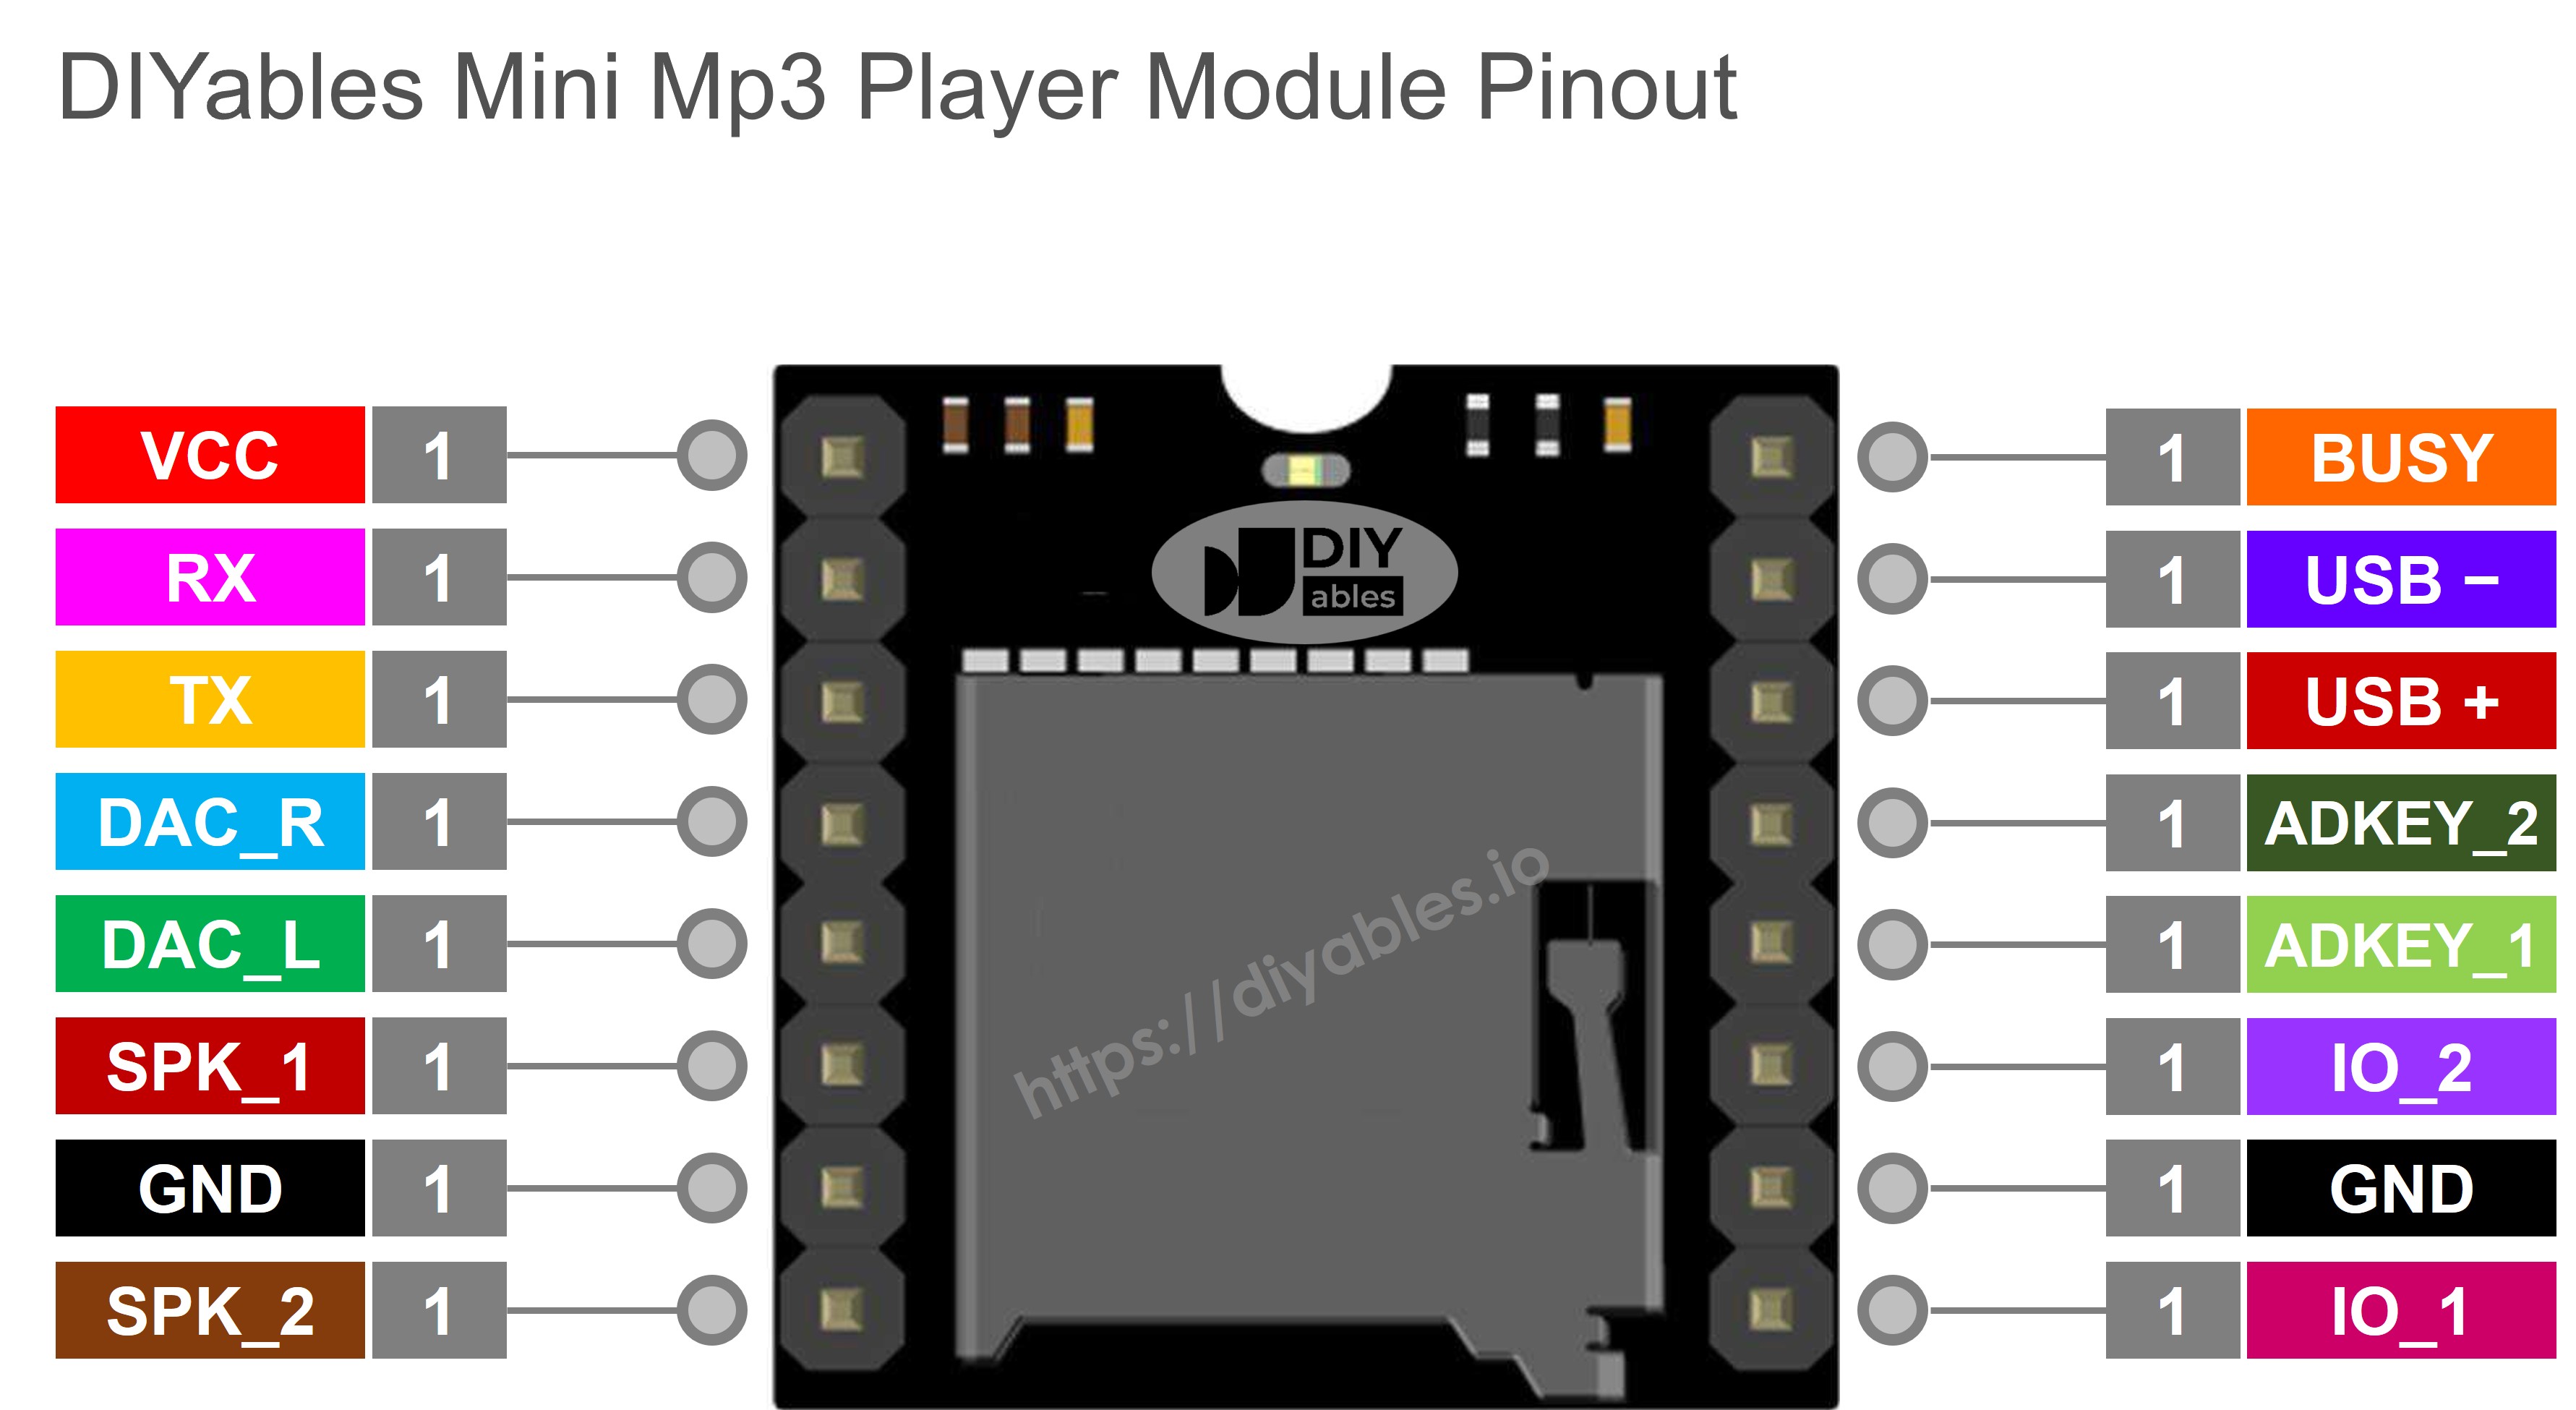
The Mini Mp3 Player Module

The DIYables Mini Mp3 Player is a small, affordable audio module powered by the YX5200-24SS chip. It decodes mp3 audio from a micro SD card and can drive a speaker directly through its onboard 3W amplifier, or output line-level audio via DAC pins for use with an external amplifier.

The Raspberry Pi Pico talks to this module over UART at 9600 baud. Since the Pico has two hardware UART peripherals (UART0 and UART1), you can assign one entirely to the mp3 player while the other remains available for sensors or other serial devices.

Available serial commands include:

  • Playback: play, pause, resume, stop, skip forward, skip backward
  • Volume: 31 discrete levels from silent (0) to full blast (30)
  • Equalizer: choose from Normal, Pop, Rock, Jazz, Classic, or Bass presets
  • Looping: repeat one track, repeat a folder, repeat all, or enable shuffle mode
  • Folder access: play tracks organized in numbered directories on the SD card
  • Announcements: temporarily interrupt music with an advertisement track, then auto-resume
  • Queries: ask the module for its current track, volume, EQ, and file statistics

Pin Description

Pin Purpose Pico Connection
VCC 3.2V to 5.0V power input Connect to Pico 3V3(OUT)
GND Ground Connect to Pico GND
RX Serial data input Connect to Pico GPIO4 (TX, UART1)
TX Serial data output Connect to Pico GPIO5 (RX, UART1)
SPK_1 Speaker + (built-in amp, 3W max) Connect to speaker
SPK_2 Speaker − Connect to speaker
DAC_R Right channel line output Optional — for external amp
DAC_L Left channel line output Optional — for external amp
BUSY LOW = playing, HIGH = stopped Optional — read with GPIO
IO_1 Short press → prev; long press → vol down Not used (controlled via UART)
IO_2 Short press → next; long press → vol up Not used (controlled via UART)
Mini Mp3 Player Pinout

Wiring

The Raspberry Pi Pico uses 3.3V logic natively, so you wire the serial lines directly — no level shifting or resistors needed.

We recommend using UART1 on GPIO4 (TX) and GPIO5 (RX):

Mini Mp3 Player Raspberry Pi Pico Notes
VCC 3V3(OUT) 3.3V output pin
GND GND
RX GPIO4 (TX - UART1) Direct connection
TX GPIO5 (RX - UART1) Direct connection
SPK_1 Speaker +
SPK_2 Speaker −
The wiring diagram between Raspberry Pi and Pico Mini Mp3 Player

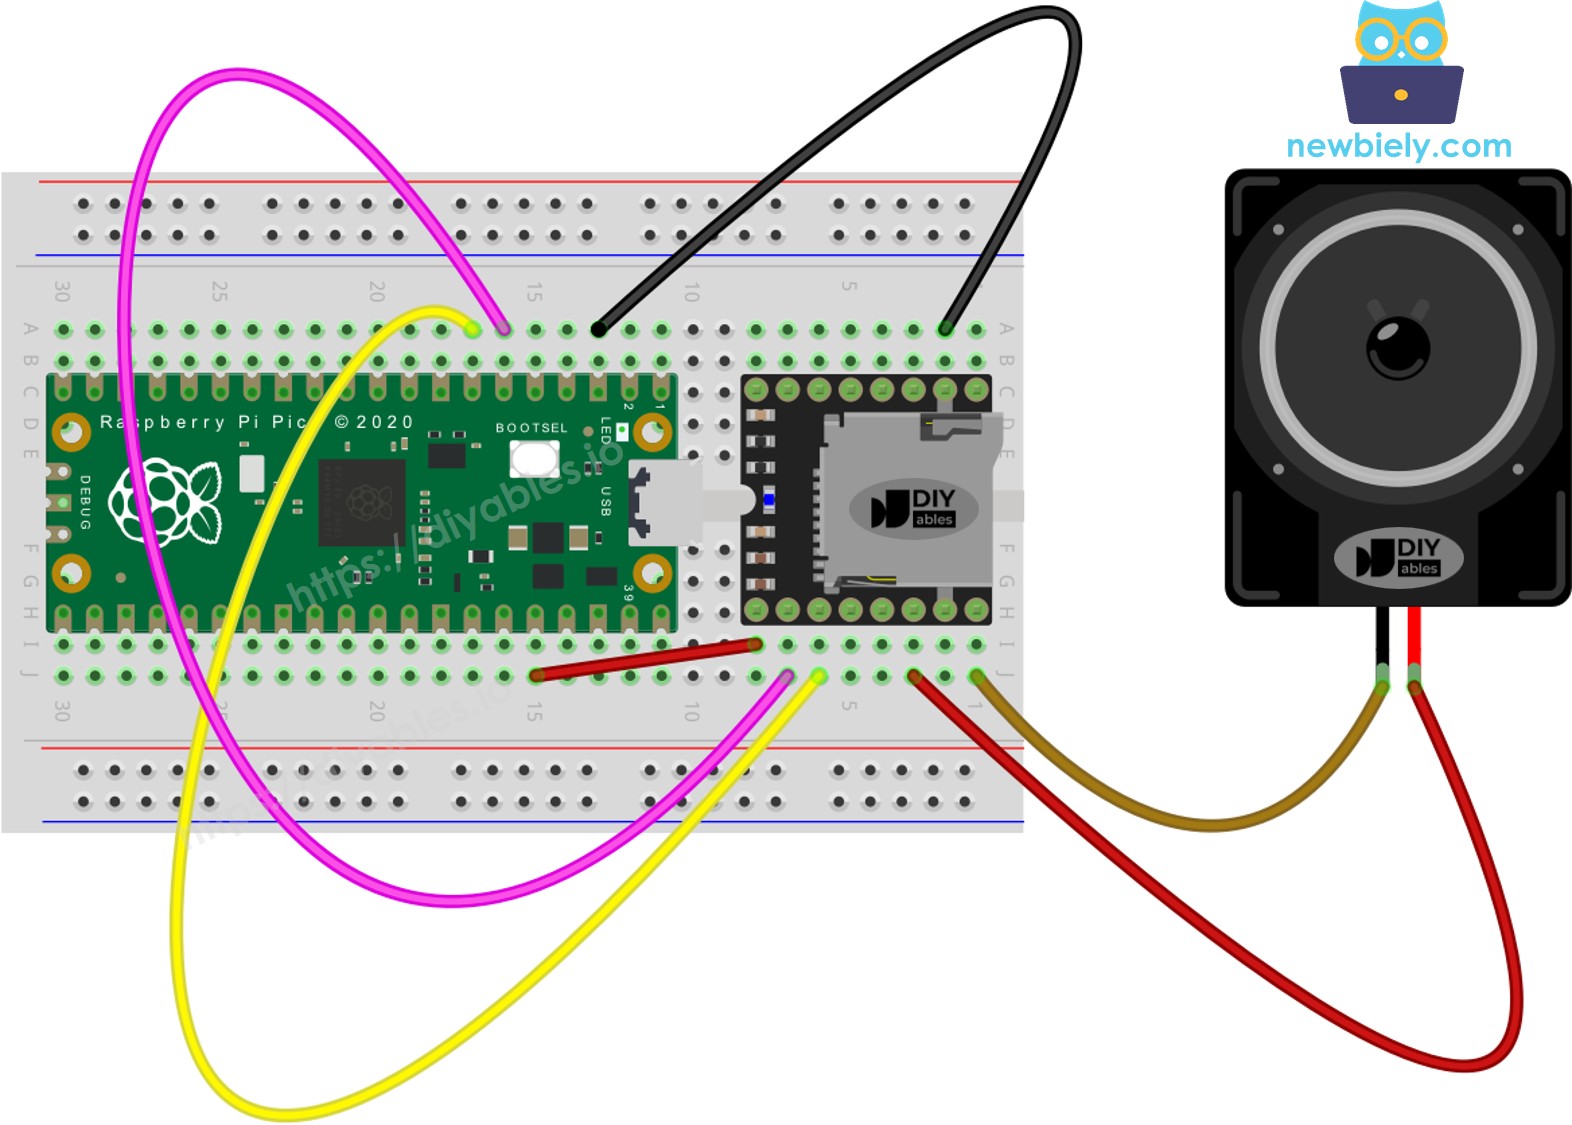
This image is created using Fritzing. Click to enlarge image

Tip: You can also use UART0 on different GPIO pins. The Pico's UART pins are flexible:

# Using UART0 on GPIO0 (TX) and GPIO1 (RX) uart = UART(0, baudrate=9600, tx=0, rx=1)

Getting the SD Card Ready

Prepare the micro SD card on your computer before connecting anything to the Pico:

  1. Format the card as FAT16 or FAT32 using your OS’s disk formatter.
  2. Add mp3 files to the root of the card. Name them with 3-digit zero-padded numbers:
/001.mp3 /002.mp3 /003.mp3
  1. For folder-based playback, create 2-digit numbered directories containing 3-digit numbered files:
/01/001.mp3 ← play_folder(1, 1) /01/002.mp3 ← play_folder(1, 2) /02/001.mp3 ← play_folder(2, 1)

Important details for Raspberry Pi Pico users:

  • Numbering starts at 1 (track 0 does not exist).
  • The module orders tracks by the copy sequence, not alphabetically. Format the card, then copy each file individually in the desired order.
  • Supported folder range: 01 through 99. Track range inside folders: 001 through 255.
  • Slide the SD card into the module’s slot before plugging the Pico into USB power.

Detailed Instructions

Here's instructions on how to set up and run your MicroPython code on the Raspberry Pi Pico using Thonny IDE:

  • Make sure Thonny IDE is installed on your computer.
  • Confirm that MicroPython firmware is loaded on your Raspberry Pi Pico board.
  • If this is your first time using a Raspberry Pi Pico with MicroPython, check out the Raspberry Pi Pico MicroPython Getting Started guide for step-by-step instructions.
  • Connect the Raspberry Pi Pico board to the Mini Mp3 Player module according to the provided diagram.
  • Connect the Raspberry Pi Pico board to your computer with a USB cable.
  • Open Thonny IDE on your computer.
  • In Thonny IDE, go to Tools Options.
  • Under the Interpreter tab, choose MicroPython (Raspberry Pi Pico) from the dropdown menu.
  • Make sure the correct port is selected. Thonny IDE usually detects it automatically, but you might need to select it manually (like COM12 on Windows or /dev/ttyACM0 on Linux).
  • Navigate to the Tools Manage packages on the Thonny IDE.
  • Search "DIYables-MicroPython-MiniMp3", then find the Mini Mp3 Player library created by DIYables.
  • Click on DIYables-MicroPython-MiniMp3, then click Install button to install the Mini Mp3 Player library.
Raspberry Pi Pico Mini Mp3 Player library
  • Copy the provided MicroPython code and paste it into Thonny's editor.
  • Save the code to your Raspberry Pi Pico by:
    • Clicking the Save button or pressing Ctrl+S.
    • In the save dialog, choose MicroPython device.
    • Name the file main.py.
  • Click the green Run button (or press F5) to execute the script.
  • Insert the SD card with mp3 files into the Mini Mp3 Player module.
  • Listen for audio playback through the connected speaker.

Starter Code Template

from machine import UART import time from DIYables_MicroPython_MiniMp3 import MiniMp3Player uart = UART(1, baudrate=9600, tx=4, rx=5) mp3 = MiniMp3Player(uart) time.sleep(1) # Wait for the module to initialize mp3.set_volume(25) # 0 = silence, 30 = maximum

Raspberry Pi Pico Code — Play a Track

""" * DIYables MicroPython Mini Mp3 Player - Play One Track * * This example plays one track once then stops. * * Product: DIYables Mini Mp3 Player Module * https://diyables.io/products/mini-mp3-player-module * * Wiring (ESP32): * Mini Mp3 RX -> ESP32 TX (GPIO17) * Mini Mp3 TX -> ESP32 RX (GPIO16) * Mini Mp3 VCC -> 3.3V * Mini Mp3 GND -> GND * Speaker connected to SPK_1 and SPK_2 pins * * Wiring (Raspberry Pi Pico): * Mini Mp3 RX -> Pico TX (GPIO4) * Mini Mp3 TX -> Pico RX (GPIO5) * Mini Mp3 VCC -> 3.3V * Mini Mp3 GND -> GND * Speaker connected to SPK_1 and SPK_2 pins * * Wiring (Arduino Nano ESP32): * Mini Mp3 RX -> D1 (GPIO43, TX) * Mini Mp3 TX -> D0 (GPIO44, RX) * Mini Mp3 VCC -> 3.3V * Mini Mp3 GND -> GND * Speaker connected to SPK_1 and SPK_2 pins * * Wiring (Arduino Giga R1 WiFi): * Mini Mp3 RX -> TX1 * Mini Mp3 TX -> RX1 * Mini Mp3 VCC -> 3.3V * Mini Mp3 GND -> GND * Speaker connected to SPK_1 and SPK_2 pins * * SD Card: Put mp3 files in root, named 001.mp3, 002.mp3, etc. """ from machine import UART import time from DIYables_MicroPython_MiniMp3 import MiniMp3Player # --- For ESP32 --- uart = UART(2, baudrate=9600, tx=17, rx=16) # --- For Raspberry Pi Pico (uncomment below, comment above) --- # uart = UART(1, baudrate=9600, tx=4, rx=5) # --- For Arduino Nano ESP32 (uncomment below, comment above) --- # uart = UART(1, baudrate=9600, tx=43, rx=44) # --- For Arduino Giga R1 WiFi (uncomment below, comment above) --- # uart = UART(1, baudrate=9600) mp3 = MiniMp3Player(uart) time.sleep(1) # Wait for the module to initialize mp3.set_volume(25) # Set volume (0 to 30) print("Playing track 1...") mp3.play(1) # Play track 001.mp3

Try It

  • Load the SD card, wire the module, connect the Pico via USB.
  • Upload the code using Thonny IDE or your preferred MicroPython tool.

Playback Control

Every playback command is non-blocking. The Pico sends a 10-byte packet over UART1 and returns instantly, so your main loop continues running without delay.

Method What Happens Code Example
play(n) Start playing track n from the root folder mp3.play(1)
play_next() Skip to the next track in sequence mp3.play_next()
play_previous() Return to the previous track mp3.play_previous()
pause() Pause at the current position mp3.pause()
resume() Continue playing from the paused position mp3.resume()
stop() Halt playback completely mp3.stop()

Raspberry Pi Pico Code — Multiple Tracks

""" * DIYables MicroPython Mini Mp3 Player - Play Multiple Tracks * * This example plays tracks one after another with a delay between them. * * Product: DIYables Mini Mp3 Player Module * https://diyables.io/products/mini-mp3-player-module * * Wiring (ESP32): * Mini Mp3 RX -> ESP32 TX (GPIO17) * Mini Mp3 TX -> ESP32 RX (GPIO16) * Mini Mp3 VCC -> 3.3V * Mini Mp3 GND -> GND * Speaker connected to SPK_1 and SPK_2 pins * * Wiring (Raspberry Pi Pico): * Mini Mp3 RX -> Pico TX (GPIO4) * Mini Mp3 TX -> Pico RX (GPIO5) * Mini Mp3 VCC -> 3.3V * Mini Mp3 GND -> GND * Speaker connected to SPK_1 and SPK_2 pins * * Wiring (Arduino Nano ESP32): * Mini Mp3 RX -> D1 (GPIO43, TX) * Mini Mp3 TX -> D0 (GPIO44, RX) * Mini Mp3 VCC -> 3.3V * Mini Mp3 GND -> GND * Speaker connected to SPK_1 and SPK_2 pins * * Wiring (Arduino Giga R1 WiFi): * Mini Mp3 RX -> TX1 * Mini Mp3 TX -> RX1 * Mini Mp3 VCC -> 3.3V * Mini Mp3 GND -> GND * Speaker connected to SPK_1 and SPK_2 pins * * SD Card: Put mp3 files in root, named 001.mp3, 002.mp3, 003.mp3 """ from machine import UART import time from DIYables_MicroPython_MiniMp3 import MiniMp3Player # --- For ESP32 --- uart = UART(2, baudrate=9600, tx=17, rx=16) # --- For Raspberry Pi Pico (uncomment below, comment above) --- # uart = UART(1, baudrate=9600, tx=4, rx=5) # --- For Arduino Nano ESP32 (uncomment below, comment above) --- # uart = UART(1, baudrate=9600, tx=43, rx=44) # --- For Arduino Giga R1 WiFi (uncomment below, comment above) --- # uart = UART(1, baudrate=9600) mp3 = MiniMp3Player(uart) time.sleep(1) # Wait for the module to initialize current_track = 1 total_tracks = 3 # Change this to match your SD card track_duration = 5000 # Wait 5 seconds between tracks (adjust as needed) mp3.set_volume(20) print("Playing track 1...") mp3.play(current_track) last_track_time = time.ticks_ms() while True: if time.ticks_diff(time.ticks_ms(), last_track_time) >= track_duration: current_track += 1 if current_track > total_tracks: current_track = 1 # Loop back to first track print("Playing track", current_track) mp3.play(current_track) last_track_time = time.ticks_ms()

Raspberry Pi Pico Code — Volume Buttons

""" * DIYables MicroPython Mini Mp3 Player - Volume Control * * This example uses two buttons to increase/decrease the volume. * * Product: DIYables Mini Mp3 Player Module * https://diyables.io/products/mini-mp3-player-module * * Wiring (ESP32): * Mini Mp3 RX -> ESP32 TX (GPIO17) * Mini Mp3 TX -> ESP32 RX (GPIO16) * Mini Mp3 VCC -> 3.3V * Mini Mp3 GND -> GND * Speaker connected to SPK_1 and SPK_2 pins * Button UP -> GPIO1 (other leg to GND) * Button DOWN -> GPIO3 (other leg to GND) * * Wiring (Raspberry Pi Pico): * Mini Mp3 RX -> Pico TX (GPIO4) * Mini Mp3 TX -> Pico RX (GPIO5) * Mini Mp3 VCC -> 3.3V * Mini Mp3 GND -> GND * Speaker connected to SPK_1 and SPK_2 pins * Button UP -> GPIO2 (other leg to GND) * Button DOWN -> GPIO3 (other leg to GND) * * Wiring (Arduino Nano ESP32): * Mini Mp3 RX -> D1 (GPIO43, TX) * Mini Mp3 TX -> D0 (GPIO44, RX) * Mini Mp3 VCC -> 3.3V * Mini Mp3 GND -> GND * Speaker connected to SPK_1 and SPK_2 pins * Button UP -> D2 (GPIO5, other leg to GND) * Button DOWN -> D3 (GPIO6, other leg to GND) * * Wiring (Arduino Giga R1 WiFi): * Mini Mp3 RX -> TX1 * Mini Mp3 TX -> RX1 * Mini Mp3 VCC -> 3.3V * Mini Mp3 GND -> GND * Speaker connected to SPK_1 and SPK_2 pins * Button UP -> D2 (other leg to GND) * Button DOWN -> D3 (other leg to GND) * * SD Card: Put mp3 files in root, named 001.mp3, 002.mp3, etc. """ from machine import UART, Pin import time from DIYables_MicroPython_MiniMp3 import MiniMp3Player # --- For ESP32 --- uart = UART(2, baudrate=9600, tx=17, rx=16) button_up = Pin(1, Pin.IN, Pin.PULL_UP) button_down = Pin(3, Pin.IN, Pin.PULL_UP) # --- For Raspberry Pi Pico (uncomment below, comment above) --- # uart = UART(1, baudrate=9600, tx=4, rx=5) # button_up = Pin(2, Pin.IN, Pin.PULL_UP) # button_down = Pin(3, Pin.IN, Pin.PULL_UP) # --- For Arduino Nano ESP32 (uncomment below, comment above) --- # uart = UART(1, baudrate=9600, tx=43, rx=44) # button_up = Pin(5, Pin.IN, Pin.PULL_UP) # button_down = Pin(6, Pin.IN, Pin.PULL_UP) # --- For Arduino Giga R1 WiFi (uncomment below, comment above) --- # uart = UART(1, baudrate=9600) # button_up = Pin(2, Pin.IN, Pin.PULL_UP) # button_down = Pin(3, Pin.IN, Pin.PULL_UP) mp3 = MiniMp3Player(uart) time.sleep(1) # Wait for the module to initialize volume = 15 # Start at half volume mp3.set_volume(volume) mp3.loop_track(1) # Play track 1 on repeat print("Volume:", volume) while True: if button_up.value() == 0: if volume < 30: volume += 1 mp3.set_volume(volume) print("Volume:", volume) time.sleep_ms(200) # Simple debounce if button_down.value() == 0: if volume > 0: volume -= 1 mp3.set_volume(volume) print("Volume:", volume) time.sleep_ms(200) # Simple debounce

Volume API

Volume ranges from 0 (silent) to 30 (loudest). With the Pico’s GPIO-based button inputs, you can wire physical volume knobs or use the REPL to test levels interactively.

Method Action Example
set_volume(v) Jump directly to volume level v mp3.set_volume(20)
volume_up() Raise volume one notch mp3.volume_up()
volume_down() Lower volume one notch mp3.volume_down()
get_volume() Ask the module for its current level mp3.get_volume()

Raspberry Pi Pico Code — Next/Previous

""" * DIYables MicroPython Mini Mp3 Player - Next/Previous with Buttons * * This example uses two buttons to play next/previous tracks. * * Product: DIYables Mini Mp3 Player Module * https://diyables.io/products/mini-mp3-player-module * * Wiring (ESP32): * Mini Mp3 RX -> ESP32 TX (GPIO17) * Mini Mp3 TX -> ESP32 RX (GPIO16) * Mini Mp3 VCC -> 3.3V * Mini Mp3 GND -> GND * Speaker connected to SPK_1 and SPK_2 pins * Button NEXT -> GPIO1 (other leg to GND) * Button PREV -> GPIO3 (other leg to GND) * * Wiring (Raspberry Pi Pico): * Mini Mp3 RX -> Pico TX (GPIO4) * Mini Mp3 TX -> Pico RX (GPIO5) * Mini Mp3 VCC -> 3.3V * Mini Mp3 GND -> GND * Speaker connected to SPK_1 and SPK_2 pins * Button NEXT -> GPIO2 (other leg to GND) * Button PREV -> GPIO3 (other leg to GND) * * Wiring (Arduino Nano ESP32): * Mini Mp3 RX -> D1 (GPIO43, TX) * Mini Mp3 TX -> D0 (GPIO44, RX) * Mini Mp3 VCC -> 3.3V * Mini Mp3 GND -> GND * Speaker connected to SPK_1 and SPK_2 pins * Button NEXT -> D2 (GPIO5, other leg to GND) * Button PREV -> D3 (GPIO6, other leg to GND) * * Wiring (Arduino Giga R1 WiFi): * Mini Mp3 RX -> TX1 * Mini Mp3 TX -> RX1 * Mini Mp3 VCC -> 3.3V * Mini Mp3 GND -> GND * Speaker connected to SPK_1 and SPK_2 pins * Button NEXT -> D2 (other leg to GND) * Button PREV -> D3 (other leg to GND) * * SD Card: Put mp3 files in root, named 001.mp3, 002.mp3, etc. """ from machine import UART, Pin import time from DIYables_MicroPython_MiniMp3 import MiniMp3Player # --- For ESP32 --- uart = UART(2, baudrate=9600, tx=17, rx=16) button_next = Pin(1, Pin.IN, Pin.PULL_UP) button_prev = Pin(3, Pin.IN, Pin.PULL_UP) # --- For Raspberry Pi Pico (uncomment below, comment above) --- # uart = UART(1, baudrate=9600, tx=4, rx=5) # button_next = Pin(2, Pin.IN, Pin.PULL_UP) # button_prev = Pin(3, Pin.IN, Pin.PULL_UP) # --- For Arduino Nano ESP32 (uncomment below, comment above) --- # uart = UART(1, baudrate=9600, tx=43, rx=44) # button_next = Pin(5, Pin.IN, Pin.PULL_UP) # button_prev = Pin(6, Pin.IN, Pin.PULL_UP) # --- For Arduino Giga R1 WiFi (uncomment below, comment above) --- # uart = UART(1, baudrate=9600) # button_next = Pin(2, Pin.IN, Pin.PULL_UP) # button_prev = Pin(3, Pin.IN, Pin.PULL_UP) mp3 = MiniMp3Player(uart) time.sleep(1) # Wait for the module to initialize mp3.set_volume(20) mp3.play(1) # Start with track 1 print("Press NEXT or PREV button to change track") while True: if button_next.value() == 0: print("Next track") mp3.play_next() time.sleep_ms(300) # Simple debounce if button_prev.value() == 0: print("Previous track") mp3.play_previous() time.sleep_ms(300) # Simple debounce

Raspberry Pi Pico Code — Pause/Resume

""" * DIYables MicroPython Mini Mp3 Player - Pause and Resume * * This example demonstrates pausing and resuming playback using a button. * Press the button to toggle between pause and resume. * * Product: DIYables Mini Mp3 Player Module * https://diyables.io/products/mini-mp3-player-module * * Wiring (ESP32): * Mini Mp3 RX -> ESP32 TX (GPIO17) * Mini Mp3 TX -> ESP32 RX (GPIO16) * Mini Mp3 VCC -> 3.3V * Mini Mp3 GND -> GND * Speaker connected to SPK_1 and SPK_2 pins * Button -> GPIO1 (other leg to GND) * * Wiring (Raspberry Pi Pico): * Mini Mp3 RX -> Pico TX (GPIO4) * Mini Mp3 TX -> Pico RX (GPIO5) * Mini Mp3 VCC -> 3.3V * Mini Mp3 GND -> GND * Speaker connected to SPK_1 and SPK_2 pins * Button -> GPIO2 (other leg to GND) * * Wiring (Arduino Nano ESP32): * Mini Mp3 RX -> D1 (GPIO43, TX) * Mini Mp3 TX -> D0 (GPIO44, RX) * Mini Mp3 VCC -> 3.3V * Mini Mp3 GND -> GND * Speaker connected to SPK_1 and SPK_2 pins * Button -> D2 (GPIO5, other leg to GND) * * Wiring (Arduino Giga R1 WiFi): * Mini Mp3 RX -> TX1 * Mini Mp3 TX -> RX1 * Mini Mp3 VCC -> 3.3V * Mini Mp3 GND -> GND * Speaker connected to SPK_1 and SPK_2 pins * Button -> D2 (other leg to GND) * * SD Card: Put mp3 files in root, named 001.mp3, 002.mp3, etc. """ from machine import UART, Pin import time from DIYables_MicroPython_MiniMp3 import MiniMp3Player # --- For ESP32 --- uart = UART(2, baudrate=9600, tx=17, rx=16) # --- For Raspberry Pi Pico (uncomment below, comment above) --- # uart = UART(1, baudrate=9600, tx=4, rx=5) # --- For Arduino Nano ESP32 (uncomment below, comment above) --- # uart = UART(1, baudrate=9600, tx=43, rx=44) # --- For Arduino Giga R1 WiFi (uncomment below, comment above) --- # uart = UART(1, baudrate=9600) mp3 = MiniMp3Player(uart) time.sleep(1) # Wait for the module to initialize button = Pin(1, Pin.IN, Pin.PULL_UP) paused = False mp3.set_volume(20) mp3.play(1) print("Playing. Press button to pause/resume.") while True: if button.value() == 0: # Button pressed (active LOW) if paused: mp3.resume() print("Resumed") else: mp3.pause() print("Paused") paused = not paused time.sleep_ms(300) # Simple debounce

Raspberry Pi Pico Code — Loop a Track

""" * DIYables MicroPython Mini Mp3 Player - Loop Track * * This example loops (repeats) a track continuously with EQ setting. * * Product: DIYables Mini Mp3 Player Module * https://diyables.io/products/mini-mp3-player-module * * Wiring (ESP32): * Mini Mp3 RX -> ESP32 TX (GPIO17) * Mini Mp3 TX -> ESP32 RX (GPIO16) * Mini Mp3 VCC -> 3.3V * Mini Mp3 GND -> GND * Speaker connected to SPK_1 and SPK_2 pins * * Wiring (Raspberry Pi Pico): * Mini Mp3 RX -> Pico TX (GPIO4) * Mini Mp3 TX -> Pico RX (GPIO5) * Mini Mp3 VCC -> 3.3V * Mini Mp3 GND -> GND * Speaker connected to SPK_1 and SPK_2 pins * * Wiring (Arduino Nano ESP32): * Mini Mp3 RX -> D1 (GPIO43, TX) * Mini Mp3 TX -> D0 (GPIO44, RX) * Mini Mp3 VCC -> 3.3V * Mini Mp3 GND -> GND * Speaker connected to SPK_1 and SPK_2 pins * * Wiring (Arduino Giga R1 WiFi): * Mini Mp3 RX -> TX1 * Mini Mp3 TX -> RX1 * Mini Mp3 VCC -> 3.3V * Mini Mp3 GND -> GND * Speaker connected to SPK_1 and SPK_2 pins * * SD Card file structure: * /001.mp3 * /002.mp3 * ... """ from machine import UART import time from DIYables_MicroPython_MiniMp3 import MiniMp3Player import DIYables_MicroPython_MiniMp3.DIYables_MicroPython_MiniMp3 as mp3_const # --- For ESP32 --- uart = UART(2, baudrate=9600, tx=17, rx=16) # --- For Raspberry Pi Pico (uncomment below, comment above) --- # uart = UART(1, baudrate=9600, tx=4, rx=5) # --- For Arduino Nano ESP32 (uncomment below, comment above) --- # uart = UART(1, baudrate=9600, tx=43, rx=44) # --- For Arduino Giga R1 WiFi (uncomment below, comment above) --- # uart = UART(1, baudrate=9600) mp3 = MiniMp3Player(uart) time.sleep(1) # Wait for the module to initialize mp3.set_volume(25) # Volume: 0 to 30 mp3.set_eq(mp3_const.EQ_NORMAL) print("Playing track 1 on loop...") mp3.loop_track(1)

Repeat & Shuffle

Once you send a loop or shuffle command, the mp3 module handles continuous playback autonomously. The Pico is free to do other work — read sensors, update a display, or sleep to save power.

Method Behavior Example
loop_track(n) Continuously repeat a single track mp3.loop_track(1)
loop_folder(f) Play all tracks in folder f on repeat mp3.loop_folder(1)
loop_all() Cycle through every track on the card mp3.loop_all()
stop_loop() Finish the current track, then stop mp3.stop_loop()
shuffle() Random playback order across all tracks mp3.shuffle()

Raspberry Pi Pico Code — Folder Playback

""" * DIYables MicroPython Mini Mp3 Player - Play from Folder * * This example plays tracks from specific folders on the SD card. * * Product: DIYables Mini Mp3 Player Module * https://diyables.io/products/mini-mp3-player-module * * Wiring (ESP32): * Mini Mp3 RX -> ESP32 TX (GPIO17) * Mini Mp3 TX -> ESP32 RX (GPIO16) * Mini Mp3 VCC -> 3.3V * Mini Mp3 GND -> GND * Speaker connected to SPK_1 and SPK_2 pins * * Wiring (Raspberry Pi Pico): * Mini Mp3 RX -> Pico TX (GPIO4) * Mini Mp3 TX -> Pico RX (GPIO5) * Mini Mp3 VCC -> 3.3V * Mini Mp3 GND -> GND * Speaker connected to SPK_1 and SPK_2 pins * * Wiring (Arduino Nano ESP32): * Mini Mp3 RX -> D1 (GPIO43, TX) * Mini Mp3 TX -> D0 (GPIO44, RX) * Mini Mp3 VCC -> 3.3V * Mini Mp3 GND -> GND * Speaker connected to SPK_1 and SPK_2 pins * * Wiring (Arduino Giga R1 WiFi): * Mini Mp3 RX -> TX1 * Mini Mp3 TX -> RX1 * Mini Mp3 VCC -> 3.3V * Mini Mp3 GND -> GND * Speaker connected to SPK_1 and SPK_2 pins * * SD Card file structure: * /01/001.mp3 <- play_folder(1, 1) * /01/002.mp3 <- play_folder(1, 2) * /02/001.mp3 <- play_folder(2, 1) * /02/002.mp3 <- play_folder(2, 2) """ from machine import UART import time from DIYables_MicroPython_MiniMp3 import MiniMp3Player # --- For ESP32 --- uart = UART(2, baudrate=9600, tx=17, rx=16) # --- For Raspberry Pi Pico (uncomment below, comment above) --- # uart = UART(1, baudrate=9600, tx=4, rx=5) # --- For Arduino Nano ESP32 (uncomment below, comment above) --- # uart = UART(1, baudrate=9600, tx=43, rx=44) # --- For Arduino Giga R1 WiFi (uncomment below, comment above) --- # uart = UART(1, baudrate=9600) mp3 = MiniMp3Player(uart) time.sleep(1) # Wait for the module to initialize mp3.set_volume(20) # Play track 1 from folder 01 print("Playing folder 01, track 001...") mp3.play_folder(1, 1) time.sleep(5) # Play track 2 from folder 01 print("Playing folder 01, track 002...") mp3.play_folder(1, 2) time.sleep(5) # Play track 1 from folder 02 print("Playing folder 02, track 001...") mp3.play_folder(2, 1)

Folder API

Organizing mp3 files into folders is ideal for Pico projects that need distinct audio banks — such as a multilingual doorbell, a quiz game with different question sets, or categorized sound effects.

Method Description Example
play_folder(f, t) Play track t in folder f (folders 01–99, tracks 001–255) mp3.play_folder(1, 1)
play_large_folder(f, t) Large-folder mode (folders 01–15, tracks 0001–3000) mp3.play_large_folder(1, 2000)
play_from_mp3_folder(t) Play from the dedicated /mp3 folder (tracks 0001–9999) mp3.play_from_mp3_folder(1)

Raspberry Pi Pico Code — Serial Console Control

""" * DIYables MicroPython Mini Mp3 Player - Serial Command Control * * Control the Mp3 player by typing commands in the serial console. * Great for testing all functions without extra hardware. * * Commands (type in serial console, then press Enter): * 1-9 Play track 1 to 9 * + Volume up * - Volume down * p Pause * r Resume * s Stop * n Next track * b Previous track (back) * ? Show current status * * Product: DIYables Mini Mp3 Player Module * https://diyables.io/products/mini-mp3-player-module * * Wiring (ESP32): * Mini Mp3 RX -> ESP32 TX (GPIO17) * Mini Mp3 TX -> ESP32 RX (GPIO16) * Mini Mp3 VCC -> 3.3V * Mini Mp3 GND -> GND * Speaker connected to SPK_1 and SPK_2 pins * * Wiring (Raspberry Pi Pico): * Mini Mp3 RX -> Pico TX (GPIO4) * Mini Mp3 TX -> Pico RX (GPIO5) * Mini Mp3 VCC -> 3.3V * Mini Mp3 GND -> GND * Speaker connected to SPK_1 and SPK_2 pins * * Wiring (Arduino Nano ESP32): * Mini Mp3 RX -> D1 (GPIO43, TX) * Mini Mp3 TX -> D0 (GPIO44, RX) * Mini Mp3 VCC -> 3.3V * Mini Mp3 GND -> GND * Speaker connected to SPK_1 and SPK_2 pins * * Wiring (Arduino Giga R1 WiFi): * Mini Mp3 RX -> TX1 * Mini Mp3 TX -> RX1 * Mini Mp3 VCC -> 3.3V * Mini Mp3 GND -> GND * Speaker connected to SPK_1 and SPK_2 pins * * SD Card: Put mp3 files in root, named 001.mp3, 002.mp3, etc. """ import sys import select from machine import UART import time from DIYables_MicroPython_MiniMp3 import MiniMp3Player # --- For ESP32 --- uart = UART(2, baudrate=9600, tx=17, rx=16) # --- For Raspberry Pi Pico (uncomment below, comment above) --- # uart = UART(1, baudrate=9600, tx=4, rx=5) # --- For Arduino Nano ESP32 (uncomment below, comment above) --- # uart = UART(1, baudrate=9600, tx=43, rx=44) # --- For Arduino Giga R1 WiFi (uncomment below, comment above) --- # uart = UART(1, baudrate=9600) mp3 = MiniMp3Player(uart) time.sleep(1) # Wait for the module to initialize mp3.set_volume(20) print("=== DIYables Mini Mp3 Player ===") print("Commands:") print(" 1-9 Play track number") print(" + Volume up") print(" - Volume down") print(" p Pause") print(" r Resume") print(" s Stop") print(" n Next track") print(" b Previous track") print(" ? Show status") print("================================") poll = select.poll() poll.register(sys.stdin, select.POLLIN) while True: events = poll.poll(100) # 100ms timeout if events: cmd = sys.stdin.read(1) if cmd in '123456789': track = int(cmd) print("Playing track", track) mp3.play(track) elif cmd == '+': print("Volume up") mp3.volume_up() elif cmd == '-': print("Volume down") mp3.volume_down() elif cmd == 'p': print("Paused") mp3.pause() elif cmd == 'r': print("Resumed") mp3.resume() elif cmd == 's': print("Stopped") mp3.stop() elif cmd == 'n': print("Next track") mp3.play_next() elif cmd == 'b': print("Previous track") mp3.play_previous() elif cmd == '?': print("--- Status ---") vol = mp3.get_volume() print("Volume:", vol) track = mp3.get_current_track() print("Current track:", track) playing = mp3.is_playing() print("Playing:", "Yes" if playing else "No") total = mp3.get_track_count() print("Total tracks:", total) print("--------------")
Command Effect
1–9 Play track
+ / − Volume
p / r / s Pause / Resume / Stop
n / b Next / Previous
? Status

Equalizer Options

Six built-in DSP presets shape the audio output. You can change the EQ at any time, even during playback. On Pico-based projects with small speakers, the Bass preset often sounds best.

Constant ID Sound Profile
EQ_NORMAL 0 No EQ applied — flat frequency response
EQ_POP 1 Emphasizes vocals and high frequencies
EQ_ROCK 2 Boosted mids and lows for energy
EQ_JAZZ 3 Smooth, warm midrange tone
EQ_CLASSIC 4 Even balance across the spectrum
EQ_BASS 5 Strong low-frequency boost
import DIYables_MicroPython_MiniMp3.DIYables_MicroPython_MiniMp3 as mp3_const mp3.set_eq(mp3_const.EQ_BASS) # Recommended for small speakers

Checking Module Status

Query functions send a request over UART1 and wait for a response. They block the Pico for up to 100 ms (adjustable via set_timeout()). A return value of −1 means the module didn’t respond in time.

These are handy for building a Pico-based mp3 player UI — for example, showing the current track number on an OLED display.

Function Return Description
is_playing() bool True when audio is actively playing
get_volume() int Volume setting from 0 to 30
get_eq() int Active equalizer mode (0–5)
get_track_count() int How many tracks are on the SD card
get_current_track() int Which track number is playing right now
get_folder_count() int How many folders exist on the SD card
get_track_count_in_folder(f) int How many tracks are inside folder f

※ OUR MESSAGES

  • As freelancers, We are AVAILABLE for HIRE. See how to outsource your project to us
  • Please feel free to share the link of this tutorial. However, Please do not use our content on any other websites. We invested a lot of effort and time to create the content, please respect our work!