Raspberry Pi Pico - SSD1309 OLED Display
The Raspberry Pi Pico is a low-cost, high-performance microcontroller board built on the RP2040 chip. Paired with MicroPython and the DIYables OLED SSD1309 library, you can easily add a crisp monochrome OLED display to your project.
This tutorial walks you through:
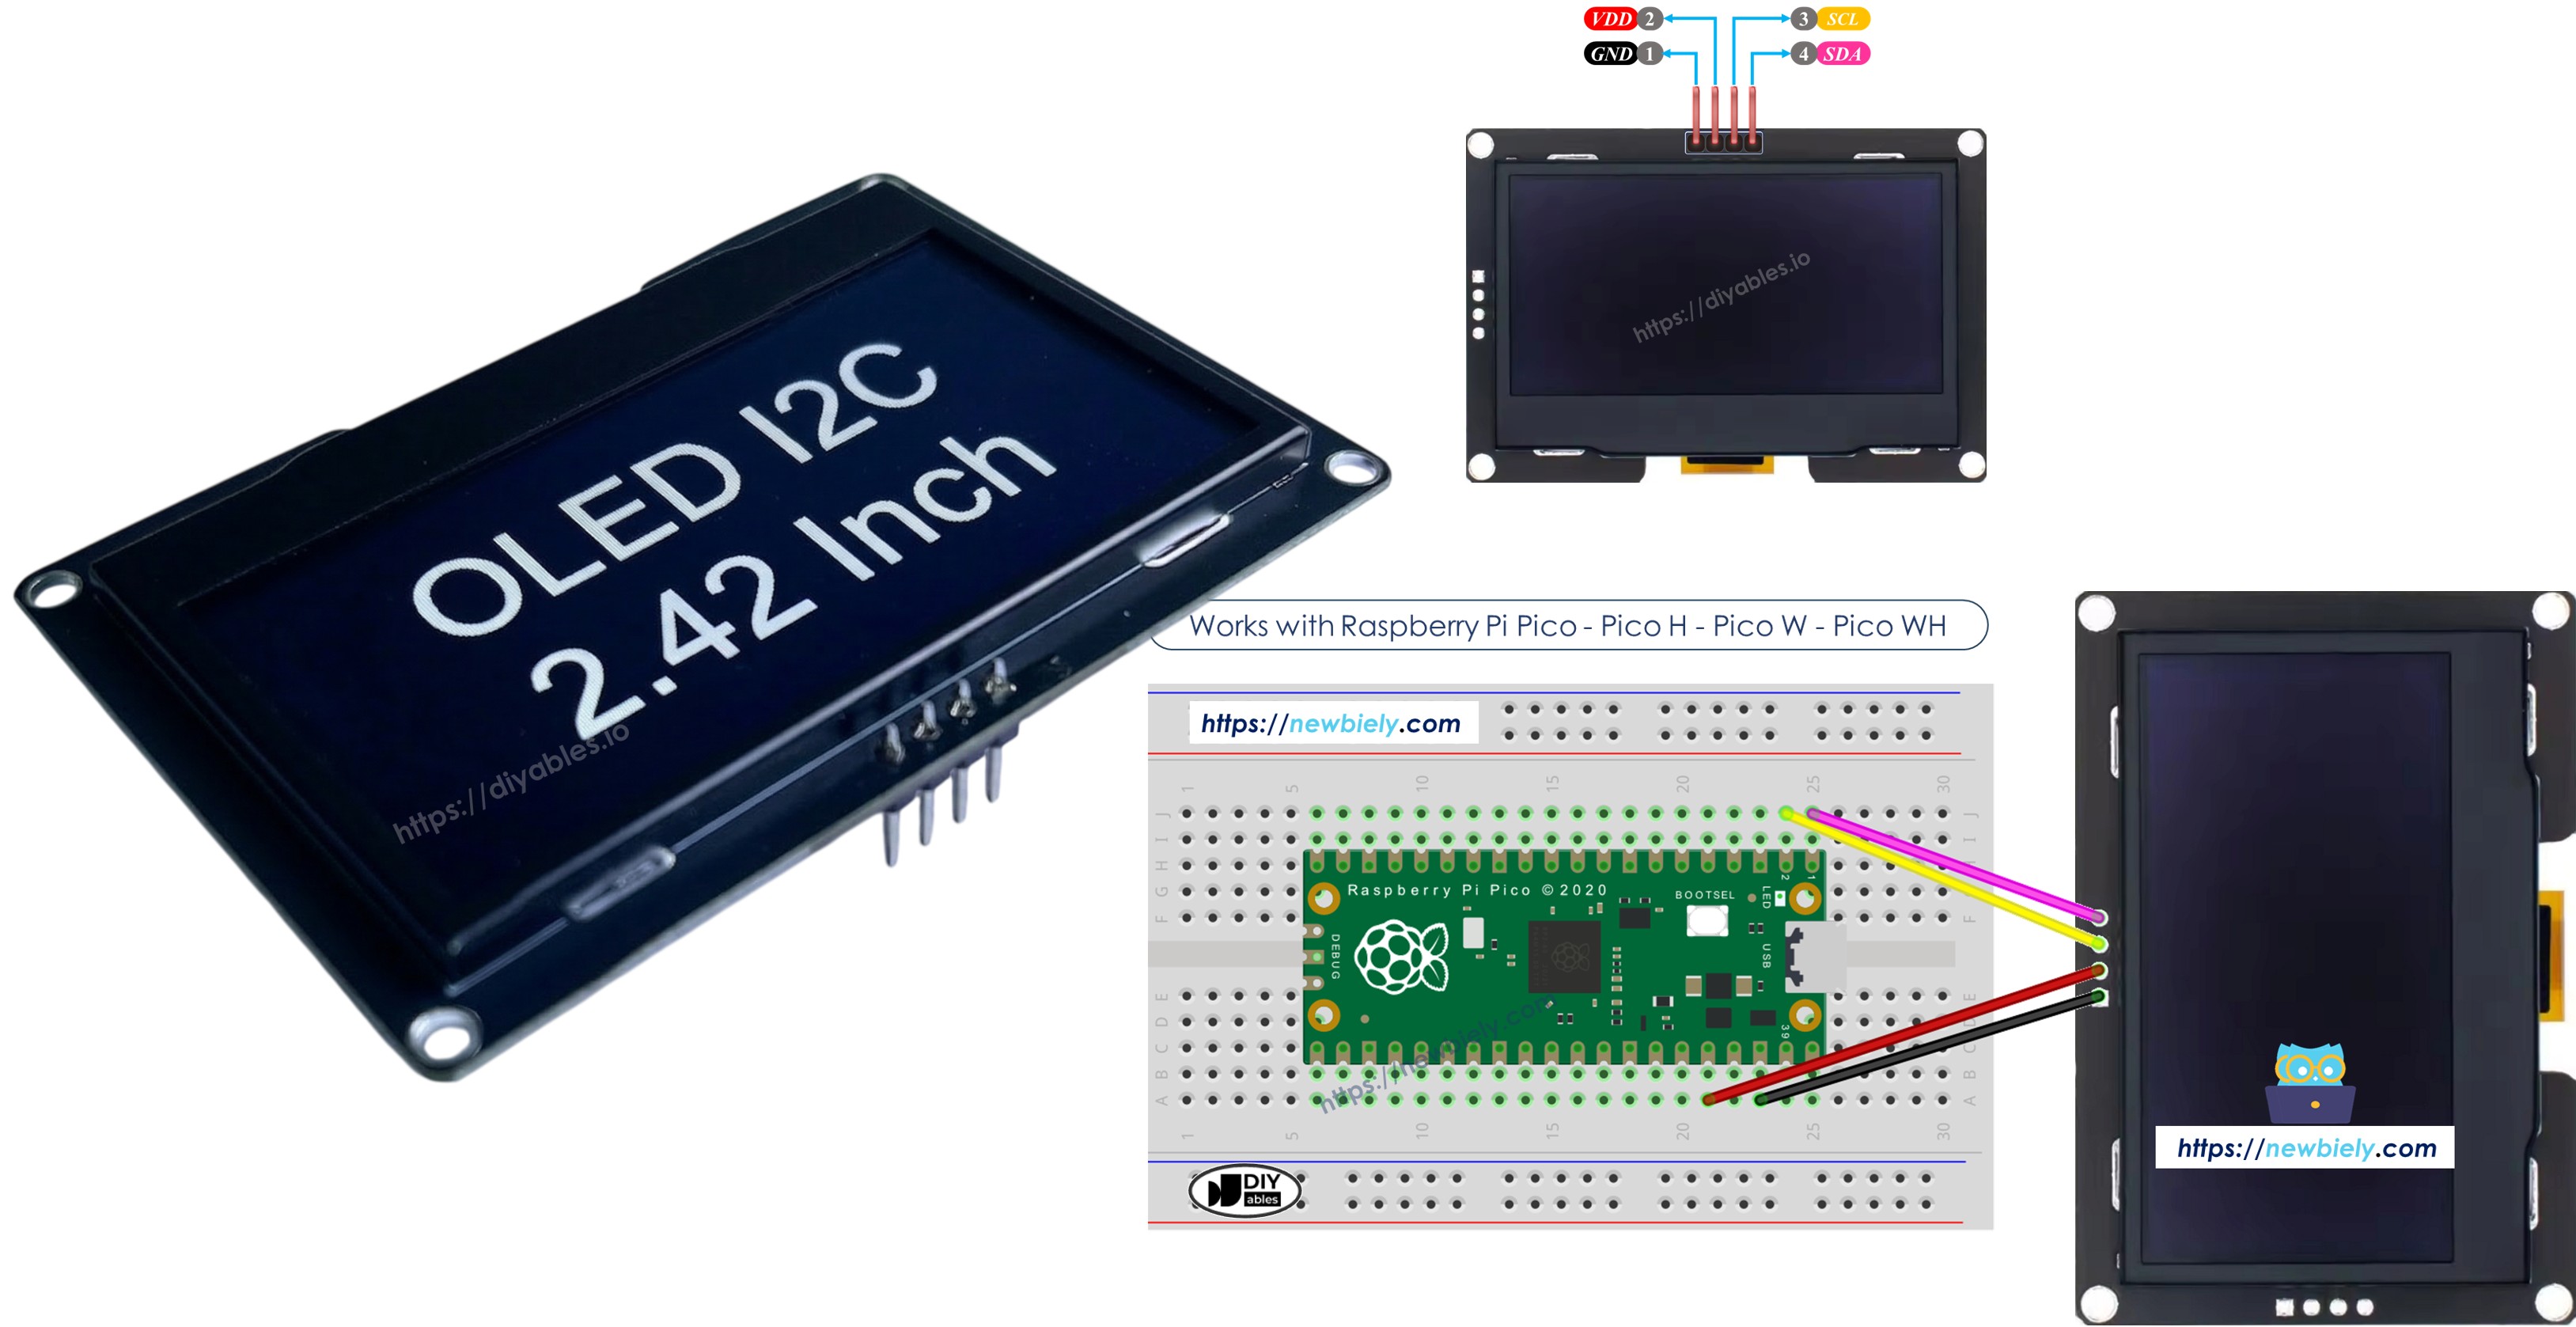
- Connecting the OLED SSD1309 to a Raspberry Pi Pico — only 2 data pins needed (I2C).
- Displaying text and numbers.
- Drawing shapes: pixels, lines, rectangles, and bitmaps.
- Using hardware scrolling.
- Adjusting contrast and dimming the display.
Components Needed
Or you can buy the following kits:
| 1 | × | DIYables Sensor Kit (18 sensors/displays) |
Additionally, some of these links are for products from our own brand, DIYables .
The OLED SSD1309
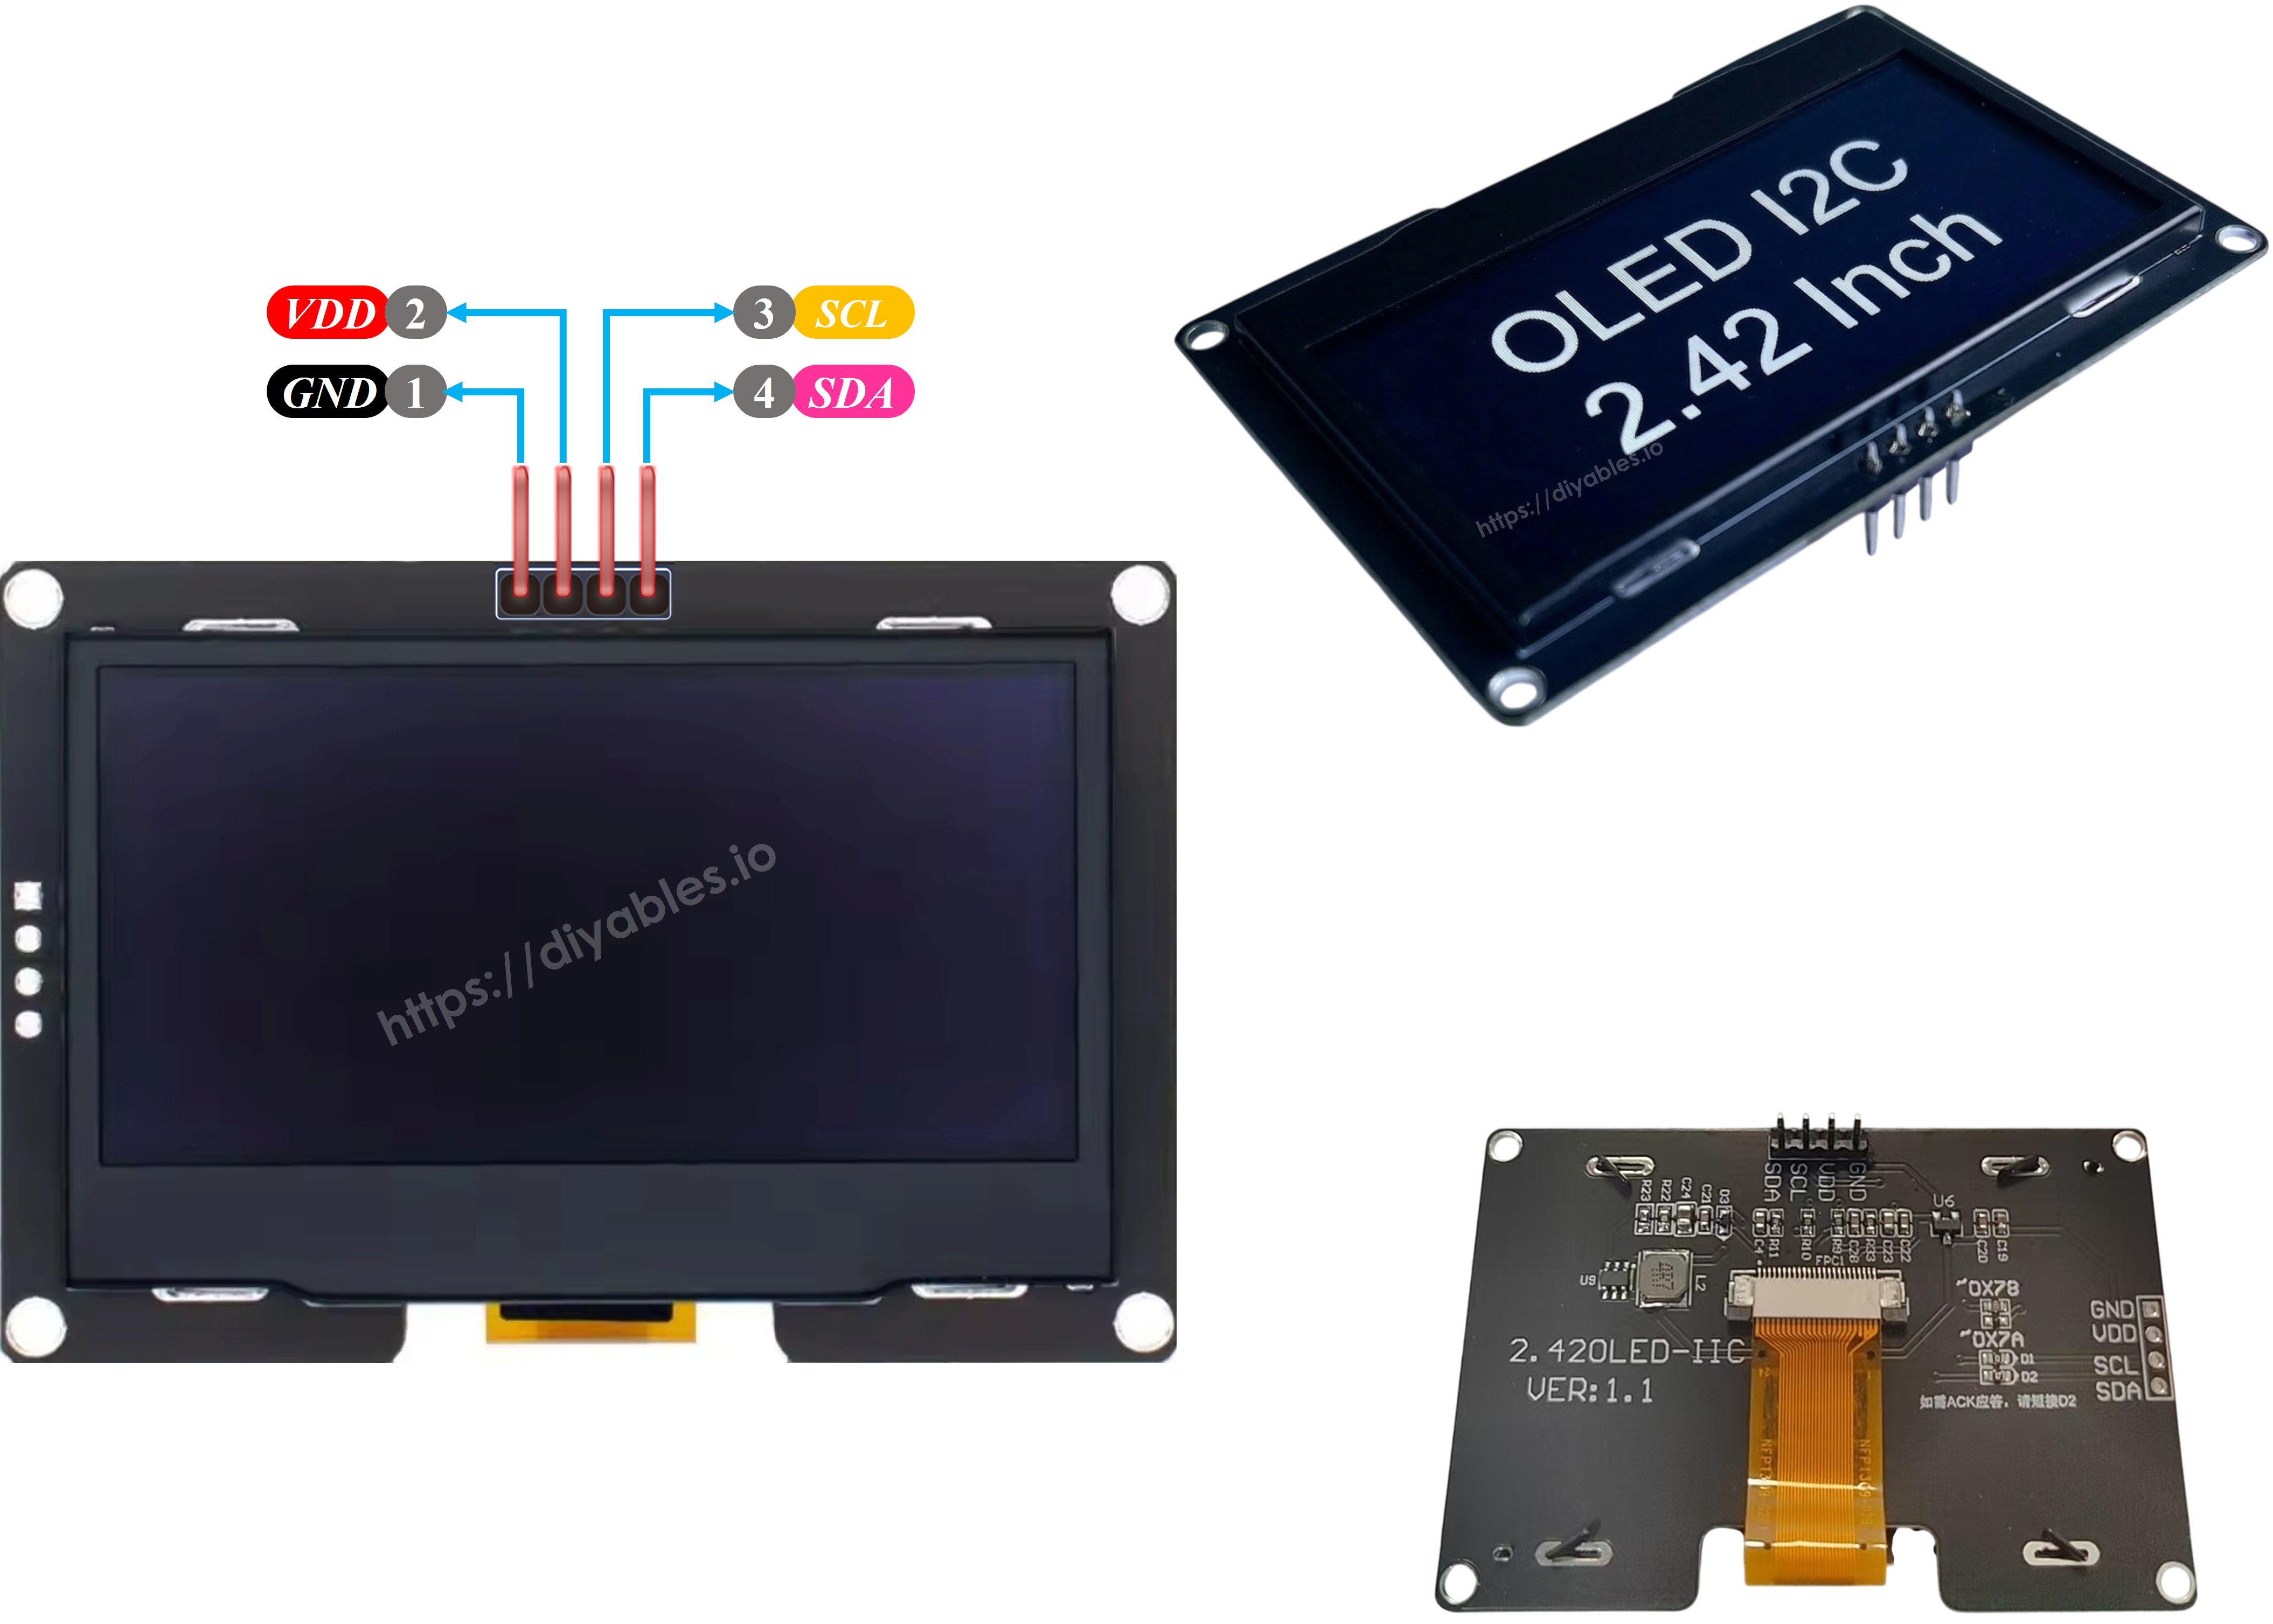
The SSD1309 is a single-chip CMOS OLED/PLED driver with controller for organic/polymer light emitting diode dot-matrix graphic display systems. It connects to a microcontroller using the I2C (two-wire) protocol, making wiring minimal — only SDA and SCL lines are required in addition to power.
The display is self-luminous (no backlight needed), offers high contrast, a wide viewing angle, and is readable in both bright and dim environments. It is commonly available in 128×64 and 128×32 pixel variants.
Key features:
- I2C interface (default address 0x3C)
- 128×64 pixel resolution (or 128×32, 96×16, 64×48, 64×32)
- Built-in hardware scrolling in horizontal and diagonal directions
- Adjustable contrast (0–255)
- Extends framebuf.FrameBuffer — all MicroPython drawing primitives work out of the box
Pin Description
| Pin | Purpose | Raspberry Pi Pico Connection |
|---|---|---|
| SDA | I2C data line | Connect to GP0 (pin 1) |
| SCL | I2C clock line | Connect to GP1 (pin 2) |
| VCC | 3.3 V to 5 V power input | Connect to 3V3(OUT) |
| GND | Ground | Connect to GND |
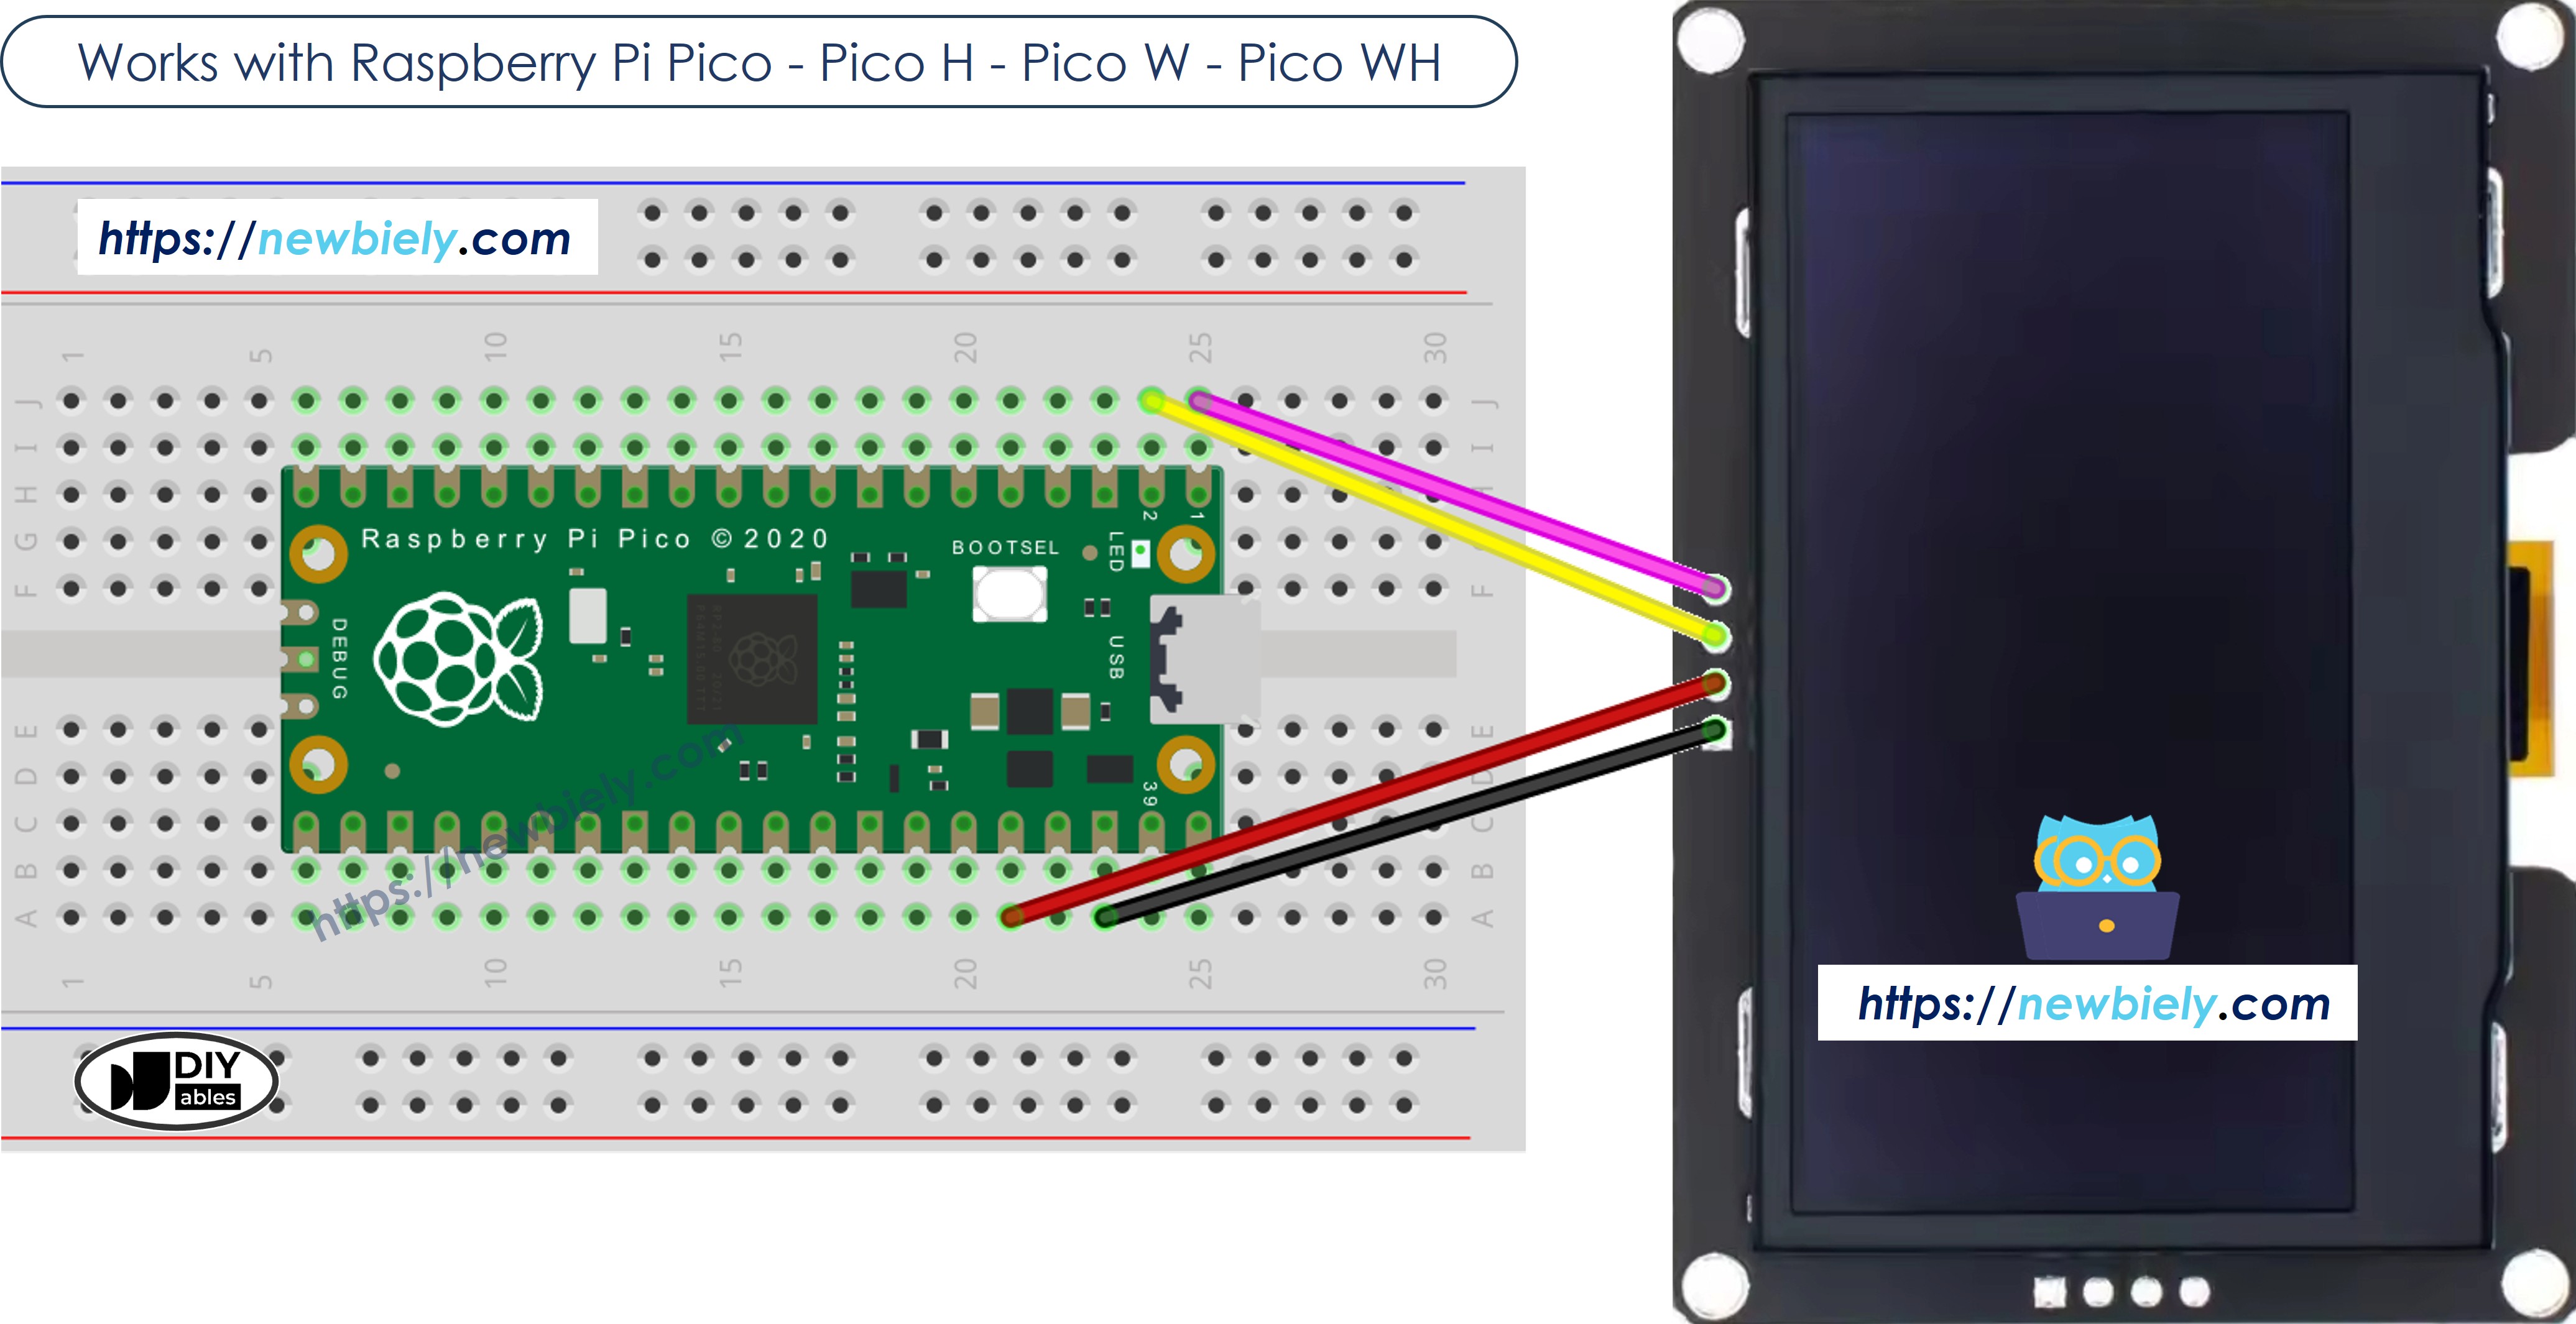
Wiring
The Raspberry Pi Pico operates at 3.3 V logic natively, which is compatible with the SSD1309 display.
| OLED SSD1309 | Raspberry Pi Pico | Notes |
|---|---|---|
| SDA | GP0 (pin 1) | I2C data |
| SCL | GP1 (pin 2) | I2C clock |
| VCC | 3V3(OUT) (pin 36) | Power (3.3 V) |
| GND | GND (pin 38) | Ground |
This image is created using Fritzing. Click to enlarge image
Tip: You can use any available I2C-capable GP pins on the Pico. Just update the SCL_PIN and SDA_PIN values in the code.
Detailed Instructions
Here's instructions on how to set up and run your MicroPython code on the Raspberry Pi Pico using Thonny IDE:
- Make sure Thonny IDE is installed on your computer.
- Confirm that MicroPython firmware is loaded on your Raspberry Pi Pico board.
- If this is your first time using a Raspberry Pi Pico with MicroPython, check out the Raspberry Pi Pico MicroPython Getting Started guide for step-by-step instructions.
- Connect the Raspberry Pi Pico board to the OLED SSD1309 according to the provided diagram.
- Connect the Raspberry Pi Pico board to your computer with a USB cable.
- Open Thonny IDE on your computer.
- In Thonny IDE, go to Tools Options.
- Under the Interpreter tab, choose MicroPython (Raspberry Pi Pico) from the dropdown menu.
- Make sure the correct port is selected. Thonny IDE usually detects it automatically, but you might need to select it manually (like COM12 on Windows or /dev/ttyACM0 on Linux).
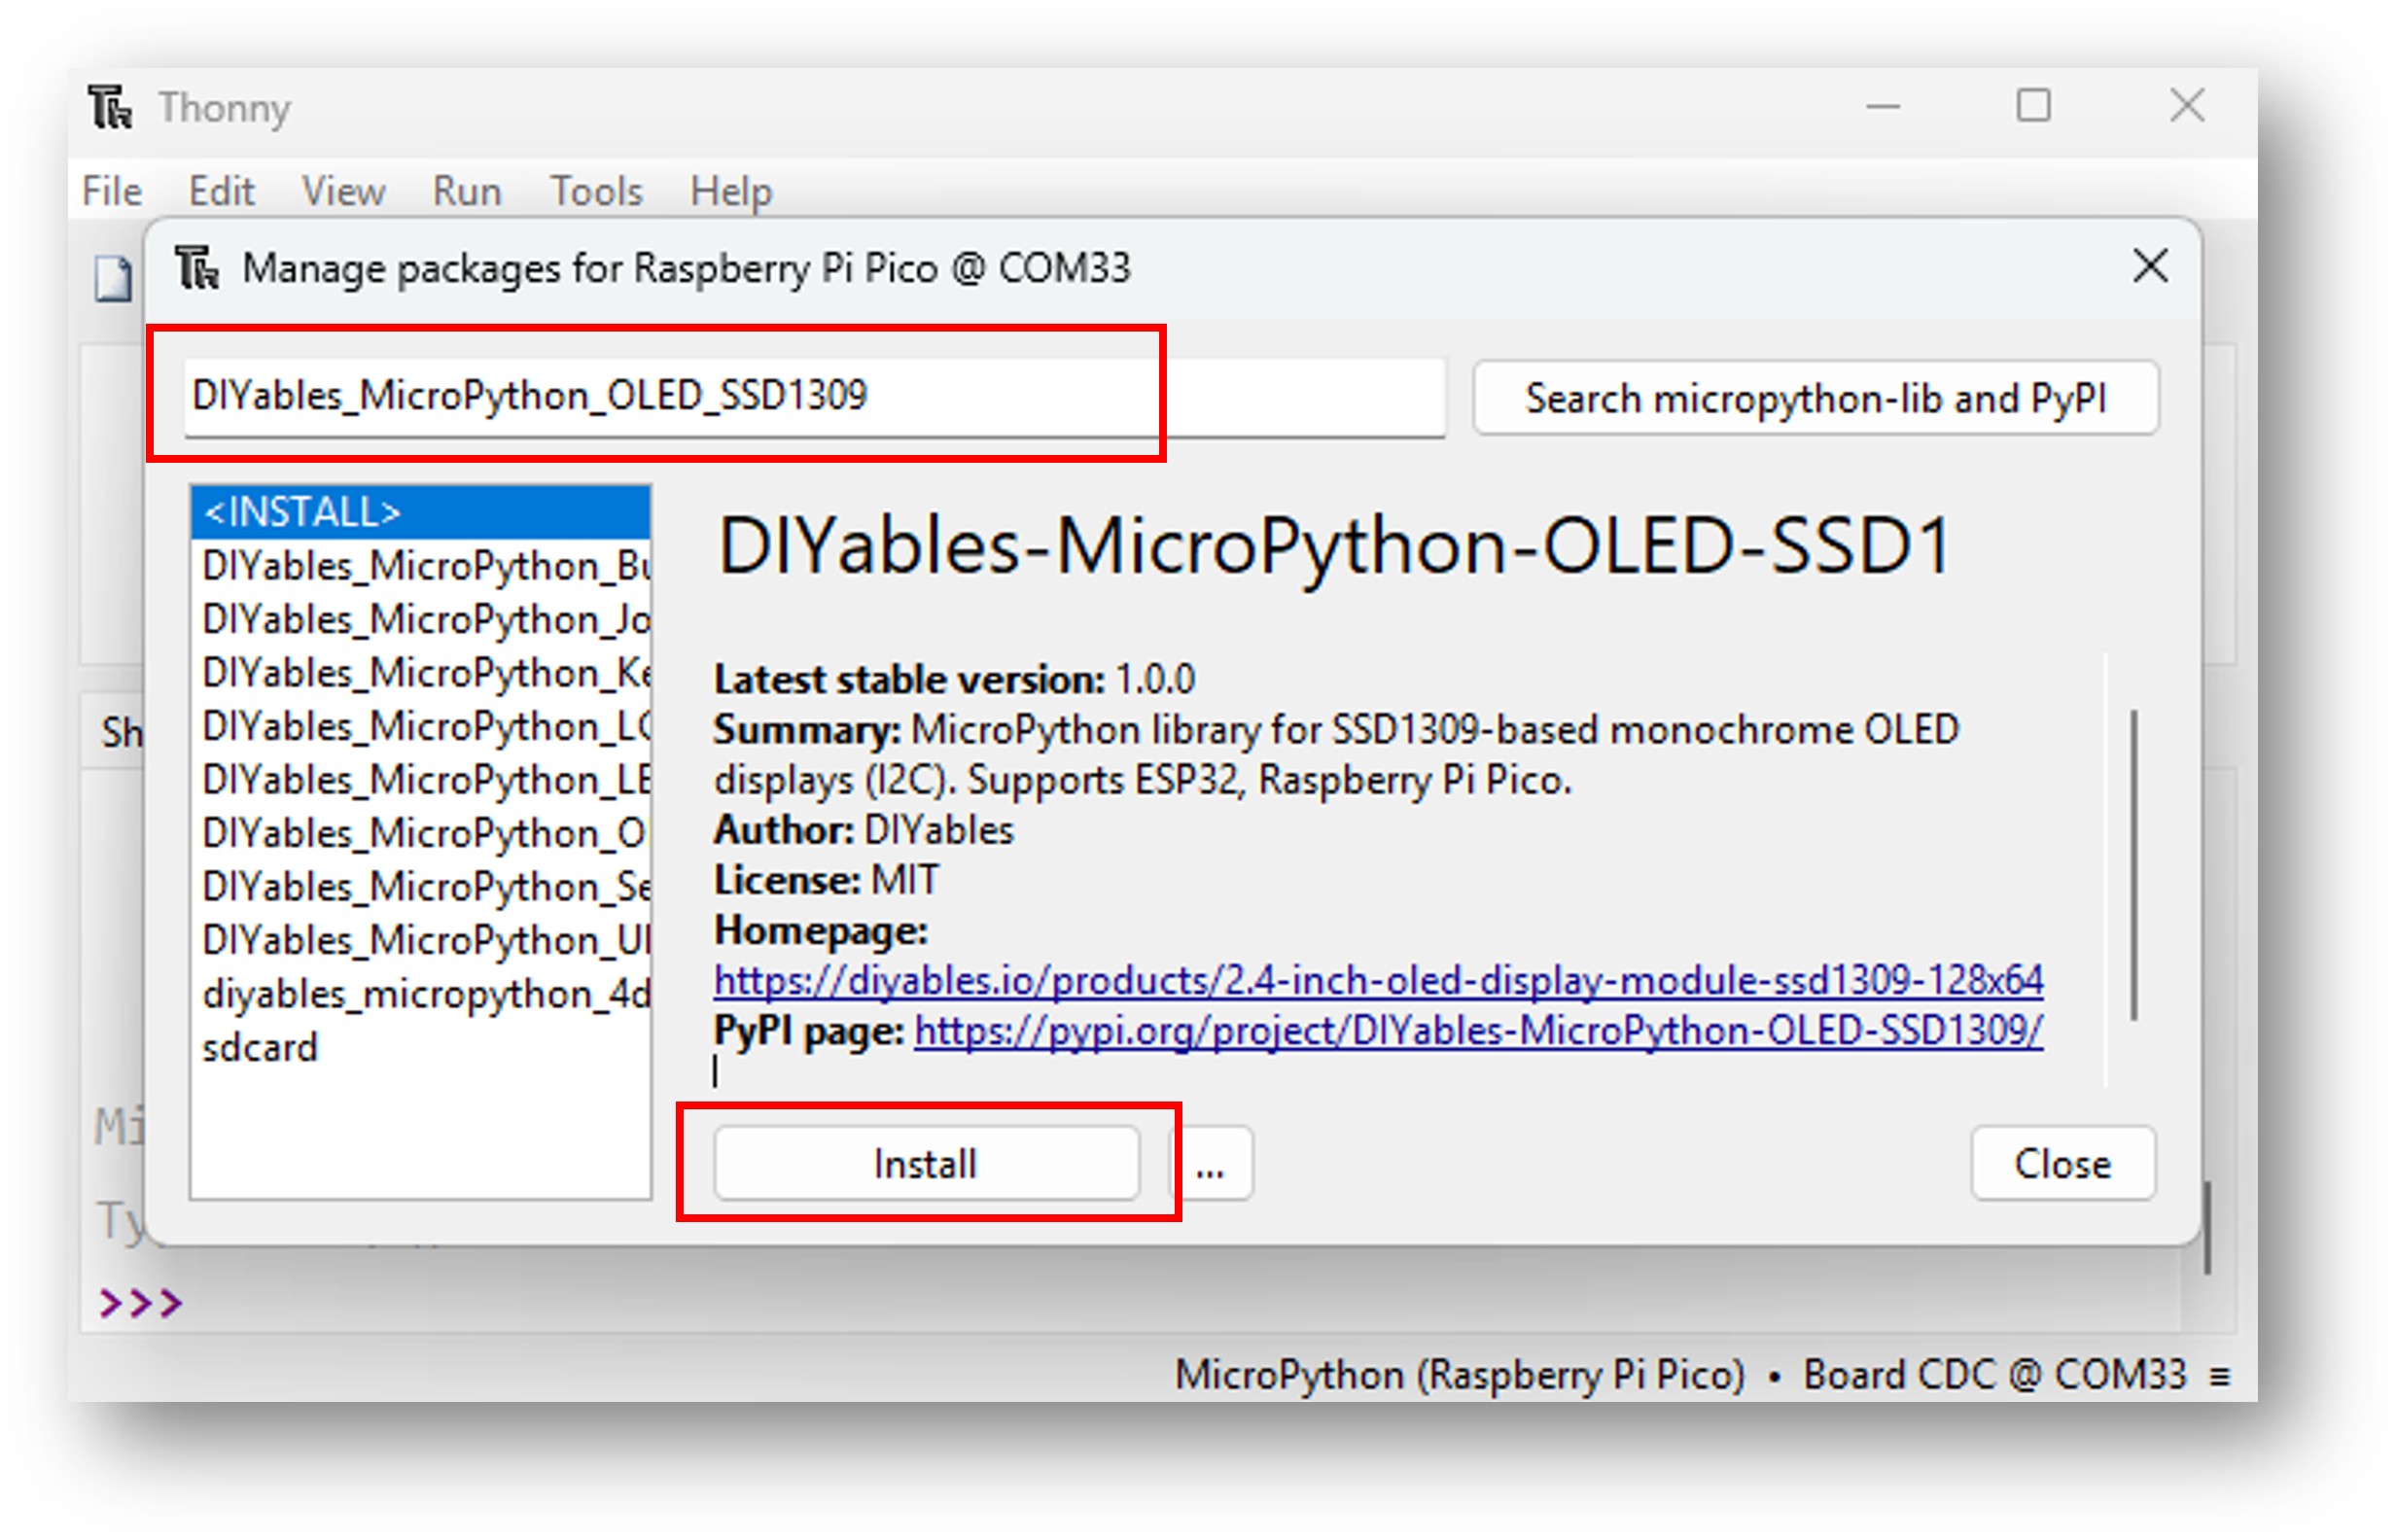
- Navigate to the Tools Manage packages on the Thonny IDE.
- Search "DIYables-MicroPython-OLED-SSD1309", then find the OLED SSD1309 library created by DIYables.
- Click on DIYables-MicroPython-OLED-SSD1309, then click Install button to install the library.
- Copy the provided MicroPython code and paste it into Thonny's editor.
- Save the code to your Raspberry Pi Pico by:
- Clicking the Save button or pressing Ctrl+S.
- In the save dialog, choose MicroPython device.
- Name the file main.py.
- Click the green Run button (or press F5) to execute the script.
- Observe the result — text and graphics should appear on the OLED display.
Starter Code Template
Raspberry Pi Pico Code — Hello World
Try It
- Wire the OLED SSD1309 to the Raspberry Pi Pico according to the diagram above.
- Upload the code using Thonny IDE.
- You should see "Hello, World!", "DIYables", and "SSD1309 OLED 128 x 64" displayed on screen.
Text Drawing Reference
| Method Call | What It Does | Notes |
|---|---|---|
| oled.fill(0) | Clear the entire screen (all pixels off) | Always call before drawing a fresh frame |
| oled.text("Hello!", 0, 0) | Draw text at column 0, row 0 | Built-in 8×8 pixel font; 16 chars per row, 8 rows on 64px display |
| oled.text("Line 2", 0, 16) | Draw text on the second line | Rows are 8 px tall; next line is y+8 or y+16 for spacing |
| oled.show() | Push framebuffer to the physical display | Nothing is visible until show() is called |
Raspberry Pi Pico Code — Draw Shapes
Try It
- Upload the code using Thonny IDE.
- The display cycles through demos: diagonal pixels, line fans, grid lines, rectangle outlines, and filled rectangles.
Drawing Methods Reference
| Method Call | What It Draws | Notes |
|---|---|---|
| oled.pixel(x, y, 1) | Single pixel at (x, y) | 0 = off, 1 = on |
| oled.line(x1, y1, x2, y2, 1) | Line between two points | Bresenham algorithm |
| oled.hline(x, y, w, 1) | Horizontal line of width w | Faster than line() for horizontal |
| oled.vline(x, y, h, 1) | Vertical line of height h | Faster than line() for vertical |
| oled.rect(x, y, w, h, 1) | Rectangle outline | Top-left corner at (x, y) |
| oled.fill_rect(x, y, w, h, 1) | Filled rectangle | Same parameters as rect() |
Raspberry Pi Pico Code — Scroll Text
Try It
- Upload the code using Thonny IDE.
- The display scrolls right, then left, then diagonally right, then diagonally left, and repeats.
Hardware Scroll Reference
| Method Call | Scroll Direction | Notes |
|---|---|---|
| oled.scroll_right(0x00, 0x07) | Right | Pages 0–7 = all rows on a 64 px display |
| oled.scroll_left(0x00, 0x07) | Left | Pages 0–7 covers the full screen height |
| oled.scroll_diag_right(0x00, 0x07) | Diagonal right (right + down) | Combines horizontal and vertical scrolling |
| oled.scroll_diag_left(0x00, 0x07) | Diagonal left (left + down) | Combines horizontal and vertical scrolling |
| oled.stop_scroll() | Stop scrolling | Call before drawing new content |
Note: Modify the framebuffer (e.g. call oled.fill() + oled.show()) before starting a new scroll to update the scrolling content. Always call stop_scroll() before sending new draw commands.
Raspberry Pi Pico Code — Contrast & Dim
Try It
- Upload the code using Thonny IDE.
- Watch the display brightness ramp up and down, then toggle between dimmed and full brightness.
Contrast & Dim Reference
| Method Call | Effect | Notes |
|---|---|---|
| oled.set_contrast(0) | Minimum brightness | Value range 0–255 |
| oled.set_contrast(128) | Medium brightness | Value is saved internally for dim/restore |
| oled.set_contrast(255) | Maximum brightness | Default after init is 0xCF (207) |
| oled.dim(True) | Drop contrast to 0 (dim) | Does not modify the saved contrast value |
| oled.dim(False) | Restore saved contrast | Restores the value set by set_contrast() |
| oled.invert(True) | Invert all pixels at hardware level | No framebuffer change |
| oled.invert(False) | Restore normal pixel polarity | — |
Raspberry Pi Pico Code — Bitmap
Try It
- Upload the code using Thonny IDE.
- A 16×16 heart icon appears centred on the display. It pulses by alternating normal and inverted frames.
Bitmap Drawing Reference
| Method Call | Description | Notes |
|---|---|---|
| framebuf.FrameBuffer(data, w, h, framebuf.MONO_HMSB) | Wrap raw bytes as a bitmap FrameBuffer | Use MONO_HMSB for row-major MSB-first data |
| oled.blit(icon_fb, x, y) | Copy bitmap onto display framebuffer at (x, y) | All pixels are copied (no transparency) |
| oled.blit(icon_fb, x, y, 1) | Blit with key=1 — skip pixels with value 1 | Useful for XOR-style effects on filled backgrounds |
How bitmap data is stored: Each row is stored left-to-right, most-significant bit first (MONO_HMSB). The byte count per row is ceil(width / 8). For a 16-wide image that is 2 bytes per row.
Library Reference
See DIYables MicroPython OLED SSD1309 Library Reference for the complete API documentation including all constructors, methods, and constants.
Next Steps
- Combine with a DHT11 or DHT22 sensor to display real-time temperature and humidity readings.
- Add a button to cycle between multiple display screens.
- Use framebuf.FrameBuffer.blit() to build an animated sprite display.