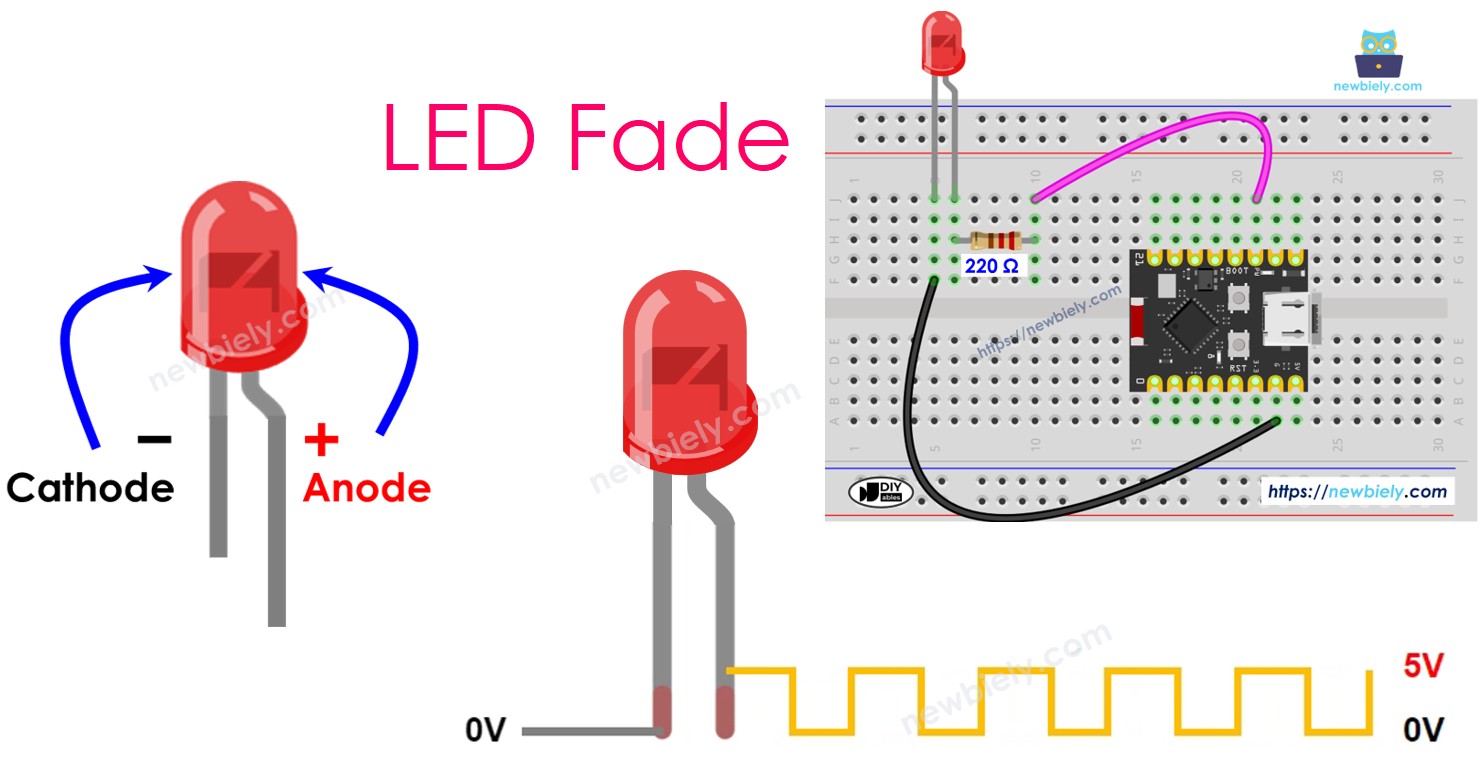
ESP32 C3 Super Mini - LED - Fade
Learn how to fade an LED with the ESP32 C3 Super Mini using PWM control. This beginner-friendly tutorial shows you three different methods to create smooth LED fade effects, from simple delay-based code to advanced non-blocking techniques.
In this tutorial, you'll learn:
- What PWM is and how it controls LED brightness
- How to wire an LED to the ESP32 C3 Super Mini
- How to fade LEDs using delay(), millis(), and ezLED library
- How to create smooth fade effects without blocking other code
- How to read and understand the fade control code
Hardware Preparation
Or you can buy the following kits:
| 1 | × | DIYables Sensor Kit (18 sensors/displays) |
Additionally, some of these links are for products from our own brand, DIYables .
Buy Note: Use the LED Module for easier wiring. It includes an integrated resistor.
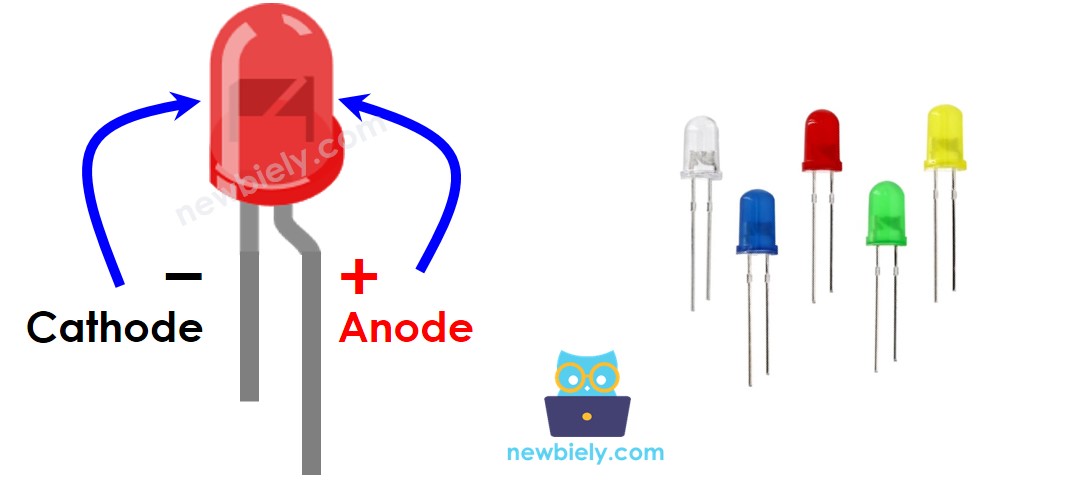
Overview of LED
An LED is a light-emitting diode that illuminates when electrical current passes through it in the correct direction.
Key features:
- Two pins: anode (positive, longer leg) and cathode (negative, shorter leg)
- Low power consumption and long lifespan
- Brightness can be controlled using PWM signals
- Requires a current-limiting resistor (typically 220 ohm) to prevent damage
- Operating voltage typically 2-3V depending on LED color
- Perfect for beginners learning about digital outputs and PWM control
LED Pinout
The LED has a simple two-pin configuration:
- Cathode (-) pin: Connect this pin to GND (0V) - this is the shorter leg with a flat edge on the LED housing
- Anode (+) pin: Connect to the ESP32 C3 Super Mini output pin to control the LED state - this is the longer leg
How LED Works
After connecting the cathode(-) to GND:
- GND on anode (+): LED is OFF (no voltage difference)
- VCC on anode (+): LED is ON at full brightness (maximum current flow)
- PWM signal on anode (+): LED brightness varies proportionally with PWM duty cycle
- PWM duty cycle ranges from 0 to 255 on the ESP32 C3 Super Mini
- Duty cycle 0 = GND equivalent = LED OFF
- Duty cycle 255 = VCC equivalent = LED at maximum brightness
- Duty cycle 127 = approximately 50% brightness
- The ESP32 rapidly switches the pin ON/OFF to create the average brightness
- Connect LED anode (+) to any PWM-capable ESP32 C3 Super Mini pin (most digital pins support PWM)
- Connect LED cathode (-) to GND through a 220 ohm resistor
- Program the ESP32 C3 Super Mini to gradually change PWM duty cycle values
- LED brightness smoothly transitions as duty cycle changes from 0 to 255
- Create fade-in effects by increasing duty cycle over time
- Create fade-out effects by decreasing duty cycle over time
※ NOTE THAT:
Always use a resistor (typically 220 ohm) in series with the LED to limit current and prevent burnout. The resistance value depends on the LED's specification and supply voltage.
ESP32 C3 Super Mini - Fade LED
The ESP32 C3 Super Mini's digital output pins can generate PWM signals for smooth LED fading effects.
How LED fading works with ESP32 C3 Super Mini:
Wiring Diagram between LED and ESP32 C3 Super Mini
Follow this wiring diagram to connect your LED to the ESP32 C3 Super Mini for fade control:
- Important: Always include the 220 ohm resistor in series with the LED to prevent damage from excess current
| LED Pin | ESP32 C3 Super Mini Pin |
|---|---|
| Anode (+) (longer leg) | D7 (through 220Ω resistor) |
| Cathode (-) (shorter leg) | GND |
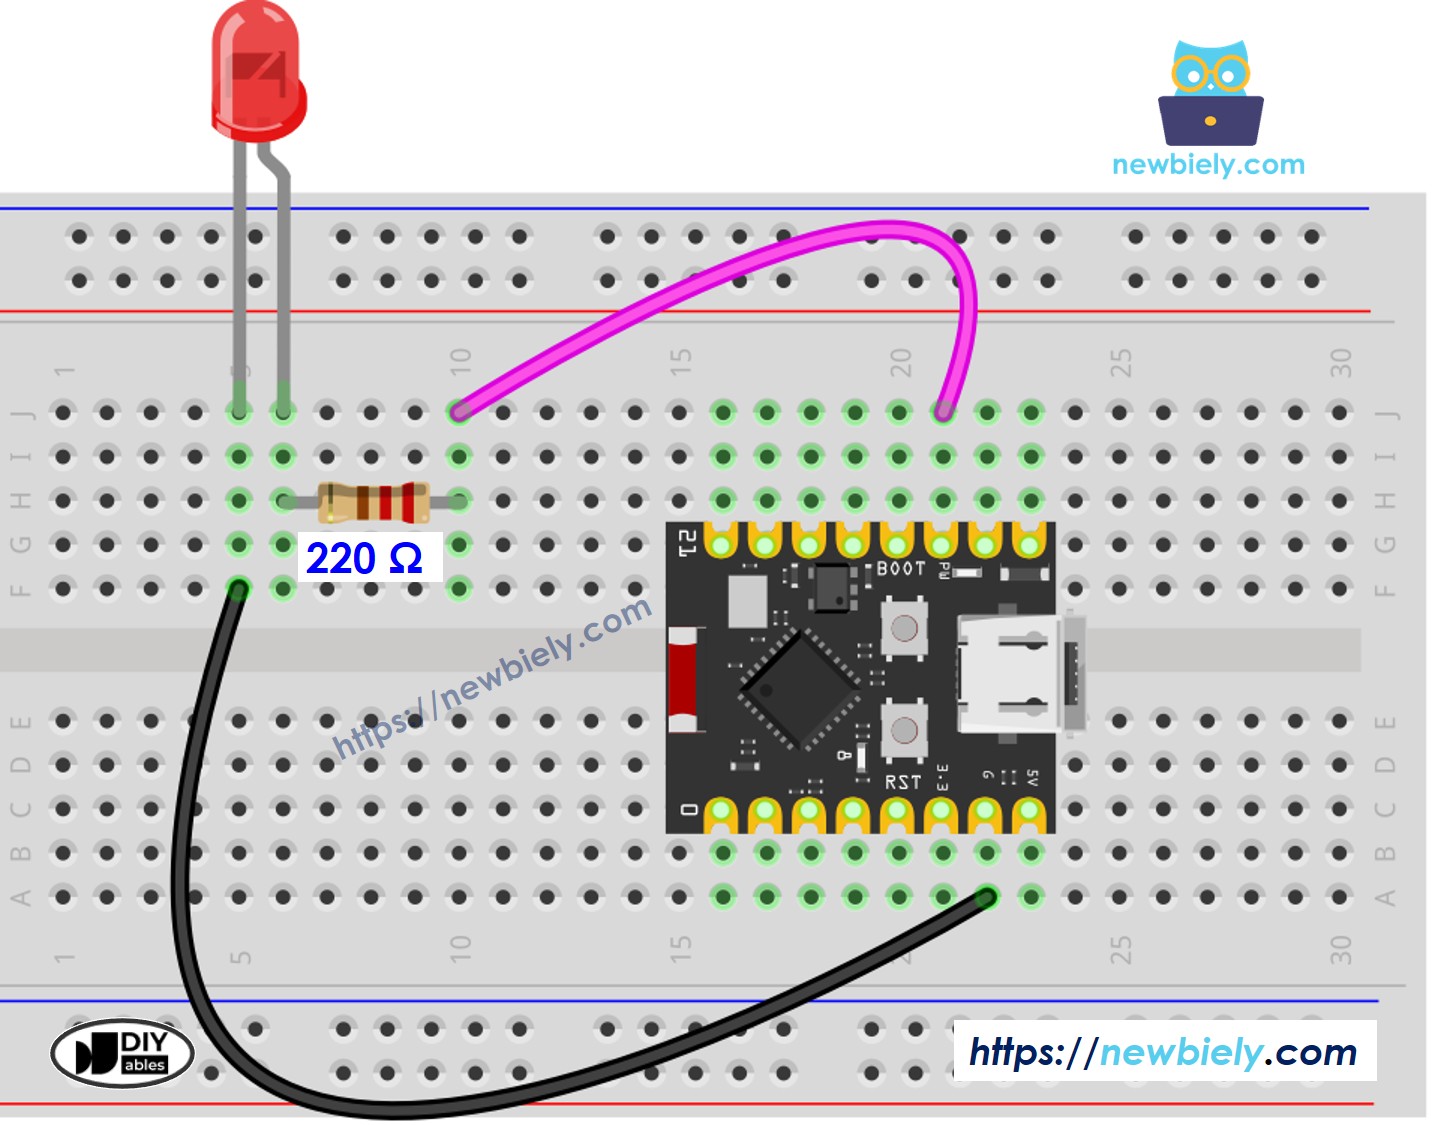
This image is created using Fritzing. Click to enlarge image
How To Program
Programming the ESP32 C3 Super Mini to fade an LED involves these basic steps:
- Configure the pin: Set an ESP32 C3 Super Mini pin as a digital output using pinMode() function (example with pin D7):
- Set LED brightness: Generate a PWM signal with the desired duty cycle using analogWrite() function:
Where brightness is a value from 0 (completely off) to 255 (maximum brightness).
What the code does:
- The pinMode() function prepares pin D7 to send output signals
- The analogWrite() function creates a PWM signal with duty cycle matching the brightness value
- Changing brightness values over time creates the fade effect
- Higher values = brighter LED, lower values = dimmer LED
ESP32 C3 Super Mini Code - Simple Fade Example
This code demonstrates basic LED fading using the delay() function:
What this code does:
- Gradually increases LED brightness from 0 to 255 (fade-in)
- Gradually decreases LED brightness from 255 to 0 (fade-out)
- Uses delay() to control the speed of brightness changes
- Repeats the fade-in and fade-out cycle continuously
Detailed Instructions
- New to ESP32 C3 Mini? Complete our Getting Started with ESP32 C3 Mini tutorial first to set up your development environment.
- Wire the components: Follow the wiring diagram above to connect the LED to pin D7 through a 220 ohm resistor
- Connect the board: Plug your ESP32 C3 Super Mini into your computer using a USB Type-C cable
- Open Arduino IDE: Launch the Arduino IDE software on your computer
- Select board and port: Choose "ESP32 C3 Super Mini" as the board and select the correct COM port
- Copy the code: Copy the code below and paste it into a new Arduino IDE sketch
- Upload the code: Click the Upload button in Arduino IDE to compile and transfer the code to your ESP32 C3 Super Mini
- Observe the result: Watch the LED smoothly fade in and out in a continuous cycle
- Pro Tip: Try changing the delay values to speed up or slow down the fade effect, or modify the brightness increment steps for smoother or more dramatic fading.

Line-by-line Code Explanation
The above ESP32 C3 Super Mini code contains line-by-line explanation. Please read the comments in the code!
※ NOTE THAT:
The above example uses the delay() function to fade-in and fade-out. The delay() function makes the LED fade less smoothly and blocks other code from running during the fade. In the next parts, we will learn how to fade-in and fade-out smoothly without blocking other code by using the millis() function for non-blocking timing control.
How to Fade-in LED in a Period Without Using delay()
This advanced code creates a smooth fade-in effect using millis() for non-blocking timing:
What this code does:
- Fades the LED from off to full brightness over a specified time period
- Uses millis() to track time without blocking other code execution
- Allows other tasks to run simultaneously during the fade
- Provides smoother and more precise fade control than delay()
- Automatically calculates brightness based on elapsed time
How to Fade-out LED in a Period Without Using delay()
This code demonstrates smooth fade-out effects with non-blocking timing control:
What this code does:
- Fades the LED from full brightness to off over a specified duration
- Uses millis() for non-blocking time tracking
- Enables multitasking while the LED fades
- Provides precise control over fade timing and smoothness
- Can be combined with fade-in code for complete fade cycles
Applications and Project Ideas
Use LED fade techniques in these beginner-friendly ESP32 C3 Super Mini projects:
- Breathing night light: Create a soothing ambient light that gently fades in and out
- Status indicator: Show device states with different fade speeds (slow fade = standby, fast fade = processing)
- Alarm clock: Gradually increase LED brightness to simulate sunrise for gentle wake-up
- Music visualizer: Sync LED fade with audio input for simple sound-reactive lighting
- Smart home mood lighting: Control LED brightness remotely with fade effects for atmosphere
- Battery level indicator: Use fade speed to represent remaining battery charge (slow = full, fast = low)
Video Tutorial
Watch the video below for a visual walkthrough of this project.
Challenge Yourself
Take your LED fade skills to the next level with these challenges:
- Easy: Modify the fade speed to create a slow, relaxing breathing effect over 5 seconds
- Easy: Change the code to fade between two different brightness levels instead of 0 to 255
- Medium: Control multiple LEDs with different fade patterns running simultaneously without blocking
- Medium: Add a button to start/stop the fade effect or switch between different fade speeds
- Advanced: Create a rainbow fade effect using RGB LEDs with overlapping color transitions
- Advanced: Implement a fade pattern that responds to sensor input (like light levels or temperature)