ESP32 C3 Super Mini - Serial Monitor
The Serial Monitor is an essential debugging tool in Arduino IDE that lets you communicate with your ESP32 C3 Super Mini board. This tutorial shows you how to send data between your ESP32 C3 Super Mini and your computer for easy debugging and control.
In this tutorial, you'll learn:
- What the Serial Monitor is and why it's useful
- How to open and use the Serial Monitor in Arduino IDE
- How to send data from ESP32 C3 Super Mini to your PC
- How to send commands from your PC to ESP32 C3 Super Mini
- How to control the built-in LED using Serial Monitor commands

Hardware Preparation
| 1 | × | ESP32 C3 Super Mini | |
| 1 | × | USB Cable Type-A to Type-C (for USB-A PC) | |
| 1 | × | USB Cable Type-C to Type-C (for USB-C PC) | |
| 1 | × | Optionally, DC Power Jack | |
| 1 | × | Breadboard | |
| 1 | × | Jumper Wires |
Or you can buy the following kits:
| 1 | × | DIYables Sensor Kit (18 sensors/displays) |
Additionally, some of these links are for products from our own brand, DIYables .
Overview of Serial Monitor
The Serial Monitor is a communication window built into Arduino IDE that lets you exchange data with your ESP32 C3 Super Mini.
Key Features:
- ESP32 C3 Super Mini to PC: Your code sends data via Serial to the Serial Monitor for debugging and monitoring
- PC to ESP32 C3 Super Mini: You can send commands or data from your PC to control the ESP32 C3 Super Mini
- USB Connection: Uses the same USB Type-C cable that uploads code to your board
- Real-time Communication: See sensor readings, debug messages, and program status instantly
- Beginner-Friendly: Essential tool for learning and troubleshooting ESP32 C3 Super Mini projects
How To Use Serial Monitor
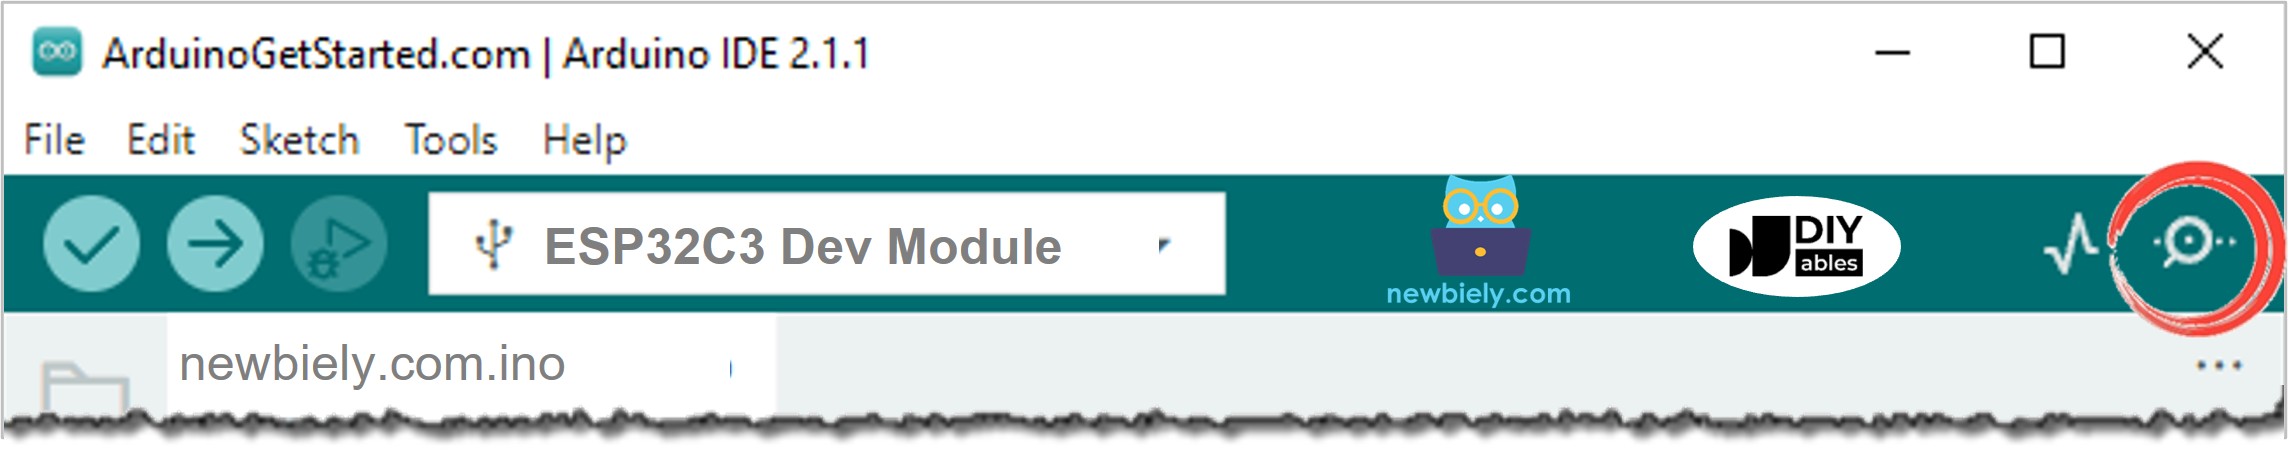
Open Serial Monitor
You can open the Serial Monitor by clicking the icon on the Arduino IDE toolbar as shown below:
Components on Serial Monitor
The Serial Monitor interface has 8 main components for ESP32 C3 Super Mini communication:
1. Output Console: Displays all data received from your ESP32 C3 Super Mini board
2. Autoscroll Checkbox: Enable or disable automatic scrolling of the output console
3. Show Timestamp Checkbox: Adds timestamps before each line of data
4. Clear Output Button: Clears all text from the output console
5. Baud Rate Selection: Sets the communication speed between PC and ESP32 C3 Super Mini (must match the value in Serial.begin())
6. Textbox: Type characters here to send to your ESP32 C3 Super Mini board
7. Ending Selection: Selects the ending characters appended to sent data
- No line ending: Adds nothing
- Newline: Adds newline (LF, or '\n') character
- Carriage return: Adds carriage return (CR, or '\r') character
- Both NL and CR: Adds both newline and carriage return characters
8. Send Button: Sends the text from the textbox plus ending characters to ESP32 C3 Super Mini
ESP32 C3 Super Mini To PC
Follow these steps to send data from your ESP32 C3 Super Mini to the Serial Monitor on your PC:
Initialize Serial Communication:
- Set the baud rate using Serial.begin() function
Send Data to Serial Monitor:
- Use one of these functions to send data:
- Serial.print() - Sends data without a newline
- Serial.println() - Sends data with a newline
- Serial.write() - Sends raw bytes
- New to ESP32 C3 Mini? Complete our Getting Started with ESP32 C3 Mini tutorial first to set up your development environment.
- Copy the Code: Copy the above code and paste it into Arduino IDE
- Upload Code: Click the Upload button to upload code to your ESP32 C3 Super Mini board
- Open Serial Monitor: Click the Serial Monitor icon in Arduino IDE
- Set Baud Rate: Select baud rate 115200 from the dropdown menu
- View Output: See the repeating message on Serial Monitor
- Experiment: Try changing Serial.println() to Serial.print() and observe the difference
- Pro Tip: Always match the baud rate in your code with the Serial Monitor setting to avoid garbled output
Example:
Example Use
This example sends "newbiely.com" from the ESP32 C3 Super Mini to Serial Monitor every second:
Detailed Instructions
PC To ESP32 C3 Super Mini
How to Send Data from PC to ESP32 C3 Super Mini
On the PC:
- Type text in the Serial Monitor textbox
- Click the Send button to transmit
In Your ESP32 C3 Super Mini Code:
Initialize Serial:
Check for Incoming Data:
Read Data Using These Functions:
- Serial.read() - Reads one byte
- Serial.readBytes() - Reads multiple bytes
- Serial.readBytesUntil() - Reads until a delimiter
- Serial.readString() - Reads entire string
- Serial.readStringUntil() - Reads string until delimiter
Example:
Example Use
This ESP32 C3 Super Mini example reads commands from Serial Monitor to control the built-in LED:
- Command "ON" turns the LED on
- Command "OFF" turns the LED off
How Commands Work:
- The ESP32 C3 Super Mini needs a terminator to know when a command ends
- We use the newline character ('\n') as the terminator
- Select "Newline" option in Serial Monitor before sending commands
- The ESP32 C3 Super Mini reads data until it encounters the newline character
Detailed Instructions
- New to ESP32 C3 Mini? Complete our Getting Started with ESP32 C3 Mini tutorial first to set up your development environment.
- Copy the Code: Copy the above code and paste it into Arduino IDE
- Upload Code: Click the Upload button to upload to ESP32 C3 Super Mini
- Open Serial Monitor: Click the Serial Monitor icon in Arduino IDE
- Configure Settings: Select baud rate 115200 and "Newline" ending option
- Send Command: Type "ON" in the textbox and click Send
- Check LED: Observe the built-in LED on your ESP32 C3 Super Mini turns on
- Test OFF Command: Type "OFF" and click Send
- Verify Response: See the LED state changes on the board and confirmation messages in Serial Monitor
- Pro Tip: Remember to select the correct line ending option (Newline) or your commands won't be recognized properly
Troubleshooting
To get your serial monitor working, apply these quick fixes:
1. Enable USB CDC on Boot
Because the ESP32-C3 uses native USB, it won't route print statements to your PC unless this specific setting is turned on.
- In the Arduino IDE, go to Tools.
- Ensure USB CDC On Boot is set to Enabled.
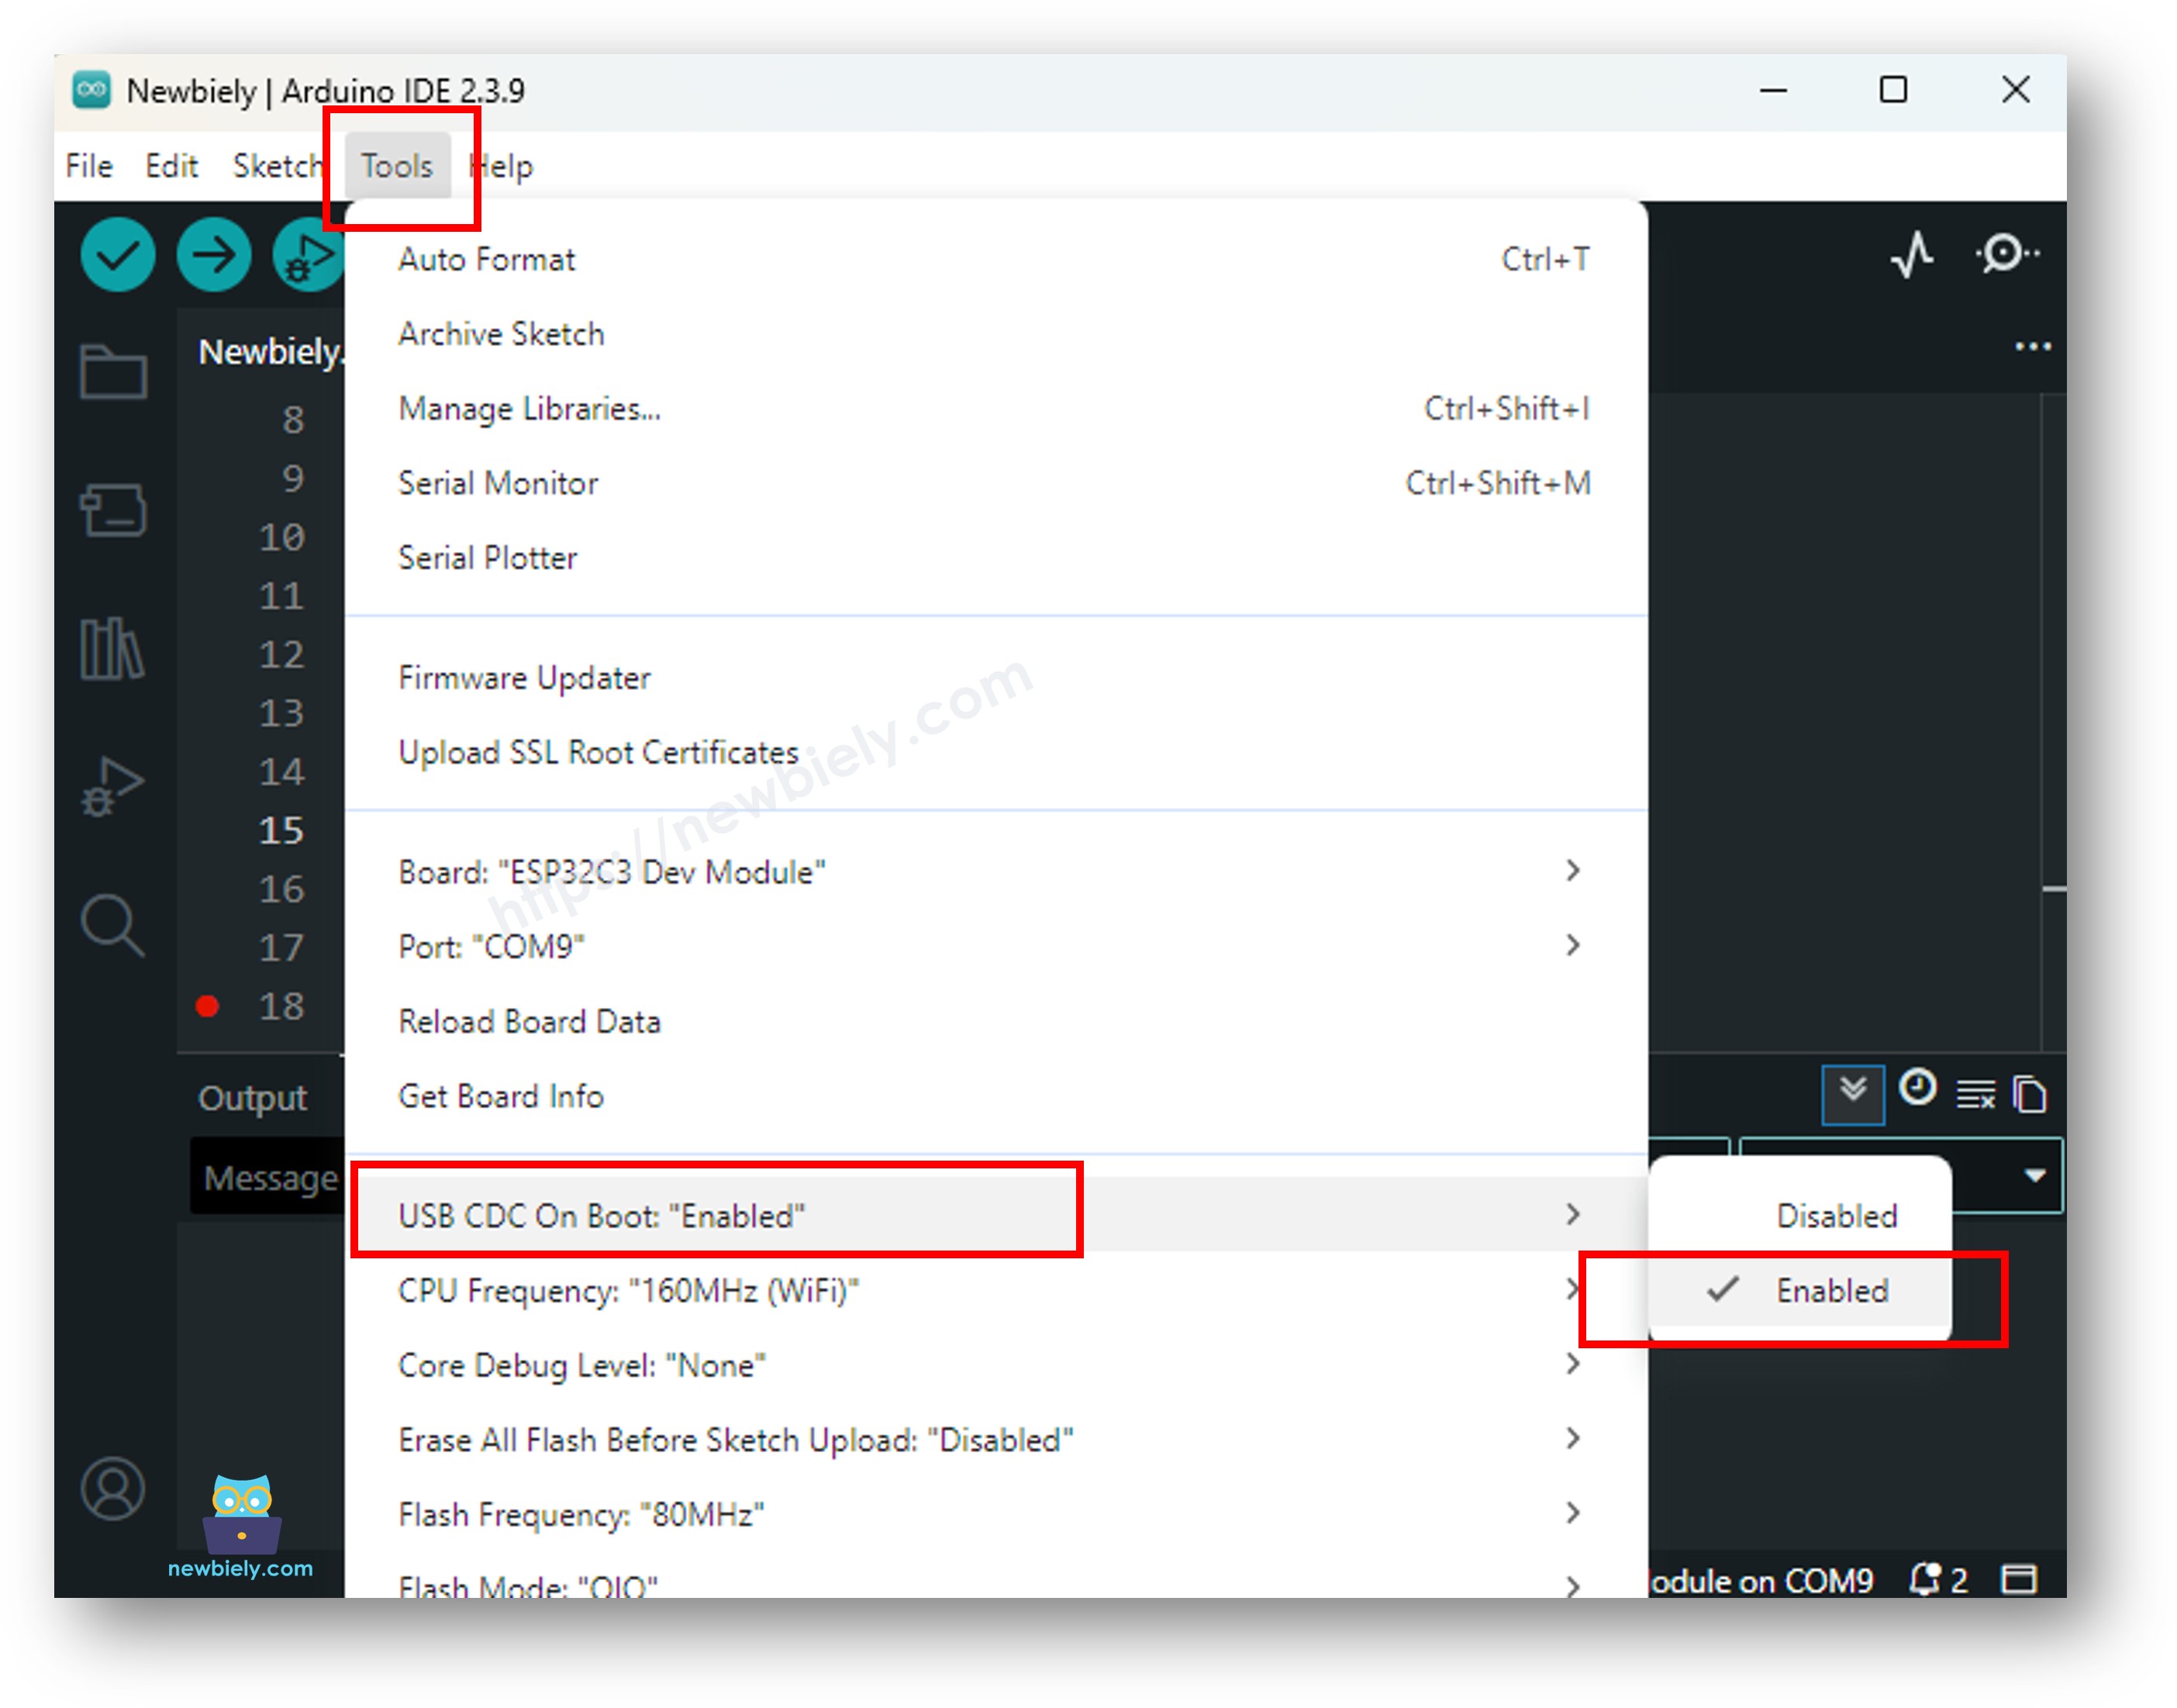
- Re-upload your code to the board after changing this setting.
2. Match the Baud Rate
If your monitor is open but blank—or showing gibberish—your baud rate settings aren't communicating at the same speed.
- In your code, set a standard speed, such as Serial.begin(115200);.
- Open the Serial Monitor and look at the bottom right corner of the window. Change the dropdown menu to match your code exactly (e.g., 115200 baud)
Application Ideas
Here are some practical projects you can build using Serial Monitor with ESP32 C3 Super Mini:
- Control home automation devices by sending ON/OFF commands via Serial Monitor
- Debug sensor readings in real-time for temperature, humidity, or motion sensors
- Create an interactive menu system to configure ESP32 C3 Super Mini settings
- Monitor system status and error messages during development
- Build a simple data logger that sends readings to your PC
- Create a remote control interface for robotics projects
Video Section
Watch the video below for a visual walkthrough of this project.
Challenge Yourself
Try these challenges to improve your ESP32 C3 Super Mini Serial Monitor skills:
- Easy: Modify the code to accept three commands: ON, OFF, and BLINK (make LED blink 5 times)
- Easy: Add a command to report the current LED status (send "STATUS" to get "LED is ON" or "LED is OFF")
- Medium: Create a brightness control using PWM - send values 0-255 to control LED brightness
- Medium: Build a command parser that accepts multiple parameters (e.g., "LED:1:ON" or "LED:2:OFF")
- Advanced: Implement a serial command menu system with help text and error handling for invalid commands