ESP32 C3 Super Mini - DHT22
Learn how to use the ESP32 C3 Super Mini with a DHT22 sensor to measure temperature and humidity. This beginner-friendly tutorial covers both DHT22 sensor and module versions with complete wiring diagrams and code examples.
In this tutorial, you'll learn:
- What the DHT22 temperature and humidity sensor is and how it works
- How to wire the DHT22 sensor and module to ESP32 C3 Super Mini
- How to program the ESP32 C3 Super Mini to read temperature and humidity data
- How to display readings on the Serial Monitor
- The differences between DHT22 sensor and DHT22 module
Hardware Preparation
Or you can buy the following kits:
| 1 | × | DIYables Sensor Kit (18 sensors/displays) |
Additionally, some of these links are for products from our own brand, DIYables .
Overview of DHT22 Temperature and Humidity Sensor
The DHT22 is a digital temperature and humidity sensor that provides reliable environmental readings for your ESP32 C3 Super Mini projects.
Key specifications:
- Operating voltage: 3V to 5V (compatible with ESP32 C3 Super Mini)
- Humidity measurement range: 0% to 100%
- Humidity accuracy: ±2% to 5%
- Temperature measurement range: -40°C to 80°C
- Temperature accuracy: ±0.5°C
- Reading rate: 0.5Hz (one reading every 2 seconds)
Why DHT22 is great for beginners:
- Simple digital interface - easy to connect and program
- Pre-built Arduino libraries available for quick setup
- Accurate readings suitable for most home projects
- Available as both raw sensor and convenient module format
| DHT22 | |
|---|---|
| Operating Voltage | 3 to 5V |
| The humidity range | 0% to 100% |
| The humidity accuracy | ± 2% to 5% |
| The temperature range | -40°C to 80°C |
| The temperature accuracy | ± 0.5°C |
| The reading rate | 0.5Hz (one time per 2 seconds) |
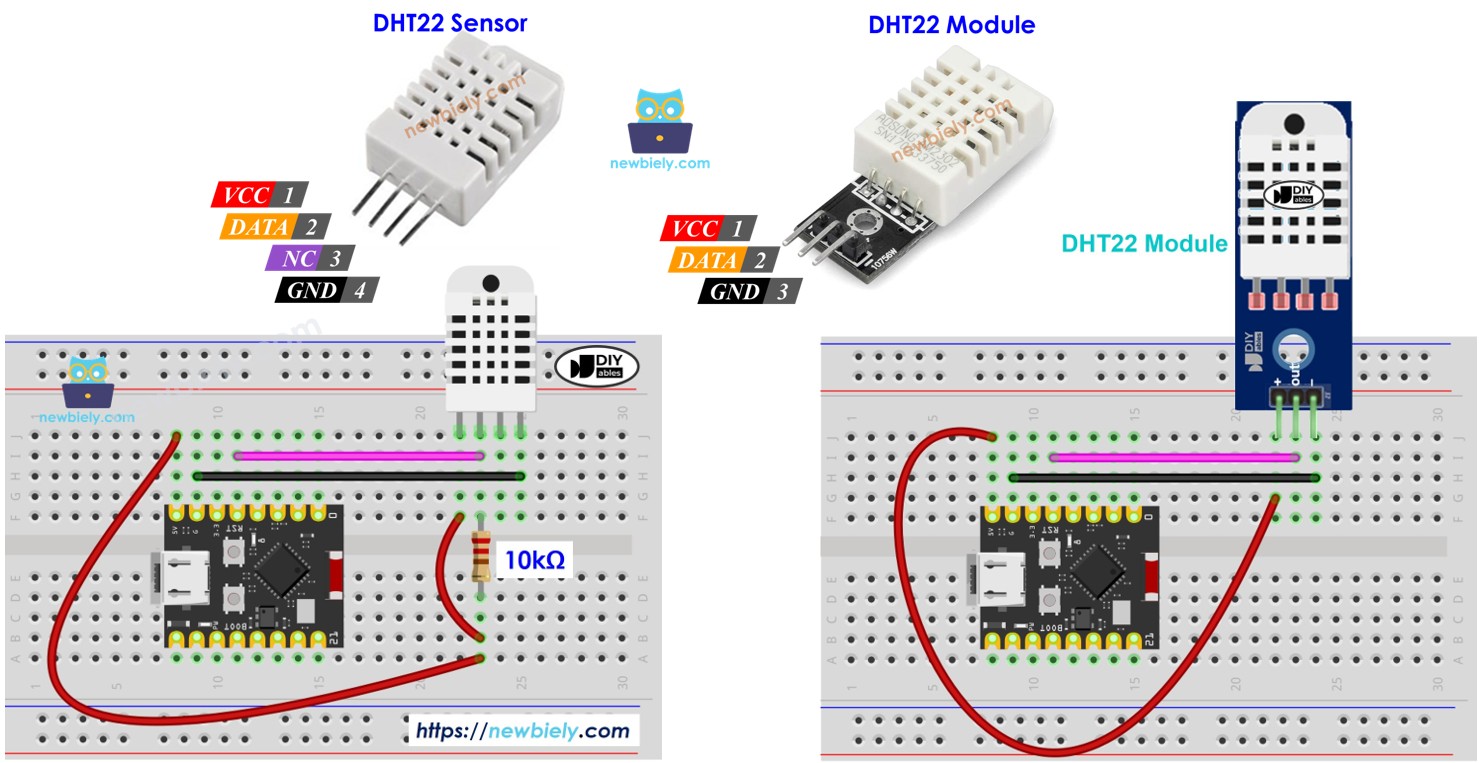
DHT22 Pinout
The DHT22 comes in two forms: a raw sensor with 4 pins and a convenient module with 3 pins.
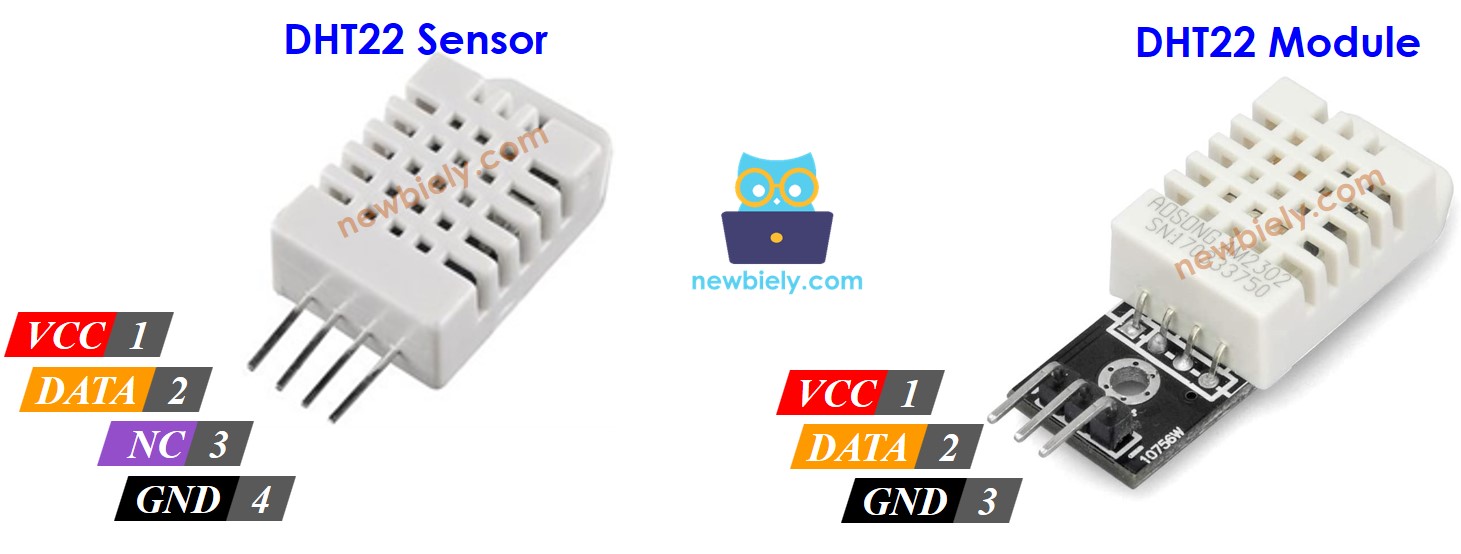
DHT22 raw sensor pins (4 pins):
- GND pin: Connect to GND (0V)
- VCC pin: Connect to VCC (3.3V or 5V)
- DATA pin: Communication pin between sensor and ESP32 C3 Super Mini
- NC pin: Not connected (leave unconnected)
DHT22 module pins (3 pins):
- VCC (or +): Connect to 3.3V or 5V
- GND (or -): Connect to GND
- DATA (or OUT): Communication pin to ESP32 C3 Super Mini
Note: The DHT22 module includes a built-in pull-up resistor, making wiring simpler for beginners.
Wiring Diagram between DHT22 and ESP32 C3 Super Mini
Here's how to connect the DHT22 sensor to your ESP32 C3 Super Mini board.
- Note: When using the raw DHT22 sensor, a 10kΩ pull-up resistor is required between DATA and VCC pins for reliable communication.
ESP32 C3 Super Mini - DHT22 Sensor Wiring
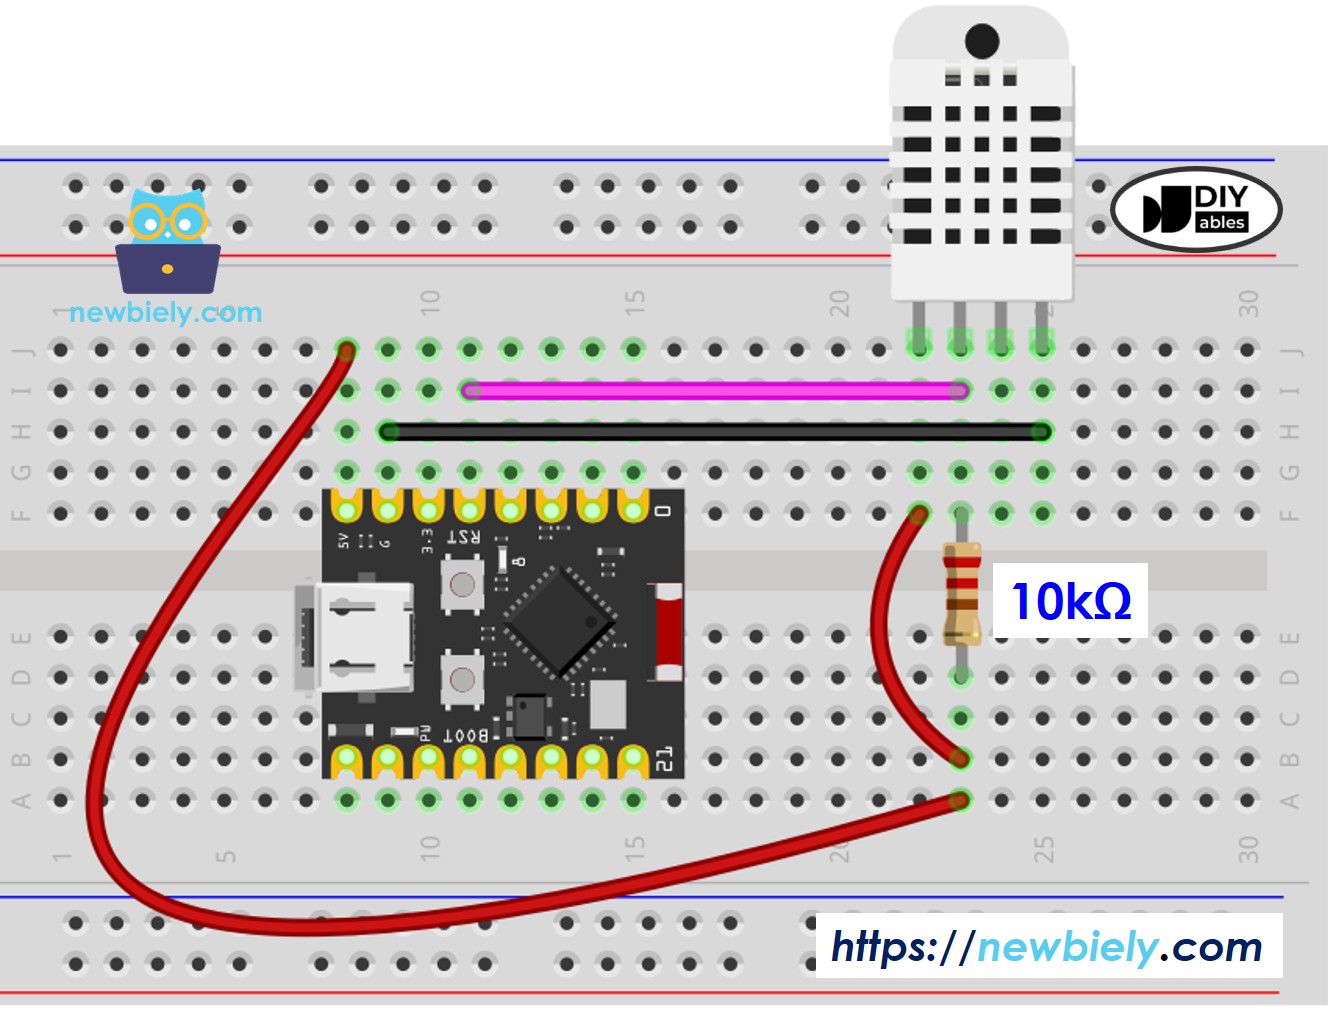
This image is created using Fritzing. Click to enlarge image
| DHT22 Sensor Pin | ESP32 C3 Super Mini Pin |
|---|---|
| VCC | 3.3V or 5V |
| GND | GND |
| DATA | D4 (or any digital pin) |
| 10kΩ Resistor | Between DATA and VCC |
ESP32 C3 Super Mini - DHT22 Module Wiring
The DHT22 module simplifies wiring by including the pull-up resistor internally - no external resistor needed!
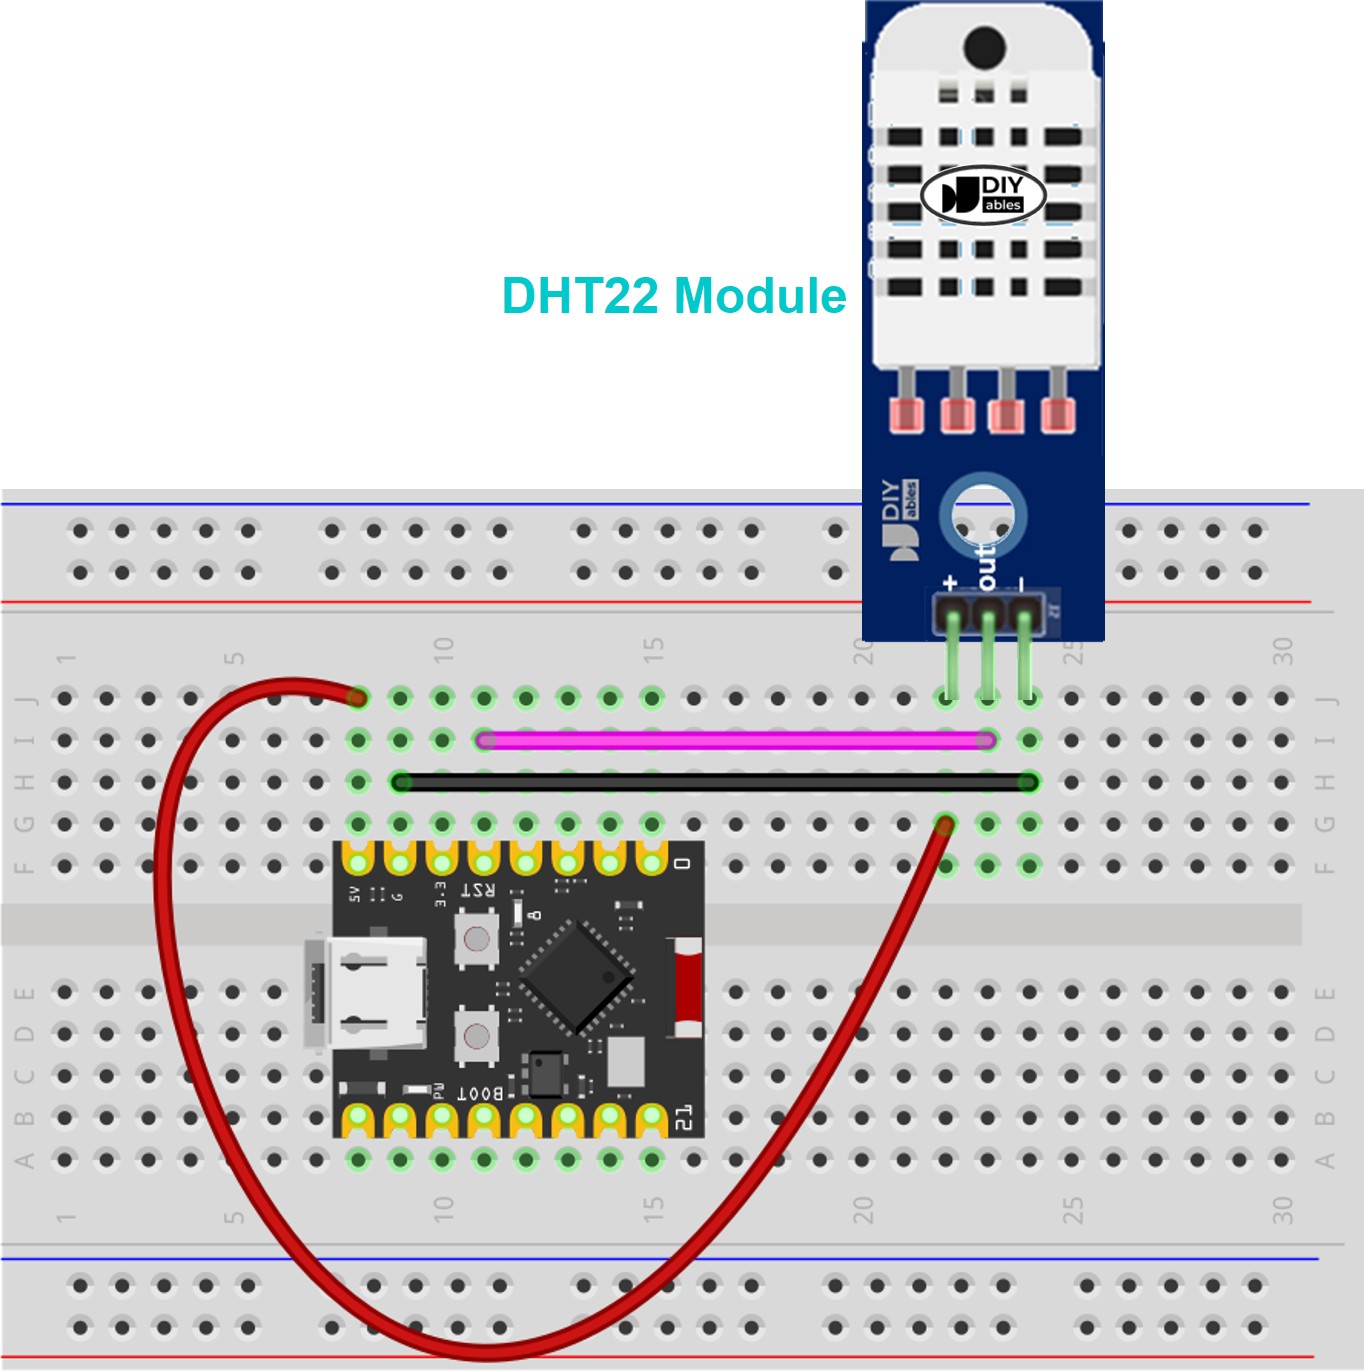
This image is created using Fritzing. Click to enlarge image
| DHT22 Module Pin | ESP32 C3 Super Mini Pin |
|---|---|
| VCC (or +) | 3.3V or 5V |
| GND (or -) | GND |
| DATA (or OUT) | D4 (or any digital pin) |
ESP32 C3 Super Mini Code - DHT22
Here's the code to read temperature and humidity from the DHT22 sensor using your ESP32 C3 Super Mini.
This code does the following:
- Initializes the DHT22 sensor on the specified pin
- Reads humidity and temperature values every 2 seconds
- Converts temperature to both Celsius and Fahrenheit
- Displays formatted readings on the Serial Monitor
- Includes error checking for failed sensor readings
Detailed Instructions
- New to ESP32 C3 Super Mini? Start with our ESP32 C3 Super Mini Getting Started guide first.
- Prepare the wiring: Connect the DHT22 sensor or module to your ESP32 C3 Super Mini according to the wiring diagram above.
- Connect to computer: Plug the ESP32 C3 Super Mini into your computer using a USB Type-C cable.
- Open Arduino IDE: Launch the Arduino IDE on your computer.
- Select your board: Choose ESP32 C3 Super Mini from the board selector and select the correct COM port.
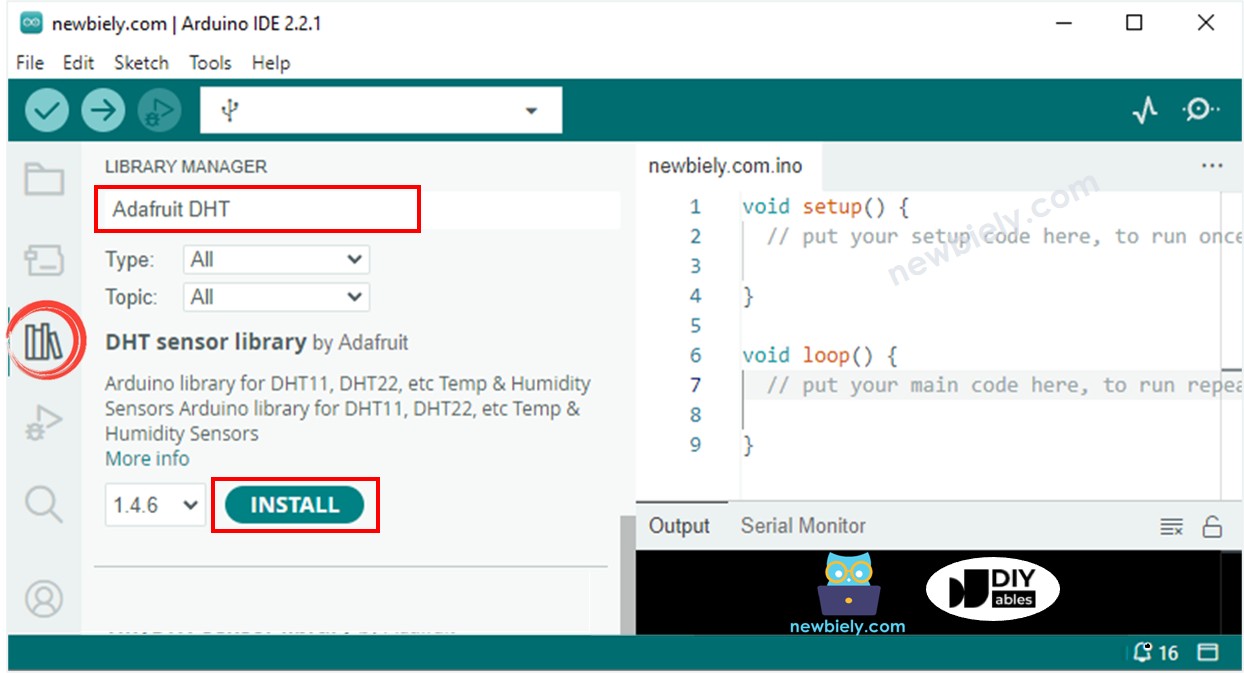
- Install DHT library: Click the Library Manager icon on the left sidebar of Arduino IDE.
- Search for library: Type "DHT" in the search box and find the DHT sensor library by Adafruit.
- Install the library: Click the Install button next to the Adafruit DHT library.
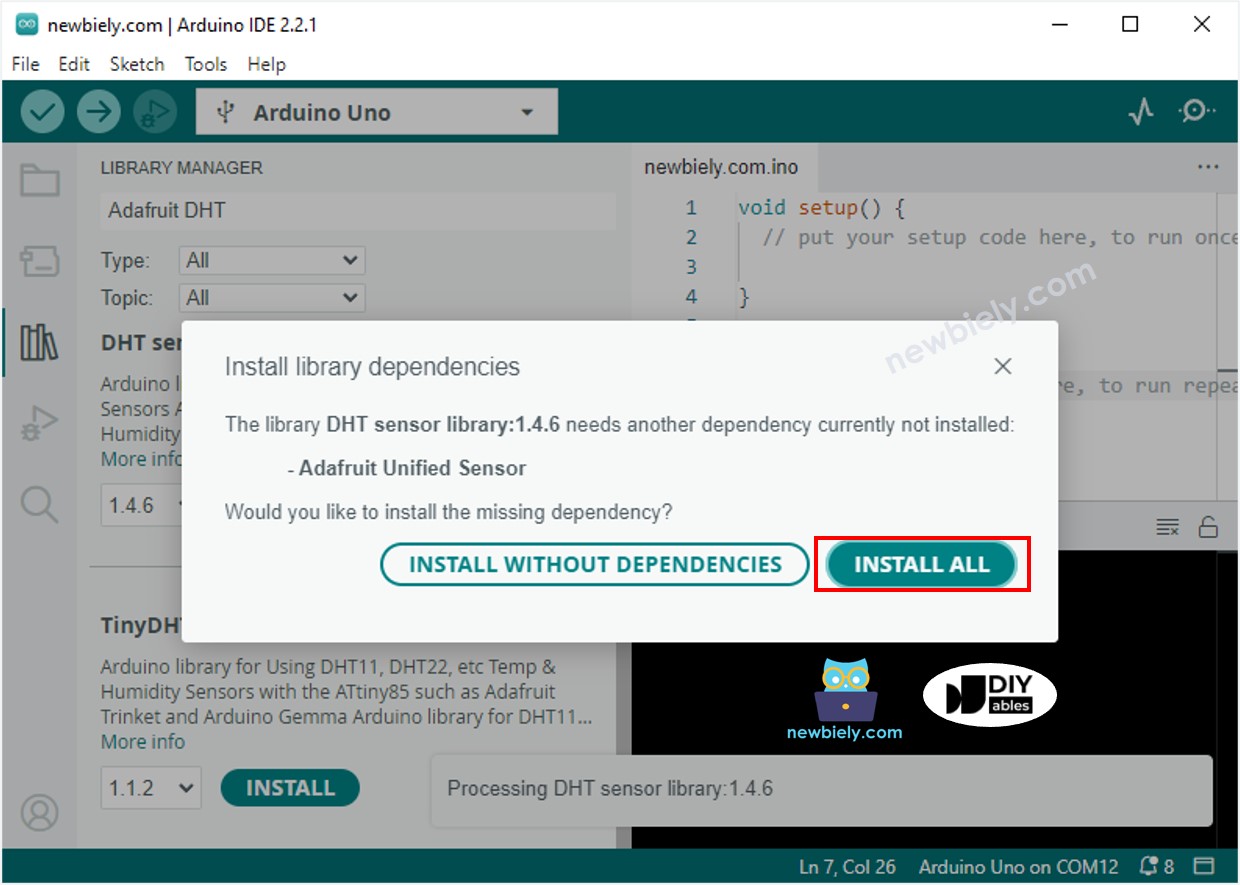
- Install dependencies: When prompted, click Install All to install all required dependencies (including Adafruit Unified Sensor library).
- Upload the code: Copy the code above, paste it into Arduino IDE, and click the Upload button.
- Test the sensor: Try changing the temperature around the DHT22 (place it near a hot cup or use a fan to cool it).
- View readings: Open the Serial Monitor (set to 115200 baud) to see live temperature and humidity readings.
- Pro Tip: Wait at least 2 seconds between readings - the DHT22 sensor updates at a maximum rate of 0.5Hz.
Serial Monitor Output
Applications and Project Ideas
Use your ESP32 C3 Super Mini with DHT22 sensor to build these practical projects:
- Home weather station: Monitor indoor temperature and humidity with data logging
- Smart greenhouse controller: Automatically adjust ventilation based on humidity levels
- Comfort monitor: Alert when room conditions exceed comfortable ranges
- Server room monitoring: Track temperature to prevent overheating in equipment rooms
- DIY thermostat: Create a smart temperature control system for your home
- Pet habitat monitor: Ensure optimal conditions for reptiles or other sensitive pets
- Indoor air quality tracker: Combine with other sensors for comprehensive environmental monitoring
Video Tutorial
Watch the video below for a visual walkthrough of this project.
Challenge Yourself
Take your ESP32 C3 Super Mini and DHT22 skills to the next level with these challenges:
- Easy: Add an LED that turns on when temperature exceeds 25°C
- Easy: Display a "Too Humid" warning when humidity goes above 70%
- Medium: Log temperature and humidity data to an SD card with timestamps
- Medium: Send readings to a smartphone using Bluetooth or WiFi
- Advanced: Create a web server that displays real-time temperature and humidity graphs
- Advanced: Build a dual-zone monitoring system using two DHT22 sensors and compare readings