ESP32 C3 Super Mini - Water Sensor
Learn how to interface a water level sensor with your ESP32 C3 Super Mini to detect water leakage, rainfall, tank overflow, and measure water levels in this beginner-friendly Arduino tutorial.
In this tutorial, you'll learn:
- What a water level sensor is and how it works with ESP32
- How to wire the water sensor to ESP32 C3 Super Mini
- How to read analog values from the water sensor
- How to detect water leakage and measure water levels
- How to calibrate your sensor for accurate readings
Hardware Preparation
| 1 | × | ESP32 C3 Super Mini | |
| 1 | × | USB Cable Type-A to Type-C (for USB-A PC) | |
| 1 | × | USB Cable Type-C to Type-C (for USB-C PC) | |
| 1 | × | Water level sensor | |
| 1 | × | Breadboard | |
| 1 | × | Jumper Wires | |
| 1 | × | Optionally, DC Power Jack |
Or you can buy the following kits:
| 1 | × | DIYables Sensor Kit (18 sensors/displays) |
Additionally, some of these links are for products from our own brand, DIYables .
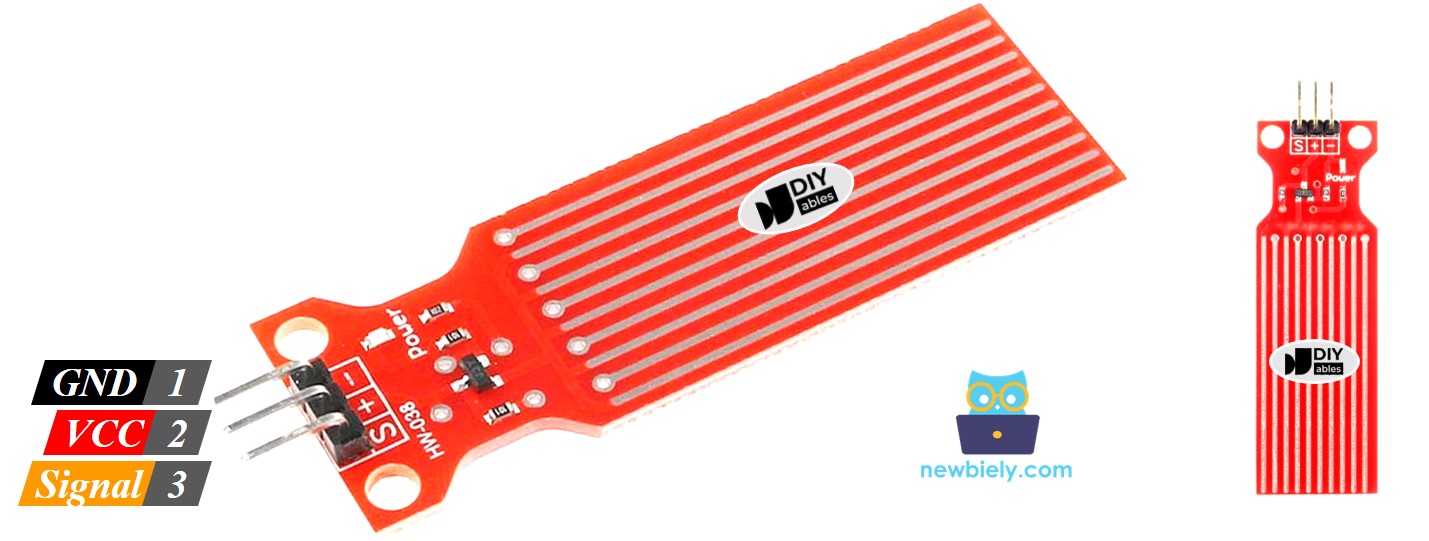
Overview of Water Level Sensor
A water level sensor is an analog sensor that detects the presence and depth of water by measuring resistance between exposed traces.
Key Features:
- Outputs analog voltage proportional to water depth
- Works with 3.3V or 5V power supply
- Simple analog interface for easy ESP32 integration
- Cost-effective solution for water detection projects
- Ideal for beginners learning analog sensor interfacing
Why Use It:
- Perfect for leak detection systems
- Great for learning analog input reading on ESP32
- Enables rainfall monitoring applications
- Suitable for tank overflow prevention projects
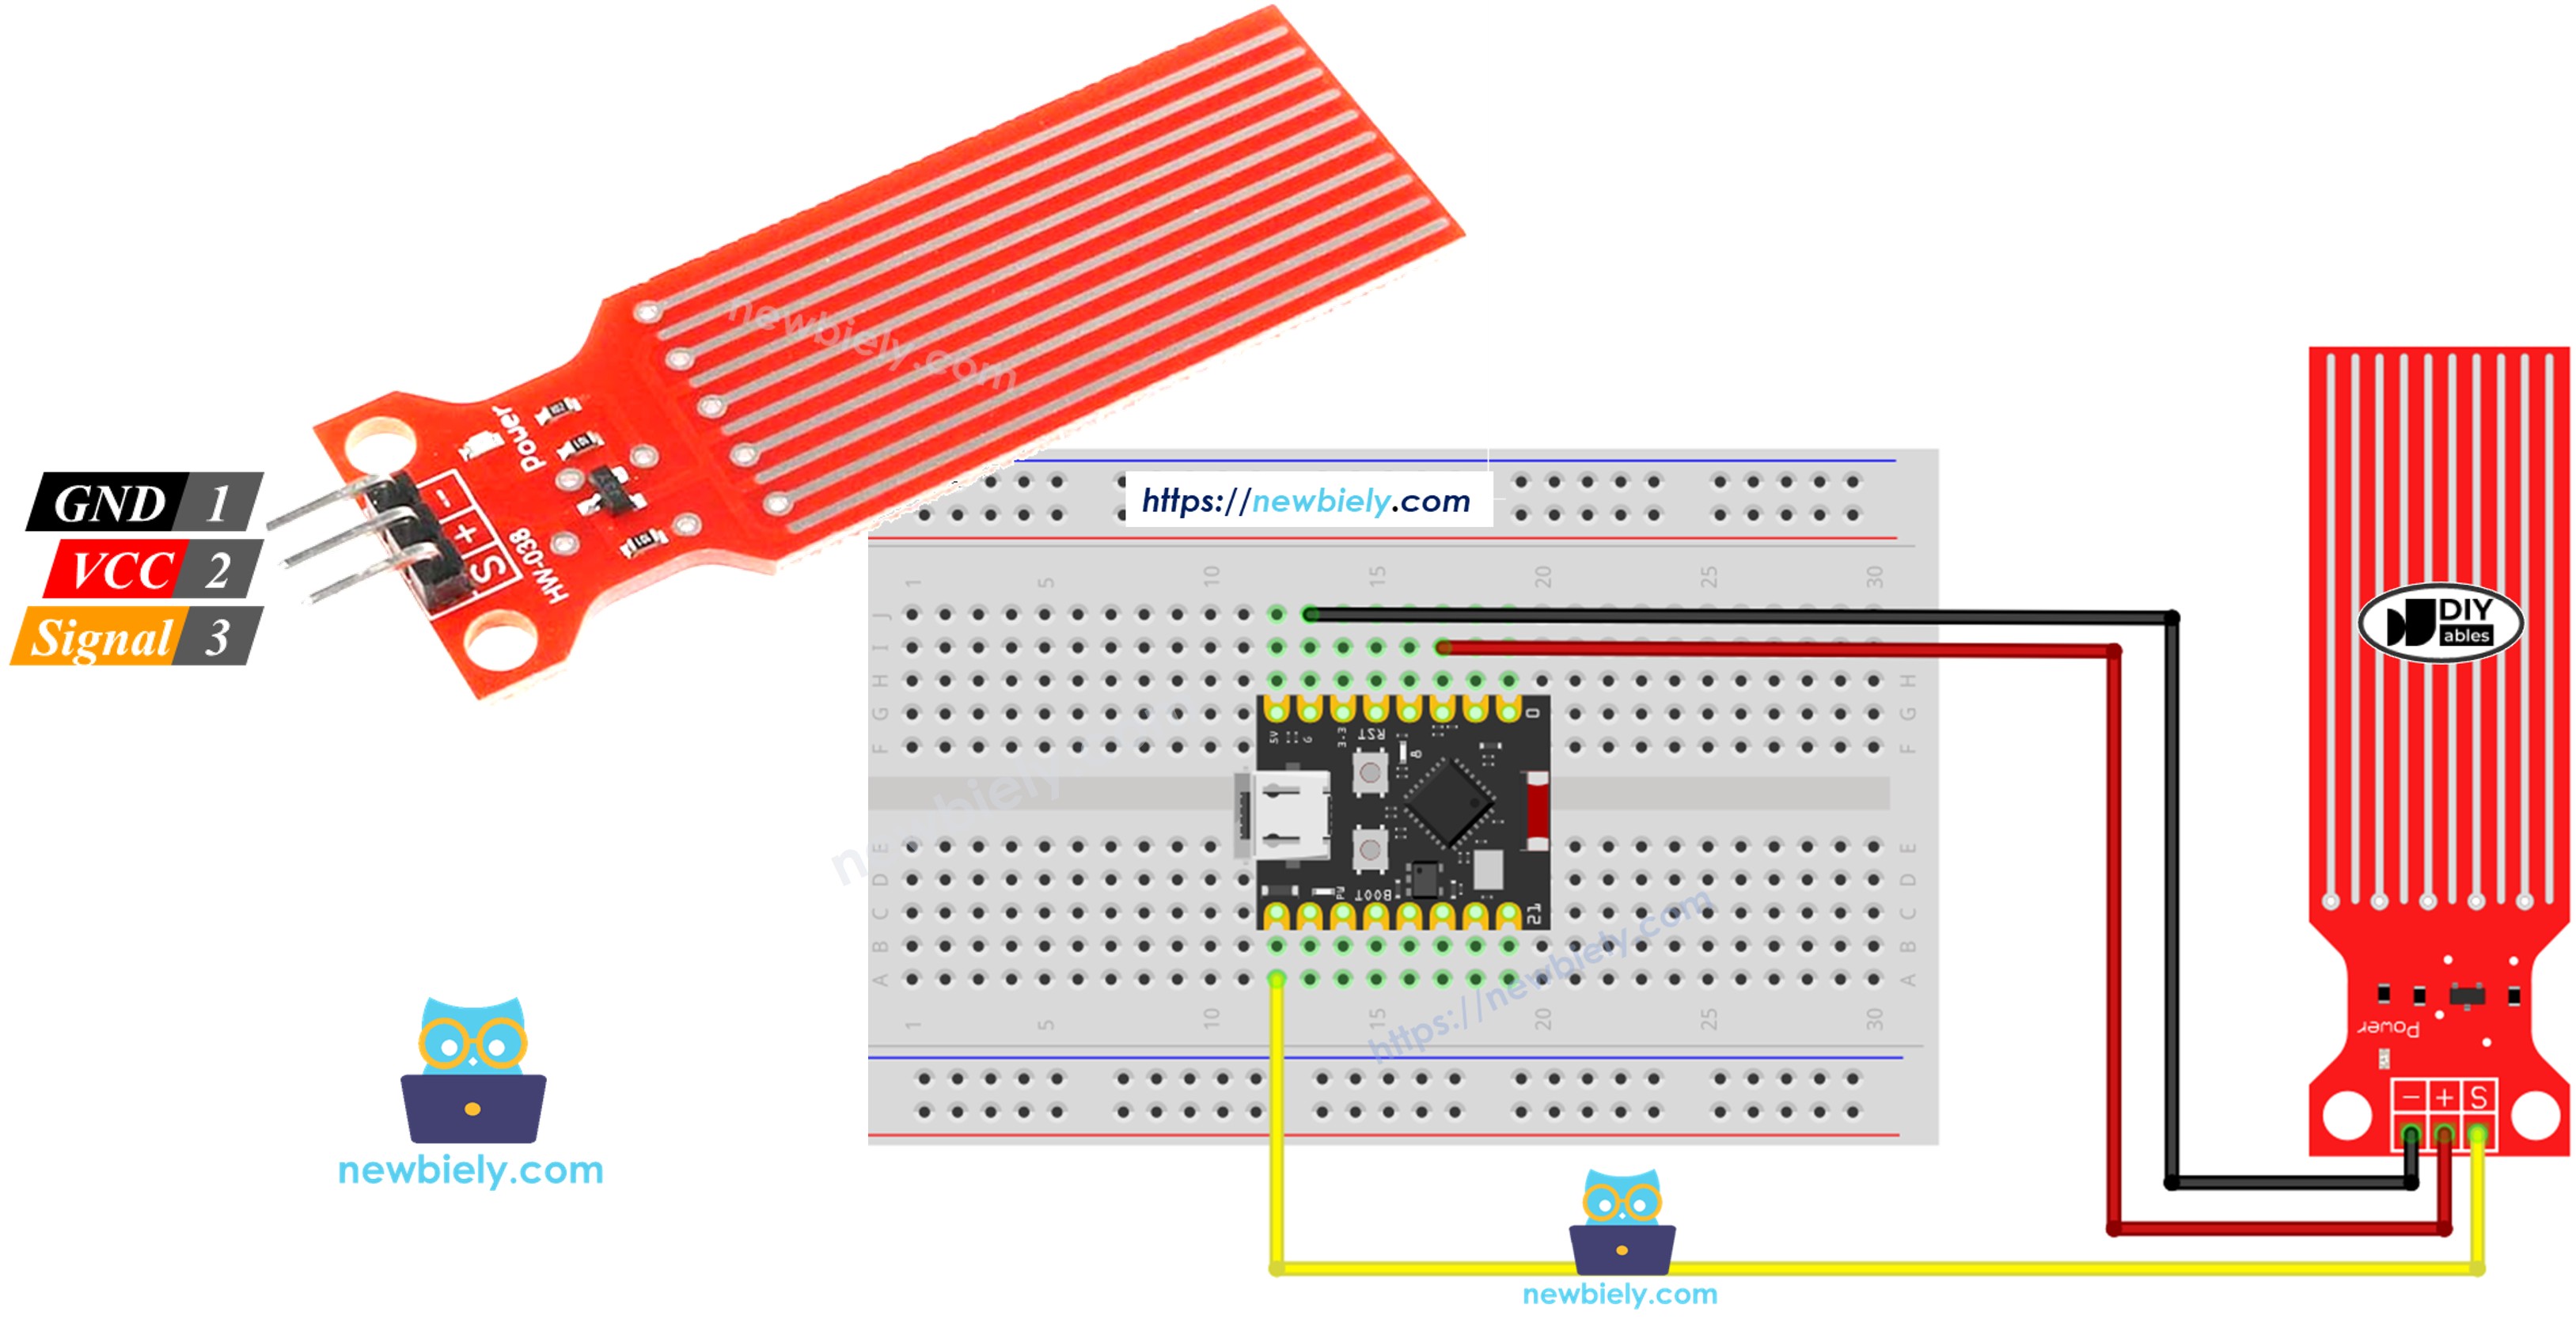
Water Level Sensor Pinout
The water level sensor has three pins for easy connection to your ESP32 C3 Super Mini:
- S (Signal) pin: Outputs analog voltage proportional to water level - connect to ESP32 analog input pin
- + (VCC) pin: Power supply pin - connect to 3.3V or 5V
- - (GND) pin: Ground pin - connect to GND
How Water Level Sensor Works
The water sensor operates on a simple principle of electrical conductivity:
- The more water covering the exposed traces, the higher the output voltage
- Dry sensor produces near-zero voltage output
- Fully submerged traces produce maximum voltage
- ESP32 reads this analog voltage to determine water level
Wiring Diagram
Here's how to connect your water sensor to the ESP32 C3 Super Mini for optimal performance and longevity.
Important Power Management:
- Note: Constant power to the sensor causes electrochemical corrosion in moist environments
- Note: Connect VCC to a digital pin instead of 3.3V for power control
- Note: Turn power ON only when reading, then OFF to extend sensor lifespan
- Note: Only the exposed traces should touch water - never fully submerge the sensor
| Water Sensor Pin | ESP32 C3 Super Mini Pin |
|---|---|
| S (Signal) | GPIO2 (Analog Input) |
| + (VCC) | GPIO3 (Digital Output for Power Control) |
| * (GND) | GND |
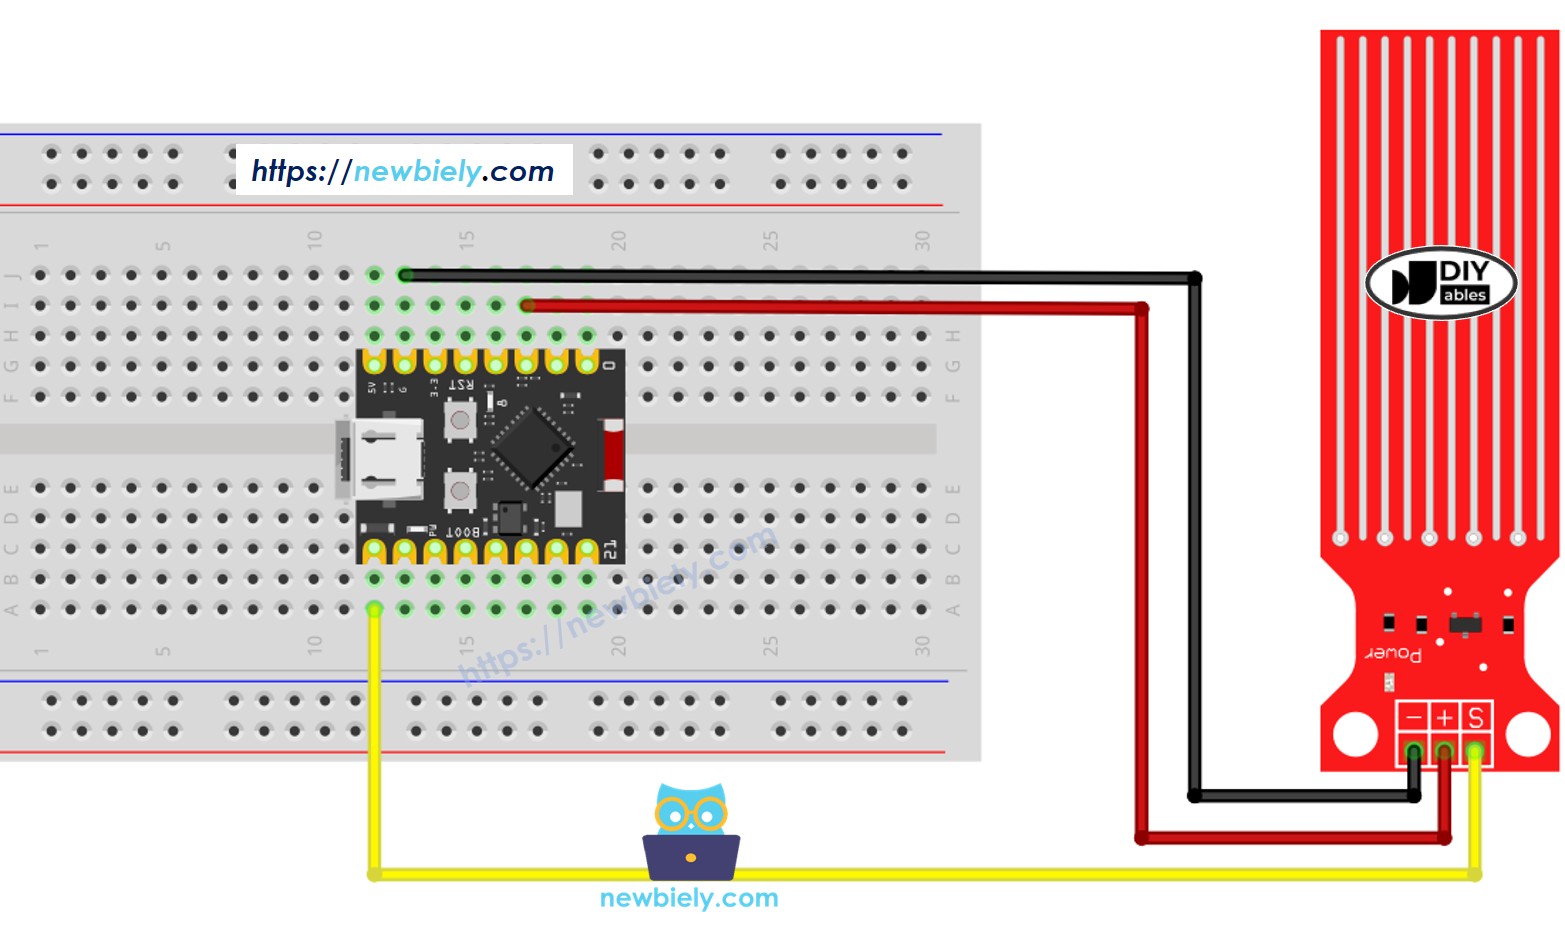
This image is created using Fritzing. Click to enlarge image
ESP32 C3 Super Mini Code - Reading Value from Water Sensor
This Arduino sketch reads analog values from the water sensor using the ESP32 C3 Super Mini.
What the code does:
- Powers the sensor ON only during readings
- Reads analog voltage from the sensor
- Converts analog reading to a numerical value
- Displays water level values on Serial Monitor
- Powers the sensor OFF after reading to prevent corrosion
Detailed Instructions
- New to ESP32 C3 Mini? Complete our Getting Started with ESP32 C3 Mini tutorial first to set up your development environment.
- Upload the Code: Copy the code above and paste it into Arduino IDE
- Compile and Upload: Click the Upload button to program your ESP32 C3 Super Mini
- Prepare Your Test: Get a glass of water for testing the sensor
- Test the Sensor: Slowly dip the sensor into the water starting from the bottom traces
- Open Serial Monitor: Set baud rate to 115200 to view readings
- Observe Values: Watch values increase as more traces contact water
- Pro Tip: Keep the sensor's PCB electronics above water - only dip the exposed sensing traces
※ NOTE THAT:
The water sensor is not designed to be completely sank, only the exposed traces on the PCB can embed into the water. Please be careful to install it.
How To Detect Water Leakage
Water leakage detection is achieved by comparing the sensor reading against a threshold value determined during calibration.
Detection Applications:
- Water leak detection in basements or appliances
- Rainfall monitoring for weather stations
- Tank overflow prevention systems
- Flood warning systems
Let's create a practical example where the ESP32 C3 Super Mini turns on an LED when water leakage is detected.
Wiring Diagram
| Component | ESP32 C3 Super Mini Pin |
|---|---|
| Water Sensor S | GPIO2 (Analog Input) |
| Water Sensor + | GPIO3 (Digital Output) |
| Water Sensor - | GND |
| LED Anode (+) | GPIO8 (through 220Ω resistor) |
| LED Cathode (-) | GND |
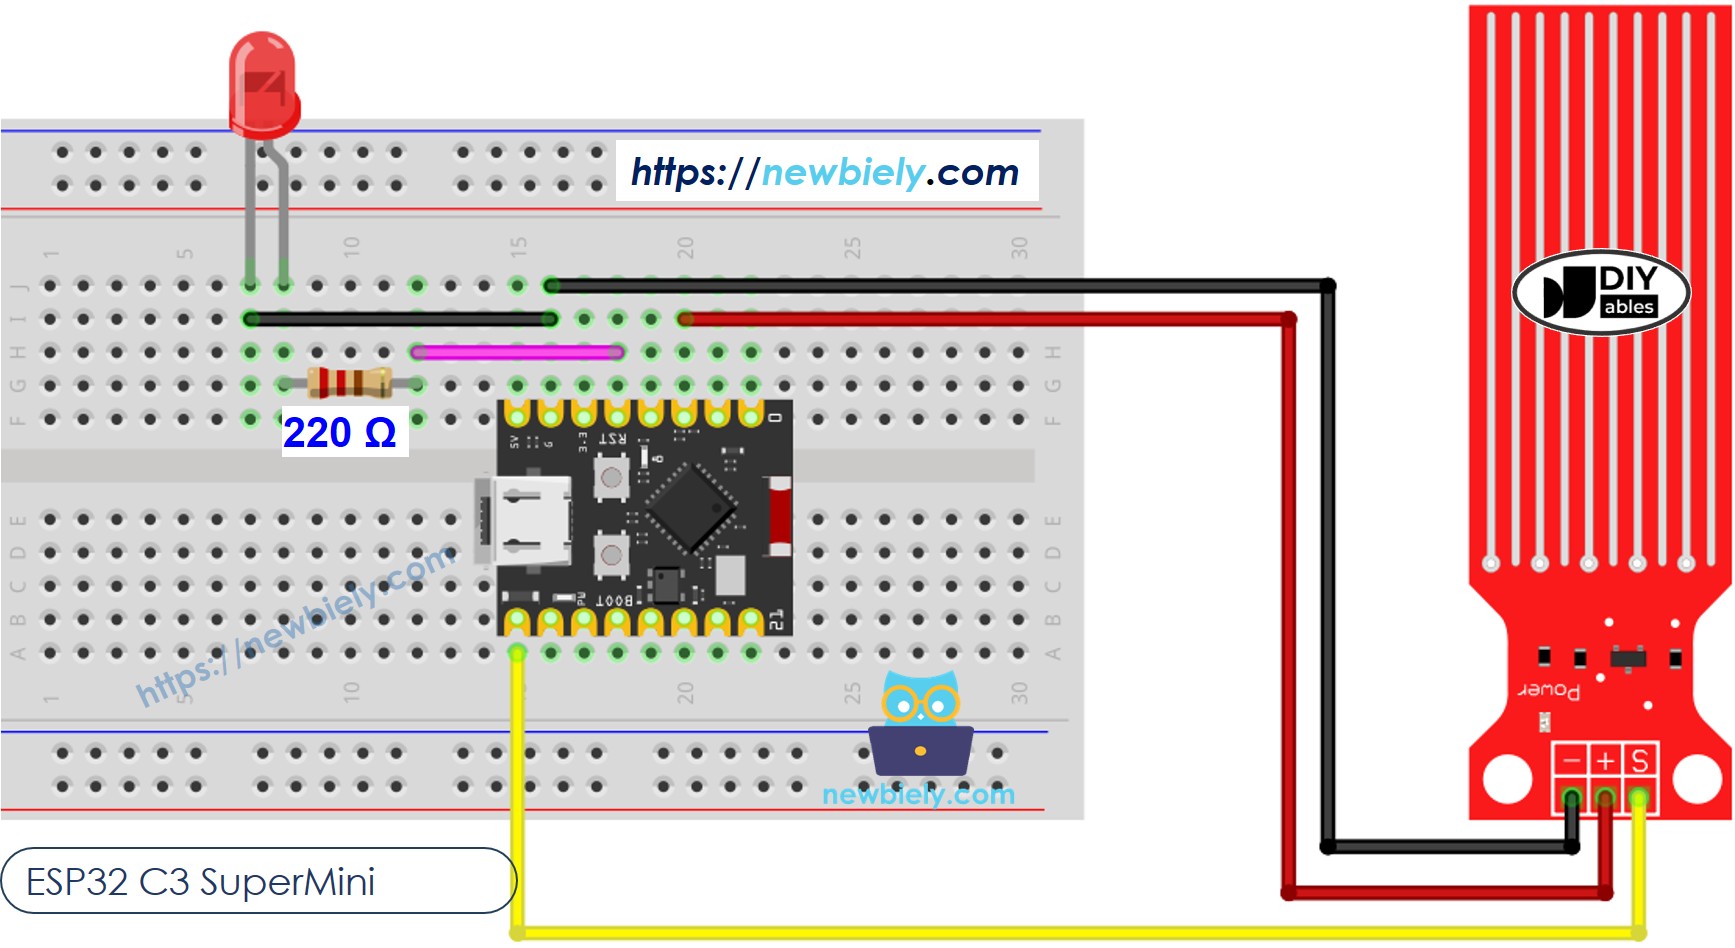
This image is created using Fritzing. Click to enlarge image
ESP32 C3 Super Mini Code - Detecting Water Leakage
This code demonstrates water leak detection with visual LED indication.
What the code does:
- Continuously monitors water sensor readings
- Compares readings against threshold value
- Turns LED ON when water is detected
- Turns LED OFF when no water is present
- Displays leak status on Serial Monitor
How To Measure The Water Level
This advanced example divides water depth into four distinct levels for precise monitoring applications.
Water Level Categories:
- Empty: No water detected
- Low: Minimal water level
- Medium: Moderate water level
- High: Maximum safe water level
※ NOTE THAT:
- SENSOR_MIN and SENSOR_MAX is determined by the calibration process.
- The above mapping method is not accurate. However, it is acceptable in many applications.
Water Level Sensor Calibration
Proper calibration ensures accurate water level readings for your specific sensor and container setup.
Calibration Process:
- Determine minimum value (dry sensor)
- Determine maximum value (fully immersed traces)
- Map these values to your water level scale
- Test and adjust threshold values
See how to calibrate the water lever sensor
※ NOTE THAT:
This tutorial uses the analogRead() function to read values from an ADC (Analog-to-Digital Converter) connected to a sensor or component. The ESP32 C3 Super Mini's ADC is suitable for projects that do not require high accuracy. However, for projects needing precise measurements, keep the following in mind:
- The ESP32 C3 Super Mini's ADC is not perfectly accurate and might require calibration for correct results. Each ESP32 C3 Super Mini board can vary slightly, so calibration is necessary for each individual board.
- Calibration can be challenging, especially for beginners, and might not always yield the exact results you want.
For projects requiring high precision, consider using an external ADC (e.g ADS1115) with the ESP32 C3 Super Mini or using another Arduino, such as the Arduino Uno R4 WiFi, which has a more reliable ADC. If you still want to calibrate the ESP32 C3 Super Mini's ADC, refer to the ESP32 ADC Calibration Driver.
Application Ideas
Here are practical projects you can build using the ESP32 C3 Super Mini with a water level sensor:
- Basement flood detection system with smartphone alerts
- Automatic plant watering system with soil moisture monitoring
- Aquarium water level monitor and auto-refill controller
- Rain gauge for DIY weather station projects
- Coffee maker drip tray overflow prevention
- Sump pump monitoring and failure alert system
Video Tutorial
Watch the video below for a visual walkthrough of this project.
Challenge Yourself
Ready to take your ESP32 water sensor project to the next level? Try these challenges:
- Easy: Add a buzzer that beeps when water is detected
- Easy: Display water level percentage on Serial Monitor instead of raw values
- Medium: Create a WiFi-enabled leak detector that sends email notifications
- Medium: Build a multi-sensor system monitoring multiple locations simultaneously
- Advanced: Design an automatic water tank filling system with upper and lower level sensors
- Advanced: Create a data logging system that tracks water levels over time and displays graphs