ESP32 C3 Super Mini - SD Card
Learn how to use a Micro SD Card with your ESP32 C3 Super Mini to store and retrieve data for your IoT projects. This tutorial covers everything from wiring the SD Card module to reading, writing, and managing files.
In this guide, you'll learn:
- What a Micro SD Card Module is and how it works with ESP32 C3 Super Mini
- How to wire the SD Card Module to your ESP32 C3 Super Mini
- How to open, create, read, and write files on the Micro SD Card
- How to append data and overwrite existing files
- How to read file contents character-by-character and line-by-line
Hardware Preparation
Or you can buy the following kits:
| 1 | × | DIYables Sensor Kit (18 sensors/displays) |
Additionally, some of these links are for products from our own brand, DIYables .
Overview of Micro SD Card Module
The Micro SD Card Module is an interface board that allows the ESP32 C3 Super Mini to read and write data to a Micro SD Card using SPI communication.
Key features and specifications:
- Uses SPI communication protocol for data transfer
- Supports Micro SD Cards formatted as FAT16 or FAT32
- Operating voltage: 3.3V to 5V
- Acts as a bridge between ESP32 C3 Super Mini and storage media
- Perfect for data logging projects and storing sensor readings
- Beginner-friendly with straightforward wiring
Why use it:
- Add expandable storage to your ESP32 projects
- Log sensor data over extended periods
- Store configuration files or web content
- Great for standalone IoT applications
Pinout
The Micro SD Card Module uses a 6-pin SPI interface for communication.
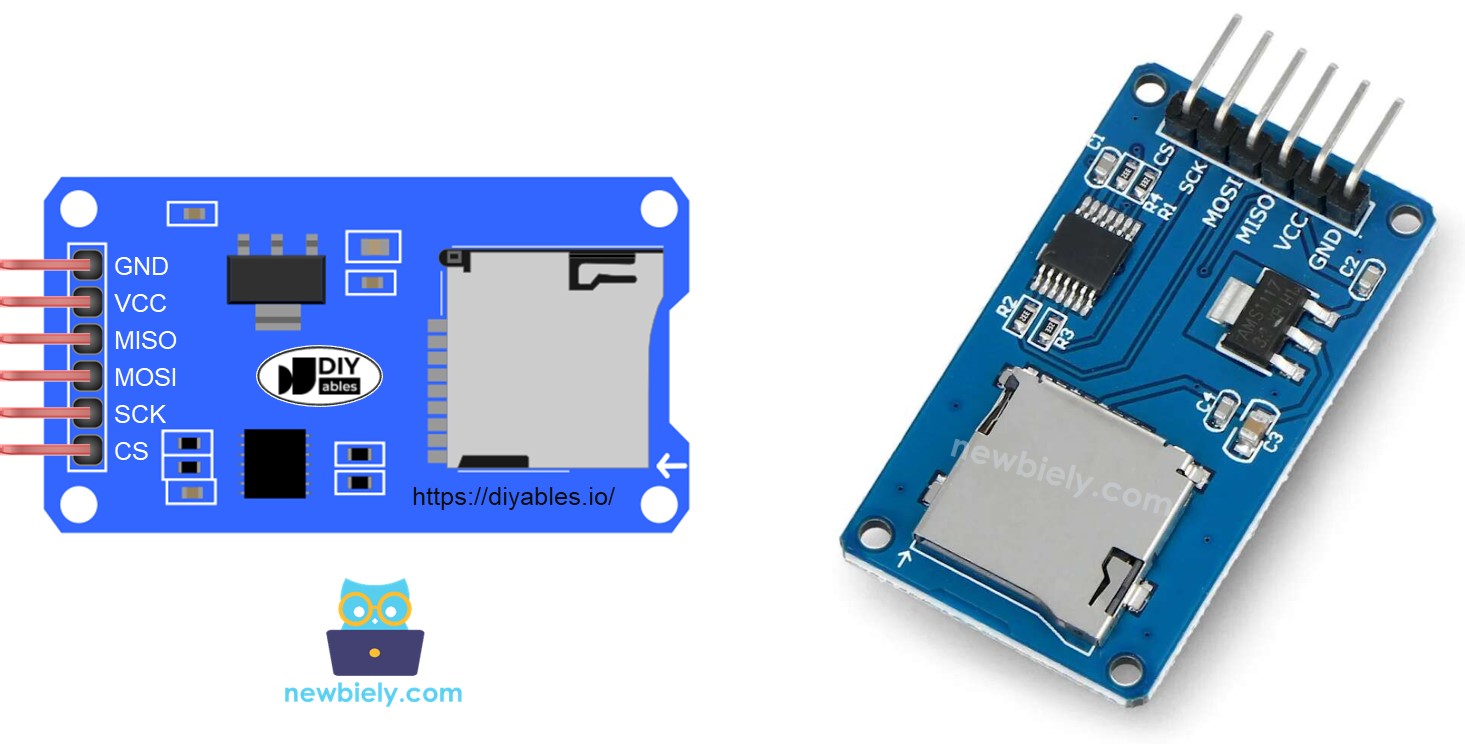
Pin connections:
- VCC: Connect to ESP32 C3 Super Mini 5V pin for power supply
- GND: Connect to ESP32 C3 Super Mini ground pin
- MISO: Master In Slave Out - connects to ESP32's MISO pin for data from SD card
- MOSI: Master Out Slave In - connects to ESP32's MOSI pin for data to SD card
- SCK: Serial Clock - connects to ESP32's SCK pin for timing synchronization
- SS: Slave Select - connects to any digital pin defined in your code (typically CS pin)
Preparation
Before starting, prepare your Micro SD Card properly:
- Insert the Micro SD Card into a USB 3.0 SD Card Reader
- Connect the reader to your PC
- Format the Micro SD Card as FAT16 or FAT32 (search online for formatting instructions)
- Safely eject the card once formatted
- Insert the formatted card into the Micro SD Card Module
Wiring Diagram
Connect your ESP32 C3 Super Mini to the Micro SD Card Module following the diagram below.
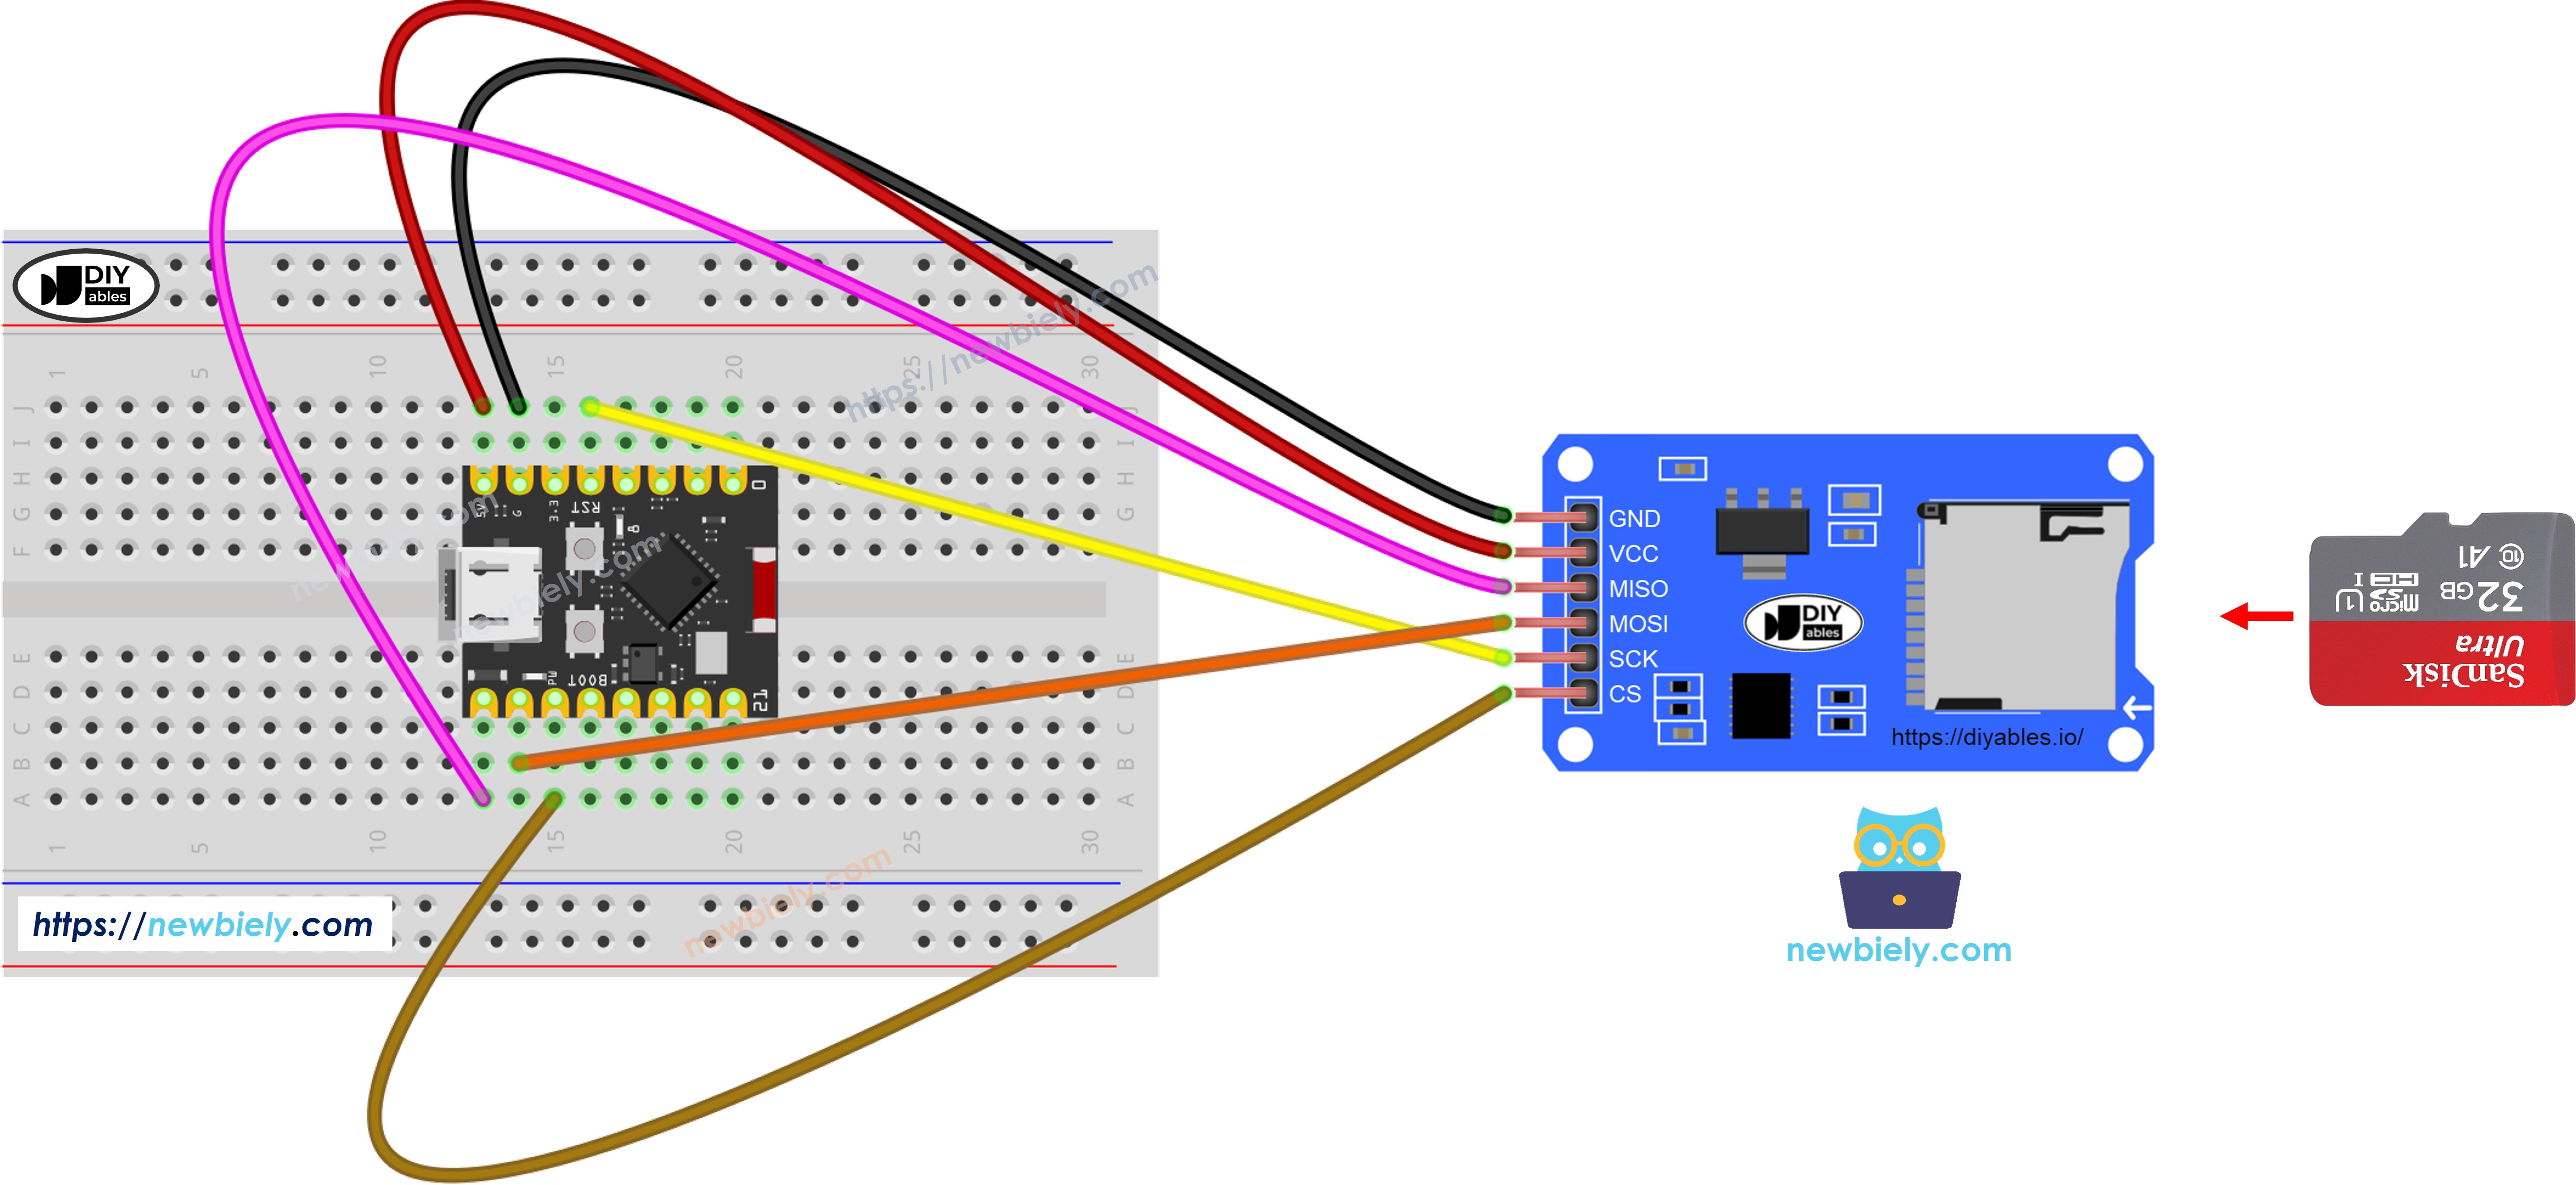
This image is created using Fritzing. Click to enlarge image
Wiring connections:
| Micro SD Module Pin | ESP32 C3 Super Mini Pin |
|---|---|
| VCC | 5V |
| GND | GND |
| MISO | GPIO5 (MISO) |
| MOSI | GPIO6 (MOSI) |
| SCK | GPIO4 (SCK) |
| SS | GPIO7 (CS) |
Safety notes:
- Double-check all connections before powering on
- Ensure the SD card is properly inserted before running code
- Use a quality SD card to avoid read/write errors
ESP32 C3 Super Mini - How to open a file on Micro SD Card and create if not existed
Code Overview
This example demonstrates how to initialize the SD card and open a file, creating it automatically if it doesn't exist.
What this code does:
- Initializes the SD card module using SPI communication
- Checks if a file named "esp32.txt" exists on the card
- Creates the file automatically if it's not found
- Reports the file status to the Serial Monitor
- Demonstrates basic SD card file system operations
ESP32 C3 Super Mini Code
Detailed Instructions
- New to ESP32 C3 Mini? Complete our Getting Started with ESP32 C3 Mini tutorial first to set up your development environment.
- Prepare the SD Card: Insert the formatted Micro SD Card into the SD Card Module
- Wire the Circuit: Connect the Micro SD Card Module to ESP32 C3 Super Mini following the wiring diagram above
- Connect ESP32: Plug the ESP32 C3 Super Mini into your PC using the USB Type-C cable
- Open Arduino IDE: Launch Arduino IDE on your computer
- Select Board: Choose ESP32 C3 Super Mini from the board menu
- Select Port: Choose the correct COM port for your ESP32
- Open Serial Monitor: Open the Serial Monitor before uploading (Tools > Serial Monitor)
- Copy Code: Copy the code provided above
- Paste Code: Paste it into a new Arduino IDE sketch
- Upload: Click the Upload button to flash the code to your ESP32 C3 Super Mini
- View Results: Check the Serial Monitor to see the file creation status
- Pro Tip: Always open Serial Monitor before uploading to see all initialization messages from the first run
Serial Monitor Output
First run (file doesn't exist yet):
Subsequent runs (file already exists):
※ NOTE THAT:
You may NOT see the output on Serial Monitor for the first run of your first upload is done before opening Serial Monitor.
Verify on PC:
- Remove the Micro SD Card from the module
- Insert it into your USB SD Card reader
- Connect the reader to your PC
- Open the SD card folder and verify the esp32.txt file was created
ESP32 C3 Super Mini - How to write/read data to/from a file on Micro SD Card
Code Overview
This example shows how to write text data to a file and read it back character-by-character.
What this code does:
- Opens or creates a file on the SD card
- Writes two lines of text to the file
- Reads the entire file content character-by-character
- Displays the file content on Serial Monitor
- Demonstrates basic file I/O operations with ESP32 C3 Super Mini
Serial Monitor Output
Expected output:
※ NOTE THAT:
The data will be appended to the end of file by default. If you reboot ESP32 C3 Super Mini with above code, the text will be appended to the file again ⇒ the Serial Monitor will shows more lines as below:
Verify the file:
- Safely remove the Micro SD Card from the module
- Insert it into your USB SD Card reader
- Connect to your PC and open the file to view its contents
ESP32 C3 Super Mini - How to read a file on Micro SD Card line-by-line
Code Overview
This example demonstrates reading file contents line-by-line instead of character-by-character for better data organization.
What this code does:
- Opens an existing file on the SD card
- Reads the file line-by-line using readStringUntil()
- Numbers each line for easy tracking
- Displays formatted output on Serial Monitor
- Useful for reading structured data or logs
Serial Monitor Output
Expected output:
※ NOTE THAT:
You may see more lines on Serial Monitor if the content of the file is not deleted before.
ESP32 C3 Super Mini - How to overwrite a file on Micro SD Card
Code Overview
Learn how to replace file contents instead of appending to them.
What this code does:
- Deletes the existing file if it exists
- Creates a new file with the same name
- Writes fresh content to the file
- Ensures clean data without old appended content
- Demonstrates file replacement technique for ESP32 C3 Super Mini
By default, the content will append to the end of the file. The simplest way to overwrite a file is: delete the existing file and create new one with the same name.
Serial Monitor Output
Expected output:
Test the overwrite:
- Press the reset button on your ESP32 C3 Super Mini
- Check the Serial Monitor output
- Verify that the content is NOT duplicated
- The file should contain only one set of lines
Verify on PC:
- Remove the Micro SD Card from the module
- Insert it into your USB SD Card reader
- Connect to your PC and open the file
- Confirm the content matches the expected output
Application Ideas
Here are practical projects you can build using ESP32 C3 Super Mini with SD Card Module:
- Build a temperature and humidity data logger for long-term climate monitoring
- Create a standalone sensor station that stores readings without WiFi connection
- Design a GPS tracker that logs location coordinates with timestamps
- Make a motion-activated security camera that saves event logs
- Develop an agricultural monitoring system that records soil moisture data
- Build a power consumption meter that stores daily usage statistics
Video Tutorial
Watch the video below for a visual walkthrough of this project.
...VIDEO esp32-c3-super-mini/micro-sd-card.mp4
...VIDEO
Challenge Yourself
Test your skills with these progressively challenging modifications:
- Easy: Modify the code to create a file with your own custom name and write a personal message
- Easy: Add a timestamp to each line of data using millis() function
- Medium: Create a program that logs random sensor values every 5 seconds with timestamps
- Medium: Build a menu system that lets you read, write, or delete files via Serial Monitor commands
- Advanced: Implement a circular log system that keeps only the last 100 entries to prevent SD card overflow
- Advanced: Create a data logger with multiple files for different sensors and implement automatic file rotation