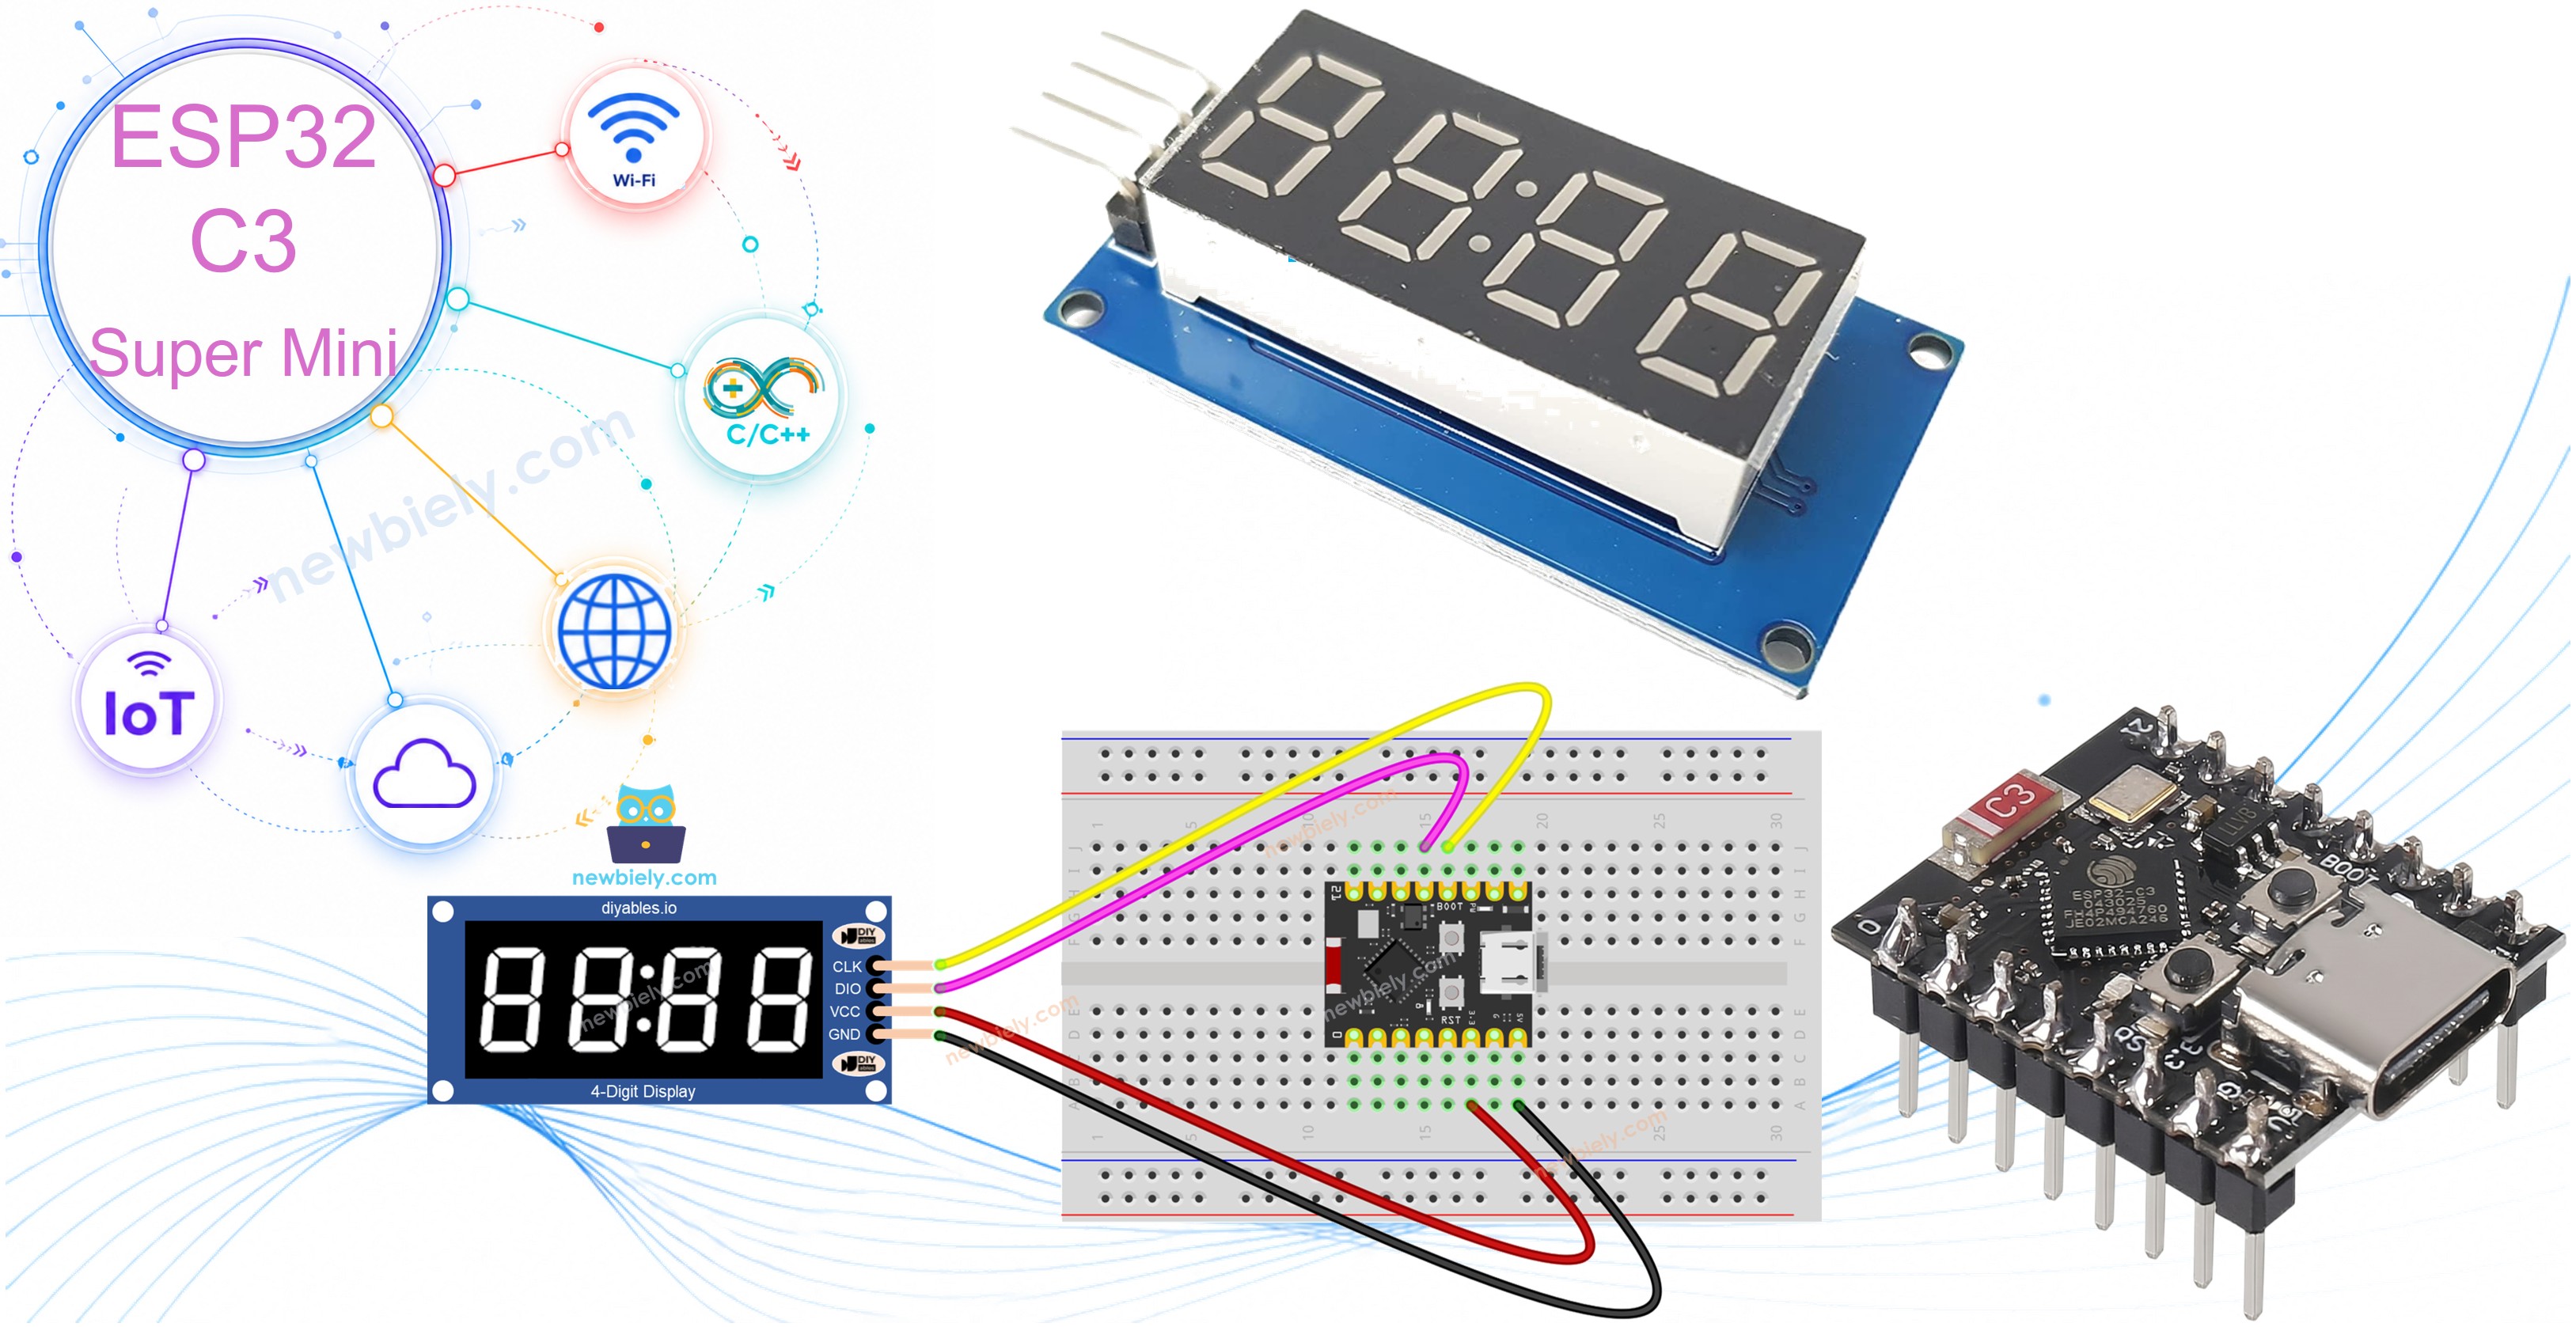
ESP32 C3 Super Mini - TM1637 4-Digit 7-Segment Display

Learn how to connect a TM1637 4-digit 7-segment display to your ESP32 C3 Super Mini for displaying numbers, text, temperature, and time. This tutorial shows you how to control brightness, blink patterns, and individual digits using the simple 2-wire interface.

In this tutorial you will learn:

ESP32 C3 Super Mini TM1637 4-Digit 7-Segment Display

Hardware Preparation

1×ESP32 C3 Super Mini
1×USB Cable Type-A to Type-C (for USB-A PC)
1×USB Cable Type-C to Type-C (for USB-C PC)
1×TM1637 4-digit 7-segment Display (colon-separated)
1×Jumper Wires

Or you can buy the following kits:

1×DIYables Sensor Kit (18 sensors/displays)
Disclosure: Some of the links provided in this section are Amazon affiliate links. We may receive a commission for any purchases made through these links at no additional cost to you.
Additionally, some of these links are for products from our own brand, DIYables .

Overview of the TM1637 Display Module

The TM1637 is an LED driver chip that controls four 7-segment digits using a simple 2-wire interface.

Key features and specifications:

  • 4 digits with 7 segments plus decimal point each
  • Built-in colon separator (between digits 1 and 2)
  • 8 adjustable brightness levels (0-7)
  • 2-wire serial interface (CLK and DIO)
  • Works with both 3.3V and 5V logic levels
  • Displays stay lit without constant refresh from microcontroller
  • Perfect for clock displays, counters, and temperature readings
  • Beginner-friendly with only two data pins to connect

TM1637 Pinout

The TM1637 module has four connection pins for power and communication.

  • CLK: Clock signal input for synchronizing data
  • DIO: Bidirectional data input/output pin
  • VCC: Power supply (3.3V or 5V)
  • GND: Ground connection

Wiring Diagram

Connect the TM1637 4-digit display to your ESP32 C3 Super Mini following this diagram.

  • Note: Use 3.3V power output to match the ESP32 logic levels
TM1637 Pin ESP32 C3 Super Mini Pin
CLK D8
DIO D9
VCC 3.3V
GND GND
The wiring diagram between ESP32 C3 Super Mini TM1637 4-Digit 7-Segment Display

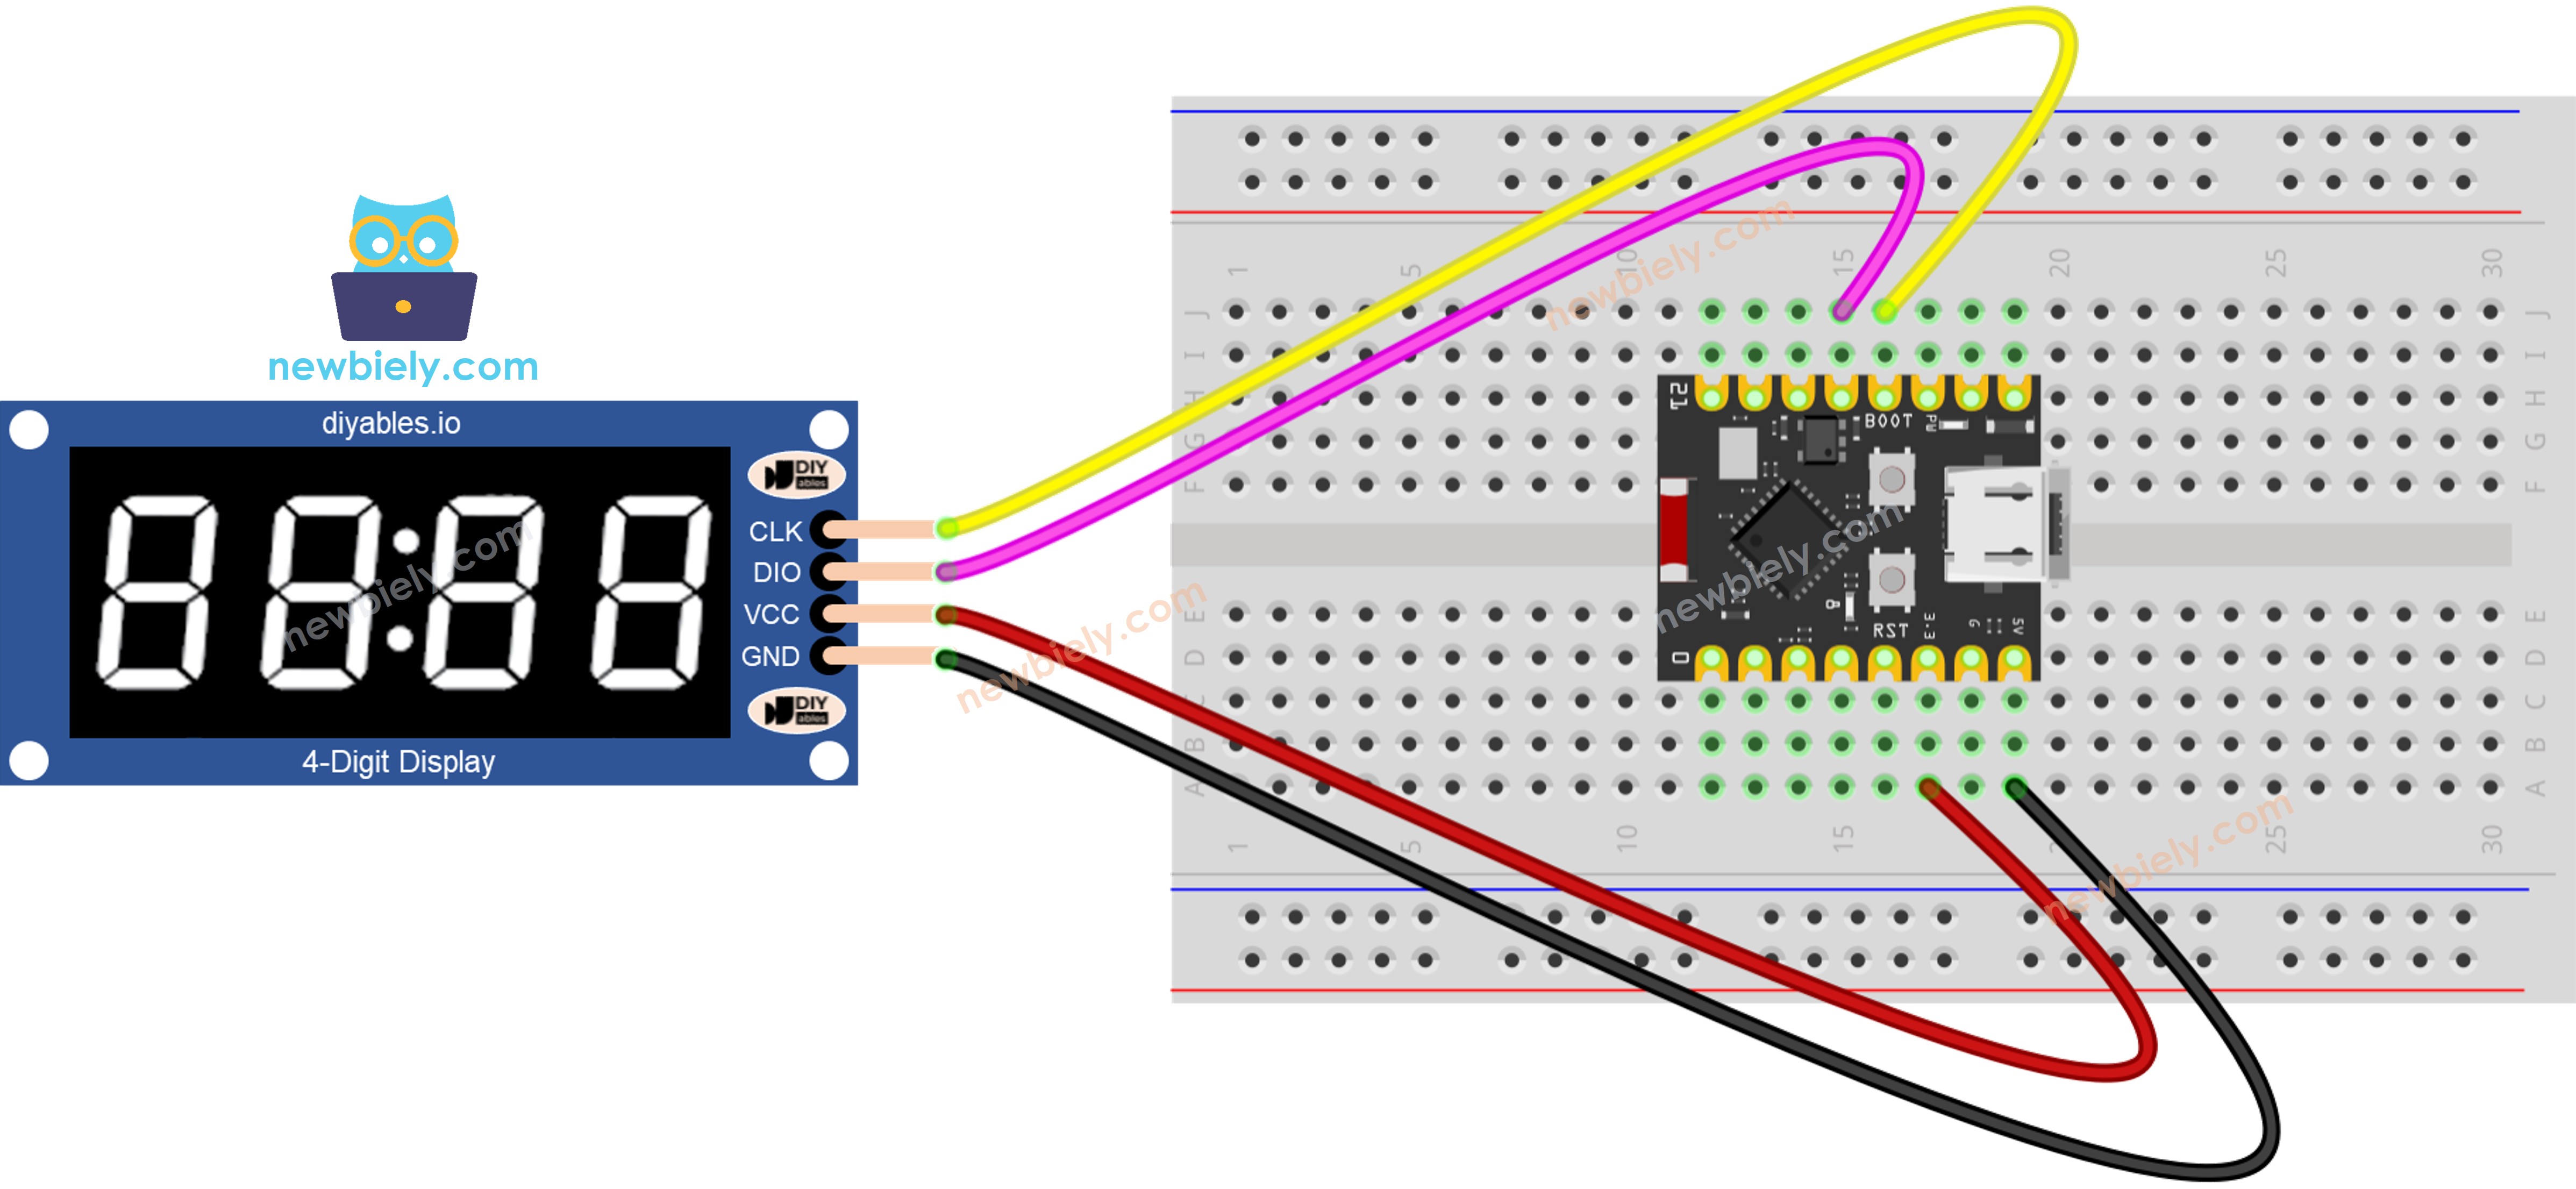
This image is created using Fritzing. Click to enlarge image

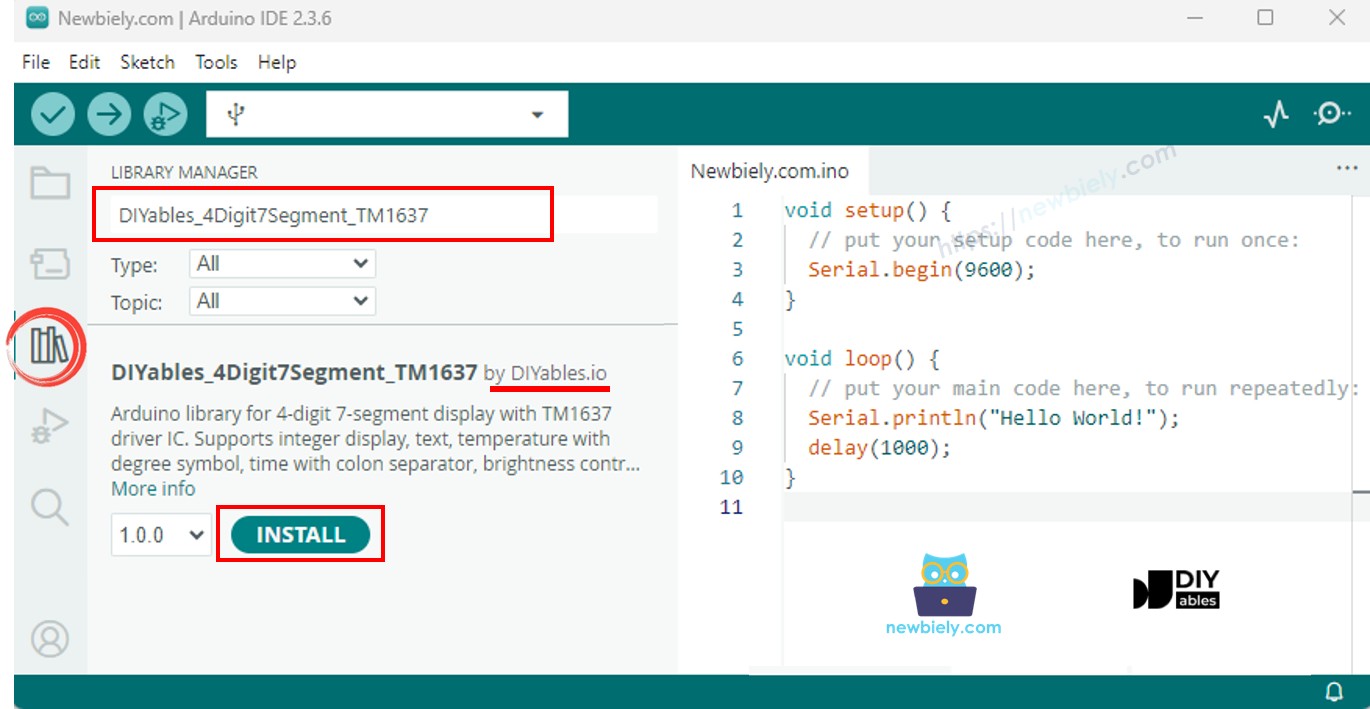
Installing the TM1637 Library

Before uploading code, install the required library for the TM1637 display module.

  • Open Arduino IDE: Launch the Arduino IDE on your computer
  • Select Board: Choose ESP32 C3 Super Mini from the board list
  • Open Library Manager: Click the Libraries icon in the left sidebar
  • Search Library: Type "DIYables_4Digit7Segment_TM1637" in the search box
  • Install: Click Install on the DIYables entry
  • Verify: Library should appear in your installed libraries list
  • Pro Tip: No additional dependencies needed - this library works standalone
Arduino TM1637 4-Digit 7-Segment Display library

Basic TM1637 Code Structure

Here's the minimum code needed to initialize and use the TM1637 display with your ESP32 C3 Super Mini.

This code demonstrates:

  • Including the TM1637 library
  • Defining CLK and DIO pins
  • Creating a display object
  • Initializing the display
  • Showing a simple 4-digit number
#include <DIYables_4Digit7Segment_TM1637.h> #define CLK_PIN D8 #define DIO_PIN D9 DIYables_4Digit7Segment_TM1637 display(CLK_PIN, DIO_PIN); void setup() { display.begin(); display.print(1234); } void loop() { }

Tutorial 1: Display Integer Numbers

Learn how to display various integer values on the TM1637, including positive numbers, negative numbers, and zero-padded values.

/* * This ESP32 C3 Super Mini code was developed by newbiely.com * * This ESP32 C3 Super Mini code is made available for public use without any restriction * * For comprehensive instructions and wiring diagrams, please visit: * https://newbiely.com/tutorials/esp32-c3/esp32-c3-super-mini-tm1637-4-digit-7-segment-display */ /* * DIYables_4Digit7Segment_TM1637 - Integer Example * * Displays various integer values on a 4-digit 7-segment display * with TM1637 driver, including zero-padded numbers. * * Tutorial: https://diyables.io/products/4-digit-7-segment-display-led-tm1637-with-colon * * TESTED HARDWARE: * - Arduino Uno R3 * - Arduino Uno R4 WiFi * - Arduino Uno R4 Minima * - Arduino Mega * - Arduino Due * - Arduino Giga * - DIYables STEM V3: https://diyables.io/stem-v3 * - DIYables STEM V4 IoT: https://diyables.io/stem-v4-iot * - DIYables STEM V4B IoT: https://diyables.io/stem-v4b-iot * - DIYables STEM V4B Edu: https://diyables.io/stem-v4-edu * - DIYables MEGA2560 R3: https://diyables.io/atmega2560-board * - DIYables Nano R3: https://diyables.io/nano-board * - DIYables ESP32 Board: https://diyables.io/esp32-board * - DIYables ESP32 S3, Uno-form factor: https://diyables.io/esp32-s3-uno * - It is expected to work with other boards */ #include <DIYables_4Digit7Segment_TM1637.h> // Pin configuration - change to match your wiring #define CLK_PIN D8 #define DIO_PIN D9 DIYables_4Digit7Segment_TM1637 display(CLK_PIN, DIO_PIN); void setup() { Serial.begin(9600); display.begin(); Serial.println("TM1637 Integer Example"); } void loop() { // Display various integers int numbers[] = {0, 42, 1234, -5, -123, 9999}; int count = sizeof(numbers) / sizeof(numbers[0]); for (int i = 0; i < count; i++) { display.print(numbers[i]); Serial.print("Displaying: "); Serial.println(numbers[i]); delay(2000); } // Display with zero padding display.print(42, true); // Shows "0042" Serial.println("Displaying: 0042 (zero-padded)"); delay(2000); }

Quick Steps to Display Integers

  • New to ESP32 C3 Mini? Complete our Getting Started with ESP32 C3 Mini tutorial first to set up your development environment.
  • Wire the Module: Connect TM1637 to ESP32 C3 Super Mini following the wiring diagram above
  • Connect USB: Plug your ESP32 C3 Super Mini into your computer using USB-C cable
  • Open Arduino IDE: Launch Arduino IDE and select the correct board and port
  • Copy Code: Paste the integer display sketch into Arduino IDE
  • Upload: Click the Upload button to flash the code to your board
  • Watch Display: Observe the different numbers appearing on the 7-segment display
  • Open Serial Monitor: Set baud rate to 9600 to see status messages
  • Pro Tip: Use print(number, true) to display numbers with leading zeros like "0042"

Serial Monitor Output

Newbiely | Arduino IDE 2.3.8
──
File
Edit
Sketch
Tools
Help
ESP32C3 Dev Module
Newbiely.ino
···
8 Serial.println("Hello World!");
Output
Serial Monitor
Message (Enter to send message to 'ESP32C3 Dev Module' on 'COM15')
New Line
9600 baud
[2026-04-15 10:23:15] Display initialized [2026-04-15 10:23:16] Showing: 0 [2026-04-15 10:23:17] Showing: 42 [2026-04-15 10:23:18] Showing: 1234 [2026-04-15 10:23:19] Showing: -5 [2026-04-15 10:23:20] Showing: -123 [2026-04-15 10:23:21] Showing: 9999 [2026-04-15 10:23:22] Showing: 0042 (zero-padded)
Ln 11, Col 1
ESP32C3 Dev Module on COM15
2

Integer Display Methods

Method Action Syntax
print(int) Display an integer (-999 to 9999) display.print(1234)
print(int, true) Display with leading zeros display.print(42, true)
clear() Clear all digits display.clear()

Tutorial 2: Display Text and Temperature

Display text strings and temperature values with degree symbols on your ESP32 C3 Super Mini TM1637 display.

/* * This ESP32 C3 Super Mini code was developed by newbiely.com * * This ESP32 C3 Super Mini code is made available for public use without any restriction * * For comprehensive instructions and wiring diagrams, please visit: * https://newbiely.com/tutorials/esp32-c3/esp32-c3-super-mini-tm1637-4-digit-7-segment-display */ /* * DIYables_4Digit7Segment_TM1637 - TextAndDegree Example * * Displays text strings, special characters, and temperature * on a 4-digit 7-segment display with TM1637 driver. * * Tutorial: https://diyables.io/products/4-digit-7-segment-display-led-tm1637-with-colon * * TESTED HARDWARE: * - Arduino Uno R3 * - Arduino Uno R4 WiFi * - Arduino Uno R4 Minima * - Arduino Mega * - Arduino Due * - Arduino Giga * - DIYables STEM V3: https://diyables.io/stem-v3 * - DIYables STEM V4 IoT: https://diyables.io/stem-v4-iot * - DIYables STEM V4B IoT: https://diyables.io/stem-v4b-iot * - DIYables STEM V4B Edu: https://diyables.io/stem-v4-edu * - DIYables MEGA2560 R3: https://diyables.io/atmega2560-board * - DIYables Nano R3: https://diyables.io/nano-board * - DIYables ESP32 Board: https://diyables.io/esp32-board * - DIYables ESP32 S3, Uno-form factor: https://diyables.io/esp32-s3-uno * - It is expected to work with other boards */ #include <DIYables_4Digit7Segment_TM1637.h> // Pin configuration - change to match your wiring #define CLK_PIN D8 #define DIO_PIN D9 DIYables_4Digit7Segment_TM1637 display(CLK_PIN, DIO_PIN); void setup() { Serial.begin(9600); display.begin(); Serial.println("TM1637 Text and Degree Example"); } void loop() { // Display text strings const char* texts[] = {"HELP", "Hi", "COOL", "done"}; for (int i = 0; i < 4; i++) { display.print(texts[i]); Serial.print("Displaying: "); Serial.println(texts[i]); delay(2000); } // Display temperature with degree symbol display.printTemperature(25, 'C'); // Shows "25°C" Serial.println("Displaying: 25 degrees C"); delay(2000); display.printTemperature(72, 'F'); // Shows "72°F" Serial.println("Displaying: 72 degrees F"); delay(2000); // Display string with degree constant char buf[5]; buf[0] = '2'; buf[1] = '5'; buf[2] = DIYables_4Digit7Segment_TM1637::DEGREE; buf[3] = 'C'; buf[4] = '\0'; display.print(buf); // Same as printTemperature(25, 'C') Serial.println("Displaying: 25 degrees C (via print)"); delay(2000); }

Quick Steps to Display Text and Temperature

  • Wire Module: Ensure TM1637 connections are secure
  • Upload Sketch: Flash the text and temperature code to ESP32 C3 Super Mini
  • Open Serial Monitor: Set baud rate to 9600
  • Watch Messages: The display cycles through text and temperature readings
  • Try Custom Text: Modify the code to display your own 4-character messages
  • Pro Tip: The TM1637 can display letters like H, E, L, P, C, o, n, e - experiment with different words

Serial Monitor Output

Newbiely | Arduino IDE 2.3.8
──
File
Edit
Sketch
Tools
Help
ESP32C3 Dev Module
Newbiely.ino
···
8 Serial.println("Hello World!");
Output
Serial Monitor
Message (Enter to send message to 'ESP32C3 Dev Module' on 'COM15')
New Line
9600 baud
[2026-04-15 11:05:22] TM1637 Text Demo Started [2026-04-15 11:05:23] Displaying: HELP [2026-04-15 11:05:25] Displaying: Hi [2026-04-15 11:05:27] Displaying: COOL [2026-04-15 11:05:29] Displaying: done [2026-04-15 11:05:31] Temperature: 25°C [2026-04-15 11:05:33] Temperature: 72°F
Ln 11, Col 1
ESP32C3 Dev Module on COM15
2

Text and Temperature Methods

Method Action Syntax
print(const char*) Display text (up to 4 chars) display.print("HELP")
printTemperature(int, char) Display temperature with degree/unit display.printTemperature(25, 'C')
DEGREE Degree symbol constant display.DEGREE

Tutorial 3: Display Time with Blinking Colon

Create a digital clock display on your ESP32 C3 Super Mini with hours, minutes, and a blinking colon separator.

/* * This ESP32 C3 Super Mini code was developed by newbiely.com * * This ESP32 C3 Super Mini code is made available for public use without any restriction * * For comprehensive instructions and wiring diagrams, please visit: * https://newbiely.com/tutorials/esp32-c3/esp32-c3-super-mini-tm1637-4-digit-7-segment-display */ /* * DIYables_4Digit7Segment_TM1637 - Time Example * * Displays time in HH:MM format with blinking colon separator * on a 4-digit 7-segment display with TM1637 driver. * * Tutorial: https://diyables.io/products/4-digit-7-segment-display-led-tm1637-with-colon * * TESTED HARDWARE: * - Arduino Uno R3 * - Arduino Uno R4 WiFi * - Arduino Uno R4 Minima * - Arduino Mega * - Arduino Due * - Arduino Giga * - DIYables STEM V3: https://diyables.io/stem-v3 * - DIYables STEM V4 IoT: https://diyables.io/stem-v4-iot * - DIYables STEM V4B IoT: https://diyables.io/stem-v4b-iot * - DIYables STEM V4B Edu: https://diyables.io/stem-v4-edu * - DIYables MEGA2560 R3: https://diyables.io/atmega2560-board * - DIYables Nano R3: https://diyables.io/nano-board * - DIYables ESP32 Board: https://diyables.io/esp32-board * - DIYables ESP32 S3, Uno-form factor: https://diyables.io/esp32-s3-uno * - It is expected to work with other boards */ #include <DIYables_4Digit7Segment_TM1637.h> // Pin configuration - change to match your wiring #define CLK_PIN D8 #define DIO_PIN D9 DIYables_4Digit7Segment_TM1637 display(CLK_PIN, DIO_PIN); int hours = 12; int minutes = 30; bool colonOn = true; void setup() { Serial.begin(9600); display.begin(); Serial.println("TM1637 Time Example"); Serial.println("Displaying 12:30 with blinking colon"); } void loop() { display.printTime(hours, minutes, colonOn); delay(500); // Toggle colon every 500ms for blinking effect colonOn = !colonOn; }

Quick Steps to Display Time

  • Upload Code: Flash the time display sketch to your ESP32 C3 Super Mini
  • Watch Display: Observe "12:30" with the colon blinking every 500 milliseconds
  • Modify Time: Change the hour and minute values in the code
  • Control Colon: Use the third parameter to manually control colon state
  • Pro Tip: Use millis() and modulo arithmetic to create smooth 1-second blink intervals

Serial Monitor Output

Newbiely | Arduino IDE 2.3.8
──
File
Edit
Sketch
Tools
Help
ESP32C3 Dev Module
Newbiely.ino
···
8 Serial.println("Hello World!");
Output
Serial Monitor
Message (Enter to send message to 'ESP32C3 Dev Module' on 'COM15')
New Line
9600 baud
[2026-04-15 14:20:10] Time Display Demo [2026-04-15 14:20:10] Time: 12:30 (colon ON) [2026-04-15 14:20:11] Time: 12:30 (colon OFF) [2026-04-15 14:20:12] Time: 12:30 (colon ON) [2026-04-15 14:20:13] Time: 12:30 (colon OFF)
Ln 11, Col 1
ESP32C3 Dev Module on COM15
2

Time Display Methods

Method Action Syntax
printTime(int, int) Display time HHMM with colon display.printTime(12, 30)
printTime(int, int, bool) Display time, control colon state display.printTime(12, 30, false)

Tutorial 5: Individual Digit Control

Control each digit position independently on your ESP32 C3 Super Mini TM1637 display for custom animations and patterns.

/* * This ESP32 C3 Super Mini code was developed by newbiely.com * * This ESP32 C3 Super Mini code is made available for public use without any restriction * * For comprehensive instructions and wiring diagrams, please visit: * https://newbiely.com/tutorials/esp32-c3/esp32-c3-super-mini-tm1637-4-digit-7-segment-display */ /* * DIYables_4Digit7Segment_TM1637 - IndividualDigits Example * * Sets individual digits, characters, and colon on a 4-digit * 7-segment display with TM1637 driver. * * Tutorial: https://diyables.io/products/4-digit-7-segment-display-led-tm1637-with-colon * * TESTED HARDWARE: * - Arduino Uno R3 * - Arduino Uno R4 WiFi * - Arduino Uno R4 Minima * - Arduino Mega * - Arduino Due * - Arduino Giga * - DIYables STEM V3: https://diyables.io/stem-v3 * - DIYables STEM V4 IoT: https://diyables.io/stem-v4-iot * - DIYables STEM V4B IoT: https://diyables.io/stem-v4b-iot * - DIYables STEM V4B Edu: https://diyables.io/stem-v4-edu * - DIYables MEGA2560 R3: https://diyables.io/atmega2560-board * - DIYables Nano R3: https://diyables.io/nano-board * - DIYables ESP32 Board: https://diyables.io/esp32-board * - DIYables ESP32 S3, Uno-form factor: https://diyables.io/esp32-s3-uno * - It is expected to work with other boards */ #include <DIYables_4Digit7Segment_TM1637.h> // Pin configuration - change to match your wiring #define CLK_PIN D8 #define DIO_PIN D9 DIYables_4Digit7Segment_TM1637 display(CLK_PIN, DIO_PIN); void setup() { Serial.begin(9600); display.begin(); Serial.println("TM1637 Individual Digits Example"); } void loop() { // Set individual numbers on each digit position display.clear(); display.setNumber(0, 1); display.setNumber(1, 2); display.setNumber(2, 3); display.setNumber(3, 4); Serial.println("Displaying: 1234"); delay(2000); // Turn colon on display.setColon(true); Serial.println("Displaying: 12:34"); delay(2000); // Turn colon off display.setColon(false); Serial.println("Displaying: 1234"); delay(2000); // Set individual characters display.clear(); display.setChar(0, 'H'); display.setChar(1, 'E'); display.setChar(2, 'L'); display.setChar(3, 'P'); Serial.println("Displaying: HELP"); delay(2000); // Mix characters and numbers with colon display.clear(); display.setChar(0, 'A'); display.setNumber(1, 3); display.setChar(2, 'b'); display.setNumber(3, 7); display.setColon(true); Serial.println("Displaying: A3:b7"); delay(2000); // Blinking colon effect display.clear(); display.setNumber(0, 1); display.setNumber(1, 2); display.setNumber(2, 3); display.setNumber(3, 0); Serial.println("Blinking colon: 12:30"); for (int i = 0; i < 5; i++) { display.setColon(true); delay(500); display.setColon(false); delay(500); } delay(1000); }

Quick Steps for Individual Digit Control

  • Upload Code: Flash the individual digit control sketch
  • Watch Patterns: Observe different combinations appearing on each digit
  • Try Custom Patterns: Use setSegments() for complete control over each segment
  • Create Animations: Update individual digits in sequence for scrolling effects
  • Pro Tip: Digit positions are 0-3 from left to right - use loops to create smooth animations

Serial Monitor Output

Newbiely | Arduino IDE 2.3.8
──
File
Edit
Sketch
Tools
Help
ESP32C3 Dev Module
Newbiely.ino
···
8 Serial.println("Hello World!");
Output
Serial Monitor
Message (Enter to send message to 'ESP32C3 Dev Module' on 'COM15')
New Line
9600 baud
[2026-04-15 16:30:44] Individual Digit Control Demo [2026-04-15 16:30:44] Setting digit 0 = 1 [2026-04-15 16:30:45] Setting digit 1 = 2 [2026-04-15 16:30:46] Setting digit 2 = 3 [2026-04-15 16:30:47] Setting digit 3 = 4 [2026-04-15 16:30:48] Displaying HELP with individual characters
Ln 11, Col 1
ESP32C3 Dev Module on COM15
2

Individual Digit Control Methods

Method Action Syntax
setNumber(int, int) Set digit 0-9 at position 0-3 display.setNumber(0, 1)
setChar(int, char) Set character at position 0-3 display.setChar(0, 'H')
setColon(bool) Control colon on/off display.setColon(true)
setSegments(int, uint8_t) Set raw segments at position 0-3 display.setSegments(0, 0x76)

Troubleshooting TM1637 Display Issues

Common problems when using the TM1637 4-digit display with ESP32 C3 Super Mini and their solutions.

Issue Possible Cause Resolution
Display is blank Wrong wiring or pin numbers Verify CLK/DIO connections match code and VCC goes to 3.3V
Wrong characters CLK and DIO swapped Switch the two signal wires
Display too dim Low brightness setting Call setBrightness(7) for maximum
Library not found Not installed Install DIYables_4Digit7Segment_TM1637 from Library Manager
Upload fails Board in wrong mode Hold the BOOT button while pressing RESET, then retry upload
Flickering display Loose connections Check all wire connections and reseat jumper wires
Random characters Electrical noise Add 100nF capacitor between VCC and GND near module

Real-World Applications

Use your ESP32 C3 Super Mini TM1637 display project in these practical applications.

  • Build a digital countdown timer for cooking or workouts
  • Create a temperature monitor that displays current room temperature
  • Make a lap timer for races or gaming sessions
  • Design a visitor counter for your home or office
  • Build a voltage/current display for power monitoring projects
  • Create a score keeper for games and competitions
  • Make a real-time clock with WiFi time synchronization using ESP32

Video Tutorial

Watch the video below for a visual walkthrough of this project.

...VIDEO ...VIDEO

Challenge Yourself

Take your ESP32 C3 Super Mini TM1637 skills to the next level with these project challenges.

  • Easy: Add a button to cycle through different display modes (time, temperature, counter)
  • Easy: Create a stopwatch with start/stop button control
  • Medium: Build a countdown timer that beeps when reaching zero using a buzzer
  • Medium: Display WiFi signal strength as a number using ESP32 wireless capabilities
  • Advanced: Create a scrolling text display that shows messages longer than 4 characters
  • Advanced: Build a thermometer using DHT22 sensor with ESP32 C3 Super Mini and TM1637 display
  • Advanced: Make a real-time clock that syncs with NTP servers over WiFi

Platform Compatibility

The DIYables_4Digit7Segment_TM1637 library works across all Arduino-compatible platforms including ESP32, ESP8266, Arduino Uno, Nano, Mega, and more (architectures=*).

※ OUR MESSAGES

  • As freelancers, We are AVAILABLE for HIRE. See how to outsource your project to us
  • Please feel free to share the link of this tutorial. However, Please do not use our content on any other websites. We invested a lot of effort and time to create the content, please respect our work!