ESP32 C3 Super Mini - Servo Motor
Learn how to control a servo motor with ESP32 C3 Super Mini using PWM signals. This beginner-friendly tutorial shows you how to make a servo motor rotate between 0° and 180° with simple Arduino code.
In this tutorial, you'll learn:
- What a servo motor is and how it works with ESP32
- How to wire a servo motor to ESP32 C3 Super Mini
- How to install the ESP32Servo library
- How to write code to control servo motor rotation
- Power supply considerations for servo motors
Hardware Preparation
| 1 | × | ESP32 C3 Super Mini | |
| 1 | × | USB Cable Type-A to Type-C (for USB-A PC) | |
| 1 | × | USB Cable Type-C to Type-C (for USB-C PC) | |
| 1 | × | Servo Motor | |
| 1 | × | Breadboard | |
| 1 | × | Jumper Wires | |
| 1 | × | Optionally, DC Power Jack |
Or you can buy the following kits:
| 1 | × | DIYables Sensor Kit (18 sensors/displays) |
Additionally, some of these links are for products from our own brand, DIYables .
Buy Note: For controlling multiple servo motors, use the PCA9685 16 Channel PWM Servo Driver Module to save MCU pins and simplify wiring.
Overview of Servo Motor
A servo motor is a rotary actuator that allows precise control of angular position between 0° and 180°.
Key Features:
- Standard rotation range: 0° to 180°
- Controlled via PWM (Pulse Width Modulation) signals
- Built-in feedback system for accurate positioning
- Commonly used in robotics, RC vehicles, and automation projects
- Easy to control with ESP32 C3 Super Mini
Why Servo Motors are Great for Beginners:
- Simple three-wire connection
- No complex motor driver required
- Precise position control
- Perfect for learning robotics basics
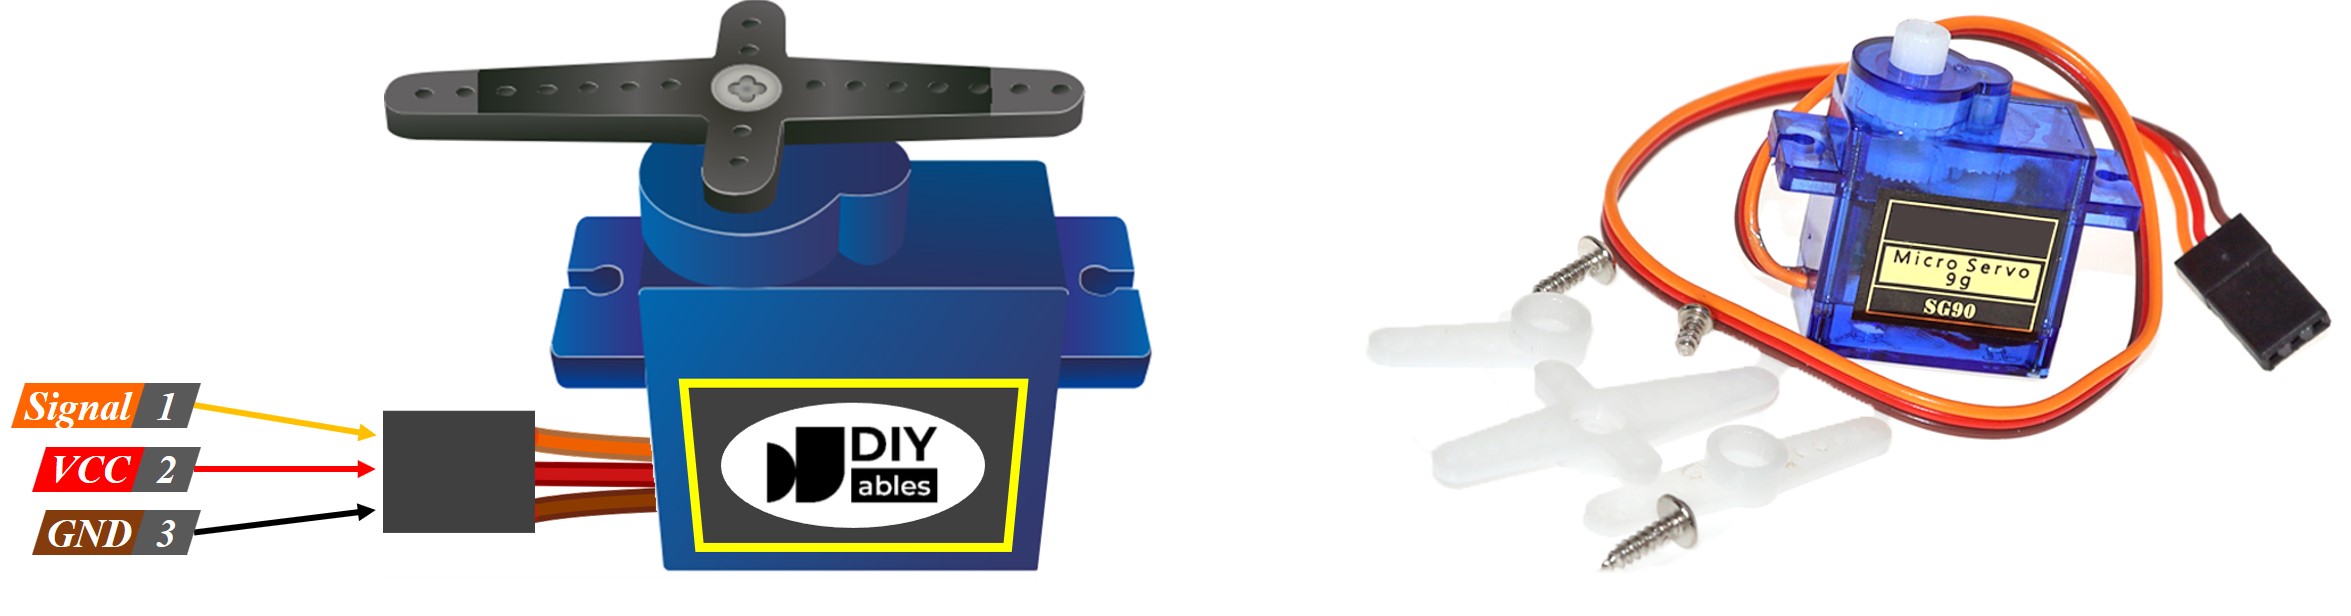
Servo Motor Pinout
The servo motor has three pins for easy connection:
- GND pin: (brown or black) connects to GND (0V)
- VCC pin: (red) connects to VCC (5V)
- Signal pin: (yellow or orange) receives PWM control signal from ESP32 pin
How Servo Motor Works
Wiring Diagram between Servo Motor and ESP32 C3 Super Mini
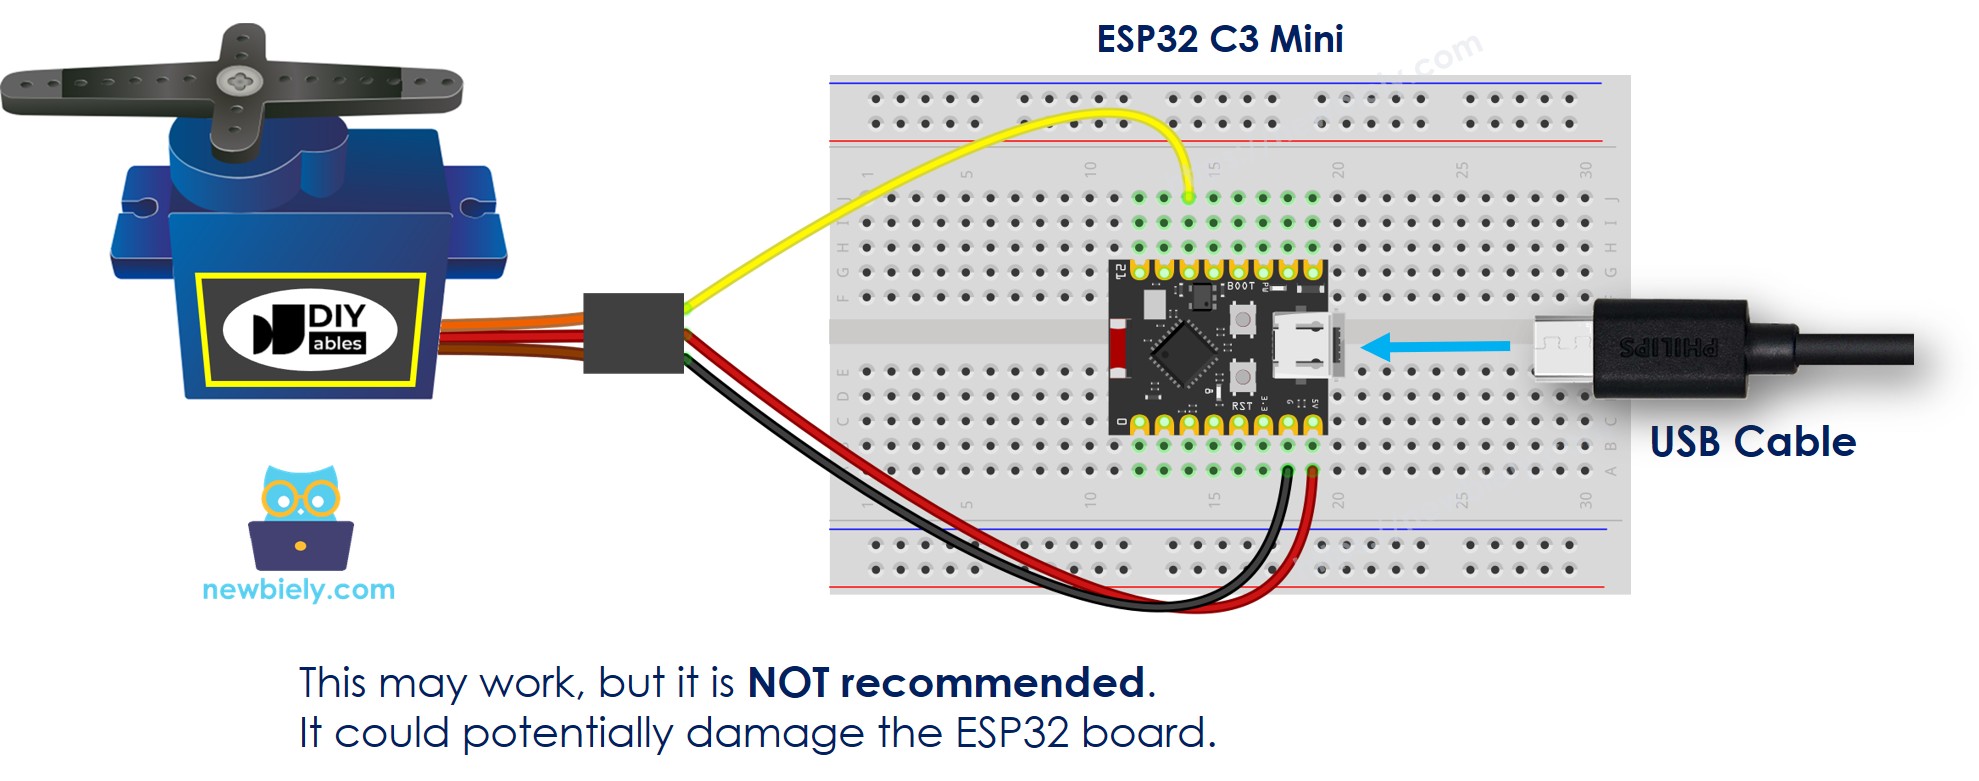
Here's how to connect your servo motor to the ESP32 C3 Super Mini board:
When powering via USB port:
This image is created using Fritzing. Click to enlarge image
| Servo Motor Pin | ESP32 C3 Super Mini Pin |
|---|---|
| GND (Brown/Black) | GND |
| VCC (Red) | 5V |
| Signal (Yellow/Orange) | D10 |
When powering via Vin pin with external power supply:
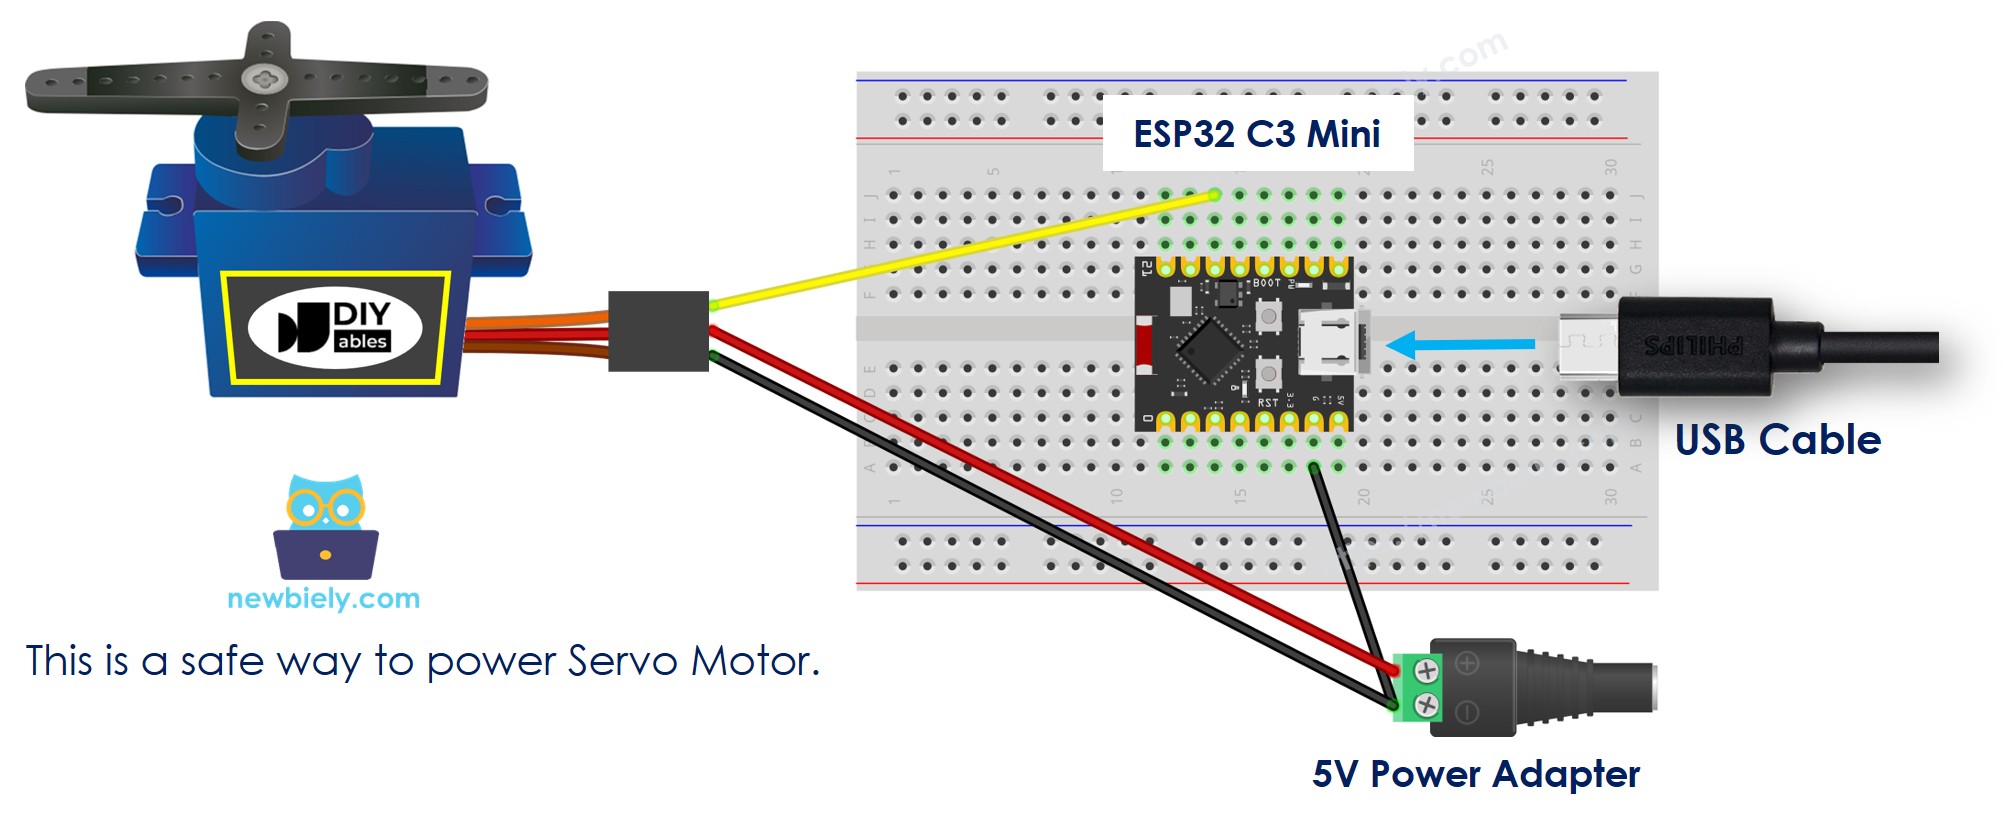
This image is created using Fritzing. Click to enlarge image
※ NOTE THAT:
IMPORTANT SAFETY WARNING: When powering the ESP32 C3 Super Mini board via USB port, do NOT power the servo motor via Vin pin or VBUS pin. This can cause excessive current draw and may permanently damage your board. Use an external power supply for the servo motor if you need more power.
ESP32 C3 Super Mini Code
The following code makes the servo motor sweep from 0° to 180° and back continuously:
What the code does:
- Initializes the ESP32Servo library
- Attaches the servo to pin D10
- Rotates servo from 0° to 180° in 1° increments
- Rotates servo back from 180° to 0°
- Repeats the sweeping motion continuously
Detailed Instructions
- New to ESP32 C3 Mini? Complete our Getting Started with ESP32 C3 Mini tutorial first to set up your development environment.
- Set up Arduino IDE: If you are new to ESP32 C3 Super Mini, refer to the tutorial on how to set up the environment for ESP32 C3 Super Mini in the Arduino IDE.
- Wire the components: Connect the servo motor to ESP32 C3 Super Mini according to the wiring diagram above.
- Connect USB cable: Connect the ESP32 C3 Super Mini board to your computer using a USB Type-C cable.
- Open Arduino IDE: Launch the Arduino IDE on your computer.
- Select board and port: Choose ESP32 C3 Super Mini board and its corresponding COM port.
- Open Library Manager: Click the Libraries icon on the left bar of the Arduino IDE.
- Search for library: Type "ESP32Servo" in the search box.
- Install library: Look for the servo library by Kevin Harrington and John K. Bennett, then click Install.
- Search for ESP32Servo created by Kevin Harrington,John K. Bennett and click the Install button.
- Copy the code: Copy the above servo motor code and paste it into Arduino IDE.
- Upload the code: Click the Upload button to compile and upload code to ESP32 C3 Super Mini.
- Observe the result: Watch the servo motor rotate slowly 180° clockwise, then counter-clockwise repeatedly.
- Pro Tip: Start with slow movements when testing servo motors to prevent mechanical stress and ensure smooth operation.
Line-by-line Code Explanation
The above ESP32 C3 Super Mini code contains line-by-line explanation. Please read the comments in the code!
How to Control Speed of Servo Motor
Applications and Project Ideas
Use your ESP32 C3 Super Mini servo motor setup in these practical projects:
- Build a robotic arm with multiple servo motors for pick-and-place operations
- Create an automatic pet feeder with timed servo-controlled dispensing
- Design a smart door lock system controlled via WiFi
- Make a solar panel tracker that follows the sun's position
- Build a camera pan-tilt mechanism for surveillance or photography
- Create an automated plant watering system with servo-controlled valves
Watch the video below for a visual walkthrough of controlling a servo motor with ESP32 C3 Super Mini.
The instruction and source code for the above video available at how to control servo motor via web tutorial
Challenge Yourself
Take your ESP32 C3 Super Mini servo motor skills to the next level:
- Easy: Modify the code to sweep the servo between 45° and 135° instead of 0° to 180°
- Easy: Change the delay time to make the servo move faster or slower
- Medium: Add a button to control when the servo moves instead of continuous sweeping
- Medium: Control multiple servo motors simultaneously from one ESP32 C3 Super Mini
- Advanced: Create a web interface to control servo position remotely via WiFi
- Advanced: Build a joystick-controlled servo system using analog input