ESP32 C3 Super Mini - SSD1309 OLED Display
Learn how to use the SSD1309 OLED 128×64 display (2.42-inch) with your ESP32 C3 Super Mini using the I2C interface. This beginner-friendly guide covers everything from basic wiring to advanced features like bitmap images and custom fonts.
In this tutorial, you'll learn:
- What the SSD1309 OLED display is and how it works with ESP32 C3 Super Mini
- How to wire the 2.42-inch I2C OLED to ESP32 C3 Super Mini
- How to display text, numbers, and graphics on the SSD1309 OLED
- How to center text, draw shapes, and show bitmap images
- How to use hardware scrolling and adjust contrast
- How to implement custom fonts from the Adafruit GFX library
Hardware Preparation
| 1 | × | ESP32 C3 Super Mini | |
| 1 | × | USB Cable Type-A to Type-C (for USB-A PC) | |
| 1 | × | USB Cable Type-C to Type-C (for USB-C PC) | |
| 1 | × | SSD1309 I2C OLED Display 128x64 (2.42 inch) | |
| 1 | × | Jumper Wires |
Or you can buy the following kits:
| 1 | × | DIYables Sensor Kit (18 sensors/displays) |
Additionally, some of these links are for products from our own brand, DIYables .
Overview of the SSD1309 2.42-Inch OLED Display
The SSD1309 is a CMOS OLED driver chip for 128×64 dot-matrix displays that communicates via I2C.
Key features:
- Resolution: 128×64 pixels (2.42-inch diagonal)
- Interface: I2C (only 2 wires needed - SDA and SCL)
- Compatibility: Register-compatible with SSD1306
- Voltage tolerance: Accepts up to 16V VCC (higher than SSD1306)
- Built-in boost converter: Most modules include onboard power regulation
- Low power consumption: 20-40 mA at full brightness
- Monochrome: White pixels on black background
- Why it's great for beginners: Simple I2C wiring, easy-to-use library, and shares I2C bus with other devices
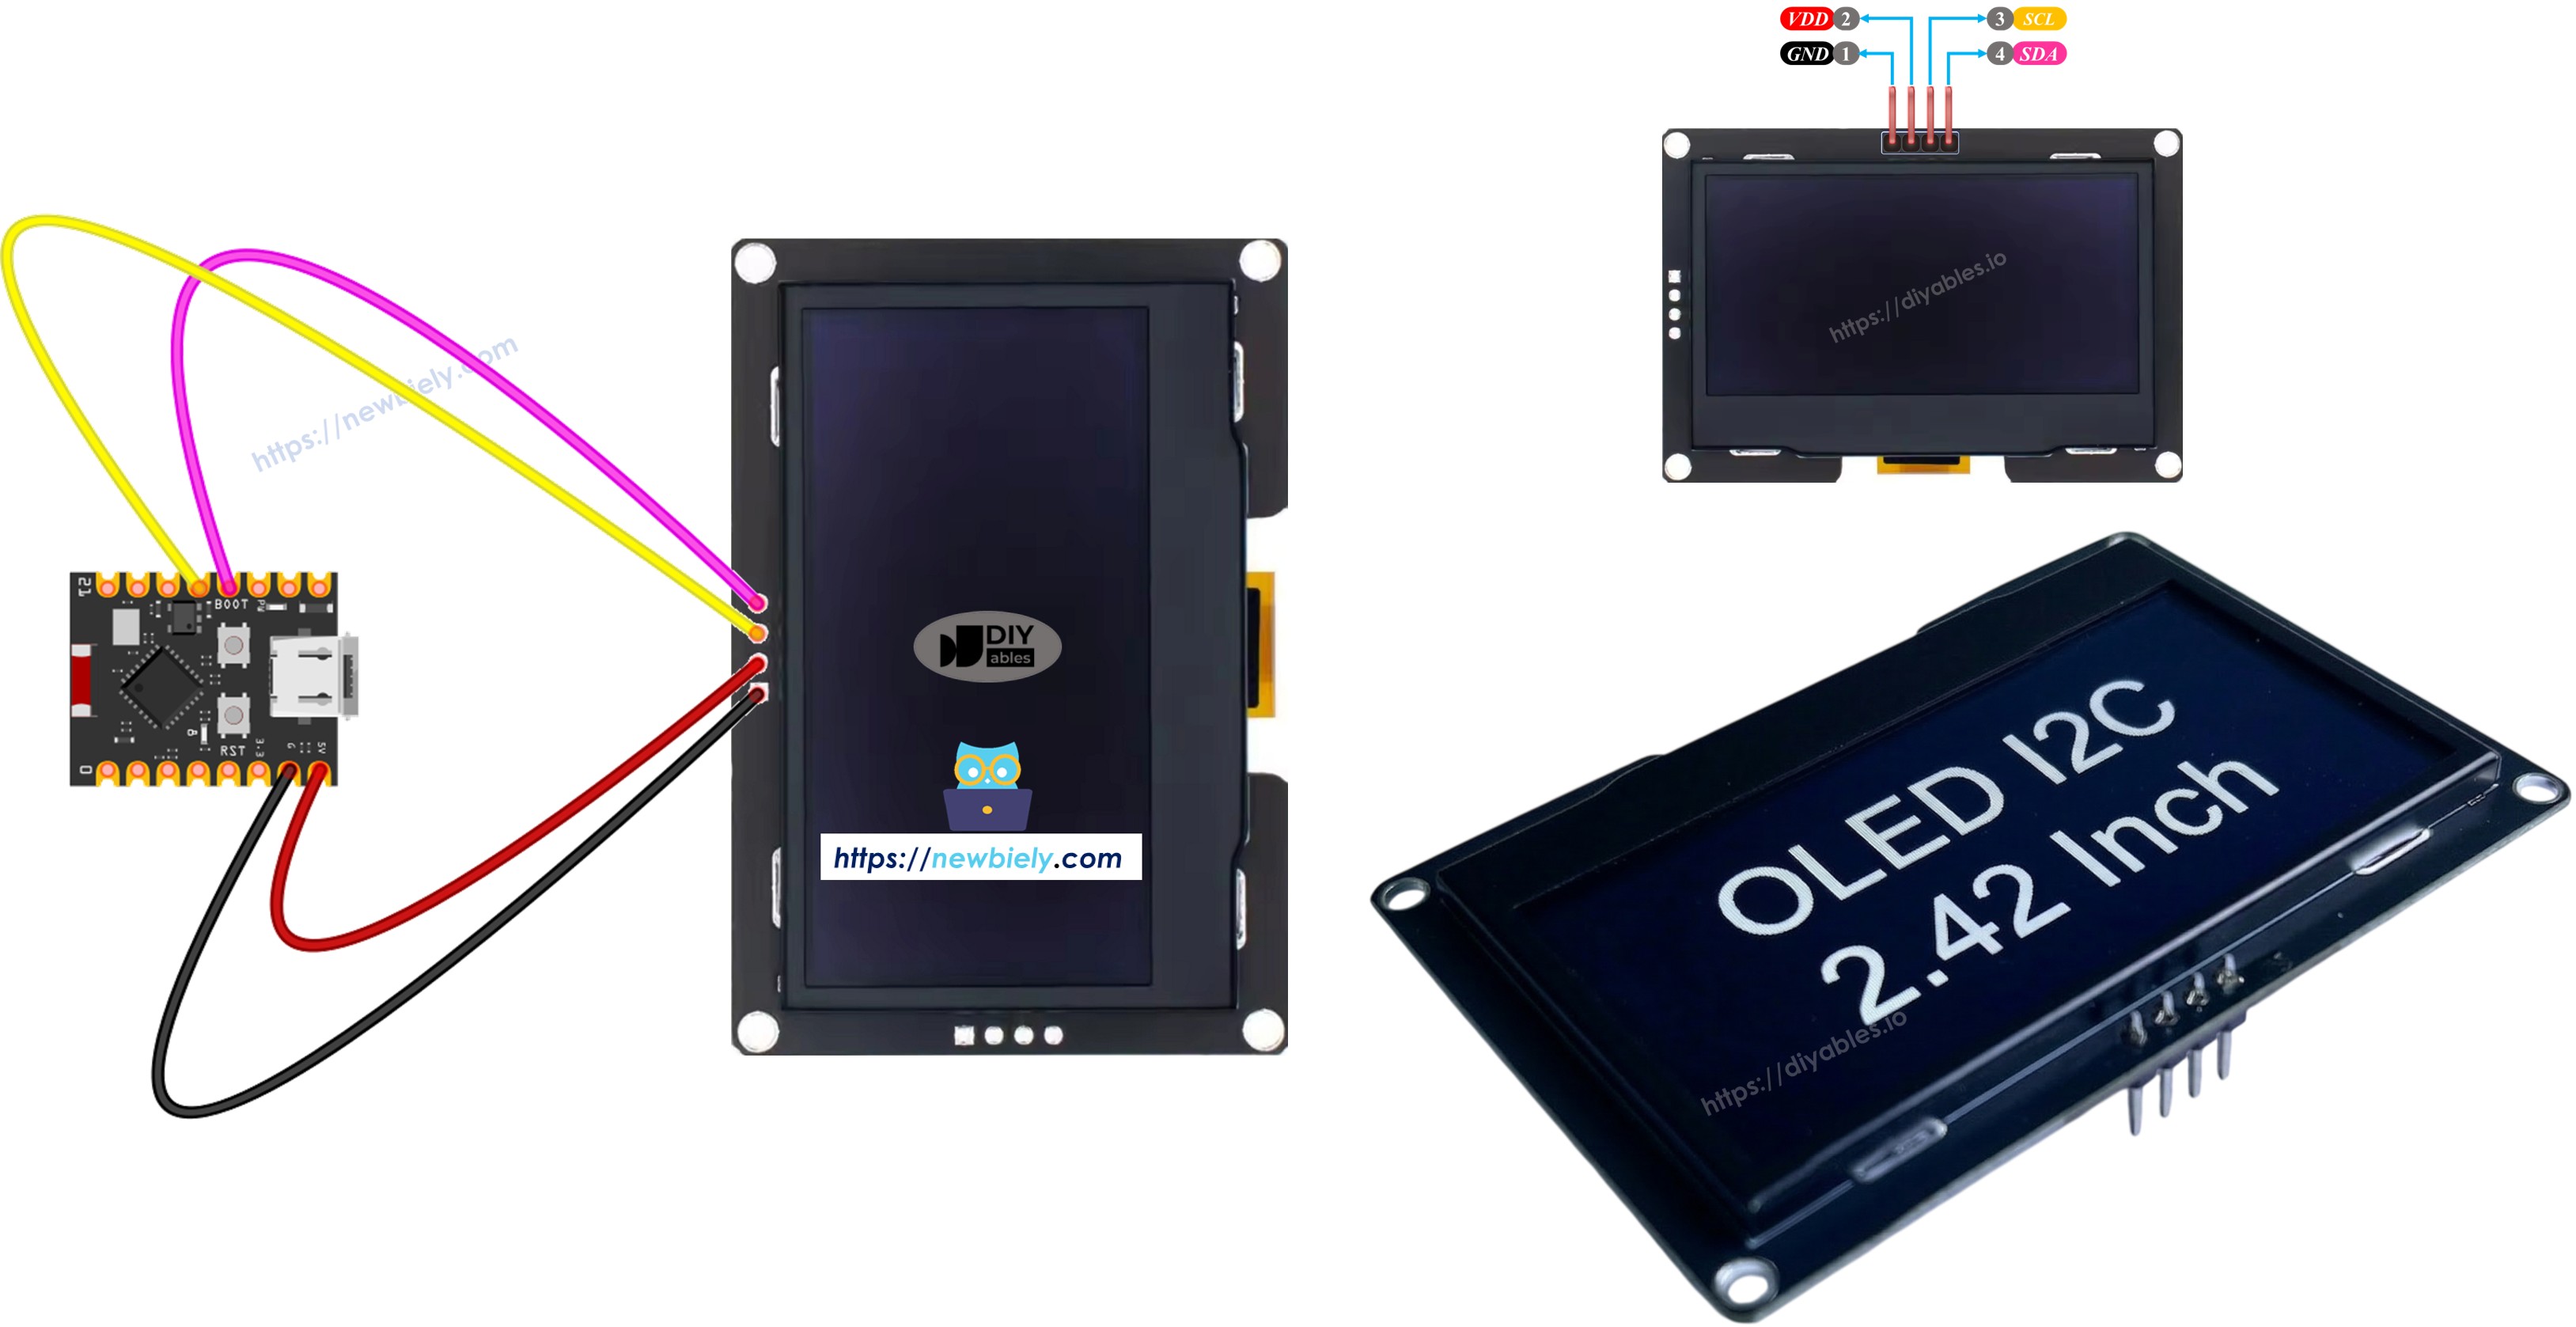
SSD1309 OLED Pinout (I2C Module)
The 2.42-inch SSD1309 OLED module has four pins:
- GND: Ground connection
- VCC: Power supply (3.3V)
- SCL: I2C clock line
- SDA: I2C data line
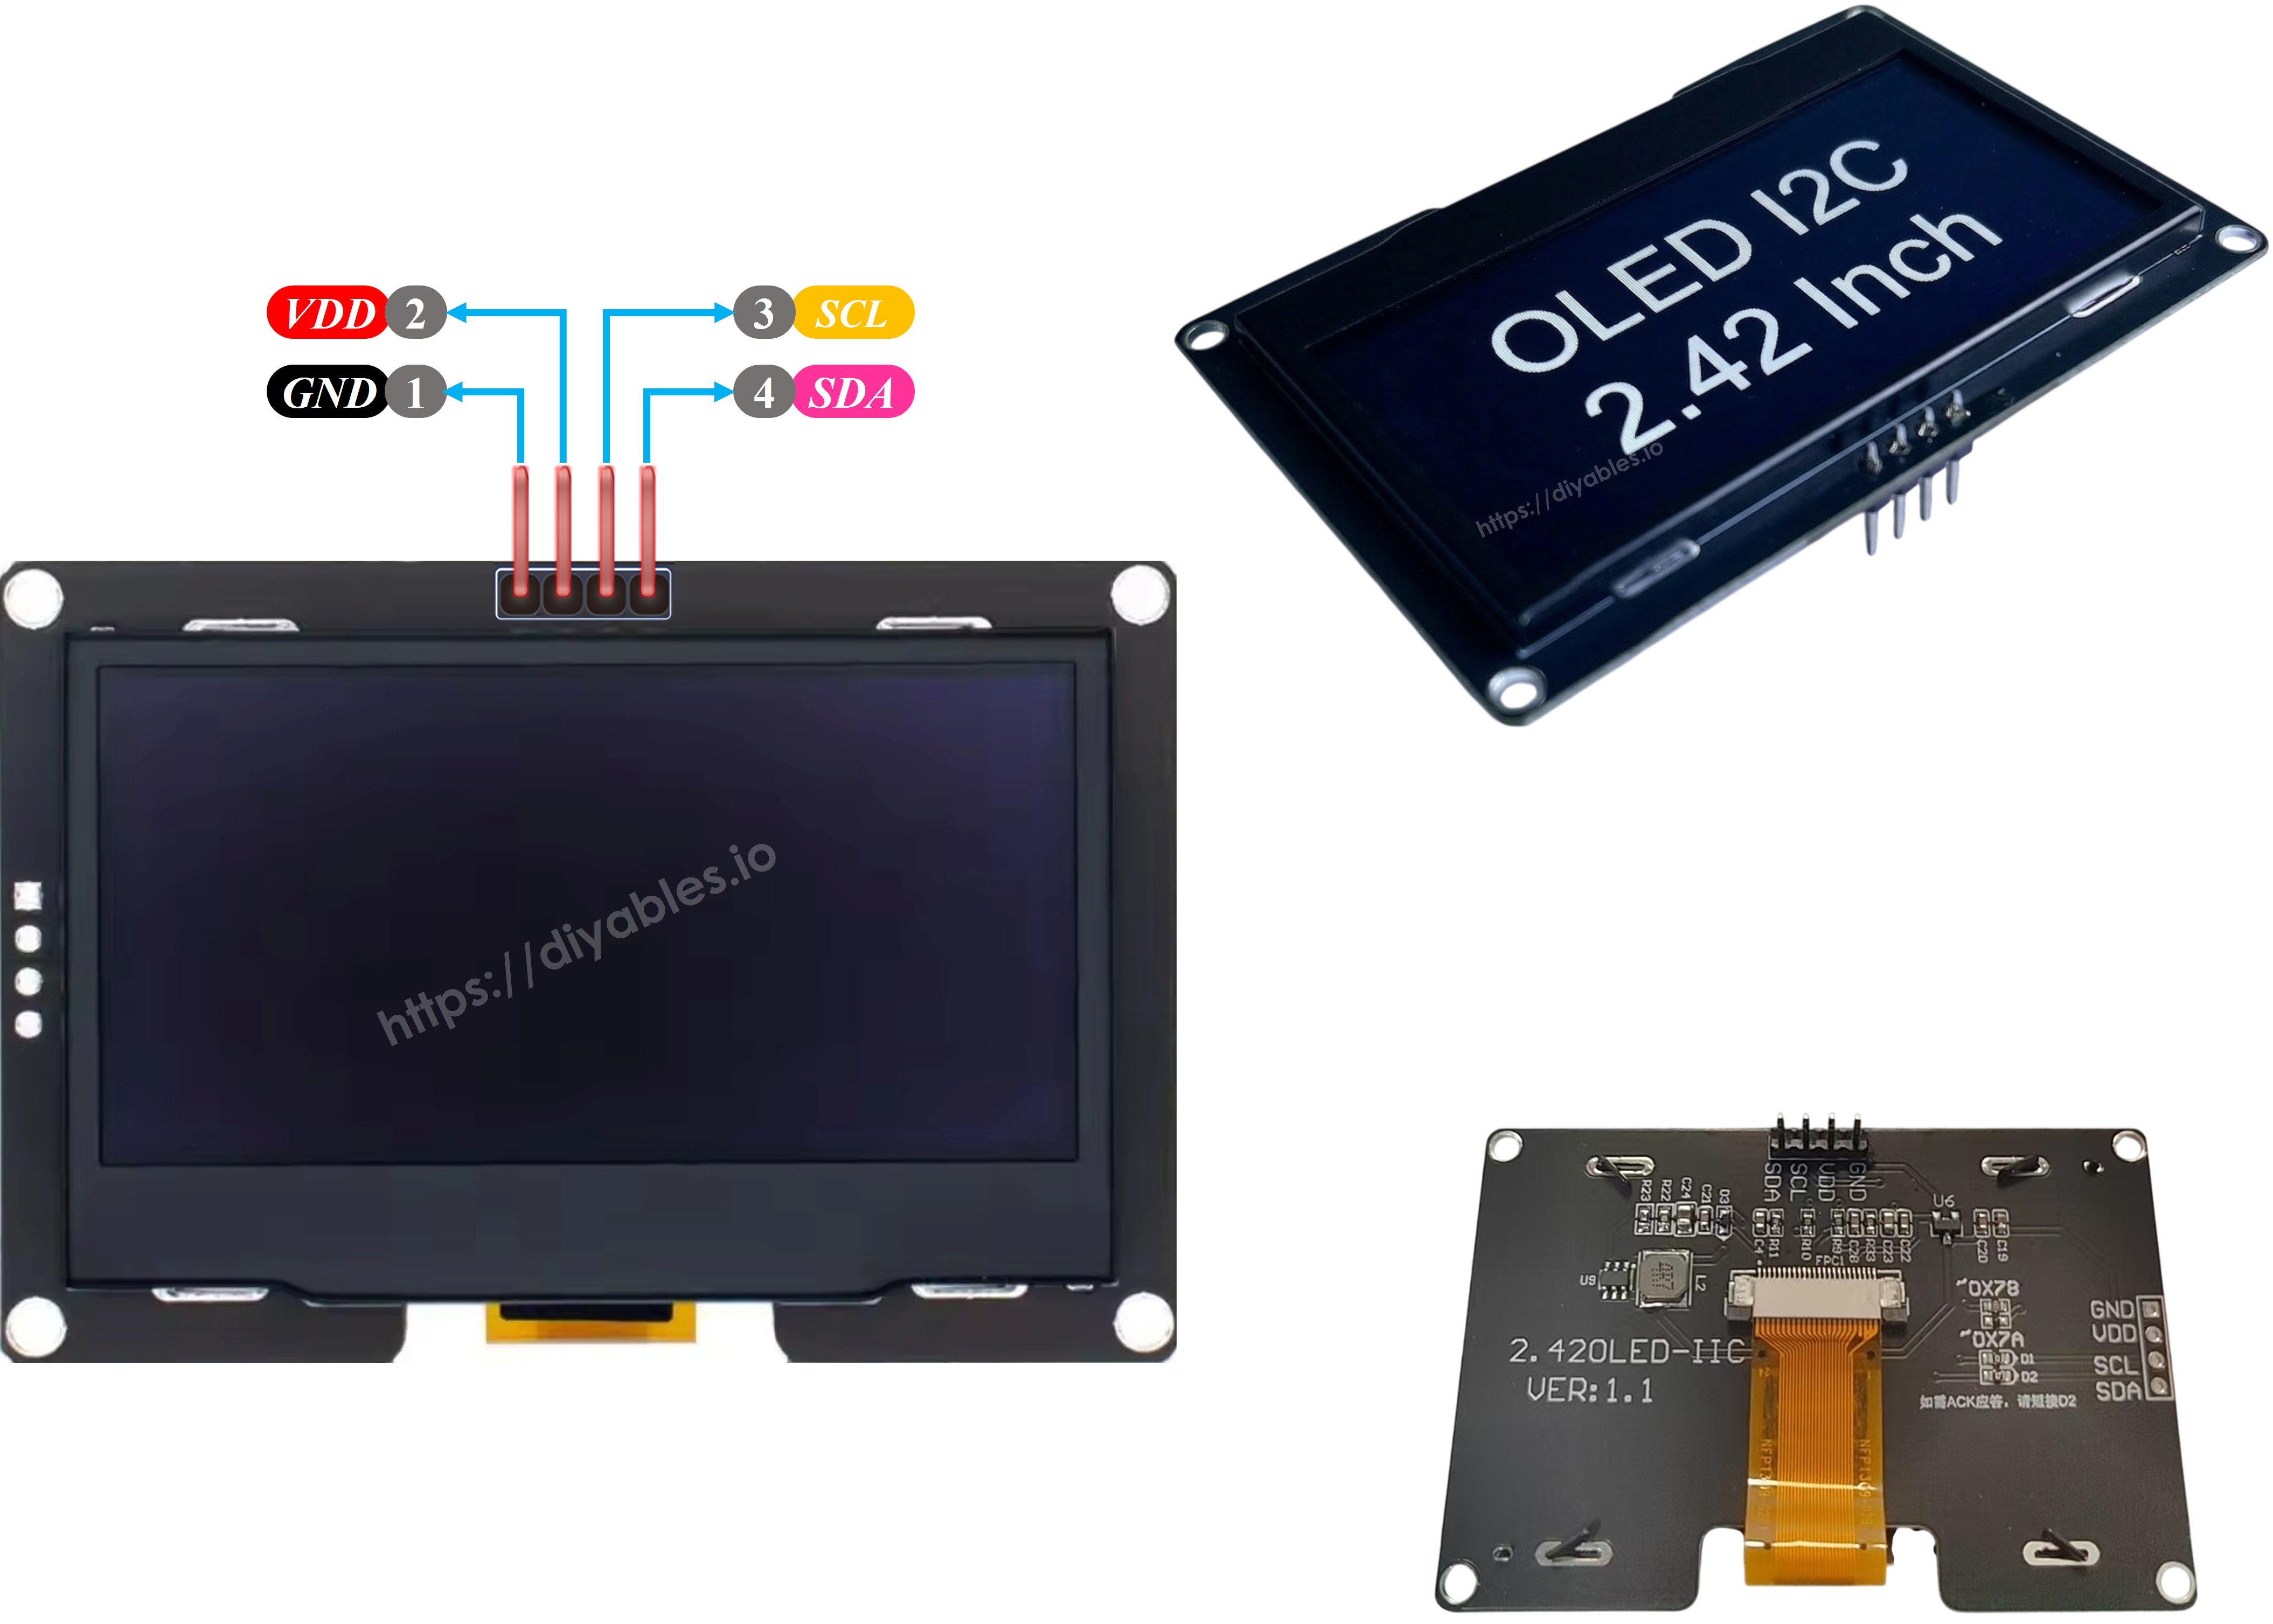
※ NOTE THAT:
- The pin layout of the OLED module can differ depending on the manufacturer. Always use the labels printed on the module itself.
- This tutorial uses the SSD1309 I2C OLED from DIYables, which has been tested and confirmed to work.
Wiring Diagram
Connect the SSD1309 OLED 128x64 display to your ESP32 C3 Super Mini following this diagram:

This image is created using Fritzing. Click to enlarge image
Connection table:
| OLED Module | ESP32 C3 Super Mini |
|---|---|
| VCC | 3.3V |
| GND | GND |
| SDA | A4 |
| SCL | A5 |
※ NOTE THAT:
- Note: Make sure connections are secure before powering on
- Note: The I2C pins (A4/A5) can be shared with other I2C devices
How to Program ESP32 C3 Super Mini for SSD1309 OLED
This section shows you how to install the required library and write code for your ESP32 C3 Super Mini SSD1309 OLED display.
What you'll do:
- Install the DIYables_OLED_SSD1309 library and dependencies
- Initialize the I2C OLED display in your code
- Display text, numbers, and graphics
- Use advanced features like scrolling and custom fonts
Install the DIYables_OLED_SSD1309 Library
- Click to the Libraries icon on the left bar of the Arduino IDE.
- Search for DIYables_OLED_SSD1309, then find the DIYables OLED SSD1309 library by DIYables.
- Click Install to install the DIYables_OLED_SSD1309 library.
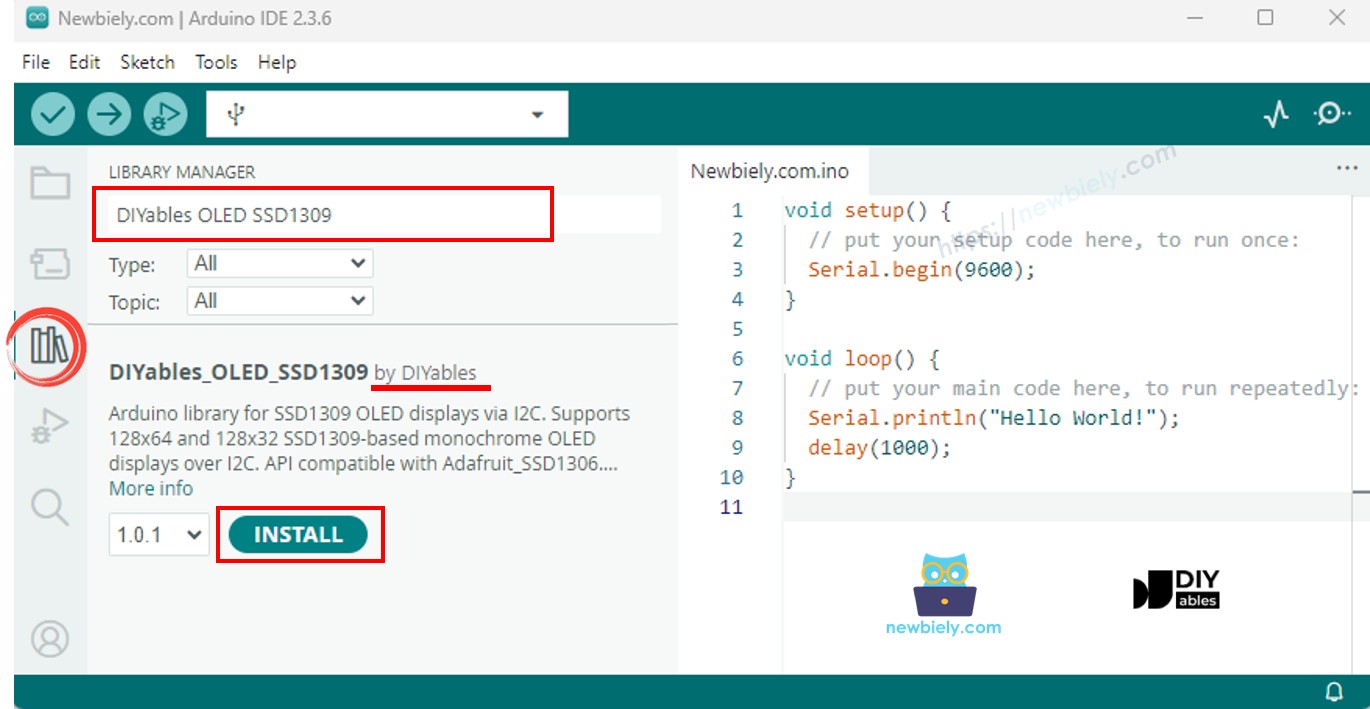
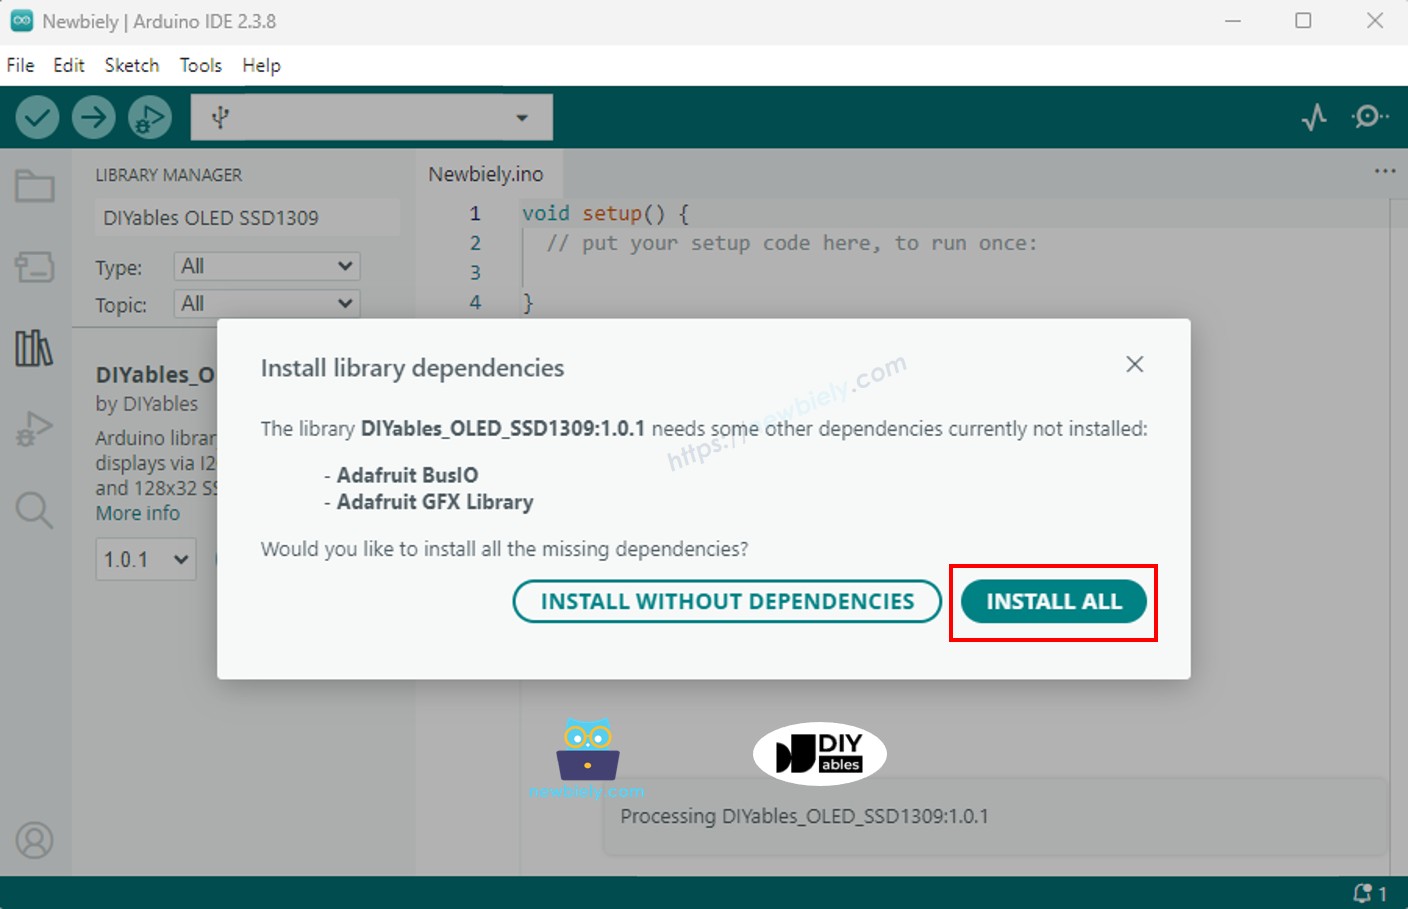
- You will be asked to install dependencies for the library.
- Click Install All to install all required dependencies.
Programming Steps
1. Include the required libraries
2. Define the screen dimensions
3. Declare the display object
4. Initialize the OLED in setup()
5. Display content
ESP32 C3 Super Mini Code — Hello World on SSD1309 OLED
This simple example displays "Hello World" text on your SSD1309 OLED display.
What this code does:
- Initializes the I2C OLED display
- Clears the screen buffer
- Sets text size and position
- Displays "Hello World" text
- Sends the buffer to the physical screen
ESP32 C3 Super Mini Code — Display Text on SSD1309 OLED
This example demonstrates advanced text features including multiple text sizes, number formatting, and efficient RAM usage.
What this code does:
- Shows text at different sizes
- Displays integers and floating-point numbers
- Uses F() macro to save RAM
- Formats numbers in decimal and hexadecimal
- Demonstrates proper cursor positioning
Useful Display Functions Reference
Basic display control:
- oled.clearDisplay() — wipe the frame buffer (all pixels off)
- oled.display() — transfer the buffer to the OLED so changes become visible
- oled.drawPixel(x, y, color) — set or clear an individual pixel
Text functions:
- oled.setTextSize(n) — scale the font by factor *n* (1 = 6×8, 2 = 12×16, etc.)
- oled.setCursor(x, y) — move the text cursor to pixel coordinates *(x, y)*
- oled.setTextColor(SSD1309_PIXEL_ON) — text foreground only (transparent background)
- oled.setTextColor(SSD1309_PIXEL_OFF, SSD1309_PIXEL_ON) — text with explicit background color
- oled.println("message") — print a string and advance to the next line
- oled.println(number) — print an integer in decimal
- oled.println(number, HEX) — print an integer in hexadecimal
Hardware scrolling:
- oled.startscrollright(start, stop) — hardware-scroll right between page *start* and *stop*
- oled.startscrollleft(start, stop) — hardware-scroll left
- oled.startscrolldiagright(start, stop) — hardware-scroll diagonally right
- oled.startscrolldiagleft(start, stop) — hardware-scroll diagonally left
- oled.stopscroll() — halt any active hardware scroll
Display settings:
- oled.setContrast(value) — adjust display brightness (0–255)
- oled.dim(true/false) — quickly dim or restore the display
- oled.invertDisplay(true/false) — hardware-level color inversion
How to Vertically and Horizontally Center Text on the SSD1309 OLED
Centering text on your ESP32 C3 Super Mini OLED display creates professional-looking interfaces.
ESP32 C3 Super Mini Code — Draw Shapes on SSD1309 OLED
The DIYables_OLED_SSD1309 library lets you draw geometric shapes on your 128x64 OLED display.
What this code does:
- Draws pixels, lines, and rectangles
- Creates circles and triangles
- Shows filled and outlined shapes
- Demonstrates rounded rectangles
- Uses the Adafruit GFX graphics functions
ESP32 C3 Super Mini Code — Hardware Scrolling on SSD1309 OLED
The SSD1309 OLED includes built-in hardware scrolling that moves content without using CPU resources.
What this code does:
- Demonstrates all four scroll directions (right, left, diagonal-right, diagonal-left)
- Uses hardware acceleration for smooth scrolling
- Shows how to start and stop scrolling
- Works with page numbers (0-7 for 8-pixel-high strips)
※ NOTE THAT:
Call display() to push your content to the OLED before starting a scroll. Stop scrolling with stopscroll() before drawing new content.
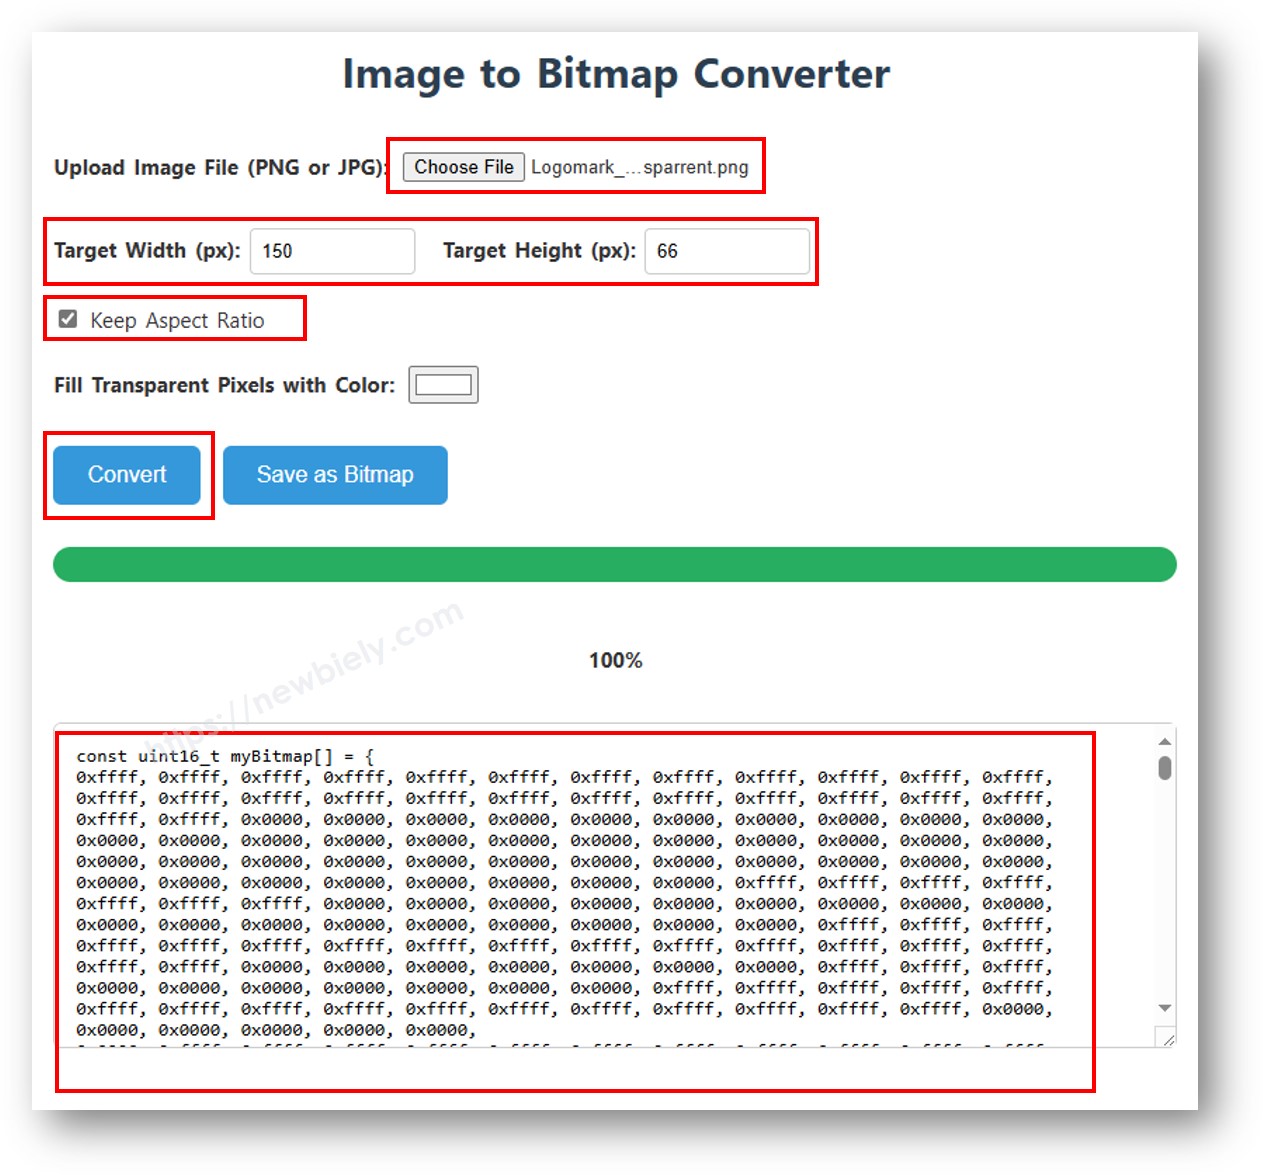
ESP32 C3 Super Mini Code — Display Bitmap Image on SSD1309 OLED
Display custom images on your SSD1309 OLED by converting them to byte arrays.
How to convert images:
- Go to image2cpp online tool
- Upload your image (PNG, JPG, BMP, etc.)
- Set canvas size to 128×64 (or smaller)
- Choose Arduino code as output format
- Copy the generated array into your sketch
What this code does:
- Converts images to monochrome bitmaps
- Stores bitmap data in PROGMEM to save RAM
- Displays the bitmap on the 128x64 OLED
- Shows proper bitmap positioning
※ NOTE THAT:
- Bitmap dimensions must not exceed 128×64 for this module
- Images are automatically converted to monochrome (black and white)
ESP32 C3 Super Mini Code — Contrast and Dim on SSD1309 OLED
Control the brightness of your ESP32 C3 Super Mini SSD1309 display with contrast and dim functions.
What this code does:
- Adjusts contrast from 0 (minimum) to 255 (maximum)
- Uses setContrast() for precise brightness control
- Uses dim() for quick brightness toggle
- Demonstrates smooth brightness transitions
ESP32 C3 Super Mini Code — Custom External Fonts on SSD1309 OLED
The Adafruit GFX library includes dozens of professional FreeFont typefaces for your SSD1309 OLED display.
Available font families:
- Serif fonts (classic look)
- Sans fonts (modern, clean)
- Mono fonts (fixed-width)
- Each in Regular, Bold, Italic styles
- Four sizes for each font
What this code does:
- Shows how to include custom font headers
- Demonstrates setFont() for font switching
- Displays text in multiple font styles
- Uses PROGMEM for efficient flash storage
※ NOTE THAT:
- When an external font is active, the cursor Y coordinate refers to the text baseline, not the top-left corner
- External fonts are stored in flash (PROGMEM). Use them thoughtfully to stay within the ESP32 C3 Super Mini flash budget
Detailed Instructions
- New to ESP32 C3 Super Mini? Complete our Getting Started with ESP32 C3 Mini tutorial first to set up your development environment.
- Wire the display: Connect SSD1309 OLED to ESP32 C3 Super Mini using the wiring table above
- Install library: Open Arduino IDE Library Manager and install DIYables_OLED_SSD1309 and all dependencies
- Open example: Load one of the example sketches from the code sections above
- Select board: Choose ESP32C3 Dev Module from Tools > Board menu
- Upload code: Connect your ESP32 C3 Super Mini and click Upload
- Check display: The SSD1309 OLED should show the example output immediately
- Experiment: Try changing text, colors, or coordinates to see how the display responds
- Pro Tip: Always call display.display() after drawing to update the screen - the SSD1309 uses a frame buffer that needs to be pushed to the physical display
SSD1309 OLED Troubleshooting with ESP32 C3 Super Mini
If nothing appears on your 2.42-inch SSD1309 OLED display, follow these troubleshooting steps:
Common issues and fixes:
- Verify wiring: Confirm SDA→A4, SCL→A5, VCC→3.3V, and GND→GND are all correctly connected
- Confirm driver chip: This library targets the SSD1309 controller - modules with SH1106 or other chips won't work
- Check I2C address: Most SSD1309 modules use 0x3C, but some use 0x3D - run the scanner below to find yours
- Call display(): The SSD1309 uses a frame buffer - nothing appears until you call oled.display()
- Check power supply: The 2.42-inch OLED draws 20-40 mA - ensure 3.3V can provide enough current
- Test connections: Try wiggling wires gently to check for loose connections
- Use I2C scanner: Upload the code below to detect your OLED's I2C address
I2C scanner code:
Expected Serial Monitor output when the SSD1309 is detected:
Application and Project Ideas
Here are some practical projects you can build with your ESP32 C3 Super Mini and SSD1309 OLED display:
- Weather station display showing temperature, humidity, and forecast icons
- Real-time clock with date, time, and custom alarm indicators
- WiFi signal strength monitor with visual bar graphs
- IoT sensor dashboard displaying multiple sensor readings
- Music player interface with song title, artist, and playback controls
- System monitor showing CPU usage, memory, and network status
- Game console for simple pixel-based games like Snake or Pong
- Scrolling message board for notifications and alerts
Video Tutorial
Watch the video below for a visual walkthrough of this project.
...VIDEO 5yFyA1jrNuk
...VIDEO
Challenge Yourself
Take your ESP32 C3 Super Mini SSD1309 OLED skills to the next level with these challenges:
- Easy: Modify the Hello World example to display your name and favorite emoji using different text sizes
- Easy: Create a simple digital clock that displays hours, minutes, and seconds in large text
- Medium: Build a temperature display that shows readings from a DHT11 sensor with a graphical thermometer
- Medium: Design an animated loading bar that fills from left to right using rectangles
- Advanced: Create a menu system with multiple pages that you can navigate using buttons
- Advanced: Build a real-time graph that scrolls sensor data across the 128x64 screen
- Advanced: Design a bitmap animation that cycles through multiple frames to create motion