ESP32 MicroPython 74HC595 4-Digit 7-Segment Display
The ESP32 is a powerful, Wi-Fi-enabled microcontroller widely used in IoT and embedded projects. Paired with MicroPython and the DIYables 4-Digit 7-Segment Display module (74HC595), you can easily show numbers, text, and sensor readings on a bright LED display.
This tutorial walks you through:
- Connecting the 74HC595-based 4-digit 7-segment display to an ESP32 — only 3 data pins needed.
- Displaying integers, floats, and text strings.
- Showing temperature with the degree symbol (°C / °F).
- Displaying time with a blinking dot separator.
- Blinking the display on and off.
- Using the auto-refresh feature — no manual refresh loop required.

Components Needed
Or you can buy the following kits:
| 1 | × | DIYables ESP32 Starter Kit (ESP32 included) | |
| 1 | × | DIYables Sensor Kit (18 sensors/displays) |
Additionally, some of these links are for products from our own brand, DIYables .
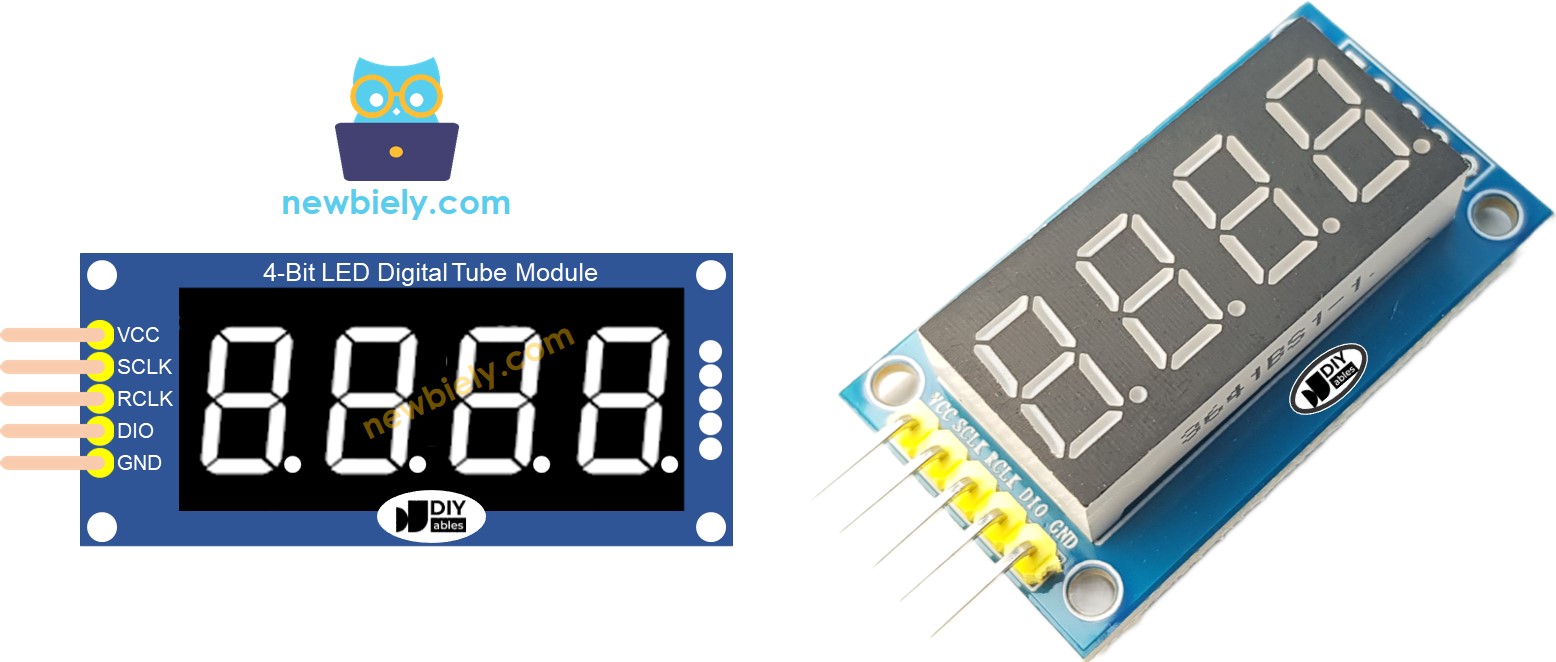
The 4-Digit 7-Segment Display 74HC595 Module
The DIYables 4-Digit 7-Segment Display 74HC595 module is a compact LED display driven by two 74HC595 shift registers. It shows 4 digits and 4 decimal point dots. Because the shift registers handle all the segment and digit driving, the ESP32 only needs 3 GPIO pins (clock, latch, and data) instead of the 12+ pins a raw display would require.
The ESP32 communicates with the module by shifting out segment data and digit-select data serially. The library handles this automatically using a hardware Timer for multiplexing — each digit is refreshed in turn at high speed, so all 4 digits appear lit simultaneously.
Key features of the module:
- Only 3 wires for data (SCLK, RCLK, DIO) plus power.
- 4 decimal point dots — individually controllable.
- Common anode or common cathode variants available.
- 5V or 3.3V compatible.
Pin Description
| Pin | Purpose | ESP32 Connection |
|---|---|---|
| SCLK (SH_CP) | Serial clock input | Connect to GPIO18 |
| RCLK (ST_CP) | Register clock / latch | Connect to GPIO17 |
| DIO (DS) | Serial data input | Connect to GPIO16 |
| VCC | 3.3V to 5V power input | Connect to 3.3V |
| GND | Ground | Connect to GND |
Wiring
The ESP32 operates at 3.3V logic. The 74HC595 module works with both 3.3V and 5V, so you can wire directly — no level shifting needed.
| 74HC595 Module | ESP32 | Notes |
|---|---|---|
| SCLK (SH_CP) | GPIO18 | Serial clock |
| RCLK (ST_CP) | GPIO17 | Latch / register clock |
| DIO (DS) | GPIO16 | Serial data |
| VCC | 3.3V | Power |
| GND | GND | Ground |

This image is created using Fritzing. Click to enlarge image
Tip: You can use any available GPIO pins on the ESP32. Just update the pin numbers in the code.
Detailed Instructions
Here's instructions on how to set up and run your MicroPython code on the ESP32 using Thonny IDE:
- Make sure Thonny IDE is installed on your computer.
- Confirm that MicroPython firmware is loaded on your ESP32 board.
- If this is your first time using an ESP32 with MicroPython, check out the ESP32 MicroPython Getting Started guide for step-by-step instructions.
- Connect the ESP32 board to the 4-digit 7-segment display module according to the provided diagram.
- Connect the ESP32 board to your computer with a USB cable.
- Open Thonny IDE on your computer.
- In Thonny IDE, go to Tools Options.
- Under the Interpreter tab, choose MicroPython (ESP32) from the dropdown menu.
- Make sure the correct port is selected. Thonny IDE usually detects it automatically, but you might need to select it manually (like COM3 on Windows or /dev/ttyUSB0 on Linux).
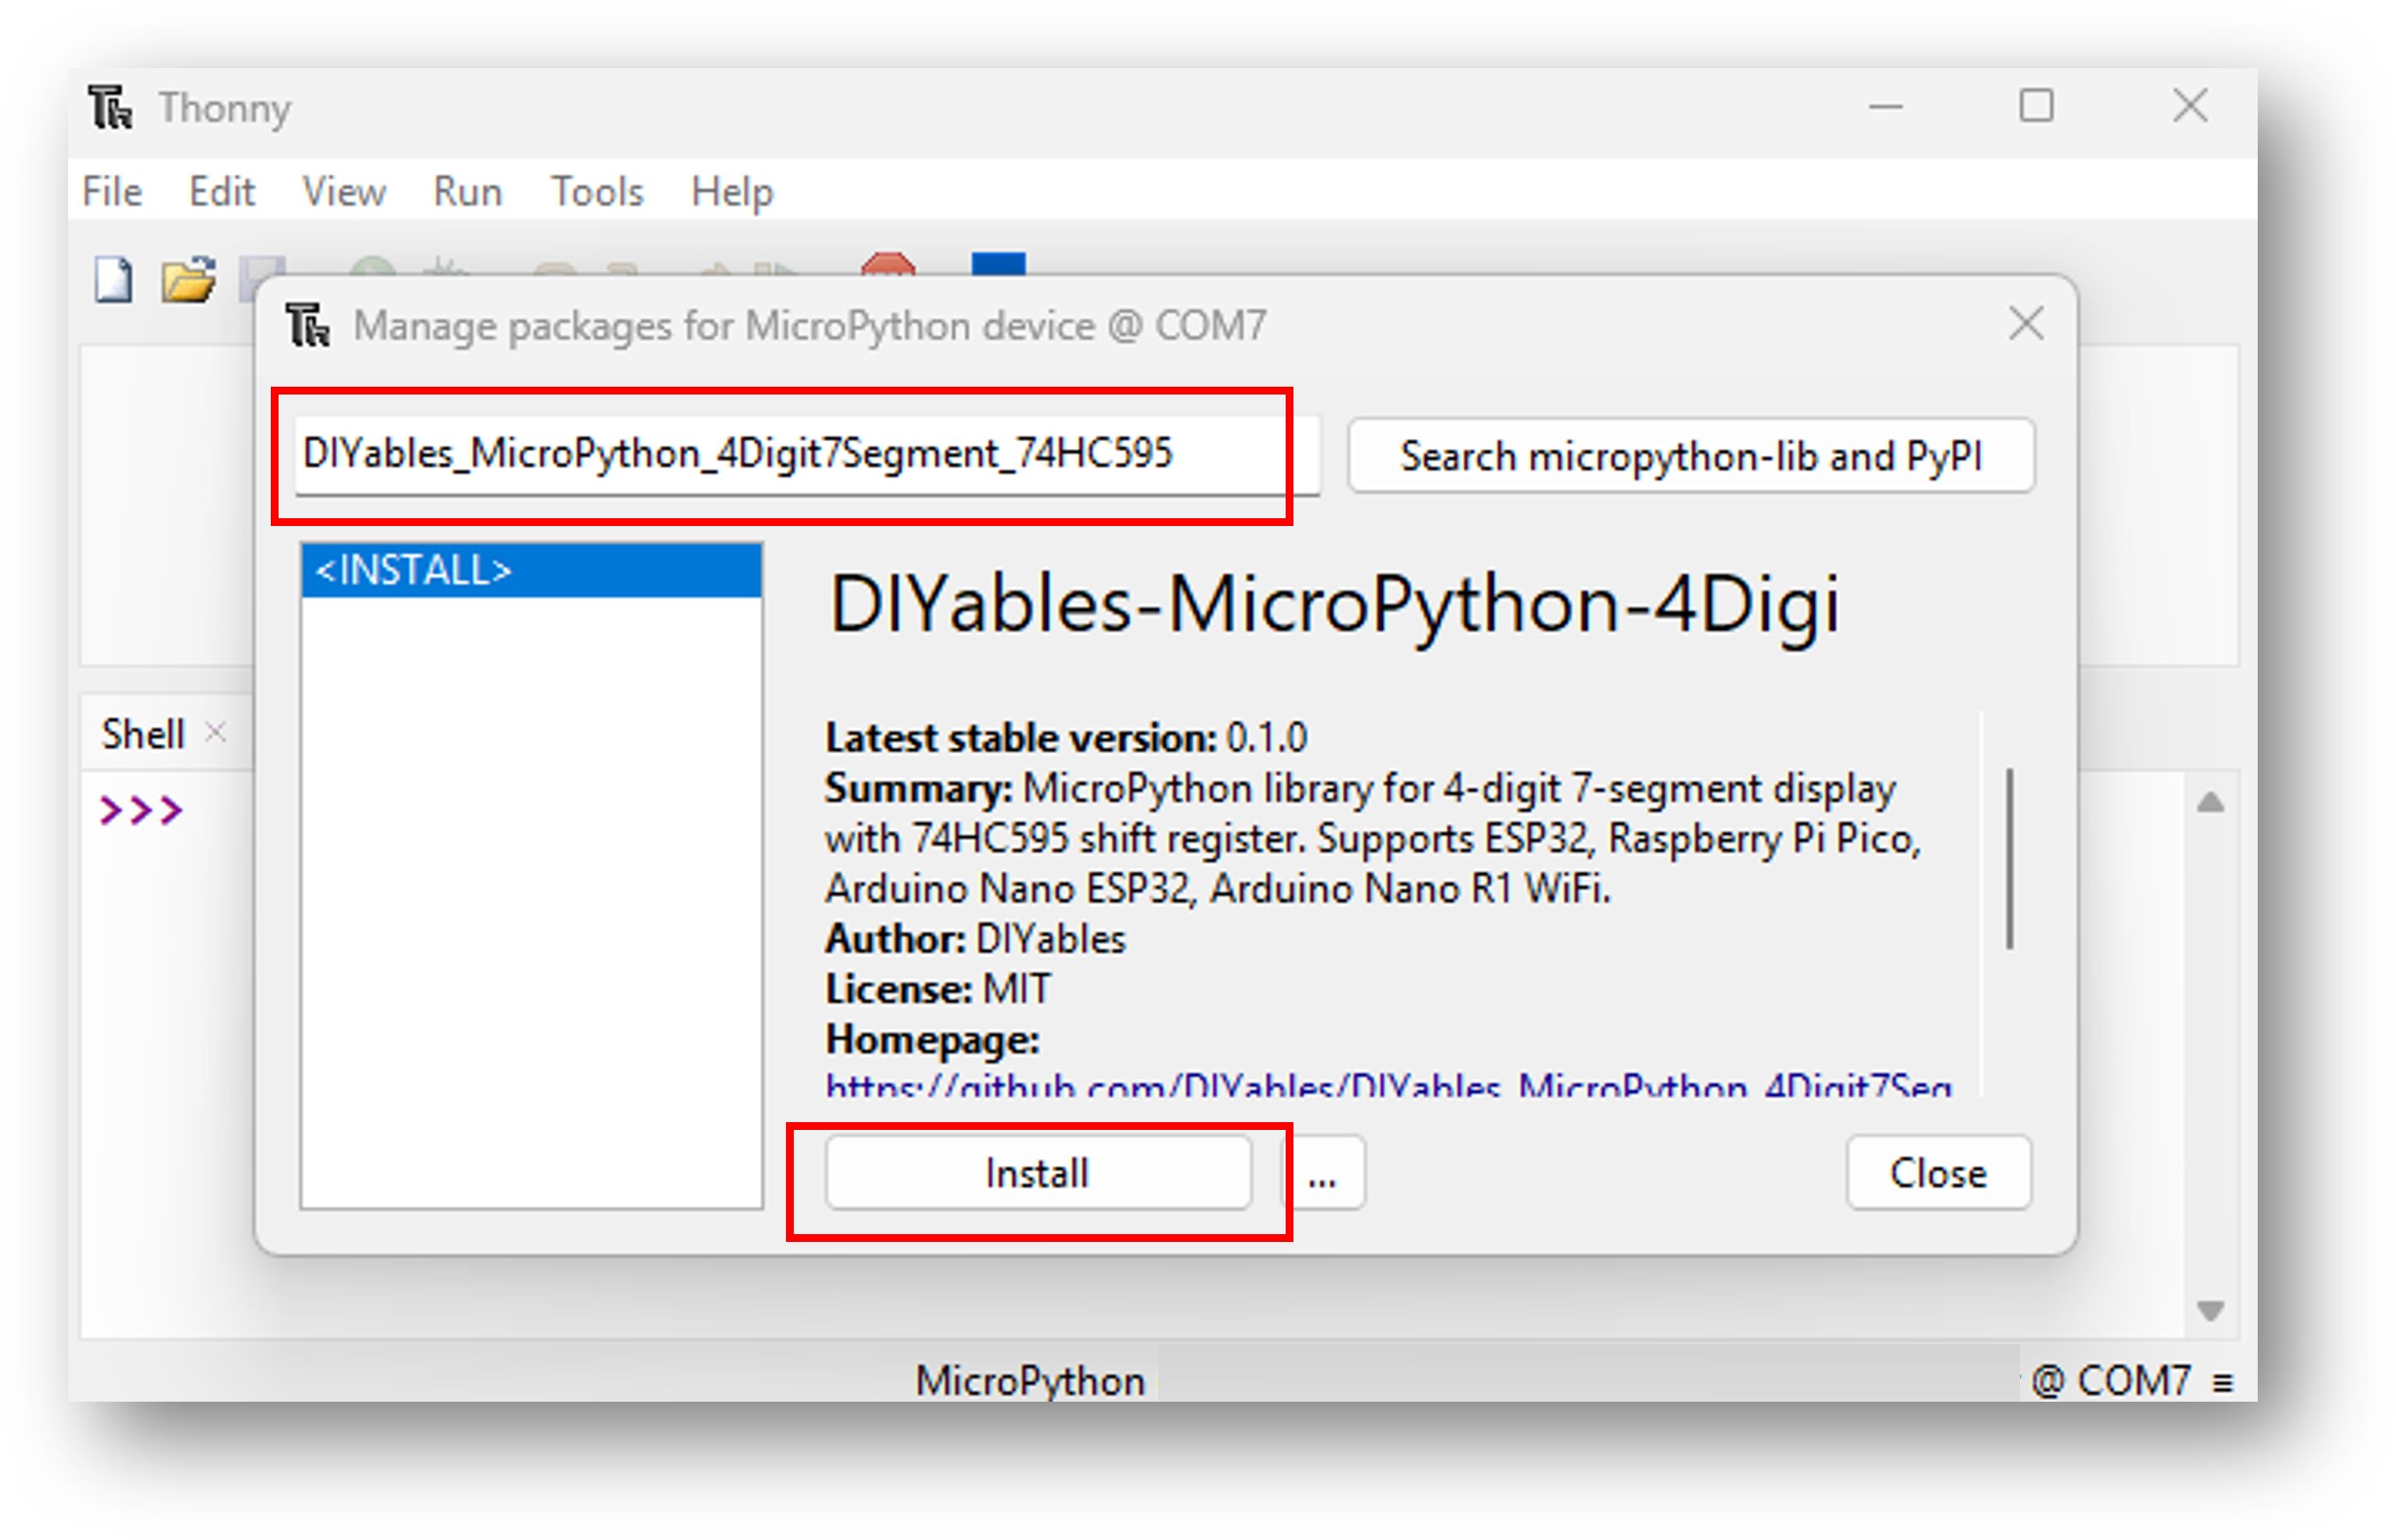
- Navigate to the Tools Manage packages on the Thonny IDE.
- Search "DIYables-MicroPython-4Digit7Segment-74HC595", then find the 4-Digit 7-Segment Display library created by DIYables.
- Click on DIYables-MicroPython-4Digit7Segment-74HC595, then click Install button to install the library.
- Copy the provided MicroPython code and paste it into Thonny's editor.
- Save the code to your ESP32 by:
- Clicking the Save button or pressing Ctrl+S.
- In the save dialog, choose MicroPython device.
- Name the file main.py.
- Click the green Run button (or press F5) to execute the script.
- Observe the display — you should see numbers, text, or other content appear on the 7-segment display.
Starter Code Template
ESP32 Code — Display Integers
Try It
- Wire the module, connect the ESP32 via USB.
- Upload the code using Thonny IDE.
- The display cycles through several integers (0, 42, 1234, -5, -123, 9999) and a zero-padded number (0042).
Integer Display
The print() method auto-detects integers and formats them right-aligned on the display.
| Method Call | Display Shows | Notes |
|---|---|---|
| display.print(0) | " 0" | Single digit, right-aligned |
| display.print(42) | " 42" | Two digits |
| display.print(1234) | "1234" | All four digits |
| display.print(-5) | " -5" | Negative with minus sign |
| display.print(-123) | "-123" | Negative, full width |
| display.print(9999) | "9999" | Maximum positive value |
| display.print(42, zero_pad=True) | "0042" | Leading zeros |
Integer range: -999 to 9999. Values outside this range display "Err".
ESP32 Code — Display Floats
Float Display
The decimal point dot is automatically placed at the correct position. You can let the library choose the number of decimal places, or specify it manually.
| Method Call | Display Shows | Notes |
|---|---|---|
| display.print(1.5) | " 1.5" | Auto decimal places |
| display.print(12.34) | "12.34" | Auto — 2 decimal places |
| display.print(3.141) | "3.141" | Auto — 3 decimal places |
| display.print(23.5, decimal_places=1) | "23.5" | Forced 1 decimal place |
| display.print(1.5, decimal_places=2) | " 1.50" | Forced 2 decimal places with trailing zero |
| display.print(1.5, decimal_places=2, zero_pad=True) | "01.50" | Zero-padded with 2 decimal places |
ESP32 Code — Display Text, Degree, and Temperature
Supported Characters
The display can show a subset of alphabetic characters that are legible on a 7-segment display:
- Digits: 0-9
- Letters: A, b, C, c, d, E, F, G, H, h, I, i, J, L, n, O, o, P, r, S, t, U, u, Y
- Special: ° (degree), - (dash), _ (underscore), (space)
Temperature Display
| Method Call | Display Shows | Notes |
|---|---|---|
| display.print_temperature(25, 'C') | "25°C" | Celsius |
| display.print_temperature(72, 'F') | "72°F" | Fahrenheit |
| display.print_temperature(-5, 'C') | "-5°C" | Negative temperature |
| display.print_temperature(100, 'C') | "100°" | No room for unit |
You can also build temperature strings manually using the DEGREE constant:
Dot Handling in Strings
A . character in a string activates the decimal point dot on the preceding digit rather than occupying its own position:
ESP32 Code — Display Time
Time Display
This module has dots only (no colon). The print_time() method uses the dot on digit 1 (second from left) as a time separator.
| Method Call | Display Shows | Notes |
|---|---|---|
| display.print_time(12, 30) | "12.30" | Dot separator on |
| display.print_time(9, 5) | "09.05" | Auto zero-padding |
| display.print_time(12, 30, colon=False) | "12 30" | Dot separator off |
Blinking effect: Toggle the colon parameter every 500ms in your main loop to create a blinking time separator.
ESP32 Code — Blink Display
Display On/Off Control
The off() method stops the auto-refresh timer and turns off all segments. The on() method restarts the timer — the display resumes showing whatever was last printed.
| Method | Action | Notes |
|---|---|---|
| display.off() | Stop display and blank all segments | Timer is stopped |
| display.on() | Restart display with current content | Timer resumes |
| display.clear() | Clear the display buffer | Display shows blank |
Use off() and on() in a loop to create a blinking effect. The display content (set by print()) is preserved during off().
API Summary
For the full API reference with detailed parameters and examples, see the Library Reference.
| Method | Description |
|---|---|
| print(value, decimal_places, zero_pad) | Display int, float, or string (auto-detects type) |
| print_temperature(temperature, unit) | Display temperature with ° symbol |
| print_time(hours, minutes, colon) | Display time HH.MM with dot separator |
| clear() | Clear the display buffer |
| off() | Stop auto-refresh and blank the display |
| on() | Restart auto-refresh |
| set_char(position, char) | Set character at position (0-3) |
| set_number(position, number) | Set digit 0-9 at position (0-3) |
| set_dot(position, state) | Set decimal point at position (0-3) |
| set_segments(position, segments) | Set raw segment bits at position (0-3) |
Next Steps
- Explore the Library Reference for the full API including low-level segment control.
- Combine the display with sensors (e.g., DHT11, DS18B20) to build a temperature monitor.
- Use print_time() with the ESP32's RTC or NTP to build a simple clock.
- Add buttons to create a countdown timer or stopwatch.