ESP32 MicroPython Write Variable to SD Card

This guide shows you how to store different types of MicroPython variables onto a Micro SD Card using the ESP32. Here is what we will cover:

This guide gives you a complete walkthrough for persisting various variable types to a Micro SD Card, making it easy to store and retrieve data later. If you need to read key-value pairs back from the SD Card and parse them into integer, float, or string types, check out the ESP32 MicroPython - Read Config from SD Card tutorial.

ESP32 MicroPython Micro SD Card

Hardware Preparation

1×ESP-WROOM-32 Dev Module
1×Alternatively, ESP32 Uno-form board
1×Alternatively, ESP32 S3 Uno-form board
1×USB Cable Type-A to Type-C (for USB-A PC)
1×USB Cable Type-C to Type-C (for USB-C PC)
1×Micro SD Card
1×Micro SD Card Module
1×Jumper Wires
1×Breadboard
1×Optionally, MicroSD to SD Memory Card Adapter
1×Recommended: Screw Terminal Expansion Board for ESP32
1×Recommended: Breakout Expansion Board for ESP32
1×Recommended: Power Splitter for ESP32

Or you can buy the following kits:

1×DIYables ESP32 Starter Kit (ESP32 included)
1×DIYables Sensor Kit (30 sensors/displays)
1×DIYables Sensor Kit (18 sensors/displays)
Disclosure: Some of the links provided in this section are Amazon affiliate links. We may receive a commission for any purchases made through these links at no additional cost to you.
Additionally, some of these links are for products from our own brand, DIYables .

Overview of Micro SD Card Module

New to the Micro SD Card Module? Find out everything about its pins, how it works, and how to program it in the ESP32 MicroPython - Micro SD Card tutorial.

Wiring Diagram

The wiring diagram between ESP32 MicroPython Micro SD Card Module

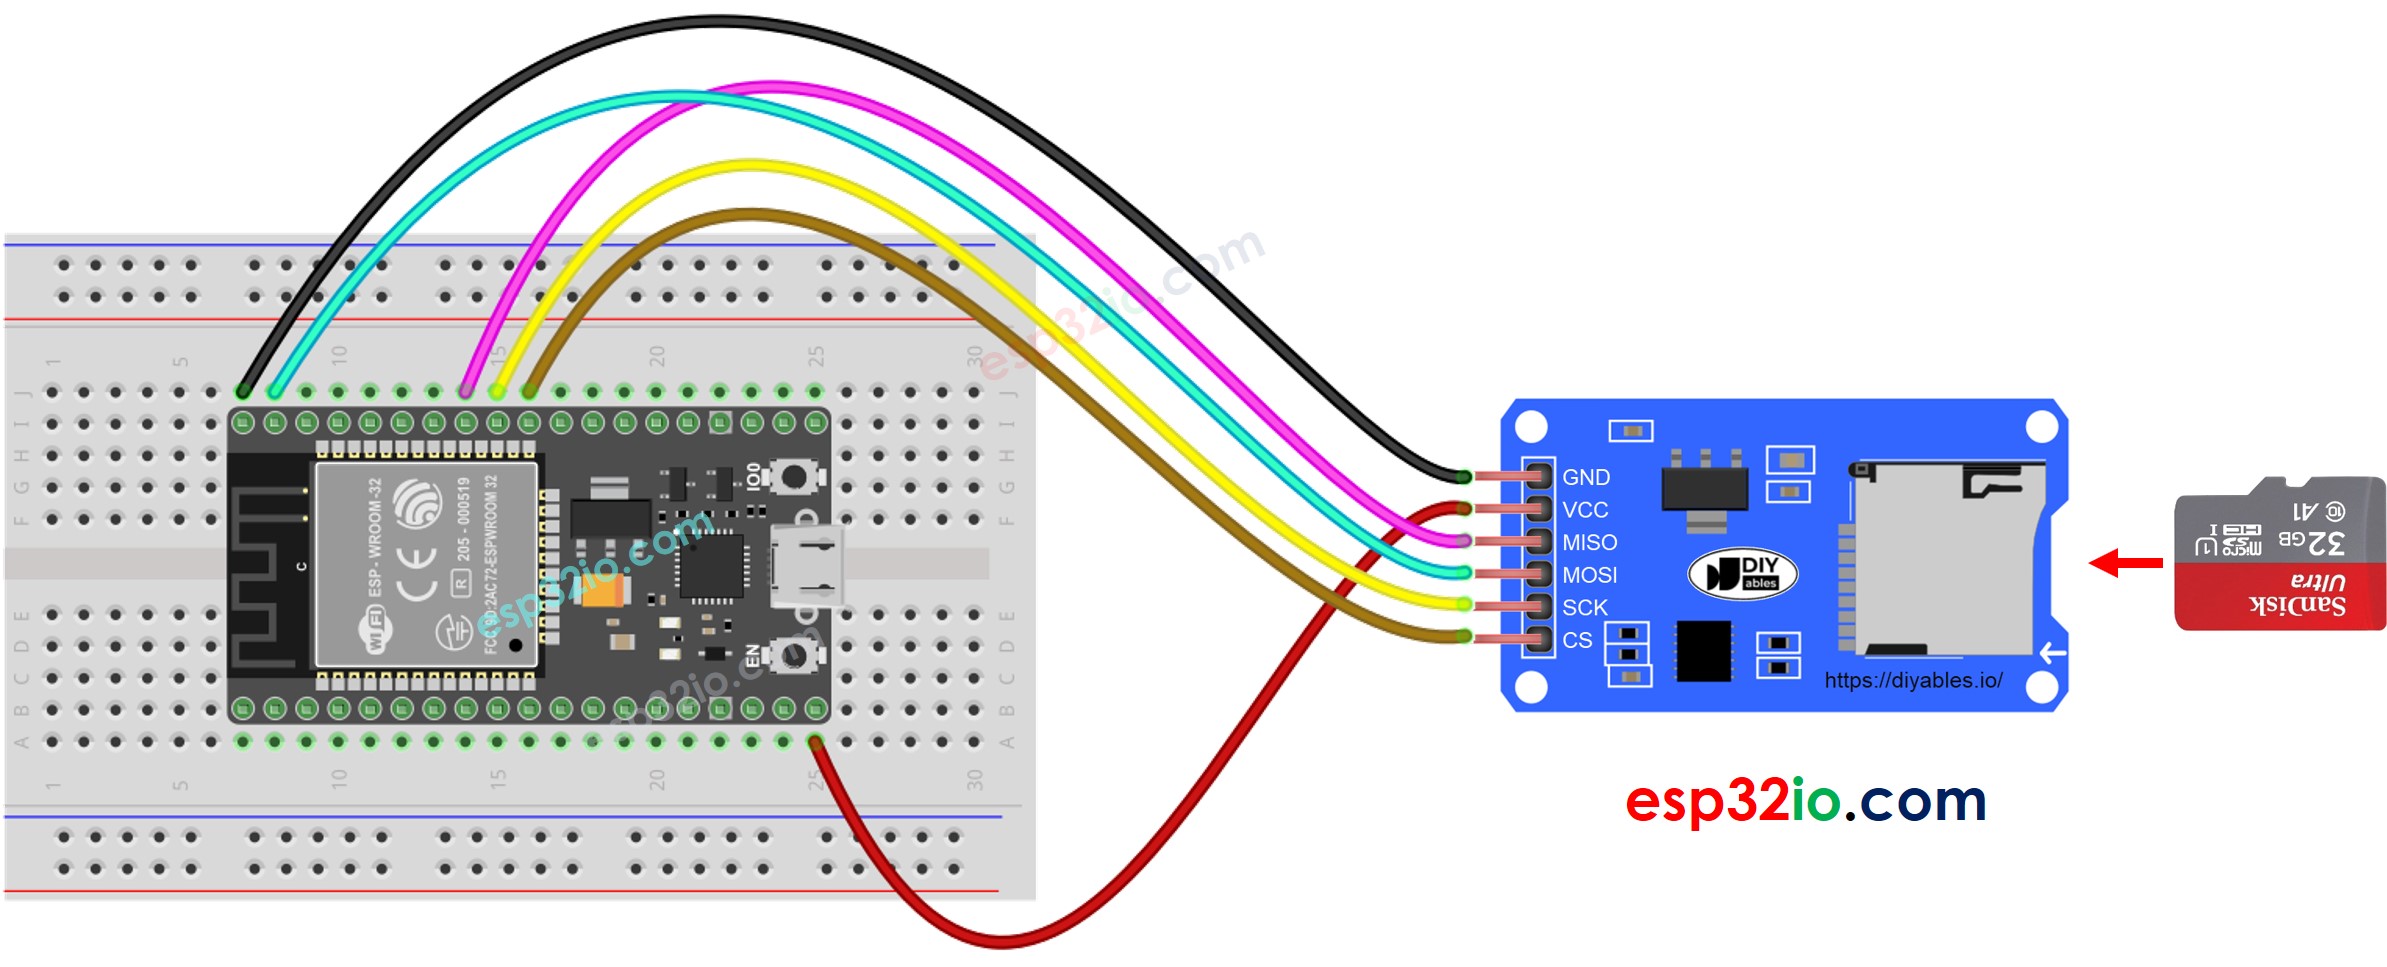
This image is created using Fritzing. Click to enlarge image

The wiring table below shows how to connect the Micro SD Card Module to the ESP32:

Micro SD Card Module ESP32
VCC 5V
GND GND
MISO GPIO19
MOSI GPIO23
SCK GPIO18
CS GPIO5

※ NOTE THAT:

If your shield (such as an Ethernet shield) already has a built-in Micro SD Card slot, you can skip the external module and simply insert the card directly into the shield.

ESP32 MicroPython - Saving Variables to a File on Micro SD Card

The following MicroPython code demonstrates how to:

  • Save an int value to the Micro SD Card
  • Save a float value to the Micro SD Card
  • Save a string to the Micro SD Card
  • Save a byte array to the Micro SD Card
""" This ESP32 MicroPython code was developed by newbiely.com This ESP32 MicroPython code is made available for public use without any restriction For comprehensive instructions and wiring diagrams, please visit: https://newbiely.com/tutorials/esp32-micropython/esp32-micropython-write-variable-to-sd-card """ import machine import os import sdcard # Define SPI pins for the Micro SD Card module SPI_SCK_PIN = 18 # The ESP32 pin GPIO18 connected to SCK SPI_MOSI_PIN = 23 # The ESP32 pin GPIO23 connected to MOSI SPI_MISO_PIN = 19 # The ESP32 pin GPIO19 connected to MISO SPI_CS_PIN = 5 # The ESP32 pin GPIO5 connected to SS (CS) # Initialize SD card using SoftSPI and sdcard driver spi = machine.SoftSPI(baudrate=1000000, polarity=0, phase=0, sck=machine.Pin(SPI_SCK_PIN), mosi=machine.Pin(SPI_MOSI_PIN), miso=machine.Pin(SPI_MISO_PIN)) cs = machine.Pin(SPI_CS_PIN, machine.Pin.OUT) try: sd = sdcard.SDCard(spi, cs) os.mount(sd, "/sd") print("SD CARD INITIALIZED.") except Exception as e: print("SD CARD FAILED, OR NOT PRESENT!", e) raise SystemExit print("--------------------") file_path = "/sd/esp32.txt" # Variables to write my_int = -52 my_float = -12.7 my_string = "HELLO" my_char_array = "newbiely.com" my_byte_array = bytearray(b'12345') # Delete the file if it exists try: os.remove(file_path) except OSError: pass # Create new file and write variables try: f = open(file_path, "w") f.write("{}\n".format(my_int)) # write int variable to SD card in line f.write("{:.2f}\n".format(my_float)) # write float variable to SD card in line f.write("{}\n".format(my_string)) # write string variable to SD card in line f.write("{}\n".format(my_char_array)) # write char array to SD card in line f.write(my_byte_array.decode()) # write byte array to SD card f.write("\n") # new line f.write(",".join(str(ch) for ch in my_byte_array.decode())) # write byte array with comma f.write("\n") # new line f.close() except Exception as e: print("SD Card: Issue encountered while attempting to open the file esp32.txt", e) # Open file for reading try: f = open(file_path, "r") while True: ch = f.read(1) # read characters one by one from Micro SD Card if not ch: break print(ch, end="") # print the character to the Shell f.close() except Exception as e: print("SD Card: Issue encountered while attempting to open the file esp32.txt", e) os.umount("/sd")

Detailed Instructions

Here's instructions on how to set up and run your MicroPython code on the ESP32 using Thonny IDE:

  • Make sure Thonny IDE is installed on your computer.
  • Confirm that MicroPython firmware is loaded on your ESP32 board.
  • If this is your first time using an ESP32 with MicroPython, check out the ESP32 MicroPython Getting Started guide for step-by-step instructions.
  • Do the wiring as above image.
  • Connect the ESP32 board to your computer with a USB cable.
  • Open Thonny IDE on your computer.
  • In Thonny IDE, go to Tools Options.
  • Under the Interpreter tab, choose MicroPython (ESP32) from the dropdown menu.
  • Make sure the correct port is selected. Thonny IDE usually detects it automatically, but you might need to select it manually (like COM3 on Windows or /dev/ttyACM0 on Linux).
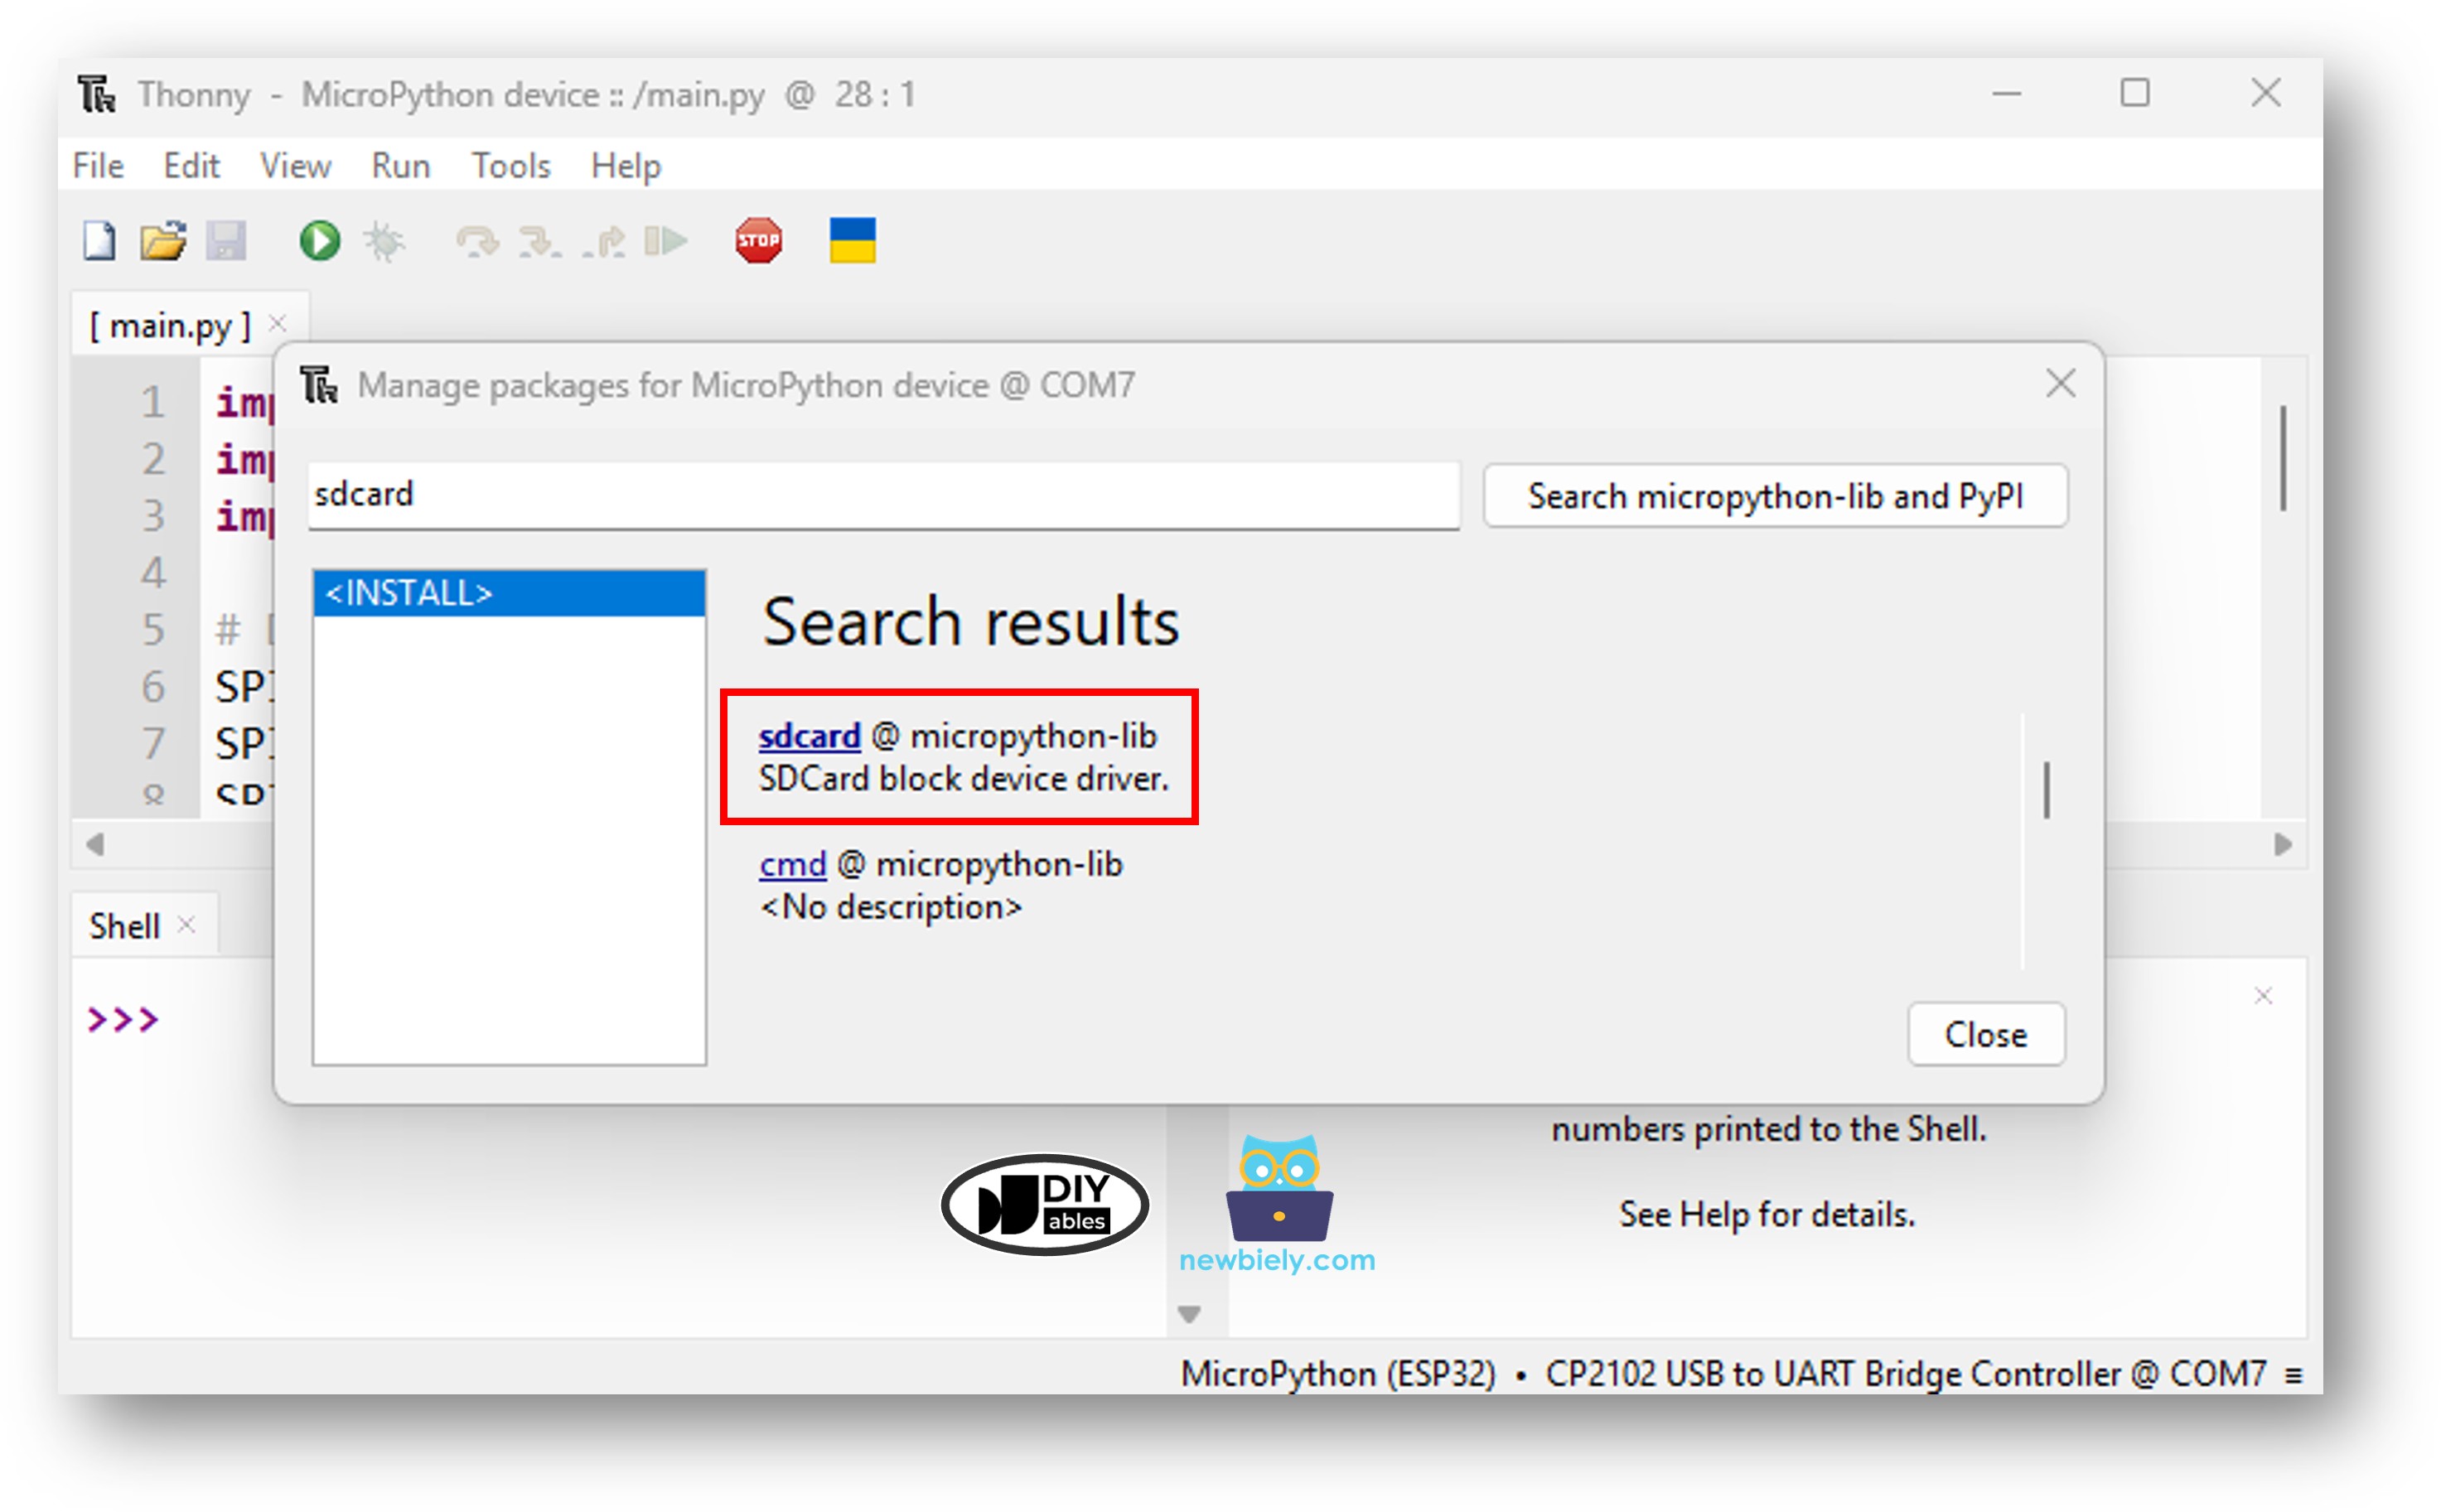
  • Navigate to the Tools Manage packages on the Thonny IDE.
  • Search "sdcard", then find the sdcard library provided by micropython-lib.
  • Click on sdcard, then click Install button to install the SD card library.
ESP32 MicroPython SD Card library
  • Ensure the Micro SD Card is formatted as FAT16 or FAT32 (look up instructions online if needed)
  • Copy the provided MicroPython code and paste it into Thonny's editor.
  • Save the code to your ESP32 by:
    • Clicking the Save button or pressing Ctrl+S.
    • In the save dialog, choose MicroPython device.
    • Name the file main.py.
  • Click the green Run button (or press F5) to execute the script.
  • Check out the message in the Shell at the bottom of Thonny.
Shell x
>>> %Run -c $EDITOR_CONTENT
MPY: soft reboot SD CARD INITIALIZED. -------------------- -52 -12.70 HELLO newbiely.com 12345 1,2,3,4,5
MicroPython (ESP32) • CP2102 USB To UART Bridge Controller @ COM12 ≡
  • Remove the Micro SD Card from the module
  • Plug it into a USB SD Card reader connected to your PC
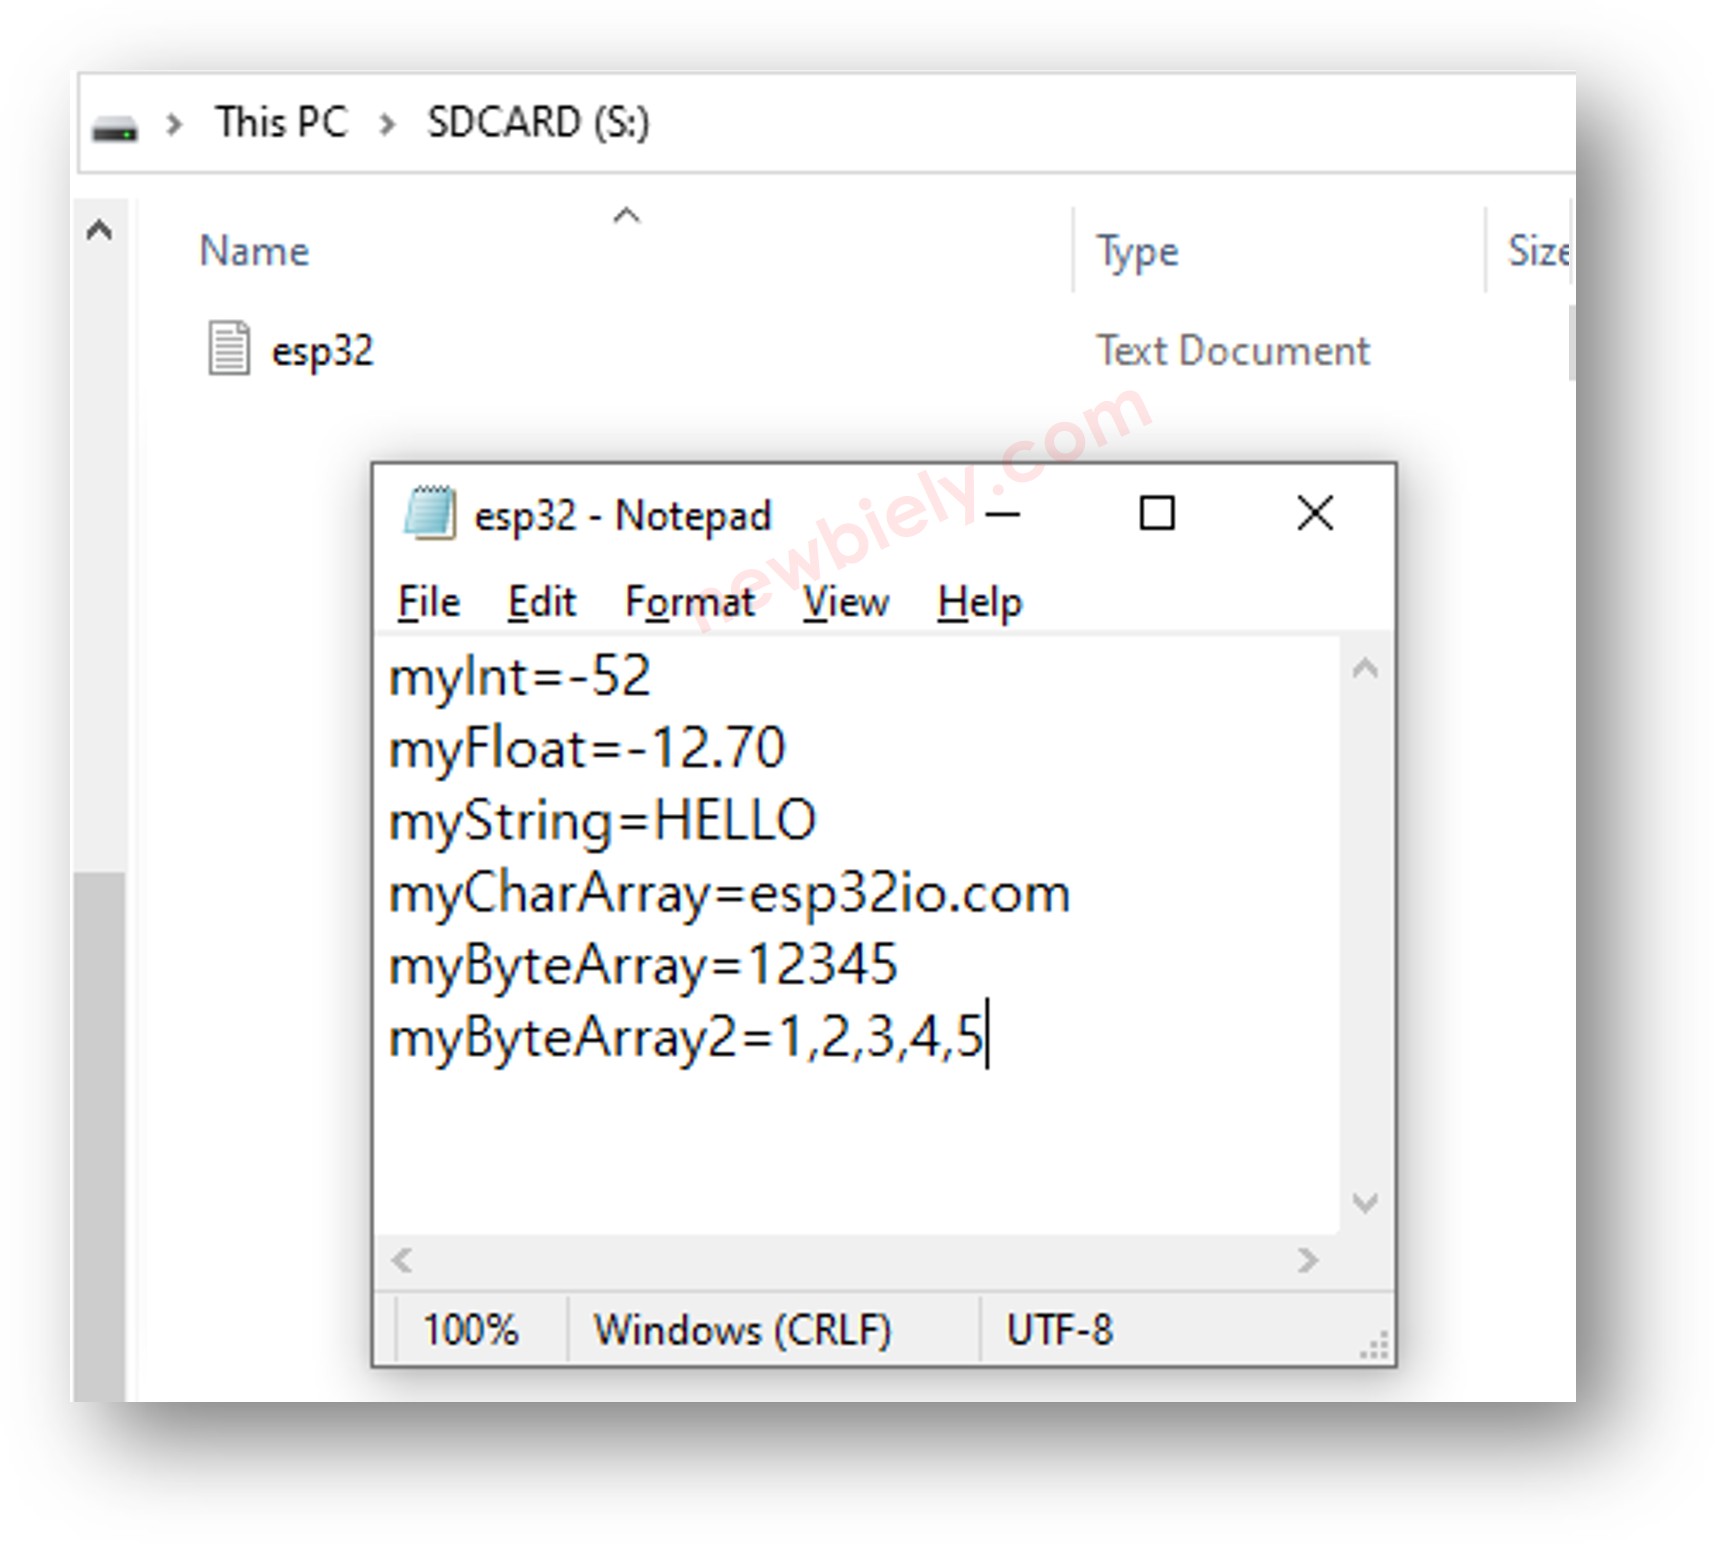
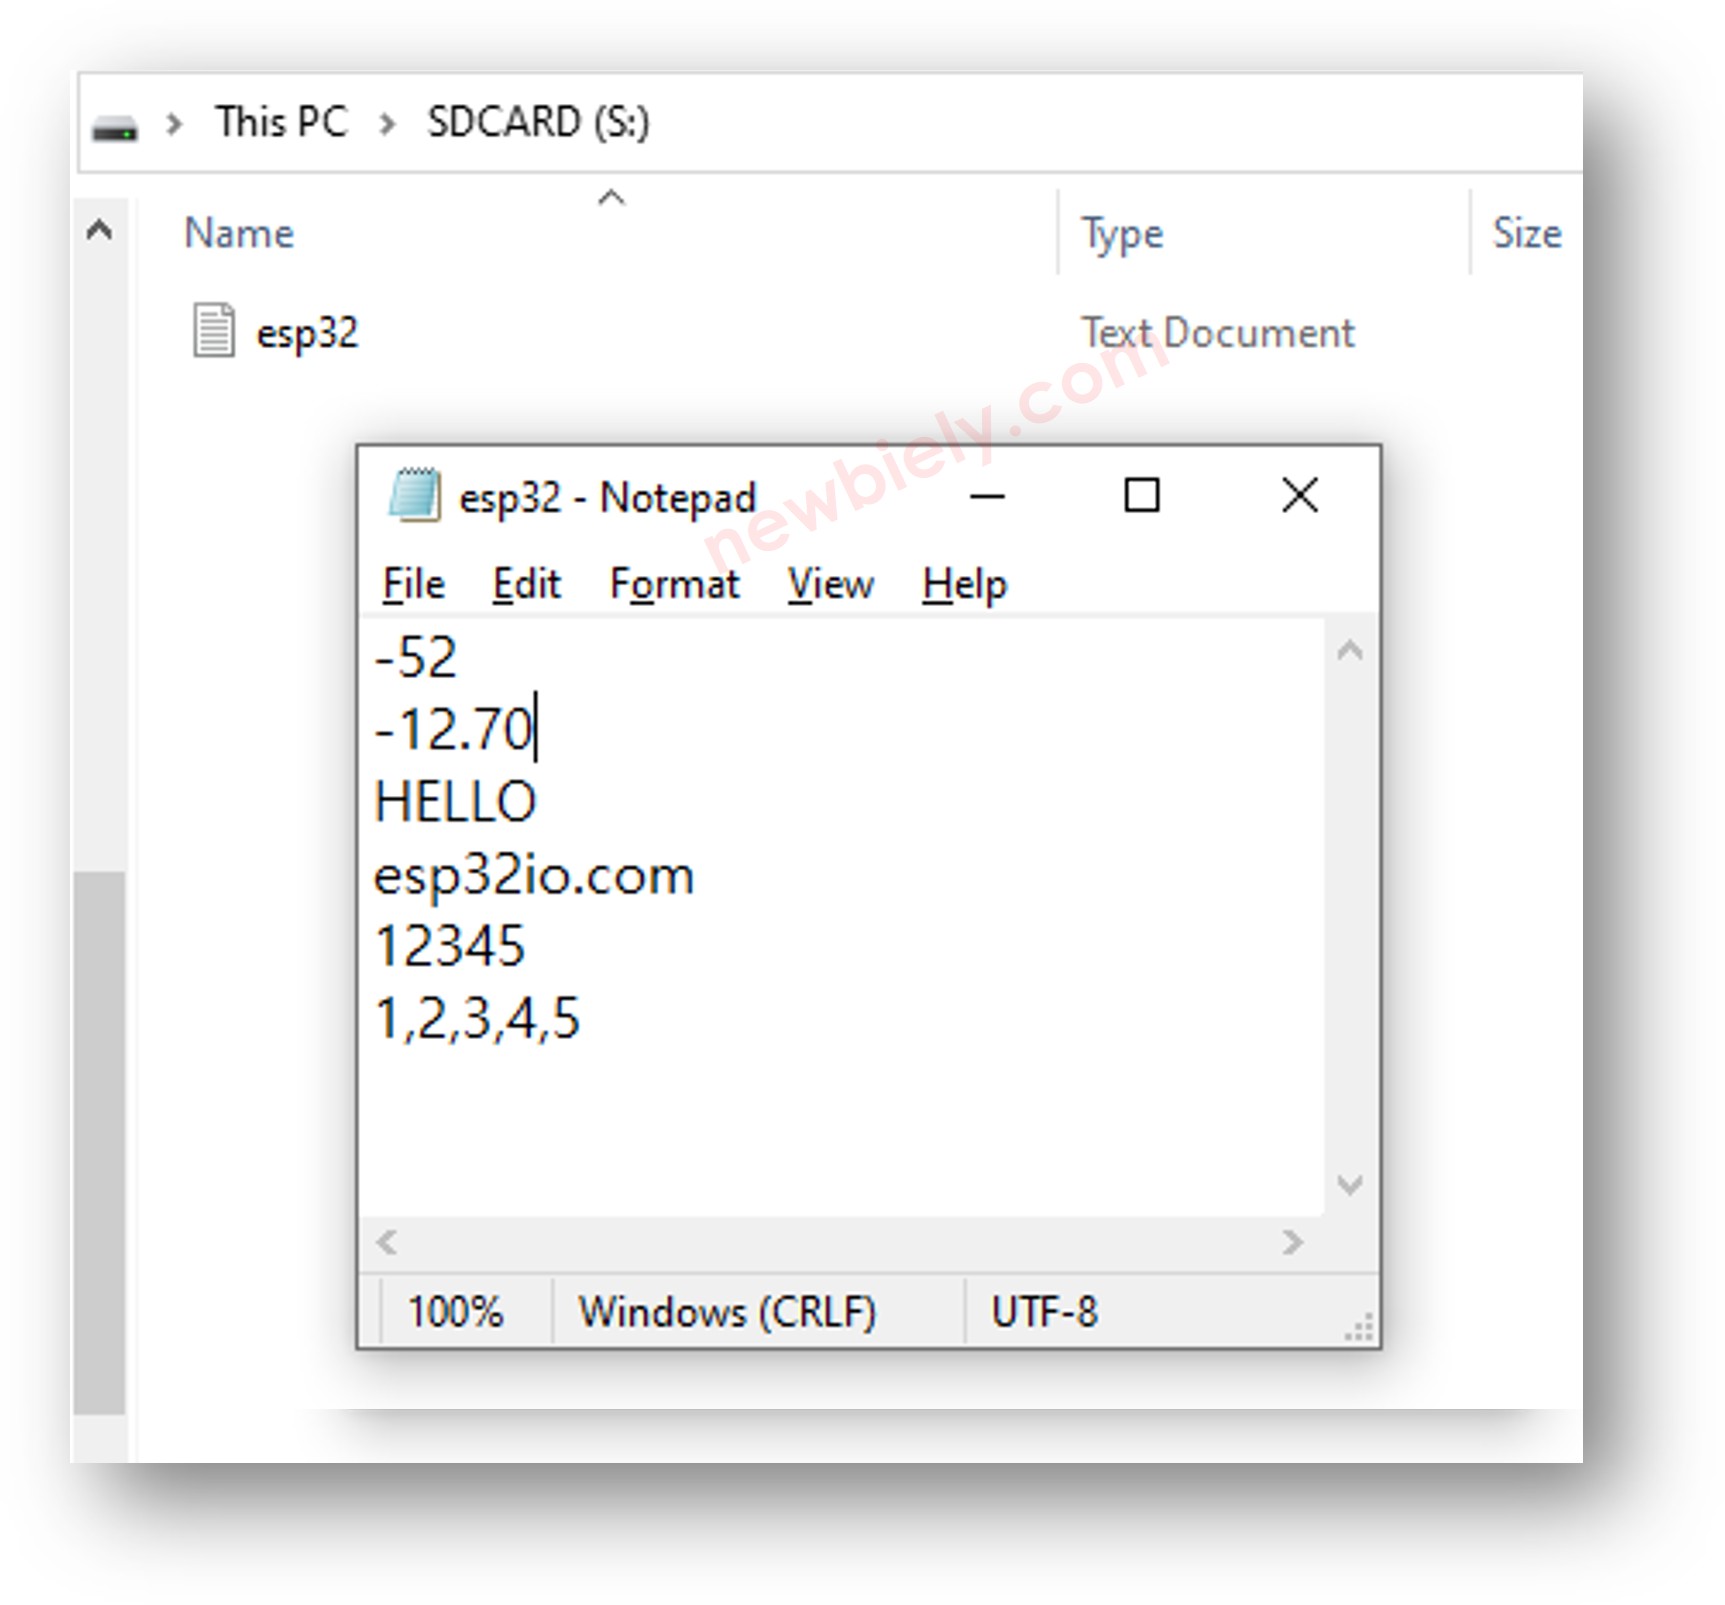
  • Open the esp32.txt file on your computer — its content should look like this:
ESP32 MicroPython writes variable to Micro SD Card

ESP32 MicroPython - Storing Key-Value Pairs on Micro SD Card

""" This ESP32 MicroPython code was developed by newbiely.com This ESP32 MicroPython code is made available for public use without any restriction For comprehensive instructions and wiring diagrams, please visit: https://newbiely.com/tutorials/esp32-micropython/esp32-micropython-write-variable-to-sd-card """ import machine import os import sdcard # Define SPI pins for the Micro SD Card module SPI_SCK_PIN = 18 # The ESP32 pin GPIO18 connected to SCK SPI_MOSI_PIN = 23 # The ESP32 pin GPIO23 connected to MOSI SPI_MISO_PIN = 19 # The ESP32 pin GPIO19 connected to MISO SPI_CS_PIN = 5 # The ESP32 pin GPIO5 connected to SS (CS) # Initialize SD card using SoftSPI and sdcard driver spi = machine.SoftSPI(baudrate=1000000, polarity=0, phase=0, sck=machine.Pin(SPI_SCK_PIN), mosi=machine.Pin(SPI_MOSI_PIN), miso=machine.Pin(SPI_MISO_PIN)) cs = machine.Pin(SPI_CS_PIN, machine.Pin.OUT) try: sd = sdcard.SDCard(spi, cs) os.mount(sd, "/sd") print("SD CARD INITIALIZED.") except Exception as e: print("SD CARD FAILED, OR NOT PRESENT!", e) raise SystemExit print("--------------------") file_path = "/sd/esp32.txt" # Variables to write my_int = -52 my_float = -12.7 my_string = "HELLO" my_char_array = "newbiely.com" my_byte_array = bytearray(b'12345') # Delete the file if it exists try: os.remove(file_path) except OSError: pass # Create new file and write key-value pairs try: f = open(file_path, "w") f.write("myInt={}\n".format(my_int)) # write key=int to SD card f.write("myFloat={:.2f}\n".format(my_float)) # write key=float to SD card f.write("myString={}\n".format(my_string)) # write key=string to SD card f.write("myCharArray={}\n".format(my_char_array)) # write key=char array to SD card f.write("myByteArray={}\n".format(my_byte_array.decode())) # write key=byte array f.write("myByteArray2={}\n".format(",".join(str(ch) for ch in my_byte_array.decode()))) # write key=byte array with comma f.close() except Exception as e: print("SD Card: Issue encountered while attempting to open the file esp32.txt", e) # Open file for reading try: f = open(file_path, "r") while True: ch = f.read(1) # read characters one by one from Micro SD Card if not ch: break print(ch, end="") # print the character to the Shell f.close() except Exception as e: print("SD Card: Issue encountered while attempting to open the file esp32.txt", e) os.umount("/sd")

Detailed Instructions

  • Copy the above code and paste it into Thonny's editor.
  • Click the green Run button (or press F5) to run the script.
  • View the output in the Shell at the bottom of Thonny.
Shell x
>>> %Run -c $EDITOR_CONTENT
MPY: soft reboot SD CARD INITIALIZED. -------------------- myInt=-52 myFloat=-12.70 myString=HELLO myCharArray=newbiely.com myByteArray=12345 myByteArray2=1,2,3,4,5
MicroPython (ESP32) • CP2102 USB To UART Bridge Controller @ COM12 ≡
  • Take out the Micro SD Card from the module
  • Connect it to your PC using a USB SD Card reader
  • Open the esp32.txt file — you should see content like this:
ESP32 MicroPython writes variable to Micro SD Card

Video Tutorial

※ OUR MESSAGES

  • As freelancers, We are AVAILABLE for HIRE. See how to outsource your project to us
  • Please feel free to share the link of this tutorial. However, Please do not use our content on any other websites. We invested a lot of effort and time to create the content, please respect our work!