
Arduino Giga R1 WiFi MOSFET Module
In this guide, we will learn how to use the MOSFET module with the Arduino Giga R1 WiFi to control a DC load that runs on 12V. In detail, we will learn:
- How the AOD4184, LR7843 and FR120N modules differ, and which one fits your load.
- How to hook up the Arduino Giga R1 WiFi, the MOSFET module, a 12V adapter and a 12V LED strip.
- How to write a program for the Arduino Giga R1 WiFi that switches the strip and sets its brightness with PWM.
The Giga R1 WiFi is a big board with a lot of PWM pins. So after you finish this single-load example, you can copy the same idea to drive several strips, fans or pumps at once, each with its own module.
Hardware Preparation
Or you can buy the following kits:
| 1 | × | DIYables Sensor Kit (18 sensors/displays) |
Additionally, some of these links are for products from our own brand, DIYables .
Overview of MOSFET Module
Every pin on the Arduino Giga R1 WiFi works at 3.3V and can give only a few milliamps. A 12V fan, pump, heater, solenoid valve or LED strip needs far more than that. The MOSFET module solves this problem. Your sketch controls the module with a tiny signal, and the module lets the big current from a separate 12V supply flow through the load.
You can buy this module with three different chips: AOD4184 (the same part is also labeled D4184), LR7843 or FR120N. Apart from the chip, the three boards are identical. The shape, pin labels, wiring steps and sketch do not change. So this one page works for all of them.
Compared with a relay, the MOSFET module has some clear benefits:
- No moving parts, so no click sound and a much longer life.
- Very quick switching, fast enough for PWM. With PWM you can set a fan speed or a light level between 0% and 100%. A relay gives you only fully on or fully off.
- One important catch: DC loads only. Do not connect AC mains to it. Stay with the relay for AC devices.
| AOD4184 | LR7843 | FR120N | |
|---|---|---|---|
| Chip on board | AOD4184A (N-channel) | IRLR7843 (N-channel) | IRFR120N (N-channel) |
| Highest load voltage (chip) | 40V DC | 30V DC | 100V DC |
| Highest current (chip) | 50A | 161A | 9.4A |
| RDS(on) resistance | about 7 mΩ | about 3.3 mΩ | about 210 mΩ |
| Safe current, no heatsink | about 10–15A | about 15A | about 2A |
| Input logic | 3.3V / 5V, active HIGH | 3.3V / 5V, active HIGH | 3.3V / 5V, active HIGH |
| Input isolation | PC817 optocoupler | PC817 optocoupler | PC817 optocoupler |
| PWM support | yes, about 1 kHz max | yes, about 1 kHz max | yes, about 1 kHz max |
| Supported loads | DC only | DC only | DC only |
Match the module to your load:
- Big current at 12V or 24V, for example a high-power strip or a large motor: take the LR7843. Its resistance is the smallest, so it runs the coolest. Do not go above 30V with it.
- A normal 12V, 24V or 36V project: the AOD4184 is the safe middle choice. It is rated to 40V and still carries a lot of current.
- A small 24V or 48V load: the FR120N accepts up to 100V. But its resistance is much higher, so keep the current near 2A unless you fit a heatsink.
Do not trust the 50A or 161A values too much. They describe the bare chip, not this small board. On the real module, heat sets the limit. Let your load run for a few minutes, then carefully touch the MOSFET. If you cannot keep your finger on it, reduce the load or mount a heatsink.
How It Works
The Signal Path
The Giga pin drives the PWM pin of the module. From there, the signal goes through a small resistor into an LED inside the PC817 optocoupler. The light of that LED switches a phototransistor, and the phototransistor feeds the MOSFET gate. A resistor on the gate pulls it down to 0V whenever the optocoupler is off.
The MOSFET sits between the LOAD terminal and the − terminal. The load is wired between + and LOAD. So the MOSFET cuts the negative wire of the load (a low-side switch), and the positive wire stays connected all the time.
Pin LOW (0V): Load Off
- The pin gives 0V, so no current flows into the optocoupler LED. It stays dark.
- The phototransistor stays off. The gate resistor keeps the MOSFET gate at 0V.
- The MOSFET is OFF. Between LOAD and −, it is like an open switch.
- The negative wire of the load has no path to ground. No current flows, and the load gets 0V.
- In code: digitalWrite(MOSFET_PIN, LOW) or analogWrite(MOSFET_PIN, 0).
Pin HIGH (3.3V): Load On
- The 3.3V pin pushes a few milliamps into the optocoupler LED, and it lights up. You cannot see it, because it is inside the chip.
- The phototransistor turns on. Now the gate gets about half of the load supply, so about 6V from a 12V adapter.
- The MOSFET turns fully ON. Between LOAD and −, it is like a closed switch with very low resistance: a few mΩ for the AOD4184 and LR7843, about 0.2Ω for the FR120N.
- Current now runs in a loop: adapter + → + terminal → load → LOAD terminal → MOSFET → − terminal → adapter −.
- The load gets almost the full 12V and runs at full power.
- In code: digitalWrite(MOSFET_PIN, HIGH) or analogWrite(MOSFET_PIN, 255).
The LED needs only a small current, so the 3.3V Giga pin is enough. You do not need a level shifter or a transistor. A 5V board would work the same way.
PWM on the Pin: Part Power
With analogWrite(MOSFET_PIN, value), the pin flips between LOW and HIGH about 500 to 1000 times every second. The MOSFET copies each flip: ON in every HIGH part, OFF in every LOW part. So the load gets a fast train of 12V pulses.
The duty cycle is the share of time the pin is HIGH. It equals value / 255. The average voltage and the average power are the duty cycle times the full value. With a 12V adapter:
| Duty Cycle | analogWrite() Value | Average Voltage | What You See |
|---|---|---|---|
| 0% | 0 | 0V | Load off |
| 20% | 51 | about 2.4V | Very dim strip |
| 40% | 102 | about 4.8V | Low light, slow fan |
| 60% | 153 | about 7.2V | Medium |
| 80% | 204 | about 9.6V | Bright, fast |
| 100% | 255 | 12V | Full power |
- LED strip: it looks dimmer. It really blinks, but too fast for your eye.
- Fan, motor or pump: it runs slower. The spinning parts smooth out the pulses.
- Keep the PWM slow, about 500 Hz to 1 kHz. The PC817 is a slow part. At a higher frequency, the MOSFET does not switch fully, the pulses are not clean, and the MOSFET gets hot. The Giga's normal analogWrite() is already slow enough.
The code in this tutorial walks through these levels from 10% to 100%, in steps of 10%.
Keep These Points in Mind
- Two separate circuits: the optocoupler keeps the Giga side and the 12V side apart. On the module, the signal GND and the load GND have no connection.
- Load supply of 6V or more: the gate voltage comes from the load supply, so a 5V load supply is too low for good results. For loads above a few amps, 9V or higher is better.
- No built-in flyback diode: motors, pumps, solenoids and relay coils create a voltage spike when they turn off. Put a 1N5819 or 1N4007 diode across the load. The cathode (the end with the stripe) goes to load +, and the anode goes to load −.
Pinout
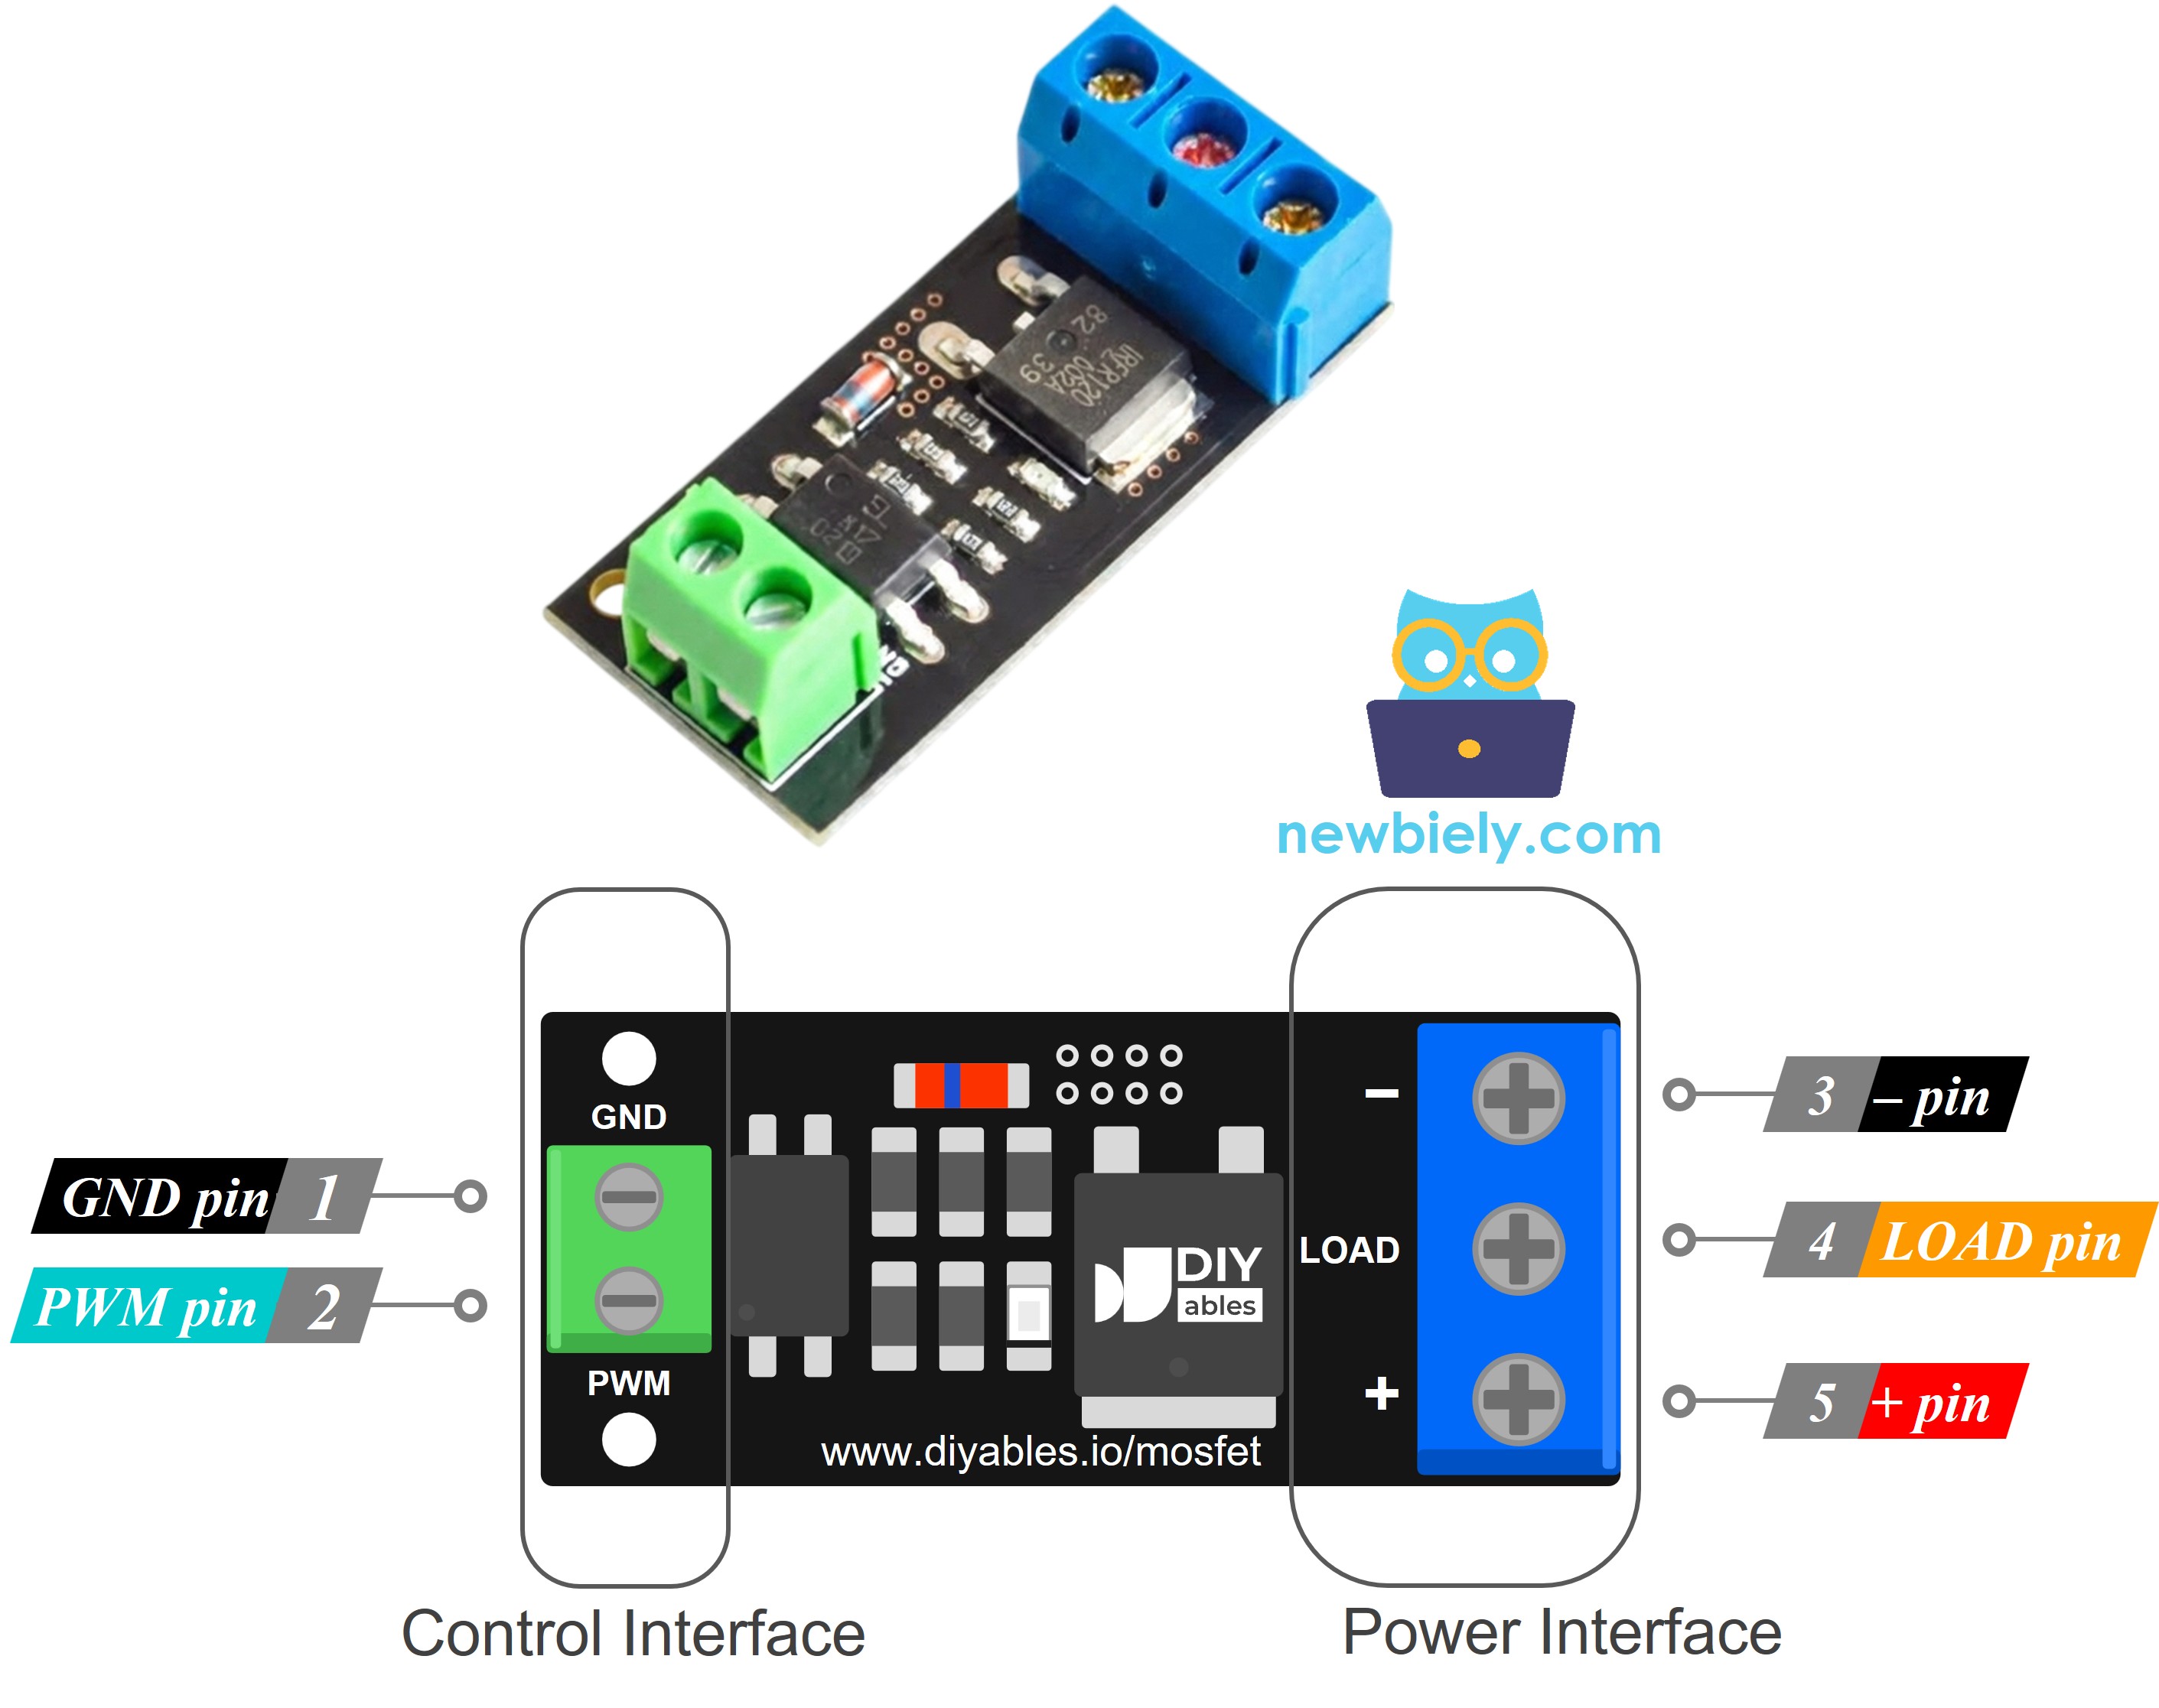
Signal header (2 pins, 2.54mm pitch, fits a breadboard):
- PWM pin: connect to a PWM-capable pin of the Arduino Giga R1 WiFi
- GND pin: connect to any GND pin of the Arduino Giga R1 WiFi
Screw terminal block (load side, 3 terminals):
- +: connect to the positive output of the load supply, such as 12V, and also to the red (positive) wire of the load. Both wires go into this one terminal. You can also join the two wires first, then put them in the terminal.
- LOAD: connect to the negative wire of the load; the MOSFET drain switches this terminal
- −: connect to the negative output (ground) of the load supply
Some batches print the labels a little differently. Check the silkscreen on the module in your hands before you wire it.
Wiring Diagram
The Giga R1 WiFi touches only the two signal pins, and the 12V adapter powers the LED strip through the screw terminals.
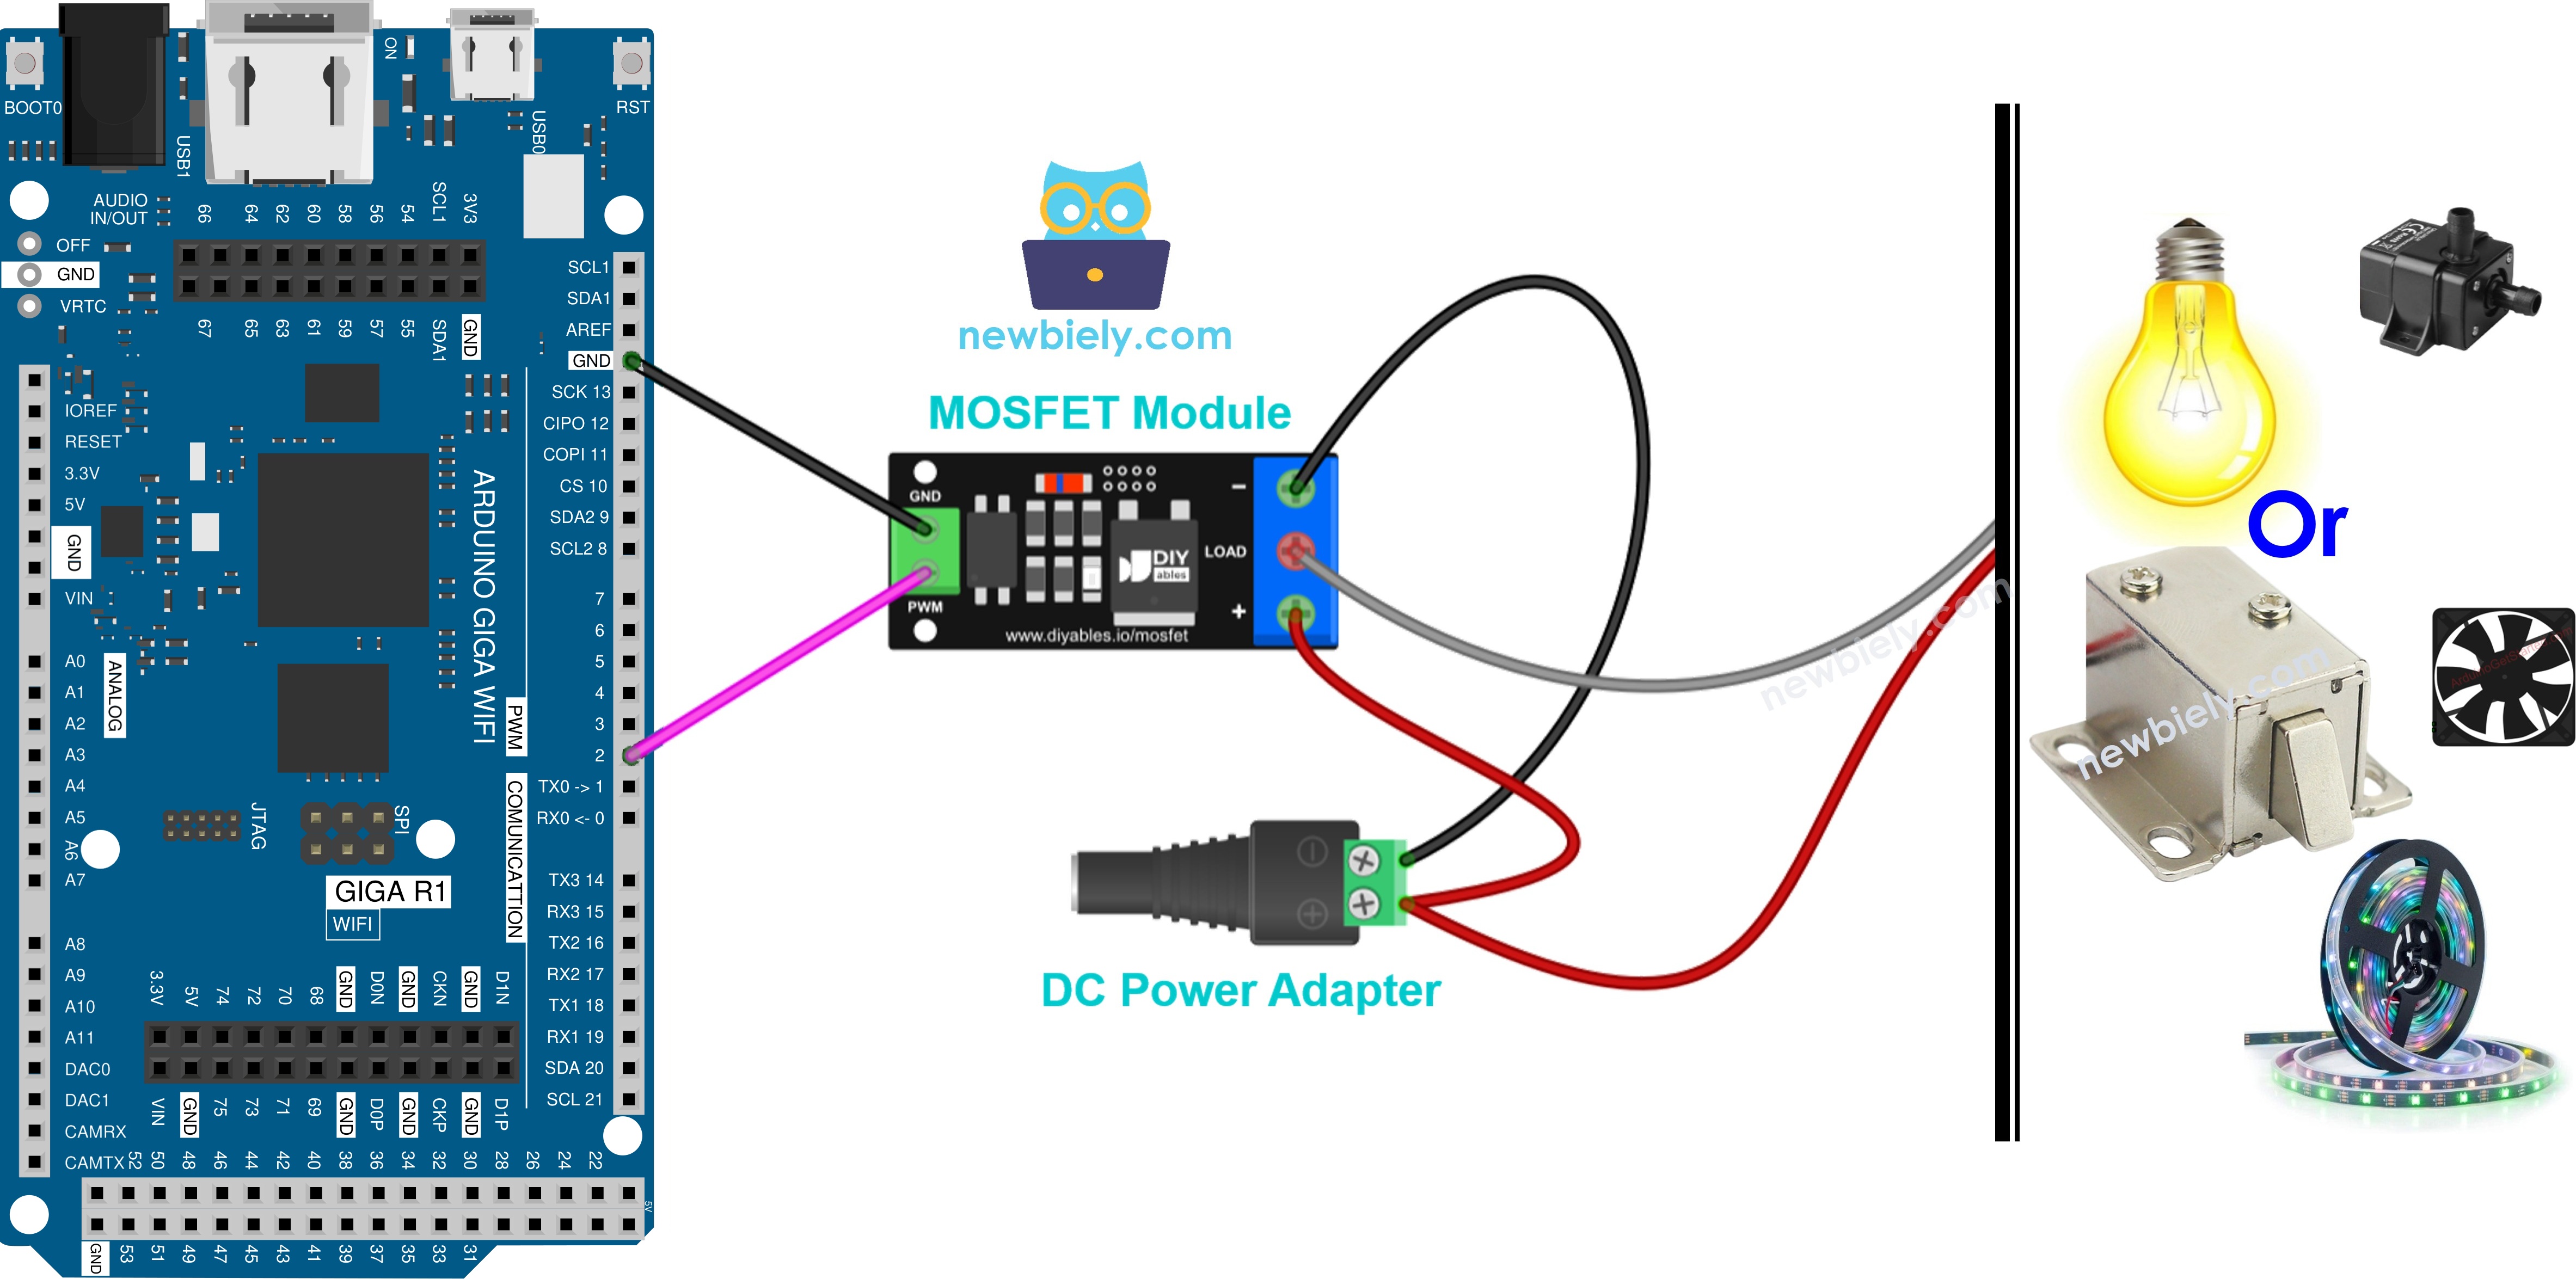
This image is created using Fritzing. Click to enlarge image
| MOSFET Module Terminal | Goes To |
|---|---|
| PWM | Arduino Giga R1 WiFi pin 2 |
| GND | Arduino Giga R1 WiFi GND |
| + | 12V adapter positive (via DC power jack) and LED strip positive |
| LOAD | LED strip negative |
| − | 12V adapter negative (via DC power jack) |
The isolation part is already on the module, so there's no need to add one. This makes wiring or soldering easier. Keep the 12V wires far away from the Giga headers, because 12V on any board pin will damage it.
Wiring Other 12V Devices to the Module
The Giga side never changes: pin 2 goes to PWM, and GND goes to GND. Only the screw terminal side is different for each device.
Rules for every example below:
- Adapter + goes to +, and adapter − goes to −.
- The device + wire also goes to +, and the device − wire goes to LOAD.
- The adapter voltage must match the device. A 12V device needs a 12V adapter. Never go below 6V.
- Check the current of the device. The FR120N is for small loads only (about 2A with no heatsink). For more current, use the AOD4184 or LR7843.
A device with a coil inside (motor, fan, pump, solenoid) kicks back a voltage spike each time the power is cut. The module has no diode to catch it. So mount a 1N5819 or 1N4007 across the device wires: the striped end (cathode) on the + wire, the other end (anode) on the − wire. Below, "Diode: yes" means you need it.
The sketch above runs all of these devices with no change. One exception: a solenoid wants only full power or no power. Use only analogWrite(MOSFET_PIN, 255) and analogWrite(MOSFET_PIN, 0) (or HIGH/LOW with digitalWrite), and skip the fade.
12V Cooling Fan
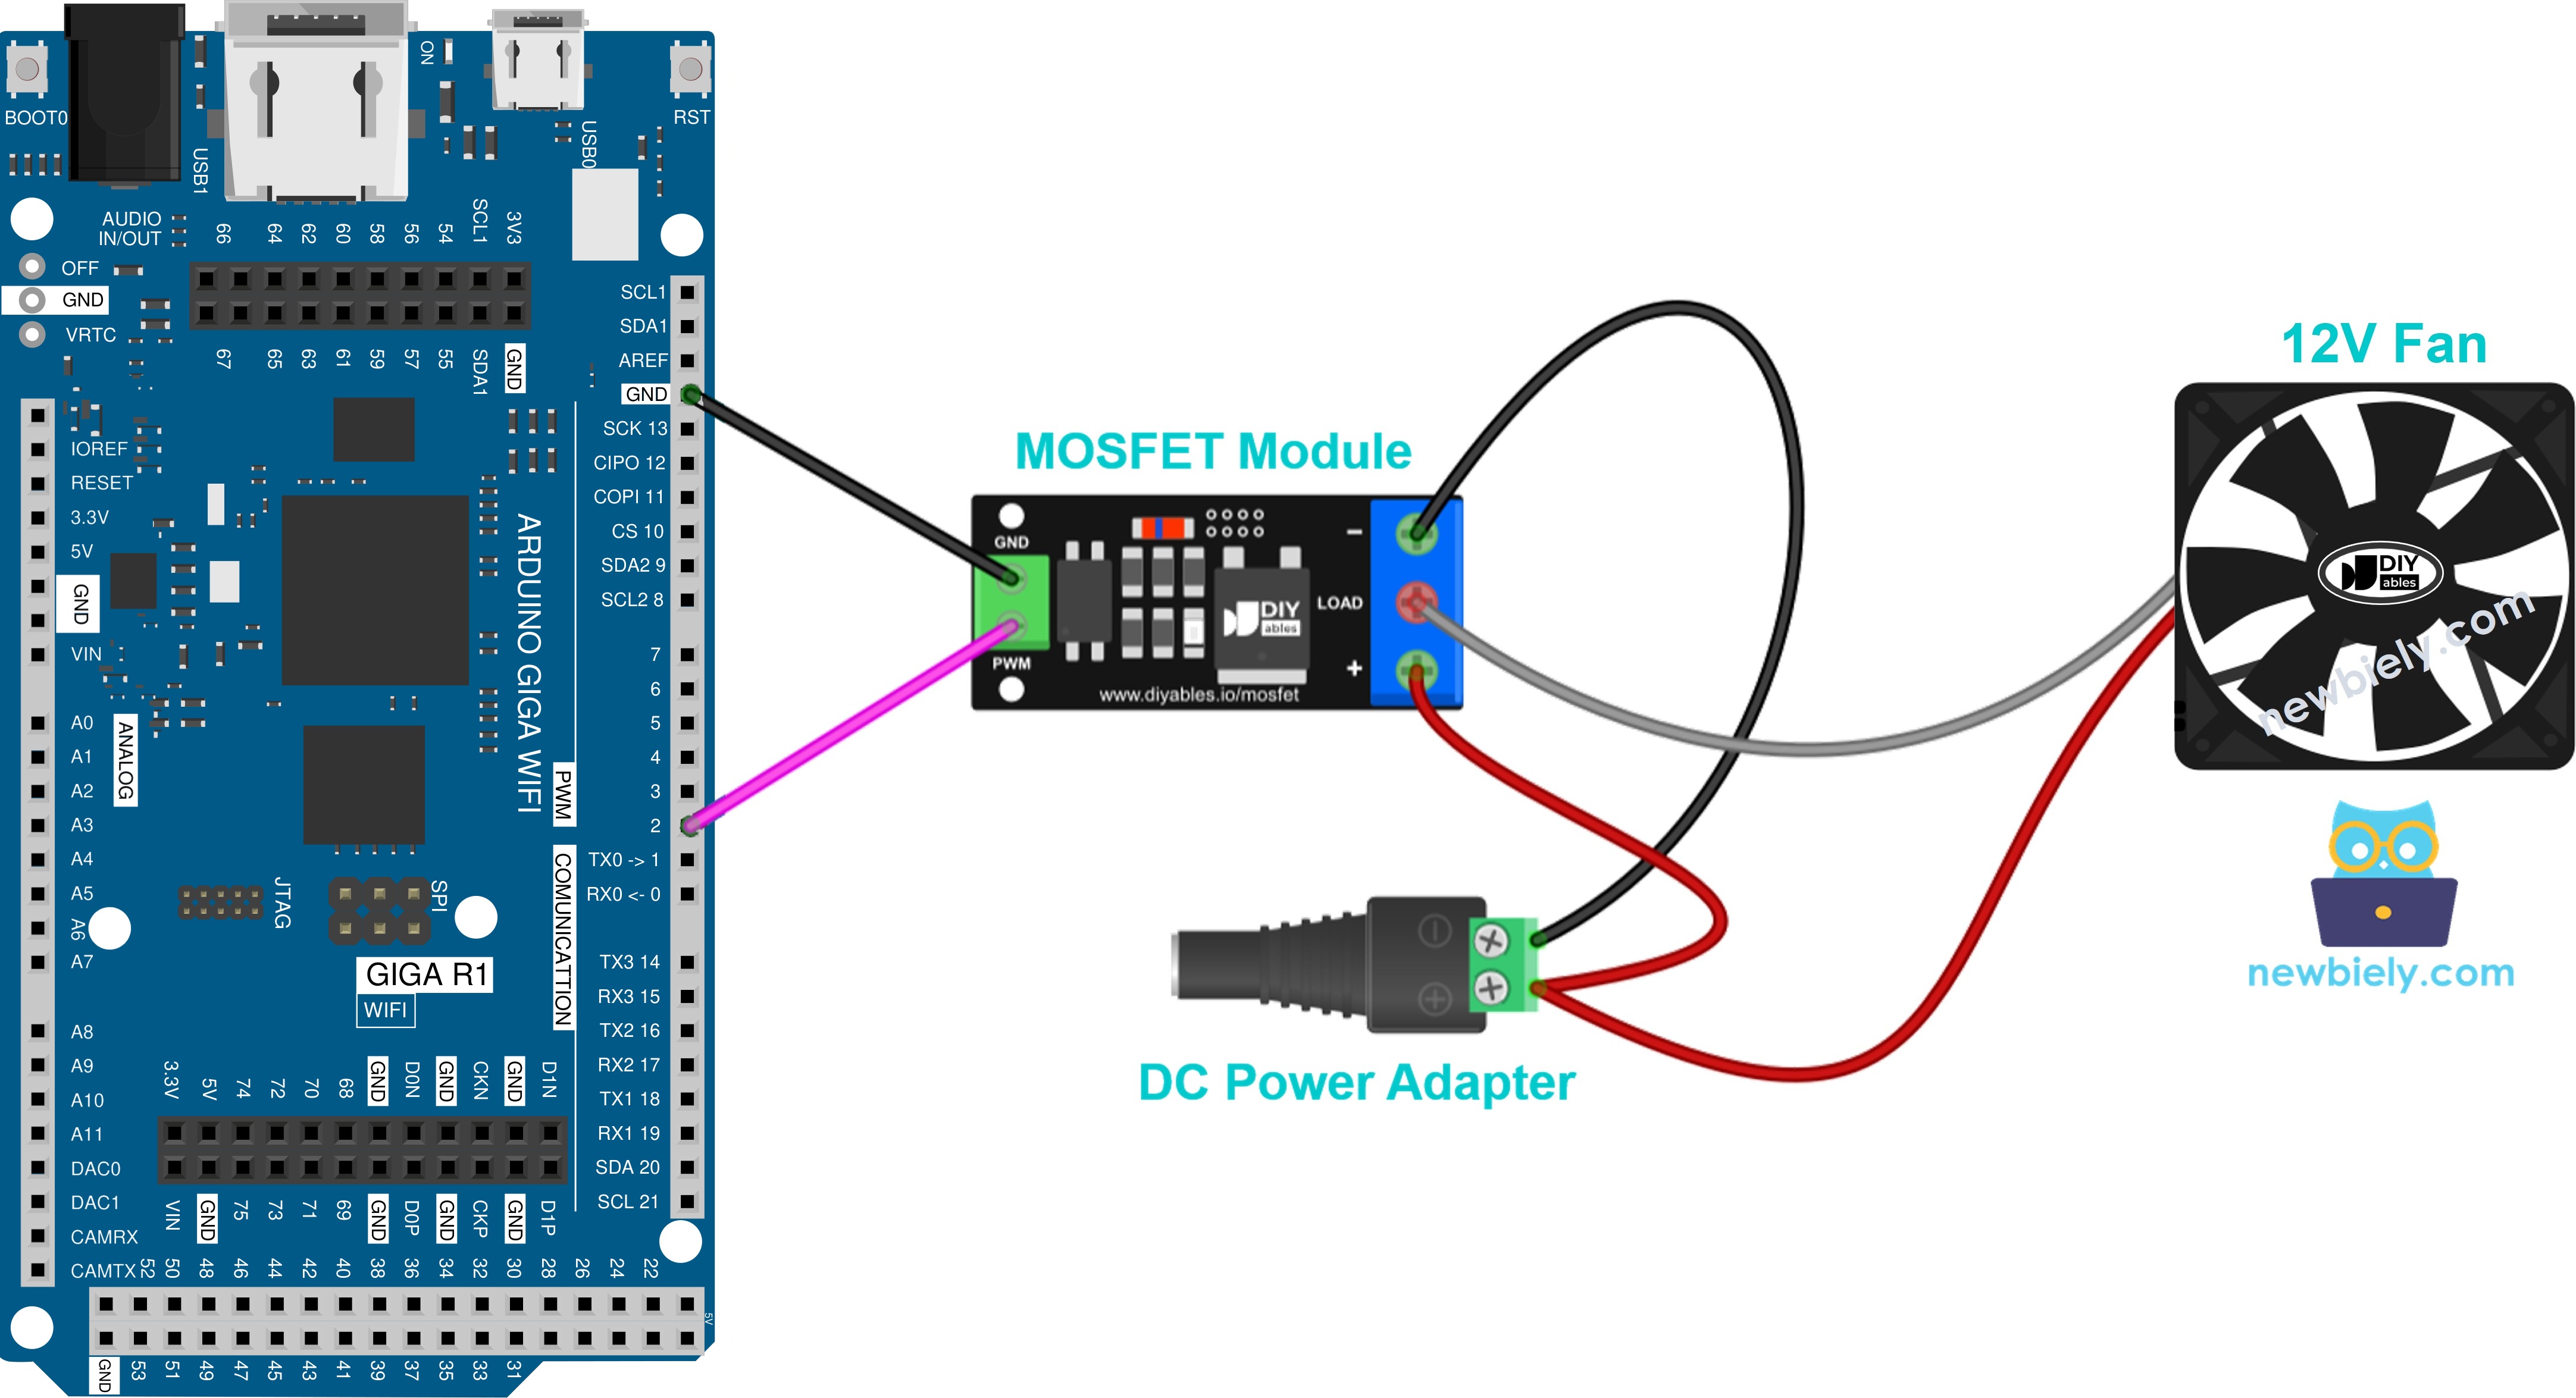
This image is created using Fritzing. Click to enlarge image
| Fan Wire | Module Terminal |
|---|---|
| Red (+) | + |
| Black (−) | LOAD |
| Yellow (speed signal, if any) | not connected |
- Diode: yes. It costs almost nothing and does no harm.
- PWM sets the speed. Many fans stall at a very low duty, so start above about 30%.
12V DC Motor
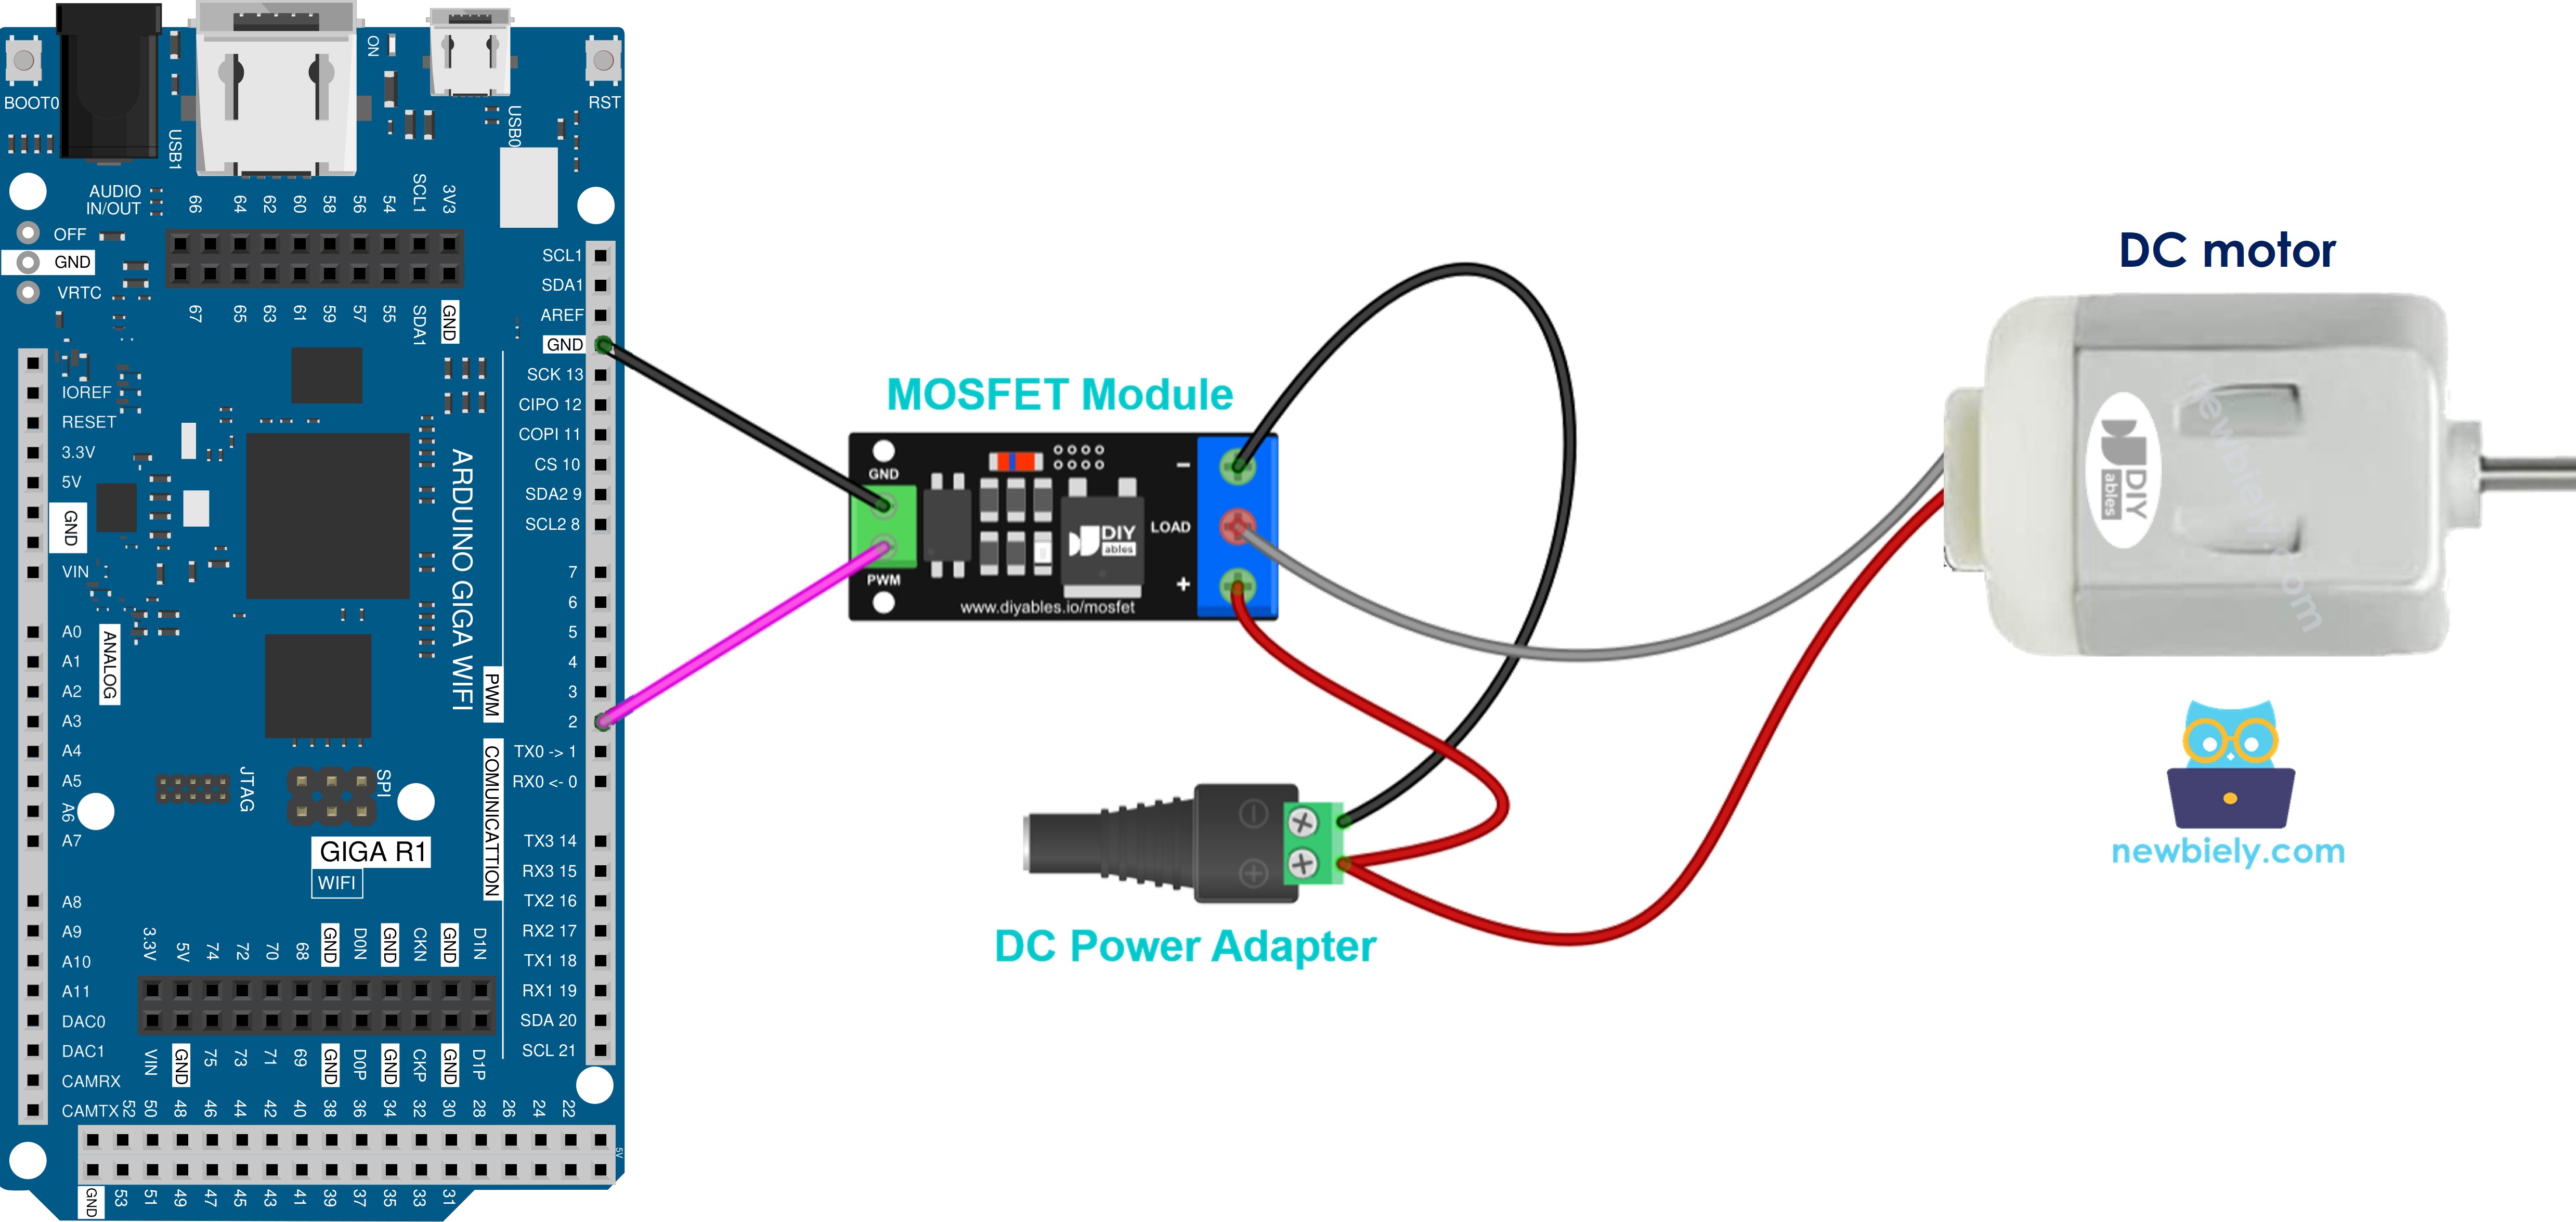
This image is created using Fritzing. Click to enlarge image
| Motor Wire | Module Terminal |
|---|---|
| Motor + | + |
| Motor − | LOAD |
- Diode: yes.
- PWM sets the speed.
- The motor turns in one direction only. To make it turn both ways, you need a motor driver, like the one in the Arduino Giga R1 WiFi - DC Motor Shield tutorial.
12V Water Pump
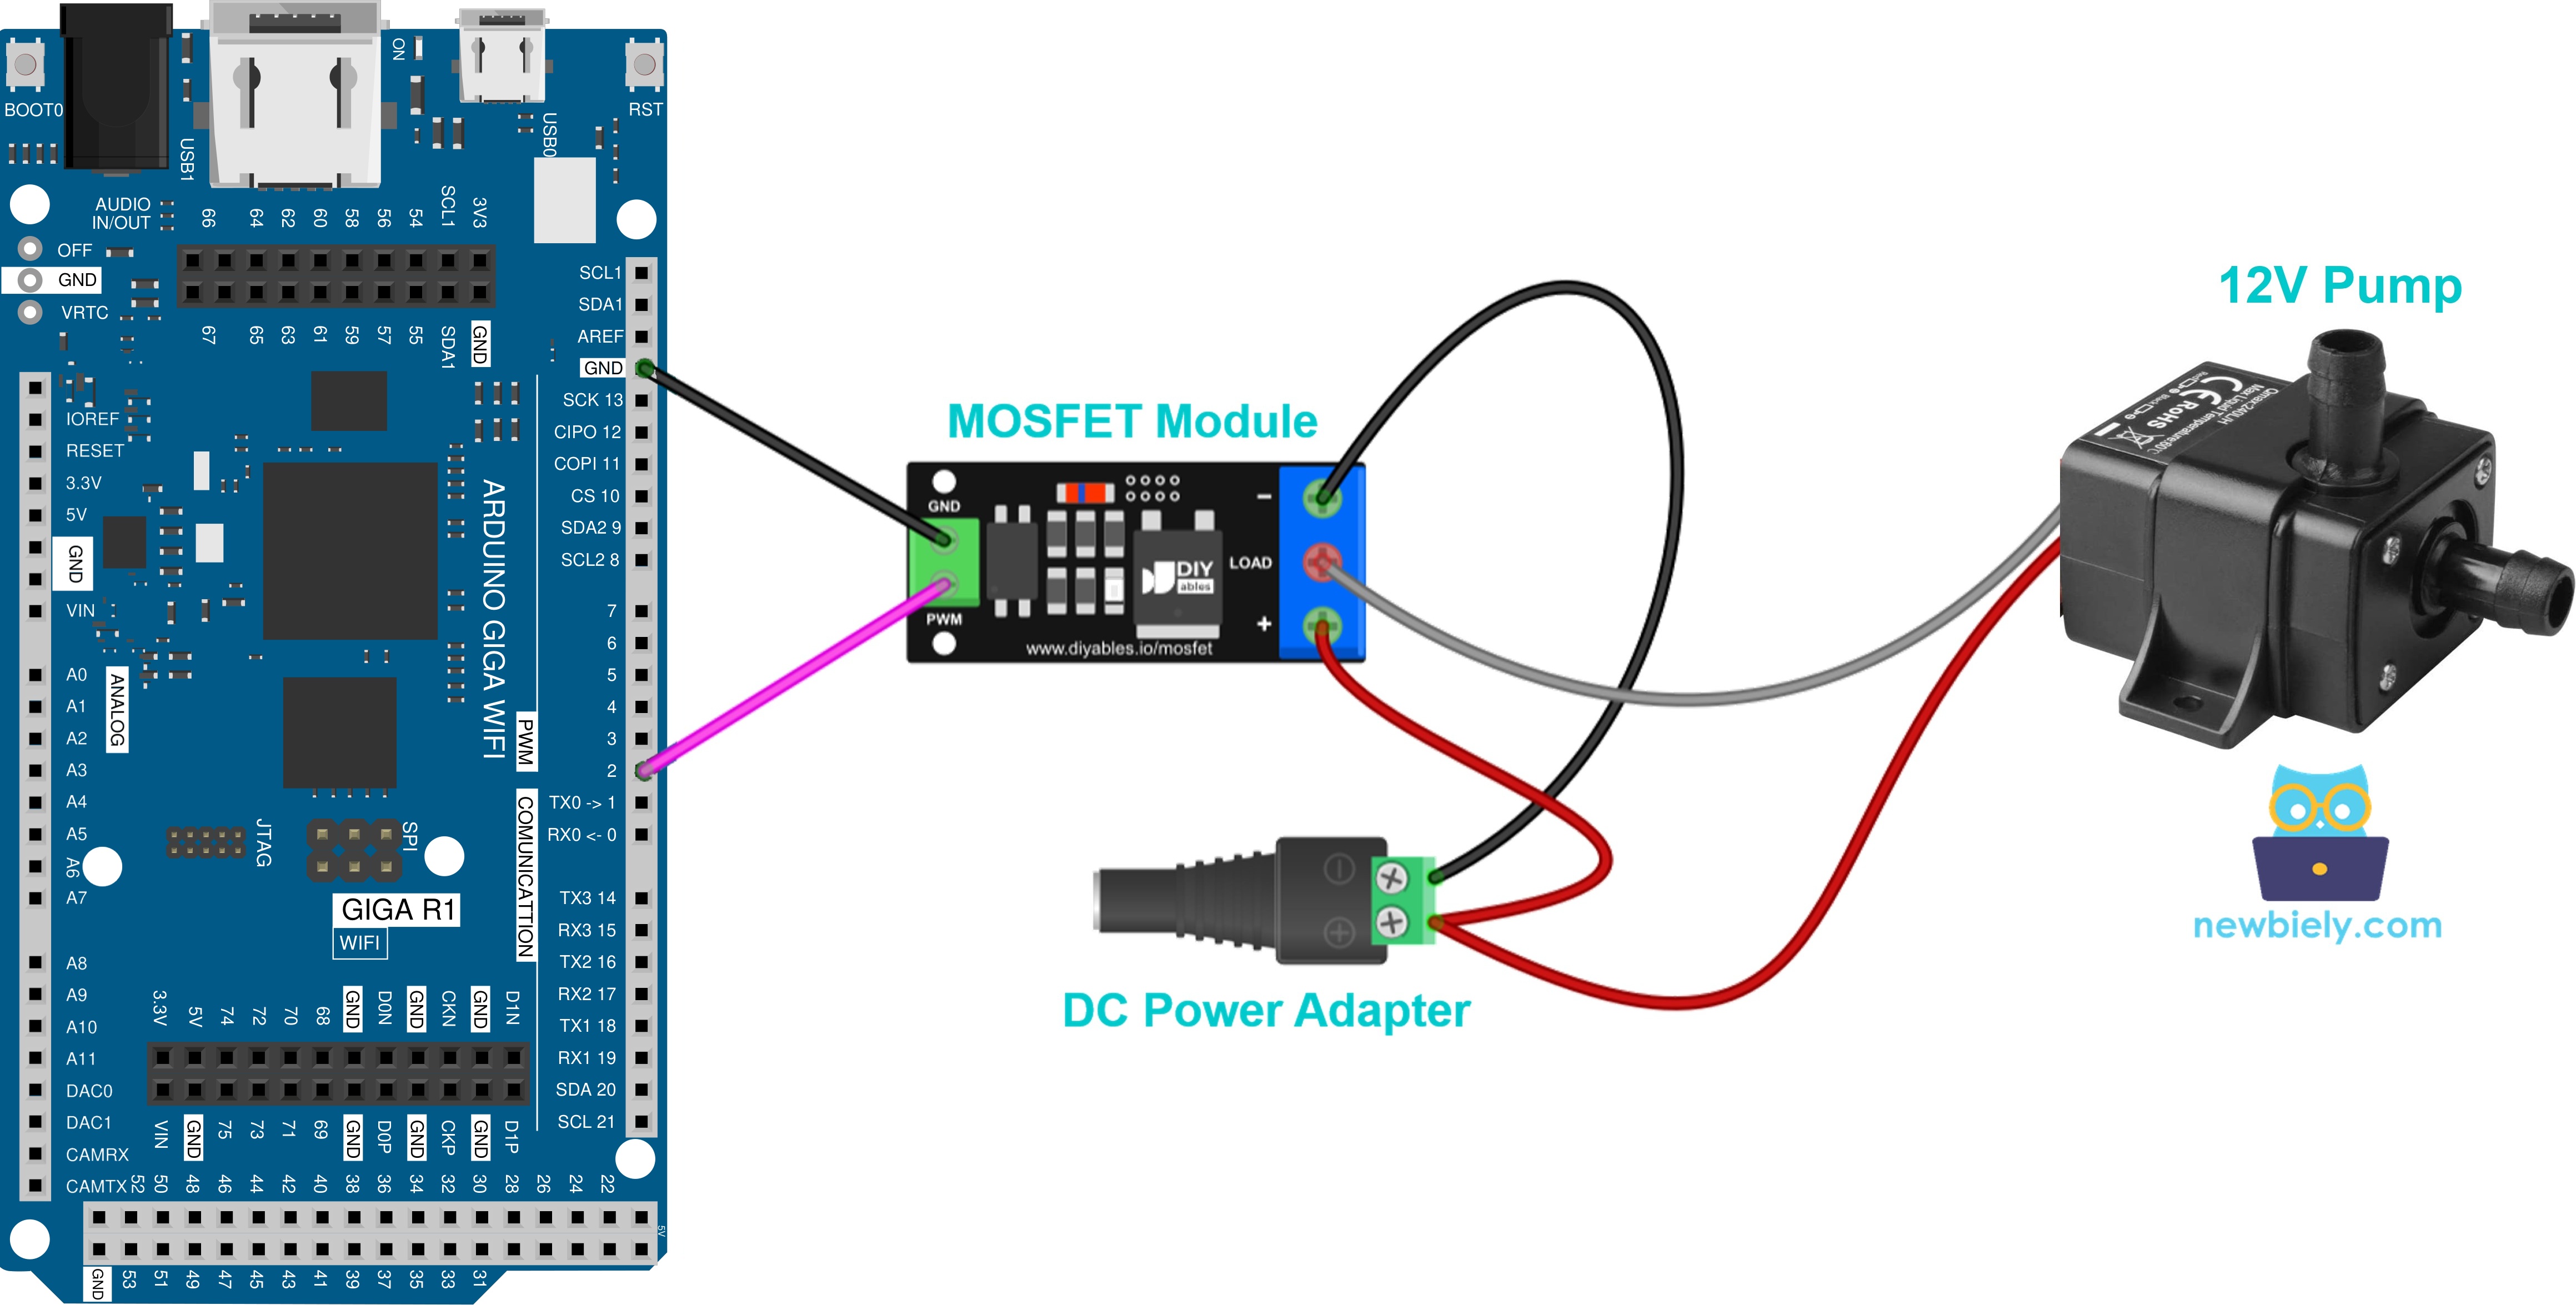
This image is created using Fritzing. Click to enlarge image
| Pump Wire | Module Terminal |
|---|---|
| Pump + | + |
| Pump − | LOAD |
- Diode: yes.
- PWM sets the water flow.
- Never let the pump run dry.
12V LED Strip (Single Color)
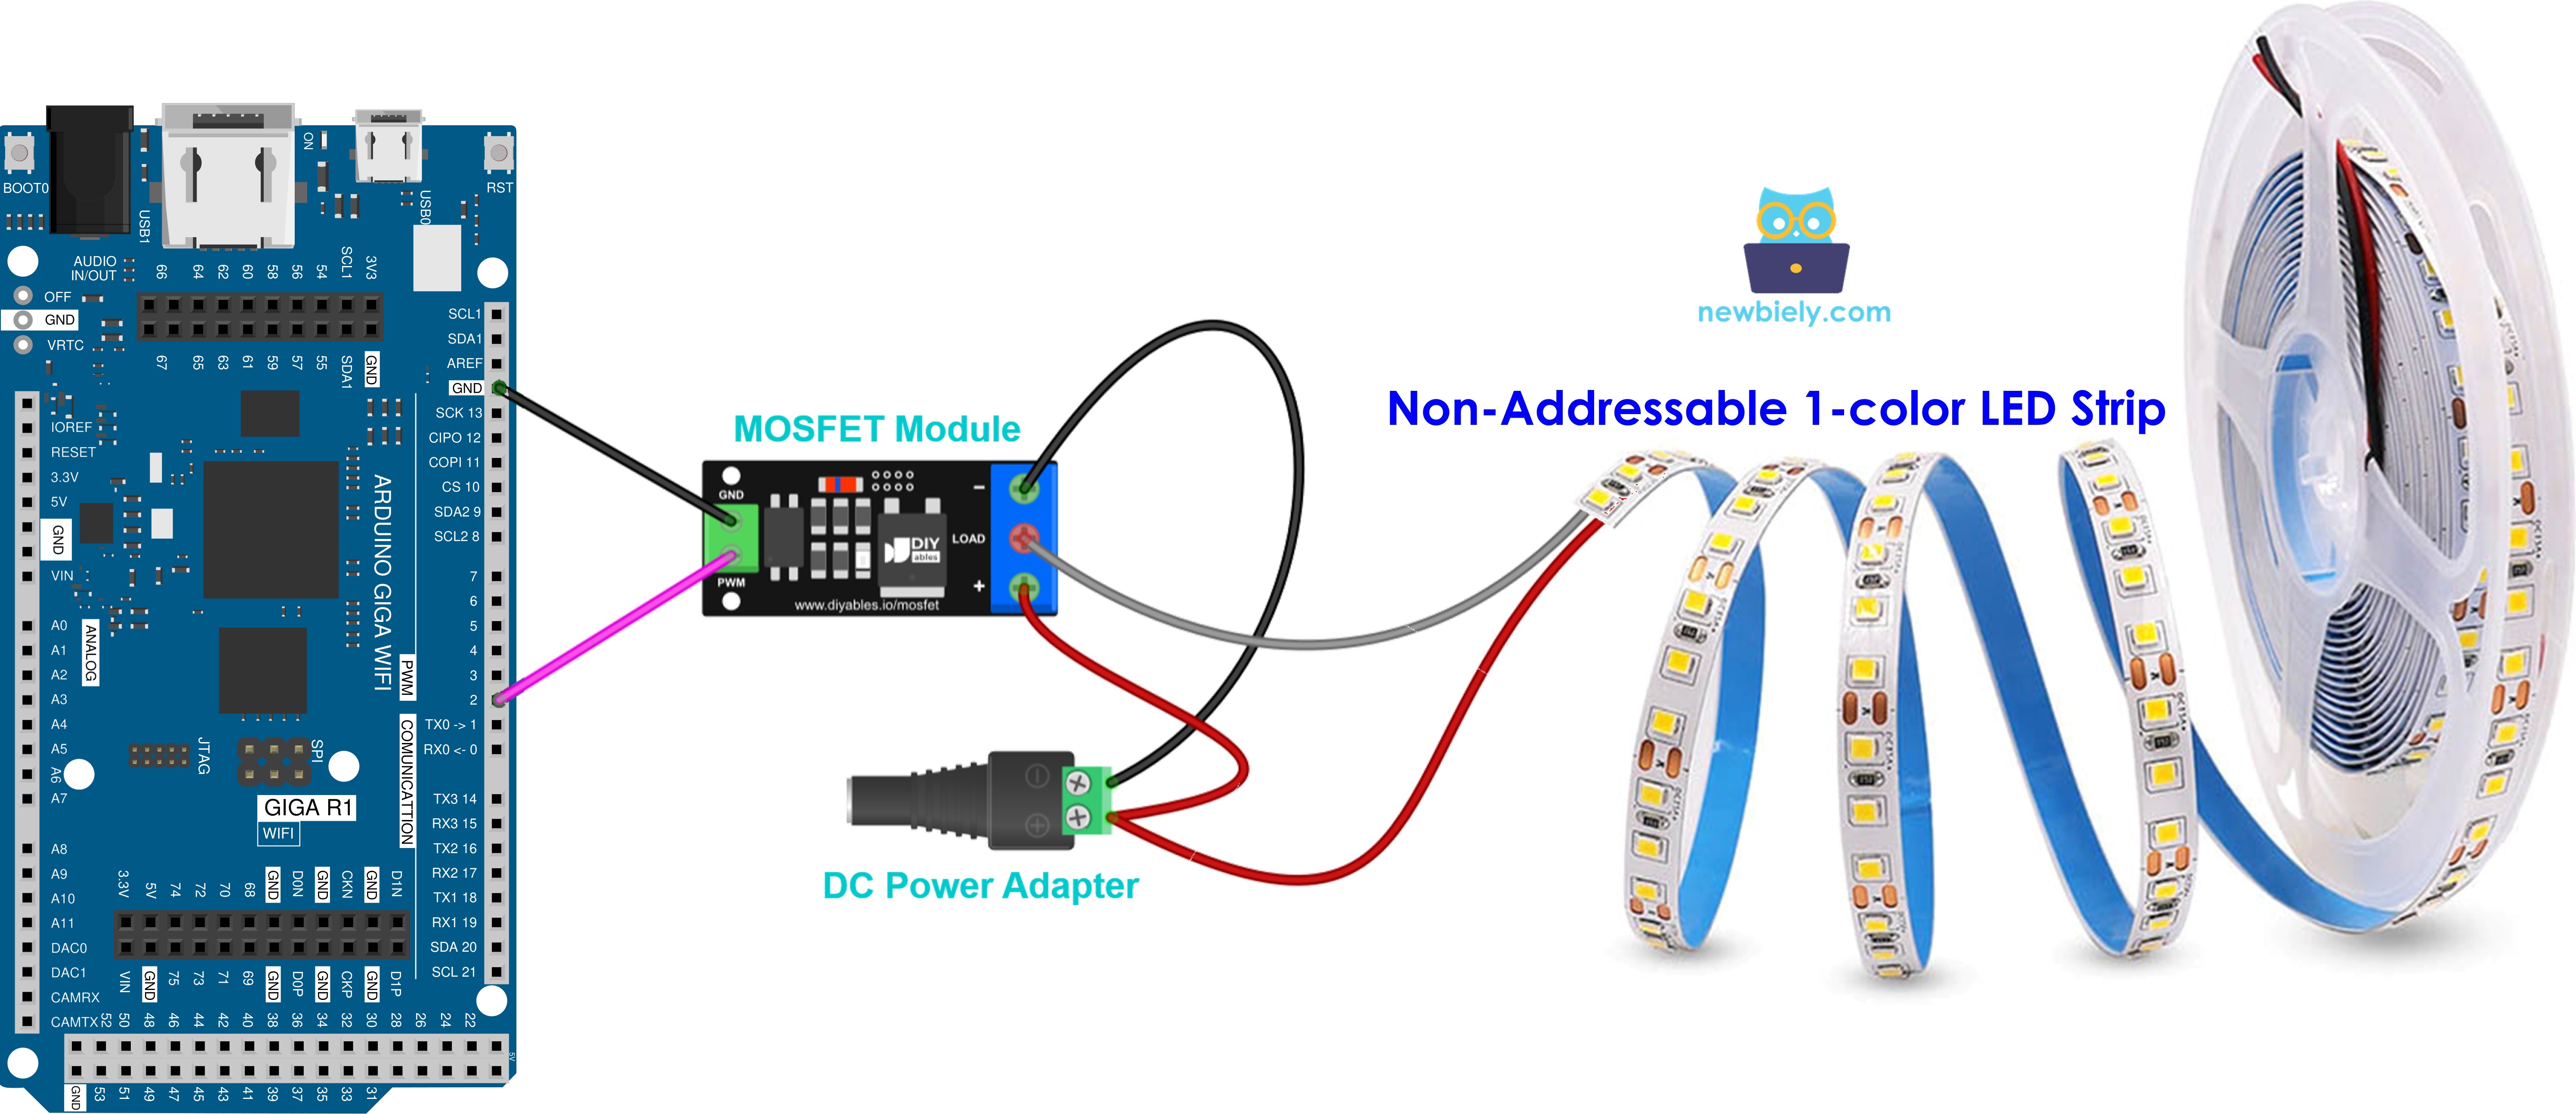
This image is created using Fritzing. Click to enlarge image
| Strip Wire | Module Terminal |
|---|---|
| Strip + (often marked 12V) | + |
| Strip − | LOAD |
- Diode: no. A strip has no coil.
- PWM sets the brightness.
- A longer strip pulls more current. Check its current before you pick the module.
- This is for a single-color strip only. RGB and addressable strips need a different setup.
12V Solenoid Valve (Normally Closed)
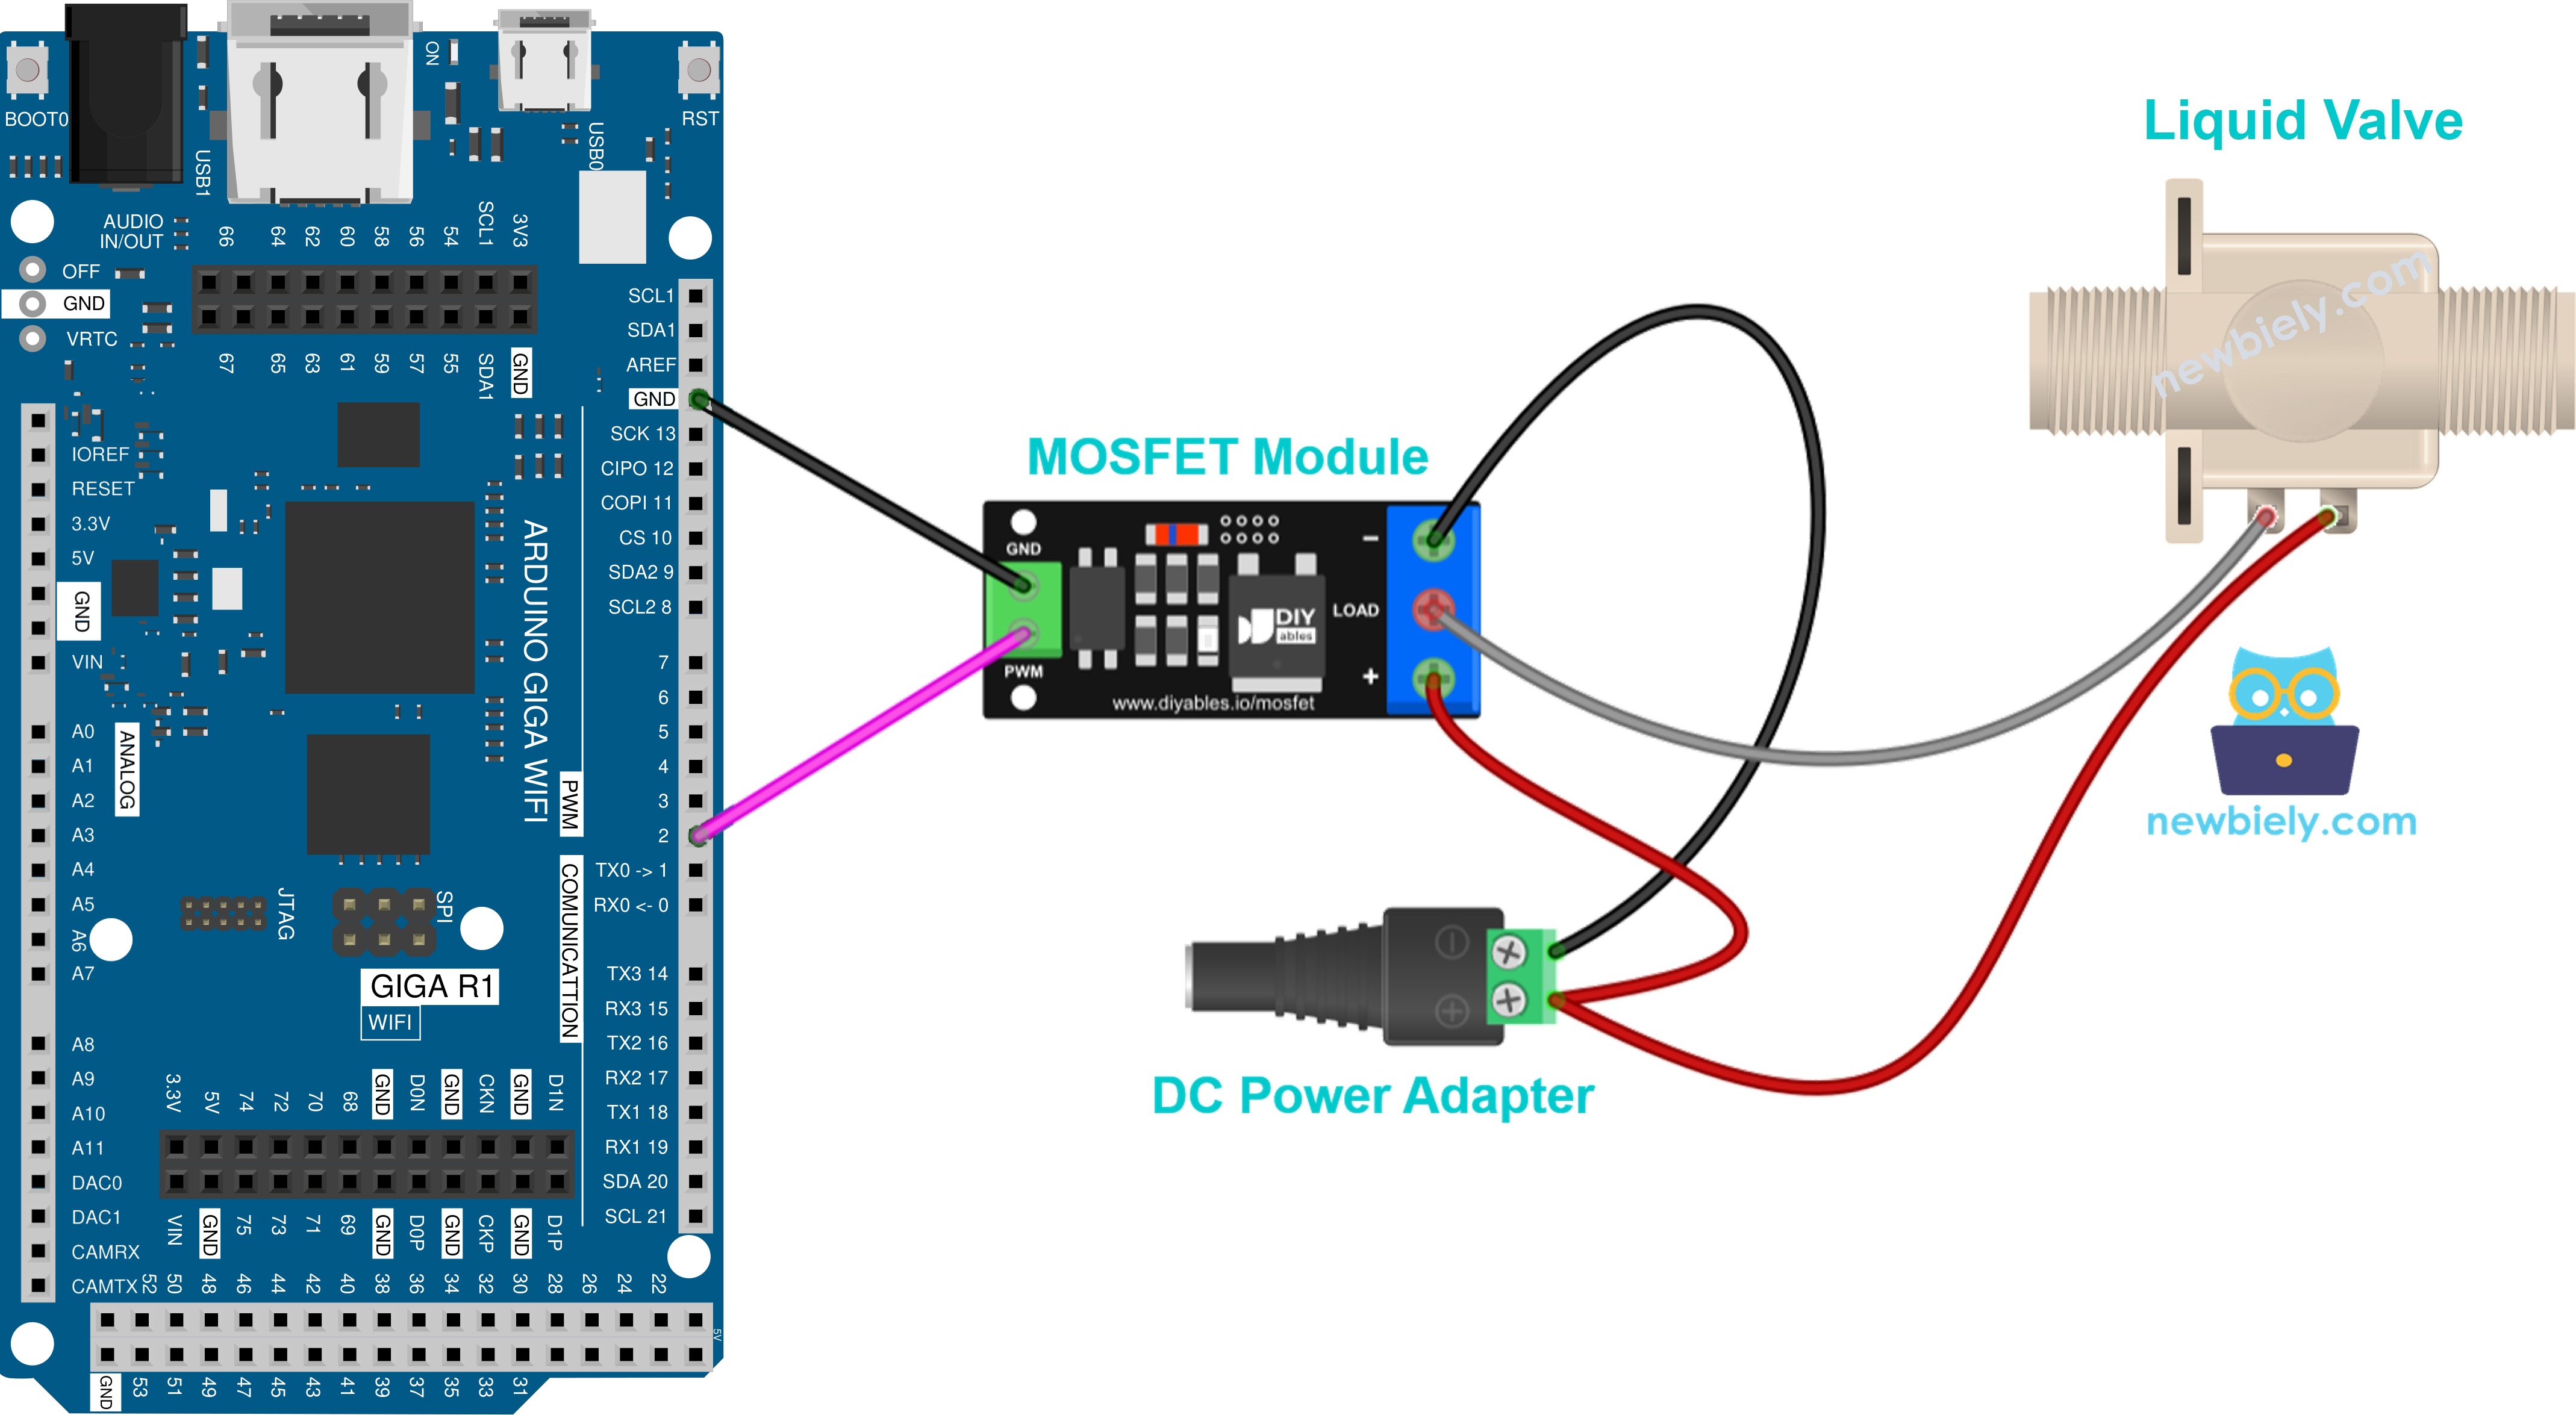
This image is created using Fritzing. Click to enlarge image
| Valve Wire | Module Terminal |
|---|---|
| Valve + | + |
| Valve − | LOAD |
- Diode: yes.
- Full power opens the valve. No power closes it.
- Use on/off only, no PWM.
12V Solenoid Lock
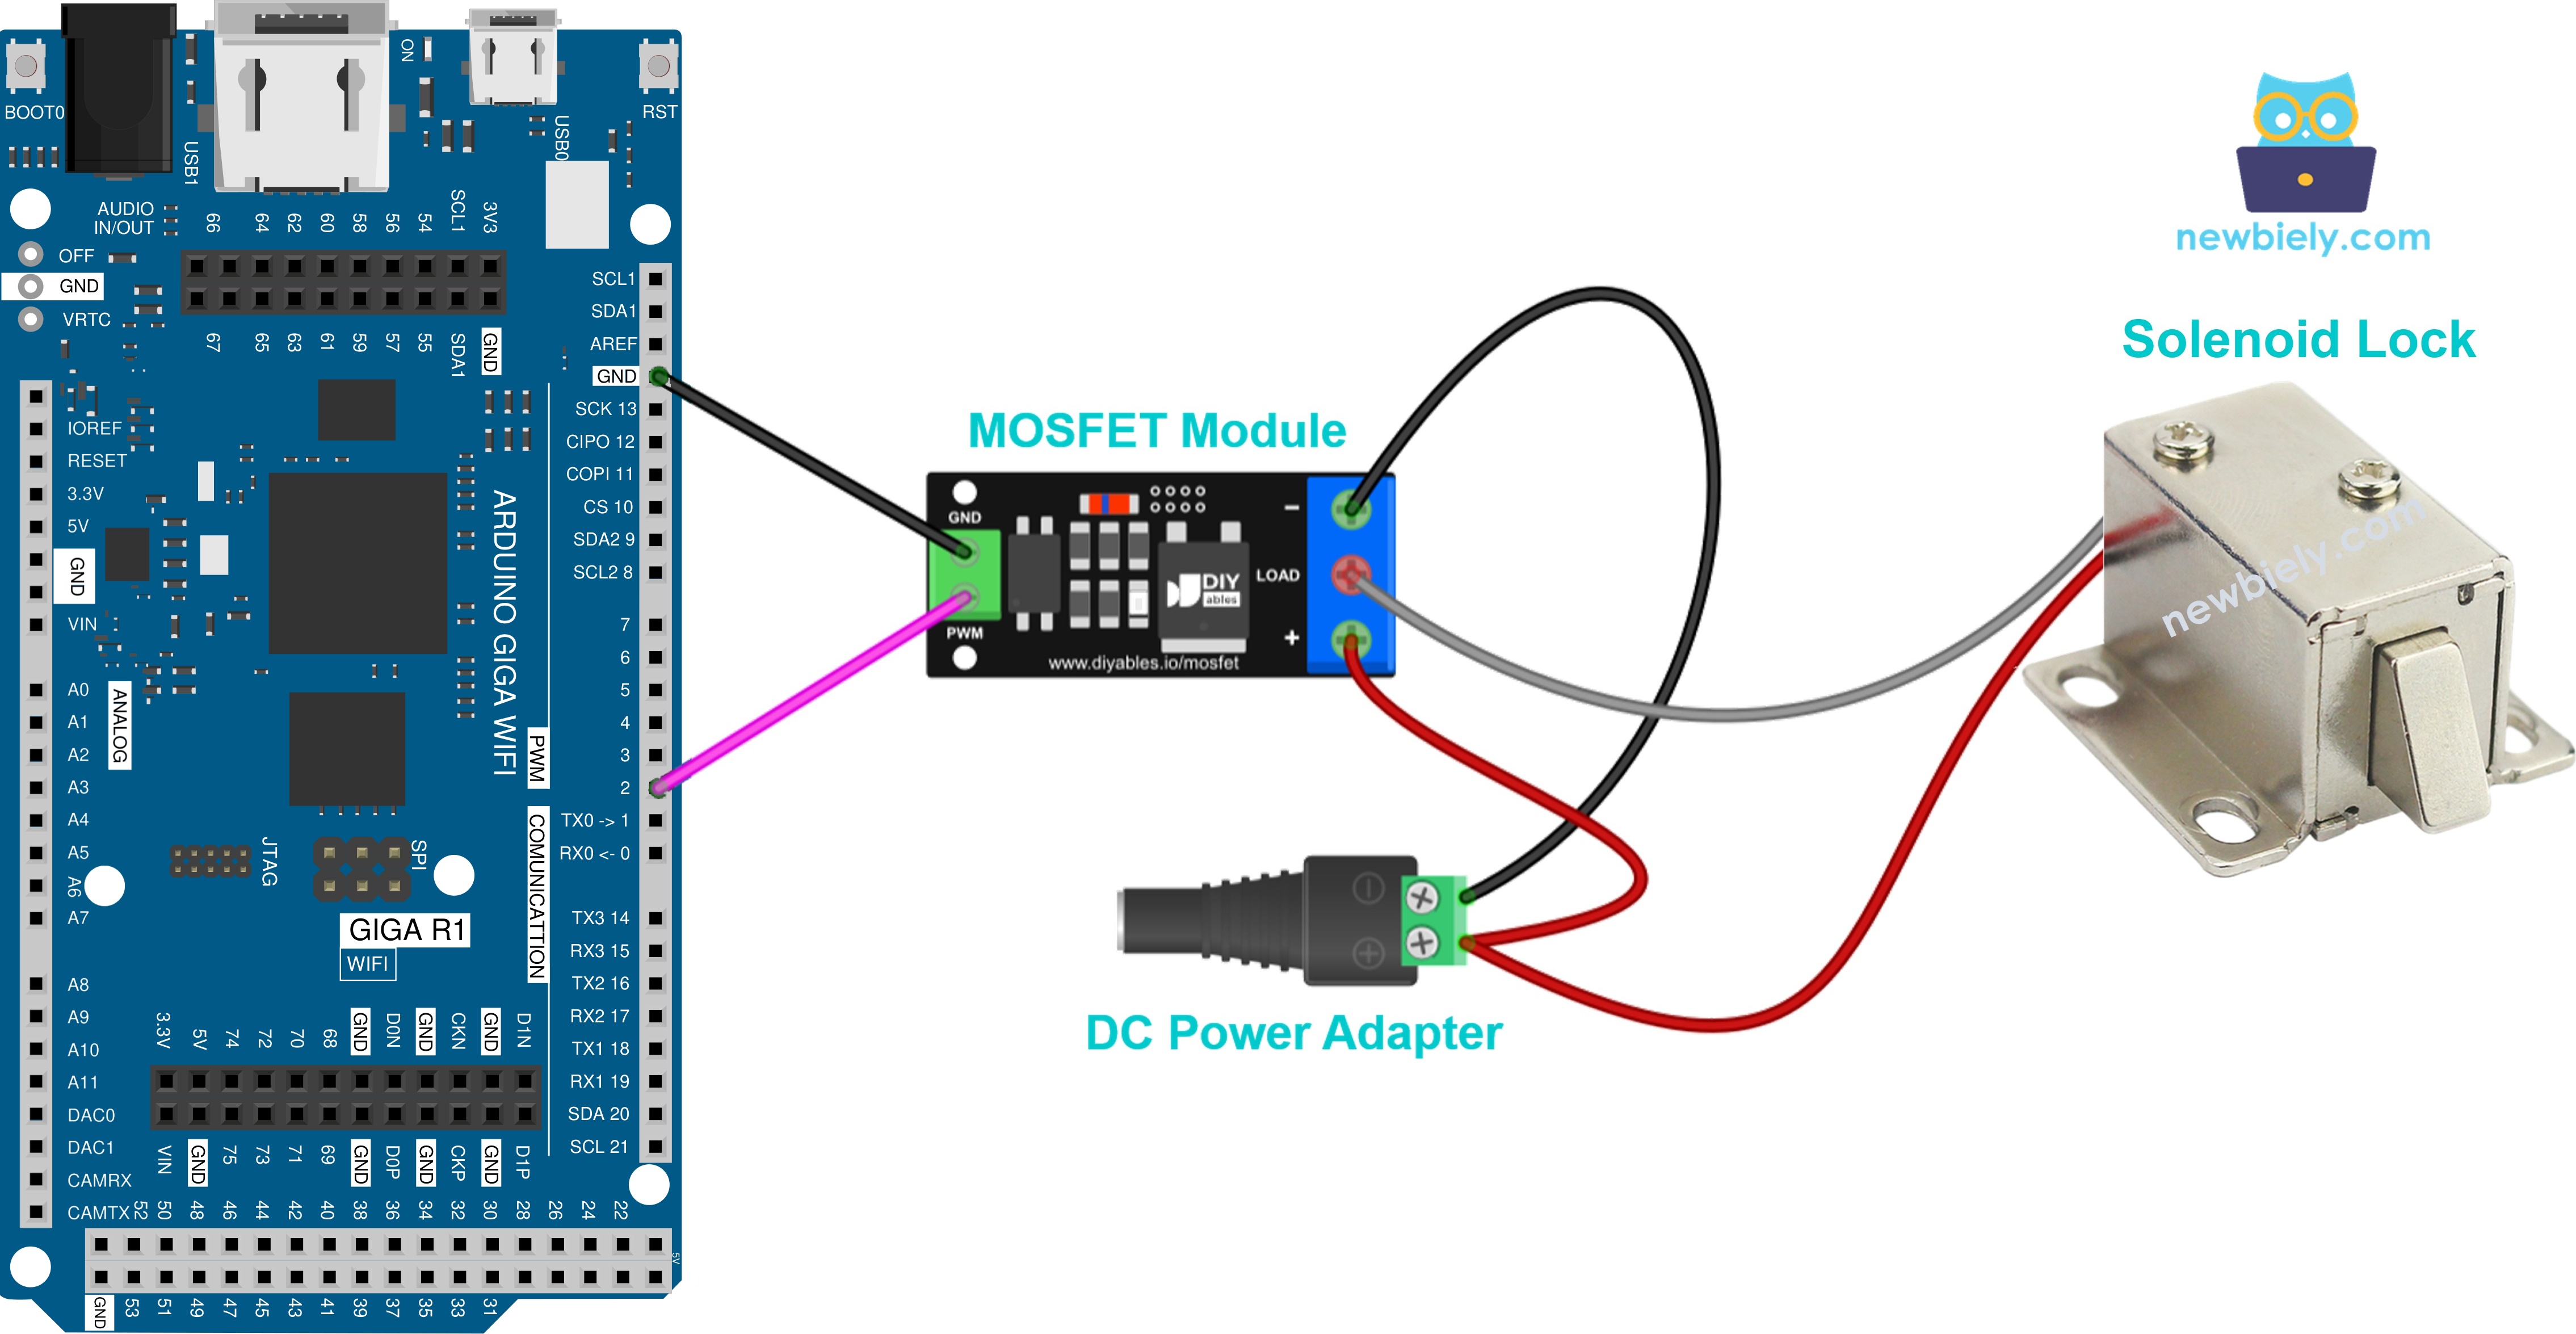
This image is created using Fritzing. Click to enlarge image
| Lock Wire | Module Terminal |
|---|---|
| Lock + | + |
| Lock − | LOAD |
- Diode: yes.
- Full on or full off only, no dimming.
- Give it a short pulse to unlock. If you hold it on for a long time, it gets hot.
How To Program For MOSFET Module
The sketch needs no library. It uses only functions that come with the Arduino core.
- Choose the Giga pin wired to the PWM input of the module:
- Configure the pin as an output and keep the load off at start:
- Give the load full power:
- Remove the power:
- Apply a power level from 0 to 100 percent. The map() function turns the percent into a 0–255 PWM value:
For a simple on/off project with no dimming, digitalWrite(MOSFET_PIN, HIGH) and digitalWrite(MOSFET_PIN, LOW) do the job too.
Arduino Giga R1 WiFi Code - MOSFET Module
What the sketch does in each loop:
- Full power for 2 seconds.
- No power for 2 seconds.
- Power rises from 10% to 100%, in steps of 10%, with half a second per step.
- Power falls from 90% to 0% at the same speed.
- A 1-second pause, and then the loop repeats.
Detailed Instructions
Follow these instructions step by step:
- New to this board? Set it up first with the Arduino Giga R1 WiFi getting started guide.
- Wire the components according to the provided diagram. Do not plug in the 12V adapter yet.
- Plug the Giga R1 WiFi into your computer with the USB Type-C cable.
- Launch the Arduino IDE on your computer.
- Select the appropriate Arduino Giga R1 WiFi board (e.g., Arduino Giga R1 WiFi) and COM port.
- Paste the code above into a new sketch in the Arduino IDE.
- Press the Upload button and wait until the upload is done.
- Now plug in the 12V adapter.
- Open the Serial Monitor at 9600 baud.
- Check the LED strip. It shines at full brightness, goes dark, then fades up slowly and fades down slowly.
Nothing happens on the strip? First make sure the 12V adapter is on. Then confirm the PWM wire is on pin 2 and the GND wire is on a Giga GND pin.
Next step: give each extra load its own MOSFET module and its own free PWM pin, and control them all from one sketch. For a relay-based way to run a fan or a pump, see the Arduino Giga R1 WiFi - Controls Fan and Arduino Giga R1 WiFi - Controls Pump tutorials.