
ESP32 MicroPython NTC Thermistor Temperature Sensor
This tutorial instructs you how to use the 10K NTC thermistor temperature sensor with the ESP32 and MicroPython. Because the sensing part is sealed in a steel tube on a thin cable, the ESP32 can stay dry on your desk while the probe checks a fish tank, a flower pot or the air outside a window. In detail, we will learn:
- Which part inside the probe senses heat, and what the small 10K resistor in the bag is for.
- How to wire the probe and that resistor to 3V3, GPIO36 and GND, with the ESP32 sitting in a breadboard.
- Why read_uv() is a better choice than read_u16() on the ESP32 for this job.
- How to turn the GPIO36 voltage into the probe's resistance, and that resistance into Celsius and Fahrenheit, using math.log().
- What the script prints when the plug is out or two wires touch.
https://newbiely.com/images/cover/esp32-micropython-ntc-thermistor-temperature-sensor.jpg
Hardware Preparation
Or you can buy the following kits:
| 1 | × | DIYables ESP32 Starter Kit (ESP32 included) | |
| 1 | × | DIYables ESP32 S3 Starter Kit (ESP32 S3 included) | |
| 1 | × | DIYables Sensor Kit (18 sensors/displays) |
Additionally, some of these links are for products from our own brand, DIYables .
Overview of NTC Thermistor Temperature Sensor
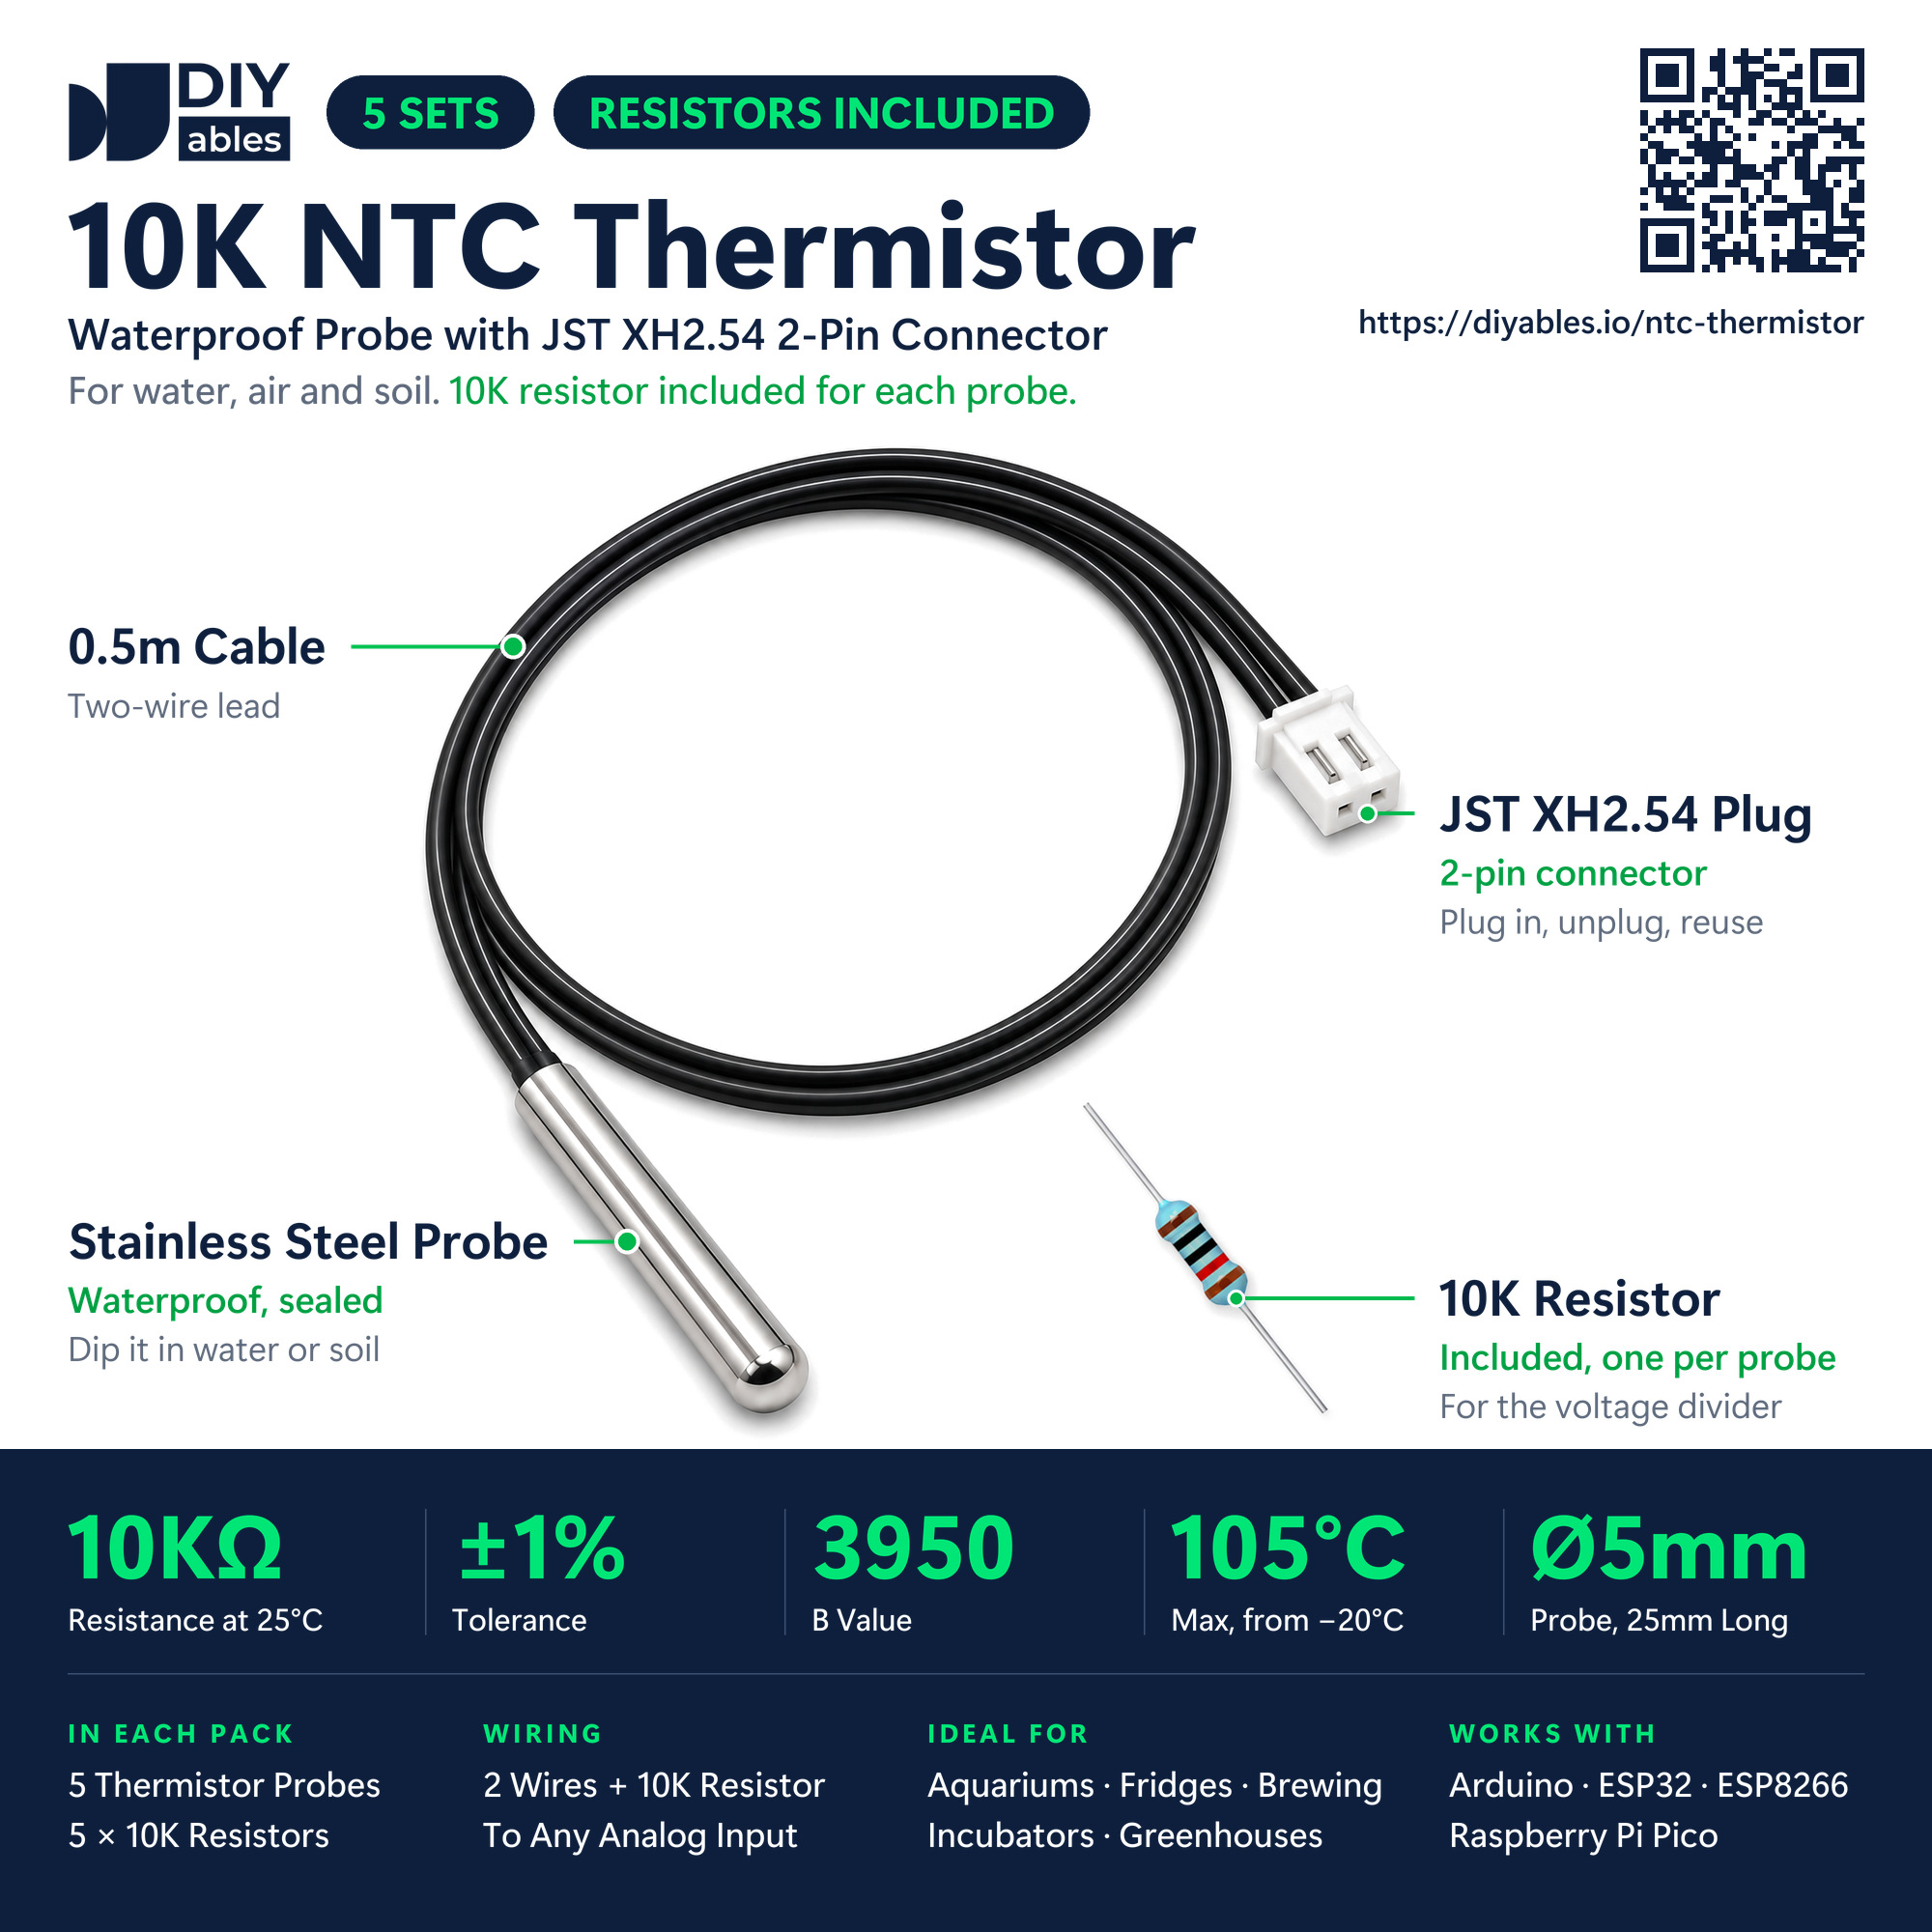
At the end of the DIYables probe is a rounded stainless-steel tube of only 5 by 25mm. The sensing part hides inside it: a thermistor. Think of it as a resistor that reacts strongly to heat. The ESP32 measures how many ohms it has right now and converts that into degrees. NTC means Negative Temperature Coefficient. Put simply: heat it, and its resistance drops; cool it, and its resistance rises. From the tube, a black two-wire cable of half a meter ends in a 2-pin white JST XH2.54 connector. You do not need an adapter: male jumper wires fit right into its two openings.
Every probe in the 5-piece pack has its own 10K resistor packed next to it. Do not lose them: our circuit uses one.
| 10K NTC Thermistor Probe | |
|---|---|
| Type | NTC thermistor |
| Resistance | 10kΩ ±1% at 25°C |
| Beta (B) value | 3950 |
| Usable range | -20°C ... 105°C |
| Tip | waterproof stainless steel, 5mm x 25mm, rounded |
| Cable | two-core, black, 0.5m |
| Plug | white JST XH2.54 (2-pin) |
| Insulation | over 100MΩ |
Pinout
Nothing on the probe is marked, and nothing has to be. Current can run through a thermistor in either direction, the same as through any plain resistor. So take one wire and name it wire A; the other one is wire B:
- Wire A: connect to 3V3 (3.3 volts) on the ESP32.
- Wire B: connect to GPIO36 of the ESP32. Your MicroPython script reads the voltage here.
- 10K resistor from the kit: connect one leg to GPIO36, together with wire B, and the other leg to GND (0 volts).
Mixed up A and B? No problem, the temperature comes out the same.
How It Works
An ADC can only tell volts, so the ESP32 needs help to see ohms. The help is the 10K resistor. Probe and resistor are chained from 3.3 volts down to GND, and GPIO36 taps the middle. Such a chain is known as a voltage divider. Each part uses up a piece of the 3.3 volts in proportion to its ohms. When the probe is warm, its ohms are low and its piece is small, so the middle point (GPIO36) rises. When it is cold, its ohms are high, and GPIO36 sinks.
What GPIO36 sees in this circuit:
| Example | Temperature | Probe resistance | Voltage on GPIO36 |
|---|---|---|---|
| Winter night on a balcony | -10°C | 58.2kΩ | about 0.48 volts |
| Water from the cold tap | 15°C | 15.8kΩ | about 1.28 volts |
| Rated point of the probe | 25°C | 10.0kΩ | about 1.65 volts |
| Bath water | 45°C | 4.35kΩ | about 2.30 volts |
| Tea after a few minutes | 70°C | 1.76kΩ | about 2.81 volts |
The script walks this path backwards. Step one gives the probe resistance R from the voltage V measured on GPIO36:
R = 10000 × (3.3 − V) / V
Step two uses R in the beta equation:
1/T = 1/T0 + (1/B) × ln(R/R0)
The numbers of this probe go in here: B = 3950, and R0 = 10000Ω at T0 = 298.15K (that is 25°C). T is in kelvin, so take away 273.15 for °C. Other guides often show the Steinhart-Hart equation instead, a three-constant version that is a bit more exact. The beta equation does fine for this probe. Near room temperature, a typical error is about 1°C, mostly due to the precision of your 10K resistor and to the ESP32's ADC.
Wiring Diagram
The board is plugged into a breadboard, and so is the 10K resistor. Red starts from 3V3, yellow from GPIO36 and black from a GND pin on the upper edge. The resistor stands across the middle gap of a free column right of the board (column 25): GND reaches the upper half of that column, GPIO36 the lower half. From the lower half, a second yellow jumper goes to the plug opening of wire B, and the red wire goes from 3V3 to the opening of wire A.
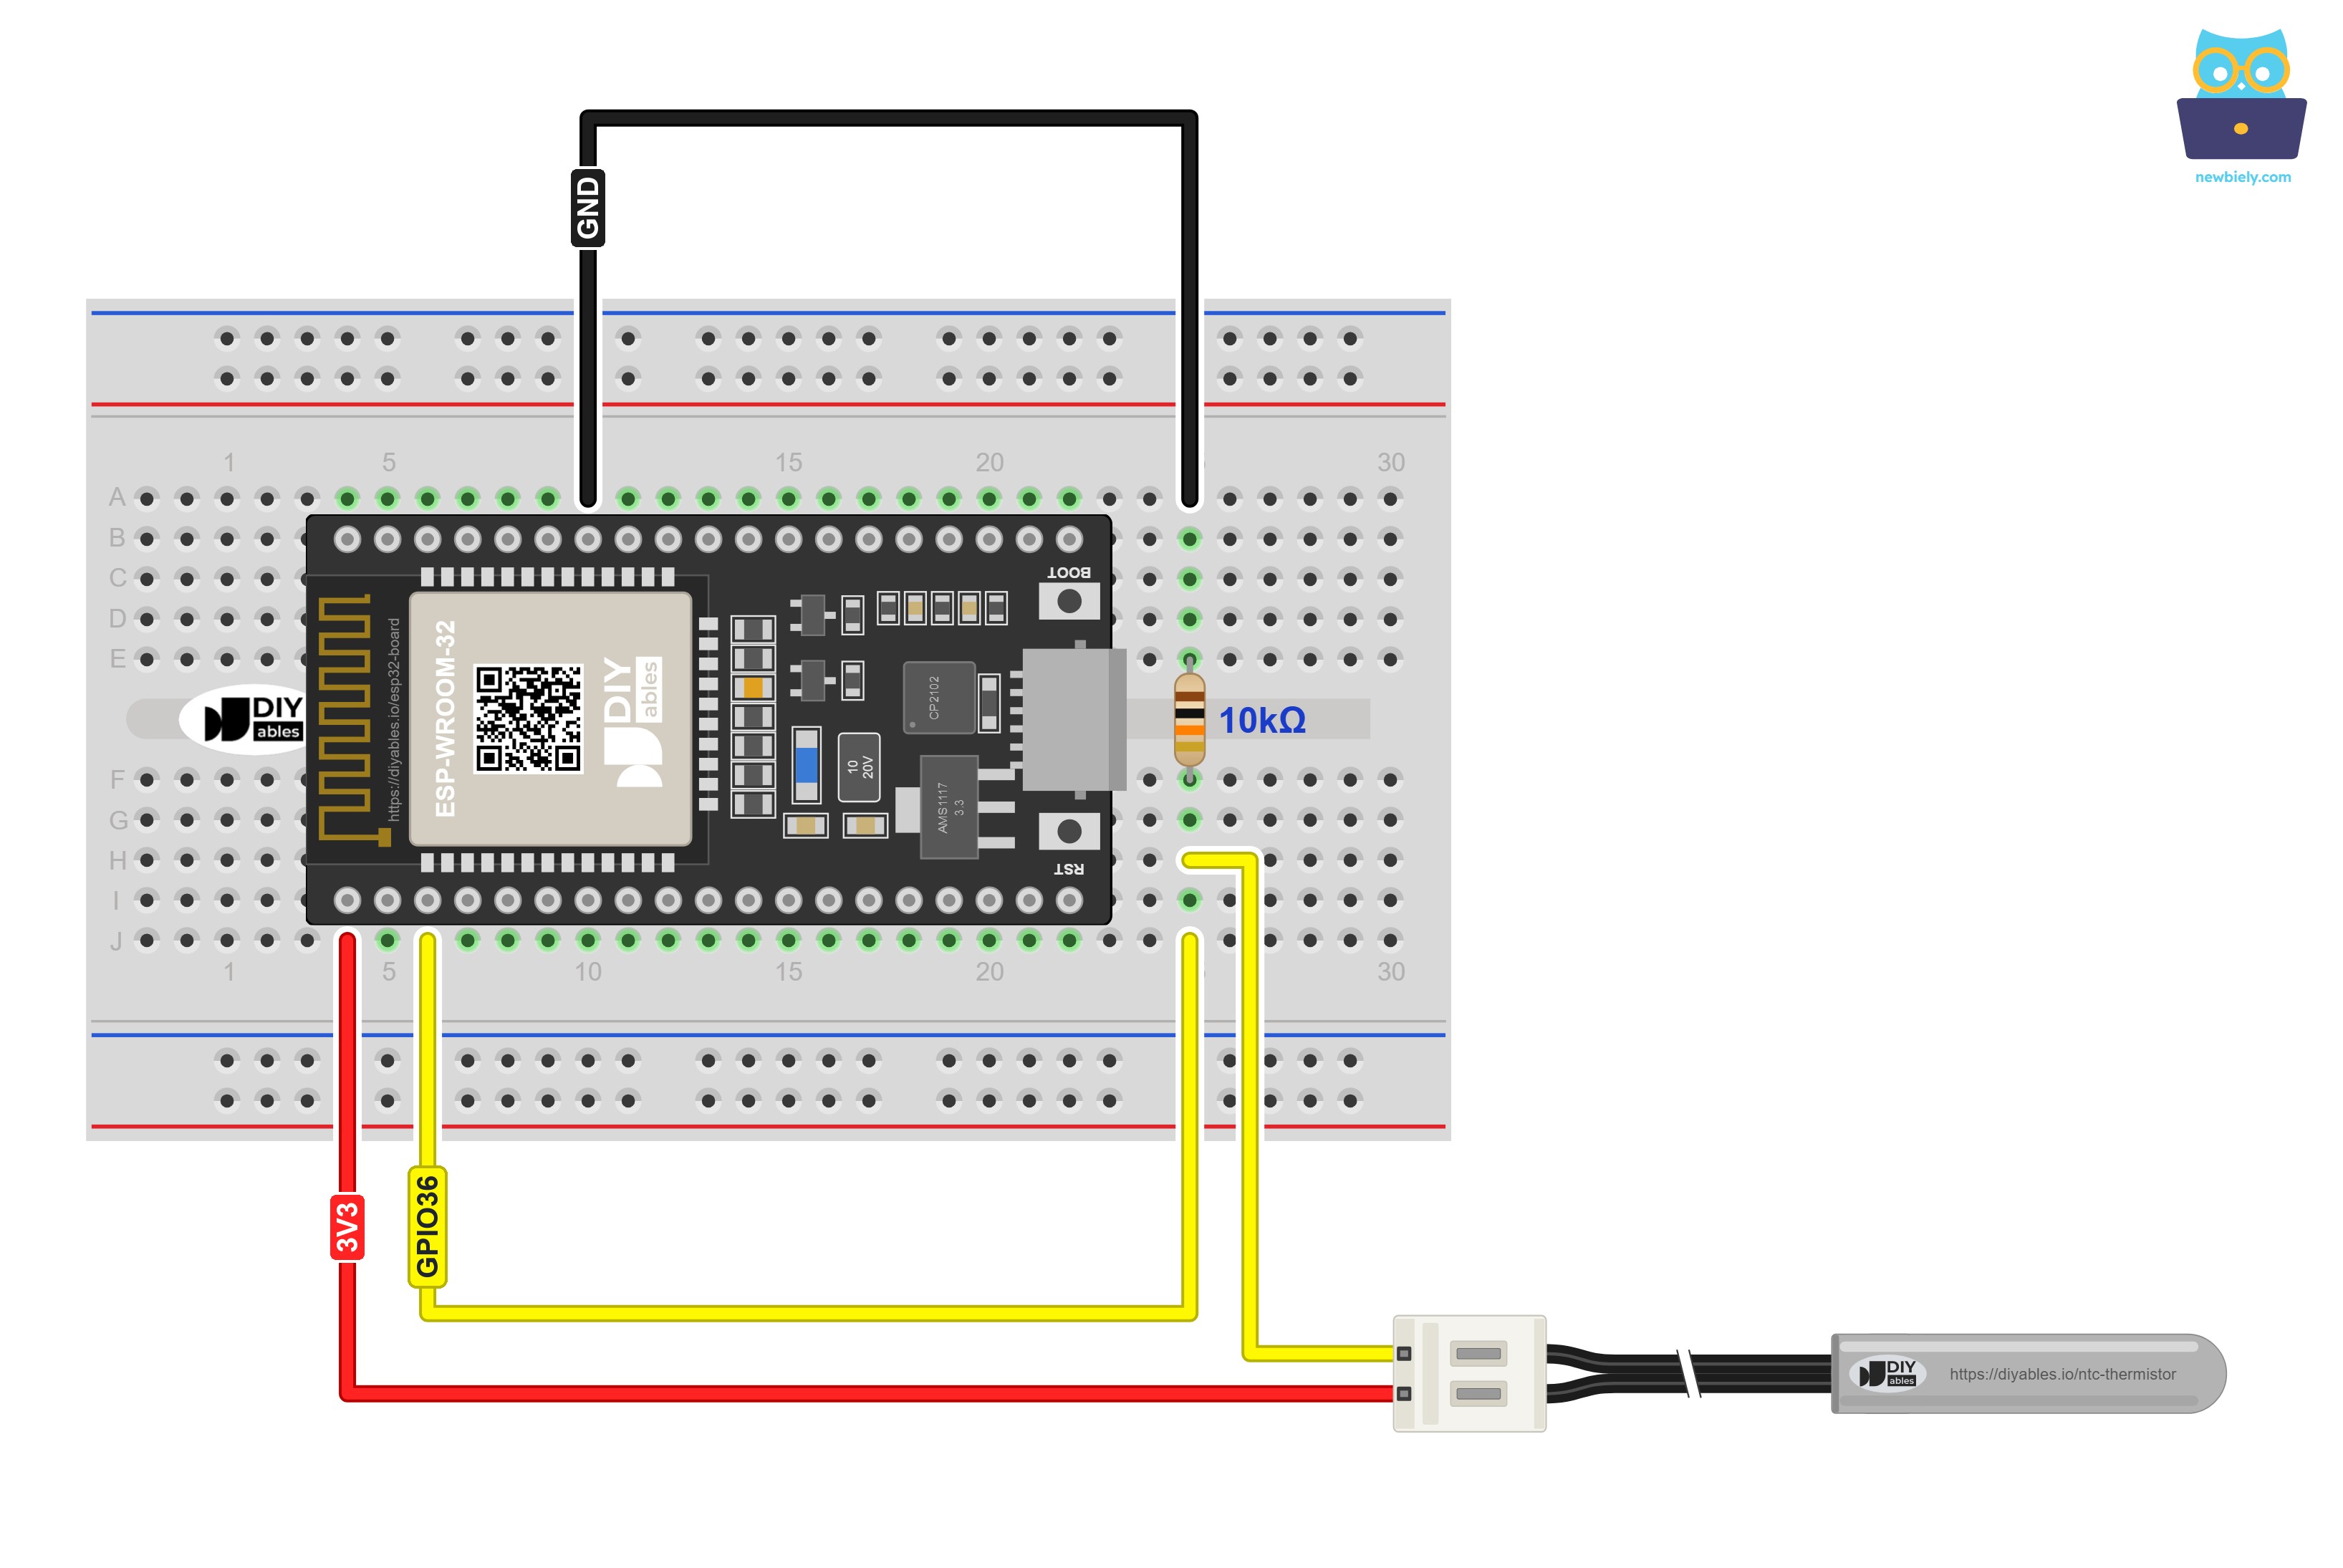
This image is created using Fritzing. Click to enlarge image
| Thermistor Side | ESP32 Pin |
|---|---|
| Wire A of the probe (pick either) | 3V3 (3.3 volts) |
| Wire B of the probe | GPIO36 (labelled VP or SVP on many boards) |
| First leg of the 10K resistor | GPIO36 |
| Second leg of the 10K resistor | GND |
Why not put the resistor right next to the GPIO36 pin? The ESP32 covers all but one hole of each of its pin columns, so the resistor goes in a free column instead: one leg in the upper half (GND), the other in the lower half (GPIO36). Each hole holds just one wire or leg.
Why GPIO36? It sits on ADC1, and ADC1 still works when WiFi is switched on. It is input-only, which a sensor does not mind. Any other ADC1 pin (GPIO32 to GPIO39) works too: just edit the 36 in ADC(Pin(36)).
※ NOTE THAT:
Keep wire A on 3V3. VIN and 5V are not allowed here. As the probe heats up, GPIO36 climbs toward the voltage that feeds the top of the chain. Feed it 5 volts, and GPIO36 goes beyond 3.3 volts once the probe passes roughly 41°C. Warm tea is enough for that, and it can damage the ESP32. The 3V3 pin is also regulated on the board, so it stays steady and matches the 3.3 that the script uses.
ESP32 MicroPython Code - NTC Thermistor Temperature Sensor
Here is what happens inside the script:
- ADC(Pin(36)) and atten(ADC.ATTN_11DB) prepare GPIO36. With no attenuation, the ESP32 ADC tops out close to 1 volt. 11 dB opens it up to about 3 volts, and hot water can push the divider that high.
- read_divider_voltage() collects 10 values from read_uv(), with 10 ms between them, and hands back their average in volts. Every ESP32 chip leaves the factory with its own calibration data, and read_uv() applies it for you. Raw read_u16() numbers are bent near both ends of the scale and hit their maximum around 3.1 volts, so math on them alone puts the temperature off by a few degrees.
- Before any math, the voltage is checked. Below 0.2 volts, the probe is missing: the 10K resistor alone pulls GPIO36 to ground. (Why not test for exactly 0? The ESP32 rarely reports a clean zero.) Above 3.05 volts, GPIO36 is almost at the top. Maybe two wires touch, the resistor is not in place, or the tip is hotter than about 94°C, where this ADC can no longer measure well. Either way, you see a line that tells you what to check.
- When the voltage is fine, the two formulas from above do the rest. math.log() with one argument is ln, the natural log. Every second, one line shows the temperature in °C and °F, then the resistance and the GPIO36 voltage in brackets.
Detailed Instructions
Here's instructions on how to set up and run your MicroPython code on the ESP32 using Thonny IDE:
- You need Thonny IDE on the computer and MicroPython firmware on the ESP32.
- Missing one of them? The ESP32 MicroPython Getting Started guide covers both.
- Wire everything as in the table. Before you plug in USB, check one more time that wire A goes to 3V3 and not to VIN.
- Plug the ESP32 into the computer with the USB cable and open Thonny.
- In Tools Options, go to the Interpreter tab and choose MicroPython (ESP32).
- If no port is chosen by itself, pick yours from the list (COM3 on Windows or /dev/ttyUSB0 on Linux, for example).
- Copy the code above into the Thonny editor.
- Save the file onto the board:
- Press Ctrl+S or click the Save button.
- In the window that opens, pick MicroPython device.
- Enter main.py as the name, then click OK.
- Get two glasses of tap water ready, one cold and one warm (comfortable for your fingers, not hot). Stand them next to the breadboard. The tip may go under water, but keep the plug and the resistor legs above the water line.
- Press F5 or the green Run button. For the first three lines, leave the probe on the table.
- Now put the tip into the cold glass. Once the numbers settle, lift it out and dip it into the warm one.
- In the Shell, you will see lines like these:
If you name your script main.py and save it to the MicroPython device, it will run automatically every time the ESP32 is powered on.
The opening three lines are room air: 24.3°C. That is just under 25°C, which is why the probe shows slightly more than 10kΩ. When the tip enters the cold glass, the value does not drop at once. It needs five or six seconds, since the steel around the thermistor must lose its heat first. The warm glass shows the same delay on the way up, ending close to 41°C. Give the probe this time after every change, and only take the number once a few lines in a row agree. Also watch the ohms and the volts move in opposite directions: that is NTC in action.
Quick accuracy test: crushed ice with a little water, stirred, stays very close to 0°C. Put the tip in and wait a minute. If the Shell shows 0.7°C, for example, your setup reads 0.7°C high, and you can subtract that in the code.
Project Ideas
Waterproof tip, WiFi on the board: here are some projects that fit well:
- Aquarium watcher: show the tank temperature with an I2C LCD, and light a warning when it leaves the band your fish need.
- Incubator or seed tray: switch a heating element on when it is too cool and off when it is warm enough.
- Home-brew cooler: run a fan when the fermentation bucket gets too warm.
- Freezer log: slide the thin cable under the door seal and write the readings with a timestamp to an SD card every few minutes.
Need a temperature as a ready digital value, without a divider or any math? The ESP32 MicroPython Temperature Sensor page uses the waterproof DS18B20 for that. For an oven, a smoker or a barbecue, far above 105°C, a thermocouple is the right sensor, not a thermistor.