
Raspberry Pi Pico - NTC Thermistor Temperature Sensor
The RP2040 chip on a Raspberry Pi Pico already has a small temperature sensor inside, on ADC channel 4. But that sensor only knows how warm the chip itself is. It cannot tell you the temperature of the water in an incubator tray, a jar of yogurt that is fermenting, or the soil in a greenhouse. For jobs like these, you need a sensor at the end of a cable. The 10K NTC thermistor probe is the simplest one: a steel tip, two wires, and no chip at all.
In this guide, we will learn to set up and use a waterproof NTC thermistor temperature sensor (10K, B value 3950) on the Raspberry Pi Pico. We will cover the following details:
- How the probe changes its resistance with heat, and what the extra 10K resistor in the kit is for.
- Which three Pico pins to use (3V3(OUT), GP26 and GND), and how the breadboard helps.
- How a short MicroPython script averages read_u16() values and uses math.log() to get °C and °F.
- What the Shell says when the probe is not plugged in.
https://newbiely.com/images/cover/raspberry-pi-pico-ntc-thermistor-temperature-sensor.jpg
Hardware Preparation
Or you can buy the following kits:
| 1 | × | DIYables Sensor Kit (18 sensors/displays) |
Additionally, some of these links are for products from our own brand, DIYables .
Overview of NTC Thermistor Temperature Sensor
Picture a short metal pencil on a cable: that is the probe. Its round-ended steel tip, 5mm across and 25mm long, holds the thermistor and keeps water out. From the tip, 0.5m of black cable leads to a small white JST XH2.54 connector with two openings. You do not need any adapter board, because the pins of male jumper wires fit right into those openings. DIYables sells the probes five at a time, and the bag has one 10K resistor for each probe.
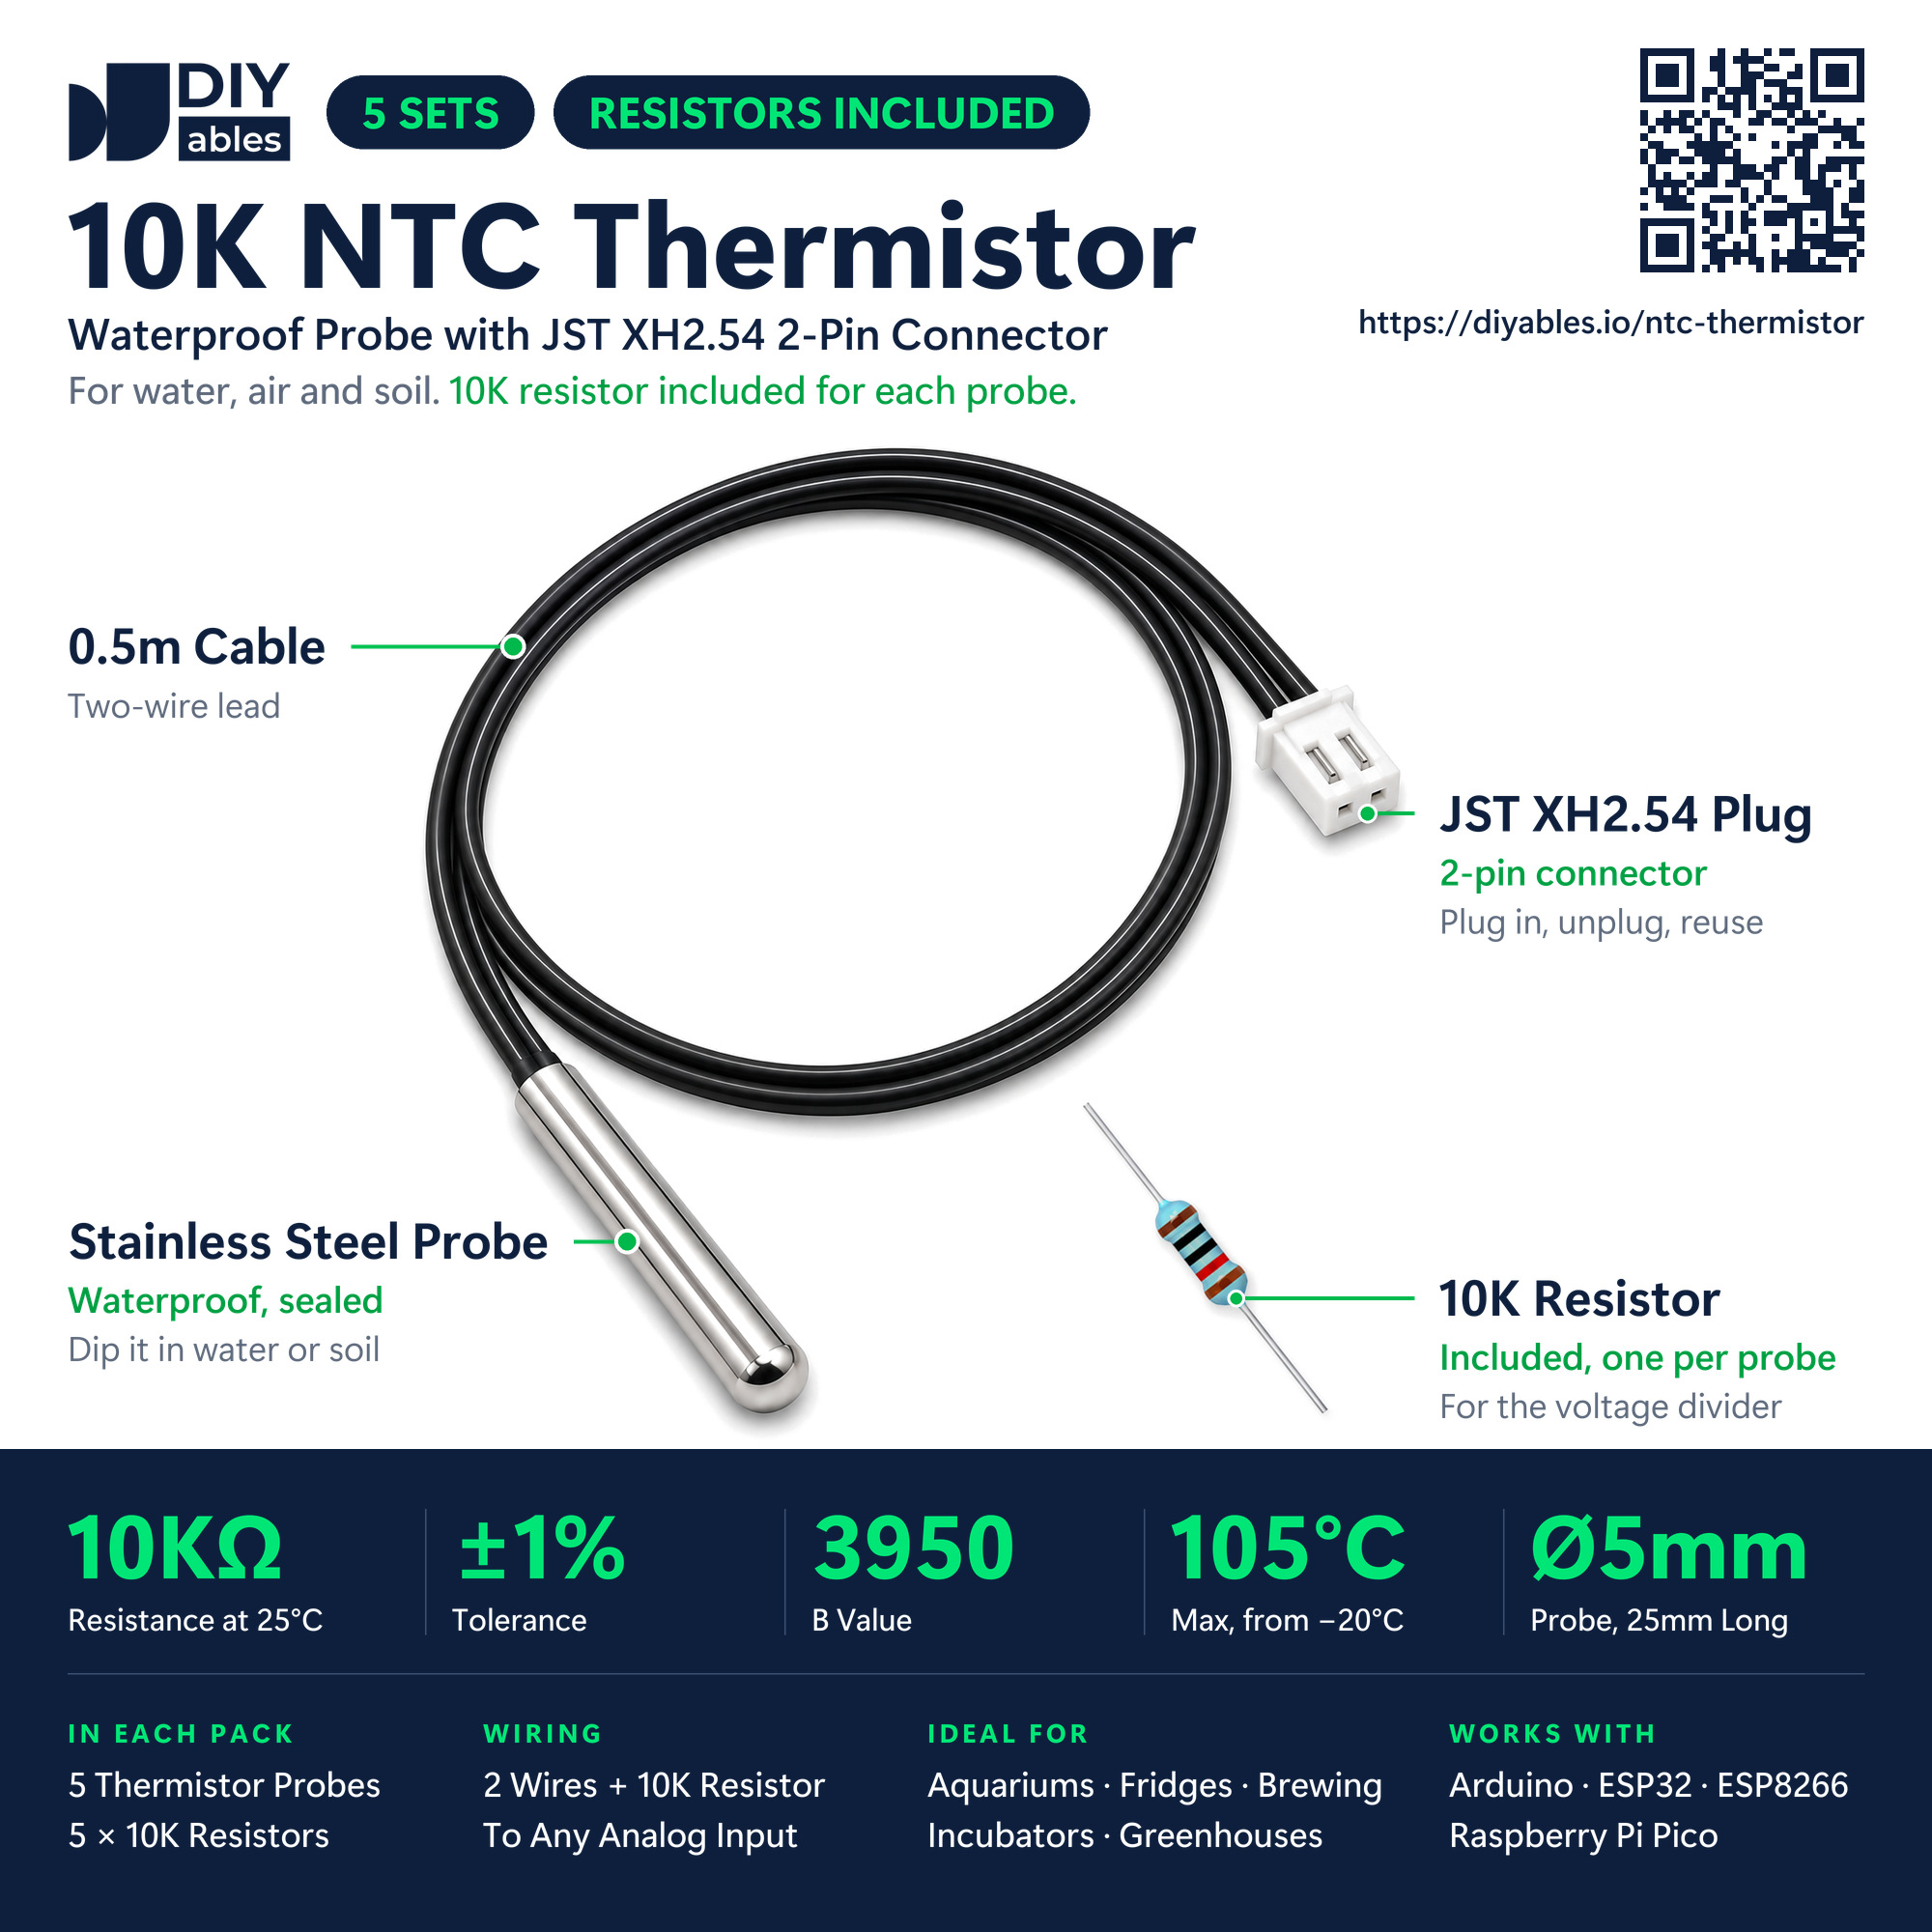
| DIYables NTC Thermistor Probe (10K, 3950) | |
|---|---|
| Element | NTC thermistor (Negative Temperature Coefficient) |
| Resistance at 25°C | 10kΩ, ±1% tolerance |
| Beta (B) Constant | 3950 |
| Range | -20°C to +105°C |
| Probe | round-ended steel tip (5mm x 25mm), waterproof |
| Cable Length | 0.5m (black, two wires) |
| End Plug | white JST XH2.54 with 2 openings |
| Kit Contents | 5 probes, 5 resistors of 10K |
Both wires of the probe are equal. Current can flow through a thermistor either way, just like through any other resistor, so you can swap them.
- First wire (either one): connect to the 3.3 volts output of the Pico, 3V3(OUT).
- Second wire: connect to GP26, one of the analog input pins of the Pico.
- 10K resistor (in the same bag as the probe): connect between GP26 and GND (0 volts).
So how does a resistor measure temperature? The part in the tip is a resistor made to change its value with heat: a change of a few degrees moves its ohms a lot. The name NTC comes from Negative Temperature Coefficient. Put simply: the warmer the tip, the fewer ohms it has. At 25°C, this probe has exactly 10000 ohms. The Pico cannot measure ohms, because its ADC only reads voltages. That is why the 10K resistor and the probe sit one after the other between 3.3 volts and GND, so that they share the 3.3 volts. Such a pair is known as a voltage divider. Heat the tip, and the probe's share shrinks, so GP26 rises. Cool it, and GP26 falls. The script measures the GP26 voltage, calculates the probe's ohms from it, and then the degrees.
Some values for this circuit on the Pico:
| Temperature | Probe Resistance | Voltage on GP26 | read_u16() Value |
|---|---|---|---|
| -10°C | about 58.2kΩ | 0.48V | 9603 |
| 4°C | about 27.3kΩ | 0.89V | 17576 |
| 15°C | about 15.8kΩ | 1.28V | 25365 |
| 35°C | about 6.5kΩ | 2.00V | 39705 |
| 70°C | about 1.76kΩ | 2.81V | 55728 |
Notice that the ohms do not fall by the same amount for every degree. A straight-line rule would be wrong here, so ntc_thermistor.py relies on the B (beta) formula:
1/T = 1/T0 + (1/B) × ln(R/R0)
Here R is the probe resistance that the Pico just measured, R0 is 10000 ohms, T0 is 298.15 kelvin (that is 25°C), and B is 3950. The formula works in kelvin, and subtracting 273.15 from T gives °C. A more precise relative of this formula exists, the three-constant Steinhart-Hart equation; with this probe, though, the one-constant beta version is plenty. Near 20°C to 25°C, a reading is normally no more than about 1°C away from the truth. The true value of your 10K resistor and the Pico's ADC cause most of that difference.
Wiring Diagram
Unlike the bigger Raspberry Pi computers, the Pico has its own ADC, so the probe needs no extra module. Only GP26, GP27 and GP28 can read an analog voltage, and here we use GP26 (ADC0), which is pin 31.
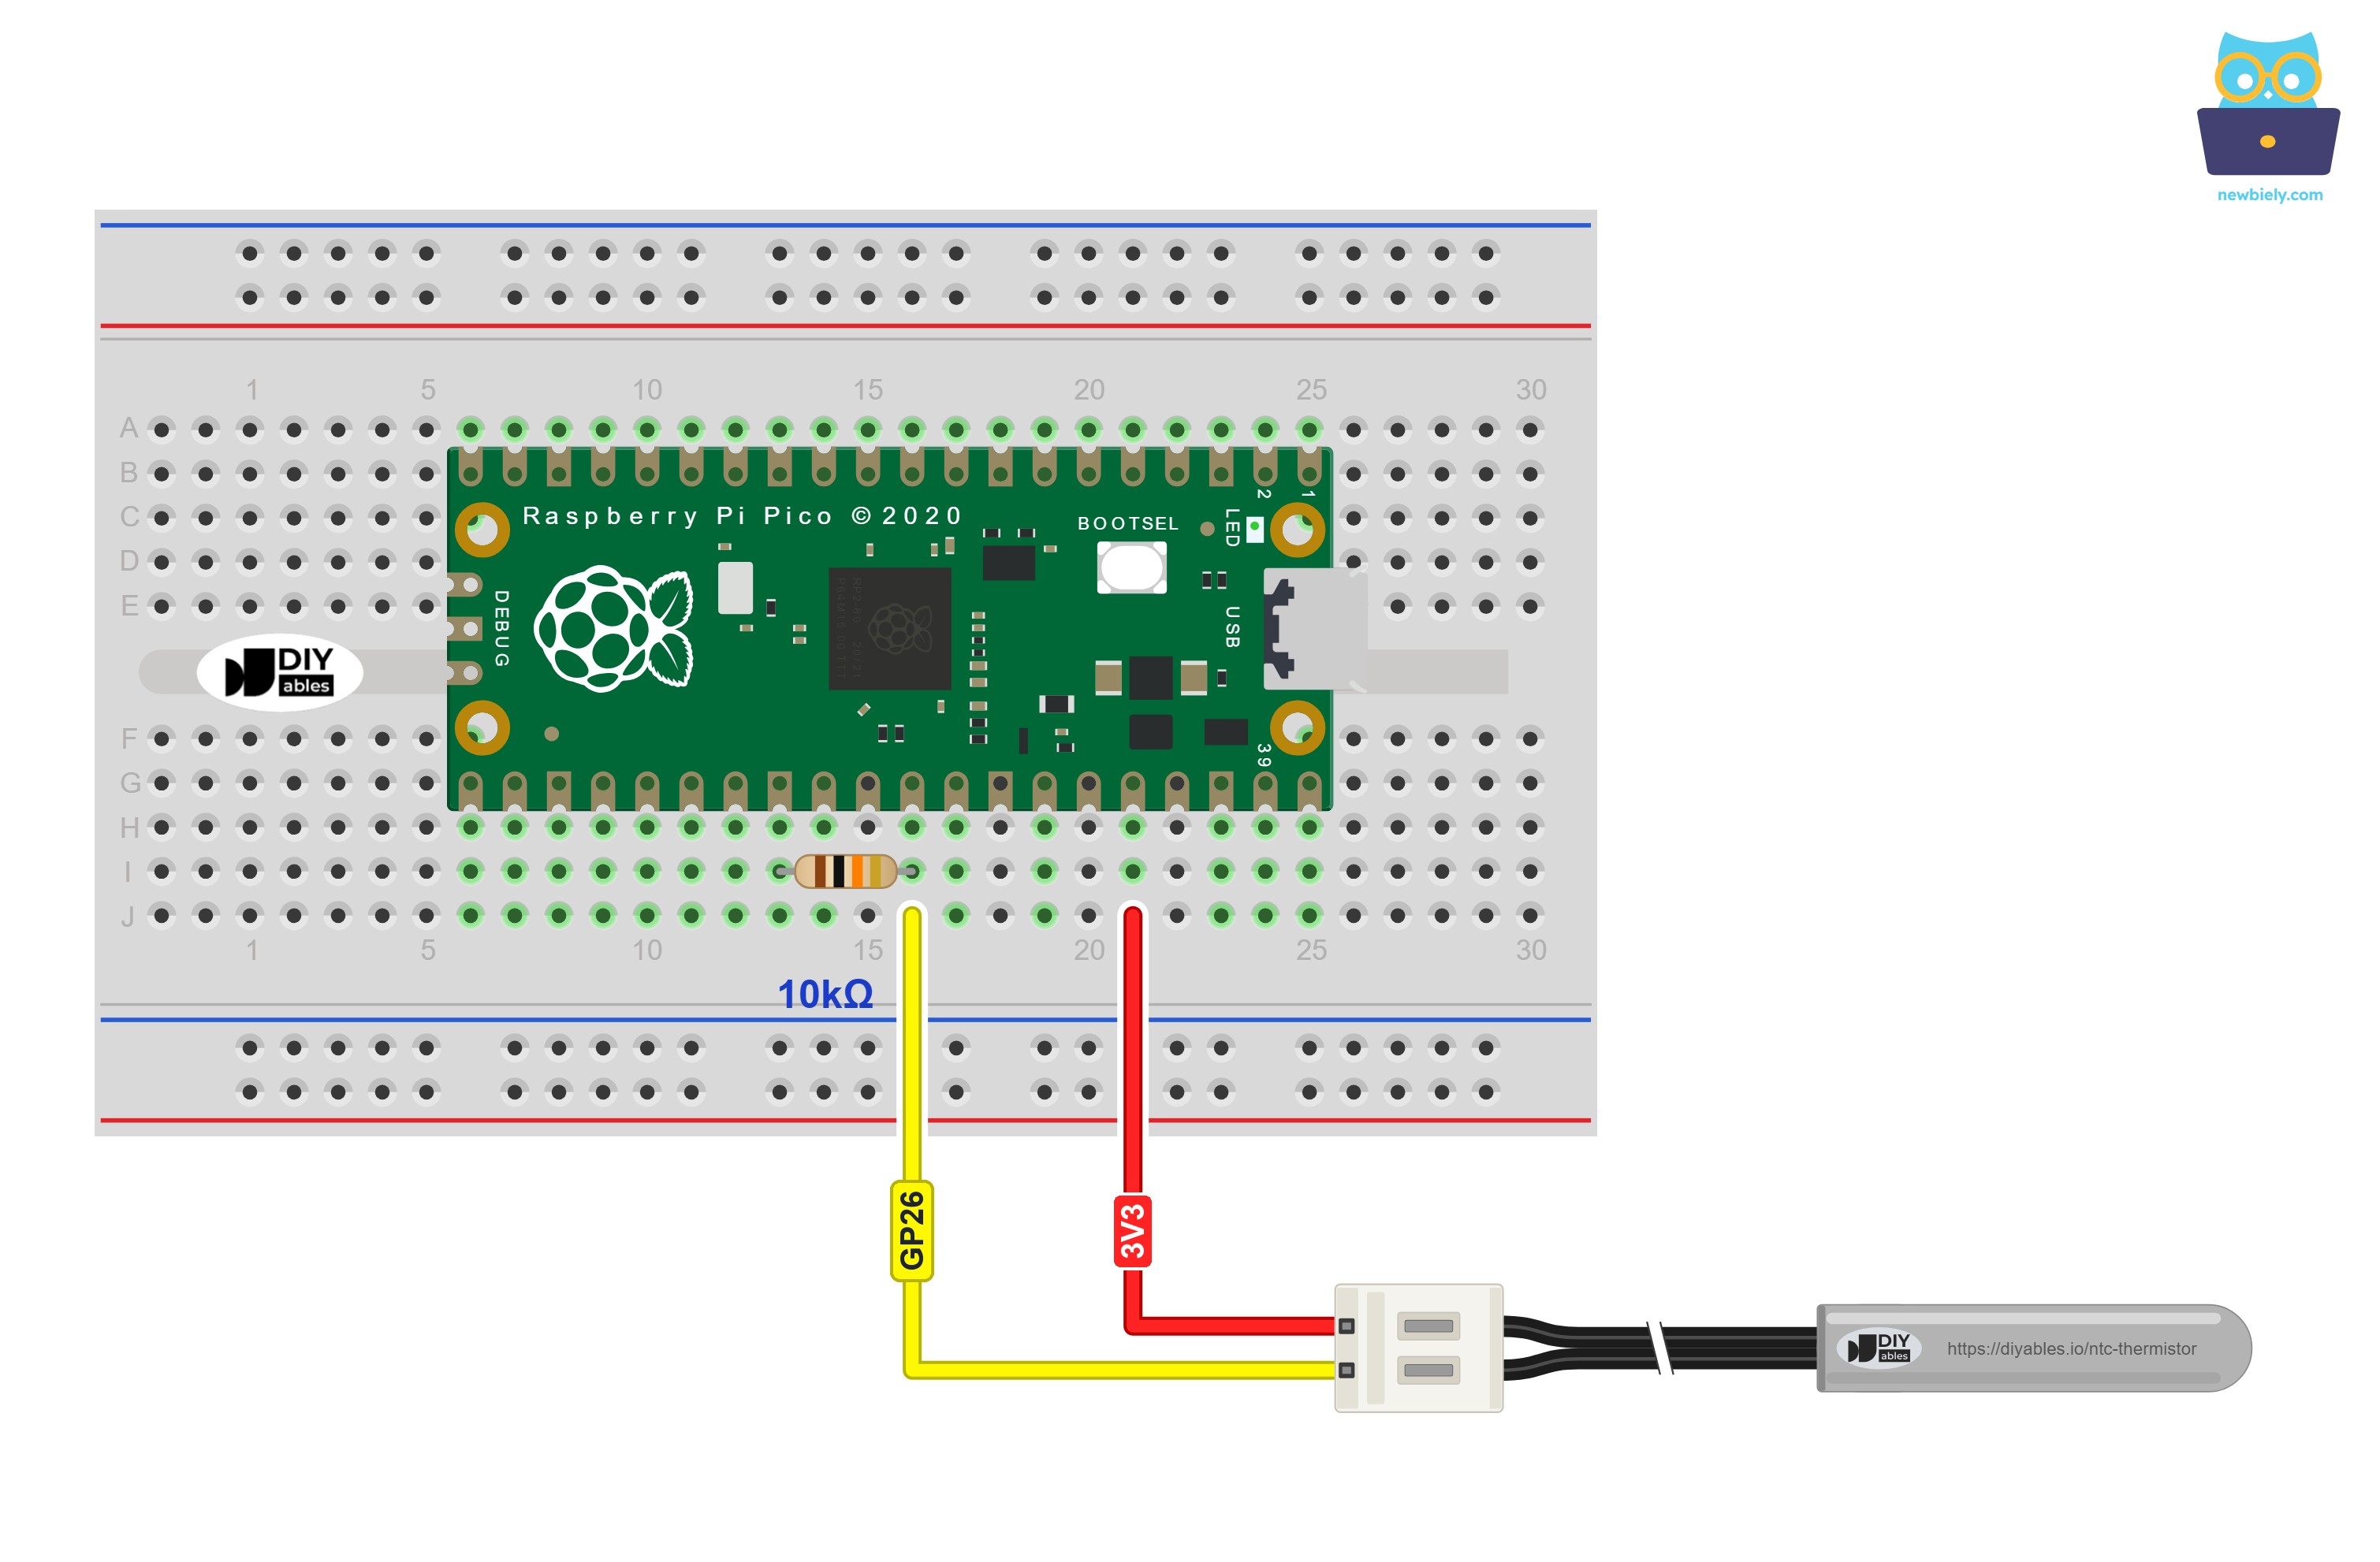
This image is created using Fritzing. Click to enlarge image
| Circuit Part | Raspberry Pi Pico |
|---|---|
| Probe wire (either one) | 3V3(OUT) (pin 36) |
| Other probe wire | GP26 / ADC0 (pin 31) |
| 10K resistor, first leg | GP26 / ADC0 (pin 31) |
| 10K resistor, second leg | GND (pin 28) |
The Pico sits in the breadboard, so every pin has free holes in its own column (the green holes in the drawing). The 10K resistor goes into the same breadboard, one row above the bottom row: one leg in the column of GP26 (pin 31), the other in the column of GND (pin 28), three columns to the left. No GND wire is needed. The jumpers start in the bottom row. From the GP26 column, a yellow jumper goes straight down to one opening of the white plug; from the 3V3(OUT) column (pin 36), a red jumper goes to the other opening.
※ NOTE THAT:
Take the probe's power from 3V3(OUT), never from VBUS or VSYS. In hot water, the probe falls to a few hundred ohms, and GP26 rises almost to the supply voltage. With about 5 volts from USB, that would be too much for the analog pin. There is a second reason: the Pico's ADC measures against the same 3.3 volts (ADC_VREF). When the divider and the ADC share one supply, the script only needs the ratio of the reading to 65535, and a small change in the 3.3 volts cancels out.
Raspberry Pi Pico Code - NTC Thermistor Temperature Sensor
The function read_gp26() reads GP26 ten times, 10 ms apart, and returns the average. The Pico's ADC has 12 bits, but MicroPython's read_u16() stretches the result to a number from 0 to 65535. The line ntc_ohms = FIXED_OHMS * (65535 / raw - 1) turns that number into the probe's ohms. Then math.log(), which is the natural log (ln) in MicroPython, puts the ohms into the beta formula. Before any math, the script checks for a reading near 0 (no probe) or near 65535 (a short), so it prints a hint instead of stopping with an error.
Detailed Instructions
Please follow these instructions step by step:
- Ensure that Thonny IDE is installed on your computer.
- Ensure that MicroPython firmware is installed on your Raspberry Pi Pico.
- If this is your first time using a Raspberry Pico, refer to the Raspberry Pi Pico - Getting Started tutorial for detailed instructions.
- Build the circuit as in the diagram: one probe wire to 3V3(OUT), the other probe wire to GP26, and the 10K resistor from GP26 to GND.
- Connect the Raspberry Pi Pico to your computer using a USB cable.
- Launch the Thonny IDE on your computer.
- On Thonny IDE, select MicroPython (Raspberry Pi Pico) Interpreter by navigating to Tools Options.
- In the Interpreter tab, select MicroPython (Raspberry Pi Pico) from the drop-down menu.
- Ensure the correct port is selected. Thonny IDE should automatically detect the port, but you may need to select it manually (e.g., COM3 on Windows or /dev/ttyACM0 on Linux).
- Copy the above code and paste it to the Thonny IDE's editor.
- Save the script to your Raspberry Pi Pico by:
- Click the Save button, or use Ctrl+S keys.
- In the save dialog, you will see two sections: This computer and Raspberry Pi Pico. Select Raspberry Pi Pico
- Save the file as main.py
- Click the green Run button (or press F5) to run the script. The script will execute.
- For the test, fill a hot-water bottle with warm water from the tap (not boiling water). Let the probe measure the room for a few seconds. Then press the steel tip flat against the hot-water bottle and hold it there.
- Watch the Shell at the bottom of Thonny:
Lines one to three were taken in the room: about 21.3°C. The probe shows about 11.8kΩ there, a bit more than 10kΩ, because the room is cooler than 25°C. When the tip touches the hot-water bottle, the reading jumps quickly at first and then climbs more and more slowly. It settles near 43.8°C after about ten seconds. This slow end is normal: the steel tip has to warm up all the way before the thermistor inside reaches the new temperature, so wait for a steady value before you trust it. Does the Shell say "no thermistor found"? Then GP26 sees only the 10K resistor: look for a jumper wire that slipped out of the white connector, or a loose 3V3(OUT) wire.
If you name your script main.py and save it to the root directory of the Raspberry Pi Pico, it will automatically run each time the Pico is powered on or reset.
Two tips for real projects. Water must stay away from everything except the steel tip: the connector, the breadboard and the Pico itself. And never use this probe above 105°C. For an oven or a grill, the Raspberry Pi Pico - MAX6675 Thermocouple Module tutorial is the right choice. If you would rather have a waterproof sensor that converts the reading itself and simply gives you degrees, see the Raspberry Pi Pico - Temperature Sensor tutorial with the DS18B20.