
Arduino MKR WiFi 1010 - Slide Switch
In this tutorial, we are going to learn:
- What makes a slide switch different from a push button, and which of the three SS12D10 pins is COM
- How to wire the slide switch to pin D2 of Arduino MKR WiFi 1010, with pin 3 on the 3.3V VCC pin (not on 5V)
- How to program Arduino MKR WiFi 1010 to report the handle position once at power-up, then once for every move
- How to get by with two wires using INPUT_PULLUP, and why ON and OFF trade places in that case
Hardware Preparation
| 1 | × | Arduino MKR WiFi 1010 | |
| 1 | × | Micro USB Cable | |
| 1 | × | Mini Slide Switch SS12D10 | |
| 1 | × | Jumper Wires |
Or you can buy the following kits:
| 1 | × | DIYables Sensor Kit (18 sensors/displays) |
Additionally, some of these links are for products from our own brand, DIYables .
Overview of Slide Switch
The SS12D10 is a very small switch: a plastic body, a 5mm handle sticking out of the top, and three legs in one row underneath. You move the handle left or right with a fingertip, and it stays where you leave it. A push button does the opposite. It springs back the moment you let go. This "stay where you put it" behavior is called latching. It makes the slide switch a good fit for choices you set once and then forget, for example "WiFi on / WiFi off" on a battery-powered MKR project, or "send data every minute / every hour".
On the datasheet, the contact type is SPDT, short for Single Pole, Double Throw. Some sellers write 1P2T. It means there is one common pin, and it can be joined to either of the two other pins, but never to both at once.
| SS12D10 | |
|---|---|
| Switch Type | SPDT (1P2T) slide switch, 2 positions |
| Pins | 3 in one row, 4.7mm apart, 6.9mm long |
| Handle | 5mm |
| Body | about 12.8 x 6.7 x 18.2mm |
| Mounting | vertical, through-hole |
| Contact Material | silver-plated brass |
| Contact Rating | AC 125V 2A |
| Switching Life | more than 100,000 cycles |
| Operating Temperature | -25°C to 80°C |
The AC 125V 2A line is the limit for switching a real load with the contacts. In this project, the switch only passes a tiny signal into pin D2 of the MKR, so we stay far below it.
Pinout
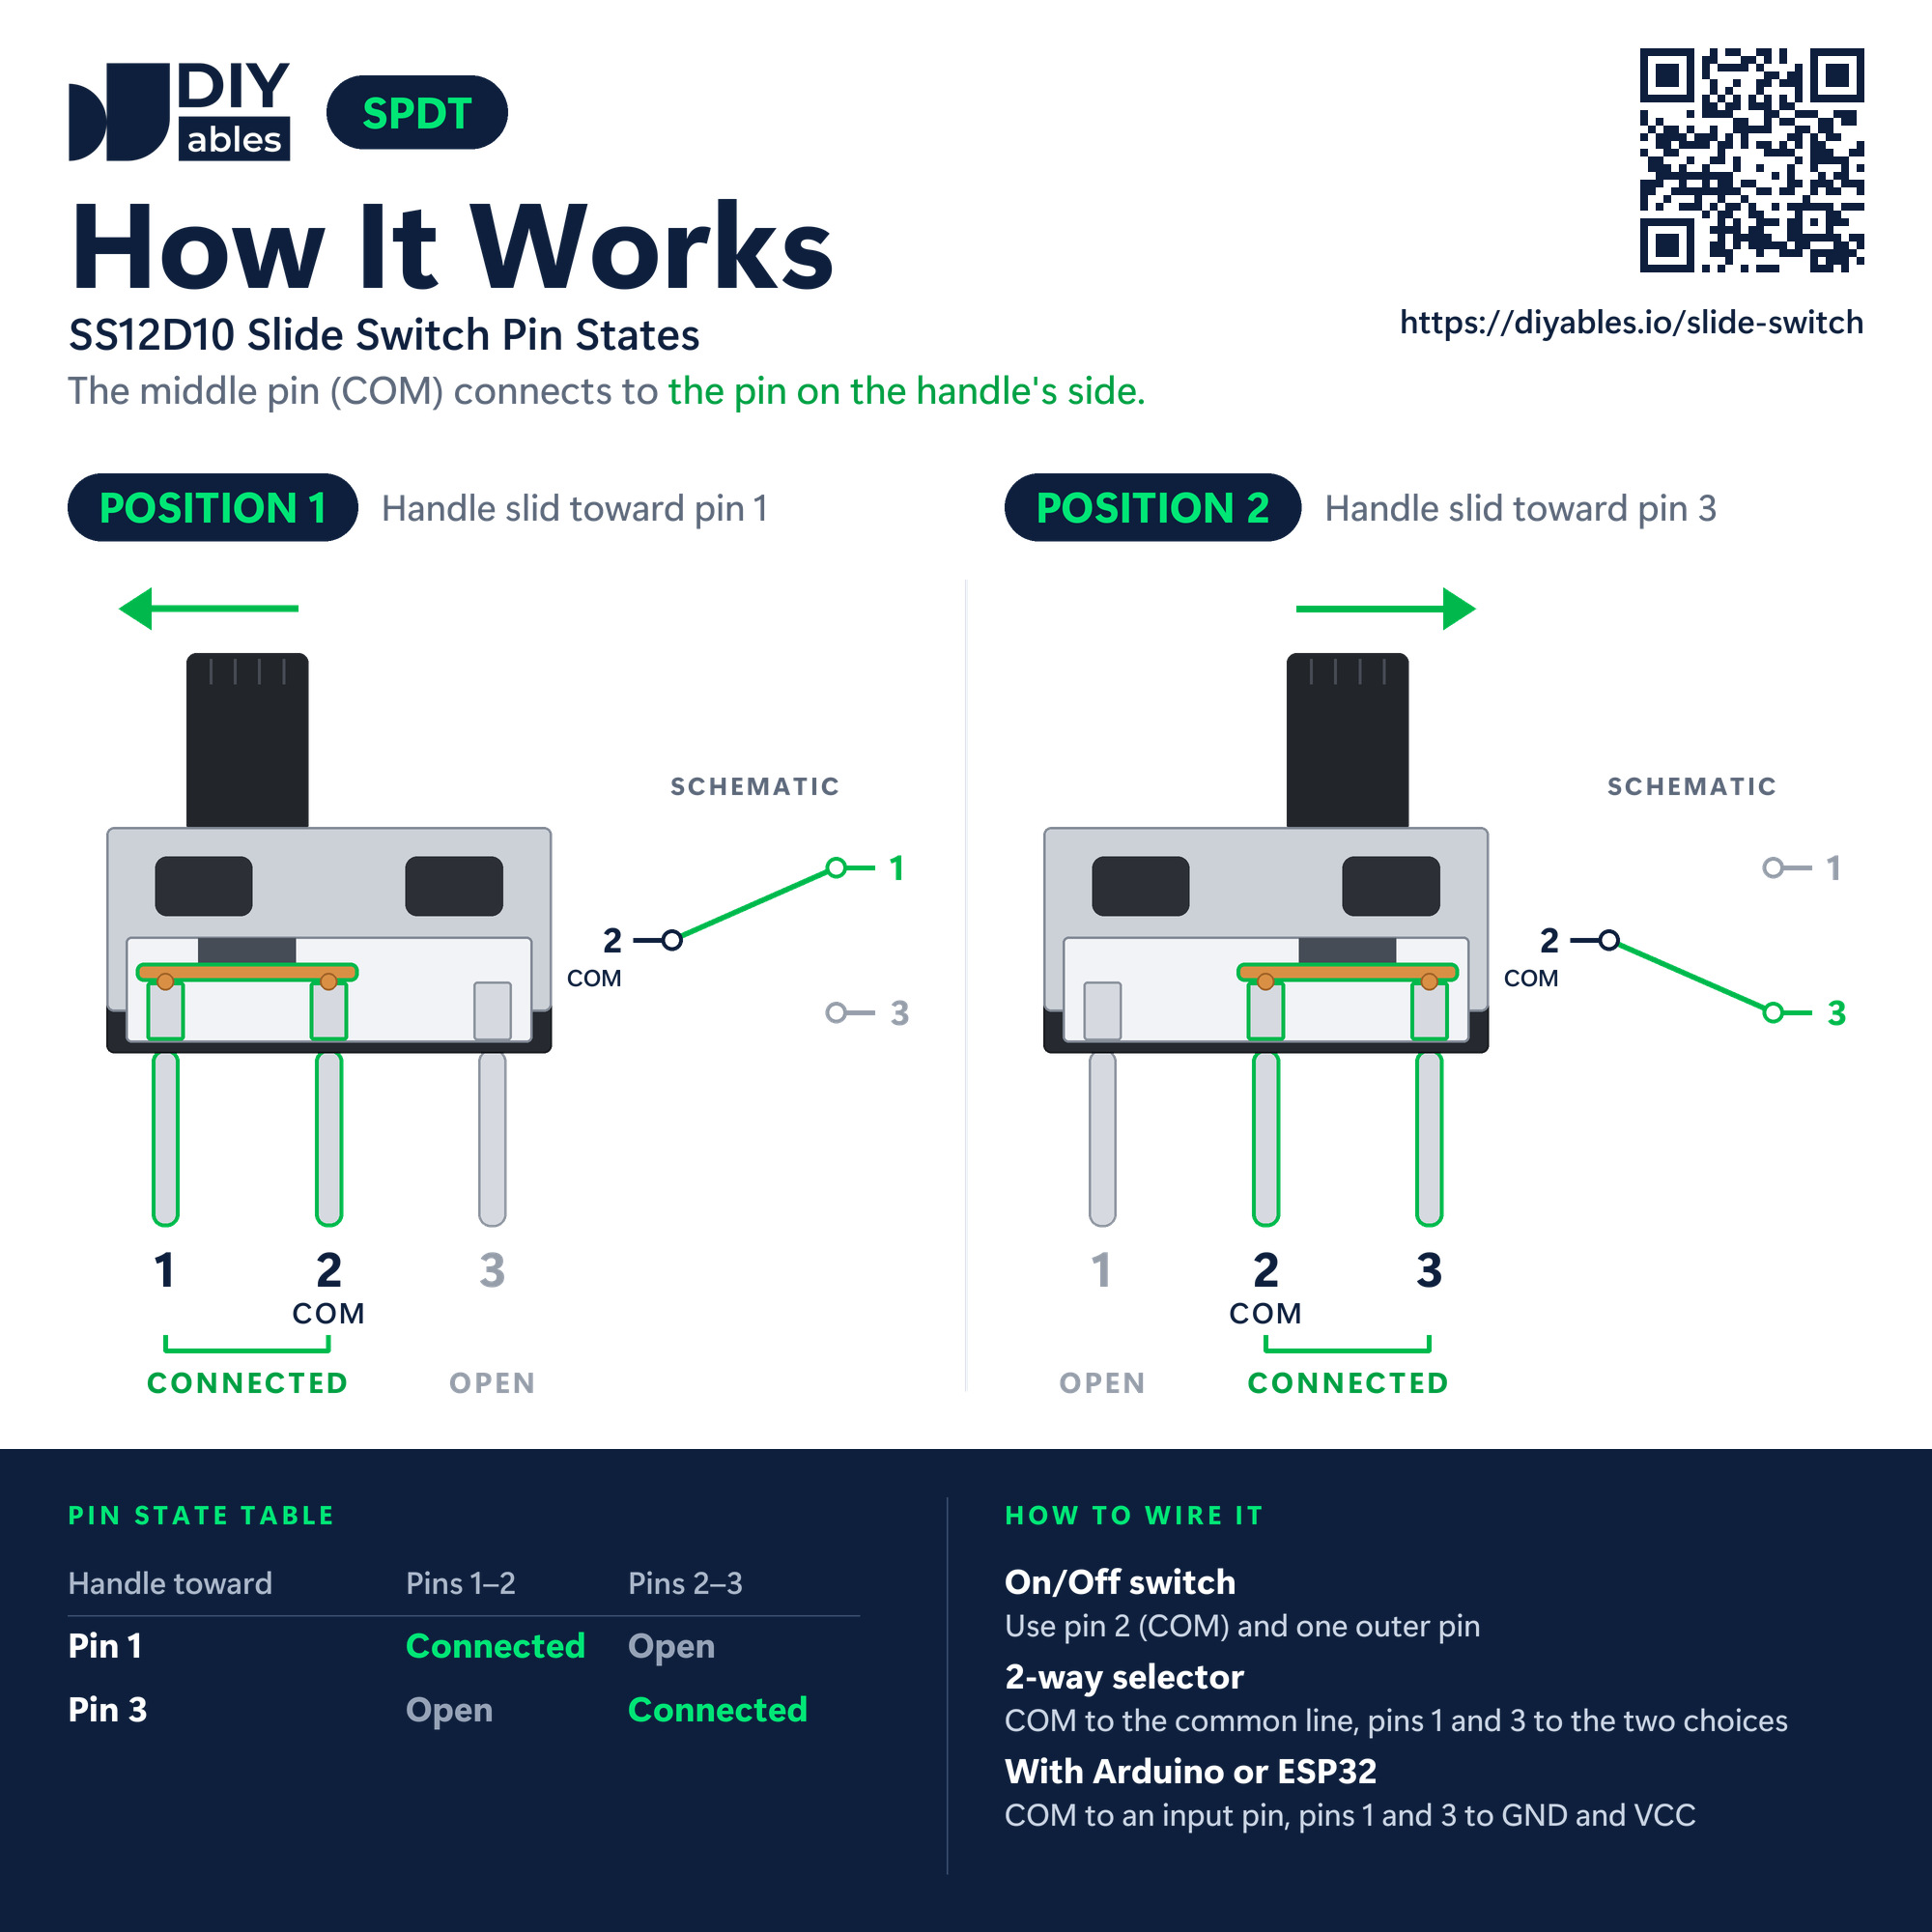
The switch has no labels on it. Hold it with the legs pointing down: the middle leg is COM, and the legs at the two ends are pin 1 and pin 3.
- Pin 1 (end leg): needs to be connected to a GND pin of Arduino MKR WiFi 1010 (0V)
- Pin 2, COM (middle leg): needs to be connected to a digital pin of Arduino MKR WiFi 1010. This tutorial uses D2
- Pin 3 (other end leg): needs to be connected to the VCC pin of Arduino MKR WiFi 1010, which gives 3.3V
Inside, a small metal bridge slides along with the handle. It always touches COM, and it also reaches the outer pin on the handle's side. With pin 1 on GND and pin 3 on 3.3V, this is what pin D2 sees:
| Handle Position | COM Is Joined To | Pin D2 Reads | The Sketch Prints |
|---|---|---|---|
| Toward pin 1 | pin 1 (GND) | LOW | OFF |
| Toward pin 3 | pin 3 (3.3V) | HIGH | ON |
Compared with the push button in the Arduino MKR WiFi 1010 - Button tutorial, there is one more difference: the button gives a short pulse while your finger is on it, but the slide switch gives a level that lasts for hours. The code does not have to remember anything. It can simply read D2 whenever it needs the setting.
Wiring Diagram
Use three jumper wires and no resistor: pin 1 to GND, the middle pin (COM) to D2, and pin 3 to the VCC pin of the MKR, which is its 3.3V output (the diagram tags this wire 3V3).
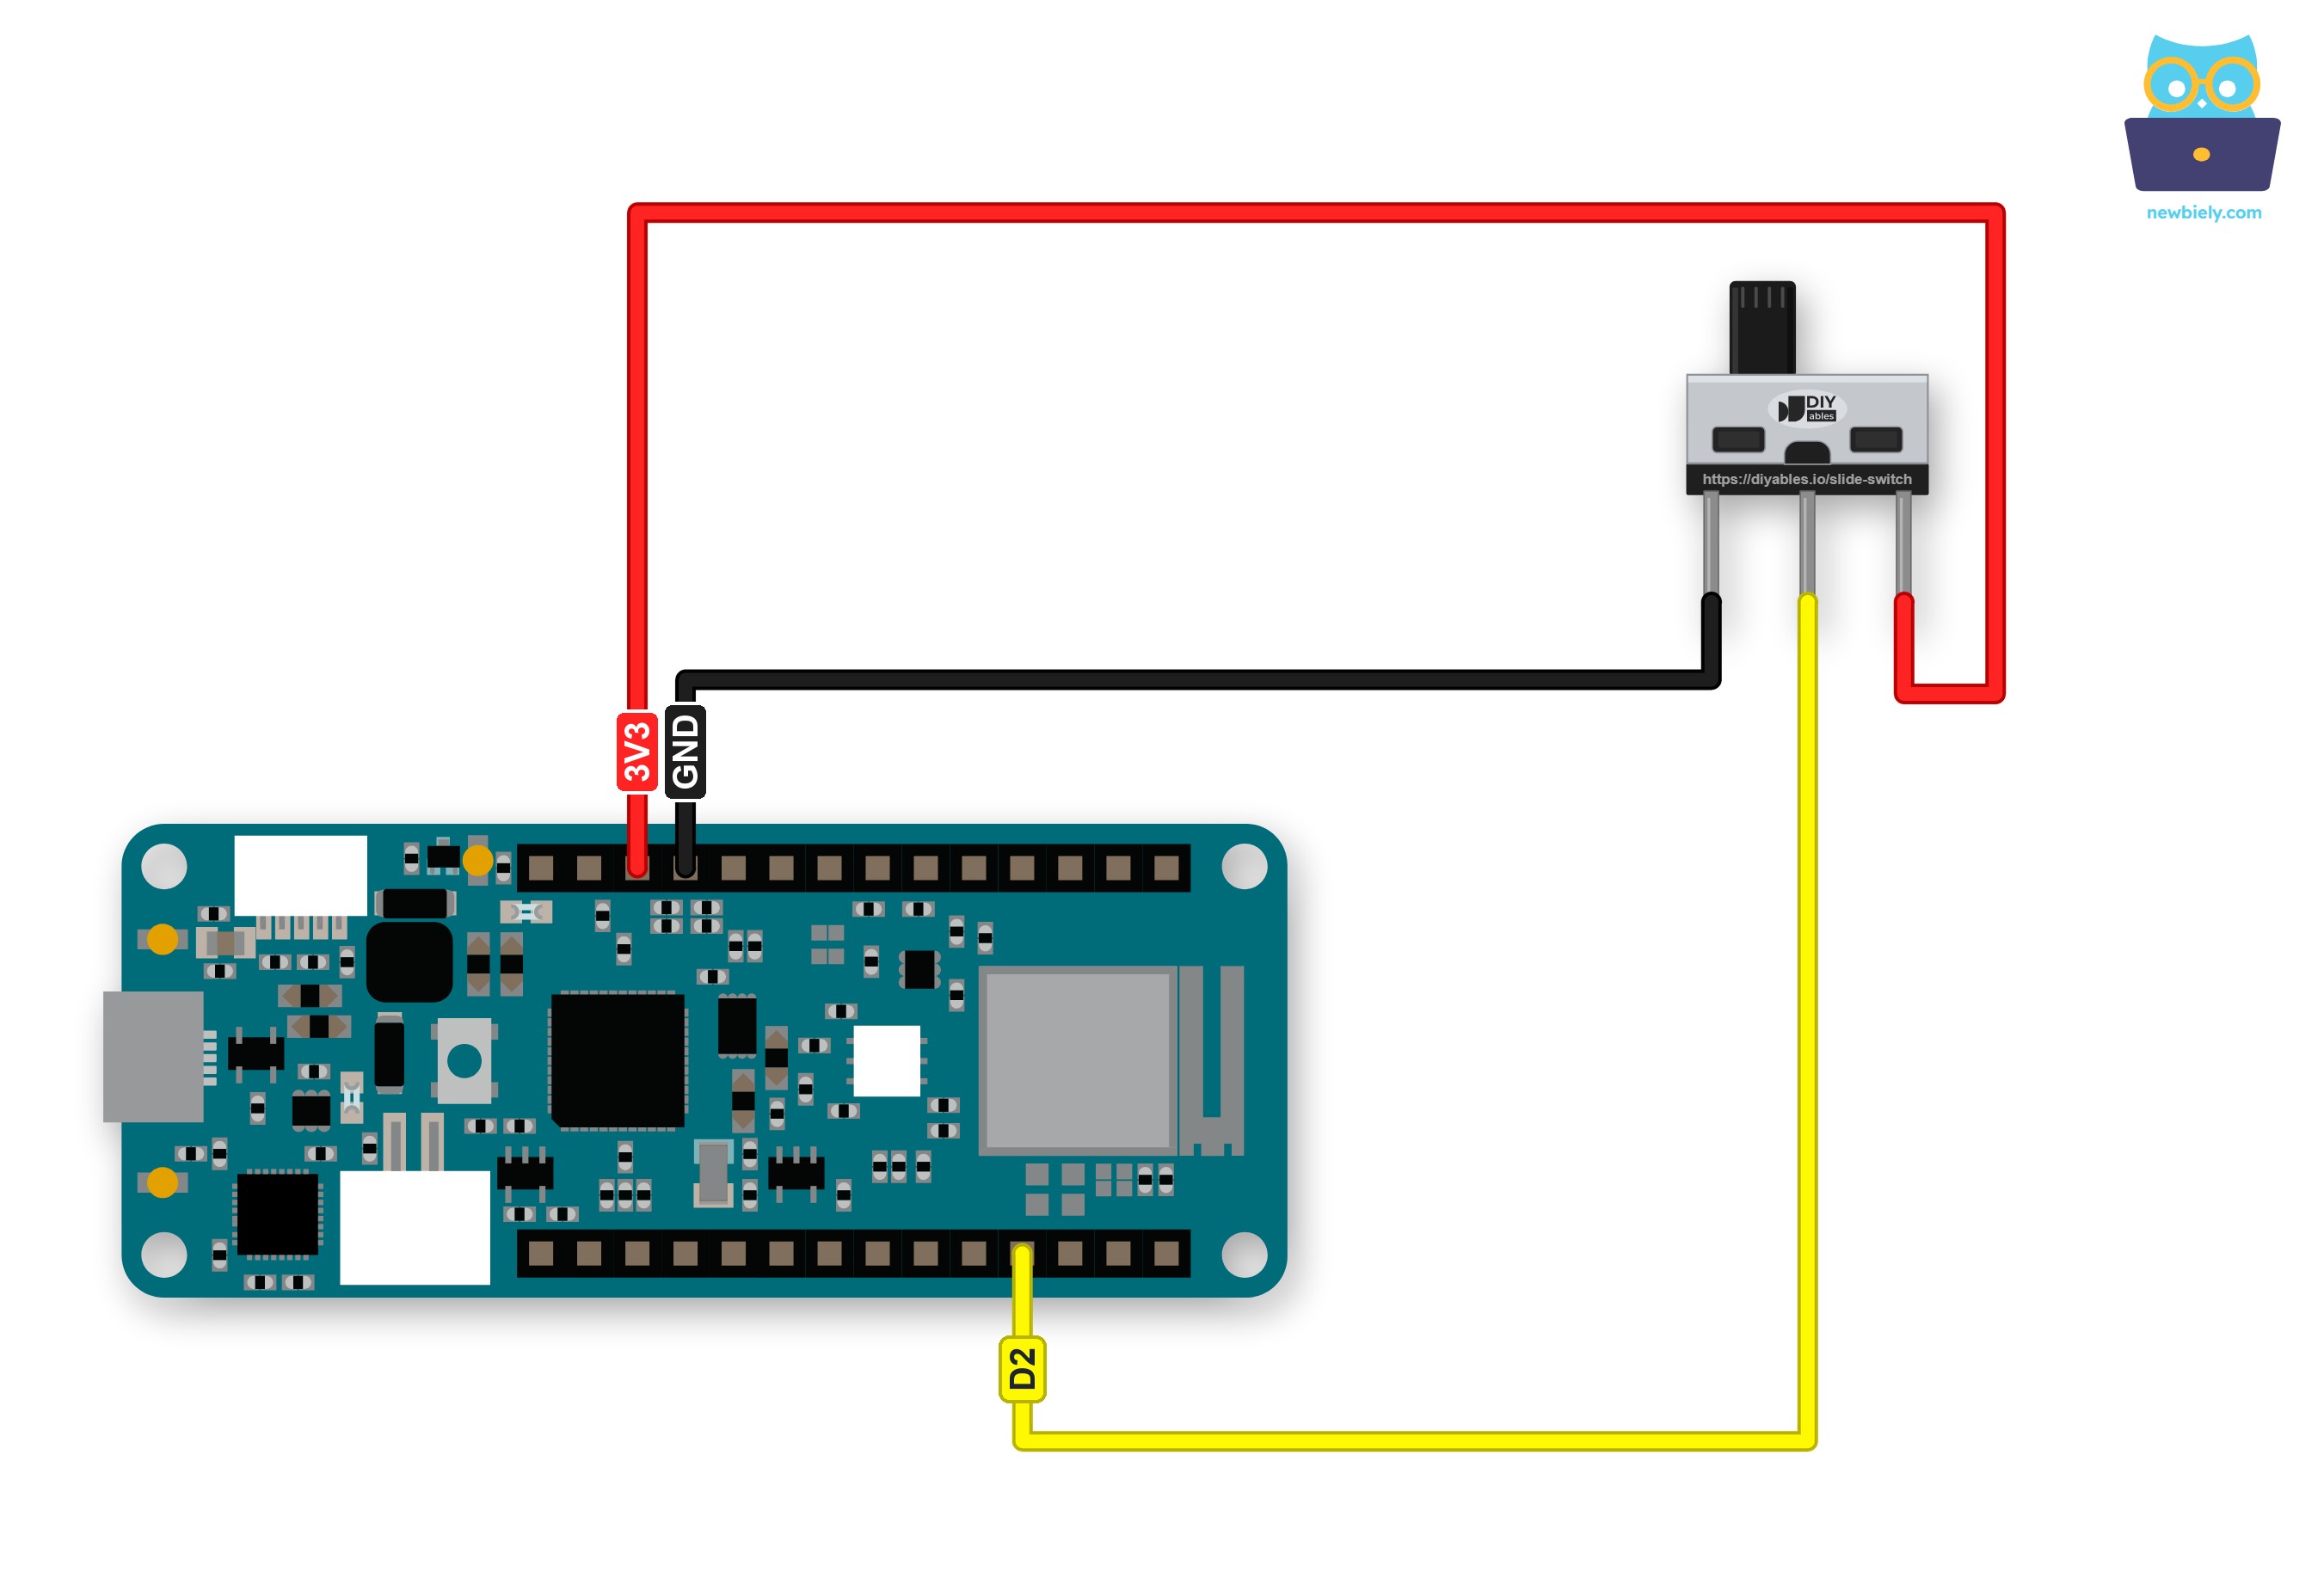
This image is created using Fritzing. Click to enlarge image
| Slide Switch Pin | Arduino MKR WiFi 1010 Pin |
|---|---|
| Pin 1 | GND |
| Pin 2 (COM) | D2 |
| Pin 3 | VCC (3.3V) |
※ NOTE THAT:
- 3.3V only: pin 3 goes to VCC, never to the 5V or VIN pin. When the handle is at the pin 3 end, COM passes that voltage straight into D2. The SAMD21 chip of the MKR WiFi 1010 accepts at most 3.3V on its pins, so 5V can damage it.
- No pull-up or pull-down resistor is needed. Through the switch, D2 is always tied to GND or to 3.3V, so it never floats. Plain INPUT mode is enough.
- Leave D2 as an INPUT. If the code ever made it an OUTPUT, the switch would connect that output straight to VCC or GND, and the pin could be damaged.
The board and the switch both get their power from the Micro USB cable.
How To Program For Slide Switch
- Define the pin of the COM wire: const int SLIDE_SWITCH_PIN = 2;
- Set it as a plain input in setup(): pinMode(SLIDE_SWITCH_PIN, INPUT);. The internal pull-up stays off, because the switch already gives D2 a clear level in both positions.
- Read the handle: int state = digitalRead(SLIDE_SWITCH_PIN); gives HIGH at the pin 3 end (ON) and LOW at the pin 1 end (OFF).
- Filter the bounce: the contacts chatter for a few milliseconds after each move. When a reading is not the same as the saved one, delay(50), read D2 again, and accept the change only if it is still there.
- Wait for the Serial Monitor: add while (!Serial && millis() < 3000); right after Serial.begin(9600);. The MKR talks to the PC over its own (native) USB port, and this line gives the Serial Monitor up to 3 seconds to connect, so the first message is not lost.
Arduino Code - Read the Slide Switch Position
When the MKR starts, the sketch tells you where the handle is. After that, it watches D2 and writes one line each time the handle really moves to the other end.
Detailed Instructions
- Connect Arduino MKR WiFi 1010 to PC via Micro USB cable.
- Wire the slide switch as shown in the wiring diagram. Before you go on, check once more that pin 3 sits on VCC, not on 5V.
- Navigate to the Arduino IDE, then select the Arduino MKR WiFi 1010 board and its port. If the board is new to you, see Getting Started with Arduino MKR WiFi 1010 first.
- Copy the above code and paste it into Arduino IDE.
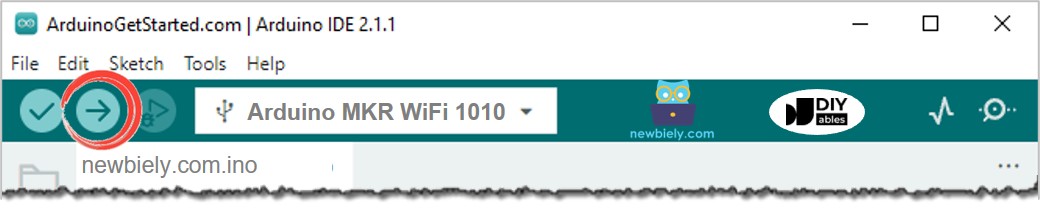
- Leave the handle at the pin 3 end, then click the Upload button to send the code to Arduino MKR WiFi 1010.
- Open the Serial Monitor right away and set the baud rate to 9600.
- Push the handle to the pin 1 end, back to the pin 3 end, and to the pin 1 end again.
Three moves give three "New position" lines, even though the contacts bounced each time. If the "Power-up check" line is missing, the Serial Monitor connected after the 3 seconds were over. That is not a problem: the next move of the handle prints as usual.
Something looks wrong?
- ON and OFF are the other way round: the GND and VCC wires are swapped on pin 1 and pin 3. Swap them back, or keep it and treat that side as ON.
- Nothing is printed when you move the handle: the D2 wire is probably on an outer leg. Move it to the middle leg.
Arduino Code - Slide Switch with Only Two Wires (INPUT_PULLUP)
Is the VCC pin already busy with a sensor, or do you want fewer wires going to a switch on the lid of a box? Each digital pin of the MKR WiFi 1010 has a pull-up resistor inside the SAMD21 chip, and INPUT_PULLUP turns it on. Then pin 3 of the switch needs no wire.
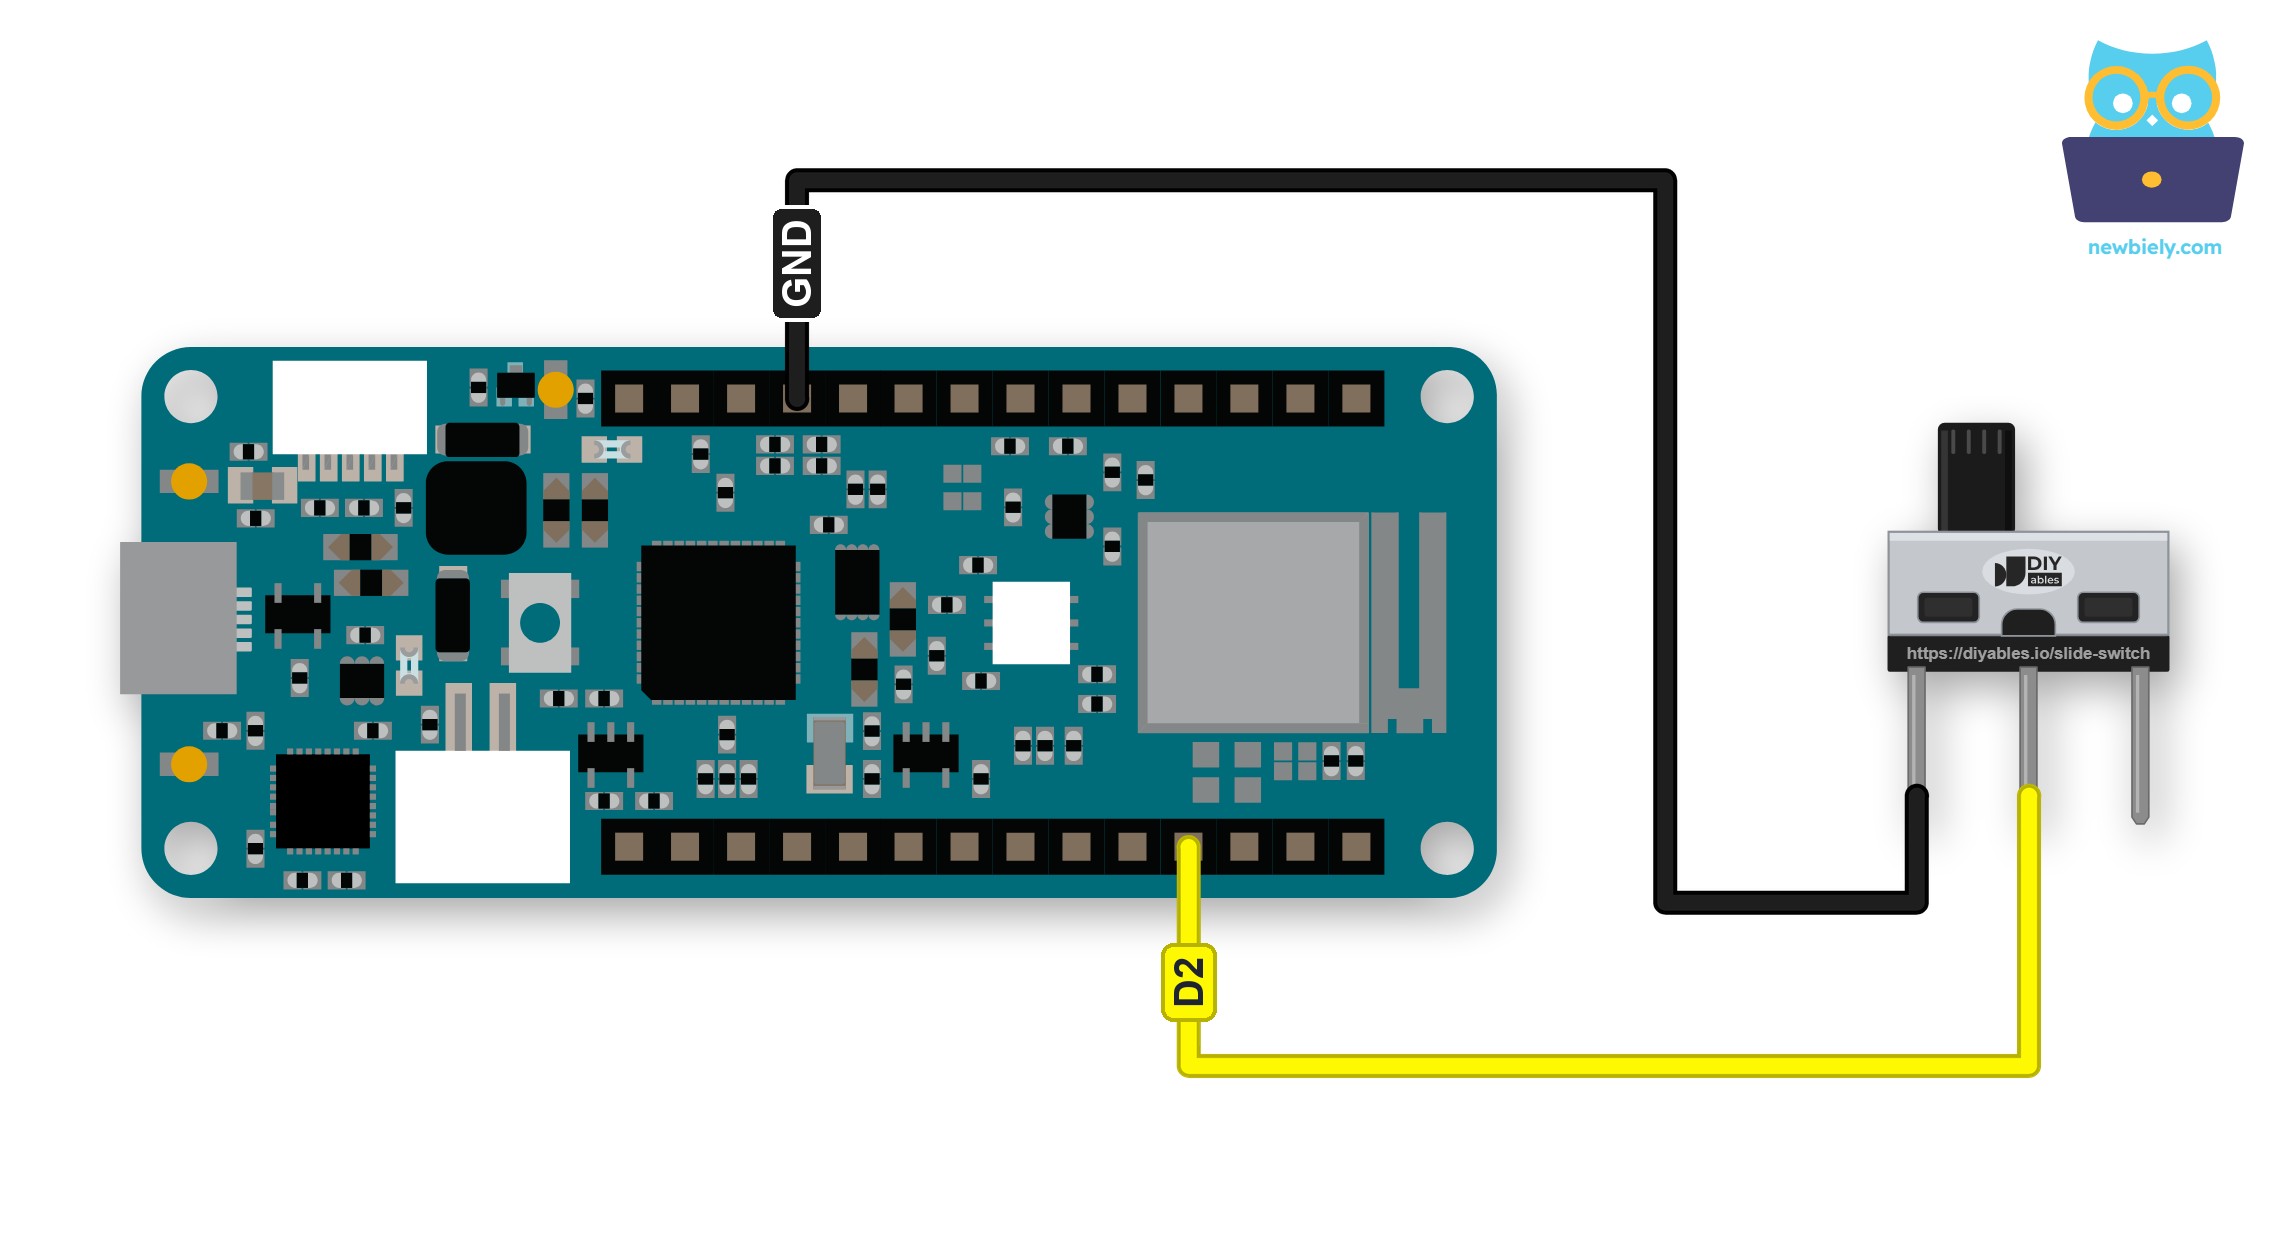
This image is created using Fritzing. Click to enlarge image
| Slide Switch Pin | Arduino MKR WiFi 1010 Pin |
|---|---|
| Pin 1 | GND |
| Pin 2 (COM) | D2 |
| Pin 3 | not connected |
With this wiring, LOW now means ON and HIGH means OFF. Here is why:
- Handle toward pin 1: COM ties D2 to GND. D2 reads LOW, and the sketch prints ON.
- Handle toward pin 3: COM touches only the empty pin 3, so nothing drives D2. The pull-up holds it at 3.3V. D2 reads HIGH, and the sketch prints OFF.
Detailed Instructions
- Just remove the pin 3 wire, between the switch and VCC. Keep the GND and D2 wires where they are.
- Put the handle at the pin 1 end.
- Copy the code above into Arduino IDE, in place of the first sketch, and click the Upload button.
- Open the Serial Monitor at 9600 baud, then slide the handle to pin 3 and back to pin 1, two times.
Look at the first line: the handle is at the pin 1 end, and that is ON now. In the 3-wire version, the same end meant OFF. Which one should you use? The 3-wire version reads the natural way (HIGH = ON). The 2-wire version saves a wire and keeps the VCC pin free. For a key that springs back after each press, see the Arduino MKR WiFi 1010 - Button and Arduino MKR WiFi 1010 - Button - Debounce tutorials.