Arduino Mega - Button - Long Press Short Press
Ready to unlock the hidden potential of a simple button? You're in the perfect place! This Arduino Mega button tutorial will walk you through everything you need to know about detecting both long press and short press events - a skill that will dramatically expand what you can do with your Arduino projects.
Think about your smartphone or any modern device - a single button can perform multiple functions depending on how you press it. Short press for one action, long press for another. Today, we're bringing that same smart functionality to your Arduino Mega projects! Whether you're just starting out with Arduino programming or looking to add more sophisticated user interaction to your existing projects, this comprehensive guide has you covered.
In this tutorial, you'll master four essential techniques: detecting short button presses, recognizing long presses, combining both detection methods, and implementing proper debouncing for real-world reliability. Don't worry if you're new to programming - we'll walk through everything step by step, explaining not just the "how" but the "why" behind each concept. By the end, you'll understand how to create responsive, professional-grade button interfaces that can distinguish between quick taps and deliberate long holds.
The practical applications are endless! You could build a smart home controller where short presses cycle through modes and long presses turn devices on/off, create a digital clock where short presses change the display and long presses set the time, or design a security system where only a long press (preventing accidental triggers) activates the alarm. What amazing project will you create first?
We will learn:
- How to detect the button's short press with precise timing control
- How to detect the button's long press using two different approaches
- How to detect both the button's long press and short press simultaneously
- Long press and short press with proper debouncing for professional results
In the first three sections, we'll explore the fundamental principles behind button press detection, building your understanding step by step. In the final section, we'll implement practical, real-world solutions using debouncing techniques. This is crucial because without proper debouncing, you might get false readings - see why do we need to debounce for button for a detailed explanation. Think of debouncing as fine-tuning your Arduino's "ears" so it can clearly distinguish between intentional button presses and electrical noise.
Hardware Preparation
Or you can buy the following kits:
| 1 | × | DIYables Sensor Kit (18 sensors/displays) |
Additionally, some of these links are for products from our own brand, DIYables .
Wiring Diagram
Let's take a look at the wiring setup - don't worry, it's simpler than it looks! Understanding these connections is key to getting your button press detection working smoothly.
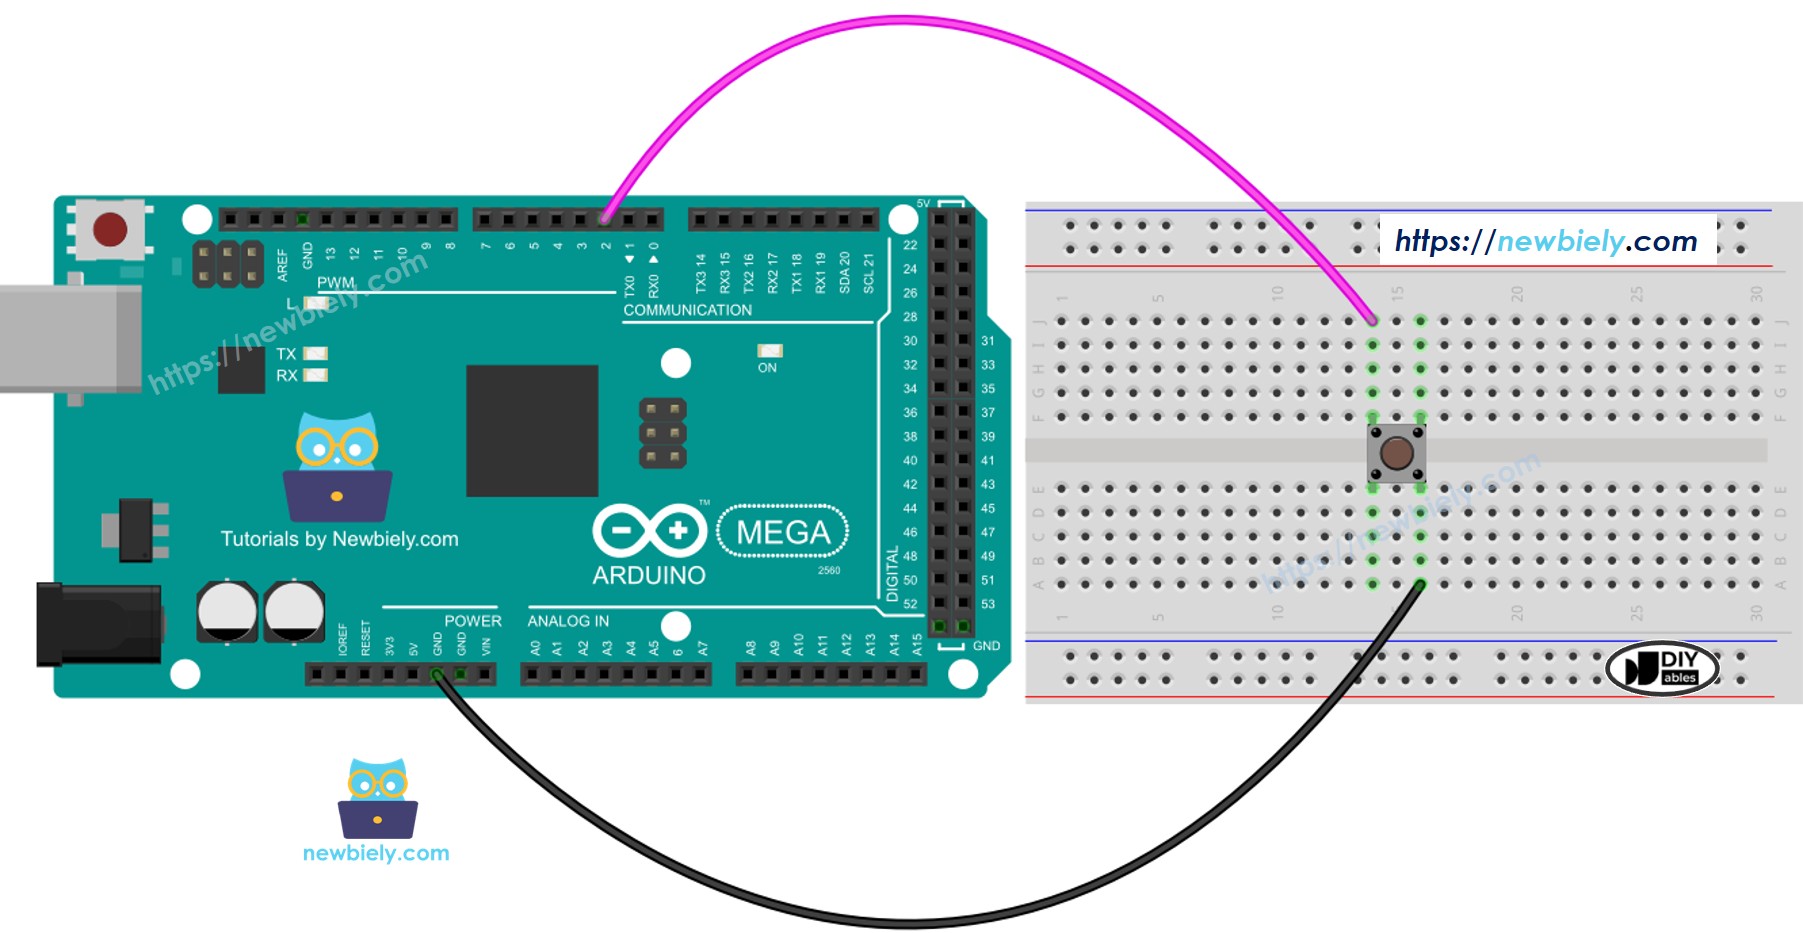
This image is created using Fritzing. Click to enlarge image
In this tutorial, we'll be using the Arduino Mega's internal pull-up resistor, which is a convenient built-in feature that saves you from needing external components. This means the button pin will read HIGH (5V) when the button is in its normal, unpressed state, and LOW (0V) when you press it down. Think of the internal pull-up resistor as gently "pulling" the pin to a HIGH state when nothing else is connected - it's like having a default setting that prevents the pin from floating in an undefined state.
| Button Pin | Arduino Mega Pin |
|---|---|
| One terminal | Digital Pin 2 |
| Other terminal | GND (Ground) |
Important Note: Using the internal pull-up resistor means your button logic will be inverted compared to what you might initially expect. Pressed = LOW, Released = HIGH. This is perfectly normal and actually the preferred method for button connections in most Arduino projects because it's more reliable and requires fewer components.
How To Detect Short Press
Now for the exciting part - let's bring your button to life with smart press detection! Don't worry if you're new to timing-based programming; we'll walk through this concept step by step, and I promise it's easier than you think.
The key principle behind short press detection is measuring time duration. We're essentially creating a stopwatch that starts when the button is pressed and stops when it's released. If that duration falls below our defined threshold (let's say 500 milliseconds), we know the user intended a quick, short press rather than a deliberate long hold.
Let's break down the detection process into manageable steps:
We measure the time duration between the pressed and released events using Arduino's built-in millis() function, which counts milliseconds since the program started. If the duration is shorter than our predefined time threshold, we've successfully detected a short press event. Think of it like measuring how long someone holds a handshake - a quick shake versus a lingering grip tells you different things about their intention!
Let's see the step-by-step implementation:
- Define the short press duration threshold - This sets the maximum time that qualifies as a "short" press:
- Detect when the button is first pressed and capture that moment in time:
- Detect when the button is released and record the release time:
- Calculate the total press duration by finding the difference:
- Determine if it's a short press by comparing duration with our threshold:
Arduino Code for detecting the short press
Detailed Instructions
New to Arduino? No worries! Start with our Arduino Getting Started guide to learn the basics first.
- Upload the Code: Copy the code above into your Arduino IDE and upload it to your Arduino Mega. Take your time with the upload process - there's no rush!
- Test Short Presses: Press the button quickly several times (less than half a second each). Try different speeds to get a feel for what qualifies as "short."
- Monitor the Results: Open your Serial Monitor (Tools → Serial Monitor) and watch for detection messages. You should see confirmations each time a short press is detected.
Pro Tip: Try experimenting with different SHORT_PRESS_TIME values to find what feels most natural for your specific project. Some applications might need quicker responses (200ms), while others might prefer slightly longer thresholds (800ms).
※ NOTE THAT:
The Serial Monitor may show several short press detections for one press. This is the normal behavior of buttons due to something called the "chattering phenomenon" - tiny electrical bounces that occur when metal contacts make and break connection. Don't worry about this for now; we'll solve this issue completely in the debouncing section at the end of this tutorial. Think of it as fine-tuning that we'll address once you understand the core concepts!
How To Detect Long Press
Long press detection opens up a whole new world of user interface possibilities! There are actually two distinct approaches we can take, each serving different purposes depending on your project's needs. Let me walk you through both methods so you can choose the one that best fits your creative vision.
Understanding the difference between these approaches is crucial for creating responsive user interfaces. The first method waits patiently until the user completely finishes their interaction (releases the button) before making any decisions. The second method is more proactive, detecting the long press while it's happening and responding immediately. Both have their place in different types of applications!
There are two practical use cases for detecting long press events:
- Detection after release: The long-press event is detected right after the button is released - perfect for confirmations and final actions
- Detection during pressing: The long-press event is detected while the button is still being held down - ideal for real-time feedback and continuous actions
In the first use case, we measure the complete time duration between the pressed and released events, similar to our short press method but with a longer threshold. If the total duration exceeds our defined time limit, we know the user intended a long press action.
In the second use case, we take a more dynamic approach. After the button is initially pressed, we continuously monitor the pressing duration in real-time, checking for the long-press condition repeatedly until the button is released. This allows us to respond immediately when the long-press threshold is reached, even while the user is still holding the button down. Think of it like a progress bar that triggers an action as soon as it fills up, rather than waiting for the user to let go.
Arduino Code for detecting long press when released
Detailed Instructions
Haven't used Arduino before? Take a quick look at our Arduino Getting Started guide to build your foundation.
- Upload and Test: Upload the code above to your Arduino Mega via Arduino IDE. This method requires patience - you need to hold the button for the full duration!
- Practice Long Presses: Press and hold the button for more than one second, then release it. Notice how the detection only happens after you let go.
- Observe the Timing: Check the Serial Monitor results. You'll see that the long-press event is only detected right after the button is released, not during the pressing.
Pro Tip: This method is perfect for actions that require confirmation, like "Are you sure you want to delete this?" scenarios. The user has to complete the entire long press gesture before anything happens.
The long-press event is only detected right after the button is released
Arduino Code for detecting long press during pressing
Detailed Instructions
First time working with Arduino? We recommend checking out our Arduino Getting Started guide - it'll help everything make sense!
- Upload and Experience: Upload this code and notice the immediate difference in responsiveness. The detection happens while you're still holding the button down!
- Test Real-time Detection: Press and hold the button for several seconds without releasing. You should see the detection message appear while your finger is still on the button.
- Feel the Difference: This approach provides instant feedback, making your projects feel more responsive and professional.
Pro Tip: This method is excellent for actions like "hold to power off" or "press and hold to enter setup mode" where immediate feedback reassures the user that something is happening.
The long-press event is detected immediately when the threshold is reached, even while the button is still being pressed
How To Detect Both Long Press and Short Press
Now we're getting to the really exciting stuff! Combining both long and short press detection transforms a simple button into a sophisticated user interface element. This is where your projects start feeling like professional devices with intuitive, multi-functional controls.
The beauty of dual detection lies in maximizing functionality while minimizing hardware. Instead of needing multiple buttons for different actions, a single button can handle two distinct functions based on user intention. Short press for quick actions, long press for more deliberate or critical functions - just like the power button on your smartphone or the controls on modern appliances!
Short Press and Long Press after released
This approach waits until the button interaction is completely finished before making any decisions. It's like letting someone finish their sentence before responding - very polite and deliberate!
Detailed Instructions
- Upload and Experiment: Upload the code above to your Arduino Mega and start experimenting with different press durations. Try quick taps and longer holds to see how the system distinguishes between them.
- Test Both Types: Practice both long and short presses to get a feel for the timing. Notice how the system waits until you release the button before deciding what type of press it was.
- Monitor Dual Detection: Watch the Serial Monitor to see how your Arduino Mega intelligently categorizes each button interaction.
Pro Tip: This method is perfect for applications where you want to avoid accidental triggering. Since nothing happens until the button is released, users can change their mind mid-press!
※ NOTE THAT:
The Serial Monitor may show several short press detections during long press attempts. This is the normal behavior of buttons due to the "chattering phenomenon" - tiny electrical bounces that occur in the button's mechanical contacts. Don't worry! This is completely normal and expected. We'll solve this issue completely in the debouncing section coming up next, where we'll implement professional-grade button handling.
Short Press and Long Press During pressing
This dynamic approach provides instant feedback the moment a long press threshold is reached, while still detecting short presses when the button is released quickly. It's like having the best of both worlds!
Detailed Instructions
- Experience Real-time Response: Upload this code and feel the difference in responsiveness. Long presses are detected immediately while short presses are caught when released.
- Practice the Timing: Try various press durations to understand how the system responds. You'll notice long press feedback happens instantly, while short press feedback waits for release.
- Appreciate the Sophistication: This approach creates a very professional user experience with immediate visual or audio feedback for long presses.
Pro Tip: This method is excellent for projects where long press actions need immediate confirmation or feedback, like "hold to activate" scenarios where users need to know their command is being processed.
※ NOTE THAT:
You might notice some extra short press detections during long press operations. This is completely normal button behavior called the "chattering phenomenon". Think of it as the button's mechanical contacts bouncing slightly when they make or break connection. The good news? We're about to fix this completely with professional debouncing techniques in the next section!
Long Press and Short Press with Debouncing
Here's where we transform your button handling from educational examples into professional, production-ready code! Debouncing is absolutely crucial for real-world applications - it's the difference between a hobby project and a reliable, commercial-grade device.
Button debouncing might sound complicated, but think of it as teaching your Arduino to "listen carefully" instead of reacting to every tiny electrical noise. When you press a physical button, the metal contacts don't make a perfect, clean connection immediately. Instead, they "bounce" - making and breaking contact rapidly for a few milliseconds. Without debouncing, your Arduino might interpret one button press as multiple presses, leading to frustrating and unpredictable behavior.
The great news is that debouncing doesn't have to be overwhelming, especially when using multiple buttons or complex timing scenarios. To make this much easier for beginners (and experienced developers too!), we'll use a fantastic library called ezButton. This library handles all the complicated timing and state management behind the scenes, letting you focus on building amazing projects rather than wrestling with low-level button mechanics.
Think of the ezButton library as your skilled assistant that perfectly interprets every button press, filtering out the electrical noise and delivering only the clean, intentional user interactions you actually want to respond to. It's like having a professional translator who ensures nothing gets lost in communication!
Short Press and Long Press with debouncing after released
This implementation provides rock-solid reliability by waiting for complete user interaction before making decisions, combined with professional-grade debouncing for perfect accuracy every time.
Detailed Instructions
- Install the ezButton Library: First, install the ezButton library in your Arduino IDE. See the detailed How To Install Guide if you need help with library installation - don't worry, it's straightforward!
- Upload and Test Reliability: Upload the code above and immediately notice the difference! No more false detections or erratic behavior - every button press is interpreted exactly as you intended.
- Experience Professional Quality: Try rapid presses, gentle touches, and firm holds. The debounced version handles everything smoothly and predictably.
Pro Tip: Once you experience debounced button handling, you'll never want to go back to basic detection methods. This is the foundation of professional Arduino project development!
Short Press and Long Press with debouncing During Pressing
This advanced implementation combines real-time long press detection with bulletproof debouncing, creating the most responsive and reliable button interface possible.
Detailed Instructions
- Ensure Library Installation: Make sure you have the ezButton library installed. Check the installation guide if needed - you've got this!
- Upload and Feel the Difference: Upload this code and experience the ultimate in button responsiveness. Long presses provide immediate feedback while maintaining perfect accuracy.
- Test Extensively: Try all sorts of button interactions - quick taps, long holds, varying pressure. Everything works flawlessly now!
Pro Tip: This is the gold standard for interactive Arduino projects. Use this approach when you want maximum responsiveness combined with professional reliability. Your users will notice the difference!
Why Needs Long Press and Short Press
Understanding the practical applications of dual press detection will inspire you to incorporate this powerful technique into your own creative projects! The ability to distinguish between short and long presses isn't just a cool programming trick - it's a fundamental user interface principle that makes devices more intuitive, efficient, and safe to use.
Maximizing Functionality with Minimal Hardware: One of the biggest advantages is conservation of resources and space. A single button can elegantly handle two or more completely different functions, reducing both component costs and the physical space required for your project. This is especially valuable in compact projects where every millimeter counts, or when you want to keep your user interface clean and uncluttered. Instead of having multiple buttons cluttering your project enclosure, one well-programmed button can do the work of several.
Preventing Accidental Actions: Long press detection is incredibly valuable for implementing safety mechanisms and preventing unintended operations. Critical functions like factory resets, data deletion, or system shutdowns can be protected behind long press requirements (typically 3-5 seconds or more). This prevents the frustrating and potentially damaging scenario where someone accidentally brushes against a button and triggers a major system change. Think about how many devices use long press for power-off functionality - it's a proven, user-friendly safety pattern.
Creating Intuitive User Experiences: Users instinctively understand the concept of "quick tap" versus "deliberate hold" interactions. This natural behavior mapping makes your projects immediately intuitive to use without requiring instruction manuals or training. Short presses feel natural for cycling through options, changing modes, or performing quick actions, while long presses feel appropriate for more significant or final actions.
Professional Application Examples:
- Smart Home Controllers: Short press to cycle through lighting scenes, long press to turn all lights off or enter programming mode
- Digital Clocks and Timers: Short press to change display modes or start/stop timers, long press to enter time-setting mode
- Security Systems: Short press for status check, long press (with confirmation) to arm/disarm the system
- IoT Devices: Short press for immediate status update, long press to initiate WiFi reconnection or enter configuration mode
- Battery-Powered Projects: Short press for normal operation, long press to enter low-power sleep mode or complete shutdown
Challenge Yourself: Ready to take your button mastery to the next level? Try these progressively challenging projects:
Easy Challenges:
- Customize the Timing: Experiment with different short/long press thresholds to find what feels most natural for your specific application
- Add Visual Feedback: Connect an LED that blinks differently for short versus long presses, providing immediate user confirmation
- Create a Simple Counter: Build a counter that increments on short press and resets on long press
Medium Challenges:
- Multi-Function LED Controller: Create a system where short press cycles through different LED patterns, and long press adjusts brightness levels
- Smart Alarm Clock: Implement short press for snooze functionality and long press for complete alarm shutoff
- Temperature Display: Short press to switch between Celsius and Fahrenheit, long press to calibrate or enter setup mode
Advanced Challenges:
- Triple Press Detection: Extend the concept to detect short, medium, and long presses for three different functions
- Combination Lock: Create a security system that requires a specific sequence of short and long presses to unlock
- Smart Thermostat Interface: Build a complete climate control interface using only button combinations and an LCD display
Don't worry if some of these challenges seem complex right now - that's how we grow as makers and programmers! Start with the easier modifications and work your way up. Each challenge will teach you something new and build your confidence for the next level. The beautiful thing about Arduino programming is that every small experiment leads to bigger, more exciting possibilities!
Application Ideas: Now that you've mastered both short and long press detection, your creativity is the only limit! Here are some inspiring project concepts to get your imagination flowing: You could create a smart doorbell system where short presses play different chimes and long presses activate intercom mode, build a pet feeder where short presses dispense small treats and long presses trigger full meal portions, set up a garden irrigation controller where short presses manually water individual zones and long presses start automatic watering cycles, or even design a home security system where short presses check sensor status and long presses arm the entire system. What innovative solution will you build first?
Video Section
Watch our comprehensive video tutorial for a visual walkthrough of this button press detection project! The video provides additional insights into troubleshooting common issues, demonstrates real-time button behavior, and shows practical wiring techniques that complement the written tutorial perfectly.